
Salvation
 1.1 Loot the Rig 1.2 Secure Machinery 2.1 Secure Research 2.3 Gain Vantage 3.1 Drain Power 3.2 Secure Rig 3.3 Operate Facility
Books
| Book | Kind | Edition | Version | Last update |
| | ||||
| | Expansion | 2 | December 2023 | |
| | ||||
| | Rulebook | 2 | Q2 2024 | June 2024 |
Critical Operations: Salvation Mission Pack
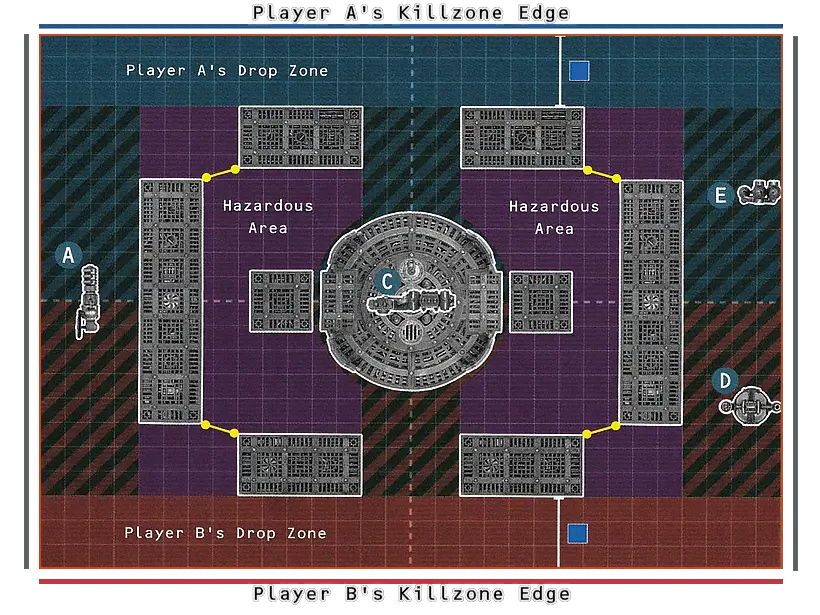
The missions use Killzone: Bheta-Decima and Killzone: Salvation to supplement it. The location of terrain features are specified. Use the mission map to help you determine the location of terrain features, ensuring they align with key points on the map such as drop zones, hazardous areas and the grid overlay.
To randomly determine a Critical Operations: Salvation mission, one player rolls one D3 to determine one of the tables below, then the other player rolls one D3 to determine the mission from that table.
Leap of Faith
Operatives cross the gap between different gantries (i.e. ones that aren’t connected) by jumping (see the Kill Team Core Book). Yellow lines on the mission map indicate the terrain features where operatives can do this to and from. When setting up the killzone, ensure the related gantries are the right distance from one another (about ) so operatives can jump.Mission Map Key
|


|
| ||||||||||
| ||||||||||
| ||||||||||
Loot the Rig
Much of the myriad machinery that make up rig apparatus can be salvaged from the structure by a kill team, who can repurpose the materials for their own ends or trade them for much needed supplies.
LOOT1AP
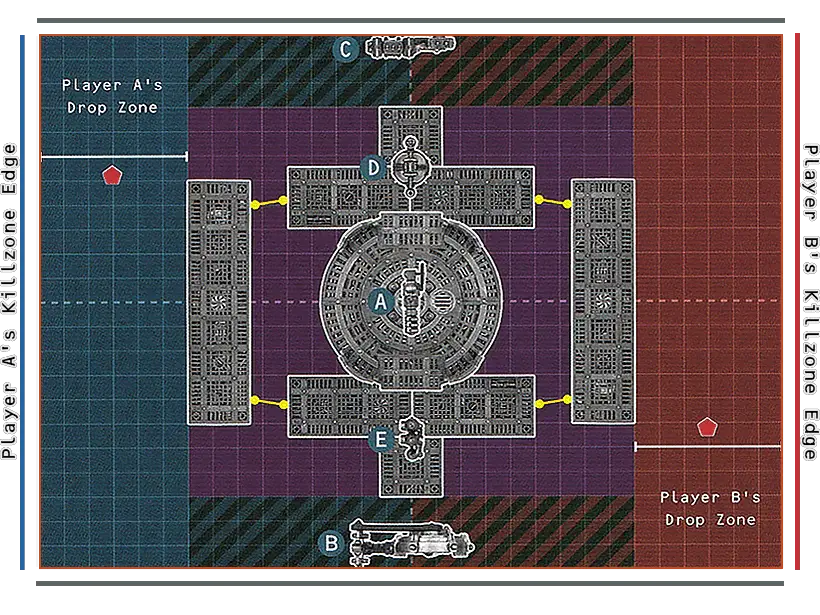
Secure Machinery
Every piece of apparatus within the rig complex can yield some advantage to opportunistic and resourceful kill teams. Even should a force have no desire to utilise one element, denying the foe of it is a victory in itself.
SECURE1AP
Capture Highpoint
This facility offers a commanding vantage point over the wider area, as well as safety from the frothing, dangerous waves of the ocean below. As such, it is prime territory for all manner of kill teams.
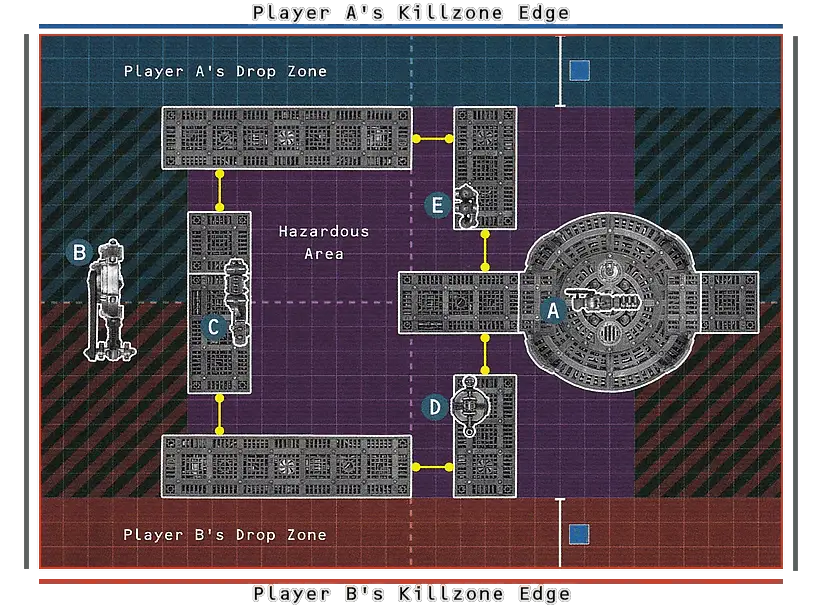
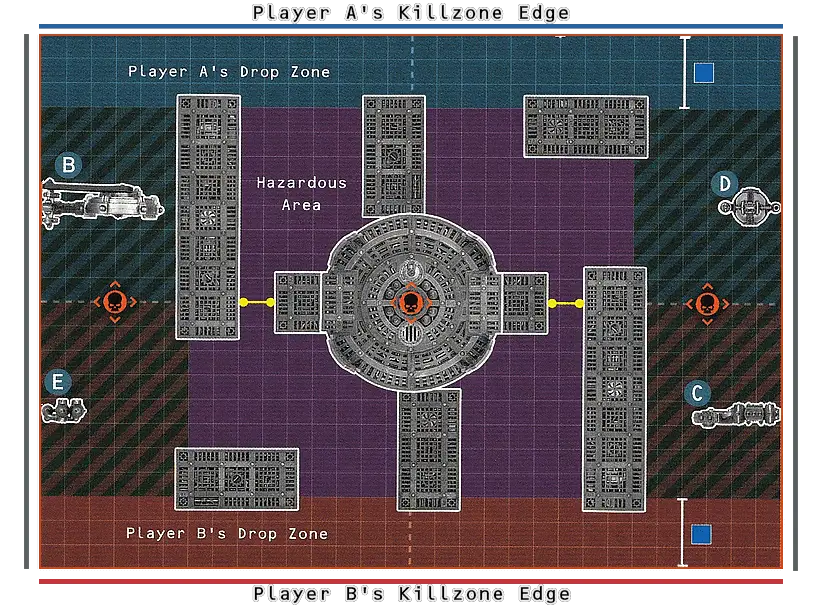
Secure Research
Many Tech-Magi of the Adeptus Mechanicus established their own research posts amidst large rig-complexes on Bheta-Decima. As the planet falls apart, many such posts lie open — abandoned or already stormed. Those as yet untouched are likely to house rare artefacts or priceless information.
- For each rig apparatus terrain feature friendly operatives control, you score 1VP.
- For each Alpha objective marker friendly operatives control, you score 2VPs.
Extract and Control
Weapons, relics and strange devices have been thrown into the depths of Bheta-Decima’s warp-corrupted oceans as rigs having been ripped from their anchor points and cast into the roiling waves. The most daring kill teams move to discover these objects and raise them to the surface for retrieval.
OPERATE APPARATUS1AP


Resource Extraction: Keep track of extraction points for the battle (we recommend a dice). Each time an operative performs the Operate Apparatus action, add 1 to the extraction points.
At the end of the battle, if friendly operatives control the Alpha objective marker, you score a number of victory points equal to the number of extraction points (to a maximum of 6VPs per player).

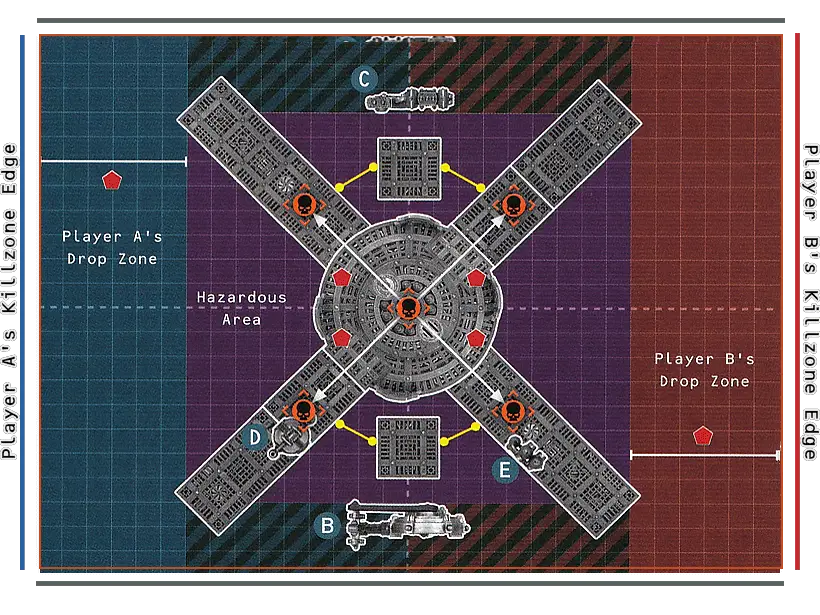
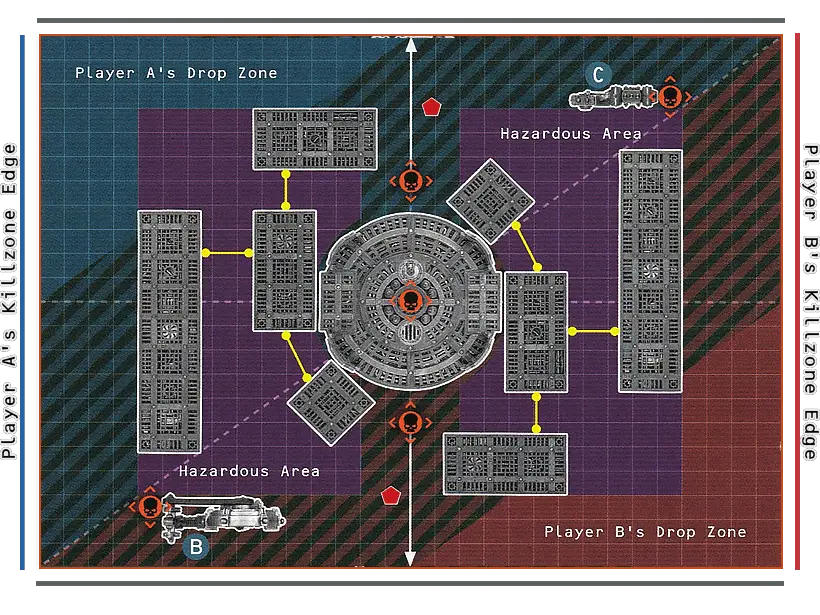
Gain Vantage
The area is surrounded by thick mist and ravaged by raging storms. Navigating through the Labyrinthine Adeptus Mechanicus structures is all but impossible in such conditions. By seizing high ground, kill teams may be able to see what structures lie ahead and discover a route through them.
GAIN VANTAGE1AP
REMOVE VANTAGE1AP

- For each of your Vantage tokens in the killzone, you score 2VPs.
- If friendly operatives control the Reciprocating Engine terrain feature, you score 2VPs.
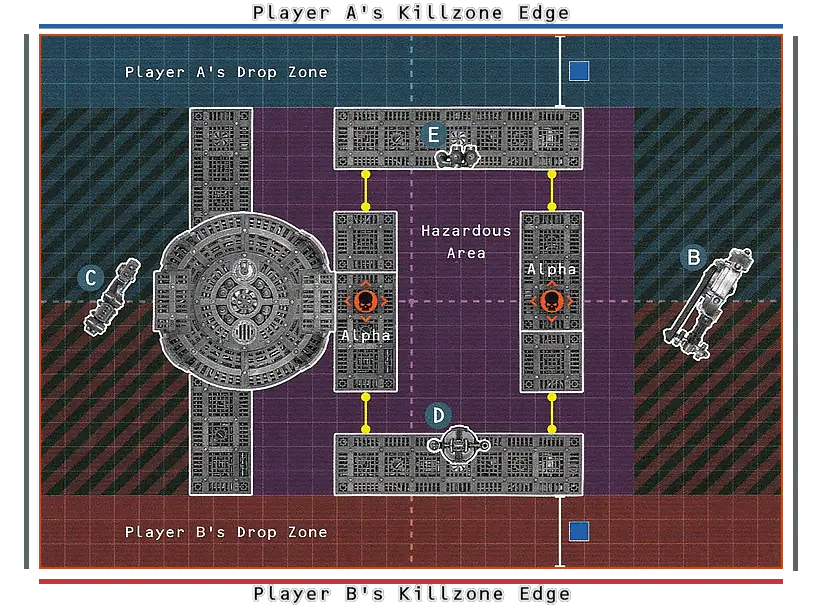
Drain Power
Flickers of power surge intermittently through this facility. Kill teams who secure the station’s external connection points take what energy they can for themselves, to aid their continuing operations.
Capture: At the end of each Turning Point (before determining victory points), each objective marker friendly operatives control is captured by your kill team. While an objective marker is captured by your kill team, it stays under their control, even if no friendly operatives are within of it. If any enemy operatives control that objective marker following the normal rules for controlling objective markers, it is no longer captured by your kill team.
- For each non-Alpha objective marker captured by your kill team, you score 1VP.
- For each Alpha objective marker captured by your kill team, you score 3VPs.
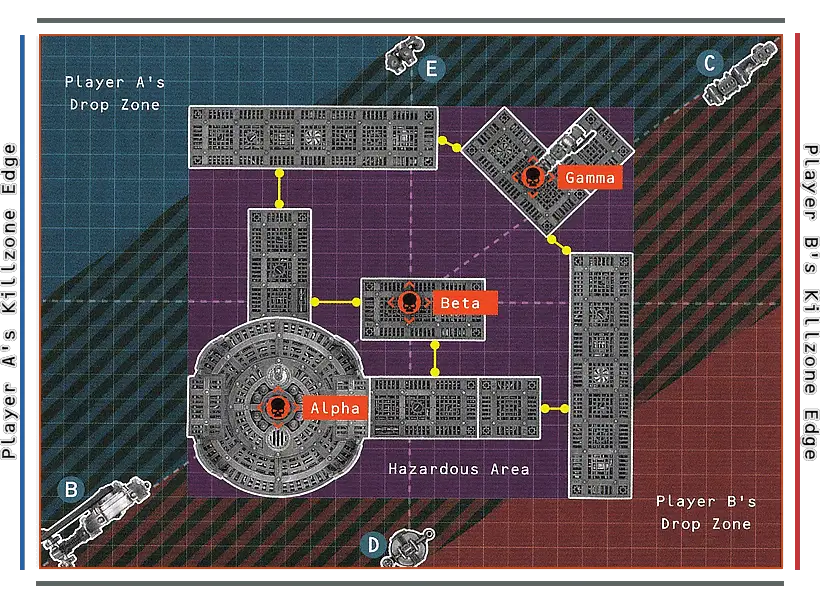
Secure Rig
Kill teams have discovered an operational rig facility. The rig is stable, strong, defensible and holding up well to the area’s relentless storms and hungering macro-fauna. It is an ideal location to use as a base, once secured.
SECURE1AP
Operate Facility
Dormant, this facility was swiftly abandoned after the Gallowdark’s wreckage crashed into Bheta-Decima. Largely untouched, stockpiles of resources, weapons and other materiel lie within. By operating the facility machinery, kill teams can gain access to the potential treasure troves inside.
OPERATE APPARATUS1AP
Bheta-Decima Infiltration
Bheta-Decima is falling apart. Anarchy reigns as Tech-Priests flee the planet in droves and aliens, heretics, mutants and beasts rampage all over the planet’s warp-polluted and wreckage-riven surface. Amidst the rampant disorder, there is still much to be gained for those with the sheer will and ferocity to fight. Many kill teams stalk the shattered landscape, hunting targets for assassination, stealing secrets, kidnapping persons of importance and recovering precious artefacts, all while navigating their way through the perils that abound across Bheta-Decima.
A Bheta-Decima infiltration is a map-based campaign system used alongside your games of Kill Team. Players will need to play games of Kill Team and secure intel while avoiding the planet’s many hazards.Preparation
This campaign is designed to be used alongside a narrative play Spec Ops campaign. Players can participate with their kill team instead of conducting a Spec Op (they should make a note of ‘Bheta-Decima infiltration’ in the Spec Ops log of their dataslate). If their kill team is currently assigned to a Spec Op, they must abort it to participate in this campaign. This campaign is considered a Spec Op for the purposes of faction Spec Ops rules.In matched play, this campaign can instead be used to provide an additional layer of interactivity between games. Just be clear which type of play you are using, as it’s best if all players use the same way to play during the campaign.
A Bheta-Decima infiltration is best run with a Campaign Master. This is a heroic individual who takes on the mobilisation and organisation of the campaign so the other players can focus on playing games. A Campaign Master is a privileged position that offers a degree of leadership to the individual who takes on the role. Its primary purpose is to facilitate a smooth and enjoyable experience for all players involved. A Campaign Master can indeed play in the campaign themselves. Below we will specify optional guidance for the Campaign Master in this italicised format.
The Campaign Master should gather together a group of 3-6 players (ideally an even number, but there’s some guidance in the Battle phase for playing with an odd number). Each player should commit to playing six games, and everyone should aim to play an equal number of games to provide an equal chance of achieving victory.
The Campaign Master should then think about how regularly the group will play. The campaign could be played over an epic weekend of gaming, it could be split over six weeks (one campaign round per week), or any other format that suits the group. The Campaign Master should chat to the players to organise a suitable schedule and ensure each player can commit to the requirements of the campaign.
Setting Up
A Bheta-Decima infiltration requires a campaign map:
An experienced Campaign Master can create their own map to suit their narrative setting, be that digital or drawn etc.
Important information is recorded on the map using removable tokens. The Campaign Master should make sure the map is accurate and up to date, and that players are informed of all token locations. You will need tokens for the following:
Progress Tokens
Each player needs a unique Progress token to mark where their kill team is on the campaign map. Tac Ops tokens (shown below) can be used, just make sure each player has a different one.
Intel Tokens

The amount, location and type of Intel tokens depends on the number of players in the campaign, as specified in the table below.
The Campaign Master is free to change the amount, location and type of Intel tokens, particularly in subsequent campaigns. This will encourage players to explore different locations. Just make sure they are fairly spread across the map so they don’t favour a particular starting location too heavily.
| |||||||||||||||||||||||||||||||||||||||||||||||||||||||||||||||||||||||||||||||||||||||||||||||||||||||||||||||||||||||||||||||||||||||
Hazard Tokens
The players will place Hazard tokens on the map as the campaign progresses. They indicate hazard effects for kill teams in that location, and also slow teams down. They are needed in two colours. Activation tokens (shown below) can be used, with the grey and orange sides showing the two different stages of the hazard.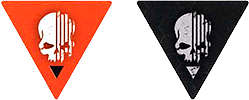
You can create your own tokens, especially Progress tokens, perhaps by painting them in their respective kill team’s colours and/or using transfers (decals) to brand them. In either case, reusable tack adhesive can fix tokens to the campaign map. Alternatively, if you attach a copy of the map to a foam or cork board, you can use flags instead of tokens. These can be made with toothpicks and labels.
Once all the resources have been gathered, each player rolls one D6. The player with the highest result is first, the player with the second highest result is second, and so on (if two or more players have a tied result, those players keep rolling until an order is established between them). Starting with the first player and proceeding down the order, each player should place their Progress token in a location marked with a that no other Progress token is in. Choose wisely, as it will determine the starting route a player’s kill team will take on the map, and what objectives they can more easily reach.
Campaign Rounds
A Bheta-Decima infiltration consists of six campaign rounds. Each campaign round involves the following phases:
|

|

Movement Phase
- Each player secretly makes note of a location to move their kill team to (e.g. E5, G9, etc.). This can be an adjacent location; or it can be two locations away if neither the intended location nor an adjacent location used to get there contains a Hazard token.
- All players reveal their locations simultaneously and move their Progress tokens to that location. If they can’t move there (i.e. if they’ve made a mistake counting locations), they move it as close as possible to that location.
If the players aren’t together during the Movement phase, they can instead let the Campaign Master know their intended locations. The Campaign Master then reveals it, moves the tokens and informs the players of each kill team’s new location.

In this example, the Progress token could move into any of the green locations, but none of the orange locations. It could move into the adjacent location with the Hazard token, but could not move through it.

Battle Phase
- The players now play a game of Kill Team each. Players with Progress tokens in the same location should play each other (if it’s three or four players, this can be a multiplayer battle). Otherwise, each player can play any other player, regardless of the distance between their Progress tokens - imagine kill teams raiding various locations of the map as appropriate.
The Campaign Master can organise the Battle phase to ensure each player gets a game, and they can even specify missions to tell a particular narrative. Similarly, they can let the players arrange games themselves, allowing the campaign to progress naturally with plenty of friendly rivalries to go with it. When preparing the campaign, they should have a chat with the players beforehand to determine which is the most appropriate way of organising this phase for the group. - The winner of each game gains 1 Intel point. Keep track of how many Intel points each player has, as this will determine the overall winner of the campaign.
If a player doesn’t have a game in the Battle phase, e.g. if the campaign has an odd number of players, one player will have to play an additional game in the Battle phase. When this happens, the player playing twice can only gain a maximum of 1 Intel point in the phase, even if they win both games.

Action Phase
- Each player secretly makes note of a campaign action they wish to do from those presented below.
- All players reveal their campaign actions and resolve them simultaneously.SECURE INTELIf your kill team is in a location with an Intel token, and no other kill teams are in that location, you can secure intel. Remove the Intel token and you gain 1 Intel point for a blue token or 2 Intel points for a red token.CAPTURE INTELIf your kill team is in a location with an Intel token, and other kill teams are also in that location, you can capture intel if you won a game against them in the preceding Battle phase. Remove the Intel token and you gain 1 Intel point for a blue token or 2 Intel points for a red token.STEAL INTELIf your kill team is in a location with other kill teams, you can steal intel from one of them if you played a game against that kill team in the preceding Battle phase and scored 2VPs from the Recover Item Tac Op (see the Critical Ops Card Pack 2022) or Retrieval Tac Op (see the Kill Team Core Book) in that game. Steal 1 Intel point from that player. You cannot steal any they gained in this campaign round. Note that Tac Ops are not used in multiplayer games, so you cannot perform this campaign action after a multiplayer game.SCOUT AHEADMove your kill team to an adjacent location. You cannot move them out of or into a location that contains a Hazard token.PREPAREAt the start of your next game, add 1CP to your pool.
The validity of an action is determined when it is revealed, before any actions are resolved. For example, if two teams are in the same location and one player selects the Scout Ahead action while the other selects the Secure Intel action, then the Scout Ahead action can be resolved but the Secure Intel action cannot, as another kill team is in that location at the time of reveal.

Hazard Phase
- Apply the hazard effect to each player whose kill team is in a location with a hazard token. If it’s the first time a hazard effect would be applied for that location during the campaign, the Campaign Master rolls one D6, consults the table below and makes a note of the result for that location (e.g. E8 - Riot). If that location already has a hazard effect determined for it, apply the same effect again.
The table below has effects for both narrative play and matched play. The Campaign Master is free to decide which to use, or for a more challenging campaign they can use both!D6 Hazard Narrative Play Effect Matched Play Effect 1 Predator Bheta-Decima’s surface is rife with beasts unleashed from the Gallowdark’s wreckage, mutated by the terrible effects of the warp and seeking unsuspecting prey.
Select D3 operatives on your dataslate. They each gain 1 Battle Scar. Select D3 operatives on your roster. They cannot be selected for deployment in your next game of the campaign (this can mean you play with less operatives than normal). 2 Industrial Accident Promethium explosions, collapsing gantries and failing power all take their toll on the kill team’s network of support systems.
Remove one strategic asset from your dataslate. You cannot add it again during this campaign. If you don’t have a strategic asset on your dataslate, you don’t suffer the effect of this hazard this time. In the Select a Kill Team step of the next game of the campaign, you don’t add any Command points to your pool (you still gain them by other means, i.e. one in each Strategy phase). 3 Riot As anarchy spreads over Bheta-Decima, the strict enforcement of law and order has collapsed. The ransacking of vital supplies is now the aim of ruthless and desperate souls in their efforts to stay alive.
You must roll two D6 and remove equipment from your stash with a combined equipment points total equal to or greater than the total result of both dice. If you don’t have enough equipment, remove as much as you can. You must roll two D6. In the next game of the campaign, subtract the total result from the points worth of equipment you can select for the battle. 4 Marauders Kill teams must expend much effort to avoid the rampaging warbands of xenos, Beastmen, mutants and heretics across Bheta-Decima.
You lose 1RP. If you don’t have any, then you don’t gain one for completing your next game of the campaign. You either cannot use Strategic Ploys or you cannot use Tactical Ploys (your choice) in the next game of the campaign. 5 Falling Debris Wreckage continually breaks off the remains of the Gallowdark In Bheta-Decima’s orbit, resulting in a continuous rain of warp-corrupted debris. This can severely hamper a kill team’s movements, or stop them dead.
In the next Movement phase of the campaign, your kill team can move no more than one location away from their current location. In your next game of the campaign, you never have the initiative; in a multiplayer game, you cannot be of a higher player order than players who don’t have this hazard effect. If all players in that game have this hazard effect, it has no effect on that game. 6 Hazard Avoided The kill team use guile and stealth to successfully navigate around the hazard.
No effect. No effect. - Remove all orange Hazard tokens from the campaign map.
- Change all grey Hazard tokens to orange.
- Three grey Hazard tokens are placed in locations on the map, and the Campaign Master records where they are. They cannot be placed in locations that currently contain or previously contained a Hazard token. In a three player campaign, each player places one token. In a campaign with more than three players, the three players with the least amount of Intel points place one token each (if there are any ties, randomise who places tokens between the tied players). When the relevant players are placing Hazard tokens, the player with the most Intel points places first (again, randomising between the tied players if there are any).
If the Campaign Master is using a copy of the campaign map, they can mark locations that gain a Hazard token so that, even when they’re removed, the players know which locations previously contained one. If the Campaign Master is using the campaign map in the book, they can make a separate note of which locations gain a Hazard token.
Ending the Campaign
At the end of the sixth campaign round, the campaign comes to an end. Rank players based on the number of Intel points they have. If players are tied, the highest number of games won is the tiebreaker. If that is still a tie, the subsequently tied players share their rank. Players then select a number of commendations determined by both their rank and the number of players in the campaign:
| ||||||||||||||||||||||||||||||||||||||||
Players select commendations from the list below. If they can select more than one, they cannot select one they’ve already selected.
- Gain one Requisition point.
- Add one item of rare equipment to your stash.
- Increase your asset capacity by one.
- Distribute up to 5XP across the operatives on your dataslate.
- Remove up to one Battle Scar from each friendly operative.
Killzone: Bheta-Decima
Killzone: Bheta-Decima is a killzone played on an area that uses the Hazardous Areas rules. Hazardous areas are on the gameboard and restrict movement and Line of Sight, so operatives must climb gantries and jump across them to get better positions on tightly contested Vantage Points.
Killzone: Bheta-Decima consists of the following terrain features, with their traits detailed below:- 2 long gantries
- 4 medium gantries
- 2 short gantries
- 1 ferratonic furnace
Gantries
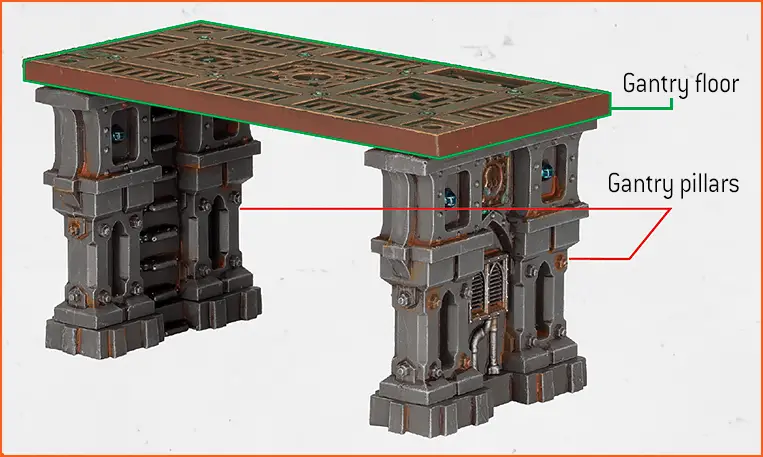
- Gantry floors have the Accessible, Ledges and Vantage Point traits.
- Gantry pillars have the Heavy trait.
- Gantries come in three sizes: long, medium and short. When they are connected (i.e. their floors are touching each other), they are treated as one terrain feature.
Ledges: An operative can begin a climb up to this Vantage Point if any part of its base is within horizontally and any distance vertically of this Vantage Point (i.e. it doesn’t need to be within of a climbable part like a gantry pillar).
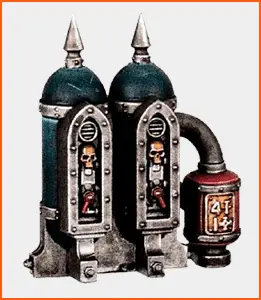
Ferratonic Furnace
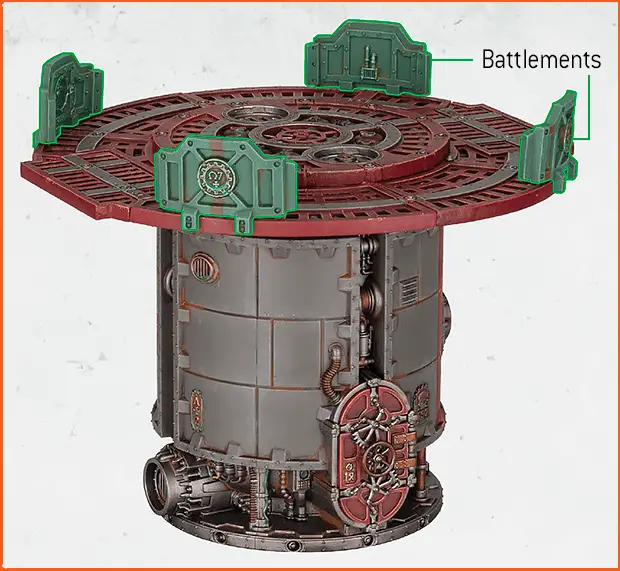
Designer’s Note: Ignore the slight difference in height between the outer and inner area of the roof.
- The roof of a ferratonic furnace has the Accessible and Vantage Point traits.
- The roof also has the Ledges trait, except an operative must be on a gantry floor to begin a climb up to this Vantage Point using the Ledges trait (i.e. an operative cannot climb up from the killzone floor using the Ledges trait, it must climb the ferratonic furnace instead).
- The battlements on the roof have the Light and Traversable traits. Note that the battlements don’t have the Accessible trait, so operatives can’t move vertically through them.
- All other parts of a ferratonic furnace have the Heavy and Scalable traits.
Designer’s Note: This means an operative looking to climb onto the ferratonic furnace’s roof from the killzone floor will travel vertically 2, instead of the usual 3. If they are climbing from a gantry floor, they will travel vertically , instead of the usual 2.
Killzone: Salvation
Killzone: Salvation is a supplement to Killzone: Bheta-Decima. It is an environment that contains various rig apparatus that operate the extraction-rig. These provide Cover and can be Obscuring, but in many cases, they must be controlled to achieve mission objectives.
Rig Apparatus
Rig apparatus are further categorised below with specified traits.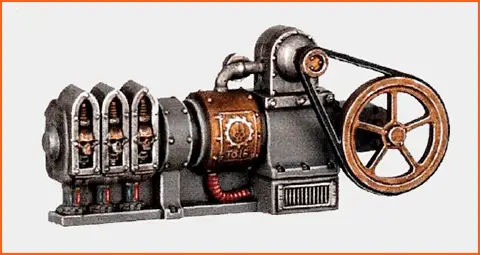
Rotary Converter
Heavy and Traversable.Mission map icon:
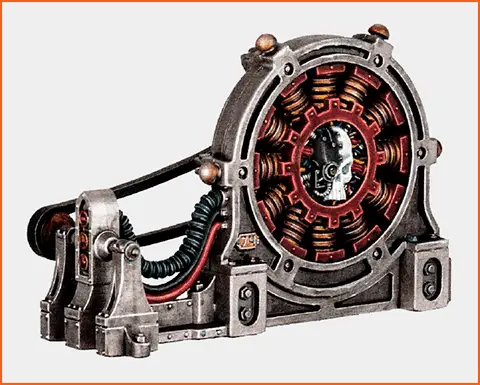
Barospheric Inducer
Heavy and Traversable.Mission map icon:

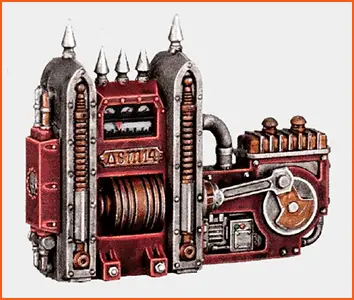
Thermovents
Heavy and Traversable.Mission map icon:

Hazardous Areas
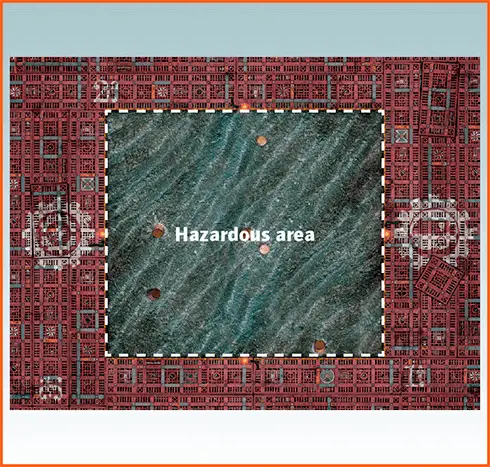
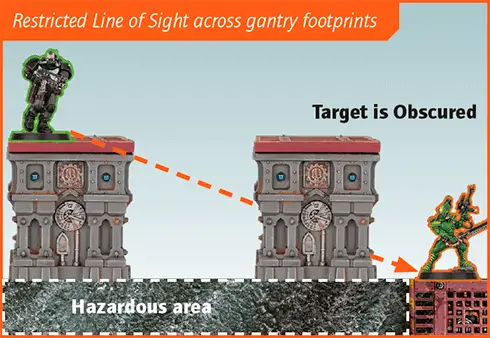
Hazardous areas restrict movement as strong currents and toxic water prevent operatives from entering into the ocean, and lurking predators stop them from venturing too close. Hazardous areas also restrict Line of Sight as relentless waves, sea mist and industrial smog make it harder for operatives to see targets over the ocean’s surface.
Restricted Movement: No part of an operative’s base can be touching a hazardous area. Operatives with the FLY keyword can touch a hazardous area when moving (they can combine valid move actions to do so, e.g. Dash and Normal Move), but no part of their base can start or finish the move touching a hazardous area.
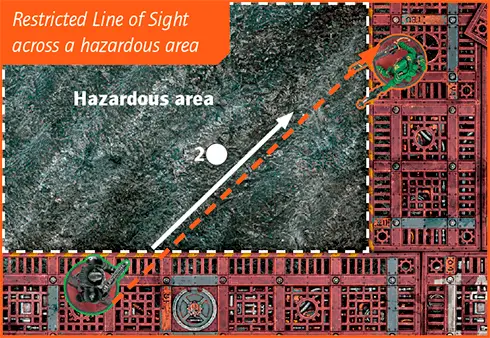
Restricted Line of Sight: When determining Line of Sight from an active operative on the killzone floor to a target operative on the killzone floor, the target operative is not Visible if a Cover line drawn to it crosses horizontally over 2 of a hazardous area.
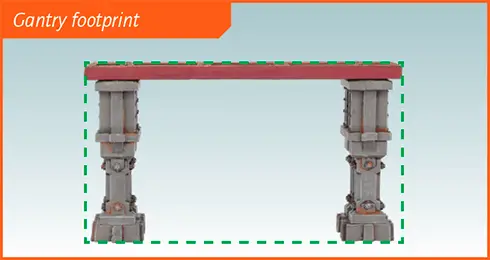
When determining Line of Sight from an active operative on a Vantage Point to a target operative on the killzone floor, or vice versa, the target operative is not Visible if a Cover line drawn to it crosses into and out of the footprint of a gantry. However, ignore the footprint of gantries the active operative or the target operative are on.
Note that when determining Line of Sight from an active operative on a Vantage Point to a target operative on a Vantage Point, the hazardous area’s restricted Line of Sight has no effect.
Tactical Ploys that allow one or more operatives to be set up outside of your drop zone, e.g. Sneaky Git, KOMMANDO and Dimensional Translocation, HIEROTEK CIRCLE. Such operatives must be set up wholly within 2 of your drop zone.
When setting up barricades, you can set them up on Vantage Points. When measuring to areas of the killzone (including the centre), measure distance horizontally
- Universal actions can be performed by all operatives. They are detailed below.
- Unique actions are actions detailed on an operative’s datacard that only they can perform, such as the Dakka Dash action found on the example datacard.
- Mission actions are specific to the mission you are playing, and will be detailed by that mission’s briefing. Missions can be found here (Open Play mission) and here (Spec Ops Narrative missions).
- Free actions can only be performed when another rule specifies. Each time an operative would perform a free action, the following rules apply.
- The operative can perform the action, so long as the requirements of the action are met.
- The player does not subtract any additional AP to perform the action.
- The operative would still count as performing the action for all rules purposes. For example, if it performed it during its activation, it would not be able to perform the action again during that activation.
For example, when a KOMMANDO DAKKA BOY performs a Dakka Dash action (see unique actions, above), it can perform a free Dash and free Shoot action without subtracting any additional AP (other than the AP spent on the Dakka Dash action). However, it is subject to those actions’ requirements, therefore it cannot perform the free Dash action if it is within Engagement Range of enemy operatives, and cannot perform the free Shoot action if it is within Engagement Range of enemy operatives or has a Conceal order. In addition, for each of the free actions it performs, it cannot perform them again during its activation.
- At the end of the battle, if a friendly operative controls your Retrieval token, you score 1VP.
- At the end of the battle, if your Retrieval token is being carried by a friendly operative, you score 1VP.
- The intended target is more than from the active operative.
- The intended target is within of a point at which a Cover line crosses another operative’s base (unless that other operative is not itself in the active operative’s LoS), or a terrain feature that provides Cover (see Terrain Traits).
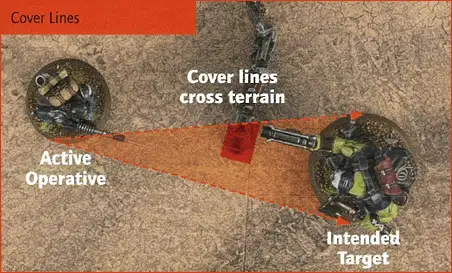
- The intended target is more than from a point at which a Cover line crosses a terrain feature that is Obscuring (see Terrain Traits). However, if the active operative is within of a point at which a Cover line crosses a terrain feature that is Obscuring, that part of the terrain feature is not treated as Obscuring.
- You can draw an imaginary, unobstructed straight line (known as a Visibility line) 1 mm wide from the head of the active operative’s miniature to any part of the miniature of the intended target (not its base).
1.1 Loot the Rig 1.2 Secure Machinery 2.1 Secure Research 2.3 Gain Vantage 3.1 Drain Power 3.2 Secure Rig 3.3 Operate Facility