
Spec Ops Narrative Play
Starting a Spec Ops Campaign
Dataslates
The first step in creating a dataslate is to select your kill team’s faction. This specifies what operatives you can select for your kill team, and all the operatives in your kill team must have that faction keyword in common. Factions are presented in kill team army lists, and are always specified with a skull symbol, e.g. KOMMANDO.
Once you have chosen your faction, you must select one of that faction’s kill teams, adhering to the selection requirements it specifies, and complete a narrative datacard for each of its operatives (note that you only complete a narrative datacard for the operatives selected to fulfill that kill team’s selection requirements, not for every operative listed as an option). Operatives that have the same selectable keyword (e.g. <CHAPTER>) must have the same keyword chosen (e.g. DARK ANGELS) These are the operatives you will start your Spec Ops campaign with.
During the campaign, the number of operatives on your dataslate can change as recruits join and operatives are slain. You can only add more operatives to your dataslate when a rule specifies, such as the Operative Assigned Requisition. Each time you do, complete a narrative datacard for that operative accordingly. You can remove an operative from your dataslate before or after a game, but if you do, it cannot be added back to your dataslate as it was removed - all experience points, injuries, Battle Honours etc. the operative gained are lost. You can never have more than twenty operatives on your dataslate.
Once you have chosen your starting kill team, it is good practice to establish your kill team’s background. Not only does it give your kill team an identity - particularly as your operatives start to gain Battle Traits and Battle Scars that must be tracked - but it also adds a sense of individuality and storytelling to your kill team as you become invested in its journey and celebrate its achievements. To establish your kill team’s background, complete each of the sections on your dataslate that are listed below. When doing so, you can choose each element yourself, or you can use the background generator found in your faction’s publication.
- Name of your kill team
- Name of each of your operatives
- The base of operations from which your kill team will operate.
- The history of your kill team
- Any quirks they have
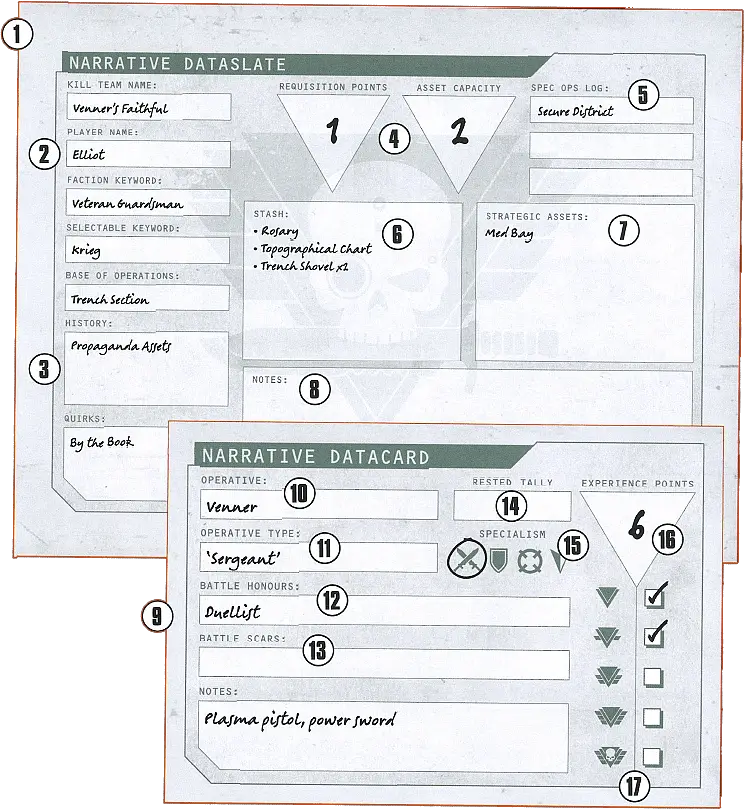
- A dataslate, which records your kill team’s information in a Spec Ops campaign.
- Your kill team’s name, your name and the faction keyword that all your operatives have in common.
- The background of your kill team, which includes their base of operations, history and quirks.
- Your current Requisition points and Asset Capacity.
- Your Spec Ops. Note that there is room for three to be recorded, allowing you to keep track of when you have completed two other Spec Ops.
- A list of equipment in your stash.
- A list of Strategic Assets you have added to your base of operations.
- Notes for your kill team, e.g. requirements for a Tac Op.
- A narrative datacard, which is necessary for each of the operatives in your kill team.
- The operative’s name.
- The operative’s type.
- Any Battle Honours the operative has gained.
- Any Battle Scars the operative has gained.
- A tally to mark each game the operative was not selected for deployment, often used when a Recovery test is required for an operative.
- Your operative’s selected specialism.
- Your operative’s current amount of experience points.
- Your operative’s current rank, which determines how many Battle Honours it can have.

Blank narrative datacards:
Experience
During a battle, the deeds of your operatives will not only determine who wins the game, but will also earn them XP. Each time a friendly operative gains (or loses) XP, adjust its XP tally on its narrative datacard accordingly. After a battle, in the Update Dataslates step of the mission sequence, operatives gain XP as follows:
- If an operative incapacitates any enemy operatives in a battle, it gains 1 XP.
- If an operative completes any mission actions in a battle (excluding the Operate Hatch action), and/or earns you any victory points for controlling an objective marker in a battle, it gains 1 XP.
- Each time you complete a condition of a Tac Op, select one friendly operative that scored you those VPs to earn 1 XP.
| ||||||||||||||||||


Battle Honours
Each time an operative earns enough XP to increase its rank, it gains a Battle Honour. Similarly, if an operative loses XP so that its rank decreases, it will lose a Battle Honour of your choosing. In either case, update its Battle Honours on your dataslate.The first time an operative gains a Battle Honour, you must select one specialism for it to progress in. A specialism is a focused skill-set to which the operatives talents are suited. Each operative’s datacard will specify which specialisms you can select for it, which are as follows:
|


Once you have selected an operative’s specialism, you then determine one Battle Honour for it to gain from that specialism. Each time an operative gains a rank thereafter, you can determine another Battle Honour for it to gain from that specialism.
To determine what Battle Honour your operative gains, you can either roll one D6 and consult the appropriate table to randomly determine a Battle Honour (re-rolling if it isn’t suitable), or you can select a Battle Honour of your choosing from the appropriate table. An operative cannot have the same Battle Honour more than once (if a duplicate result is rolled, roll again until a different result is rolled).
| ||||||||||||||||
| ||||||||||||||||
| ||||||||||||||||
| ||||||||||||||||
Casualties
Casualty Test
At the end of each battle, a Casualty test must be taken for each friendly operative that was incapacitated in that battle. To do so, roll one D6: on a 2+, the test is passed, but that operative can gain no more than 3XP from that battle. On a 1, the test is failed, and that operative gains a Battle Scar.For each friendly MEDIC operative that was selected for deployment, so long as it was not incapacitated during that battle, you can re-roll one Casualty test after the battle.
To determine what Battle Scar an operative gains, roll one D6, subtract 1 from the result for each other Battle Scar that operative has, then consult the Battle Scars table below. Each time the result corresponds to a Battle Scar that operative already has, re-roll the D6 until a Battle Scar is determined that the operative does not have.
For example, a Casualty test is failed for an operative with a Critical Impairment Battle Scar. The player rolls one D6 and the result is a 2. They must subtract 1 from the result as the operative already has a Battle Scar, therefore the final result is Slain.
Battle Scars
Designer’s Note: You might find that, though the names of the results below work for the majority of kill teams, a small number might not. If you find the name of a result on the table below does not fit as well with the theme of your faction as much as it could, feel free to replace the name with a more thematic result. For example, ‘Damaged Logic Circuits’ might fit better for a Necron Warrior or Skitarii Ranger than ‘Severe Concussion’. Be sure to note which of the ’actual’ results you have rolled, however, as the impact it has on the operative in battle will still be the same!Recovery Test
At the end of each battle, operatives will attempt to recover from their injuries and prepare themselves for the next fight. All operatives recuperate wounds lost during the battle (excluding those that are Slain), and are no longer considered injured.A Recovery test must be taken for each operative on your dataslate that has a Battle Scar. To do so, roll one D6, adding 1 to the result for each consecutive battle in which that operative was not selected for deployment (known as ‘Rested’). On a 5+, the test is passed: remove one Battle Scar that operative gained from a previous battle (you cannot remove a Battle Scar that the operative gained from the same battle).
For example, a Recovery test is taken for an operative with a Battle Scar. The player rolls one D6 and the result is a 4. The operative was not selected for deployment for three games in a row, therefore 3 is added to the result. The final result is a 7, therefore the test is passed, and that operative’s Battle Scar is removed.
| ||||||||||||||||
Base of Operations
Equipment
Your army list will detail various equipment you can equip your operatives with for a battle. In a Spec Ops campaign, your access to this equipment is managed via your stash. When you begin a Spec Ops campaign, there is no equipment in your stash. Instead, you must add equipment to your stash, such as by using the Equipment Drop Requisition. Each time you add an item of equipment to your stash, make a note of it in the ‘Stash’ section of your dataslate.Before a battle, you can select equipment to equip your operatives with (as specified by the mission sequence), but you can only select from the equipment you have in your stash. Note that when doing this, the quantity of equipment matters. For example, if you have one item of equipment in your stash, then only one operative can be equipped with that item of equipment. If you wish to equip more than one operative with that item of equipment (assuming the equipment would allow you to), you would have to add the relevant quantity of that equipment to your stash.
Rare Equipment
Each time your kill team gains an item of rare equipment, you must determine what item to add to your stash. To do so, you can either roll one D6 and consult the relevant table to randomly determine the rare equipment (re-rolling if it isn’t suitable), or you can select an appropriate one. Your stash cannot include more than one of each item of rare equipment (if a duplicate result is rolled, roll again until a different result is rolled).
For each of the items of rare equipment presented opposite, when you equip an operative with it before a battle, you must select one relevant weapon (i.e. a ranged or melee weapon) that operative is equipped with to be upgraded and gain that rare equipment’s rule for the battle. You can only upgrade each weapon an operative is equipped with once.
Designer’s Note: The names of the Rare Equipment used below are very well suited for a great number of kill teams, though you may wish to tweak the name depending on the faction your kill team is from. For example, if you play a Tyranids kill team and one of your operatives gains a ‘Thermal Sight’, you might wish to note this as ‘Photothermic Bioreceptors’ or something equally thematic instead. If you choose to do this, make a note where appropriate so that it is clear what upgrade the operative has.
| ||||||||||||||||
| ||||||||||||||||
Strategic Assets
|
Requisitions
If you wish to use a Requisition, you must spend Requisition points equivalent to its cost. If you do not have enough Requisition points to spend on that Requisition, you cannot use it. Each time you spend a Requisition point, reduce your total by one. Each Requisition will tell you when it can be purchased. Unless stated otherwise, there is no limit on the number of Requisitions you can purchase, the number of times you can purchase each Requisition, nor the combination of Requisitions you can purchase, so long as you have enough Requisition points.
Some Requisitions upgrade an operative so that it interacts with rules in a different manner (e.g. Weaponsmith). When you use such Requisitions on an operative, make a note of its upgrade on its datacard.
Kill teams grow in size in all manner of ways. High command might assign new soldiers. The kill team's boss might bully a lesser warrior into joining its mob. A new creature may daw and bite its way out of an amniotic sac, or a lone survivor might be found on the battlefield.
For some kill teams, acquiring new equipment might involve being sent wargear by their commanders. For others it might mean stealing said weapons before the rival can collect it. On occasion a kill team might be issued with trial weapons - depraved creations from sadistic minds, highly advanced technologies developed by brilliant scientists or anything in between.
All kill teams seek to enhance their base of operations, whether that be with hideous pain-extractor stations, territorial prowler squigs, sophisticated drone surveillance technology or weaponsmith forges.
Some kill team operatives sustain injuries too severe to keep them in the front lines. They might be reprogrammed by their Overlords or Tech-Priest masters, sent to the Painboyz for patchin' up, despatched to highly sophisticated medical facilities or even sent to filthy, improvised medicae tents.
Rest and basic medical care goes a long way to restoring the health of injured operatives. The same can be said for a temporary forced shutdown, memory scrub or the reciting canticles of maintenance.
By sheer luck, divine beneficence, manipulation of fate or pre-programmed plan, some kill team operatives survive mission after mission. Some have faced so many different threats they have gained new capabilities through alien manners of biological adaptation. Others have learned new skills along the way, only making them more likely to survive.
Very well-equipped operatives serve vital functions in kill teams. How they become this way differs greatly. Some are blessed by their dark patrons with all manner of empyric gifts. Others have proven their worth and been mechanically upgraded by the masters they are programmed to serve. Many learn the skills to upgrade their own wargear, painstakingly combining rare components, or bashing them together until they resemble something that works.
Spec Ops
Each player will determine their own Spec Op, so will therefore be working to achieve their campaign objective individually. This means a player in a Spec Ops campaign can play other players attempting to achieve different Spec Ops, and can even play against players who are not taking part in a Spec Ops campaign, as their campaign objective is all self contained.
Each player in a Spec Ops campaign must select one Spec Op their kill team will be assigned to. There are a selection of Spec Ops presented below, and more can be found in other Warhammer 40,000: Kill Team publications. Once you have selected one, make a note of it in the ‘Spec Ops log’ of your dataslate.
You should then assign your kill team to a new Spec Op. A kill team cannot be assigned to a completed Spec Op again until it has completed two other Spec Ops. To keep track of this, once a Spec Ops has been completed, cross it out on your Spec Ops log, and remove it once you have completed two other Spec Ops. At the end of any battle, you can choose to abort your uncompleted Spec Op. That Spec Op is removed from your log (you can assign it to your kill team again in the future) and you can assign a new Spec Op to your kill team instead.
1.0 Elimination
Various rival factions have deployed kill teams in the area. If they gain a foothold, your faction’s war effort will be severely hampered. Your kill team must make a series of pre-emptive strikes and eventually eliminate the enemy’s command structure before their forces gain too much ground.
You must conduct a series of raids to collect Intelligence on enemy leaders, bleed their forces, and draw them into a battle on terms in your favour.
Complete five games in which you scored victory points from the ‘Mark Target’, ‘Execution’ and/or ‘Rob and Ransack’ Tac Op.Intelligence has been gathered and the enemy’s composure is frayed. You must now apply overwhelming force to neutralise an enemy’s command structure. Nothing but the elimination of the enemy leader will achieve victory.
Complete a game in which you scored victory points from the ‘Headhunter’ Tac Op.- You gain one Requisition point.
- The friendly operative that scored you victory points from the ‘Headhunter’ Tac Op earns 5 XP. This is not affected by a passed Casualty test.
- You can add one item of rare equipment to your stash, or you can increase your asset capacity by one.
2.0 Recover Archeotech
Rumours are circulating of a hidden archeotech artefact, a rare and ancient item of technology that offers great power. Your kill team must search the area, and if the rumours prove to be true, retrieve the archeotech for high command.
By conducting a comprehensive investigation of the area’s structures, you can discover the archeotech’s data traces. Collect enough data and you can triangulate the archeotech’s location.
Complete five games in which you scored victory points from the ‘Seize Ground’ and/or ‘Vantage’ Tac Op.You have discovered the location of the archeotech. The enemy are unaware of its true power, so you must press the attack to retrieve it and deliver it to headquarters.
Complete a game in which you scored victory points from the ‘Retrieval’ Tac Op.- You gain three Requisition points.
- You can add one item of rare equipment to your stash, or you can increase your asset capacity by one.
3.0 Perform Ritual
The war continues, the cost in Lives and resources ever increasing. You must perform a complex ritual to amass the strength required and gain enough power to secure victory.
Various rites must be performed to develop the ritual. Only by completing the required tasks, and preventing the enemy from obstructing them, can you culminate the ritual.
Complete five games in which you scored victory points from the ‘Hold the Line’ and/or ‘Protect Assets’ Tac Op.The rites have been completed. Only the final steps remain to be taken to complete the ritual and summon the power needed for victory.
Complete a game in which you scored victory points from the ‘Plant Banner’ Tac Op.- You gain one Requisition point.
- The friendly operative that scored you victory points from the ‘Plant Banner’ Tac Op earns 5 XP. This is not affected by a passed Casualty test.
- You can distribute 5 XP across the other operatives on your roster.
4.0 Demolition
The enemy has garrisoned the area. Their robust line of fortifications and supply network has made a conventional assault suicide. Your kill team must strike at their foundations, bringing the whole thing down upon the foe.
Various key points across the front have been identified as targets for demolition. Your kill team must conduct excursions into enemy territory to rig structures with explosives and transponders.
Complete five games in which you scored victory points from the ‘Plant Signal Beacon’ and/or ‘Sabotage’ Tac Op.The charges are set and transponders are in place, but the enemy is jamming incoming signals. Your kill team must initiate the detonation sequence in close proximity.
Complete a game in which you scored victory points from the ‘Upload Viral Code’ Tac Op.- You gain three Requisition points.
- You can add one item of rare equipment to your stash or you can increase your asset capacity by one.
5.0 Infiltrate the Enemy
The enemy’s strength outstrips that of your own forces, so high command has tasked your kill team with waging unconventional warfare to tip the scales. By infiltrating the enemy’s ranks, an operative can weaken them from within.
Your kill team must secure enemy uniforms, access codes, surveillance data, patrol movements, garrison locations and all manner of relevant intelligence to plant an operative successfully.
Complete five games in which you scored victory points from the ‘Rob and Ransack’, ‘Implant’ and/or ‘Behind Enemy Lines’ Tac Op.With all the necessary intelligence gathered, a complex plan has been hatched for an operative to infiltrate the enemy’s ranks and strike from within.
Complete a game in which you scored victory points from the ‘Interloper’ Tac Op.- You gain one Requisition point.
- The friendly operative that scored you victory points from the ‘Interloper’ Tac Op earns 5 XP. This is not affected by a passed Casualty test.
- You can add one item of rare equipment to your stash, or you can increase your asset capacity by one.
6.0 Purge Order
A decisive message, declaring your dominance, must be sent to your enemies. To deliver it, your kill team has one task - the wholesale elimination of enemy operatives.
Your kill team must establish a foothold in the area and locate enemy kill teams. Once you have them cornered, move in to attack and leave none alive.
Complete five games in which you scored victory points from the ‘Deadly Marksman’, ‘Rob and Ransack’ and/or ‘Execution’ Tac Op.With enemy kill teams reeling, you must press the advantage and utterly rout them. Only by breaking them entirely will you achieve dominance.
Complete a game in which you scored victory points from the ‘Rout’ Tac Op.- You gain one Requisition point.
- You can distribute 5 XP across the operatives on your roster.
- You can add one item of rare equipment to your stash, or you can increase your asset capacity by one.
7.0 Breakout
Be it a desperate escape attempt or a return to base from a daring mission, our kill team is out of position and behind enemy lines. They must fight bravely and cleverly to return safely.
Your kill team must move fast, plotting a course through enemy territory and evading enemy kill teams deployed to apprehend or eliminate them.
Complete five games in which you scored victory points from the ‘Overrun’, ‘Vantage’ or ‘Triangulate’ Tac Op.Your kill team has survived being on the run for many days and draws near to safety. Although weary, they must make one last dash for freedom.
Complete a game in which you scored victory points from the ‘Behind Enemy Lines’ or ‘Interloper’ Tac Op.- You gain three Requisition points.
- After the battle, all friendly operatives pass Casualty and Recovery tests.
8.0 Extraction
Your kill team has gained possession of an invaluable resource, such as a prisoner, powerful artefact or the knowledge of a vital secret. Your enemies now descend to secure it for themselves. You must survive until high command can extract you.
Your kill team must find and establish a defensible position from which you can await extraction. You must hold at all costs.
Complete five games in which you scored victory points from the ‘Hold the Line’ and/or ‘Damage Limitation’ Tac Op.The extraction point is beset from all angles, with enemy kill teams overrunning your position. With extraction en route, you must hold on just a little longer.
Complete a game in which you scored victory points from the ‘Seize Ground’ Tac Op.- You gain one Requisition point.
- After the battle, all friendly operatives pass Casualty and Recovery tests.
- You can add one item of rare equipment to your stash, or you can increase your asset capacity by one.
9.0 Honour-bound
Perhaps to serve as an act of repentance for a previous failure, or due to the political machinations of a rival, your kill team has been assigned a forlorn operation. Victory under such circumstances will test any kill team and is highly unlikely, but acclamation and vindication awaits those that achieve it.
For your kill team they must win, or they will die. Though the odds are stacked against them, they must look the hazards dead in the eye. Honour demands nothing less.
Complete five games in which you scored victory points from the ‘Execution’, ‘Headhunter’ or ‘Rout’ Tac Op.Your kill team is on the verge of erasing the stain from their record. In their final acts of redemption, a champion must step forward to reclaim their honour and cement their deeds in legend.
Complete a game in which you scored victory points from the ‘Challenge’ Tac Op.- You gain one Requisition point.
- The friendly operative that scored you victory points from the ‘Challenge’ Tac Op earns 5 XP. This is not affected by a passed Casualty test.
- You can distribute 5 XP across the other operatives on your roster.
10.0 Secure District
Your kill team must take and control a key district until high command can reinforce it. The enemy, too, recognises the area’s value, and will send in raiding parties to pick it clean of resources.
Your kill team must respond with a swift application of force when an enemy raiding party appears.
Complete five games in which you scored victory points from the ‘Protect Assets’ and/or ‘Plant Banner’ Tac Op.For days on end your kill team has been pushed, fighting back enemies seeking to encroach upon your lands. They are exhausted. Reinforcements are on the horizon, however, and your kill team must hold until they arrive.
Complete a game in which you scored victory points from the ‘Central Control’ Tac Op.- You gain three Requisition points.
- You can add one item of rare equipment to your stash, or you can increase your asset capacity by one.
Narrative Play Mission Sequence
1. Determine Mission
The players determine which mission they will play. First, the players must select a mission pack, such as the one presented here. They must then select a mission from that pack, either by agreeing which one to use, or by randomly determining which one to use.2. Read Mission Briefing
Each mission has a briefing that will detail the mission rules, mission objective and a map detailing drop zones and where to set up objective markers. The players should familiarise themselves with this information before proceeding as it will detail key rules for the mission and how victory can be achieved.3. Determine Killzone
The players determine which killzone is in use, either by agreeing which one to use, or by rolling off and the winner decides. The players then set up its gameboard.4. Set Up Objective Markers
The players set up objective markers in the locations specified by the mission map.5. Set Up the Killzone
The players set up terrain features. This is done by following the guidelines here, or by following the configuration specified by the mission (if any). When setting up a terrain feature, the players should agree on the terrain traits of each part of it. If players are using terrain features configured in the same manner as their Killzone Environment, these terrain traits will be specified.6. Select Drop Zone
The players determine who will be the Attacker and who will be the Defender, either by agreeing what is most appropriate to the narrative, or by rolling off and the winner decides.Some missions will specify which drop zone belongs to which player. Otherwise, the Defender selects one of the drop zones for their operatives. The Attacker has the other drop zone.
7. Select a Kill Team
Each player determines their operatives for deployment by selecting one kill team from their army list. They then select any operatives from their dataslate to be in that kill team, so long as those operatives adhere to the restrictions of that kill team. Note that this means a player can include less operatives than specified by that kill team. Once both players have selected their kill team, they should reveal it to their opponent.If a player’s kill team includes a LEADER operative, they add 2CP to their pool. In addition, each player adds up the total number of Battle Honours of the operatives they selected for deployment, as well as how many strategic assets they have, and compares the total with their opponent. For every two that one player’s total is less than the other, they can select one of the following for the game:
- Add 1 CP to their pool.
- They have two additional points to select equipment with.
8. Select Tac Ops
Each player secretly builds a six-card Tac Ops deck. Up to three of their cards can be their faction’s Tac Ops as specified in their faction’s army list. The remaining Tac Ops in their deck must be from an archetype of their choosing.Each player shuffles their six-card deck, then determines which Tac Ops they have for the battle in secret. To do so, they draw two cards from their deck, select one and discard the other. They repeat this process until three Tac Ops cards have been selected. They do not need to declare which Tac Ops they have selected.
9. Select Equipment
Each player selects up to ten points worth of equipment from their stash to equip operatives from their kill team with for the battle, following all rules specified in that kill team’s equipment list. Once both players have selected their equipment, they should reveal it. After each game, all equipment is returned to the stash and an operative is no longer equipped with it.10. Set Up Barricades
The players alternate setting up barricades, one at a time, starting with the Defender, until the players have set up two barricades each. Each time a player sets up a barricade, it must be within of their drop zone and not on a terrain feature (unless it has the Insignificant trait).11. Set Up Operatives
The Defender sets up all of their operatives first. Then the Attacker sets up all of their operatives. When a player sets up an operative, it must be wholly within their drop zone and must be given an Engage or Conceal order.12. Scouting
Each player secretly selects one of the pre-game scouting options. Each option will provide the player with an additional benefit, however it will affect who has initiative in the first turning point. A player selects a scouting option by secretly putting a number of D6 into their hand that corresponds to the number of the option they would like to select. For example, if a player would like to select the Recon option, they would put three D6 into their hand. Once both players have selected, they reveal the number of D6 in their hand simultaneously. They then resolve their selection starting with the Defender. The scouting options are as follows: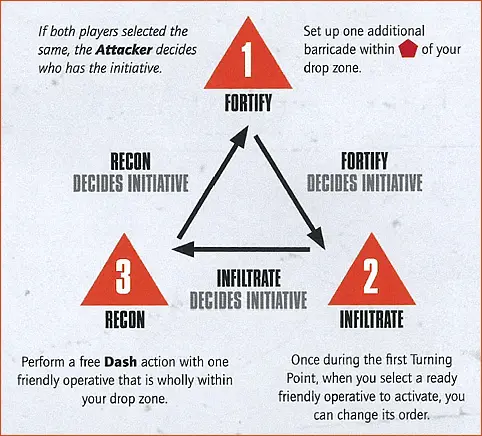
13. Begin the Battle
The first Turning Point of the battle begins. In the first Initiative phase, initiative for the first turning point is determined based on the players’ choices in the Scouting step:- If one player selected Fortify and the other selected Infiltrate, the former decides who has the initiative.
- If one player selected Infiltrate and the other selected Recon, the former decides who has the initiative.
- If one player selected Recon and the other selected Fortify, the former decides who has the initiative.
- If both players selected the same scouting option, the Attacker decides who has the initiative.
14. End the Battle
The battle ends after four Turning Points have been completed. If one player has no operatives remaining in the killzone, the other player continues to play out each remaining Turning Point until the battle ends.15. Determine Victor
At the end of the battle, the player with the most victory points is the winner of the game. If players are tied, the game is a draw.- Each player can score a maximum of 12 victory points from the mission objective.
- Each player can score a maximum of 2 victory points from each Tac Op, therefore a player’s Tac Ops are worth 6 victory points in total.
- If every operative in a player’s kill team was painted to a Battle Ready standard, that player scores 2 victory points.
- In total, each player can score a maximum of 20 victory points from the game.
16. Update Dataslates
Each player updates their rosters by completing the following steps:1. Take Casualty tests.
2. Update Experience.
3. Take Recovery tests.
4. Complete operations.
Kill teams grow in size in all manner of ways. High command might assign new soldiers. The kill team's boss might bully a lesser warrior into joining its mob. A new creature may daw and bite its way out of an amniotic sac, or a lone survivor might be found on the battlefield.
OPERATE HATCH1AP
An operative can perform this action during a Dash or Normal Move action, and any remaining increments of movement can be used after it does so. Note, however, that opening a Hatchway can cause the operative to be within Engagement Range of an enemy operative, in which case that Dash or Normal Move action would immediately end (unless the operative has any rules that allow it to move within Engagement Range of an enemy operative, e.g. FLY).
Designer’s Note: If a Hatchway’s status is changed and operative placement would prevent the hatch from fully opening or closing, temporarily remove the necessary operatives from the killzone, fully open or close the hatch as appropriate, then return the operatives to the killzone as close as possible to their original location. If an operative is within an enemy operative’s Engagement Range before a hatch is opened, it must be returned within Engagement Range of that enemy operative after the hatch is opened.
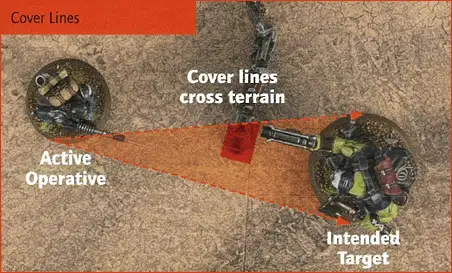
- The intended target is more than from the active operative.
- The intended target is within of a point at which a Cover line crosses another operative’s base (unless that other operative is not itself in the active operative’s LoS), or a terrain feature that provides Cover (see Terrain Traits).
For some kill teams, acquiring new equipment might involve being sent wargear by their commanders. For others it might mean stealing said weapons before the rival can collect it. On occasion a kill team might be issued with trial weapons - depraved creations from sadistic minds, highly advanced technologies developed by brilliant scientists or anything in between.
- The first time you strike with a critical hit, select one of your opponent’s normal hits from that combat to be discarded
- The second time you strike with a critical hit, subtract 1 from the target’s APL.
All kill teams seek to enhance their base of operations, whether that be with hideous pain-extractor stations, territorial prowler squigs, sophisticated drone surveillance technology or weaponsmith forges.
Very well-equipped operatives serve vital functions in kill teams. How they become this way differs greatly. Some are blessed by their dark patrons with all manner of empyric gifts. Others have proven their worth and been mechanically upgraded by the masters they are programmed to serve. Many learn the skills to upgrade their own wargear, painstakingly combining rare components, or bashing them together until they resemble something that works.
- When an enemy LEADER operative is selected as the target of a shooting attack for a Shoot action, and no other shooting attacks are made for that action, you can attempt to mark that operative instead. Complete the shooting sequence as normal, except that if any damage would be inflicted on that enemy operative, it does not lose any wounds and you score 1VP.
- If you achieve the first condition in any subsequent Turning Points, you score 1VP.
- At the end of the battle, if more enemy operatives than friendly operatives were incapacitated during two or more Turning Points, you score 1VP.
- At the end of the battle, if more enemy operatives than friendly operatives were incapacitated during three or more Turning Points, you score 1VP.
- You score 1VP.
- At the end of the battle, if you achieved the first condition and that friendly operative has not been incapacitated, you score 1VP.
- You score 1VP.
- If it is the first or second Turning Point, you score 1VP.
- At the end of the battle, if the total APL of friendly operatives within of that terrain feature is greater than that of enemy operatives, you score 1VP.
- If you achieve the first condition, there are no enemy operatives on or within of that terrain feature, and the total APL of friendly operatives within of that terrain feature is 4 or more, you score 1VP.
- Universal actions can be performed by all operatives. They are detailed below.
- Unique actions are actions detailed on an operative’s datacard that only they can perform, such as the Dakka Dash action found on the example datacard.
- Mission actions are specific to the mission you are playing, and will be detailed by that mission’s briefing. Missions can be found here (Open Play mission) and here (Spec Ops Narrative missions).
- Free actions can only be performed when another rule specifies. Each time an operative would perform a free action, the following rules apply.
- The operative can perform the action, so long as the requirements of the action are met.
- The player does not subtract any additional AP to perform the action.
- The operative would still count as performing the action for all rules purposes. For example, if it performed it during its activation, it would not be able to perform the action again during that activation.
For example, when a KOMMANDO DAKKA BOY performs a Dakka Dash action (see unique actions, above), it can perform a free Dash and free Shoot action without subtracting any additional AP (other than the AP spent on the Dakka Dash action). However, it is subject to those actions’ requirements, therefore it cannot perform the free Dash action if it is within Engagement Range of enemy operatives, and cannot perform the free Shoot action if it is within Engagement Range of enemy operatives or has a Conceal order. In addition, for each of the free actions it performs, it cannot perform them again during its activation.
- If a friendly operative performs the Vantage action, you score 1VP.
- If you achieve the first condition in any subsequent Turning Points, you score 1VP.
VANTAGE2AP
- At the end of the battle, if a friendly operative controls your Retrieval token, you score 1VP.
- At the end of the battle, if your Retrieval token is being carried by a friendly operative, you score 1VP.
- At the end of any Turning Point, if there are no enemy operatives within of your drop zone, you score 1VP.
- If you achieve the first condition at the end of any subsequent Turning Points, you score 1VP.
- At the end of any Turning Point, if two or more enemy operatives were incapacitated while within of an objective marker during that Turning Point, and/or while carrying an objective during that Turning Point, you score 1VP.
- If you achieve the first condition at the end of any subsequent Turning Points, you score 1VP.
- At the end of the battle, if your Banner token is within of but not wholly within your opponent’s drop zone, you score 1VP.
- At the end of the battle, if your Banner token is wholly within your opponent’s drop zone, you score 2VP.
DESTROY BANNER1AP
- At the end of the battle, if your signal beacon token is within of your opponent's drop zone, you score 2VPs.
PLANT SIGNAL BEACON2AP
- If a terrain feature is sabotaged by friendly operatives, you score 1VP.
- If any other terrain feature is sabotaged by friendly operatives, you score 1VP.
SABOTAGE2AP
- If a friendly operative performs the Upload Viral Code action, you score 1VP.
- If you achieve the first condition in any subsequent Turning Points, you score 1VP.
UPLOAD VIRAL CODE2AP
- Instead of inflicting damage on an enemy operative from that strike, you can implant that operative instead. That operative does not lose any wounds from that strike and you score 1VP.
- If two other enemy operatives are implanted, you score 1VP.
- If one or more friendly operatives are wholly within your opponent’s drop zone and more than from enemy operatives, you score 1VP.
- If you achieve the first condition at the end of any subsequent Turning Points, you score 1VP.
- Remove your interloper from the killzone and score 2VPs.
INTERLOPE1AP
- If any other enemy operatives are incapacitated by another shooting attack made by your Marksman, you score 1VP.
- At the end of the battle, if you achieved the first condition and your Marksman has not been incapacitated, you score 1VP.
- If an enemy operative is incapacitated by a friendly operative that is within of your opponent’s drop zone, you score 1VP.
- If you achieve the first condition in any subsequent Turning Points, you score 1VP.
- At the end of any Turning Point, if a friendly operative is wholly within each killzone quarter and more than from the centre of the killzone, you score 1VP.
- If you achieve the first condition at the end of any subsequent Turning Points, you score 1VP.
- If two killzone edges are triangulated by friendly operatives, you score 1VP.
- If three killzone edges are triangulated by friendly operatives, you score an additional 1VP.
TRIANGULATE1AP
- At the end of any Turning Point, if no friendly operatives were incapacitated during that Turning Point, you score 1VP.
- If you achieve the first condition at the end of any subsequent Turning Points, you score 1VP.
- If that enemy operative is incapacitated by that friendly operative, you score 1VP.
- If you achieve the first condition while that enemy operative is within of that friendly operative, you score 1VP.
- At the end of any Turning Point, if the total APL of friendly operatives within of the centre of the killzone is greater than that of enemy operatives, you score 1VP.
- If you achieve the first condition at the end of any subsequent Turning Points, you score 1VP.
