
Shadow Ops: The Lure
A narrative Kill Team campaign that pits a Farstalker Kinband against the might of the Imperial Navy.
 1.2 Dank Hold 1.3 Perilous Morass
If you’re playing this as a mini-campaign, in the first mission, Relentless Pursuit, the Farstalker Kinband player should be the Defender and the Imperial Navy Breacher player should be the Attacker. In the two subsequent missions, the loser of the preceding battle is the Defender and the winner is the Attacker.
While the story is told with Farstalker Kinband and Imperial Navy Breacher kill teams in mind, the players should feel free to substitute their own kill teams as appropriate - just be clear about which kill team is replacing which for the first mission. If you do this, we encourage you to create your own narrative for your campaign.
Some mission objectives in this mission pack require you to calculate a certain percentage total. To do so, take the number of operatives that have satisfied the condition (i.e. been incapacitated or escaped) and divide by the total number of operatives in that kill team that were selected for deployment, then multiply by 100 to get your percentage total.
Books
| Book | Kind | Edition | Version | Last update |
| | ||||
| | White Dwarf | 2 | November 2022 | |
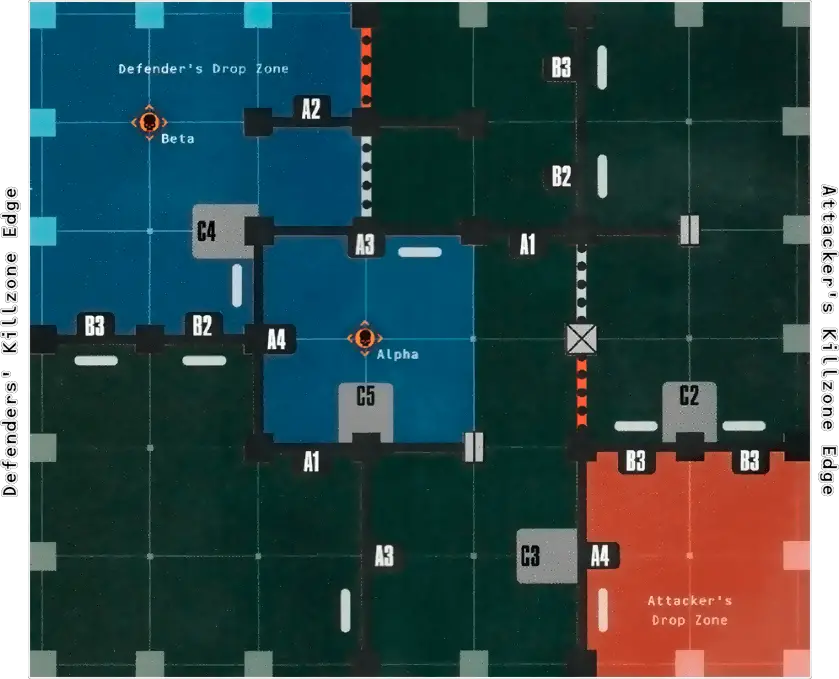
Relentless Pursuit
After a violent confrontation with Imperial Navy Breachers, the Farstalker Kinband is falling back. Despite the Kroots’ efforts to throw the enemy off their trail, the Breachers continuously track them down and press the attack. The Kinband must find a way to prevent a rout, holding back the Breachers while searching out a secure withdrawal route.
Ferocious Assault:
- The Attacker cannot set up barricades.
- The Attacker has the initiative every Turning Point.
Nowhere to Hide: At the end of any Turning Point, if the Attacker’s operatives control any objective markers, they must remove one of them from the killzone and the length of the battle is extended as shown below. If the second objective marker is removed from the killzone, the battle ends instead.
|
- If friendly operatives control the Alpha objective marker, you score 5VPs.
- If friendly operatives control the Beta objective marker, you score 3VPs.
At the end of the battle, the Attacker scores victory points as follows:
- If the Alpha objective marker has been removed from the killzone, you score 3VPs.
- If the Beta objective marker has been removed from the killzone, you score 5VPs.
|
SPEC OPS CAMPAIGN
If you are playing this mission as part of a Spec Ops campaign, the following mission rules also apply:Successful Retreat: If you are the Defender, are victorious and are currently undertaking the ‘Breakout’ Spec Op, then reduce by 1 the number of games required to complete that Spec Op’s Operation 1.
Dank Hold
Breaking through into a flooded hold, the Kinband rapidly adapt their tactics, hunting the Breachers in turn. Thick liquid floods the area and dense, sickly growths sprout from the oozy depths. The dank environment slows operatives down and provides plenty of locations for ambushes, but unanticipated dangers lurk in the hold...
Designer’s Note: We recommend a token at least 40mm in diameter such as an objective marker. You can use the grey side to differentiate it from normal objective markers. If players have suitable terrain features to represent a Growth token, they can use those instead.
Flooded: The inner area of the killzone (as shown by the white dotted lines) is flooded Operatives cannot perform Dash actions while within the flooded area. In addition, each time an operative within the flooded area performs an action in which it moves, it cannot move more than 3 for that action. Note that an operative that starts those actions wholly outside of the flooded area is unaffected.
Dangerous Environment: At the end of each Firefight phase, roll one D6 for each Growth token that has operatives within of it, adding 1 to the result for each Danger point it already has:
- On a 1-5, that token gains a Danger point
- On a 6+, remove all Danger points that token has, then randomly determine one operative within of it to suffer 2D3 mortal wounds.
At the end of the battle:
- For each objective marker on the edge of your opponent’s drop zone that friendly operatives control, you score 2VPs.
- If any friendly operatives are wholly within your opponent’s drop zone, you score 2VPs.
SPEC OPS CAMPAIGN
If you are playing this mission as part of a Spec Ops campaign, the following mission rules also apply: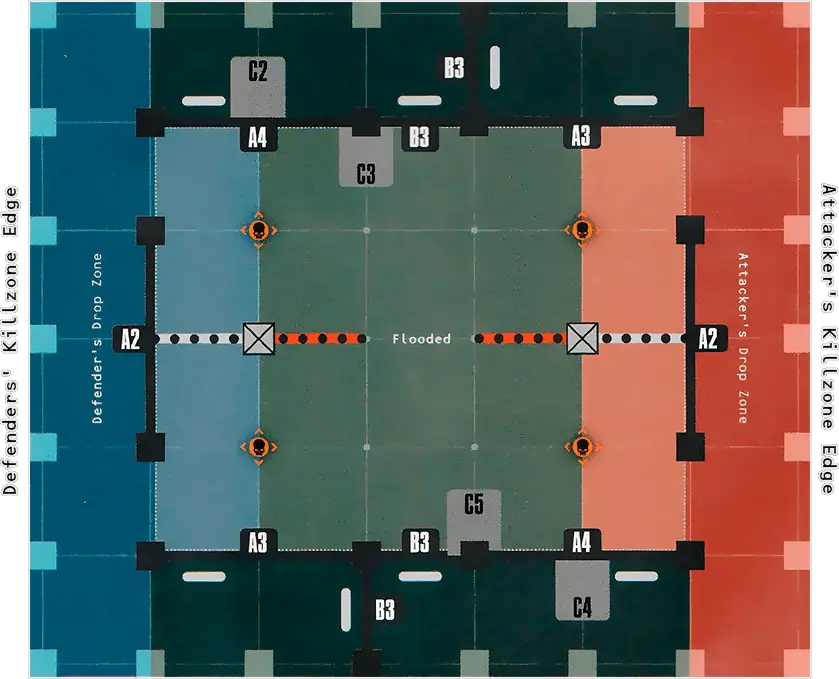
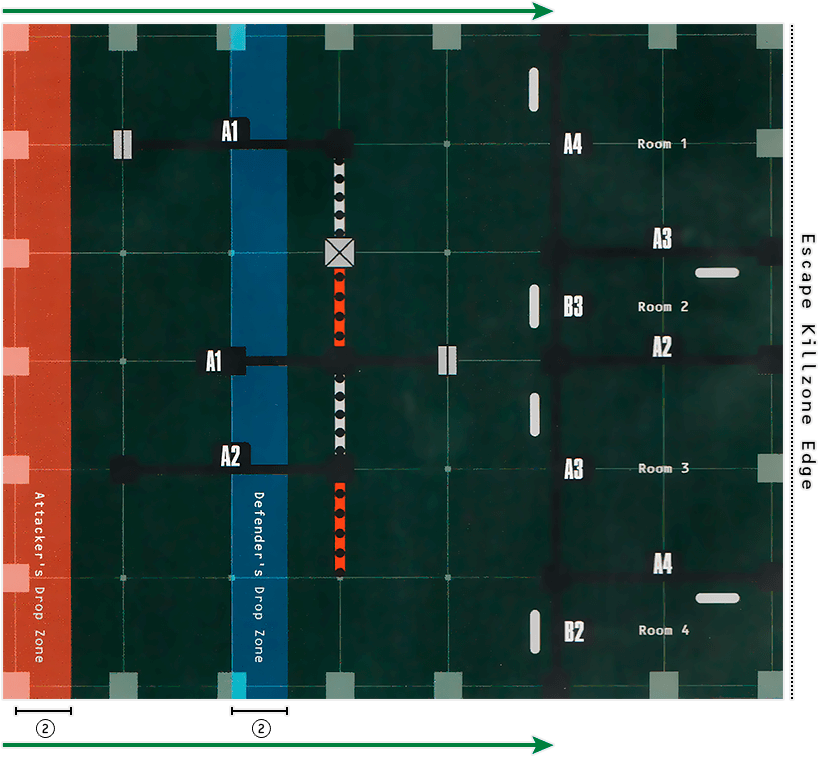
Perilous Morass
The defeated kill team have escaped from the flooded hold, coming upon a steeply inclined surface leading to some far lower deck. Foul liquid runoff from the swamp and thick fungal growths have turned the slope into a slick and boggy mire, on which both the Breachers and the Kinband struggle to find purchase. The defeated kill team must make a break for it and find an escape route quickly, lest they be routed entirely.
Steep Slope: An operative is on the slope if it’s within the area of the killzone between the two green arrows. Each time a friendly operative on the slope is activated, unless its base is touching a terrain feature, take a fall test for it after determining its order. Roll one D6 if that operative has a Conceal order, or two D6 if it has an Engage order. If any result is a 4+, that operative falls (see Fall below). Alternatively, you can choose for a friendly operative to fall (no dice roll is required).
Fall: Each time an operative falls, it must immediately perform a Normal Move action with the following exceptions:
- It costs 2AP (unless the operative generated less, in which case it costs the normal 1AP).
- It must move D3+1 increments of (regardless of its M characteristic or any other rules) in a straight line indicated by the green arrows.
- Ignore Engagement Range to perform that action and during the move; it can therefore end the move within Engagement Range of an enemy operative.
- If its base comes into contact with a terrain feature, it stops.
- If its base comes into contact with another operative, roll one D6: on a 1-3, it stops; on a 4+, it moves across that operative. It must finish the move in a location it can be placed, so if it can’t, place it as close as possible to its correct final location.
- If it would move up the slope in any way (i.e. further from the Escape killzone edge), it cannot move more than for that action.
- If it would move in any other direction on the slope, it cannot move more than 3 for that action.
Dead End: Some of the rooms on the mission map may be blocked. The first time an operative moves within each room, if fewer than two blocked rooms have been discovered, roll one D6: on a 4+, it’s a blocked room. The Defender’s operatives cannot move off the killzone edge in blocked rooms (see mission objective).
|
SPEC OPS CAMPAIGN
If you are playing this mission as part of a Spec Ops campaign, the following mission rules also apply:- Each of the Defender’s operatives that escaped the killzone automatically pass their Recovery test.
- Each of the Attacker’s operatives that incapacitated one or more enemy operatives during the battle gain 1XP (this is not affected by a passed Casualty test).
Successful Retreat: If you are the Defender, are victorious and are currently undertaking the ‘Breakout’ Spec Op, then reduce by 1 the number of games required to complete that Spec Op’s Operation 1.
 1.2 Dank Hold 1.3 Perilous Morass