
Gallowfall
Welcome to Kill Team: Gallowfall. This is the fourth and final instalment of this season of Kill Team, in which elite warriors drawn from the galaxy’s myriad warring races have plunged into the depths of the enormous space hulk known as the Gallowdark. Whether opportunistic thief, adventurous treasure-hunter, brutal killer or noble warrior, all are willing to kill anything in their path for the sake of their objective.
 1.2 Cripple the Foe 1.3 Escape the Hulk 1.4 Ageing Remains 1.5 Critical Surgery 1.6 Vital Communiqué 2.3 Abandon Ship
Books
| Book | Kind | Edition | Version | Last update |
| | ||||
| | Expansion | 2 | May 2023 | |
Shadow Operations: Gallowfall Mission Pack
The missions increase in detail, with the first three being the most simple and straightforward and the second three requiring more thought and consideration. The final three missions are the most unique in that they use a killzone twice as big as normal (you will need two Killzone: Gallowdark killzones to use these missions). They are themed around evacuating the Gallowdark using escape pods.
All of the missions use a specified arrangement of terrain, using the Killzone: Gallowdark and Killzone: Gallowfall terrain sets, each tailored to enhance the mission at hand. The scoring parameters of the mission objectives vary across the mission pack, therefore having an expansive roster will allow you to select the right operatives for the mission. The missions can be used with any of the three ways to play, but have bonuses for those using them as part of a Spec Ops campaign.
To randomly determine a Shadow Operations: Gallowfall mission, one player rolls one D6 to determine one from table 1. If you have two Killzone: Gallowdark killzones and would like to play the unique larger missions, one player can instead roll one D3 to randomly determine one from table 2.
| ||||||||||||||||
| ||||||||||
Loot Medical Supplies
A stockpile of salvageable medical supplies has been discovered that is vital for continued operations. Kill teams descend to pick it clean.
Operatives can perform the following mission action:
LOOT MEDICAL SUPPLIES1AP
SPEC OPS CAMPAIGN
If you are playing this mission as part of a Spec Ops campaign, the following mission rules also apply: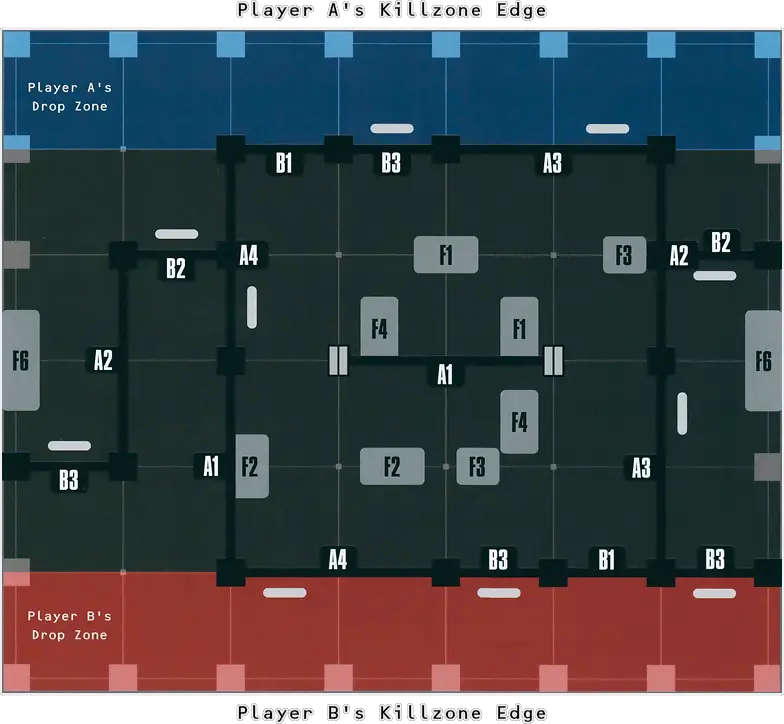
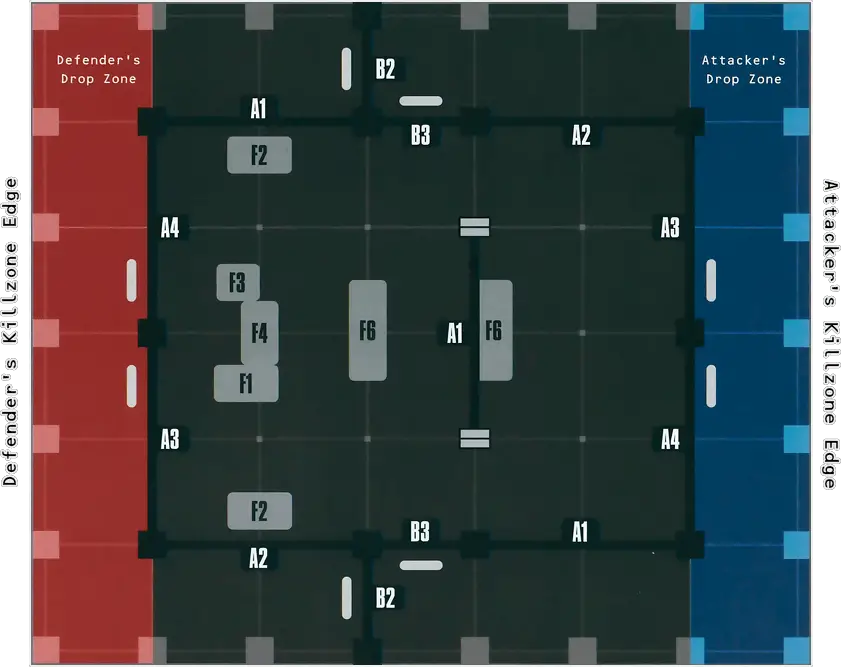
Cripple the Foe
One kill team has infiltrated a section of the ship that an enemy team are occupying, where they hold a great deal of prized medical equipment and escape pods. The attackers intend to destroy these vital supplies, and make it impossible for the foe to continue operating here.
SCUTTLE1AP
- If an operative the Attacker controls is performing this action, that terrain feature gains a Scuttle token.
- If an operative the Defender controls is performing this action, that terrain feature loses a Scuttle token.
- If an operative the Attacker controls is performing this action and that terrain feature already has a Scuttle token, it’s permanently scuttled.
SPEC OPS CAMPAIGN
If you are playing this mission as part of a Spec Ops campaign, the following mission rules also apply:Deck Defended: If you are the Defender, are victorious and are currently undertaking the Secure District Spec Op, then reduce by 1 the number of games required to complete that Spec Op’s Operation 1.
Escape the Hulk
The hulk is disintegrating and kill teams fight to survive. There are too few escape pods for every operative, so a brave few must do all they can to cover their comrades’ escape.
INITIALISE ESCAPE POD1AP
ENTER/EXIT ESCAPE POD1AP
While an operative is occupying an Escape Pod:
LAUNCH ESCAPE POD1AP
SPEC OPS CAMPAIGN
If you are playing this mission as part of a Spec Ops campaign, the following mission rules also apply: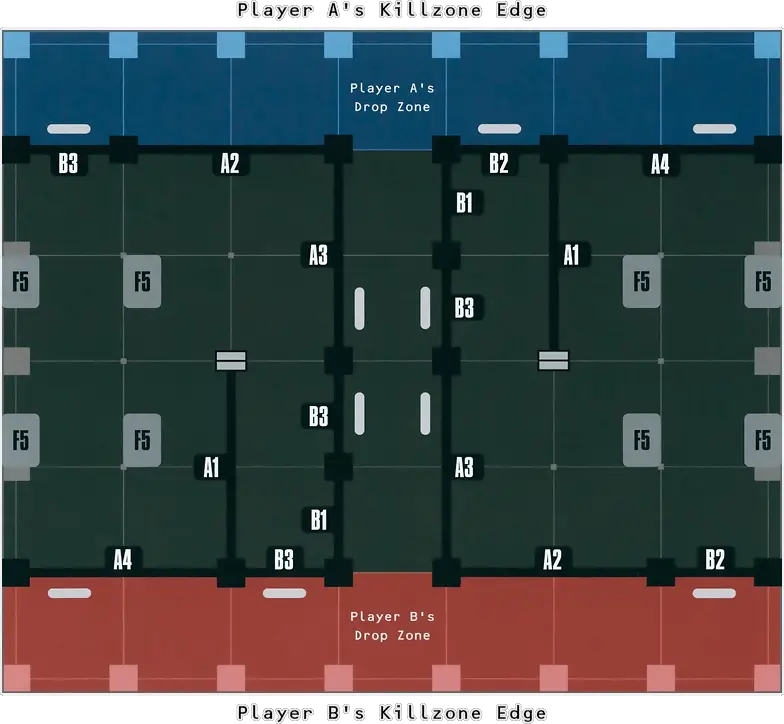
Ageing Remains
The launch bays of a ship contain the remains of those caught in an evacuation gone wrong. While time has turned much to ruin, there are items of value that can be salvaged.
Operatives can perform the following mission action:
SEARCH POD1AP
SCAN POD1AP
At the end of the battle, for each objective marker friendly operatives control, you score 2VPs. Note that objective markers only appear as a result of the Search Pod action.
SPEC OPS CAMPAIGN
If you are playing this mission as part of a Spec Ops campaign, the following mission rules also apply: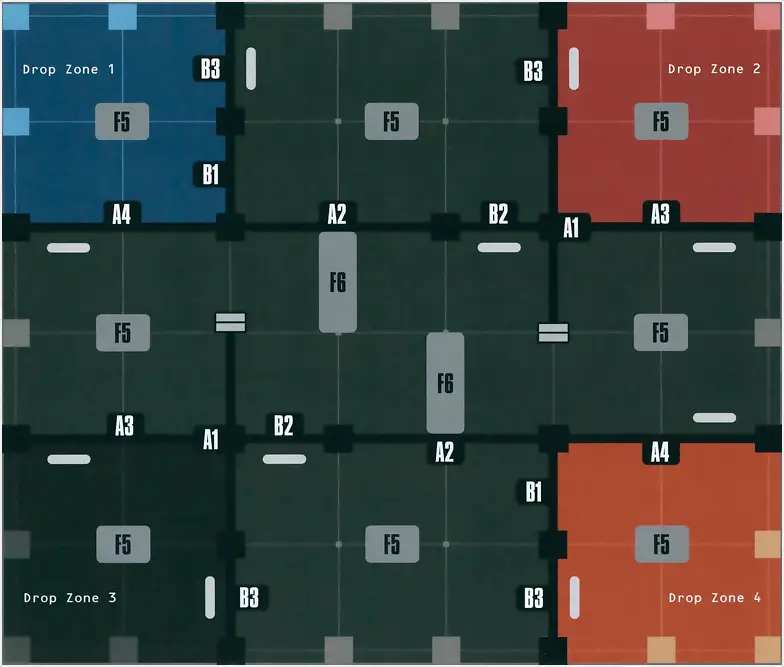
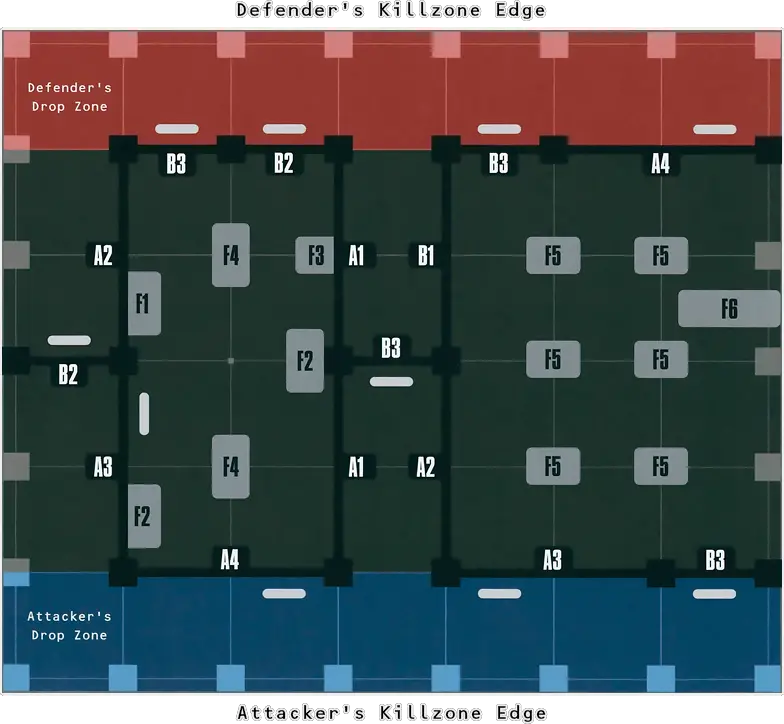
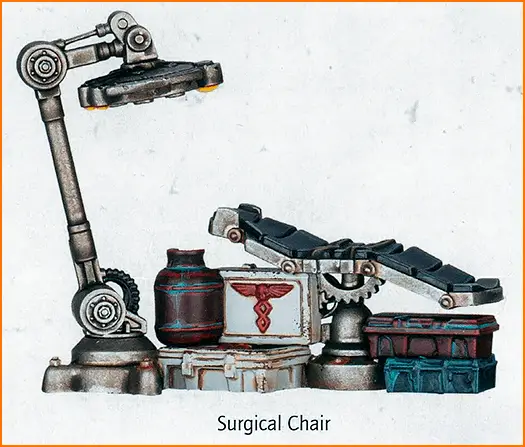
Critical Surgery
A key asset with vital information is in critical condition. They must be saved, or kept alive long enough to divulge what they know. The enemy descends to eliminate the patient and thus silence them entirely.
Critical Patient: In the Set Up Operatives step, the Defender selects one of their operatives to be carrying the Critical Patient token. The Defender’s operatives can perform the Pick Up action on that token.
The Defender’s operatives can perform the following mission action:
SURGERY2AP
The Attacker’s operatives can perform the following unique action:
The Attacker’s operatives can perform the following unique action:
ELIMINATE1AP
At the end of the battle, work out the number of Surgery actions performed and consult the table below to determine how many victory points each player scores.
|
SPEC OPS CAMPAIGN
If you are playing this mission as part of a Spec Ops campaign, the following mission rules also apply:Patient Saved: If you are the Defender, are victorious and are currently undertaking the Extraction Spec Op, then reduce by 1 the number of games required to complete that Spec Op’s Operation 1.
Vital Communiqué
A kill team must find a location from which they can transmit an important communiqué to their commanders. However, another team race to intercept them, determined to claim the information for themselves.
Lying In Wait: In the Set Up Operatives step, the Defender does not set up operatives in the killzone. Instead, they must secretly select up to half of their operatives to be hiding within an Escape Pod (F5) or Stasis Pods (F6) terrain feature (max one per terrain feature). Their remaining operatives are in reserve. We recommend numbering each terrain feature, then the Defender can make a note of which operative is set up in which terrain feature. For the purposes of any other rules that reference the Defender’s drop zone (e.g. Tac Ops), use the Defender’s killzone edge instead.
Spring Ambush: The Defender’s operatives that are hiding and in reserve are considered to be within the killzone for activation purposes and must be activated as normal. Each time such an operative is activated, they must either perform Pass actions (to stay hiding or in reserve), or be set up by the Defender.
- Operatives in hiding must be set up as close as possible to the terrain feature they are hiding within. They then perform their actions as normal, but must subtract from the distance they can move in their first move action during that activation (Normal Move, Charge etc.).
- Operatives in reserve must be set up as close as possible to the Defender’s killzone edge and wholly within a section specified by a D3 roll (roll for each operative when you set them up). They are then treated as having performed a Normal Move action (subtract action points accordingly).
At the end of the battle, determine the percentage of the Attacker’s kill team selected for deployment that escaped (rounding down to the nearest percentage grade) and consult the table below to determine how many victory points each player scores.
|
At the end of the battle, if the Defender’s operatives control the objective marker, the Defender scores 4VPs.
SPEC OPS CAMPAIGN
If you are playing this mission as part of a Spec Ops campaign, the following mission rules also apply:Ambushed: If you are the Defender, are victorious and are currently undertaking the Purge Order Spec Op, then reduce by 1 the number of games required to complete that Spec Op’s Operation 1.
Race to the Tubes
A handful of escape pods have been primed for deployment in their launch tubes. Both teams must use every tactic and weapon in their arsenal to break through and claim one of the few spots available.
Escape: The battle does not end after four Turning Points. Instead, the battle ends at the end of a Turning Point in which either of the following is true:
- All of the Escape Pods (F5) have been removed from the killzone.
- No more operatives can escape in following Turning Points.
Operatives can perform the following mission action:
ENTER/EXIT ESCAPE POD1AP
While an operative is occupying an Escape Pod:
LAUNCH ESCAPE POD1AP
SPEC OPS CAMPAIGN
If you are playing this mission as part of a Spec Ops campaign, the following mission rules also apply: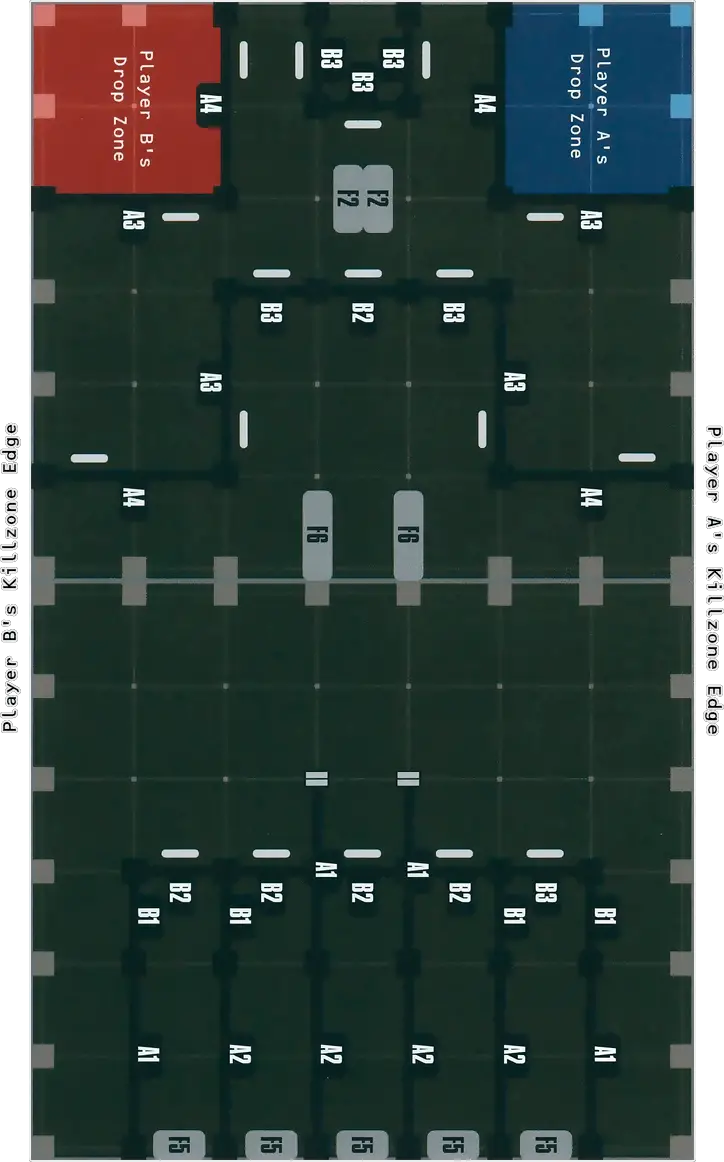
Bio-authorisation Required
The evacuation procedures aboard the ship follow strict protocols, only launching when a bio-scan of the occupant matches one of the original crew. The teams must collect bio-samples to confuse the pod’s ageing machine spirit in order to launch successfully.
Escape: The battle does not end after four Turning Points. Instead, the battle ends at the end of a Turning Point in which either of the following is true:
- All of the Escape Pods (F5) have been removed from the killzone.
- No more operatives can escape in following Turning Points.
Bio-sample: The Pick Up action can be performed upon objective markers.
Operatives can perform the following mission actions:
ENTER/EXIT ESCAPE POD1AP
While an operative is occupying an Escape Pod:
LAUNCH ESCAPE POD1AP
SPEC OPS CAMPAIGN
If you are playing this mission as part of a Spec Ops campaign, the following mission rules also apply:
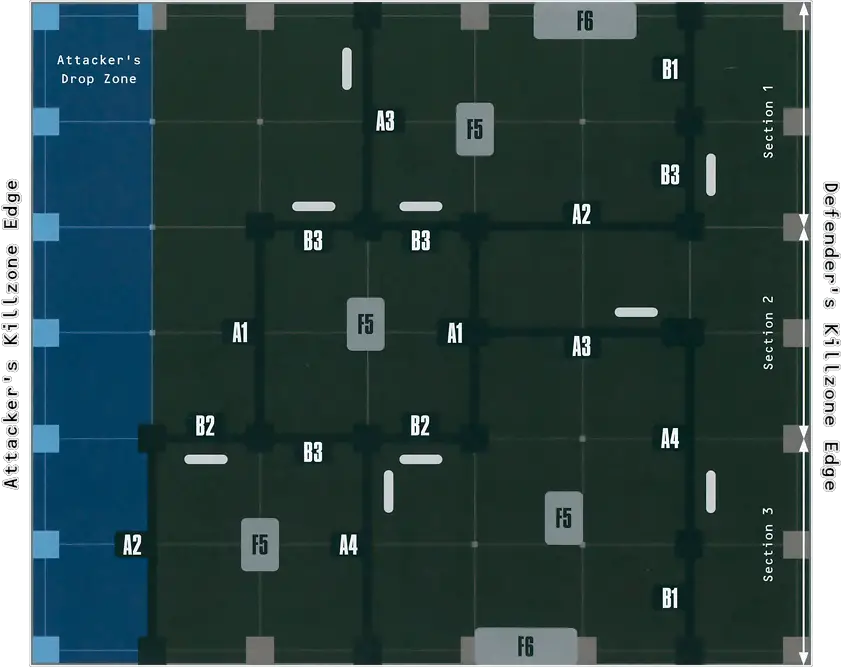
Abandon Ship
The ship is falling apart. Operatives must rush to the escape pods and annihilate all obstacles, or they will be destroyed with the vessel.
Escape: The battle does not end after four Turning Points. Instead, the battle ends at the end of a Turning Point in which either of the following is true:
- All of the Escape Pods (F5) have been removed from the killzone.
- No more operatives can escape in following Turning Points.
Ship In Ruin: The killzone is divided into a series of column sections (see the mission map) that become ruined during the battle, starting from Section 1. At the end of each Turning Point, roll one D6: on a 2-5, the next section is ruined; on a 6, the next two sections are ruined. If an operative is ever wholly within a ruined section, it’s immediately incapacitated and removed from the killzone, regardless of any other rules. If an Escape Pod (F5) is ever wholly within a ruined section, it’s removed from the killzone (if an operative is occupying it, it’s incapacitated as above).
Operatives can perform the following mission actions:
ENTER/EXIT ESCAPE POD1AP
While an operative is occupying an Escape Pod:
LAUNCH ESCAPE POD1AP
SPEC OPS CAMPAIGN
If you are playing this mission as part of a Spec Ops campaign, the following mission rules also apply: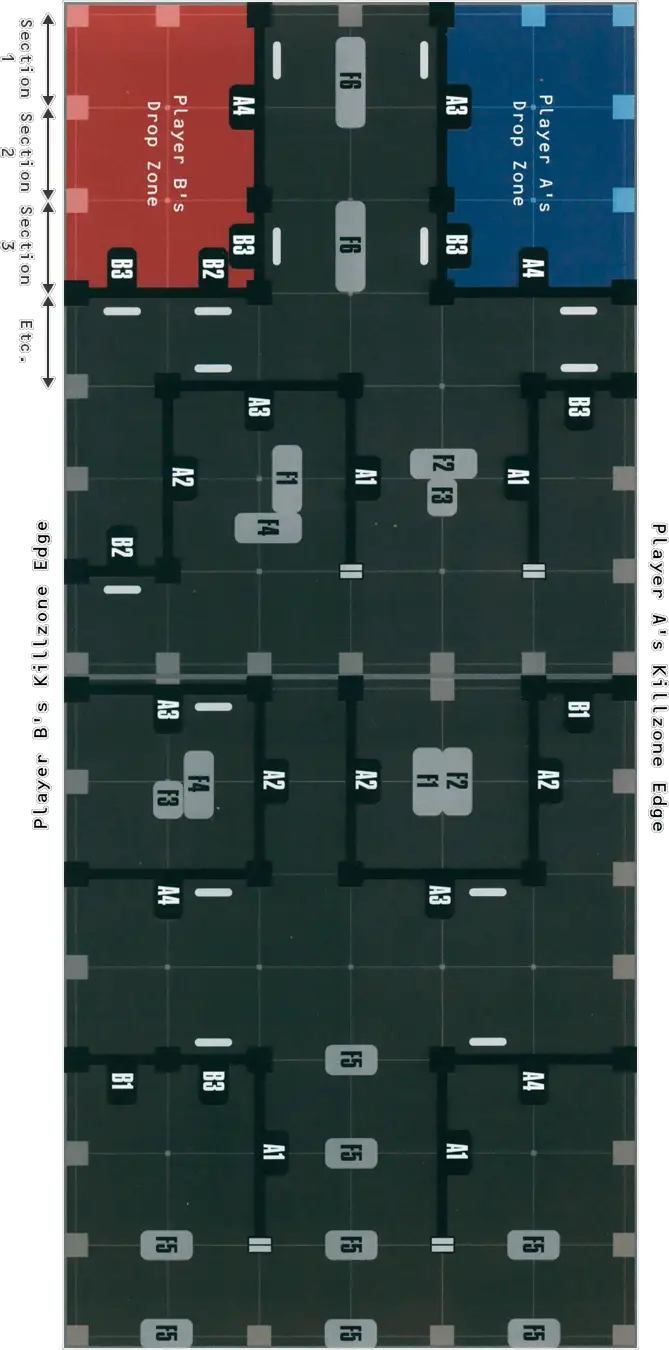
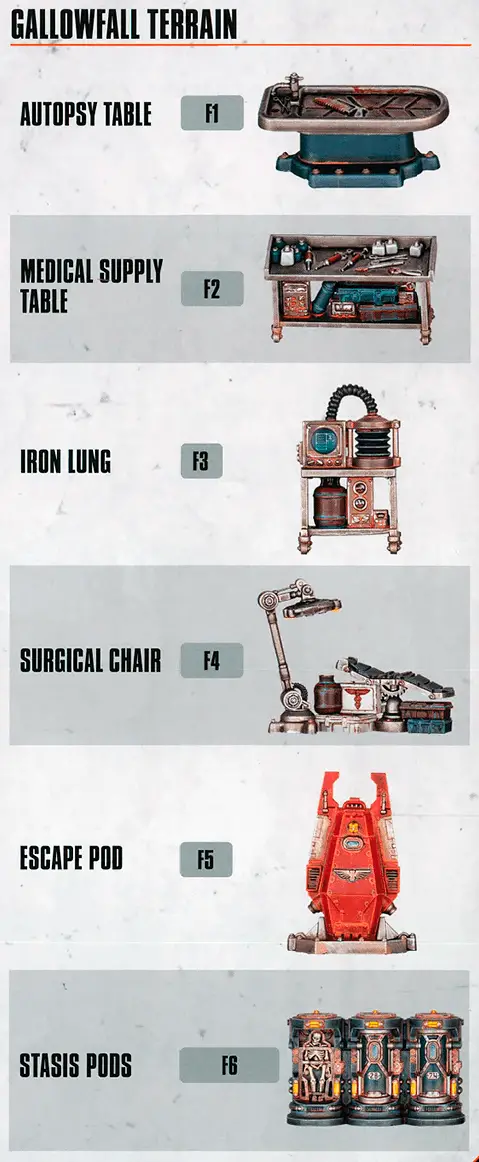
Killzone: Gallowfall
Killzone: Gallowfall is a supplement to Killzone: Gallowdark. It includes medical equipment and escape pods that are vital for survival and provide unique mission rules in the Shadow Operations: Gallowfall mission pack.
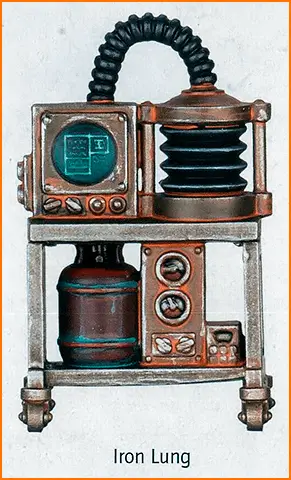
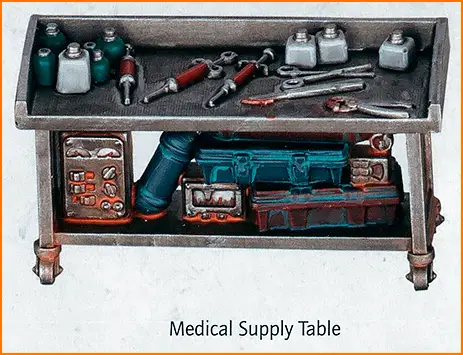
Medical Equipment
Medical Equipment terrain features have the Light and Traversable traits.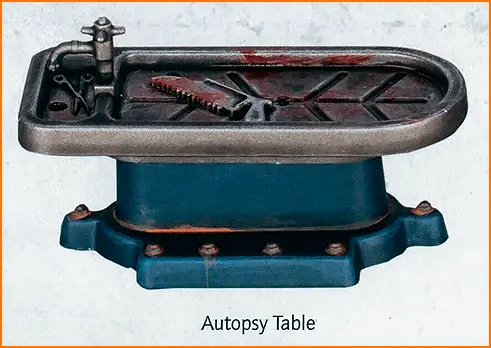
Escape Pod
An Escape Pod terrain feature has two parts - a pod and a launch stand. All parts have the Heavy trait.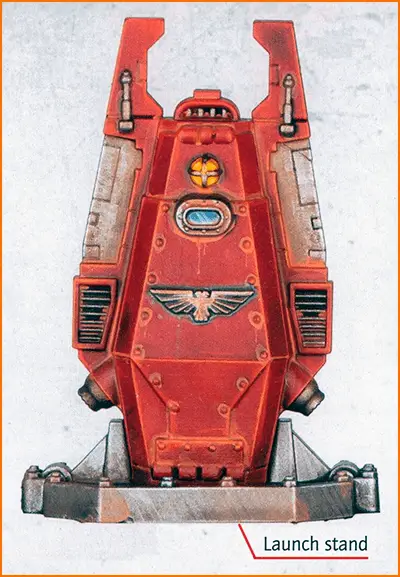
Stasis Pods
A Stasis Pods terrain feature has the Heavy trait.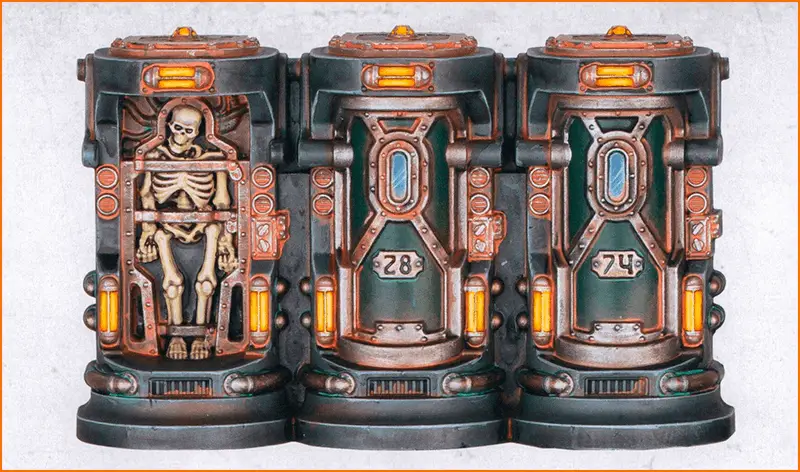
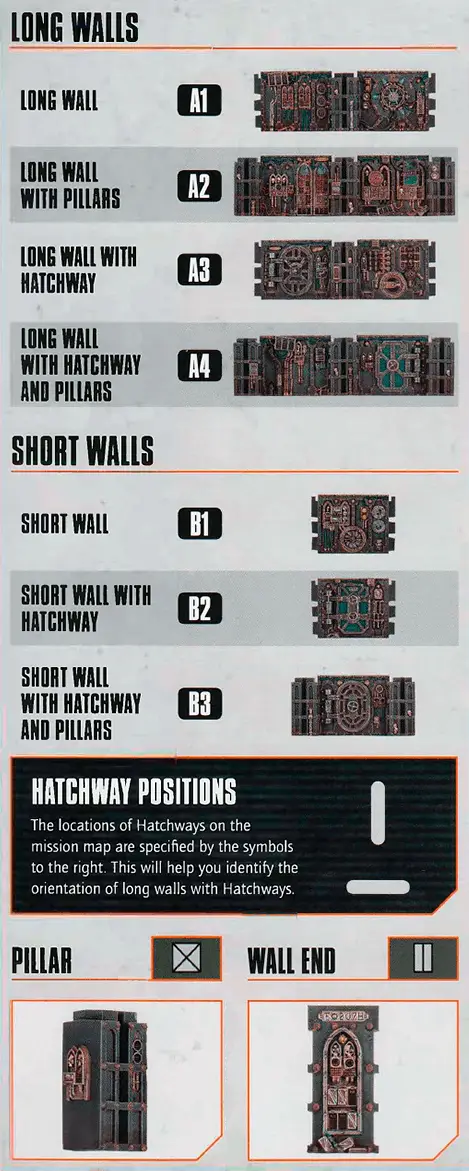
Killzone Key Reference
Dataslates and Datacards
Hearthkyn Salvager and Fellgor Ravager Datacards:
Hearthkyn Salvager Narrative Dataslate:
Fellgor Ravager Narrative Dataslate:
- Universal actions can be performed by all operatives. They are detailed below.
- Unique actions are actions detailed on an operative’s datacard that only they can perform, such as the Dakka Dash action found on the example datacard.
- Mission actions are specific to the mission you are playing, and will be detailed by that mission’s briefing. Missions can be found here (Open Play mission) and here (Spec Ops Narrative missions).
- Free actions can only be performed when another rule specifies. Each time an operative would perform a free action, the following rules apply.
- The operative can perform the action, so long as the requirements of the action are met.
- The player does not subtract any additional AP to perform the action.
- The operative would still count as performing the action for all rules purposes. For example, if it performed it during its activation, it would not be able to perform the action again during that activation.
For example, when a KOMMANDO DAKKA BOY performs a Dakka Dash action (see unique actions, above), it can perform a free Dash and free Shoot action without subtracting any additional AP (other than the AP spent on the Dakka Dash action). However, it is subject to those actions’ requirements, therefore it cannot perform the free Dash action if it is within Engagement Range of enemy operatives, and cannot perform the free Shoot action if it is within Engagement Range of enemy operatives or has a Conceal order. In addition, for each of the free actions it performs, it cannot perform them again during its activation.
The datacards using MEDIC keyword can be found in the following Factions:
Chaos: Blooded.Imperium: Elucidian Starstrider, Exaction Squad, Inquisitorial Agent, Kasrkin, Novitiate, Phobos Strike Team, Veteran Guardsman.
Aeldari: Corsair Voidscarred.
Xenos: Brood Brother, Hearthkyn Salvager, Hierotek Circle, Pathfinder.
The MEDIC keyword is used in the following datacards:
1.2 Cripple the Foe 1.3 Escape the Hulk 1.4 Ageing Remains 1.5 Critical Surgery 1.6 Vital Communiqué 2.3 Abandon Ship