
Soulshackle
Welcome to Kill Team: Soulshackle. This is the third instalment in the latest series of Kill Team, following the fortunes of elite squads of warriors amongst the nightmarish innards of the space hulk known as the Gallowdark. Predators, thieves, assassins, crusaders and myriad others fight and explore within this deadly vessel. Either hunger or duty drive them to brave its depths.
 2.1 Reignite Comms 2.2 Bridge Assault 3.1 Service Tunnels 3.2 Hasty Defence 3.3 Recover Archives
Books
| Book | Kind | Edition | Version | Last update |
| | ||||
| | Expansion | 2 | February 2023 | |
Shadow Operations: Soulshackle Mission Pack
The first four missions have more symmetric mission rules and objectives, meaning both players will be attempting to achieve the same thing. The final five missions are asymmetric, where the Attacker and Defender have different goals to achieve and different strategies to achieve them. In these missions the Attacker must utilise an aggressive strategy to breach the Defender’s prepared position.
To randomly determine a Shadow Operations: Soulshackle mission, one player rolls one D3 to determine one of the tables below, then the other player rolls one D3 to determine the mission from that table.
| ||||||||||
| ||||||||||
| ||||||||||
Inload Data-gheist
The enemy are accessing a functioning data control system. Whether it be a corruptive machine spirit, a security override or the transmission of military secrets, their information must be stopped at all costs!
INLOAD DATA-GHEIST1AP
EXORCISE INLOAD1AP
SPEC OPS CAMPAIGN
If you are playing this mission as part of a Spec Ops campaign, the following mission rules also apply: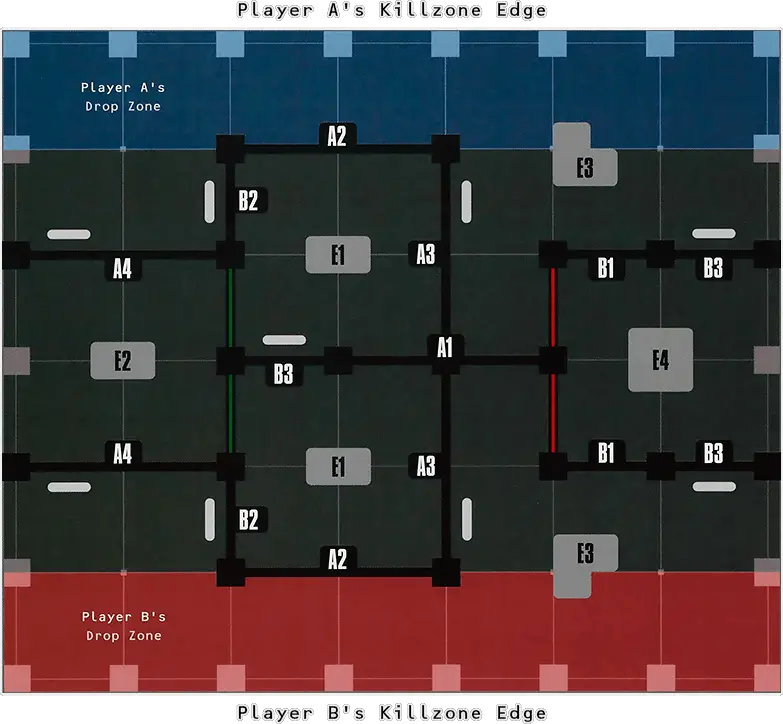
Awaken Control Cores
They are already accessing active systems. Soon they will divert enough energy to awaken even those quiescent systems that have lain dormant for millennia. We must sever their access or the ancient data will be lost.
AWAKEN CONTROL CORES1AP
ACCESS DORMANT CONSOLE1AP
At the end of each Turning Point:
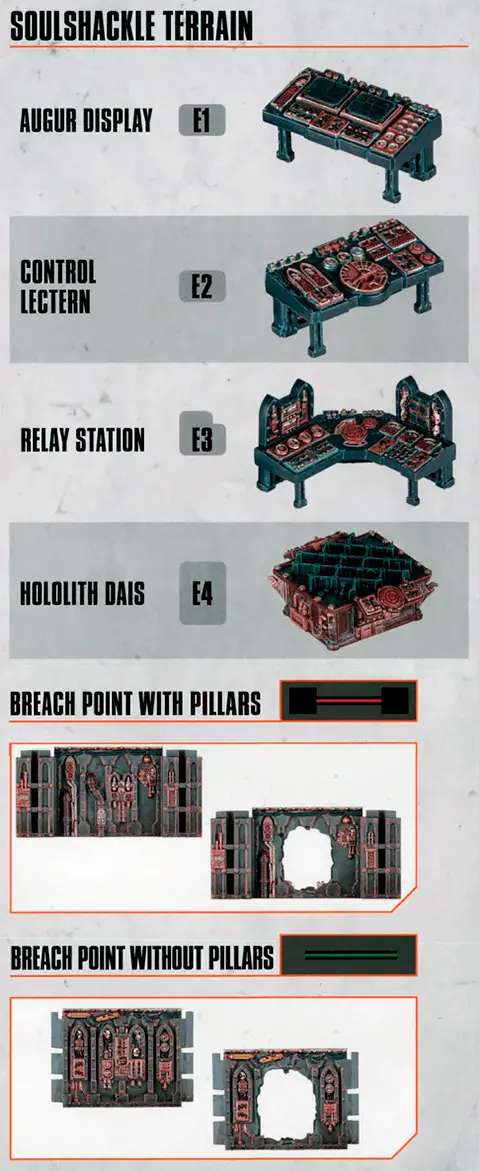
- If friendly operatives control more Augur Display (E1) Console terrain features than enemy operatives do, you score 1VP.
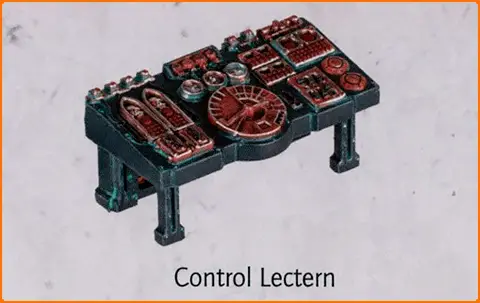
- If friendly operatives control more Control Lectern (E2) Console terrain features than enemy operatives do, you score 1VP.
SPEC OPS CAMPAIGN
If you are playing this mission as part of a Spec Ops campaign, the following mission rules also apply: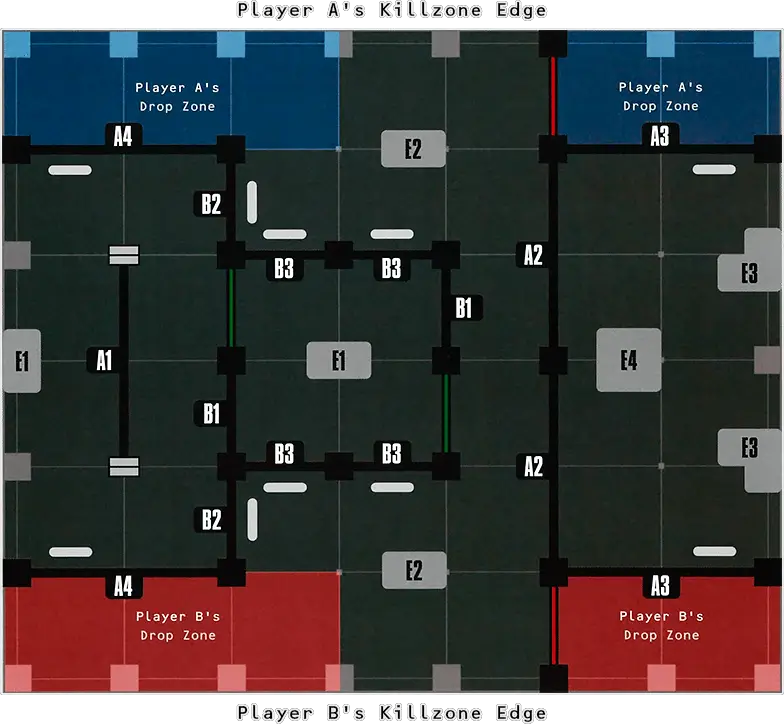
Cryptogrammic Raid
Coiled helices of data-heavy code are stored within the bowels of this ship fragment, accessible at a handful of controls. Some fear the code’s cryptic nature: is it xenos, is it corrupt, is it aware? There are also those who would pay for it, with information or far darker commodities.
RAID DATA1AP
Data Limit: For the purposes of the Raid Data mission action, each Console terrain feature can be accessed a maximum of three times by each player’s kill team during the battle (we recommend placing a dice on each terrain feature to remind you how many times it can still be accessed).
- If an enemy operative was the last operative to perform the mission action at that terrain feature, you score an additional 1VP.
- If it is the Relay Station (E3) Console terrain feature that is closest to your opponent’s drop zone, you score an additional 2VPs.
SPEC OPS CAMPAIGN
If you are playing this mission as part of a Spec Ops campaign, the following mission rules also apply: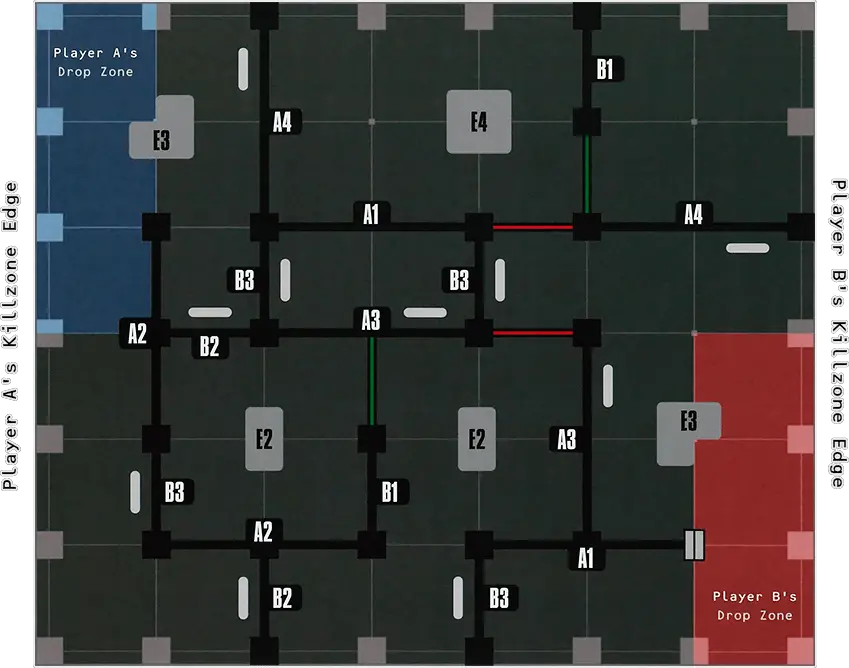
Reignite Comms
Deep in the bowels of the space hulk, a functioning transmission relay has been located. Kill teams race to re-establish broken communications in order to relay key information, arrange rendezvous or lure the unwary.
TRANSMIT1AP
At the end of the battle, add up the number of times enemy operatives performed the Transmit mission action. Subtract the result from 8. You score victory points equal to the total.
SPEC OPS CAMPAIGN
If you are playing this mission as part of a Spec Ops campaign, the following mission rules also apply: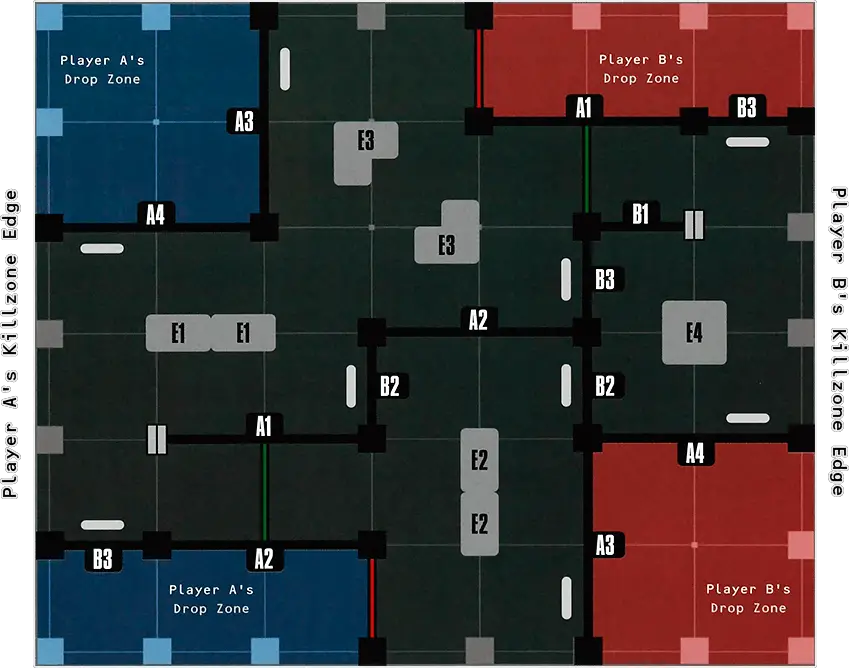
Bridge Assault
We’ve got the drop on them, but they’re dug in. Whatever systems they’ve got up and running in that semi-operationaI bridge need to be shut down. It’ll take an all-out assault; breaching charges at the ready. If we can’t access those systems, then neither will they.
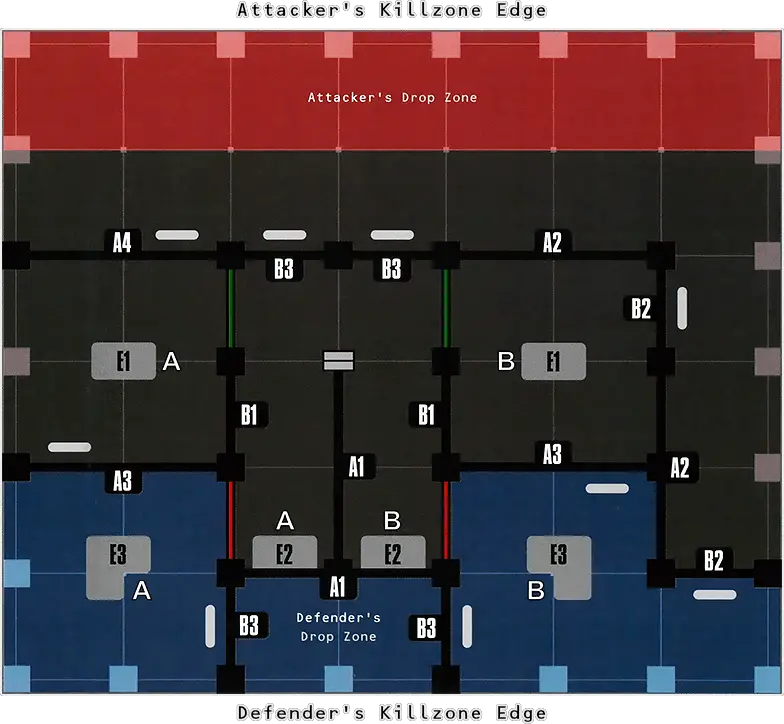
- In the Set Up Barricades step, the Defender can additionally set up to four Hatchway Jammers up, but they cannot be against the Hatchway labelled + (see mission map).
Breach Mission (Attacker):
- The Attacker cannot set up barricades.
- The Attacker always has the initiative.
- The Attacker’s operatives can perform the Plant Charge and Detonate Charge mission actions, as well as the following mission action:
SABOTAGE CONSOLE1AP
- For each Augur Display (E1) Console terrain feature that is sabotaged, the Attacker scores 1VP. For each that isn’t, the Defender scores 1VP.
- For each Relay Station (E3) Console terrain feature that is sabotaged, the Attacker scores 2VPs. For each that isn’t, the Defender scores 2VPs.
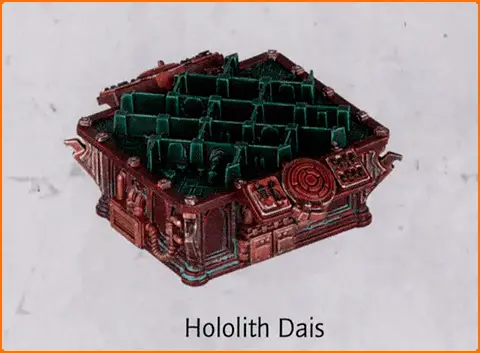
- If the Hololith Dais (E4) Console terrain feature is sabotaged, the Attacker scores 6VPs. If it isn’t, the Defender scores 6VPs.
SPEC OPS CAMPAIGN
If you are playing this mission as part of a Spec Ops campaign, the following mission rules also apply: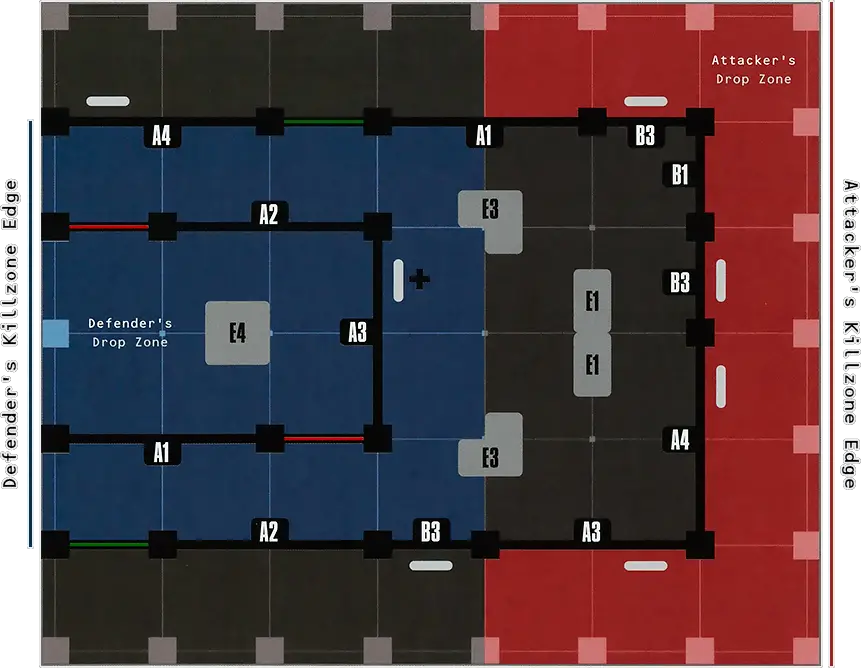
Command Centre Surrounded
A kill team has been pushed back to their command centre and will fight hard to defend the relic systems they can control from there. Their executioners have them surrounded, intent on routing them entirely and crippling what systems they have been able to rekindle.
- The Defender does not have a killzone edge.
- In the Set Up Barricades step, the Defender can additionally set up to four Hatchway Jammers up.
Breach Mission (Attacker):
- The Attacker does not have a killzone edge.
- The Attacker cannot set up barricades.
- The Attacker always has the initiative.
- The Attacker’s operatives can perform the Plant Charge and Detonate Charge mission actions.
- If friendly operatives control more Augur Display (E1) Console terrain features than enemy operatives do, you score 1VP.
- If friendly operatives control more Control Lectern (E2) Console terrain features than enemy operatives do, you score 1VP.
- If friendly operatives control more Relay Station (E3) Console terrain features than enemy operatives do, you score 1VP.
- If friendly operatives control the Hololith Dais (E4) Console terrain feature, you score 1VP.
SPEC OPS CAMPAIGN
If you are playing this mission as part of a Spec Ops campaign, the following mission rules also apply:If you are the Attacker and scored 8 or more victory points from the mission objective, each friendly operative that incapacitated one or more enemy operatives during the battle gains 1XP (this is not affected by a passed Casualty test).
Command Centre Routed: If you are the Attacker, are victorious and are currently undertaking the Purge Order Spec Op, then reduce by 1 the number of games required to complete that Spec Op’s Operation 1.
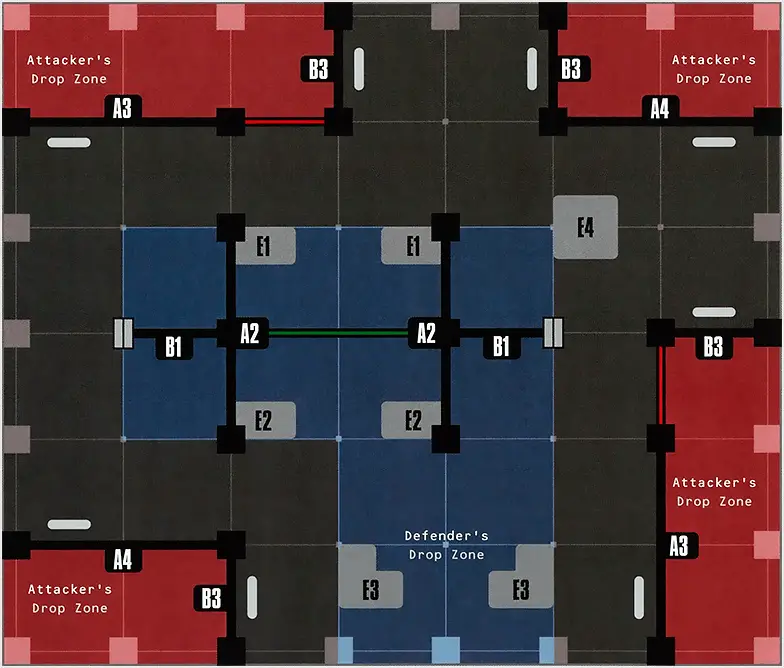
Service Tunnels
Within this wreck fragment’s lower decks, broad servo-ducts and bilge tunnels provide hidden access to maintenance control stations, and invaders have infiltrated them. The occupiers can hear them, they know they’re coming, but they won’t relinquish their lair without a fight.
- In the Set Up Barricades step, the Defender can additionally set up to four Hatchway Jammers up, but they cannot be against the Hatchway labelled + (see mission map).
Breach Mission (Attacker):
- The Attacker cannot set up barricades.
- The Attacker always has the initiative.
- The Attacker’s operatives can perform the Plant Charge and Detonate Charge mission actions.
- For each Augur Display (E1) or Control Lectern (E2) Console terrain feature that friendly operatives control, you score 1VP.
- If friendly operatives control the Hololith Dais (E4) Console terrain feature, you score 1VP.
- If friendly operatives control the Relay Station (E3) Console terrain feature, you score 1VP. Note that the Relay Station Consoles are treated as one connected terrain feature in this mission.
SPEC OPS CAMPAIGN
If you are playing this mission as part of a Spec Ops campaign, the following mission rules also apply:Infiltration Successful: If you are the Attacker, are victorious and are currently undertaking the Infiltrate the Enemy Spec Op, then reduce by 1 the number of games required to complete that Spec Op’s Operation 1.
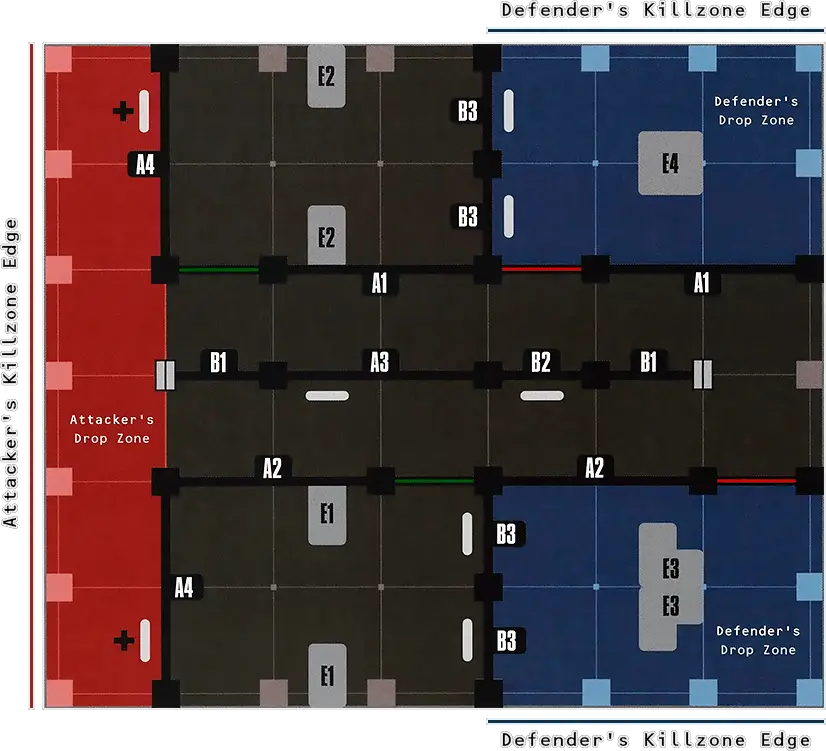
Hasty Defence
They’re right on our tails! Secure that hatch. Watch that junction. We haven’t much time but we can’t abandon this control hub. Hold them back; don’t Let them overwhelm our positions!
- The Defender does not have a killzone edge.
- In the Set Up Barricades step, the Defender can additionally set up to two Hatchway Jammers up.
Breach Mission (Attacker):
- The Attacker cannot set up barricades.
- The Attacker always has the initiative.
- The Attacker’s operatives can perform the Plant Charge and Detonate Charge mission actions.
- If your total is higher than your opponent’s, you score 2VPs.
- If your total is twice as high as your opponent’s, you score 2VPs.
SPEC OPS CAMPAIGN
If you are playing this mission as part of a Spec Ops campaign, the following mission rules also apply:Enemy Routed: If you are the Attacker, are victorious and are currently undertaking the Purge Order Spec Op, then reduce by 1 the number of games required to complete that Spec Op’s Operation 1.
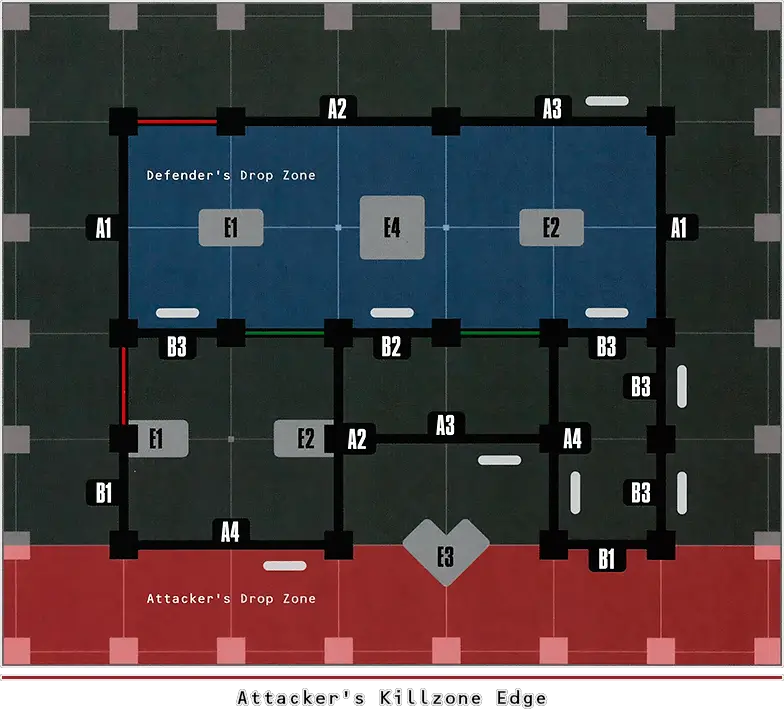
Recover Archives
A tantalising spoor of archaic data-webs has led to a hub of indexing chambers above a vast bibliovault that extends far below the rusted decking. The chambers are watched, and though their sentinels do not know what the invaders seek, they have vowed to deny it all the same.
Breach Mission (Defender):
- In the Set Up Barricades step, the Defender can additionally set up to two Hatchway Jammers up.
Breach Mission (Attacker):
- The Attacker cannot set up barricades.
- The Attacker always has the initiative.
- The Attacker’s operatives can perform the Plant Charge and Detonate Charge mission actions, as well as the following mission action:
RECOVER ARCHIVES1AP
|
SPEC OPS CAMPAIGN
If you are playing this mission as part of a Spec Ops campaign, the following mission rules also apply:If you are the Attacker and were victorious, each friendly operative that performed the Recover Archives mission action gains 1XP (this is not affected by a passed Casualty test).
Archives Recovered: If you are the Attacker, are victorious and are currently undertaking the Recover Archeotech Spec Op, then reduce by 1 the number of games required to complete that Spec Op’s Operation 1.
Killzone: Soulshackle
Killzone: Soulshackle is a supplement to Killzone: Gallowdark. Focusing the battle on key strategic command stations aboard the Gallowdark, it includes Breach Points - allowing certain operatives to create access points in the walls of the space hulk.
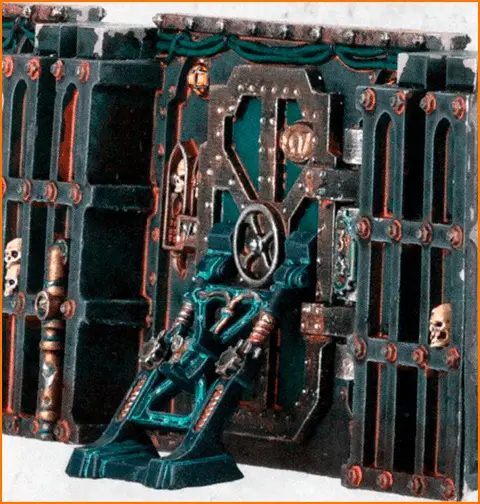
Breach Point
A Breach Point terrain feature has two statuses: closed and open. It has two parts - an access point and a breach wall - and their traits depend upon the Breach Point’s status.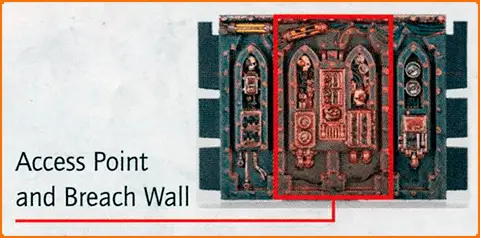
- Its breach wall must be fully within its access point.
- All parts of it have the Heavy and Wall traits.
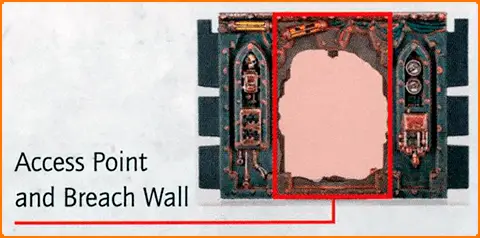
- Its breach wall must be removed from the killzone.
- Its access point has the Accessible trait.
Designer’s Note: An open Breach Point’s access point does not provide Cover, nor is it Obscuring. The Walls either side of the access point must be used for this instead.
PLANT CHARGE1AP
DETONATE CHARGE1AP
- On a 3+, that operative suffers D3 mortal wounds.
- On a 5+, subtract 1 from that operative’s APL.
- On a 6, that operative suffers D3 mortal wounds.
In addition, any operative can attempt to change a Breach Point’s status from closed to open by making a shooting attack against its breach wall using a weapon with the AP2 special rule. If it does so:
- In the Select Valid Target step, a breach wall is a valid target for shooting attacks if its Visible to the active operative, and no friendly operatives are both within of that breach wall and on the same side of it as the active operative.
- For any weapons that make an attack against each operative within range of a specified point (e.g. remote mine, melta mine, Blast X special rule, etc.), the breach wall is a valid target.
- In the Roll Attack Dice step, if two or more successful hits are retained, the Breach Point is open.
- At the end of the Roll Attack Dice step, the attack sequence ends.
Console
A Console terrain feature has the Light and Traversable traits.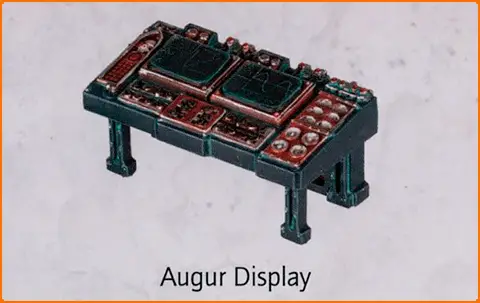

Hatchway Jammer
Jammed: While a Hatchway is jammed, it cannot be opened unless an operative performs the Operate Hatch action on the same side of the Hatchway as its Hatchway Jammer. If it does so, remove that Hatchway Jammer from the killzone.
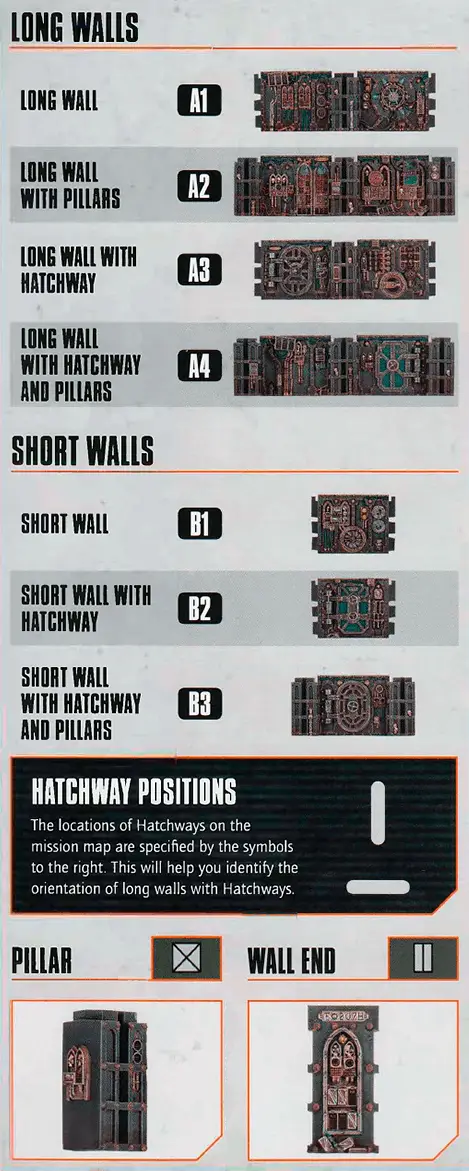
Killzone Key Reference
Dataslates and Datacards
Exaction Squad and Hand of the Archon Datacards:
Exaction Squad Narrative Dataslate:
Hand of the Archon Narrative Dataslate:
PLANT CHARGE1AP
- You can draw an imaginary, unobstructed straight line (known as a Visibility line) 1 mm wide from the head of the active operative’s miniature to any part of the miniature of the intended target (not its base).
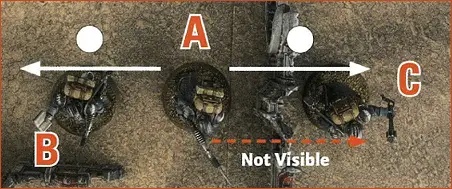
- An operative performs a Shoot action, selects a ranged weapon with the Blast special rule, and selects operative A as the target.
- After making the shooting attack against operative A, it makes a shooting attack against operative B, determining if it is a valid target as if operative A was making the shooting attack.
- It cannot make a shooting attack against operative C, as when determining if it is a valid target in this manner, operative C is not Visible to operative A due to the terrain feature between them.
DETONATE CHARGE1AP
- On a 3+, that operative suffers D3 mortal wounds.
- On a 5+, subtract 1 from that operative’s APL.
- On a 6, that operative suffers D3 mortal wounds.
In addition, any operative can attempt to change a Breach Point’s status from closed to open by making a shooting attack against its breach wall using a weapon with the AP2 special rule. If it does so:
- In the Select Valid Target step, a breach wall is a valid target for shooting attacks if its Visible to the active operative, and no friendly operatives are both within of that breach wall and on the same side of it as the active operative.
- For any weapons that make an attack against each operative within range of a specified point (e.g. remote mine, melta mine, Blast X special rule, etc.), the breach wall is a valid target.
- In the Roll Attack Dice step, if two or more successful hits are retained, the Breach Point is open.
- At the end of the Roll Attack Dice step, the attack sequence ends.
- Universal actions can be performed by all operatives. They are detailed below.
- Unique actions are actions detailed on an operative’s datacard that only they can perform, such as the Dakka Dash action found on the example datacard.
- Mission actions are specific to the mission you are playing, and will be detailed by that mission’s briefing. Missions can be found here (Open Play mission) and here (Spec Ops Narrative missions).
- Free actions can only be performed when another rule specifies. Each time an operative would perform a free action, the following rules apply.
- The operative can perform the action, so long as the requirements of the action are met.
- The player does not subtract any additional AP to perform the action.
- The operative would still count as performing the action for all rules purposes. For example, if it performed it during its activation, it would not be able to perform the action again during that activation.
For example, when a KOMMANDO DAKKA BOY performs a Dakka Dash action (see unique actions, above), it can perform a free Dash and free Shoot action without subtracting any additional AP (other than the AP spent on the Dakka Dash action). However, it is subject to those actions’ requirements, therefore it cannot perform the free Dash action if it is within Engagement Range of enemy operatives, and cannot perform the free Shoot action if it is within Engagement Range of enemy operatives or has a Conceal order. In addition, for each of the free actions it performs, it cannot perform them again during its activation.
ACCESS DORMANT CONSOLE1AP
RAID DATA1AP
TRANSMIT1AP
RECOVER ARCHIVES1AP
- The intended target is more than from the active operative.
- The intended target is within of a point at which a Cover line crosses another operative’s base (unless that other operative is not itself in the active operative’s LoS), or a terrain feature that provides Cover (see Terrain Traits).
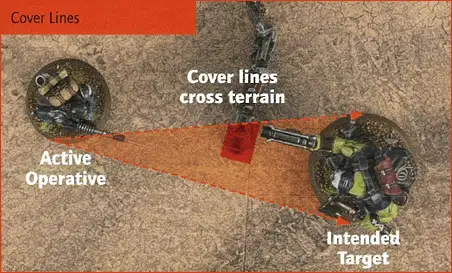
- The intended target is more than from a point at which a Cover line crosses a terrain feature that is Obscuring (see Terrain Traits). However, if the active operative is within of a point at which a Cover line crosses a terrain feature that is Obscuring, that part of the terrain feature is not treated as Obscuring.
OPERATE HATCH1AP
An operative can perform this action during a Dash or Normal Move action, and any remaining increments of movement can be used after it does so. Note, however, that opening a Hatchway can cause the operative to be within Engagement Range of an enemy operative, in which case that Dash or Normal Move action would immediately end (unless the operative has any rules that allow it to move within Engagement Range of an enemy operative, e.g. FLY).
Designer’s Note: If a Hatchway’s status is changed and operative placement would prevent the hatch from fully opening or closing, temporarily remove the necessary operatives from the killzone, fully open or close the hatch as appropriate, then return the operatives to the killzone as close as possible to their original location. If an operative is within an enemy operative’s Engagement Range before a hatch is opened, it must be returned within Engagement Range of that enemy operative after the hatch is opened.
2.1 Reignite Comms 2.2 Bridge Assault 3.1 Service Tunnels 3.2 Hasty Defence 3.3 Recover Archives