
Octarius
 1.1 Reconnoitre 1.3 Fuel Run 2.1 Eliminate Target 2.2 Saboteurs 2.3 Supply Drop 3.1 Ambush 3.2 Evac Inbound 3.3 Breach Defences
Shadow Operations: Octarius War Mission Pack
To randomly determine a Shadow Operations: Octarius War mission, one player rolls one D3 to determine one of the tables below, then the other player rolls one D3 to determine the mission from that table.
| ||||||||||
| ||||||||||
| ||||||||||
Reconnoitre
This killzone stands on a vital point of high ground, overlooking both yours and the enemy’s lines. Whoever can gain control of the area will have an unsurpassed vantage point from which to observe enemy movements.
RECON VANTAGE POINT1AP
SERVO-AUGER [1EP]
An operative with this equipment can continue to perform actions in a Turning Point even after performing the Recon Vantage Point action.
|
SPEC OPS CAMPAIGN
If you are playing this mission as part of a Spec Ops campaign, the following mission rules also apply: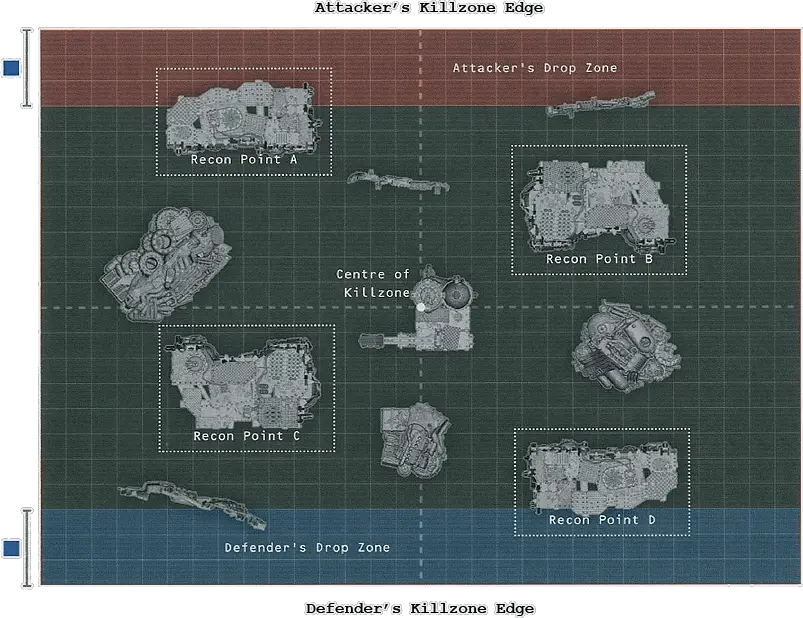
Search and Retrieve
One of our agents, carrying a rare and mysterious artefact, secreted it among the junk piles in this killzone before he was cut down in a greenskin ambush. Her actions ensured the artefact has not yet fallen into enemy hands. It is your task to locate and retrieve it, as well as any other valuable salvage.
SEARCH FOR RELIC1AP
Secure Relic: The Pick Up action can be performed upon the Relic objective marker. While an operative is carrying the Relic objective marker, it cannot perform Dash actions.
ARCHEO-AUSPEX [1EP]
Each time an operative with this equipment performs the Search for Relic action, add 1 to the dice roll to see if the Relic is discovered.- Each time a friendly operative performs the Search for Relic action, you score 1VP (to a maximum of 3VPs per player per Turning Point).
- If a friendly operative discovers the Relic, you score an additional 1VP.
- If a friendly operative controls the Relic objective marker at the end of the battle, you score an additional 2VPs (score 3VPs instead if a friendly operative is carrying the Relic objective marker).
SPEC OPS CAMPAIGN
If you are playing this mission as part of a Spec Ops campaign, the following mission rules also apply: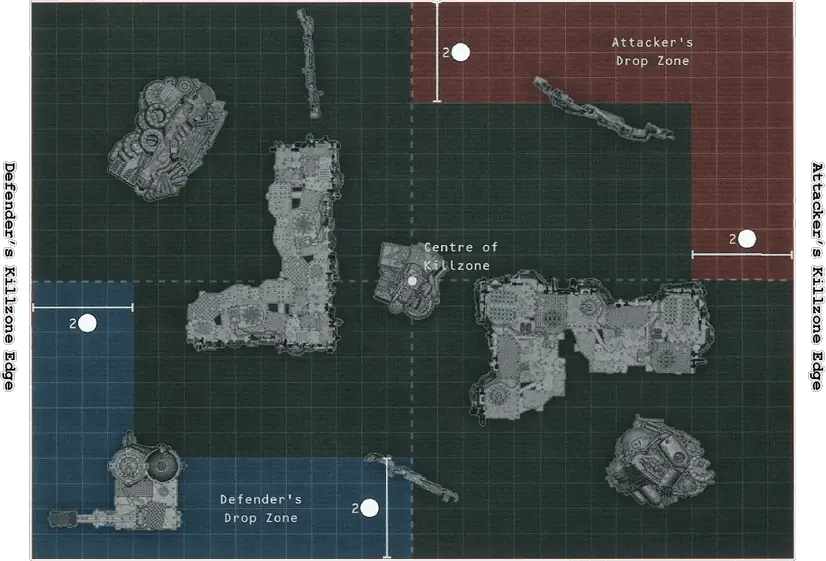
Fuel Run
Our promethium reserves are desperately low. Infiltrate the promethium pumping station in this killzone and take what you can by any means necessary.
SIPHON THE GOOD STUFF1AP
Recover Fuel: The Pick Up action can be performed upon any objective marker. While an operative is carrying an objective marker, it cannot perform Dash actions.
Volatile Promethium: Each time a friendly operative makes a shooting attack, if the target is carrying an objective marker, in the Roll Attack Dice step of that shooting attack, if you retain any critical hits, the fuel canister might explode. After resolving al! of that operative's shooting attacks for that action, before removing incapacitated operatives, roll one D6 for each fuel canister that might explode: on a 6, all operatives within of the operative carrying that objective marker suffer 1 mortal wound. That objective marker the model was carrying is then removed from the battle.
AUTO-EXTRACTOR [1EP]
Each time an operative with this equipment performs the Siphon the Good Stuff action, provided it is not carrying any other objective marker, do not place a Refined Fuel objective marker within of that operative: instead, that operative is automatically carrying that objective marker.- Each time a friendly operative performs the Siphon the Good Stuff action, you score 1VP.
- At the end of the battle, for each objective marker friendly operatives control, you score 2VPs.
- At the end of the battle, if you control one or more Refined Fuel objective markers, you score an additional 3VPs.
SPEC OPS CAMPAIGN
If you are playing this mission as part of a Spec Ops campaign, the following mission rules also apply: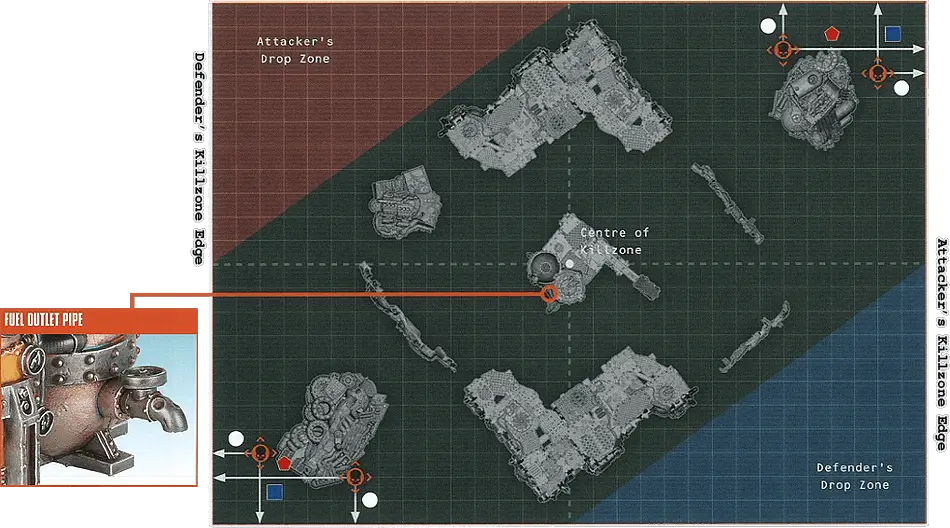
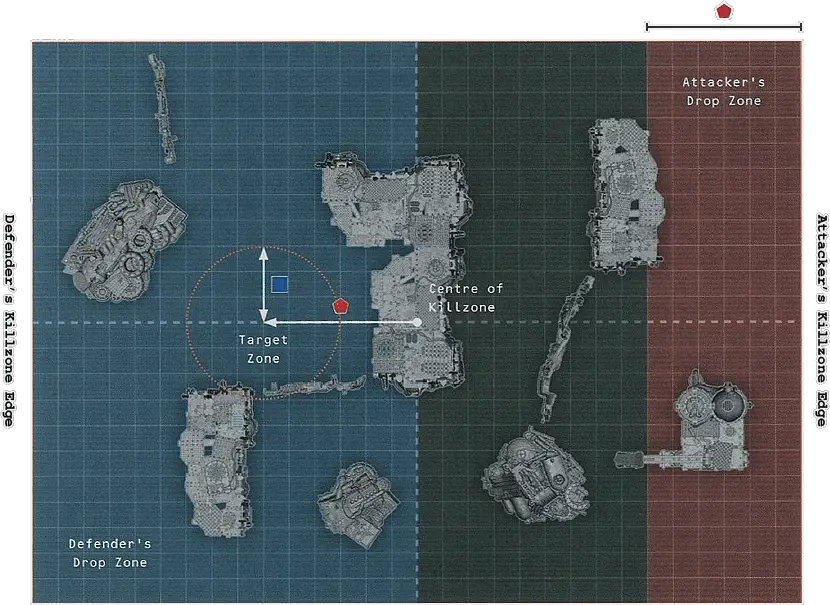
Eliminate Target
An enemy commander is in the area to personally oversee the final stages of preparation for an as-yet unknown plan. If this can be disrupted, or the leader slain, it will strike a massive blow for the ongoing war effort. The commander will be protected. Expect to fight through them.
Operatives can perform the following mission action:
OVERSEE PLANS1AP
Surprise Attack: The Attacker decides who has the initiative in the first Turning Point.
AUTO-MEDICAE [1EP]
Once per Turning Point, one operative equipped with an auto-medicae can perform the following action:ADMINISTER MEDICAE1AP
- Each time the Defender’s Commander performs the Oversee Plans action, the Defender scores 2VPs.
- At the end of the battle, whichever player controls the target zone scores 3VPs. A player controls the target zone if the combined APL of all friendly operatives within the target zone is greater than the combined APL of all enemy operatives within the target zone.
- At the end of the battle, if the Defender’s Commander has all of its Wounds remaining, the Defender scores 1VP.
- At the end of the battle, if the Defender’s Commander is Injured, the Attacker scores 6VP (if the Defender’s Commander is Incapacitated, the Attacker scores 9VPs instead.
SPEC OPS CAMPAIGN
If you are playing this mission as part of a Spec Ops campaign, the following mission rules also apply:- If the Attacker scores 3 or more VPs from Seek and Destroy Tac Ops during this battle, they gain 1 additional Requisition point.
- If the Defender scores 3 or more VPs from Security Tac Ops during this battle, they gain 1 additional Requisition point.
Hardly a Scratch: If the Defender is undertaking the Perform Ritual or Secure District Spec Op, then at the end of the battle, if their commander is not incapacitated and did not suffer damage before the last Turning Point, reduce by 1 the number of games required to complete that Spec Op’s Operation 1.
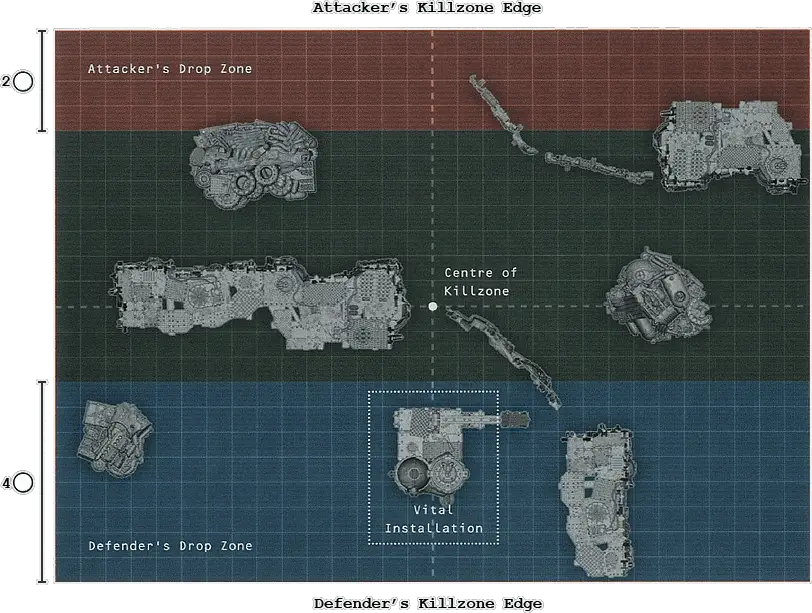
Saboteurs
Your distraction effort was successful. Fully half the sentries around the communications installation vital to our foes are elsewhere. There has never been a greater opportunity to knock out this infrastructure. Go in, strike hard and destroy it, before they discover the ruse.
It’s a Decoy, Return to Base: At the start of the Strategy phase of the second Turning Point, the Defender rolls one D6 for each of their operatives that were in the force that were lured away by the Attacker’s ruse. On a 4+, that operative has returned to the killzone and the Defender can set that operative up anywhere that is wholly within their drop zone, wholly within of a killzone edge and more than from enemy operatives. At the start of the Strategy phase of the third Turning Point, all of the Defender’s remaining operatives who were lured away by the Attacker’s ruse return to the killzone, and are set up anywhere that is wholly within of a killzone edge and more than from enemy operatives.
The Attacker’s operatives can perform the following mission action:
PLANT EXPLOSIVES1AP
MELTA CHARGES [1EP]
Each time an operative equipped with melta charges performs the Plant Explosives action, the vital installation suffers 1 additional Damage point.The Defender’s operatives can be equipped with the following equipment:
EMERGENCY VOX [1EP]
Each time you roll to see if an operative returns to the killzone, if that operative is equipped with an Emergency Vox, add 1 to the dice roll.
|
SPEC OPS CAMPAIGN
If you are playing this mission as part of a Spec Ops campaign, the following mission rules also apply:- If the Attacker scores 3 or more VPs from Infiltration Tac Ops during this battle, they gain 1 additional Requisition point.
- If the Defender scores 3 or more VPs from Security Tac Ops during this battle, they gain 1 additional Requisition point.
Razed to the Ground: If the Attacker is currently undertaking the Demolition or Infiltrate the Enemy Spec Op, then at the end of the battle, if the vital installation has suffered 7 or more Damage points, reduce by 1 the number of games required to complete that Spec Op’s Operation 1.
Supply Drop
Vital supplies are incoming, but the foe will try to intercept them. Clear all three potential Landing zones of the enemy. If you fail, we will be Lost.
HOMING BEACON [1EP]
Once per Turning point, one operative equipped with an homing beacon can perform the following action:ACTIVATE HOMING BEACON1AP
|
SPEC OPS CAMPAIGN
If you are playing this mission as part of a Spec Ops campaign, the following mission rules also apply: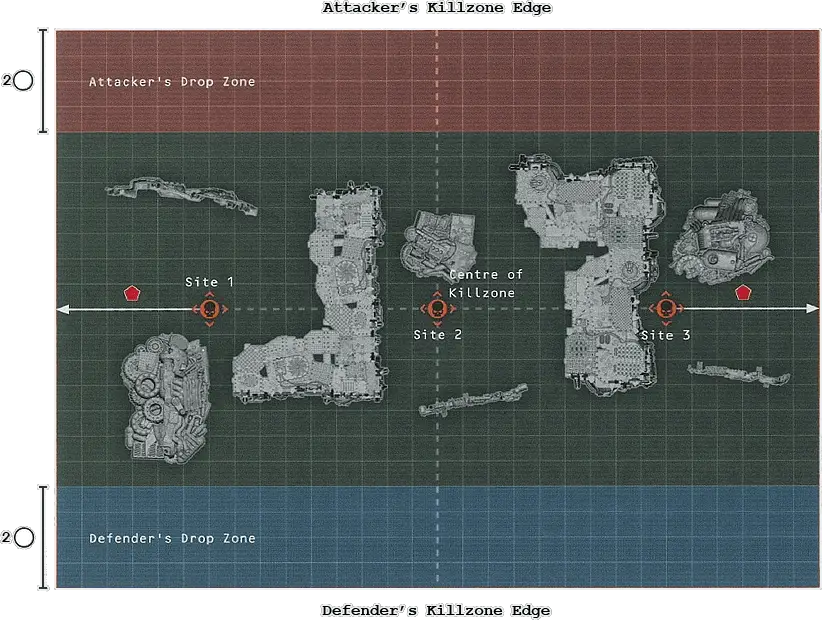
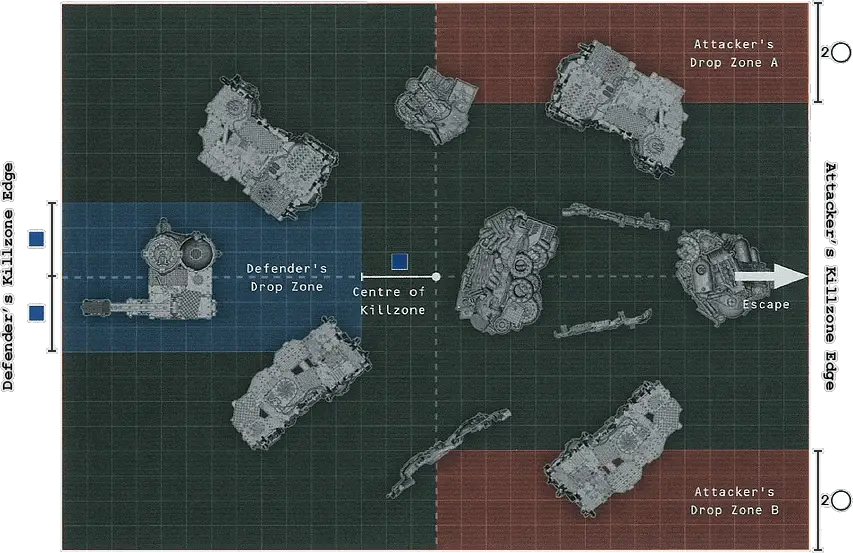
Ambush
Your forces have prepared an ambush for an enemy patrol and lain in wait for the perfect moment to strike. Alas, mere moments before you strike, the prey has realised their danger, and unless you attack now all hope of a swift victory will be lost.
Once all the Attacker’s Concealed Deployment markers are set up, the Defender then sets up their entire kill team as normal. Once they have done so, the Attacker’s Concealed Deployment markers are all turned face up and replaced with the corresponding operative.
Element of Surprise: The Attacker decides who has the initiative in the first Turning Point.
Escape: The Defender’s operatives can move off the Attacker’s killzone edge. If they do, they are said to have escaped and take no further part in this mission, but do not count as having been incapacitated for any rules reasons.
DECOY [1EP]
For each operative in your kill team that is equipped with a decoy, you can set up one additional Concealed Deployment marker when you set up your forces. This marker is blank, and is removed after all other non-decoy markers have been replaced with operatives.The Defender’s operatives can be equipped with the following equipment:
SCANNERS [2EP]
For each operative in your kill team that is equipped with scanners, you can, before setting up any of your operatives during deployment, select one Concealed Deployment marker on the killzone. The Attacker must turn the marker face up and, if it is an operative, replace that marker with the corresponding operative.- Each time one of the Defender’s operatives escapes, the Defender scores 2VPs.
- Each time one of the Defender’s operatives is incapacitated, the Attacker scores 2VPs.
SPEC OPS CAMPAIGN
If you are playing this mission as part of a Spec Ops campaign, the following mission rules also apply:- If the Attacker scores 3 or more VPs from Seek and Destroy Tac Ops during this battle, they gain 1 additional Requisition point.
- If the Defender scores 3 or more VPs from Security Tac Ops during this battle, they gain 1 additional Requisition point.
Evasion: If the Defender is currently undertaking the Extraction or Breakout Spec Op, then at the end of the battle, if at least half of their operatives escaped the ambush, reduce by 1 the number of games required to complete that Spec Op’s Operation 1.
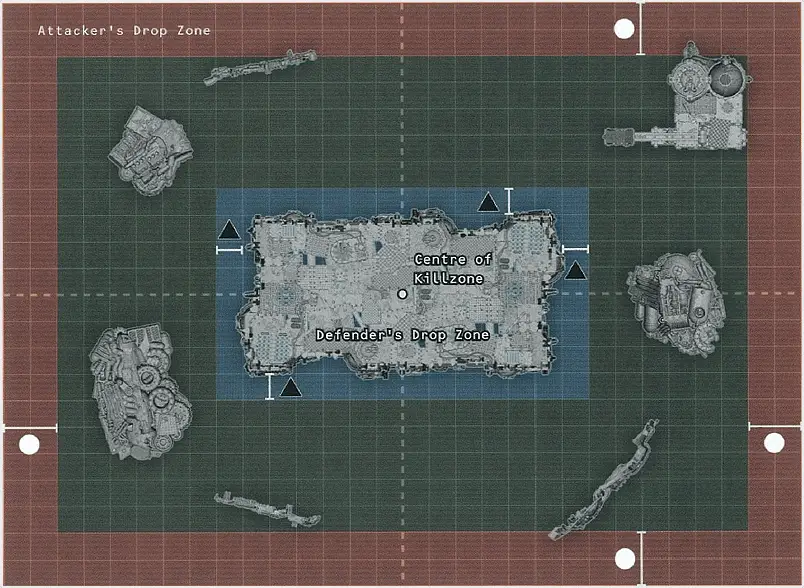
Evac Inbound
Hold firm. Relief force and evacuation transport inbound. You will be rescued. Do not let the intelligence you’ve retrieved fall into enemy hands. Do whatever it takes.
Fort: The four Wall terrain features in this mission are combined to create a single Fort. Operatives cannot move into this Fort - they must instead climb onto its Vantage Point.
Relief Forces Inbound: After the Defender has selected their kill team, they must divide their kill team into two forces, with as equal a number of models in each as possible. The Attacker then selects one of these forces: that force is the Relief Force and will not start the battle on the killzone, but will arrive later during the battle. Operatives in the other group are known as the Spies.
Reinforcements Have Arrived: At the start of the Strategy phase of the second Turning Point, the Defender rolls one D6 for each of their Relief Force operatives: on a 4+, that operative has returned to the killzone and the Defender can set that operative up anywhere that is wholly within of any battlefield edge and not within Engagement Range of an enemy operative. At the start of the Strategy phase of the third Turning Point, all of the Defender’s remaining Relied Force operatives return to the killzone, and are set up anywhere that is wholly within of any battlefield edge and not within Engagement Range of an enemy operative.
Low Ammo: Each time a Spy operative performs a Shoot or Overwatch action, after that action has been resolved, roll one D6: on a 1-2, place a marker next to that operative to denote it is Out of Ammo. That operative cannot perform any Shoot or Overwatch actions with any weapons listed on their datacards while it has this marker.
Spy Operatives can perform the following mission action:
REDISTRIBUTE AMMO & RELOAD1AP
JAMMERS [1EP]
Once per Turning Point, when the Defender rolls to see if a Relief Force operative arrives in the killzone, an operative equipped with jammers can use them. If they do, the Defender must subtract 1 from the dice roll.The Defender’s operatives can be equipped with the following equipment:
SPARE AMMO [1EP]
Once per battle, the first time an ammo roll is failed for this operative, that ammo roll is considered to have been passed instead.- At the end of each Turning Point, the Defender scores 1 Victory point for each of their Spy operatives that are on a Vantage Point of a terrain feature that is wholly within their drop zone (to a maximum of 3VPs per Turning Point).
- Each time one of the Defender’s Spy operatives is incapacitated, the Attacker scores 3VPs.
- At the end of the battle, for each of the Defender’s Spy operatives that are on the battlefield and injured, or that are on the battlefield but not on a Vantage Point of a terrain feature that is wholly within their drop zone, the Attacker scores 1VP.
SPEC OPS CAMPAIGN
If you are playing this mission as part of a Spec Ops campaign, the following mission rules also apply:- If the Attacker scores 3 or more VPs from Infiltration Tac Ops during this battle, they gain 1 additional Requisition point.
- If the Defender scores 3 or more VPs from Recon Tac Ops during this battle, they gain 1 additional Requisition point.
Exfiltration: If the Defender is currently undertaking the Extraction or Secure District Spec Op, then at the end of the battle, if none of their Spy operatives were incapacitated and all of them are within the Defender’s drop zone, reduce by 1 the number of games required to complete that Spec Op’s Operation 1.
Breach Defences
The army attacks the enemy Lines in force tomorrow. To pave the way, you must breach the enemy’s defences. Under cover of darkness, scale or circumvent them and plant sapping charges. Operational freedom granted - if opportunity presents itself, destroy anything else of value you can find.
SAPPING CHARGES1AP
GRAPNEL-HOOKS [1EP]
The operative gains the following ability:Grapnel-hook:
- Each time this operative ascends or descends a terrain feature while climbing, the first vertical distance of up to 3 it travels are counted as for that climb.
- This operative does not need to be within of a physical and climbable part of a terrain feature in order to climb it.
- Each time this operative drops, the intended location can be any vertical distance from the level it occupies.
- Each time this operative drops, it counts any vertical distance it travels as half for that drop.
- At the end of each Turning Point, you score 1VP if one of more friendly operatives are wholly within the enemy’s drop zone.
- At the end of each Turning Point, you score 1VP if you control the Oil Pump Vantage Point objective marker.
- At the end of the battle, you score 4VPs for each objective marker in the enemy’s drop zone that was sapped.
- At the end of the battle, you score 2VPs for each objective marker in your drop zone that was not sapped.
SPEC OPS CAMPAIGN
If you are playing this mission as part of a Spec Ops campaign, the following mission rules also apply: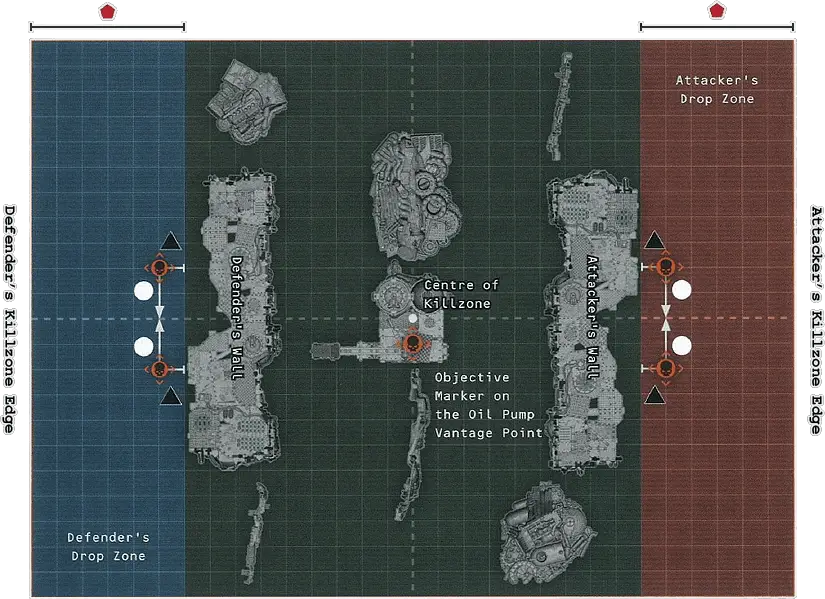
Killzone: Octarius
Killzone: Octarius is a killzone made up of the detritus and debris of battle. While it might appear ramshackle, it is in fact a defendable position that allows operatives to use cover and safely advance on their enemy. It also provides numerous vantage points to rain down fire on enemies seeking shelter behind barricades and scrap piles. Killzone: Octarius consists of the following terrain features, with their traits detailed below:- Four Ramshackle Walls
- One Oil Pump
- Three Ramshackle Barricades
- Three Scrap Piles
Ramshackle Wall
A Ramshackle Wall terrain feature includes parts with different traits (Traversable, Heavy, Vantage Point).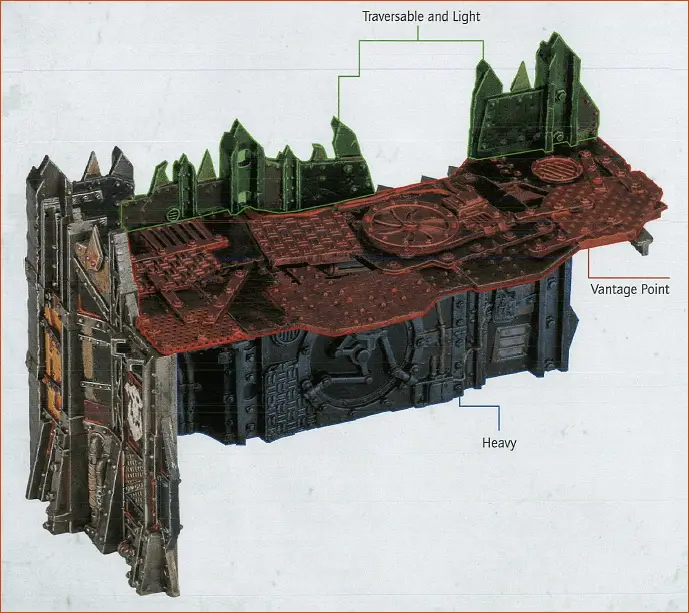
Oil Pump
An Oil Pump includes a part with the Vantage Point trait. All other parts of it have the Heavy trait.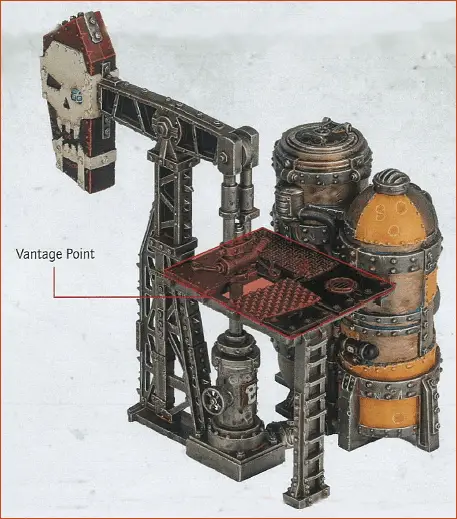
Ramshackle Barricade
All parts of a Ramshackle Barricade terrain feature have the Light and Traversable traits.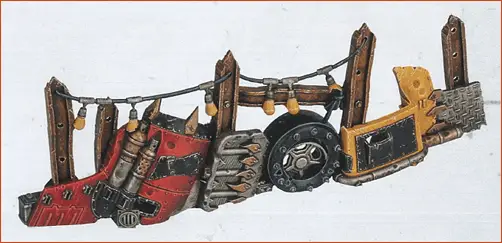
Scrap Pile
All parts of a Scrap Pile terrain feature have the Light and Scramble traits.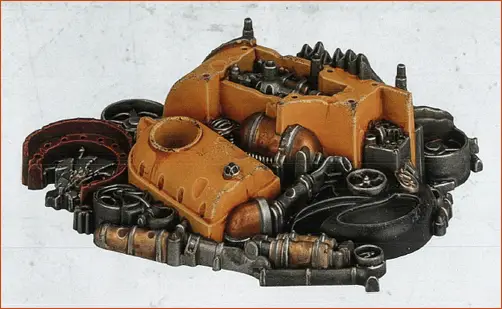
Scramble: An operative cannot climb over this part of the terrain feature. Instead, they must scramble over it. To do so, an operative must perform a Scramble Over or Charge Over action.
SCRAMBLE OVER1AP
- Move the operative as though it can FLY and has an unlimited Movement characteristic. The operative cannot move over any other terrain features during this move.
- It must finish the move within of a part of this terrain feature that has the Scramble trait.
- It can move within Engagement Range of an enemy operative, but cannot finish its move within Engagement Range of an enemy operative.
CHARGE OVER1AP
- Move the operative as though it can FLY and has an unlimited Movement characteristic. The operative cannot move over any other terrain features during this move.
- It must finish the move within of a part of this terrain feature that has the Scramble trait.
Dataslates and Datacards
Orks and Veteran Guardsman Datacards:
Veteran Guardsman Narrative Dataslate:
Orks Narrative Dataslate:
- Universal actions can be performed by all operatives. They are detailed below.
- Unique actions are actions detailed on an operative’s datacard that only they can perform, such as the Dakka Dash action found on the example datacard.
- Mission actions are specific to the mission you are playing, and will be detailed by that mission’s briefing. Missions can be found here (Open Play mission) and here (Spec Ops Narrative missions).
- Free actions can only be performed when another rule specifies. Each time an operative would perform a free action, the following rules apply.
- The operative can perform the action, so long as the requirements of the action are met.
- The player does not subtract any additional AP to perform the action.
- The operative would still count as performing the action for all rules purposes. For example, if it performed it during its activation, it would not be able to perform the action again during that activation.
For example, when a KOMMANDO DAKKA BOY performs a Dakka Dash action (see unique actions, above), it can perform a free Dash and free Shoot action without subtracting any additional AP (other than the AP spent on the Dakka Dash action). However, it is subject to those actions’ requirements, therefore it cannot perform the free Dash action if it is within Engagement Range of enemy operatives, and cannot perform the free Shoot action if it is within Engagement Range of enemy operatives or has a Conceal order. In addition, for each of the free actions it performs, it cannot perform them again during its activation.
- You can draw an imaginary, unobstructed straight line (known as a Visibility line) 1 mm wide from the head of the active operative’s miniature to any part of the miniature of the intended target (not its base).