
Into the Dark
Welcome to Kill Team: Into the Dark. This volume is the first of a new season of Kill Team in which squads of elite troops from across many of the galaxy’s factions delve into the dangerous interior of the space hulk known as the Gallowdark. Whether they have come in search of battle, wealth, ancient lore or for some other nefarious reason, all are willing to kill any in their path - if the predacious denizens of the Gallowdark or the space hulk itself don’t get them first...
 1.2 Airlocked 1.3 Subsidence 2.1 Desperate Raid 2.2 Deadly Hangar 2.3 Maze Breakout 3.1 Power Overload 3.3 Contact Lost 1.2 Power Surge 1.3 Supply Raid 2.1 Junction Assault 3.1 Forge Stronghold 3.2 Vault Plunder 3.3 Exposed Trove
This book gives you a glimpse of the madness, confusion and horror to be found by kill teams when fighting aboard a portion of a gargantuan, labyrinthine space hulk. It includes faction army lists for two brand new kill teams - the boarding troops of the Imperial Navy Breachers and opportunistic mercenaries of the Kroot Farstalker Kinbands. There is plenty more rules content besides this, including nine matched play missions, nine narrative play missions, mission rules for fighting in close quarters, killzone rules and a narrative campaign for exploring a section of the Gallowdark.
Books
| Book | Kind | Edition | Version | Last update |
| | ||||
| | Expansion | 2 | September 2022 | |
Shadow Operations: Into The Dark Mission Pack
The scoring parameters of the mission objectives vary across the mission pack, therefore having an expansive roster will allow you to select the right operatives for the mission. They have been designed to immerse you in the story of your operatives as they explore and understand the Gallowdark, with a particular mind to rewarding players who use these missions as part of a Spec Ops campaign. Therefore, they are especially suited to narrative play.
The missions use Killzone: Gallowdark, and Killzone: Into the Dark to supplement it. The location of terrain features are specified using a key system, as described here.
To randomly determine a Shadow Operations: Into the Dark mission, one player rolls one D3 to determine one of the tables below, then the other player rolls one D3 to determine the mission from that table.
| ||||||||||
| ||||||||||
| ||||||||||
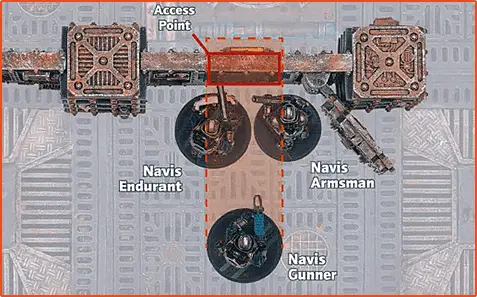
Reinforced Chamber
The kill teams have discovered a hidden chamber with reinforced walls that is easily defendable. If they can get the power on and secure the area, it can provide a safe haven within the Gallowdark.
Restart: Each of the following Ancient Apparatus terrain features begin the battle dormant:
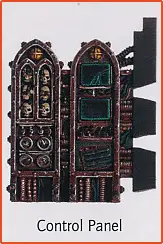
- Control panel
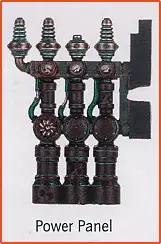
- Power panel
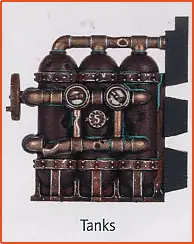
- Tanks
POWER UP1AP
At the end of the battle, for each sector friendly operatives control, you score 2VPs.
SPEC OPS CAMPAIGN
If you are playing this mission as part of a Spec Ops campaign, the following mission rules also apply: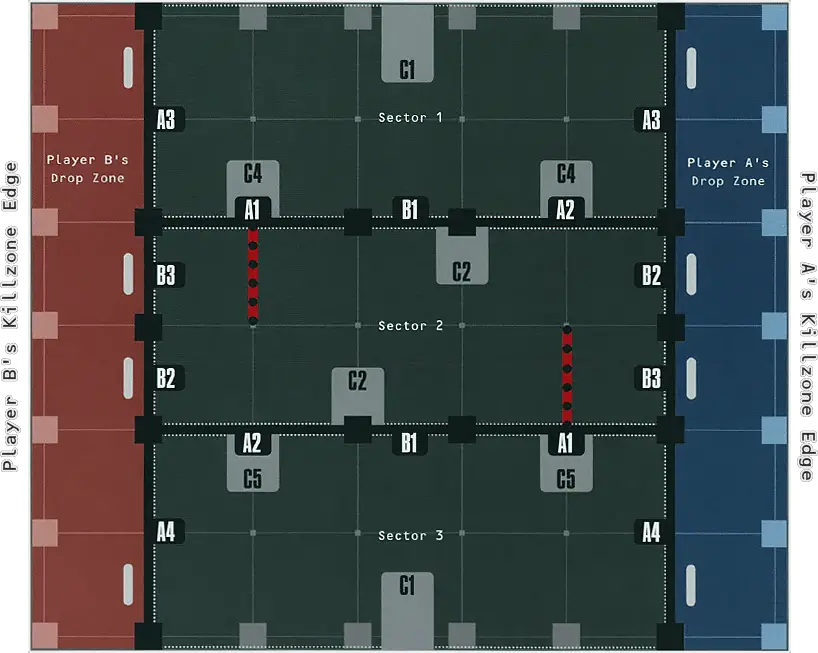
Airlocked
Some areas of the Gallowdark have little to no breathable atmosphere, and kill teams must be able to function in and navigate through these environments to survive. When an opportunity to refill their portable tanks with breathable air becomes available, kill teams will fight to the death for this most precious of resources.
Operatives can perform the following mission action:
SIPHON OXYGEN1/2APAP
SPEC OPS CAMPAIGN
If you are playing this mission as part of a Spec Ops campaign, the following mission rules also apply:
Subsidence
The subsidence of a ship within the Gallowdark has opened up a new passage within the hulk. A section closed off for centuries is now ripe for raiding. Two kill teams rush for the new territory, intent on securing the passage.
Unstable Position: Each time an operative performs an action in which it moves during its activation, if it does not finish that move within of a terrain feature, roll one D6: on a 1-3, that operative is treated as being injured until the end of its activation, regardless of any rules that say it cannot be injured.
- For each Alpha objective marker friendly operatives control, you score 4VPs.
- For each non-Alpha objective marker friendly operatives control, you score 2VPs.
SPEC OPS CAMPAIGN
If you are playing this mission as part of a Spec Ops campaign, the following mission rules also apply: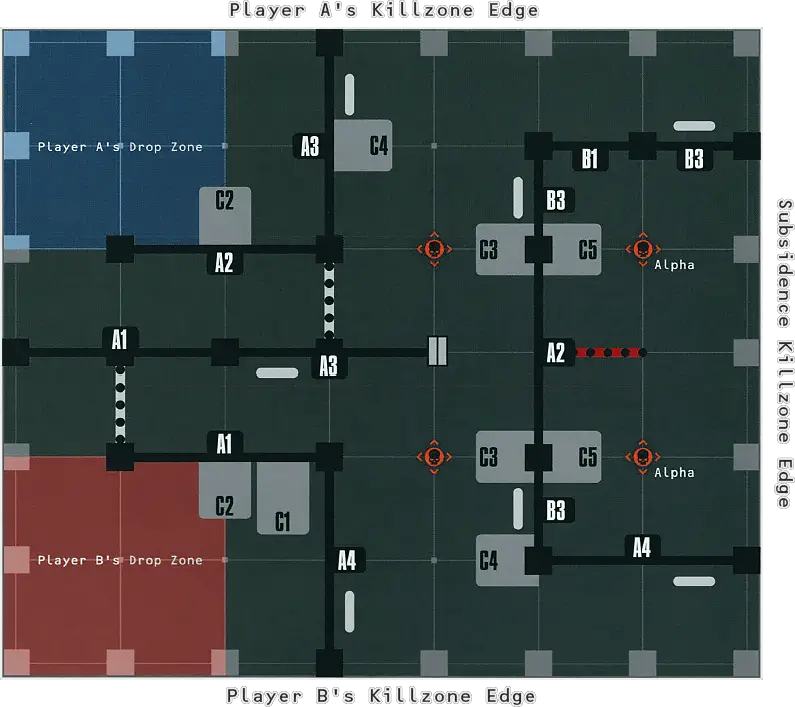
Desperate Raid
One kill team is running low on a valuable resource. They must conduct a dangerous raid into enemy territory to steal as much from the foe as they can.
- Dynamo: on
- Pipes: on
- Control Panel: off
Operatives can perform the following mission action:
OPERATE PIPELINE1AP
SIPHON RESOURCE1AP
|
SPEC OPS CAMPAIGN
If you are playing this mission as part of a Spec Ops campaign, the following mission rules also apply:At the end of the battle, if you are the Defender and scored 8 or more victory points from the mission objective, you can distribute up to 4XP across the friendly operatives selected for deployment.
Supply Protected: If you are the Defender, are victorious and are currently undertaking the Secure District Spec Op, then reduce by 1 the number of games required to complete that Spec Op’s Operation 1.

Deadly Hangar
A hangar has been discovered that may contain salvageable energy cells. There is much risk in attempting to recover them, however, for they are housed within the floor, and operatives will be exposed in the open when attempting to inspect and extract them. Cut the power and the hangar will be in darkness, granting operatives cover.
INSPECT ENERGY CELL1AP
OPERATE LIGHTS1AP
At the end of the battle, for each active objective marker friendly operatives control, you score 3VPs.
SPEC OPS CAMPAIGN
If you are playing this mission as part of a Spec Ops campaign, the following mission rules also apply: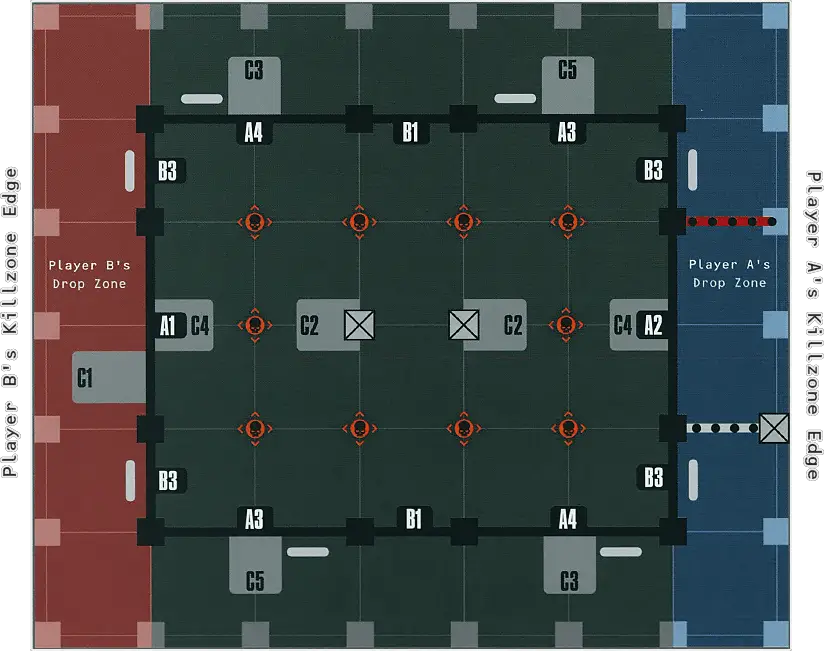
Maze Breakout
An excursion into the Gallowdark has gone bad. Now cut off, the kill team must find a new way back to base. A route has been proposed, but requires navigation through tight corridors, piled debris and nests of industrial equipment. They must fight their way through.
Breakout: If an operative the Attacker controls performs an action in which they move, and ends that action within of the Defender’s killzone edge and not within Engagement Range of an enemy operative, the Attacker can remove that operative from the killzone. That operative has escaped.
|
SPEC OPS CAMPAIGN
If you are playing this mission as part of a Spec Ops campaign, the following mission rules also apply:Hunted Down: If you are the Defender, are victorious and are currently undertaking the Purge Order Spec Op, then reduce by 1 the number of games required to complete that Spec Op’s Operation 1.
Power Overload
A kill team has restarted the power in this area and is using the energy sparingly for their operations. The machinery is old, however; overloading it will cause irreparable damage and stall the enemy’s activities.
When setting up a guard, the Defender must set it up with an Engage or Conceal order within of an Alpha terrain feature another guard is not within of. During the battle, until an enemy operative is Visible to a guard, a guard cannot move through a Hatchway.
Overloaded Apparatus: Ancient Apparatus terrain features begin the battle with the stable status.
OPERATE APPARATUS1AP
- For each Ancient Apparatus Alpha terrain feature that is overloaded, the Attacker scores 3VP.
- For each Ancient Apparatus non-Alpha terrain feature that is overloaded, the Attacker scores 1VP.
- For each Ancient Apparatus Alpha terrain feature that is stable, the Defender scores 3VP.
- For each Ancient Apparatus non-Alpha terrain feature that is stable, the Defender scores 1VP.
SPEC OPS CAMPAIGN
If you are playing this mission as part of a Spec Ops campaign, the following mission rules also apply:At the end of the battle, if you are the Defender and every Alpha terrain feature is stable, you can distribute up to 3XP across the friendly operatives selected for deployment.
Plans Protected: If you are the Defender, are victorious and are currently undertaking the Perform Ritual Spec Op, then reduce by 1 the number of games required to complete that Spec Op’s Operation 1.
Pursue and Secure
A kill team is in pursuit of an enemy courier carrying a valuable item. Unable to outrun the pursuers, the courier only has enough time to stash the item in a hidden location and call for help. The kill team must find and secure the item, while the courier must prevent it from falling into enemy hands.
In the Courier step, the Defender sets up one operative anywhere in the killzone with a Conceal order. They then roll three D6 (keep re-rolling dice results of 1 until a different result is generated) and add the results together; the total is the number of action points their courier has for that step. They can perform the following actions, and can perform them more than once:
- Normal Move
- Operate Hatch
- Pass
The Defender performs actions with their courier until they have used all their action points. At any point during the Courier step, if the courier performs a Pass action while it controls an Ancient Apparatus terrain feature, they can secretly hide the item in that terrain feature (if it could be more than one terrain feature, you must select one for the item to hide in). If they do so, the Defender must secretly make a note of that terrain feature. Note that this means the Defender does not have to reveal which terrain feature the item is hidden in, and it’s best if their courier performs the Pass action at other terrain features so the Attacker can’t be sure where the item is hidden. If the Defender does not hide the item, the Attacker selects one Ancient Apparatus terrain feature for the item to be hidden in. After the courier has used all of their action points, the Courier step ends.
Pursuit: The Attacker has the initiative for the first Turning Point. During the first Turning Point, operatives can be activated as normal, even if they are not within the killzone (unless they are incapacitated). When an operative is activated, it must be given an Engage or Conceal order and must perform an action to move into the killzone measured from their killzone edge. The courier must have a Conceal order, however, and is activated as normal. Any operatives who are not in the killzone by the end of the first Turning Point are incapacitated.
Secure Item: The Attacker’s operatives can perform the Pick Up action while they control an Ancient Apparatus terrain feature. If they do so, the Defender must reveal if that terrain feature is the location of the hidden item. If it is, the item becomes an objective marker and the operative who performed the Pick Up action is now carrying it.
The Attacker scores victory points as follows:
- If the courier is incapacitated, you score 2VPs.
- If friendly operatives control the objective marker, you score 6VPs.
- If a friendly operative is carrying the objective marker, you score 2VPs.
- If a friendly operative is carrying the objective marker and is not within of an enemy operative, you score 2VPs.
The Defender scores victory points as follows:
- If the courier is not incapacitated, you score 2VPs.
- If no one controls the objective marker, you score 2VPs.
- If friendly operatives control the objective marker, you score 6VPs.
- If the courier controls the objective marker, you score 2VPs.
SPEC OPS CAMPAIGN
If you are playing this mission as part of a Spec Ops campaign, the following mission rules also apply:At the end of the battle, if you are the Defender and the courier controls the objective marker, that operative earns up to 4XP.
Item Held: If you are the Defender, are victorious and are currently undertaking the Extraction Spec Op, then reduce by 1 the number of games required to complete that Spec Op’s Operation 1.
Contact Lost
All contact has been lost with an ally bearing valuable intelligence back to base. Investigate their last known whereabouts and recover the information as first priority.
The Attacker’s operatives can perform the following mission action:
INVESTIGATE1AP
Attacker:
- If the intel objective marker has been determined, you score 3VPs.
- If friendly operatives control the intel objective marker, you score 3VPs.
- If a friendly operative is carrying the intel objective marker, you score 3VPs.
- If a friendly operative is carrying the intel objective marker and is not Visible to enemy operatives, you score 3VPs.
Defender:
- If the intel objective marker has not been determined, you score 12VPs.
- If the intel objective marker is not being carried by an operative the Attacker controls, you score 3VPs.
- If a friendly operative is within 2 of the intel objective marker, or within 2 of an enemy operative carrying the intel objective marker, you score 3VPs.
- if you control the intel objective marker, you score 3VPs.
SPEC OPS CAMPAIGN
If you are playing this mission as part of a Spec Ops campaign, the following mission rules also apply:At the end of the battle, if the intel objective marker has not been determined, or if you win the battle and half or less of your operatives have been incapacitated, you can distribute up to 4XP across the friendly operatives selected for deployment.
Enemy Neutralized: If you are the Defender, are victorious and are currently undertaking the Purge Order Spec Op, then reduce by 1 the number of games required to complete that Spec Op’s Operation 1.
Gallowdark Expedition
To claim the potential treasures and relics within a space hulk, a kill team must be prepared to fight unknown horrors. It must endure inhospitable environments where decks can collapse underfoot, passageways can be crushed in hulk-quakes and cave-ins are common. To keep going, a kill team must be resourceful enough to make best use of the tools it can salvage, the resources it can gather and the knowledge it can acquire. It is impossible to fully prepare for the hardships one endures on an expedition into a space hulk, but for those who survive, the rewards can be huge.Players can participate in a Gallowdark expedition with their kill team instead of conducting a Spec Op (they should make a note of ‘Gallowdark expedition’ in the Spec Ops log of their dataslate). If their kill team is currently assigned to a Spec Op, they must abort it to participate in the expedition. A Gallowdark expedition is considered a Spec Op for the purposes of faction Spec Ops rules (i.e. Imperial Navy Breacher Spec Ops Rules and Farstalker Kinband Spec Ops Rules).
Campaign Master
A Gallowdark expedition is best run with a Campaign Master. This is a heroic individual who takes on the mobilisation and organisation of the expedition so that the other players can focus on playing games. A Campaign Master is a privileged position that offers a degree of leadership to the individual who takes on the role. Its primary purpose is to facilitate a smooth and enjoyable experience for all players involved. A Campaign Master can indeed play in the expedition, but in larger expeditions that include a multitude of players, it may be best if they solely oversee the expedition rather than play in it.Over the following sections we will refer to the Campaign Master and how they can go about organising a Gallowdark expedition. Below, you will also find Campaign Master’s Edicts, which are useful tools and rules ideas that the Campaign Master can use to add further excitement to an expedition. These are by no means essential, however. If this is the first expedition for many of the players, or they would otherwise prefer to keep things as simple as possible, then Campaign Master’s Edicts are not necessary for a Gallowdark expedition.
Expedition Length
Before the expedition begins, the Campaign Master should determine its length. It is split into three stages, and they should decide the length of time allocated to each stage and the total number of games that can be played in that stage. Once either of those conditions have been met, that stage ends. Once the third stage ends, the expedition ends.An expedition can be a long and expansive experience where each stage takes place over a month, with many battles fought, objectives secured and heroes (or villains) forged. Equally, it can be a short and focused expedition played over a weekend, with each stage consisting of just one game representing the key moments of the expedition. Ultimately, the Campaign Master should determine an expedition length that best suits the gaming group taking part, thinking about how regularly they can meet and how many games they are likely to play. As a guide, if each member of your group will usually play a couple of games in one evening each week, we recommended each stage of the expedition lasts as follows:
- Length of time: 2 weeks
- Total number of games: equal to twice the number of players
A Gallowdark expedition works best if each player plays an equal number of games, giving everyone an equal chance to achieve victory. Therefore, the Campaign Master has a few options concerning how players are matched up for games. They can leave the players to arrange games themselves, with challenges thrown down and honour at stake. This is perhaps the simplest way of arranging the games, and lets the expedition progress naturally with plenty of friendly rivalries to go with it! Alternatively, they can introduce more structure to ensure everyone gets an equal amount of games. This can be done by scheduling match-ups in each stage, and works particularly well if the group meets at a regular time, e.g. at a games night or gaming club.
Generating the Hulk
A Gallowdark expedition would be incomplete without a section of the Gallowdark to explore, for within its time-worn halls lay all manner of spoils ready to be secured. The Campaign Master constructs a section of the Gallowdark by using a deck of standard 52 playing cards. These cards are location cards, and represent different locations of the Gallowdark waiting to be explored. The Campaign Master shuffles the cards and draws a number of them at random - without looking at the results - to create a Gallowdark deck. The number of cards in the deck should be equal to the total number of games to be played in the whole expedition (as determined by expedition length above, usually the number of games in a stage multiplied by 3). For example, if they decided the number of games in each stage would be 8, they would deal 24 cards into the deck.The Gallowdark deck then stays with the Campaign Master - they will be using it to generate different locations for the kill teams to explore. Each time a Gallowdark expedition game is arranged, the Campaign Master draws a location card from the Gallowdark deck, assigns it to a free location of their choice on a
 Gallowdark expedition map and informs the players of the result for their game (drawn location cards remain for the duration of the expedition).
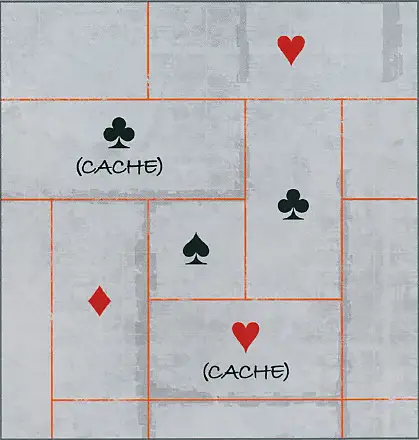
Material Points
In a Gallowdark expedition, the kill teams will be attempting to secure three different materials: Salvage, Knowledge and Resources. This is expressed as points, the total of which will determine commendations and the overall victor(s) at the end of the expedition.- All players in that game gain 2 points of that location card’s material, or 1 point of the material from any existing
 ,
,  or
or  location card on the map.
 - The winner of that game gains 2 points of that location card’s material, or 1 point of the material from any existing , or location card on the map.
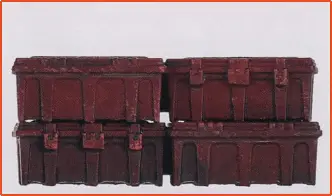
SalvageAmmunition, weapons, medical equipment, machinery etc.
KnowledgeInvestigation, study, survey, examination etc.
ResourcesFuel, promethium, plasma, food, water etc.
 Wild
WildThis is not a material. Each time a player would gain material from this location, they assign the points in full to a material of their choice instead (i.e. Salvage, Knowledge or Resources).
It is the player’s responsibility to inform the Campaign Master of any material points they gain, and the Campaign Master’s responsibility to record it. So that one player isn’t unfairly penalised for circumstances beyond their control (e.g. if their opponent does not show), the Campaign Master can award material points at their discretion. In the aforementioned example, they would draw the location card and follow the relevant steps as if that player had played and won that game.
Caches
Jack, Queen, King and Ace location cards are cache cards. Each time a cache card is drawn, the players in that game compare their points of each material. If one player has less than the other in two or more materials, they gain one additional Requisition point for completing that game. While the opposing kill team was securing material in a previous game, they secured easy pickings from the cache!Commendations
At the end of each expedition stage (including the final stage), each player that gained one or more material points in that stage selects one commendation from the list below:- You gain one Requisition point.
- You can add one item of rare equipment to your stash.
- You can increase your asset capacity by one.
- You can distribute up to 5XP across the operatives on your dataslate.
- You can remove up to one Battle Scar from each friendly operative.
At the end of the expedition, compare each player’s total points for each material to determine the winner of each victor category below:
- Scavenger: The player with the most Salvage points.
- Researcher: The player with the most Knowledge points.
- Prospector: the player with the most Resources points.
The winner of each victor category can select one commendation from above (they cannot select the same commendation more than once per stage). If players are tied in a victor category, the winner of that category is the tied player with the highest number of material points overall. If that is still a tie, the subsequently tied players are the winners of that category.
Campaign Master’s Edicts
Campaign Master’s Edicts are tools the Campaign Master has at their disposal to add further depth to a Gallowdark expedition. They can use these at their discretion if it is appropriate for their gaming group.Twists
Twists are additional rules effects that can be used in expedition games. They add another tactical layer to games and can capture certain narrative circumstances. A Campaign Master can introduce twists to games in a variety of ways. For example, they could specify their use in certain games, perhaps specifying the mission too, for a curated narrative experience. Alternatively, they could introduce a twist to each expedition stage, with players using that twist for all of their games during that stage. A Campaign Master can use the twists below, either as written, or to inspire twists of their own creation.Low Light
- During each Turning Point, the first time each operative makes a shooting attack, it gains a Light token until the end of the Turning Point.
- For an operative to be Visible, it must have a Light token or be within of the active operative.
Corroded Hatchway
Until it is opened for the first time, each Hatchway is corroded. While a Hatchway is corroded, each time an operative performs the Operate Hatch action, roll one D6:- On a 1-3, an additional action point must be subtracted to open that Hatchway. If you do not open that Hatchway, the action point(s) subtracted for that action so far is not refunded.
- On a 4+, open that Hatchway as normal.
Thin Atmosphere
- Operatives cannot perform Dash actions.
- Operatives cannot move more than their Movement characteristic for Charge actions.
- Subtract from the Rng of ranged weapons that have both the Rng X and Torrent X special rules e.g. Rng becomes Rng 2.
Distorted Machine Spirits
In the Ready Operatives step of each Turning Point, roll one D6 for each open Hatchway, rolling one additional D6 if there are no operatives within of that Hatchway:- If any result is a 4+, close that Hatchway.
- If any result is a 6, until the end of the battle, that Hatchway is locked. Each time an operative would perform the Operate Hatch action to open a locked Hatchway, one additional action point must be subtracted.
Unstable Structure
- Subtract from the Movement characteristic of operatives.
- In the Ready Operatives step of the second Turning Point, roll one D6: on a 1-4, repeat this process in the subsequent Turning Point; on a 5+, the structure subsides (note that the structure can only subside once).
- If the structure subsides, roll one D6 for each operative: if the result is greater than their unmodified APL, subtract 1 from their APL.
Strategic Exploration
Strategic Exploration adds an additional layer to a Gallowdark expedition, as the location and numerical value of each location card has an impact. Each time a game is arranged, the players must first roll off to determine the Attacker and Defender for that mission. The Campaign Master then determines the location card for that game, and the Defender assigns it to a free location of their choice on the Gallowdark map that is adjacent (above, below, left or right, but not diagonal) to an existing location card. If it is the first game of the expedition, place the card in the centre of the map.Each location card can provide no more of its specified material points than its numerical value during an expedition. For example, an 8
location card has no more than 8 points of Salvage material available during an expedition. When a cache card is drawn (Jack, Queen, King and Ace cards), the Campaign Master rolls one D6 and adds 5 to the result: the total is the numerical value of that location. Each time a player would gain a point of material from a location, deduct it from that location’s total; once the total reaches zero, that location becomes exhausted and no more material can be gained from it. Note that, although Wild cards provide points to a material of the player’s choice, the numerical value is still a limit for that location.At the end of each game, players alternate choosing where to gain all their points from, starting with the winner. This follows the same rules as specified in Material Points section, except that ‘1 point of the material from any existing
, or location card on the map’ must be an adjacent location card (above, below, left or right, but not diagonal). Players then alternate gaining points, one point at a time, starting with the winner (if the winner chooses two different locations, they choose which they gain points from first). Note this means locations with low material points can become exhausted before a player, or both players, would get their due amount of material points from that location; in such circumstances, those points are lost.For example, both players complete a game in a 3
location. The winner chooses to gain 2 points from that location and 1 point from an adjacent location with material points remaining, and chooses to gain points from the location first. The loser chooses to gain 2 points from that location. The winner gains 2 Resource points and 1 Salvage point; the loser only gains 1 Resource point; that location is exhausted.If a Campaign Master decides to use Strategic Exploration, the location and numerical value of location cards are critical, therefore they must keep an up-to-date record and regularly communicate with the players.
Extra Commendation
In an expedition that includes a large number of players, the Campaign Master can award additional commendations at their discretion. For example, they could allow the winner of each victor category (i.e. the Scavenger, the Researcher and the Prospector) to select one additional commendation.The Campaign Master can then determine the runner-up categories, which can be won by any player that did not win a victor category. The runner-up categories are as follows:
- Warlord: The player who won the most games during the expedition.
- Architect: The player who scored the most victory points from Security Tac Ops during the expedition.
- Spy: The player who scored the most victory points from Infiltration Tac Ops during the expedition.
- Scout: The player who scored the most victory points from Recon Tac Ops during the expedition.
- Headhunter: The player who scored the most victory points from Seek and Destroy Tac Ops during the expedition.
- Paragon: The player who scored the most victory points from their faction’s Tac Ops during the expedition.
Note that if a Campaign Master decides to use runner-up categories, it is the players’ responsibility to inform the Campaign Master after each game of their result and the victory points scored from each Tac Op category, and the Campaign Master’s responsibility to record it.
Critical Operations: Gallowdark Mission Pack
The missions use Killzone: Gallowdark only (do not use any supplement killzones such as Killzone: Into the Dark). The location of terrain features are specified using a key system.
To randomly determine a Critical Operations: Gallowdark mission, one player rolls one D3 to determine one of the tables below, then the other player rolls one D3 to determine the mission from that table.
| ||||||||||
| ||||||||||
| ||||||||||
Command Station Control
A key command station has been discovered. Capturing it will allow a kill team to engage various systems across the region, putting them in a commanding position and giving them a significant strategic advantage to dominate this part of the space hulk.
Power Surge
Power is returning to this part of the space hulk. Two kill teams rush to a relay station to divert energy for their own use and siphon as much as they can from the surge.
Operatives can perform the following mission action:
SIPHON POWER1AP
At the end of each Turning Point:
- If friendly operatives control one or more objective markers, you score 1VP.
- If friendly operatives control more objective markers than enemy operatives control, you score 1VP.
Supply Raid
A kill team is raiding an enemy’s supply store. Both players fight to secure the goods within.
At the end of the battle:
- For each objective marker friendly operatives control, you score 1VP.
- For each objective marker friendly operatives are carrying, you score 1VP.
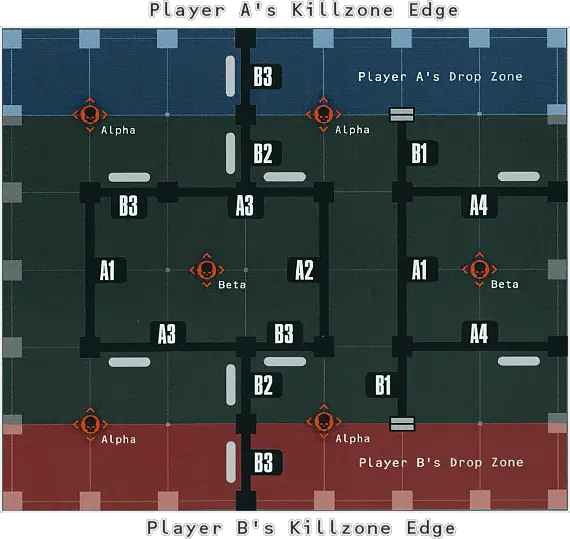
Junction Assault
This junction is vital for quick and relatively safe access to a number of areas of the space hulk. Controlling it will help the kill team assert dominance across a wider area and carry out their operations much more efficiently.
- For each sector in which no enemy operatives are on your drop zone’s side of the centre line, you score 1VP.
- For each sector in which you have friendly operatives within of your opponent’s drop zone, you score 1VP.
Full-scale Attack
The time has come to completely destroy the enemy presence in this part of the space hulk. For too long have they attempted to thwart your plans, steal your kill team’s supplies and recover precious archeotech that your kill team has sought for itself.
- For each Beta objective marker friendly operatives control, you score 1VP.
- For each Alpha objective marker within your opponent’s drop zone that friendly operatives control, you score 2VPs.
Mysterious Signature
We have identified a strange and sizeable signature on our scanners. Whatever it is, we must pinpoint its exact Location and investigate. Undoubtedly it will have attracted the attention of our enemies.
SCAN1AP
At the end of the battle:
- If friendly operatives control the source objective marker, you score 3VPs.
- If a friendly operative is carrying the source objective marker, you score 3VPs.
Forge Stronghold
We have discovered a small region of the hulk in a strategically viable location that has been left undisturbed for some time. There is a plethora of salvageable equipment there, perfect for us to establish a new base of operations.
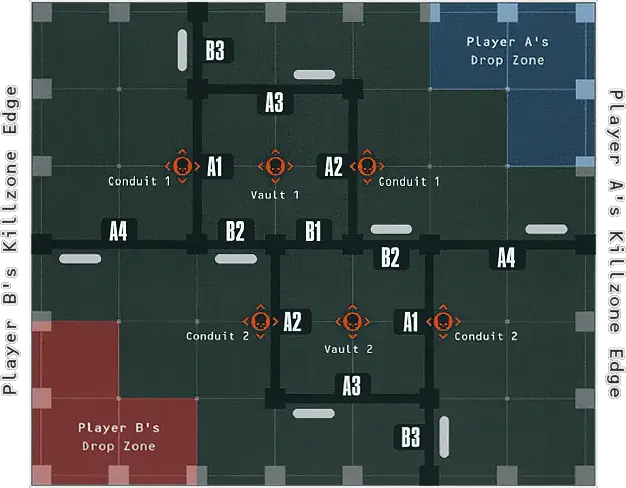
Vault Plunder
Two small stasis vaults have been discovered, both of which contain and preserve powerful items. Operatives must power down the vaults by disconnecting their conduits to claim the valuable contents.
POWER DOWN1AP
At the end of the battle, for each Vault objective marker friendly operatives control, you score 2VPs for each of its Conduit objective markers that have been removed from the killzone. Note that if none of its Conduit objective markers have been removed from the killzone, you score 0VPs for that Vault objective marker.
Exposed Trove
A hulk-quake has made a previously closed off area of the space hulk accessible. Whenever such an event occurs, there is much opportunity for the claiming of wealth, technology and weapons. The fighting for such potential gains is fierce indeed.
CLAIM LOOT1AP
At the end of the battle, for each Alpha objective marker friendly operatives control, you score 2VPs.
Killzone: Gallowdark
Killzone: Gallowdark is a killzone played on a 607mm by 704mm area that uses the Close Quarters rules. It is an indoor killzone with Walls and Hatchways, creating tightly packed rooms and corridors. There are no Vantage Points in the killzone; rather, operatives must move carefully, battle over key fire lanes and time their forward pushes appropriately.Wall
All parts of a Wall terrain feature have the Heavy and Wall traits. Some Walls include a Hatchway, which is a separate terrain feature explained below.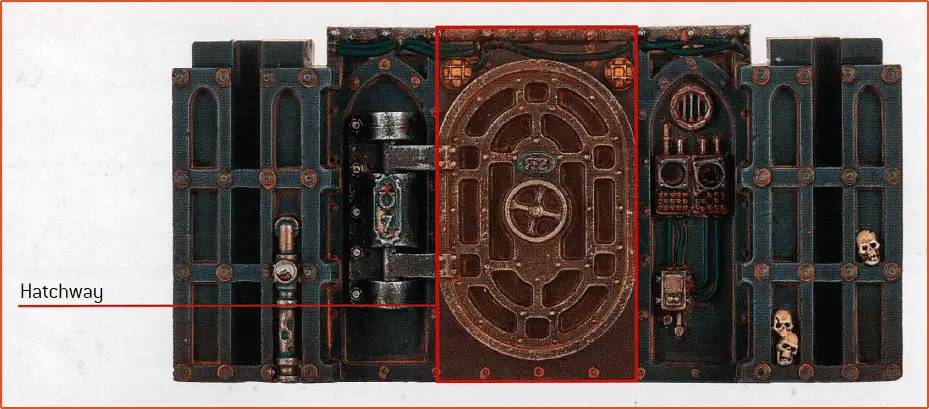
Wall:
- Operatives cannot move over or through Wall terrain regardless of any other rules, other than as a result of the Accessible trait.
- Visibility lines cannot be drawn over or through Wall terrain.
- An operative is never a valid target if every Cover line drawn to it crosses Wall terrain.
- Distance cannot be measured over or through Wall terrain; you must measure around it using the shortest possible route (as shown in the diagram below). However, measure distances to areas of the killzone through walls (e.g. the centre of the killzone or drop zones, but not objective markers or tokens).
- In order for Wall terrain to provide Cover or be Obscuring, a Cover line must cross a corner or end of that terrain feature (as shown in the diagrams below).
Wall: Range Example
Wall: Cover Example

Hatchway
A Hatchway terrain feature has two statuses: closed and open. It has two parts - an access point and a hatch - and their traits depend upon the Hatchway’s status. Operatives can perform the Operate Hatch mission action to change its status.Closed Hatchway
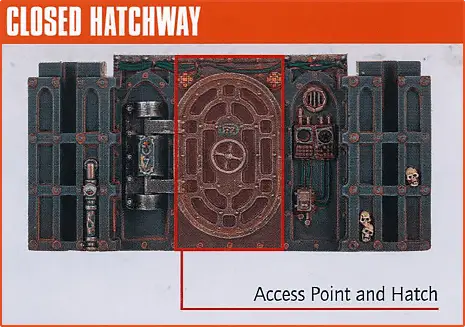
OPERATE HATCH1AP
An operative can perform this action during a Dash or Normal Move action, and any remaining increments of movement can be used after it does so. Note, however, that opening a Hatchway can cause the operative to be within Engagement Range of an enemy operative, in which case that Dash or Normal Move action would immediately end (unless the operative has any rules that allow it to move within Engagement Range of an enemy operative, e.g. FLY).
Designer’s Note: If a Hatchway’s status is changed and operative placement would prevent the hatch from fully opening or closing, temporarily remove the necessary operatives from the killzone, fully open or close the hatch as appropriate, then return the operatives to the killzone as close as possible to their original location. If an operative is within an enemy operative’s Engagement Range before a hatch is opened, it must be returned within Engagement Range of that enemy operative after the hatch is opened.
Open Hatchway
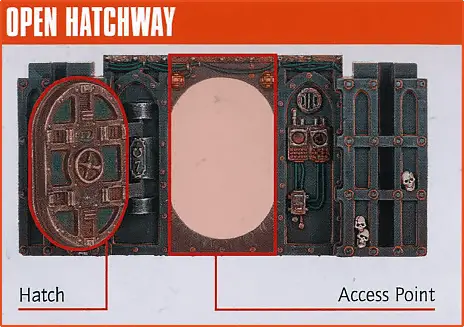
- Its hatch must be fully open (it cannot be ajar).
- Its access point has the Accessible trait.
- Its hatch has the Wall trait.
Accessible: An operative can move through the Walls up to adjacent to this access point as if they were not there, so long as at least part of its base would move through this access point when it does so (as shown in the diagrams below). An operative cannot finish a move in or on an access point. As an operative must finish a move in a location it can be placed, it must finish the move wholly on one side or the other of this terrain feature.
Designer’s Note: An open Hatchway’s access point does not provide Cover, nor is it Obscuring. The Walls either side of the access point, or its hatch, must be used for this instead.
Hatchway: Accessible Example
Killzone: Into the Dark
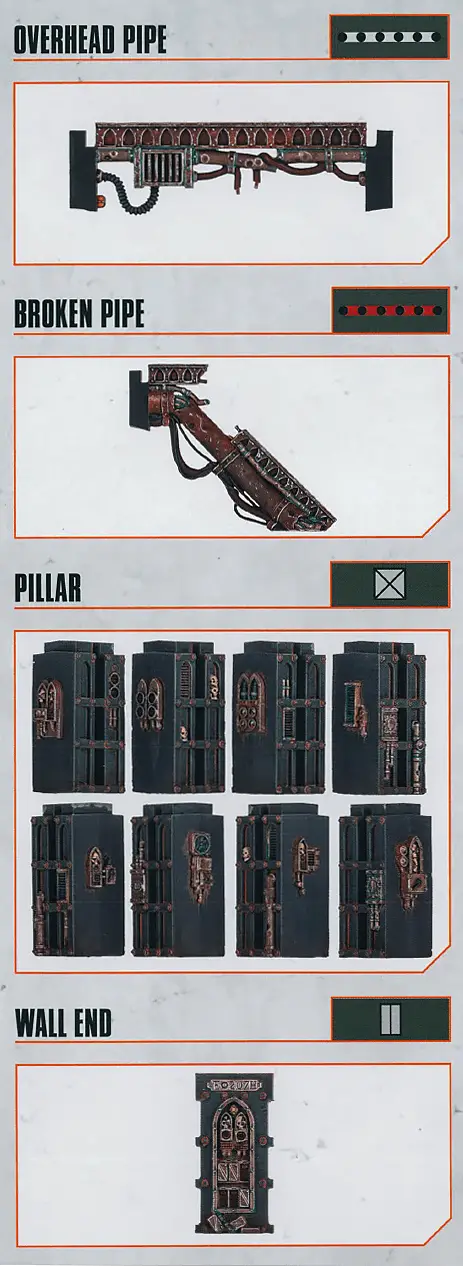
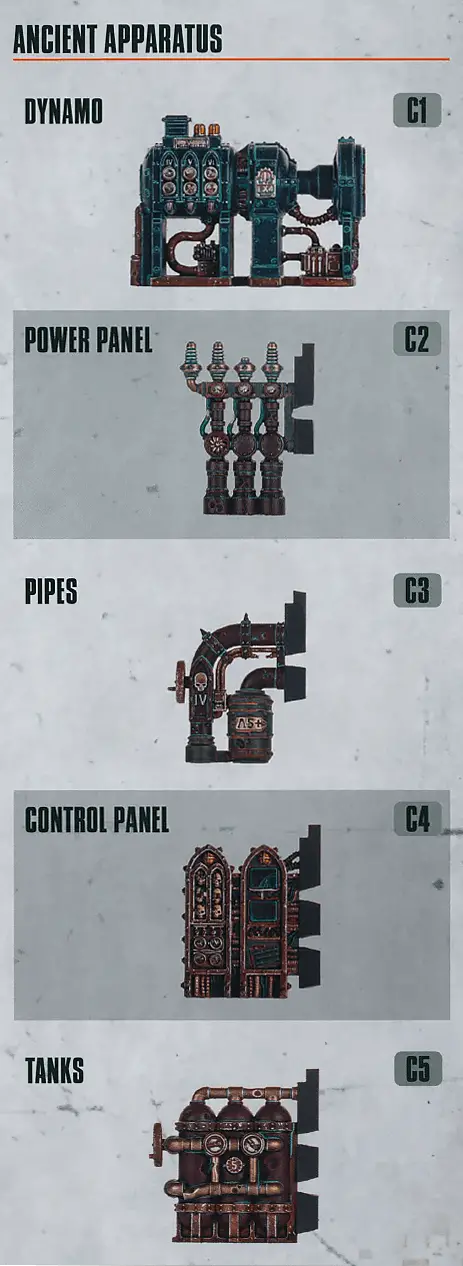
Killzone: Into the Dark is a supplement to Killzone: Gallowdark. It is a condensed, cramped environment that kill teams must navigate, and represents the operatives’ first steps aboard the Gallowdark.Ancient Apparatus
Ancient Apparatus terrain features are further categorised below. They have the Heavy and Traversable traits.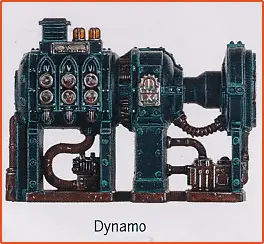
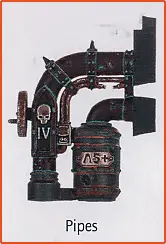
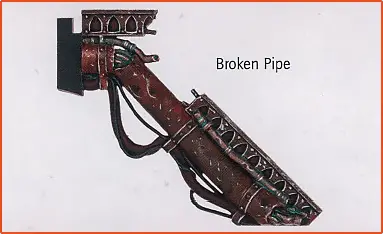
Pipes
Overhead Pipe terrain features have the Insignificant trait. Broken Pipe terrain features have the Light and Traversable traits.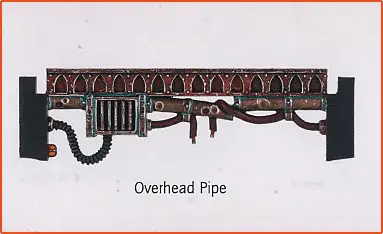
Gallowdark Barricades
Gallowdark barricades are variant barricades designed to fit with the theme of space hulks. They are normal barricades for all rules purposes, meaning they have the Light and Traversable traits.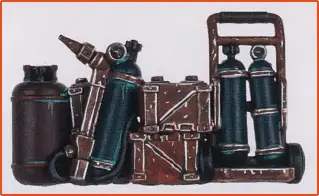

Close Quarters
If a Kill Team battle uses the Close Quarters rules, the following rules are in effect for the battle:Actions
Operatives can perform the following actions:Guard1AP
- It performs a guard attack or any actions (excluding Pass).
- An enemy operative ends an action within Engagement Range of it and it does not make a guard attack.
- Its order is changed to Conceal.
- It is the end of the Turning Point.
If an operative performs point-blank overwatch, it performs an Overwatch action with the following additional rules:
- It can perform an Overwatch action while within Engagement Range of an enemy operative, and the enemy operative within its Engagement Range is the target, regardless of any other rules.
- Until the end of the interrupted enemy operative’s activation, each time that friendly operative fights in combat, do not select melee weapons or roll attack dice for it during that combat.
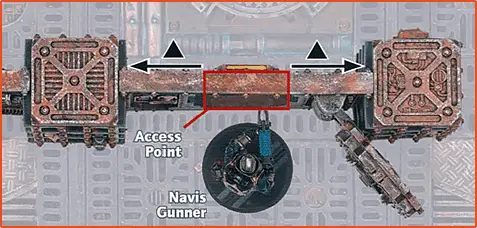
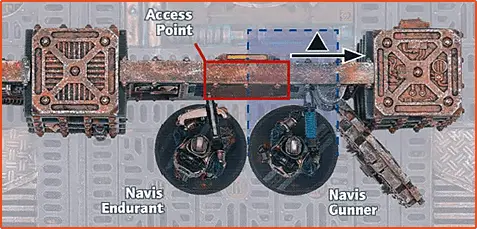
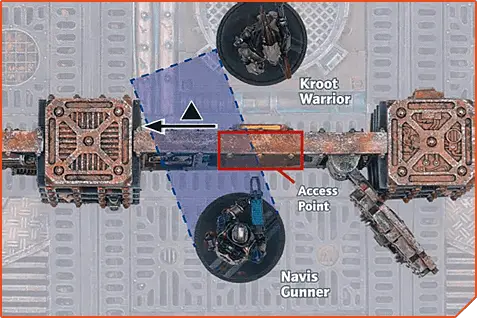
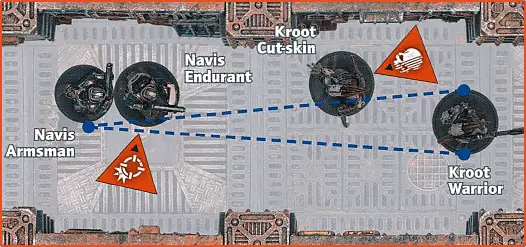
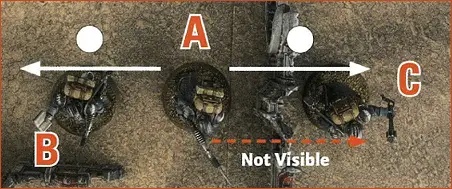
Hatchway Fight1AP
- It is not within Engagement Range of an enemy operative.
- Its base is touching an open Hatchway’s access point.
- An enemy operative is blocking that access point (an enemy operative is blocking that access point if it is on the other side and within of that access point, as shown in the diagram below).
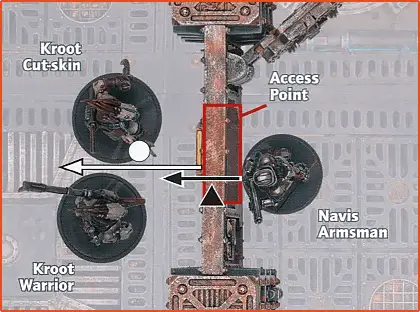
The Navis Armsman is not within Engagement Range of an enemy operative and its base is touching an open Hatchway’s access point. Two enemy operatives are blocking that access point, so the Navis Armsman performs a Hatchway Fight action to fight in combat against one of them.
Additional Rules
Condensed Environment
Close Quarters amplifies the impact of certain weapons, but the low ceilings and level floors mean targeting enemy operatives must be more direct:- Weapons with the Blast X, Splash X and/or Torrent X special or critical hit rules gain the Lethal 5+ special rule.
- Each time a friendly operative makes a shooting attack with a weapon that has the Indirect special rule, you must choose whether or not to use that special rule. If you choose to use it, that weapon gains the Rng special rule for that shooting attack.
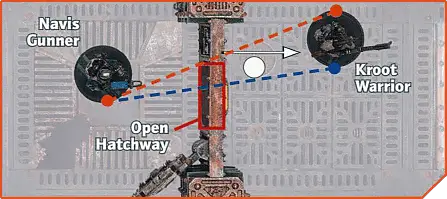
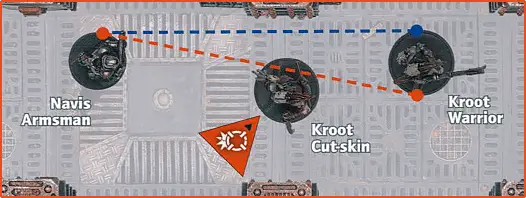
- Each time a friendly operative makes a shooting attack against an enemy operative, if a Cover line drawn to that enemy operative crosses one or more operatives with an Engage order (excluding operatives with a Wounds characteristic of 5 or less, and friendly operatives whose bases are touching the active operative’s), in the Roll Attack Dice step of that shooting attack, roll one less attack dice (as shown in the diagrams below).
Barricades
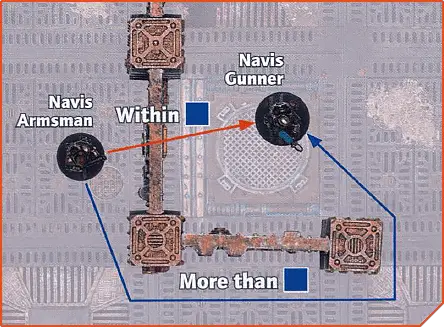
When using the Close Quarters rules, barricades are set up differently. They can be set up anywhere in the killzone that is:- More than from your opponent’s drop zone.
- More than from access points.
- More than from other barricades.
- Not on a terrain feature (unless it has the Insignificant trait).
Tac Ops
When using the Close Quarters rules, the following Tac Ops are not in use: Seize Ground; Hold the Line; Sabotage; Vantage. If this would mean you cannot build a six-card Tac Ops deck (i.e. you do not have any faction Tac Ops), you can select the number of cards needed to complete your deck from one of the other archetypes your kill team has access to (in matched play, if they do not have any other archetypes, you can select the needed cards from any one other archetype).Setup
Some Tactical Ploys allow one or more operatives to be set up outside of your drop zone, e.g. Sneaky Git, KOMMANDO$ and Dimensional Translocation, HIEROTEK CIRCLE$. In a battle that uses Close Quarters rules, you cannot do so. Instead, you can only use such Tactical Ploys once per battle at the end of the Scouting step, and they allow the operative(s) with the keyword specified by the ploy that is wholly within your drop zone and has a Conceal order to perform a free Normal Move and/or Operate Hatch action. In addition, that operative’s order cannot be changed in the first Turning Point (e.g. as a result of the Infiltrate scouting option). Note that, for the WYRMBLADE$ Hiding Tactical Ploy, up to two NEOPHYTE operatives can do this.Setting Up Terrain
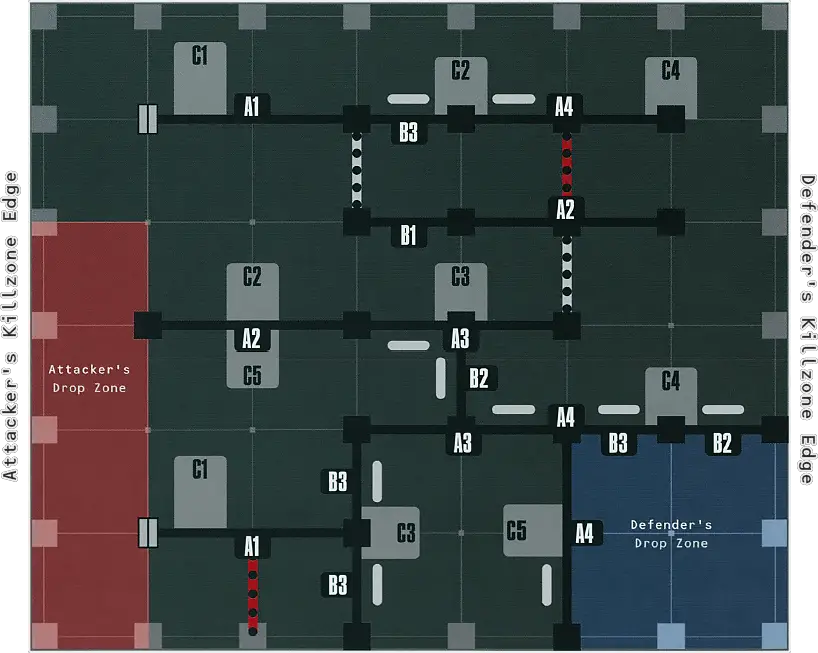
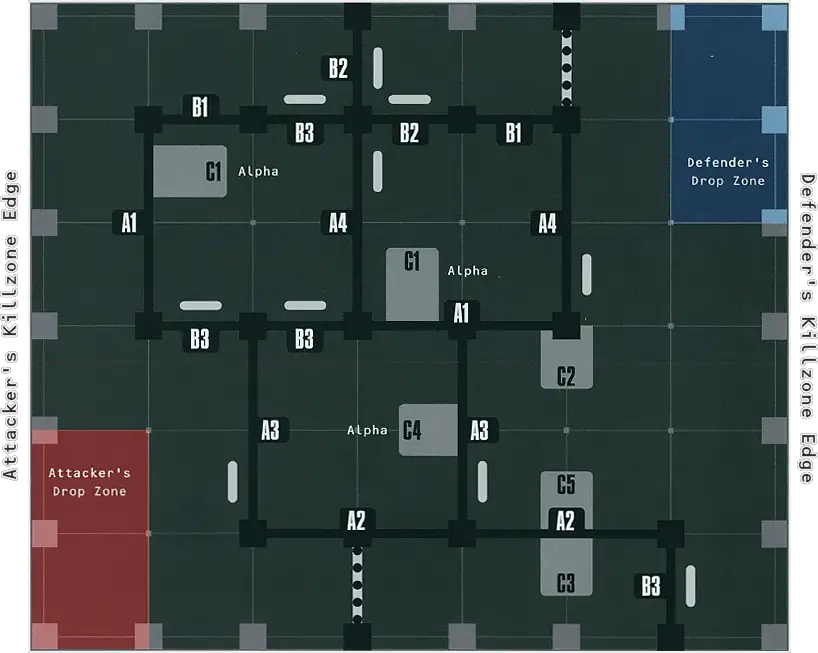
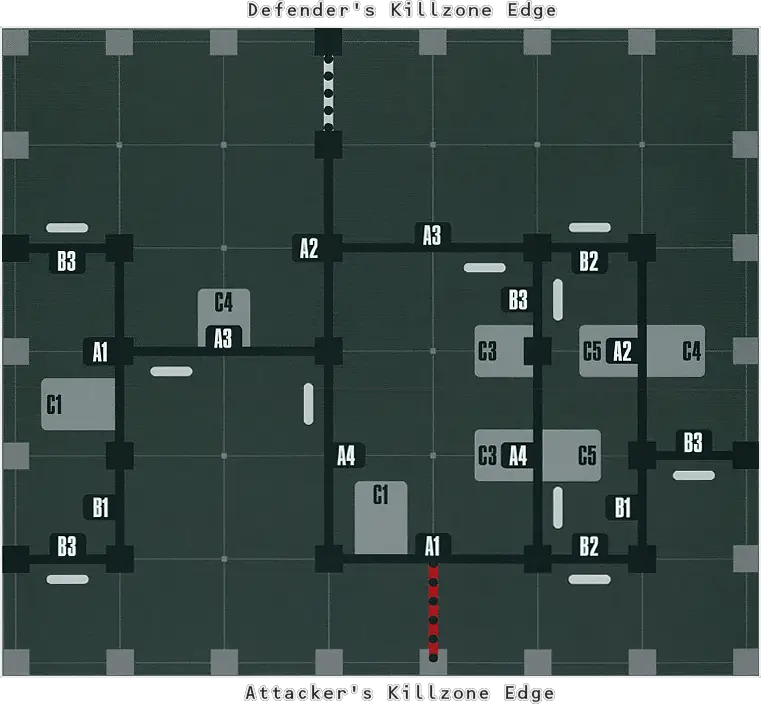
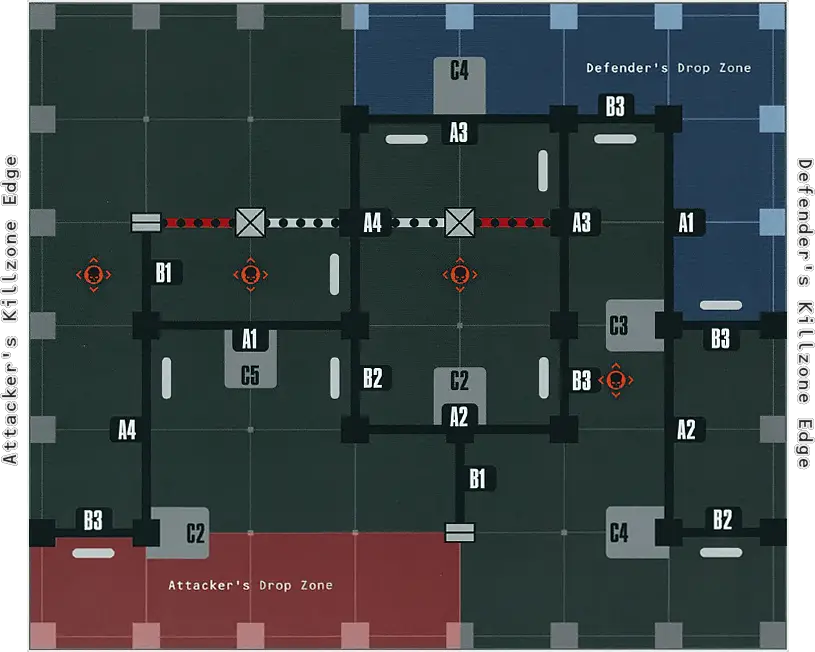
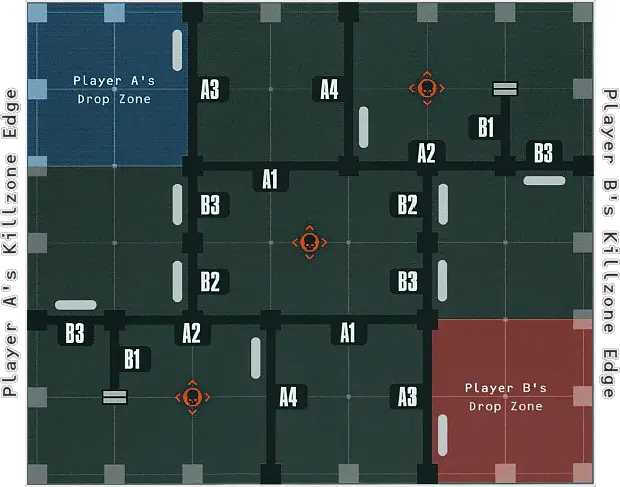
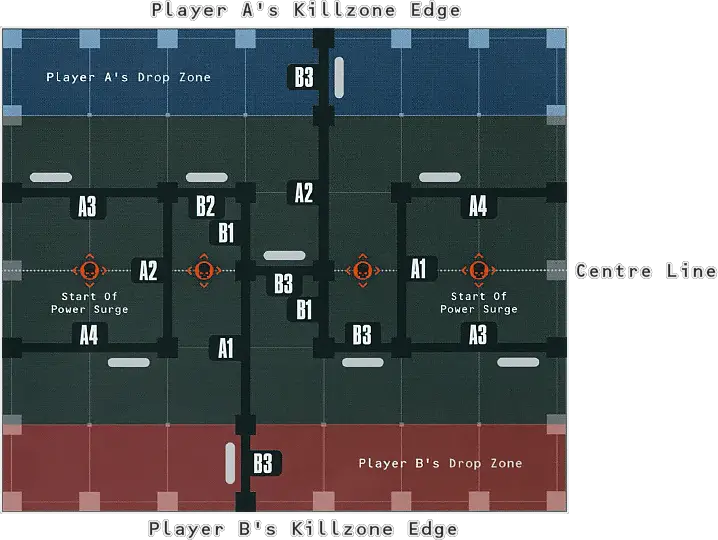
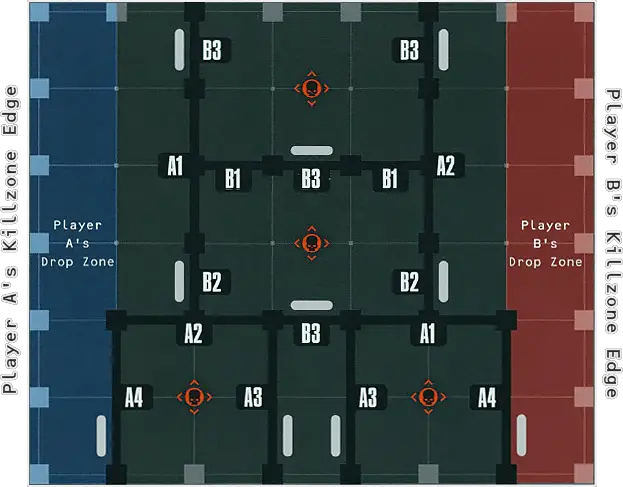
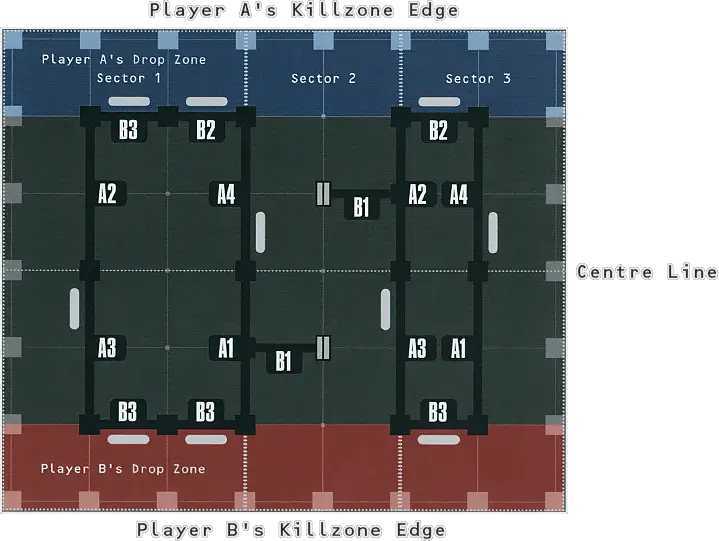
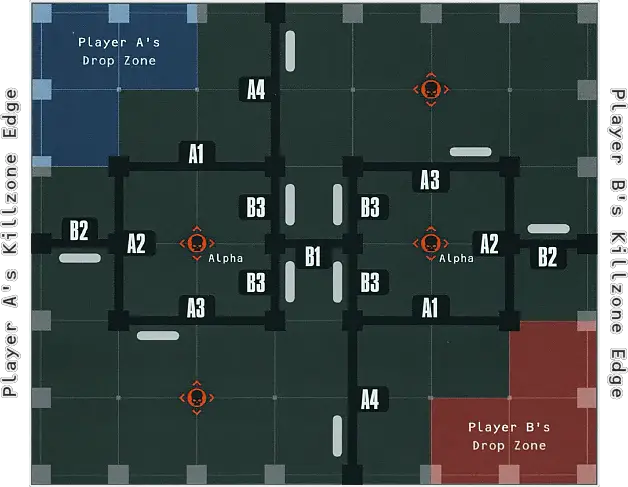
Killzone: Gallowdark (and the Killzone: Into The Dark supplement) is a modular terrain set that allows you to construct a large variety of different killzones. The mission packs presented in this publication (Shadow Operations: Into the Dark Mission Pack and Critical Operations: Gallowdark Mission Pack) both use this killzone, and will specify the location of terrain features using a key and grid system. When setting up terrain features in such a killzone, use the key system to identify the relevant terrain feature, then place it in the specific location on the gameboard using its grid.Shown below is the mission map of a specific mission, as well as an example of that mission set up with its terrain features.
As a handy note, you can paint or write the relevant key on the bottom edge of each terrain feature. This will help you set up terrain features without having to compare each terrain feature to the key. We have also included a
Killzone Key Reference for quick and easy reference.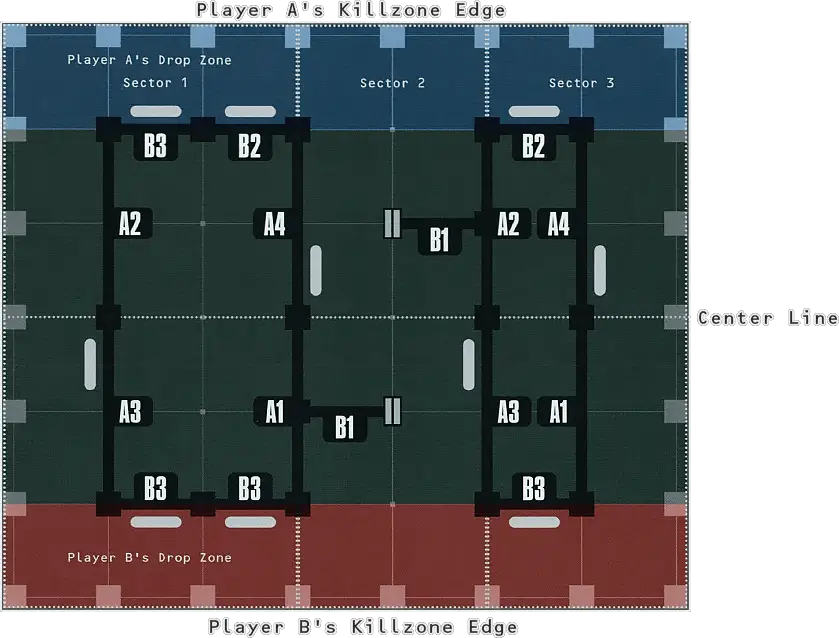

Killzone Key
Below, you will find a reference for each terrain feature in Killzone: Gallowdark and the Killzone: Into the Dark supplement, noting its relevant key for the mission maps in their relevant sections (Shadow Operations: Into the Dark Mission Pack and Critical Operations: Gallowdark Mission Pack).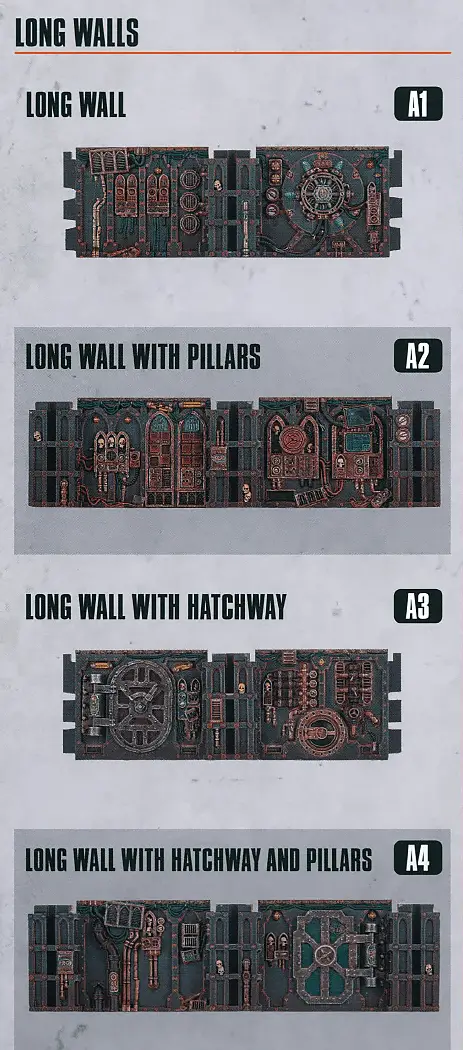


Dataslates and Datacards
Imperial Navy Breacher and Farstalker Kinband Datacards:
Imperial Navy Breacher Narrative Dataslate:
Farstalker Kinband Narrative Dataslate:
- Universal actions can be performed by all operatives. They are detailed below.
- Unique actions are actions detailed on an operative’s datacard that only they can perform, such as the Dakka Dash action found on the example datacard.
- Mission actions are specific to the mission you are playing, and will be detailed by that mission’s briefing. Missions can be found here (Open Play mission) and here (Spec Ops Narrative missions).
- Free actions can only be performed when another rule specifies. Each time an operative would perform a free action, the following rules apply.
- The operative can perform the action, so long as the requirements of the action are met.
- The player does not subtract any additional AP to perform the action.
- The operative would still count as performing the action for all rules purposes. For example, if it performed it during its activation, it would not be able to perform the action again during that activation.
For example, when a KOMMANDO DAKKA BOY performs a Dakka Dash action (see unique actions, above), it can perform a free Dash and free Shoot action without subtracting any additional AP (other than the AP spent on the Dakka Dash action). However, it is subject to those actions’ requirements, therefore it cannot perform the free Dash action if it is within Engagement Range of enemy operatives, and cannot perform the free Shoot action if it is within Engagement Range of enemy operatives or has a Conceal order. In addition, for each of the free actions it performs, it cannot perform them again during its activation.
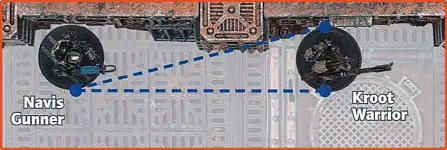
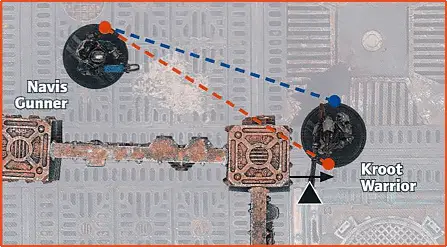
- The intended target is more than from the active operative.
- The intended target is within of a point at which a Cover line crosses another operative’s base (unless that other operative is not itself in the active operative’s LoS), or a terrain feature that provides Cover (see Terrain Traits).
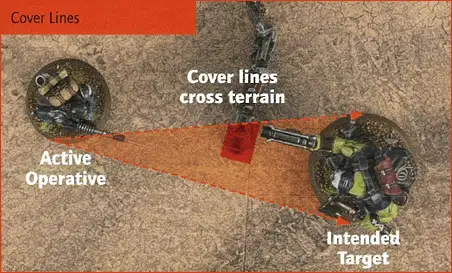
- You can draw an imaginary, unobstructed straight line (known as a Visibility line) 1 mm wide from the head of the active operative’s miniature to any part of the miniature of the intended target (not its base).
OPERATE HATCH1AP
An operative can perform this action during a Dash or Normal Move action, and any remaining increments of movement can be used after it does so. Note, however, that opening a Hatchway can cause the operative to be within Engagement Range of an enemy operative, in which case that Dash or Normal Move action would immediately end (unless the operative has any rules that allow it to move within Engagement Range of an enemy operative, e.g. FLY).
Designer’s Note: If a Hatchway’s status is changed and operative placement would prevent the hatch from fully opening or closing, temporarily remove the necessary operatives from the killzone, fully open or close the hatch as appropriate, then return the operatives to the killzone as close as possible to their original location. If an operative is within an enemy operative’s Engagement Range before a hatch is opened, it must be returned within Engagement Range of that enemy operative after the hatch is opened.
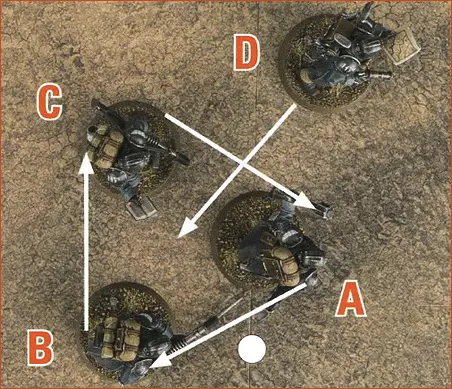
- An operative performs a Shoot action, selects a ranged weapon with the Torrent special rule, and selects operative A as the target.
- After making the shooting attack against operative A, it makes a shooting attack against operative B and C, determining if they are a valid target as normal.
- It cannot make a shooting attack against operative D, as while that operative is within of operative A and C, it is not within of operative B.
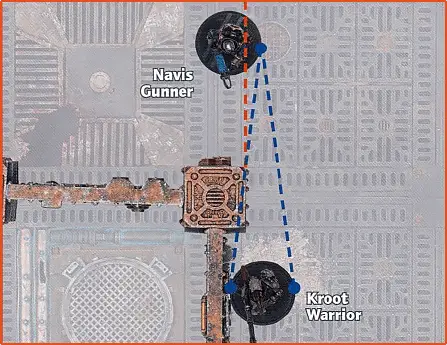
- The intended target is more than from a point at which a Cover line crosses a terrain feature that is Obscuring (see Terrain Traits). However, if the active operative is within of a point at which a Cover line crosses a terrain feature that is Obscuring, that part of the terrain feature is not treated as Obscuring.
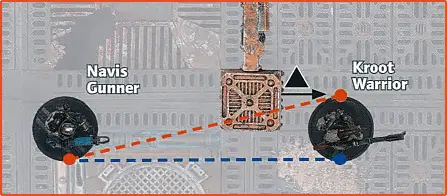
- An operative performs a Shoot action, selects a ranged weapon with the Blast special rule, and selects operative A as the target.
- After making the shooting attack against operative A, it makes a shooting attack against operative B, determining if it is a valid target as if operative A was making the shooting attack.
- It cannot make a shooting attack against operative C, as when determining if it is a valid target in this manner, operative C is not Visible to operative A due to the terrain feature between them.
- At the end of the battle, if the total APL of friendly operatives within of that terrain feature is greater than that of enemy operatives, you score 1VP.
- If you achieve the first condition, there are no enemy operatives on or within of that terrain feature, and the total APL of friendly operatives within of that terrain feature is 4 or more, you score 1VP.
- At the end of any Turning Point, if there are no enemy operatives within of your drop zone, you score 1VP.
- If you achieve the first condition at the end of any subsequent Turning Points, you score 1VP.
- If a terrain feature is sabotaged by friendly operatives, you score 1VP.
- If any other terrain feature is sabotaged by friendly operatives, you score 1VP.
SABOTAGE2AP
- If a friendly operative performs the Vantage action, you score 1VP.
- If you achieve the first condition in any subsequent Turning Points, you score 1VP.
VANTAGE2AP
The NEOPHYTE keyword is used in the following Wyrmblade datacards:
- Friendly operatives hiding have a Group Activation characteristic of 1, are considered to be within the killzone for activation purposes and can be activated as normal.
- When a friendly operative hiding is activated for the first time, set it up with an order of your choice anywhere in the killzone within of your drop zone and more than from enemy operatives. That operative is treated as having performed a Normal Move action (subtract action points accordingly), then continue its activation as normal.
- Any hiding operatives not activated by the end of the first Turning Point are incapacitated.
1.2 Airlocked 1.3 Subsidence 2.1 Desperate Raid 2.2 Deadly Hangar 2.3 Maze Breakout 3.1 Power Overload 3.3 Contact Lost 1.2 Power Surge 1.3 Supply Raid 2.1 Junction Assault 3.1 Forge Stronghold 3.2 Vault Plunder 3.3 Exposed Trove