
Open Play
Contents
Open Play Mission Sequence
An open play game is completed by following the sequence below. Alternatively, if the players want the freedom to create their own experience, they can devise a mission and mission sequence as described in Creating Your Own Open Play Games section.
1. Determine Mission
The players determine which mission they will play. If the players want a simple game, Control the Killzone mission is ideal.2. Read Mission Briefing
Each mission has a briefing that will detail the mission rules, mission objectives and a map detailing drop zones and where to set up objective markers. The players should familiarise themselves with this information before proceeding, as it will detail key rules for the mission and how victory can be achieved.3. Determine Killzone
The players determine which killzone is in use, either by agreeing which one to use or by rolling off and the winner decides. The players then set up its gameboard and terrain features. This is done by following the guidelines detailed here, or by following the configuration specified by the mission (if any). When setting up a terrain feature, the players should agree on the terrain traits of each part of it. If players are using terrain features in the configuration specified by their killzone, these terrain traits will be specified.4. Select Drop Zone
The players roll off and the winner decides who will be the Attacker and who will be the Defender. The Defender then selects one of the drop zones for their operatives. The Attacker has the other drop zone.5. Select a Kill Team
Each player determines their operatives for deployment by selecting one kill team from their army list. Once both players have selected their kill team, they should reveal it to their opponent. If a player’s kill team includes a LEADER operative, they add 2CP to their pool.6. Set Up Barricades
The players alternate setting up barricades, one at a time, starting with the Defender, until the players have set up two barricades each. Each time a player sets up a barricade, it must be within of their drop zone and not on a terrain feature (unless it has the Insignificant trait).7. Set Up Operatives
The Defender sets up all of their operatives first. Then the Attacker sets up all of their operatives. When a player sets up an operative, it must be wholly within their drop zone and must be given an Engage or Conceal order.8. Begin the Battle
The first Turning Point of the battle begins. In the first Initiative phase, the Attacker decides who has the initiative.9. End the Battle
The battle ends after four Turning Points have been completed. If one player has no operatives remaining in the killzone, the other player continues to play out each remaining Turning Point until the battle ends.10. Determine Victor
At the end of the battle, the player with the most victory points is the winner of the game. If players are tied, the game is a draw.Creating Your Own Open Play Games
If you want the freedom to create your own battles, open play is an ideal way to play. From thematic engagements with one distinct premise, to expansive skirmishes that involve completing a series of tasks, open play provides the creative mind the perfect chance to craft games that match their vision. We have provided a few handy tips below for you to devise your own open play games, but in this style of play, your imagination is the only limit!
Before the Battle
- A kill team is defending an armoury, therefore has access to a large amount of equipment from their faction army list.
- The kill team has scouted out the enemy position for days on end, therefore many of their operatives can be redeployed as described by the Recon option.
- The Defender has fortified their position and created a killing field. They can set up additional barricades and the Attacker can set up none.
- Enemy operatives have broken through the front line and now stalk between a built-up area hunting their prey. Set up large terrain features to create a dense battlefield.
- The leaders have a secret agenda of their own. Each player secretly selects one Tac Op from their kill team’s archetype. If their leader meets the condition of that Tac Op, they score the specified victory points.
- A kill team has taken up a position undetected ready to ambush their foe. The Defender must deploy all their operatives before the Attacker, and the Attacker automatically has initiative in each Turning Point.
- A marksman has taken up a position on the highest point to rain down fire upon their foe. When setting up an operative from one player’s kill team, it can be set up anywhere in the killzone so long as it is on a Vantage Point and not in the enemy’s drop zone.
Mission Rules
- Clandestine operatives engage in a firefight under the cover of darkness. Operatives can perform a Shoot action while they have the Conceal order, so long as they do not move in the same activation.
- The Defender has installed a shielding system to protect their position against incoming fire. While an operative in the Defender’s kill team is wholly within their drop zone, add 1 to their Defence characteristic.
- An operative in the Attacker’s kill team has been inspired by the divine, and now carves a righteous path through their enemy. Before the battle, the Attacker selects one operative from their kill team and increases its APL and Defence characteristic by 1, and increases the Attacks characteristic of melee and ranged weapons it is equipped with by 1.
- A kill team has been hounded for weeks on end, and now makes their final stand. The Defender creates a killzone of their choosing, selects drop zones, and their operatives cannot be injured.
- Two kill teams with a bitter grudge against one another succumb to their rage. Each time an operative performs a Charge action, before it is moved, it can perform a free Dash action.
Objectives
- A weapons cache has been located and both kill teams advance to secure it. Select one terrain feature that is not in either player’s drop zone. At the end of the battle, if the total APL of a player’s operatives within of the terrain feature is greater than that of their opponent’s operatives, they win the battle.
- Two kill teams have been engaged in a struggle for weeks on end. With tempers high, they take to the field of battle, and only the wholesale destruction of the enemy will settle the score. A player wins when all enemy operatives have been incapacitated. In addition, the battle ends when this objective is achieved, rather than at the end of the fourth Turning Point.
- One operative in the Defender’s kill team has uncovered a crucial piece of intelligence, and they are now hunted by an enemy intent on preventing it from being shared. The Defender secretly selects one operative from their kill team. If that operative is incapacitated, the Attacker wins, otherwise the Defender wins.
- A powerful relic lies amidst the ruin of a recent battle. The players place one objective marker in a suitable location near the centre of the killzone. Operatives can perform the Pick Up action on the objective marker. A player wins the battle if friendly operatives control the objective marker at the end of the battle.
- The Attacker must install a device that will hijack the automated defence systems of the enemy. The Defender places one objective marker on the battlefield. The Attacker wins the battle if a friendly operative performs the following mission action:
INSTALL DEVICE1AP
An operative can perform this action if it is within of an objective marker it controls and not within Engagement Range of an enemy operative.
Open play mission
Control the Killzone
MISSION RULES
Objective Markers: After setting up the gameboard but before setting up terrain features, the players roll off. Starting with the winner, the players alternate setting up objective markers until there are four on the battlefield. The first objective marker each player sets up must be on the horizontal line equidistant from both players’ drop zone, more than from the edge of the killzone and more than from any other objective marker. The second objective marker each player sets up must be more than from each player’s drop zone, more than from the edge of the killzone and more than from any other objective marker.Operatives can perform the following mission action:
SECURE1AP
An operative can perform this action while within of an objective marker it controls that has not been secured during this Turning Point. Until the start of the next Turning Point, that objective marker is secured.
MISSION OBJECTIVE
Each time a friendly operative performs the Secure action, you score 1VP.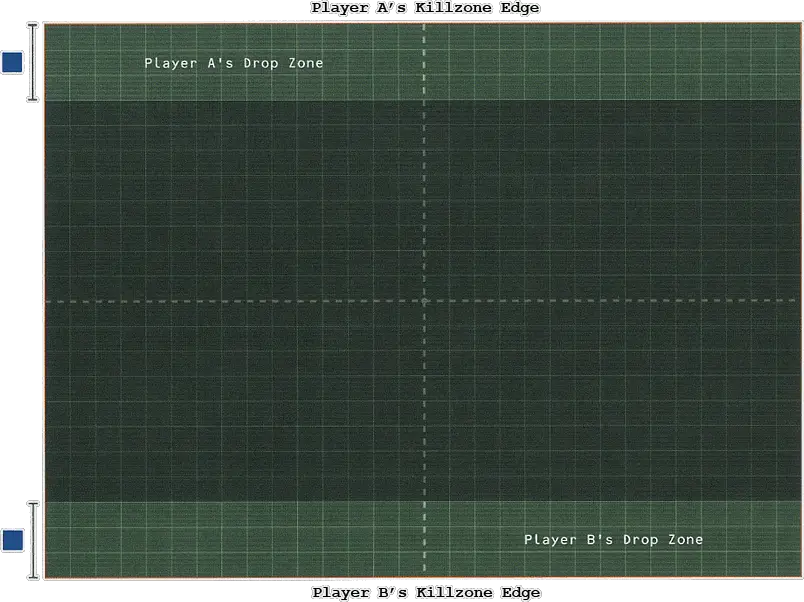
Actions
Actions are categorised as follows:- Universal actions can be performed by all operatives. They are detailed below.
- Unique actions are actions detailed on an operative’s datacard that only they can perform, such as the Dakka Dash action found on the example datacard.
- Mission actions are specific to the mission you are playing, and will be detailed by that mission’s briefing. Missions can be found here (Open Play mission) and here (Spec Ops Narrative missions).
- Free actions can only be performed when another rule specifies. Each time an operative would perform a free action, the following rules apply.
- The operative can perform the action, so long as the requirements of the action are met.
- The player does not subtract any additional AP to perform the action.
- The operative would still count as performing the action for all rules purposes. For example, if it performed it during its activation, it would not be able to perform the action again during that activation.
For example, when a KOMMANDO DAKKA BOY performs a Dakka Dash action (see unique actions, above), it can perform a free Dash and free Shoot action without subtracting any additional AP (other than the AP spent on the Dakka Dash action). However, it is subject to those actions’ requirements, therefore it cannot perform the free Dash action if it is within Engagement Range of enemy operatives, and cannot perform the free Shoot action if it is within Engagement Range of enemy operatives or has a Conceal order. In addition, for each of the free actions it performs, it cannot perform them again during its activation.
Engagement Range
Engagement Range is the zone of threat that operatives present to their enemies. Many rules in the game use Engagement Range, such as when moving and fighting. Engagement Range is mutual, therefore operatives are within each other’s Engagement Range if one of them is Visible to and within of the other.
Contents