
Core Rules
Books
| Book | Kind | Edition | Version | Last update |
| Warhammer 40,000 Kill Team: Core Book | ||||
| Warhammer 40,000 Kill Team: Core Book | Rulebook | 2 | 2.0 | May 2024 |
| | ||||
| | Rulebook | 2 | Q2 2024 | June 2024 |
Tools of War
In order to play a battle of Warhammer 40,000: Kill Team, each player will need a collection of Citadel miniatures. They will also need their miniatures’ accompanying rules, known as a faction army list, which can be found in various Warhammer 40,000: Kill Team publications.You will also need a set of combat gauges, a killzone and some dice. You may also find it helpful to have tokens to use when your miniatures have acted, taken wounds or performed certain special actions during the game.
Operatives and Kill Teams
When you select your operatives for a battle, you are not selecting individuals, but rather a specialist squad that works together. This is known as your Kill Team. A list of the Kill Teams available to you can be found in your faction’s army list. In battle, all your friendly operatives are collectively referred to as your Kill Team.
Once you have selected your way to play, its mission sequence will tell you when you must select a Kill Team for a battle. When you do, you must select one of the Kill Teams from your faction’s army list, then select the operatives as specified by that Kill Team. Some Kill Teams will specify the exact configuration of operatives it consists of. Others will allow you to select your own configuration of operatives (with restrictions). In either case, the final configuration of operatives must conform to the requirements laid out by that Kill Team.
Distances
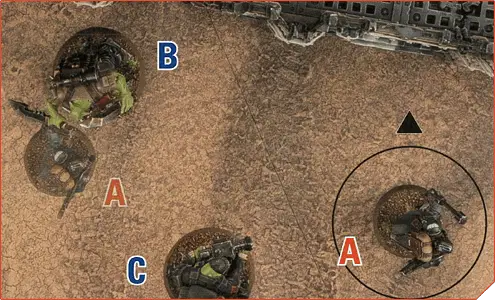
Warhammer 40,000: Kill Team captures the tactical engagement of elite operatives by using a collection of combat gauges listed below to measure distances. Similarly, the tense and timely actions of operatives is often displayed in increments. Players can use a tape measure or other measuring device if they wish by converting the relevant distance below into inches, however the game is designed for and explained with graded distances.The triangle distance is 1".
The circle is 2".
The square is 3".
The pentagon is 6".
Distances can be measured at any time, and can be measured out in different increments, so long as the total does not exceed the specified distance. For example, if an operative is going to be moved a distance of 3. This can be measured out as , 6, or even .
Many rules, such as a Normal Move or ability, will have a distance requirement. When measuring distances to and from operatives, measure from the closest part of the bases of operatives, rather than the miniature.
If a rule states that something must be ‘within’ a certain range, it is in range if the closest part of its base is no more than the specified distance. If a rule states something must be ‘wholly within’ a certain range, it is in range if every part of its base is no more than the specified distance. An operative is always within and wholly within range of itself.
Killzones
A killzone is the playing area in which your operatives wage war. Games of Warhammer 40,000: Kill Team are designed to be played on a 30" by 22" area, which is the size of a kill team gameboard. A killzone will also contain various terrain features that add excitement and tactical depth to your games. Terrain is explained in more detail here.Dice
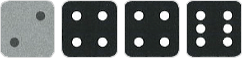
Many rules require a certain result to succeed, such as attacking. For example, to make a successful roll, you might need a 3+. This means the result must be three or higher to succeed, so a dice roll value of 3, 4, 5 or 6 succeeds, whereas a dice roll value of 1 or 2 fails.
Some rules allow you to re-roll a dice roll. You can never re-roll a dice more than once, and you cannot select the original result, even if the new result is worse.
Some rules instruct players to roll off. To do so, both players roll one D6, and whoever scores highest wins the roll-off. If there is a tie for the highest roll, make the roll-off again. If both players would use a rule that would allow them to re-roll their dice when rolling off, both players must declare the use of this rule before any dice are re-rolled, starting with the player who lost the roll off.
Some rare rules will modify the result of a roll by adding or subtracting from the result. All modifiers are cumulative. A dice result can be modified above or below the maximum or minimum possible value of the roll. For example, if a D6 value is 6 and you must add 1 to the result, the final result is a 7.
Datacards
Each operative in your Kill Team has its own set of individual rules known as a datacard. It states all the key characteristics of your operatives and the weapons they are equipped with, and details anything unique they can do. You will find an example datacard and details of what information it provides below. All of the terms below are then explained in this section.
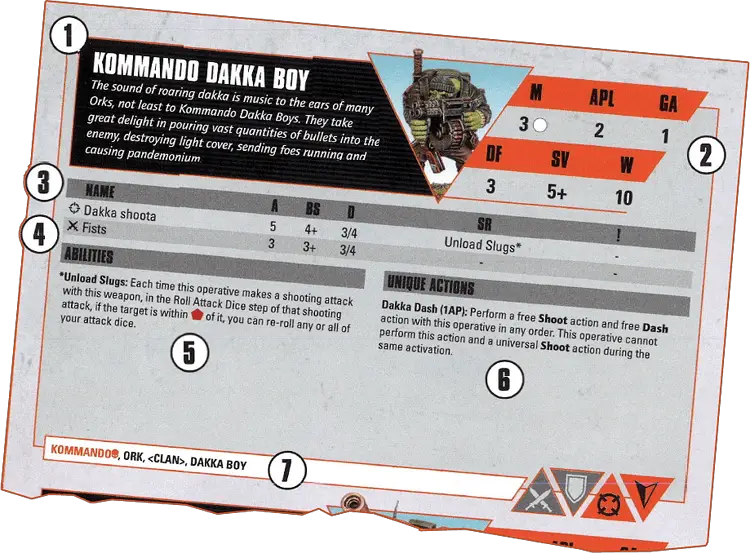
1. Operative Type
The type of the operative.2. Physical Profile
- Movement (M): The speed at which the operative moves across the killzone, represented by a distance value.
- Action Point Limit (APL): The number of action points an operative generates when it is activated, which are used to perform actions.
- Group Activation (GA): Most operatives are activated individually, but some operatives must be activated in a group. This number states how many of these operatives are activated together.
- Defence (Df): How many attacks the operative can defend each time another operative attacks it with a ranged weapon.
- Save (Sv): How likely the operative is to avert an attack each time another operative attacks it with a ranged weapon, represented by the result required when rolling a D6. Note that a lower result is a better characteristic.
- Wounds (W): How many wounds an operative can lose before it is incapacitated. This is explained here.
 3. Ranged Weapons Profile
The ranged weapons the operative can be equipped with, and their characteristics and rules when shooting.- Name: The name of the weapon.
- Attacks (A): The number of attack dice to roll when the operative attacks with this weapon.
- Ballistic Skill (BS): How accurate the operative is when attacking with this weapon, represented by the result required when rolling a D6. Note that a lower result is a better characteristic.
- Damage (Dmg): The amount of damage each attack dice can inflict. The first value is the Normal Damage characteristic. The second value is the Critical Damage characteristic.
- Special Rules (SR): Any special rules that apply each time the operative attacks with this weapon. Common special rules are explained here. Special rules marked with a * are explained on the operative’s datacard.
- Critical Hit Rules (!): Any additional effects the weapon can cause with critical hits.
 4. Melee Weapon Profiles
The melee weapons the operative can be equipped with, and their characteristics and rules when fighting in combat.- Name: The name of the weapon.
- Attacks (A): The starting number of attack dice to roll when the operative attacks with this weapon.
- Weapon Skill (WS): How accurate and skilled the operative is when attacking with this weapon, represented by the result required when rolling a D6. Note that a lower result is a better characteristic.
- Damage (Dmg): The amount of damage each attack dice can inflict. The first value is the Normal Damage characteristic. The second value is the Critical Damage characteristic.
- Special Rules (SR): Any special rules that apply each time the operative attacks with this weapon. Common special rules are explained here. Special rules marked with a * are explained on the operative’s datacard.
- Critical Hit Rules (!): Any additional effects the weapon can cause with critical hits.
5. Abilities
- Some abilities will only affect operatives with the relevant keywords, as explained below.
- An operative gains no benefit from the same ability from two different operatives - that ability only applies once.
6. Unique Actions
Any unique actions the operative can perform, in addition to the universal actions available to all operatives. Actions are explained here.7. Keywords
- A set of keywords that help to identify the operative.
- Some rules will only affect operatives with the relevant keyword, identified by the KEYWORD BOLD font. For example, if a rule specifies friendly ADEPTUS ASTARTES PHOBOS operatives, it only affects operatives from your kill team that have both the ADEPTUS ASTARTES and PHOBOS keywords.
- Some keywords are orange and have a skull symbol, e.g. KOMMANDO. This denotes a faction keyword, which is used for creating a roster (Matched Roster and Narrative Dataslate).
- Pluralisation of a keyword does not affect which operative the rule applies to.
- Some operatives have selectable keywords in angular brackets, such as <CHAPTER>. This denotes a keyword that you must choose for yourself when the operative is added to your roster. Your choice replaces all instances of the angular bracket keyword on that operative’s datacard. For example, if you add an ADEPTUS ASTARTES INTERCESSOR to your roster and you choose for it to be from the Dark Angels Chapter, you replace the <CHAPTER> keyword in all instances on that operative’s datacard with the DARK ANGELS keyword.
Engagement Range
Engagement Range is the zone of threat that operatives present to their enemies. Many rules in the game use Engagement Range, such as when moving and fighting. Engagement Range is mutual, therefore operatives are within each other’s Engagement Range if one of them is Visible to and within of the other.Modifying Characteristics
Some rules will modify the characteristics of an operative and/or their weapons. All modifiers to a characteristic are cumulative.If a characteristic refers to the result required when rolling a D6 (i.e. Save, Ballistic Skill and Weapon Skill), the modifier will specify to improve or worsen the characteristic. As a lower result is a better characteristic, the modifier should be applied accordingly. For example, if a Ballistic Skill of 4+ is worsened by 1, it would be modified to a 5+.
If an operative’s APL is modified, it lasts until the end of its current or next activation (whichever comes first). Regardless of how many APL modifiers an operative is affected by, the total modification can never be more than -1 or +1 from its normal APL. For example, if an operative has an APL of 2, and two rules say to add 1 to the operative’s APL, until the end of its next activation it would have an APL of 3.
") Fire Teams
Fire Teams
Many of the kill teams presented in Kill Team: Compendium require you to select your kill team by selecting one or two fire teams. A fire team is a collection of operatives and their selection requirements for the associated kill team. If your kill team consists of two fire teams, you can select the same fire team more than once. Many fire teams have the option to select a LEADER operative. When selecting your kill team, you can only include one LEADER operative, and in matched play, you must include one LEADER operative. Finally, each fire team has one or more archetypes. In such circumstances, your kill team’s overall archetype(s) is the archetype(s) of its fire teams.Battle Structure
A battle of Warhammer 40,000: Kill Team consists of four Turning Points. A Turning Point includes three phases, each of which must be completed in order and in full. Once all three phases have been completed, the next Turning Point begins, the process repeating until the battle ends at the end of the fourth Turning Point. The three phases are listed in order below, and are explained below.Initiative Phase
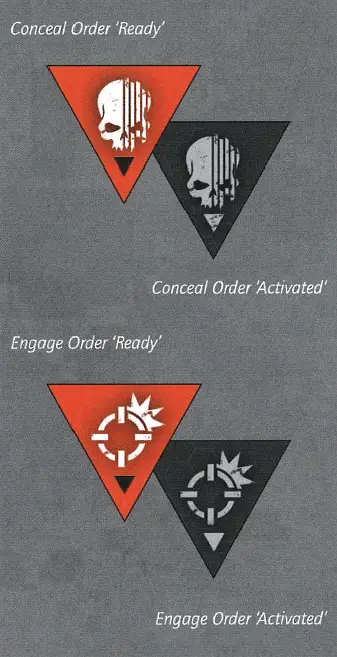
1. Ready Operatives
Each player readies all friendly operatives in the killzone by flipping their order token so they show an operative as ready.2. Determine Initiative
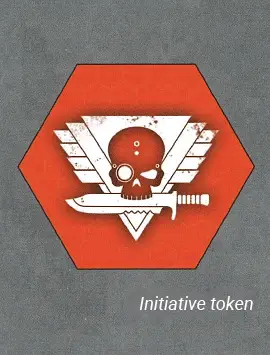
Having the initiative will give a player influence over the order of certain aspects of the battle, such as deciding which operative activates first during the Turning Point. If more than one rule would happen simultaneously, for example two rules that take effect at the end of a Turning Point, the player with the initiative determines the order in which they take effect.
Strategy Phase
1. Generate Command Points
Each player generates 1 Command Point (CP) and adds it to their CP pool. CPs remain in a player’s pool until they are spent.CPs can be spent on Strategic Ploys. They are used in the Strategy phase as described below, and are unique rules a cunning general can use to aid their kill team. Strategic Ploys can be found in your faction’s army list.
CPs can also be spent on Tactical Ploys. It will specify when they should be used. Tactical Ploys are minor benefits that can have significant effects if used at the right time. Other than Command Re-roll below, each player can use each Tactical Ploy no more than once per Turning Point. If a Tactical Ploy is not used during a Turning Point, it is only limited by the number of Command Points you have. Tactical Ploys can be found in your faction’s army list. In addition, the Command Re-roll Tactical Ploy is available to all factions.
2. Play Strategic Ploys
Starting with the player who has initiative, each player alternates either using a Strategic Ploy or choosing to pass. The players repeat this process until they have both passed in succession.If a player declares they are going to use a Strategic Ploy, they must first pay its CP cost by removing the specified CPs from their pool. If a player does not have enough CPs to pay the cost, they cannot use that Strategic Ploy. When a Strategic Ploy is used, resolve its effects immediately before alternating to the other player. Each player cannot use the same Strategic Ploy more than once during each Strategy phase.
3. Target Reveal
Starting with the player who has initiative, the players alternate revealing Tac Ops that may be revealed in the Target Reveal step of this Turning Point, or choosing to pass. Note that players do not have to reveal a Tac Op, but some must be revealed in certain Turning Points in order to be achieved. The players repeat this process until they have both passed in succession.Firefight Phase
1. Perform Actions
Each time a player activates one of their ready operatives, they must determine whether it has the Engage or Conceal order. If it is the first Turning Point, it has the order that was given to it when it was set up before the battle. In all subsequent Turning Points, they can choose what order to give it.
The operative then generates a number of action points equal to its Action Point Limit (APL), which are used to perform actions. Once all their action points have been used and they have no other actions to perform, their activation ends and they are no longer ready.
New Core Rule
Some rules allow you to activate operatives in succession before your opponent can activate. Regardless of such rules, you can never activate more than two operatives in the same Turning Point before your opponent has had a turn to activate a ready operative or perform Overwatch.The controlling player does not need to declare all of their operative’s actions when it is activated. Instead, they can perform an action, and then decide the next action after seeing its effects. Unless otherwise specified, an operative cannot perform the same action more than once during its activation.
Overwatch
When it is your turn to activate an operative, if you do not have any ready operatives left to activate, but your opponent has not yet activated all of their operatives, you can select a friendly operative that has an Engage order and has already activated this phase to perform a single Overwatch action. Each operative can perform one Overwatch action per Turning Point, and you can only select an operative to do so if your opponent still has operatives left to activate. That means that once your opponent has activated all their operatives, the Firefight phase ends.Actions
Actions are categorised as follows:- Universal actions can be performed by all operatives. They are detailed below.
- Unique actions are actions detailed on an operative’s datacard that only they can perform, such as the Dakka Dash action found on the example datacard.
- Mission actions are specific to the mission you are playing, and will be detailed by that mission’s briefing. Missions can be found here (Open Play mission) and here (Spec Ops Narrative missions).
- Free actions can only be performed when another rule specifies. Each time an operative would perform a free action, the following rules apply.
- The operative can perform the action, so long as the requirements of the action are met.
- The player does not subtract any additional AP to perform the action.
- The operative would still count as performing the action for all rules purposes. For example, if it performed it during its activation, it would not be able to perform the action again during that activation.
For example, when a KOMMANDO DAKKA BOY performs a Dakka Dash action (see unique actions, above), it can perform a free Dash and free Shoot action without subtracting any additional AP (other than the AP spent on the Dakka Dash action). However, it is subject to those actions’ requirements, therefore it cannot perform the free Dash action if it is within Engagement Range of enemy operatives, and cannot perform the free Shoot action if it is within Engagement Range of enemy operatives or has a Conceal order. In addition, for each of the free actions it performs, it cannot perform them again during its activation.
Normal Move1AP
The operative must finish the move in a location it can be placed. If this is not possible, it cannot move there. It cannot move over the edge of the killzone or through any part of another operative’s base, and it cannot move within Engagement Range of an enemy operative, unless another friendly operative is already within Engagement Range of that enemy operative, in which case it cannot finish its move within Engagement Range of that enemy operative.
An operative cannot move through terrain features - it must traverse or climb over them. If an operative wishes to move across the killzone by jumping across gaps or down from ledges, it must jump or drop.
An operative cannot perform this action if it is within Engagement Range of an enemy operative. In addition, an operative cannot perform this action in the same activation in which it performed the Fall Back or Charge action.
Fly
Each time an operative makes any kind of move, if it has the FLY keyword, it can move around, across and over other operatives (and their bases) as if they were not there, but must finish its move following all requirements specified by that move, and cannot finish its move on top of other operatives (or their bases).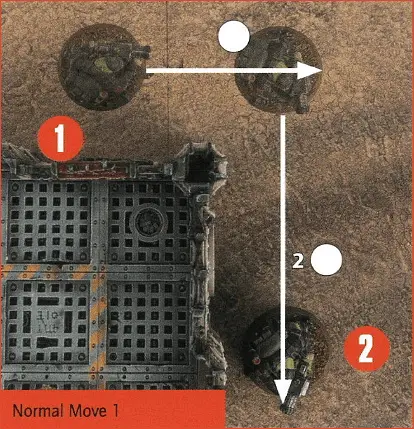
- The operative’s M characteristic is 3. It first moves in a straight line increment of to clear the corner of a wall.
- It then moves in a straight line increment of 2, the remaining distance it can move without exceeding its M characteristic.
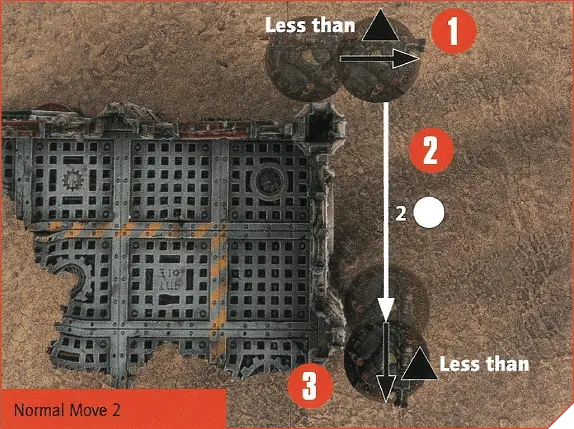
- The operative’s M characteristic is 3. It intends to stay close to the wall, therefore its movement will be measured out in different increments without exceeding its M characteristic. It first moves in a straight line increment of less than , but as the minimum increment of movement is , it is still treated as a movement of .
- It then moves in a straight line increment of 2.
- Finally, the operative wants to be at the corner of the wall. Its final increment of movement is less than , but as before, this is rounded up to . The operative’s final distance of movement is 2 and 2.
Charge1AP
- Move the active operative up to a distance that does not exceed the distance equal to its Movement characteristic plus .
- It must finish the move within Engagement Range of an enemy operative. If this is not possible you must choose a different action for the operative (the action points subtracted for the Charge action are refunded).
- If it moves within Engagement Range of an enemy operative, if no other friendly operatives are within Engagement Range of that enemy operative, it must finish the move within Engagement Range of that enemy operative.
- If an operative has a rule that allows it to perform a Charge action while within Engagement Range of an enemy operative, it can move out of Engagement Range of enemy operatives, but must still finish that move within Engagement Range of at least one enemy operative.
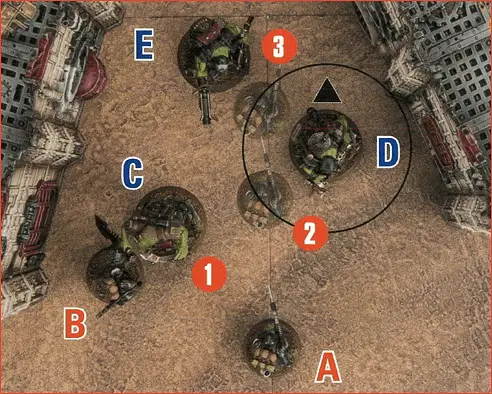
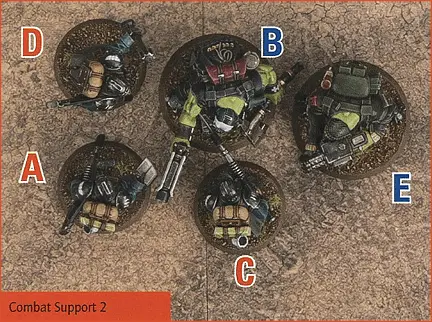
- Operative A wants to charge operative E. It first moves within Engagement Range of operative C. As operative C is within Engagement Range of operative B, operative A is free to continue.
- It then moves within Engagement Range of operative D. As operative D is not within Engagement Range of any other friendly operatives, operative A must now finish the move within Engagement Range of operative D.
- However, as operative A still has movement remaining, it can still move within Engagement Range of operative E, so long as it still finishes the move within Engagement Range of operative D.
Fall Back2AP
- It can only perform this action if it is within Engagement Range of an enemy operative.
- It can move within Engagement Range of enemy operatives, but cannot finish the move within Engagement Range of an enemy operative. If this is not possible, it cannot perform this action (the action points subtracted for the Fall Back action are refunded).
Dash1AP
Move the active operative following the same rules as a Normal Move action with the following exception:- It can only move up to .
Overwatch0AP
Make a shooting attack with one of the active operative’s ranged weapons. For that shooting attack, worsen the Ballistic Skill characteristic of the active operative’s ranged weapons by 1.An operative cannot perform this action if it is within Engagement Range of an enemy operative. In addition, an operative can only perform this action once per Turning Point, only if it has an Engage order, and only as explained by Overwatch here.
Pick Up1AP
To perform this action, an operative must be within of an objective marker or token that the Pick Up action can be performed upon. Remove that objective marker or token from the killzone; the acting operative is now carrying it. While an operative is carrying an objective marker or token, it is always in control of it, and unless otherwise specified, acts normally.An operative can drop an objective marker or token it is carrying at any point during its activation without subtracting any additional AP. If an operative would be removed from the killzone while carrying an objective marker or token, before it is removed, it must drop it. To drop an objective marker or token, the operative’s controlling player places the centre of it within of and Visible to the operative. If that is not possible, they must place it in a location that is Visible and as close as possible to the operative.
An operative cannot perform the Pick Up action if it is within Engagement Range of an enemy operative, if it does not control that objective marker or token, or if it is already carrying another objective marker or token.
Shoot1AP
1. Select Ranged Weapon
The attacker selects one ranged weapon their operative is equipped with and collects their attack dice. Their attack dice are a number of D6 equal to the weapon’s Attacks characteristic.2. Select Valid Target
The attacker selects a valid target for the shooting attack. A valid target is an enemy operative in the active operative’s Line of Sight that has no friendly operatives within its Engagement Range. If there are no valid targets for the shooting attack, the Shoot action cannot be resolved and you must choose a different action for the operative (the action points subtracted for the Shoot action would be refunded). If there are no valid targets for the shooting attack, the Shoot action cannot be resolved and you must choose a different action for the operative (the action points spent on the Shoot action would be refunded).3. Roll Attack Dice
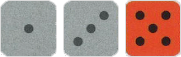
The attacker rolls their attack dice. Each result that equals or beats the selected weapon’s Ballistic Skill characteristic is a successful hit and is retained. Each that doesn’t is a failed hit and is discarded. A result of 6 is always a successful hit and a result of 1 is always a failed hit. Keep track of each retained result of 6 - this is a critical hit. Each other retained success is a normal hit.4. Roll Defence Dice
The defender collects their defence dice and rolls them. Their defence dice are a number of D6 equal to the target’s Defence characteristic. Each result that equals or beats the target’s Save characteristic is a successful save and is retained. Each that doesn’t is a failed save and is discarded. A result of 1 is always a failed save. Keep track of each retained result of 6 - this is a critical save. Each other retained success is a normal save.If the target is in Cover, before rolling their defence dice, the defender can retain one as a successful normal save without rolling it.
5. Resolve Successful Saves
The defender resolves all of their successful saves. To resolve a successful save, they select one or more of their retained defence dice, discard one of the attacker’s successful hits, then discard that defence dice.- If the defence dice they select is a normal save, they select one of their opponent’s normal hits to be discarded.
- If the defence dice they select are two normal saves, they select one of their opponent’s critical hits to be discarded.
- If the defence dice they select is a critical save, they select one of their opponent’s normal hits or critical hits to be discarded.
6. Resolve Successful Hits
The attacker resolves any remaining successful hits. To resolve a successful hit, they select one of their retained attack dice, inflict damage on the target, then discard that attack dice.- If the attack dice they select is a normal hit, inflict damage equal to the weapon’s Normal Damage.
- If the attack dice they select is a critical hit, inflict damage equal to the weapon’s Critical Damage.
7. Remove Incapacitated Operatives
Any operatives that were incapacitated are removed from the killzone after the active operative has finished making all of its shooting attacks for that action. That means that in the rare instance that an operative is attacking multiple targets (e.g. the weapon has the Blast special rule), they make all of their attacks for that action before any incapacitated operatives are removed.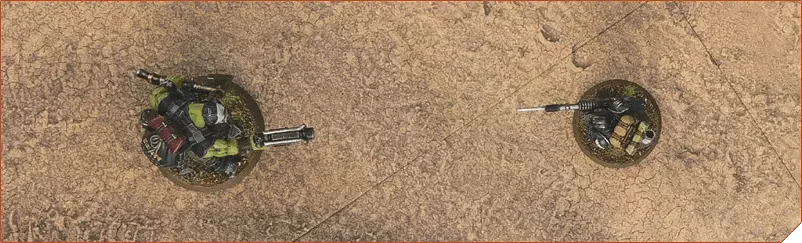
- The Veteran Guardsman makes a shooting attack. The attacker, the Veteran Guardsman’s controlling player, selects the Veteran Guardsman’s lasgun as the ranged weapon to make the shooting attack with and collects four attack dice. They then select the Kommando as the target.
- The attacker rolls their attack dice and the results are as follows:
The result of 2 is discarded as it does not equal or beat the weapon’s BS characteristic, and the rest are retained as successful hits. - The defender, the Kommando’s controlling player, collects and rolls their defence dice and the results are as follows:
The results of 1 and 3 are discarded as they do not equal or beat the Kommando’s Sv characteristic, and the result of 5 is retained as a successful save. - The defender resolves their successful saves. As the retained defence dice is a normal save, they select one of the attacker’s normal hits (a result of 4) to be discarded. They now have no remaining defence dice.

- The attacker resolves their remaining successful hits.
The first retained attack dice they resolve is a critical hit (the result of 6), therefore they inflict Critical Damage on the Kommando. The remaining retained attack dice they resolve is a normal hit (the result of 4), therefore they inflict Normal Damage on the Kommando. They now have no remaining attack dice and the Kommando has lost a total of 5 wounds.
Fight1AP
1. Select Valid Target
The attacker selects a valid target for combat. A valid target is an enemy operative in the active operative’s Engagement Range. The rules for determining if the target operative is Visible can be found here. If there are no valid targets for combat, the Fight action cannot be resolved and you must choose a different action for the operative (the action points subtracted for the Fight action are refunded).2. Select Melee Weapons
The attacker selects one melee weapon their operative is equipped with and collects their attack dice. The defender then selects one melee weapon their operative is equipped with and collects their attack dice. Each player’s attack dice are a number of D6 equal to their selected weapon’s Attacks characteristic.3. Roll Attack Dice
Both players roll their attack dice simultaneously. Each result that equals or beats their selected weapon’s Weapon Skill characteristic is a successful hit and is retained. Each that doesn't is a failed hit and is discarded. A result of 6 is always a successful hit and a result of 1 is always a failed hit. Keep track of each retained result of 6 - this is a critical hit. Each other retained success is a normal hit.4. Resolve Successful Hits
Starting with the attacker, each player alternates resolving one of their successful hits. They repeat this process until one operative in that combat is incapacitated or they have no more hits to resolve, in which case their opponent resolves all of their remaining hits. To resolve a successful hit, they select one of their retained attack dice, choose for their operative to strike or parry, then discard that attack dice.If they parry, one of their opponent’s successful hits is discarded.
- If the attack dice they select is a normal hit, they select one of their opponent’s normal hits to be discarded.
- If the attack dice they select is a critical hit, they select one of their opponent’s normal hits or critical hits to be discarded.
- If the attack dice they select is a normal hit, inflict damage equal to their selected weapon’s Normal Damage.
- If the attack dice they select is a critical hit, inflict damage equal to their selected weapon’s Critical Damage.
Combat Support
Each time an operative fights in combat, for each other friendly operative that supports them in that combat, improve the Weapon Skill characteristic of melee weapons they are equipped with by 1 for that combat. For a friendly operative to support them, it must be within Engagement Range of the enemy operative in that combat and not within Engagement Range of other enemy operatives.2. The attacker and defender roll their attack dice simultaneously. The attacker rolls:

The results of 1 and 2 are discarded as they do not equal or beat the weapon’s WS characteristic, and the rest are retained as successful hits.
The defender rolls:
...and the defender has no remaining attack dice:

4. The attacker resolves a successful hit again. They select their remaining attack dice result of 4 and choose to strike. As the retained attack dice is a normal hit, they Inflict Normal Damage on the Veteran Guardsman. Both players now have no remaining attack dice. The Veteran Guardsman operative has lost a total of 4 wounds and the Kommando operative has lost a total of 2 wounds.

Wounds and Damage
If an operative’s wounds are reduced to 0 or less, it is incapacitated. When an operative is incapacitated, it is removed from the killzone and you can no longer use its abilities. If an operative is incapacitated during a shooting sequence, it is removed after all shooting attacks from that action have been made, as specified in the shooting sequence. If an operative is incapacitated during a fight sequence, any remaining hits are discarded and not resolved.
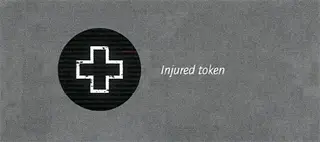
If an operative has fewer than half of its wounds remaining, it is injured. While an operative is injured, subtract from its Movement characteristic and worsen the Ballistic Skill and Weapon Skill characteristics of the ranged and melee weapons it is equipped with by 1 respectively.
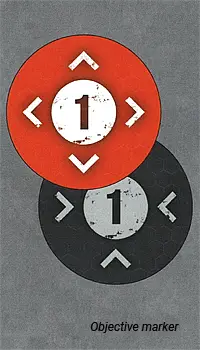
Controlling Objective Markers and Tokens
The locations of objective markers on the battlefield are typically shown on the deployment map of the mission being played, and are represented by the icon above.
Line of Sight
1. Visible.
2. Not Obscured.
1. Visible
2. Not Obscured
3. Not in Cover.
Visible
For an intended target to be Visible, the following must be true:- You can draw an imaginary, unobstructed straight line (known as a Visibility line) 1 mm wide from the head of the active operative’s miniature to any part of the miniature of the intended target (not its base).
Obscured
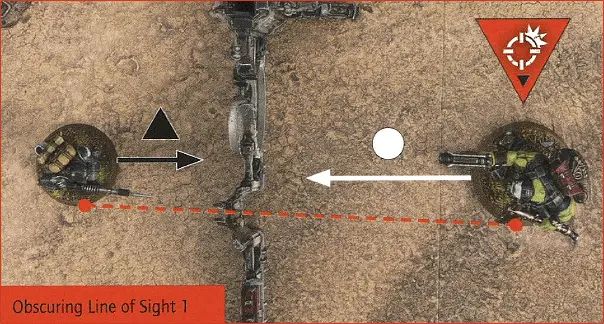
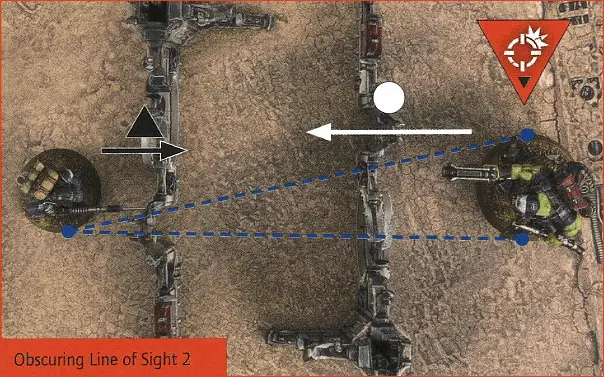
Regardless of whether a target operative has an Engage or Conceal order, if an Obscuring terrain feature is in the way, an active operative may be unable to have LoS to them. For an intended target to be Obscured, the following must be true:- The intended target is more than from a point at which a Cover line crosses a terrain feature that is Obscuring (see Terrain Traits). However, if the active operative is within of a point at which a Cover line crosses a terrain feature that is Obscuring, that part of the terrain feature is not treated as Obscuring.
Cover
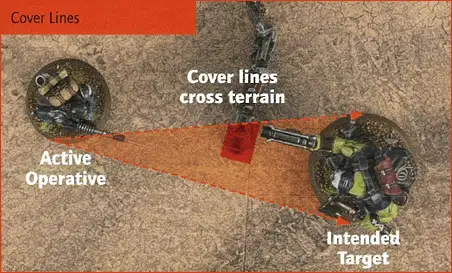
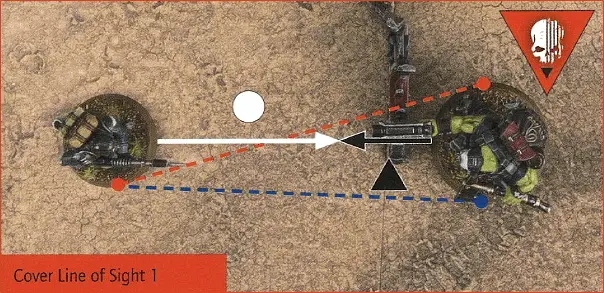
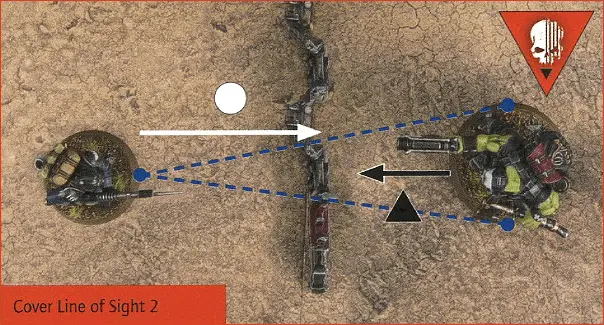
If an operative positions themselves in Cover, they will use it for protection while they have an Engage order, or hide behind it while they have a Conceal order. For an intended target to be in Cover, both of the following must be true:- The intended target is more than from the active operative.
- The intended target is within of a point at which a Cover line crosses another operative’s base (unless that other operative is not itself in the active operative’s LoS), or a terrain feature that provides Cover (see Terrain Traits).
Killzones
Killzones are an essential component of Warhammer 40,000: Kill Team, providing an immersive experience as well as an engaging battlefield for your operatives to fight on. Securing objectives, climbing buildings, vaulting obstacles, taking cover and leaping over gaps are all part of mastering the environments your operatives wage war within. In this section you will find all the rules for the features that makes up your killzone, and how your operatives interact with it.
Terrain Traits
Killzones will include a multitude of terrain features for your operatives to fight around, and the various parts of each terrain feature have traits that convey certain rules effects. If you create a killzone using a Killzone Environment, each terrain feature will be built in a specific way and the different parts of it will be defined. If your killzone is of your own devising, you and your opponent must define each part of a terrain feature and its accompanying traits. Examples of how to do this can be found here.Heavy
Heavy terrain provides Cover and is Obscuring.Light
Light terrain provides Cover unless otherwise specified (e.g. Vantage Point).Traversable
Traversable terrain can be traversed.Insignificant
Insignificant terrain is terrain too small to have an impact on your operatives and provides no rules.Scalable
This trait can be applied to terrain features more than 2 tall. Each time an operative climbs this terrain feature, the final incremental distance of less than is ignored, instead of being rounded up to .Barricades
Barricades are terrain that players set up before a battle. They are wide and tall. They are Light and Traversable.
Vantage Point
A Vantage Point is a terrain feature with a vertical element (i.e. a level higher than the floor of the killzone) that operatives can be placed upon. If a part of a terrain feature is not defined as a Vantage Point, operatives can climb over or traverse it, but they cannot finish a move or be set up upon it.Each time an operative on a Vantage Point makes a shooting attack, each enemy operative that has a Conceal order that is in Cover provided by Light terrain or another operative, and is at least lower than them, is treated as having an Engage order for that attack instead.
Each time a shooting attack is made against an operative on a Vantage Point, for that shooting attack:
- The operative cannot use the floor of the Vantage Point as Cover or to be Obscured.
- The operative cannot use parts of the Vantage Point’s terrain feature that is lower than the operative as Cover or to be Obscured.
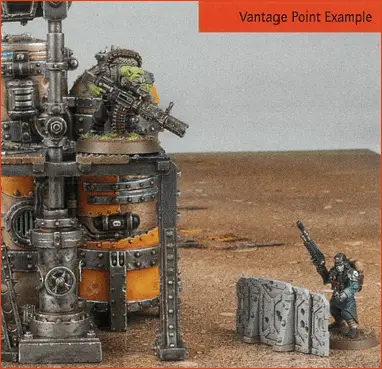
Vantage Point 2: The Veteran Guardsman makes a shooting attack. The Kommando has a Conceal order and is on a Vantage Point, but as it cannot use the floor of the Vantage Point or parts of the Vantage Point that are lower than it as Cover or to be Obscured, it is a valid target for the shooting attack and cannot use the Vantage Point as Cover.
Moving Through Terrain
Traverse
A traverse is when an operative must clear a small obstacle in their way such as a barricade or pipe. During an operative’s move, it can ascend and descend terrain with the Traversable trait at a cost of , but cannot finish a move on top of it. If this is not possible, it cannot traverse it - it must move around it instead. Note that a traverse is not a climb - the operative simply vaults over the obstacle in their way as it moves horizontally across the killzone.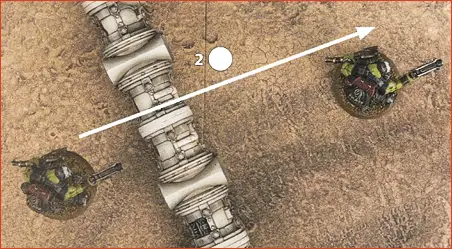
Jump
A jump is when an operative crosses a gap between terrain that is within horizontally and vertically from one edge to the other. The operative must be within of the edge of the terrain feature the operative will jump from. To jump, take a jump test for the operative by rolling one D6: on a 1, the test is unsuccessful, the operative remains where it is and that action ends; on a 2+, the test is successful and you can move the operative across the gap. Only the horizontal distance an operative moves during a jump counts towards how far it has moved. Note that an operative cannot jump instead of climbing. If an operative simply wishes to ascend or descend a terrain feature, it must drop or climb instead.Jump tests: Automatically successful (do not roll).
Remember that an operative must finish a move in a location it can be placed. If this is not possible, such as if an operative does not have enough Movement to reach its intended destination, it cannot attempt the jump.
Climb
A climb is when an operative ascends or descends a terrain feature that it cannot traverse across during a move. First, the operative must be within of a physical and climbable part of a terrain feature to climb it - a wall, pipe, chain etc. The operative can then climb that terrain feature, counting the distance it travels towards the total distance it moves, rounding up any incremental distances of less than to .Remember that an operative must finish a move in a location it can be placed. If this is not possible, such as if an operative does not have a high enough Movement characteristic to reach its intended destination, it cannot begin the climb. This means an operative cannot finish a move partway through a climb. An operative can, however, perform a Dash action during a climb in order to reach its intended destination.
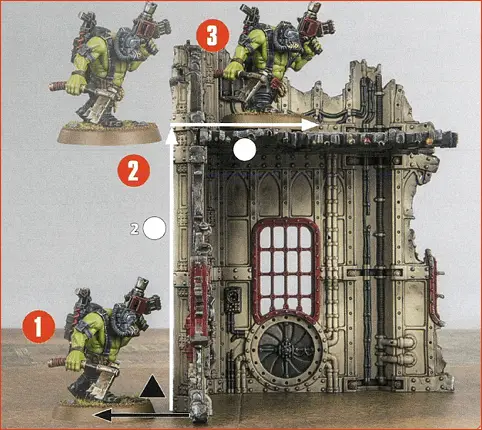
- An operative with an M characteristic of 3 intends to climb onto the next level. It is within of a physical part of the terrain feature it can climb.
- It then climbs the terrain feature. It must move a vertical distance of more than but less than 2. As increments are rounded up, it moves 2 vertically.
- To reach a location it can be placed, it must also move horizontally. The operative has of its M characteristic remaining, allowing it to move onto the next level. You could then move the operative the full distance onto the level.
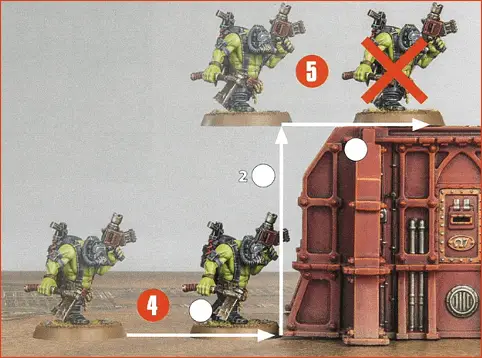
- An operative with an M characteristic of 3 intends to climb onto the next level. It first moves to be within of a physical part of a terrain feature it can climb.
- It then attempts to climb the terrain feature. It must move 2 vertically (increments rounded up) and horizontally. As this would exceed its M characteristic, it cannot begin the climb.
- If the operative has any action points remaining, however, it could perform a Dash action to complete the climb, so long as it hasn’t already performed a Dash action during its activation.
Drop
A drop is when an operative descends from height without climbing. The operative must be within of the edge of the terrain feature it will drop from, and the intended location must be vertically within 3 of the level it occupies. The operative can drop from that terrain feature counting the vertical distance it travels towards the total distance it moves. The vertical distance is measured in increments of , rounding down. Note that a total vertical distance of less than is therefore ignored. An operative can perform a Dash action during a drop in order to reach its intended destination.Remember that an operative cannot move through any part of another operative’s base (unless it can FLY) Therefore if the intended location has any operatives that would prevent the operative moving in that direction, it cannot make the drop.
Flying Over Terrain
Operatives with the FLY keyword ignore vertical distances when moving on and over terrain features, meaning they do not need to climb or traverse and can move freely across gaps instead of jumping. In addition, when they drop, their intended location can be any vertical distance and the vertical distance they travel does not count towards the total distance they move.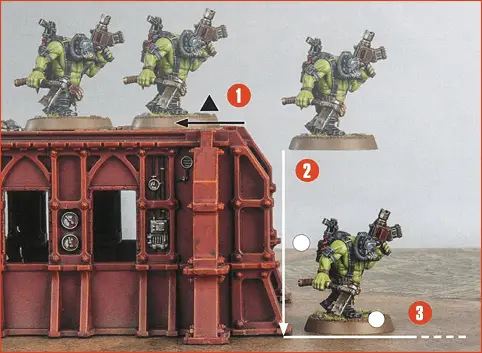
- The operative intends to drop to the next level. It first moves to be within of the edge of the terrain feature it will drop from.
- The operative then drops from that terrain feature. The horizontal distance it moves is measured as normal. The vertical distance it moves is more than but less than 2. As increments are rounded down, it moves vertically.
- After the model has finished the drop, it can complete its move as normal with any remaining M characteristic it has.
Example Boards
This is an ideal set up for a killzone. It has numerous terrain features and a variety of terrain traits, allowing players to make crucial decisions on how their operatives will interact with the killzone. There are plenty of opportunities to keep operatives out of Line of Sight, as well as key positions to establish firing lanes and engage the enemy. Finally, it creates an exciting and dynamic battlefield that can set the scene for an intense skirmish between two forces.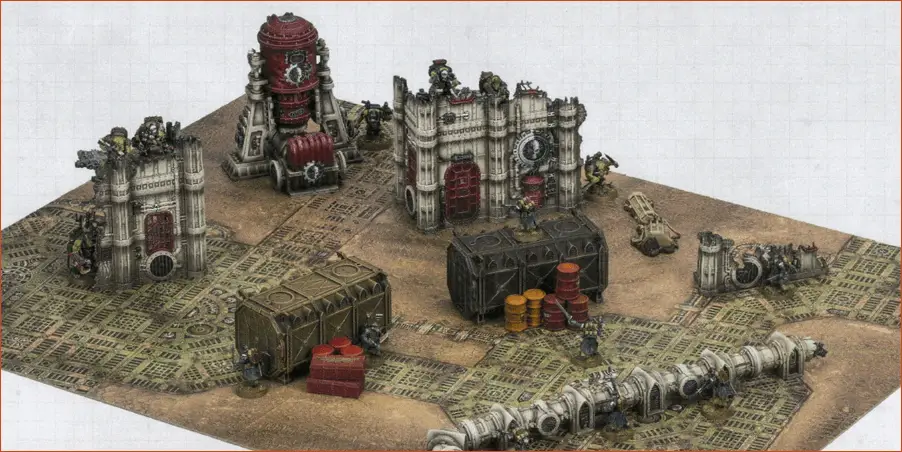
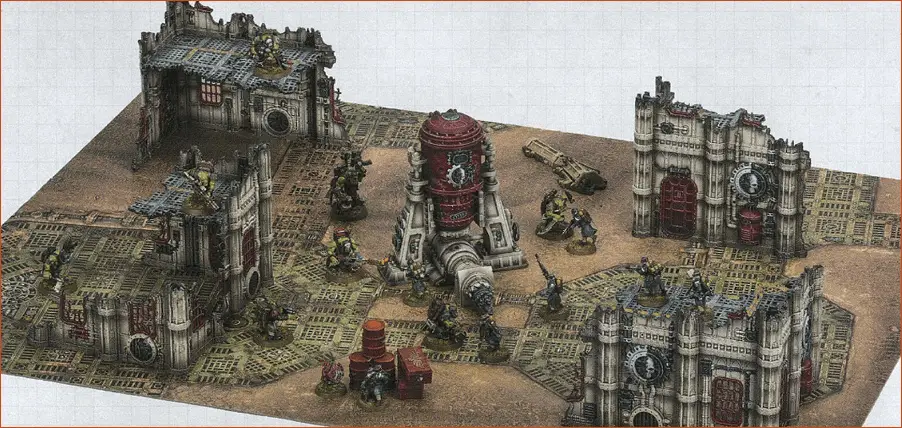
Example Terrain Features
If players are using a specific killzone for their game, its terrain features and traits will be specified. However, if players are using a killzone of their own devising, the players should agree upon the traits of the killzone’s terrain features before the battle. We have provided examples of different terrain features below as guidance:Pipe
All parts of a Pipe terrain feature have the Light and Traversable trait.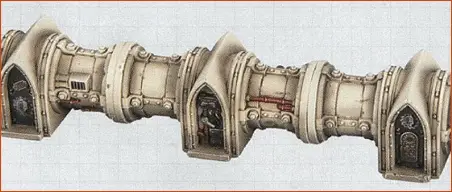
Wall
All parts of a Wall terrain feature have the Heavy trait.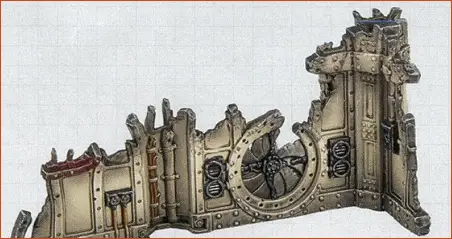
Battlefield Detritus
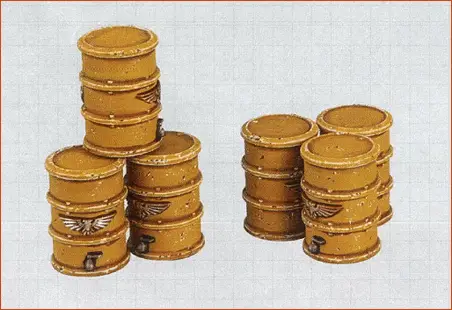
Battlefield Detritus are terrain features that are usually less than tall. They have the Insignificant trait. Note that if the crates below were stacked together, they could become a Killzone Materiel terrain feature.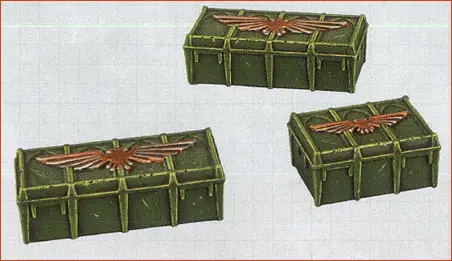
Low Wall
All parts of a Low Wall terrain feature have the Light and Traversable trait.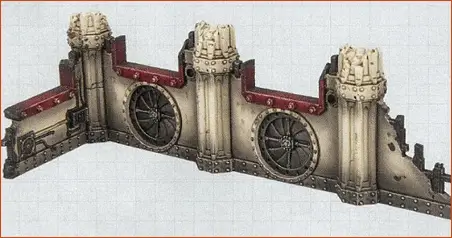
Killzone Materiel
All parts of a Killzone Materiel terrain feature have the Light trait. They can also be Traversable, usually if they are no more than tall.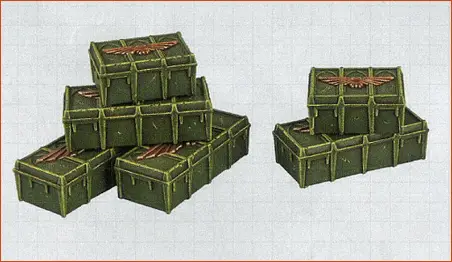
Building
A Building terrain feature can include parts with different traits.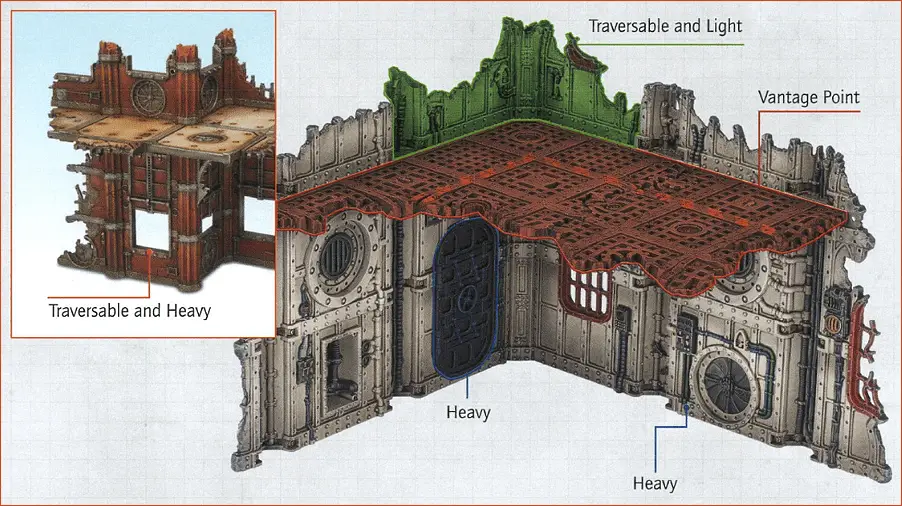
Industrial Machine
All parts of an Industrial Machine terrain feature have the Heavy trait.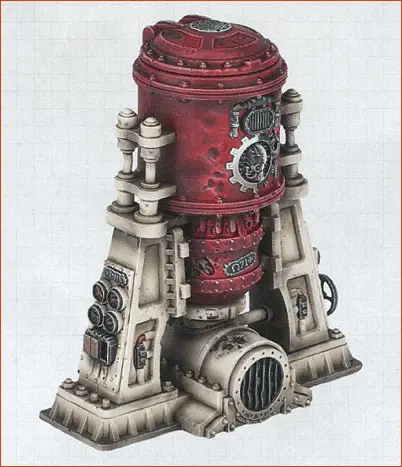
Forest
A Forest terrain feature includes parts with different traits.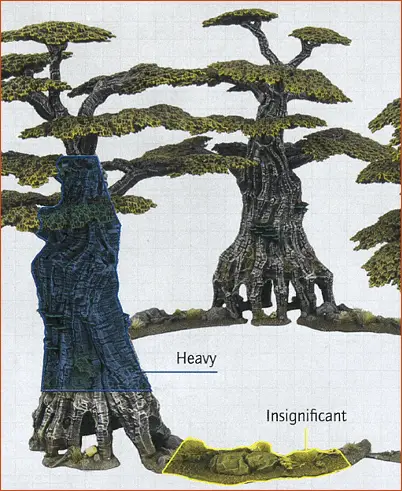
Industrial Structure
An Industrial Structure terrain feature can include parts with different traits.
Munitorum Container
A Munitorum Container terrain feature includes parts with different traits.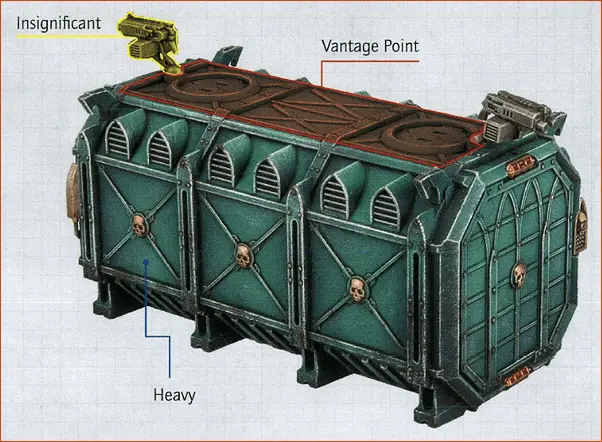
Ways to Play
Open Play
Open play is a free-form and permissive style of play. If you are new to Warhammer 40,000: Kill Team, it is a great way to start. Open play provides a degree of simplicity, allowing you to practice all you’ve learnt so far and become familiar with the core mechanics of the game without any added depth. Open play is also a great way to play for those wanting the freedom to create their own battles, so even for the accomplished generals, it provides the creative mind the perfect chance to craft games that match their vision.Matched Play
Matched play is the most mechanically balanced style of play. From this foundation, it is suitable for players looking for a fair game under common principles. Matched play is also suitable for players looking for an in-depth tactical battle, where smart decisions and decisive action achieves victory.Narrative Play
Narrative play is a style of play for those looking to explore an element of storytelling. Whether it’s playing unique missions that capture the cinema of Warhammer 40,000: Kill Team, or embarking upon campaigns where each game is linked and the consequences matter, narrative play turns your games into a rich and thematic experience where the deeds and exploits of your operatives can be recorded and rewarded.- Universal actions can be performed by all operatives. They are detailed below.
- Unique actions are actions detailed on an operative’s datacard that only they can perform, such as the Dakka Dash action found on the example datacard.
- Mission actions are specific to the mission you are playing, and will be detailed by that mission’s briefing. Missions can be found here (Open Play mission) and here (Spec Ops Narrative missions).
- Free actions can only be performed when another rule specifies. Each time an operative would perform a free action, the following rules apply.
- The operative can perform the action, so long as the requirements of the action are met.
- The player does not subtract any additional AP to perform the action.
- The operative would still count as performing the action for all rules purposes. For example, if it performed it during its activation, it would not be able to perform the action again during that activation.
For example, when a KOMMANDO DAKKA BOY performs a Dakka Dash action (see unique actions, above), it can perform a free Dash and free Shoot action without subtracting any additional AP (other than the AP spent on the Dakka Dash action). However, it is subject to those actions’ requirements, therefore it cannot perform the free Dash action if it is within Engagement Range of enemy operatives, and cannot perform the free Shoot action if it is within Engagement Range of enemy operatives or has a Conceal order. In addition, for each of the free actions it performs, it cannot perform them again during its activation.
- You can draw an imaginary, unobstructed straight line (known as a Visibility line) 1 mm wide from the head of the active operative’s miniature to any part of the miniature of the intended target (not its base).
- The intended target is more than from the active operative.
- The intended target is within of a point at which a Cover line crosses another operative’s base (unless that other operative is not itself in the active operative’s LoS), or a terrain feature that provides Cover (see Terrain Traits).
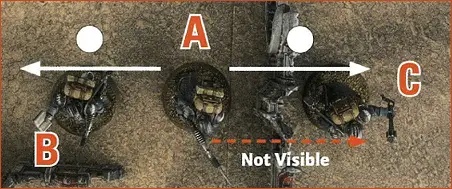
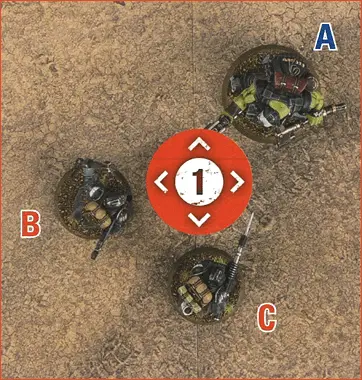
- An operative performs a Shoot action, selects a ranged weapon with the Blast special rule, and selects operative A as the target.
- After making the shooting attack against operative A, it makes a shooting attack against operative B, determining if it is a valid target as if operative A was making the shooting attack.
- It cannot make a shooting attack against operative C, as when determining if it is a valid target in this manner, operative C is not Visible to operative A due to the terrain feature between them.
- The intended target is more than from a point at which a Cover line crosses a terrain feature that is Obscuring (see Terrain Traits). However, if the active operative is within of a point at which a Cover line crosses a terrain feature that is Obscuring, that part of the terrain feature is not treated as Obscuring.