Moroch
 1.1
1.1 Shadow Operations: Moroch Mission Pack
All of the missions use a specified arrangement of terrain using the Killzone: Moroch terrain set, each tailored to enhance the mission at hand. The scoring parameters of the mission objectives vary across the mission pack, therefore having an expansive roster will allow you to select the right operatives for the mission at hand. They have been designed to immerse you in the story of your operatives as they fight across Killzone: Moroch, with a particular mind to rewarding players who use them as part of a Spec Ops campaign. Therefore, they are especially suited to narrative play.
To randomly determine a Shadow Operations: Moroch mission, one player rolls one D3 to determine one of the tables below, then the other player rolls one D3 to determine the mission from that table.
| ||||||||||
| ||||||||||
| ||||||||||
Sentries
Some missions from the Shadow Operations: Moroch mission pack use the Sentries mission rule, which is a prologue to the battle in which you will play through a series of sentry patrols. The Attacker’s intruders can attempt to infiltrate the killzone, take up key positions and complete objectives ahead of the main assault. The Defender’s sentries must attempt to stop the intruders by patrolling the killzone and discovering them.Each mission will specify how many intruders and sentries the Attacker and Defender have respectively. If a mission uses the Sentries mission rule, the following changes take effect for the mission sequence:
- In the Set Up Operatives step, the players only set up their specified number of intruders or sentries. These are operatives from their kill team, and they must be set up wholly within the player’s drop zone (they cannot use any rules that allow them to set up elsewhere). Intruders must be set up with a Conceal order (if they cannot have a Conceal order, they cannot be selected as an intruder) and sentries must be set up with an Engage order (unless otherwise specified by the mission).
- In the Scouting step, the players do not select and resolve pregame scouting options. Instead, they resolve sentry patrols, as described below.
- Victory points cannot be scored during a sentry patrol.
- Once the alarm is raised, continue the battle as described below.
Sentry Patrol
Sentry patrols are conducted in rounds, each of which consists of a Sentry phase and an Intruder phase.Sentry Phase
The Defender selects one of their sentries and both players roll off. If their results are the same, that sentry performs a Pass action. If the Defender’s result is higher than the Attacker’s, the Defender performs a Normal Move action with that sentry. If the Attacker’s result is higher than the Defender’s, the Attacker performs a Normal Move action with that sentry. Each time a sentry performs a Normal Move action in the Sentry phase, the player moving it rolls one D6 and moves that operative up to a number of increments equal to the result of the D6. The players repeat this process until all of the Defender’s sentries have been moved or passed, or until the alarm is raised (see below), whichever comes first.Example: The Defender selects one of their sentries, and both players roll one D6. The Attacker’s result is a ‘4’ and the Defender’s result is a ‘2’ therefore the Attacker performs a Normal Move action with that sentry. The Attacker rolls one D6, and the result is a ‘3’; therefore they can move that sentry up to 3.
Once all of the Defender’s sentries have been moved or passed, and if the alarm has not been raised, the Sentry phase ends.
Intruder Phase
The Attacker selects one of their intruders and activates them. Intruders are activated as if it were the Firefight phase and are subject to the following rules:- They must have a Conceal order.
- They can only perform Dash, Normal Move, Pass or mission actions (excluding Tac Op mission actions), or the Pick Up action.
Once all of the Attacker’s intruders have been activated, and if the alarm has not been raised, the Intruder phase ends and a new sentry patrol round begins.
Raising the Alarm
The alarm is raised if any of the following conditions are met:- An intruder is in a sentry’s Line of Sight (note that as intruders always have a Conceal order, they must be Visible, not Obscured and not in Cover to be in a sentry’s Line of Sight).
- An intruder is Visible to and within of a sentry.
- The Attacker chooses to begin the assault, which automatically raises the alarm.
- Any other conditions specified by the mission.
When the alarm is raised, the sentry patrol immediately ends after that action and the players set up their remaining operatives as specified by the Set Up Operatives step of the mission sequence (they cannot use any rules that allow them to set up operatives elsewhere). The players then begin the battle as normal with the following rules:
- In the first Initiative phase, the players roll off and the winner decides who has the initiative.
- During the first Turning Point, each time an operative that was selected as an intruder or sentry is activated, the controlling player can change its order (rather than needing to have the order given to it when it was set up before the battle).
Plunder
The enemy are within our very walls, slitting throats and pilfering vital supplies! They cannot be allowed to rampage unchecked, and must be swiftly driven off.
The Attacker’s operatives can perform the following mission action:
PLUNDER1AP
- If it has been plundered, the Attacker scores 2VPs.
- If it has not been plundered, the Defender scores 2VPs.
At the end of the battle, for each STC Hab-bunker Door:
- If it has been plundered, the Attacker scores 3VPs.
- If it has not been plundered, the Defender scores 3VPs.
SPEC OPS CAMPAIGN
If you are playing this mission as part of a Spec Ops campaign, the following mission rules also apply:Assets Protected: If you are the Defender, are victorious and are currently undertaking the Secure District Spec Op, then reduce by 1 the number of games required to complete that Spec Op’s Operation 1.
Control the Outpost
After severe attrition, at last we have a foothold within the enemy compound. Victory is not yet ours, however, for the enemy are regrouping deeper within the complex. Expect a counter-attack at any moment.
- At the end of the second and fourth Turning Points, you score VPs as follows:
- If friendly operatives control the STC Hab-bunker, you score 1VP.
- If friendly operatives control the Fronteris Landing Pad Door, you score 1VP.
- If friendly operatives control the Vox-antenna, you score 1VP.
- If friendly operatives control the Auspex Shrine, you score 1VP.
- If you are the Attacker and friendly operatives control the Fronteris Landing Pad Door, you score 2VPs.
- If you are the Defender and friendly operatives control the STC Hab-bunker, you score 2VPs.
SPEC OPS CAMPAIGN
If you are playing this mission as part of a Spec Ops campaign, the following mission rules also apply:- If you scored 8 or more VPs from the mission objective, you gain 1 additional Requisition point.
- At the end of the battle, if you control both the STC Hab-bunker and the Fronteris Landing Pad Door, your operatives pass all Casualty tests after the battle.
Compound Assault
They are gathering their forces, and soon they will launch an all-out attack upon our strongpoint. We must hold them here, or the entire outpost will be lost.
- For each objective marker friendly operatives control, you score 3VPs.
- If any of the Attacker’s operatives are on the Fronteris Landing Pad’s Vantage Point, the Attacker scores 3VPs.
- If none of the Attacker’s operatives are wholly within the Defender’s drop zone, the Defender scores 3VPs.
SPEC OPS CAMPAIGN
If you are playing this mission as part of a Spec Ops campaign, the following mission rules also apply:- At the end of the battle, each of the Attacker’s operatives that are on the Fronteris Landing Pad’s Vantage Point gains 1XP.
- At the end of the battle, if none of the Attacker’s operatives are wholly within the Defender’s drop zone, the Defender’s operatives pass all Casualty tests after the battle.
Assets Protected: If you are the Defender, are victorious and are currently undertaking the Extraction Spec Op, then reduce by 1 the number of games required to complete that Spec Op’s Operation 1.
Emergency Transmission
At all costs the vox-mast must be seized and held, for this strategic missive is of the very highest importance. They cannot be allowed to retake the facility before it is sent.
Transmission Terrain: The STC Hab-bunker, Vox-antenna and Auspex Shrine are transmission terrain features. They begin the battle not transmitting.
Operatives can perform the following mission action:
TRANSMISSION1AP
- If the operative performing this action belongs to the Attacker, that terrain feature is transmitting.
- If the operative performing this action belongs to the Defender, that terrain feature is not transmitting.
- If the operative controls a STC Hab-bunker Door, remove it from the killzone. At the end of the Turning Point, set it up as close as possible to a STC Hab-bunker Door or on the STC Hab-bunker Vantage Point (it cannot be set up on other operatives, but can be set up within of enemy operatives).
SYSTEM ACCESS CIPHER [2EP]
Once during the battle, this operative can perform the Transmission mission action without subtracting any action points.- For each transmission terrain feature that is transmitting, the Attacker scores 1VP.
- For each transmission terrain feature that is not transmitting, the Defender scores 1VP.
- If the STC Hab-bunker is not transmitting, the Defender scores 1VP.
SPEC OPS CAMPAIGN
If you are playing this mission as part of a Spec Ops campaign, the following mission rules also apply:- At the end of the battle, if the STC Hab-bunker is not transmitting, the Defender gains 1 Requisition point.
- At the end of the battle, if the Auspex Shrine and the STC Hab-bunker are transmitting, the Attacker gains 1 Requisition point.
Transmission Denied: If you are the Defender, are victorious and are currently undertaking the Purge Order Spec Op, then reduce by 1 the number of games required to complete that Spec Op’s Operation 1.
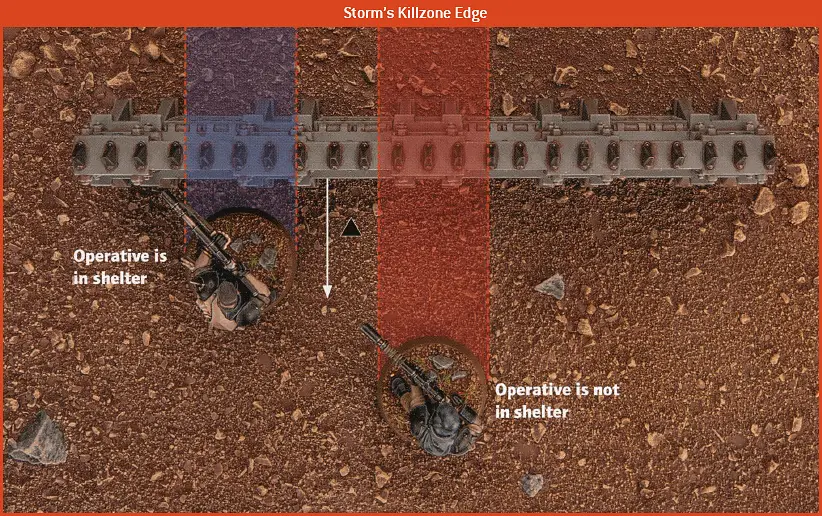
Outrun the Storm
They say that the mica-storms of this world can strip flesh from bone in less time than it takes to scream. Better not be caught outside when the winds start to howl...
Shelter: From the second Turning Point:
- Each time an operative fights in combat or makes a shooting attack, unless it is in shelter, it is treated as being injured for that combat or shooting attack, regardless of any rules that say it cannot be injured.
- Each time an operative performs an action in which it moves, unless it starts that move within shelter, it is treated as being injured for that move, regardless of any rules that say it cannot be injured.
- For each objective marker friendly operatives control, you score 1VP.
- For each STC Hab-bunker Door friendly operatives control, you score 2VPs.
SPEC OPS CAMPAIGN
If you are playing this mission as part of a Spec Ops campaign, the following mission rules also apply:- At the end of the battle, if friendly operatives control one or more STC Hab-bunker Doors and enemy operatives do not control any, your operatives pass all Casualty tests after the battle.
- At the end of the battle, if friendly operatives control the Auspex Shrine or Vox-antenna and enemy operatives control neither, you gain 1 Requisition point.
Smoking Ruin
The bombardment has reduced their defences to rubble and sent the garrison fleeing like whipped curs. We must attack now, quickly, and seize the enemy’s pLans before they have a chance to reclaim them.
Operatives can perform the following mission action:
SEARCH FOR INTEL1AP
At the end of the battle:
- If friendly operatives control the key intel objective marker, you score 4VPs.
- If the key intel objective marker is wholly within your drop zone, or is being carried by a friendly operative that is wholly within your drop zone, you score 3VPs.
SPEC OPS CAMPAIGN
If you are playing this mission as part of a Spec Ops campaign, the following mission rules also apply: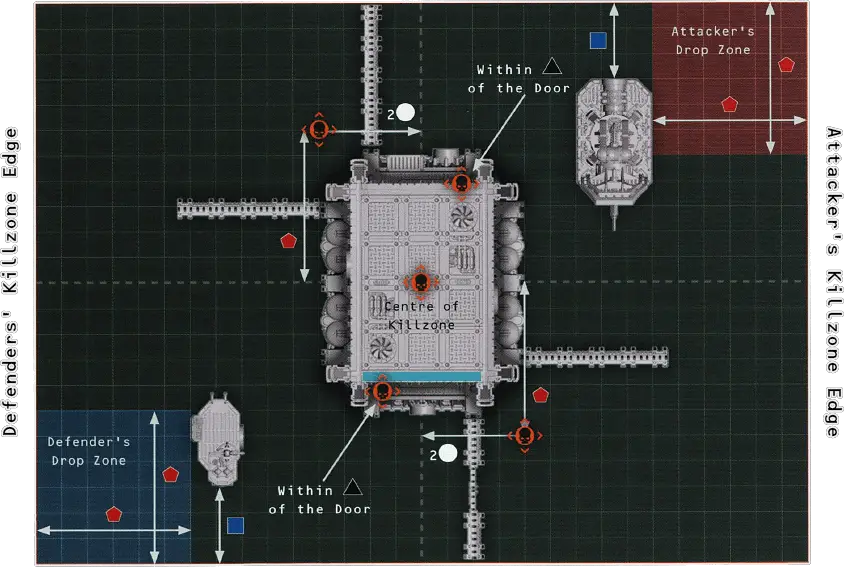
Demolitions
Even the mightiest fastness can be brought Low by a few well-placed explosives and a band of killers merciless enough to set them off.
- The Attacker has one intruder and the Defender has two sentries.
- The alarm is also raised if an intruder moves within of the STC Hab-bunker.
Demolition Targets: At the start of the battle, demolition targets are not planted with explosives. The demolition targets are as follows:
- 4 Fronteris Landing Pad Fuel Tanks
- Fronteris Landing Pad Door
- 2 STC Hab-bunker Doors
- Vox-antenna
- Auspex Shrine
Operatives can perform the following mission action:
HANDLE EXPLOSIVES1AP
- If the operative performing this action belongs to the Attacker, one demolition target it controls is planted with explosives.
- If the operative performing this action belongs to the Defender, one demolition target it controls is not planted with explosives.
Detonate Explosives: At the end of any Turning Point, if the Attacker has any friendly operatives in the killzone, they can detonate explosives. If they do so, each operative within of one or more demolition targets that are planted with explosives suffers D3 mortal wounds. The Attacker can only detonate explosives once.
- For each demolition target that is planted with explosives, the Attacker scores 1VP.
- For each demolition target that is not planted with explosives, the Defender scores 1VP.
- If 7 or more demolition targets are planted with explosives, the Attacker scores 3VPs.
- If 2 or less demolition targets are planted with explosives, the Defender scores 3VPs.
SPEC OPS CAMPAIGN
If you are playing this mission as part of a Spec Ops campaign, the following mission rules also apply:- At the end of the battle, if the Attacker detonated explosives, the Attacker earns 1XP to distribute across the operatives in their kill team for every demolition target that was planted with explosives after the fifth.
- At the end of the battle, the Defender earns 1XP to distribute across the operatives in their kill team for every demolition target that was not planted with explosives after the fifth.
Outpost Secured: If you are the Defender, are victorious and are currently undertaking the Secure District Spec Op, then reduce by 1 the number of games required to complete that Spec Op’s Operation 1.
Infiltrate the Landing Pad
We need to keep this quick and quiet. Slip past their sentries and get inside before we’re spotted.
- The Attacker has one intruder and the Defender has two sentries.
- At the start of each even numbered Intruder phase (i.e. 2nd, 4th, 6th etc.), the Attacker sets up one of their remaining operatives as an intruder wholly within their drop zone and within of an edge of the killzone (this does not count as that operative’s activation for that phase).
- The alarm is also raised if an intruder moves within of the Fronteris Landing Pad.
Infiltrate Landing Pad: At any point during an Attacker operative’s activation, if it is wholly on the Fronteris Landing Pad Door and not within Engagement Range of an enemy operative, the Attacker can remove it from the killzone; that operative has infiltrated the Fronteris Landing Pad.
PROXIMITY ALARM [2EP]
The alarm is also raised if this operative is within of an intruder.
|
Example: If the Attacker has 10 operatives selected for deployment, and at the end of the battle 3 of them have infiltrated the Fronteris Landing Pad, the Attacker scores 4VPs and the Defender scores 9VPs.
SPEC OPS CAMPAIGN
If you are playing this mission as part of a Spec Ops campaign, the following mission rules also apply:- If you scored 9 or more VPs from the mission objective, you gain 1 Requisition point.
- If you scored 12VPs from the mission objective, your operatives also pass all Casualty tests after the battle.
Intruders Eliminated: If you are the Defender, are victorious and are currently undertaking the Secure District Spec Op, then reduce by 1 the number of games required to complete that Spec Op’s Operation 1.
Stealth Offensive
The enemy are out there, creeping through the shadows. You might not see them, but you can sense them. Let them get too close and it will be all over bar the screaming.
- The Attacker selects one or more operative from their kill team to be intruders and the Defender has two sentries.
- One of the Defender’s sentries is set up on the Vox-antenna’s Vantage Point. The other is set up on the Fronteris Landing Pad Door. Both sentries are set up with a Conceal order.
- The Defender can set up to two barricades within of their drop zone.
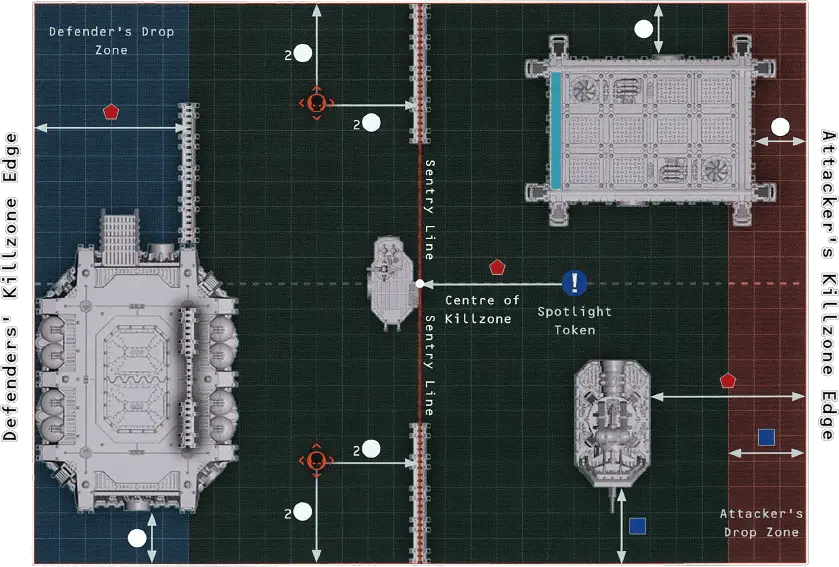
- In the Sentry phase, the players roll off to move the Spotlight token, instead of the sentries. This is done twice in each Sentry phase, and the token cannot be moved past the sentry line.
Raising the Alarm: The alarm is raised if any of the following conditions are met (instead of those here):
- An intruder is within of the Spotlight token and is within a sentry’s Line of Sight (note that as intruders always have a Conceal order, they must be Visible, not Obscured and not in Cover to be in a sentry’s Line of Sight).
- An intruder moves over the sentry line (see map).
- The Attacker chooses to begin the assault.
Night Assault: When determining Line of Sight during the battle, an intended target is Obscured if a Cover line crosses the sentry line (see map) and both the active operative and intended target are more than from the sentry line.
- For each objective marker friendly operatives control, you score 4VPs.
- If you control the Fronteris Landing Pad Doors, you score 4VPs.
SPEC OPS CAMPAIGN
If you are playing this mission as part of a Spec Ops campaign, the following mission rules also apply:- If you are the Defender and there are no enemy operatives within of your drop zone, you gain 1 Requisition point.
- If you are the Attacker and you control the Fronteris Landing Pad Door, you gain 1 Requisition point.
Outpost Protected: If you are the Defender, are victorious and are currently undertaking the Perform Ritual Spec Op, then reduce by 1 the number of games required to complete that Spec Op’s Operation 1.
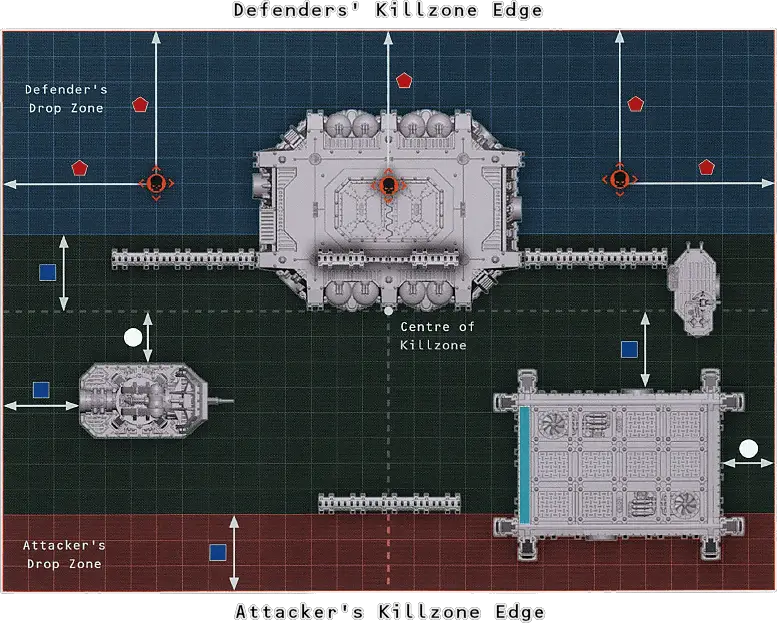
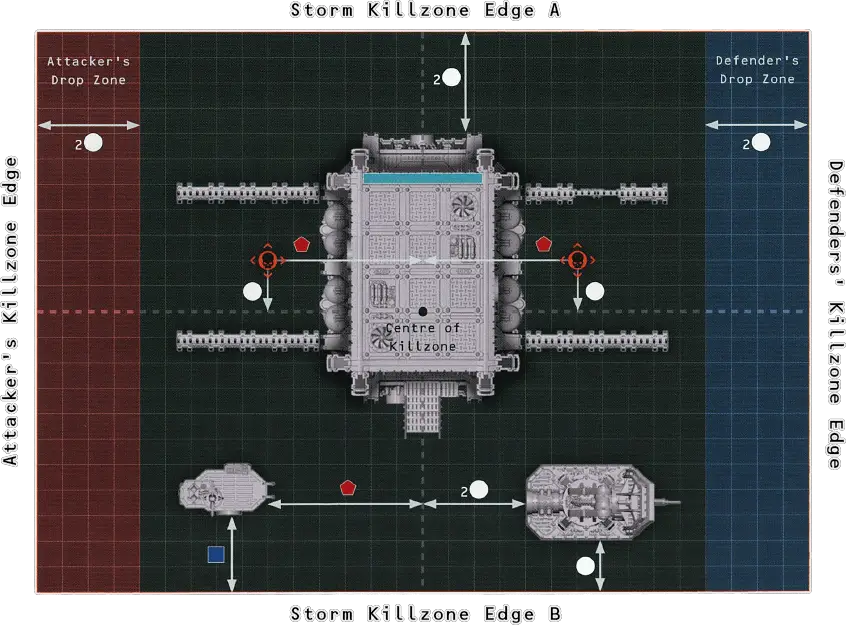
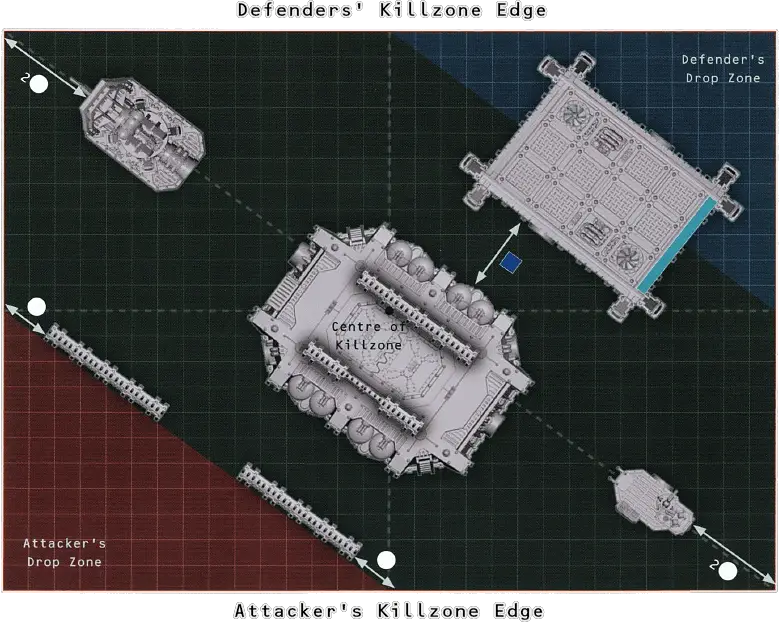
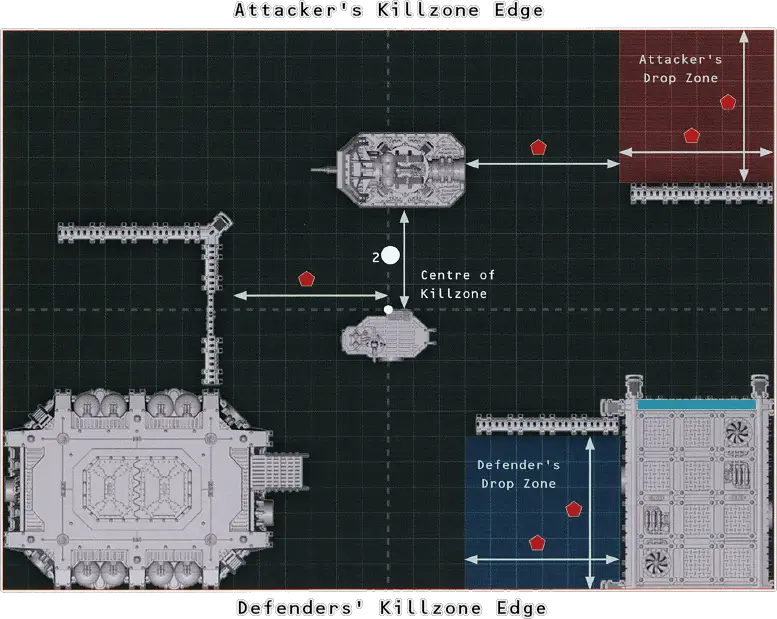
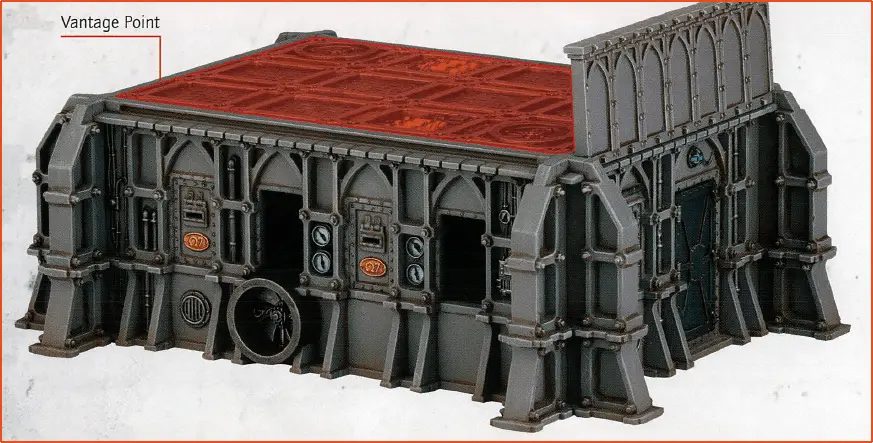
Killzone: Moroch
Killzone: Moroch is a Fronteris outpost. The Fronteris Landing Pad and STC Hab-bunker dominate the kilizone, providing Vantage Points and Heavy Cover. Fronteris Stockades can connect these to create a compound, or they can be placed independently. Fronteris Stockades have both the Stockade and Defendable traits, making them substantially more protective than regular barricades. Finally, the killzone has a Auspex Shrine and Vox-antenna, both of which provide Heavy Cover, with the latter providing another Vantage Point. The end result is a killzone in which positioning is key. Flanking an enemy to create advantageous firing lanes will remove their ability to hide with Heavy Cover, while a brave operative garrisoning the Fronteris Stockades can see off any charging aggressors. Killzone: Moroch consists of the following terrain features, with their traits detailed below:- One Fronteris Landing Pad
- One STC Hab-bunker
- One Auspex Shrine
- One Vox-antenna
- One Fronteris Landing Pad Steps
- Four Fronteris Stockades
- Four Fronteris Stockade Connectors
- Four Fronteris Stockade Curves
Fronteris Landing Pad
- The roof of a Fronteris Landing Pad terrain feature has the Vantage Point trait.
- All other parts of it have the Heavy and Low traits.
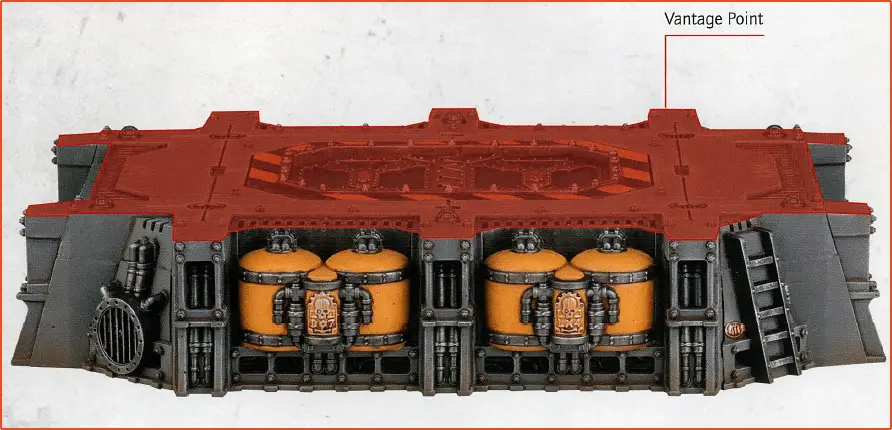
Low: An operative climbing onto or dropping from this terrain feature treats its height as , even if the vertical distance it would need to travel would be slightly more than . Note that this means when dropping, the vertical distance travelled is ignored.
Fronteris Landing Pad Fuel Tanks
The Fronteris Landing Pad has Fuel Tanks. Some missions require operatives to control Fronteris Landing Pad Fuel Tanks. In such missions, each Fronteris Landing Pad Fuel Tank is treated as an objective marker, except that a friendly operative controls a Fronteris Landing Pad Fuel Tank if it is within of the Fuel Tank and the total APL characteristic of friendly operatives within of that Fuel Tank is greater than that of enemy operatives within of that Fuel Tank.
Designer’s Note: A Fronteris Landing Pad’s Fuel Tanks are not a Vantage Point, therefore operatives can climb them, but cannot finish a move or be set up upon them.
Fronteris Landing Pad Door
The Fronteris Landing Pad has a Door. Some missions require operatives to control the Fronteris Landing Pad Door. In such missions, the Fronteris Landing Pad Door is treated as an objective marker, except that a friendly operative controls the Fronteris Landing Pad Door if it is on the Door and the total APL characteristic of friendly operatives on that Door is greater than that of enemy operatives on that Door.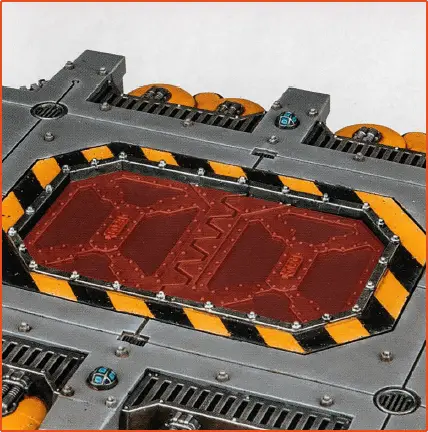
Fronteris Landing Pad Steps
- Fronteris Landing Pad Steps are a separate terrain feature that is sometimes attached to a Fronteris Landing Pad.
- The handrails of Fronteris Landing Pad Steps have the Insignificant trait.
- All other parts of it have the Light and Steps traits.
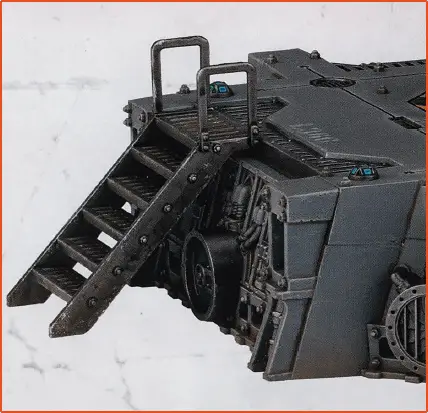
Steps: Each time an operative climbs a terrain feature with this trait, it ignores the vertical distance it travels.
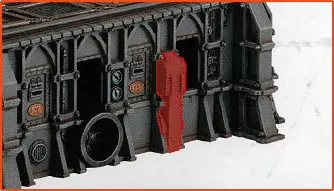
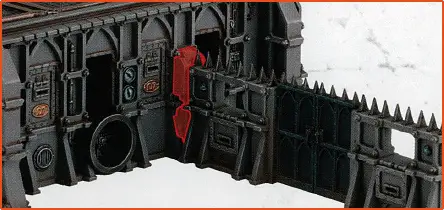
STC Hab-bunker
- The roof of a STC Hab-bunker terrain feature has the Vantage point trait.
- All other parts of it have the Heavy trait.
- In the Shadow Operations: Moroch mission pack, the STC Hab-bunker’s rampart is indicated with a thick blue line.
STC Hab-bunker Doors
The STC Hab-bunker has Doors. Some missions require operatives to control STC Hab-bunker Doors. In such missions, each STC Hab-bunker Door is treated as an objective marker, except that a friendly operative controls a STC Hab-bunker Door if it is within of the Door and the total APL characteristic of friendly operatives within of that Door is greater than that of enemy operatives within of that Door.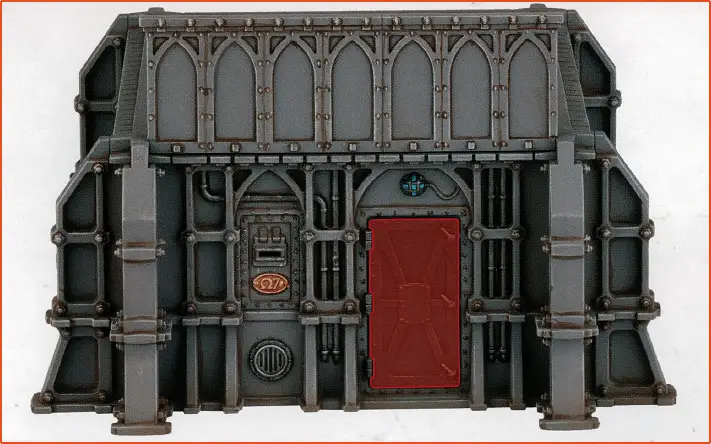
Auspex Shrine
- The base of an Auspex Shrine terrain feature has the Insignificant trait.
- The pipe has the Light and Traversable traits.
- All other parts of it have the Heavy trait.
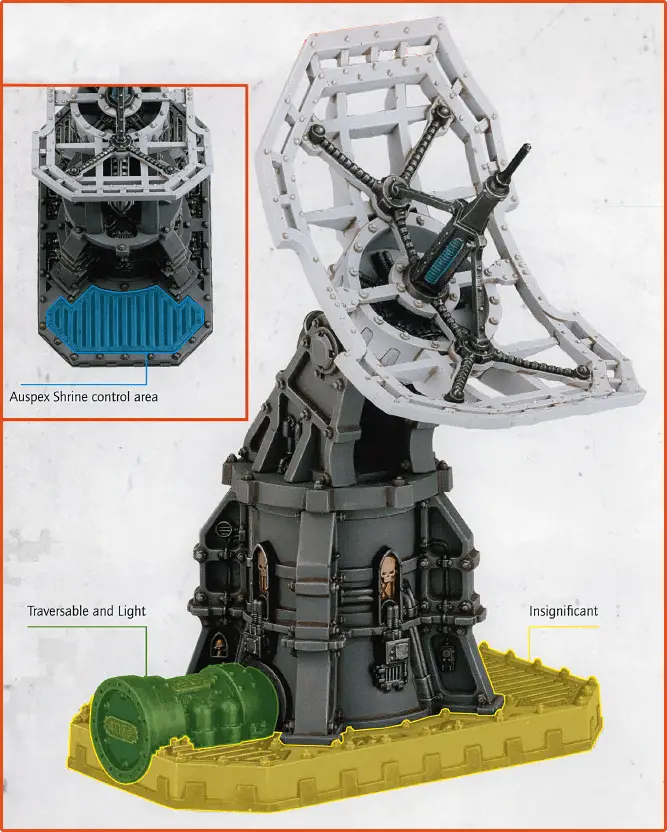
Auspex Shrine Control Area
Some missions require operatives to control the Auspex Shrine. In such missions, the Auspex Shrine control area is treated as an objective marker, except that a friendly operative controls the Auspex Shrine if it is on the control area and the total APL characteristic of friendly operatives on that control area is greater than that of enemy operatives on that control area.
Vox-antenna
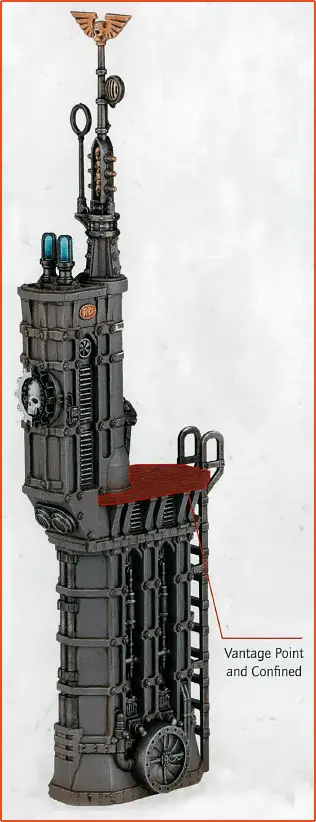
- The platform of a Vox-antenna has the Vantage Point and Confined traits.
- The handrails on the platform have the Insignificant trait.
- The ladder has the Heavy and Scalable traits.
- All other parts of a Vox-antenna terrain feature have the Heavy trait.
Confined: While an operative is on this terrain feature’s Vantage Point, no other operatives can finish a move or be set up upon this Vantage Point.
Scalable: Each time an operative climbs this part of the terrain feature, the final increment of distance less than is ignored, instead of being rounded up to .
Designer’s Note: This means an operative looking to climb onto a Vox-antenna’s Vantage Point via the ladder will travel vertically 2. instead of the usual 3.
Vox-antenna Control Area
Some missions require operatives to control the Vox-antenna. In such missions, the Vox-antenna Vantage Point is treated as an objective marker, except that a friendly operative controls the Vox-antenna if it is on its Vantage Point.
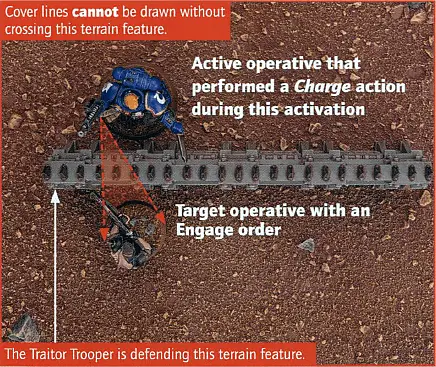
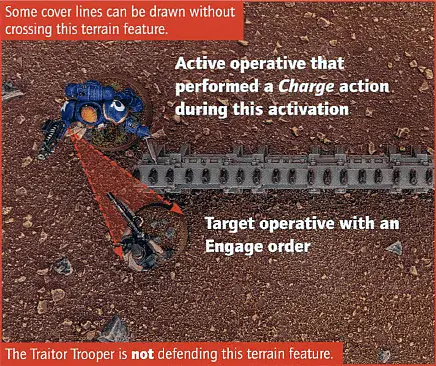
Fronteris Stockade
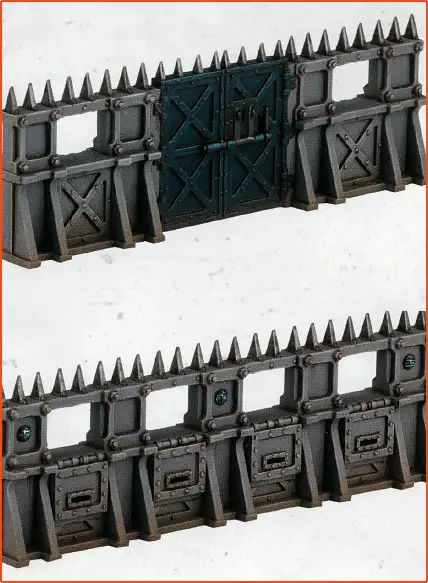
Stockade:
- An operative climbing over this terrain feature needs to travel 2 vertically ( up and down).
- When determining Line of Sight, if the active operative and/or the intended target is higher than the highest point of this terrain feature, it is not treated as Obscuring. Note that measurement is determined from the operatives’ bases.
Defendable: Each time an operative fights in combat, if it is not the active operative but is defending this terrain feature, it is always the Attacker, regardless of any rules the enemy operative has. For an operative to be defending this terrain feature, all of the following must be true:
Fronteris Stockade Connections
Fronteris Stockade Connectors are used to connect Fronteris Stockades to the Fronteris Landing pad and STC Hab-bunker. They count as Fronteris stockades for all rules purposes.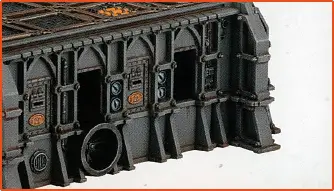
Fronteris Stockade Curves
Fronteris Stockade Curves are used to connect Fronteris Stockades that turn at a 90° angle. They count as Fronteris Stockades for all rules purposes.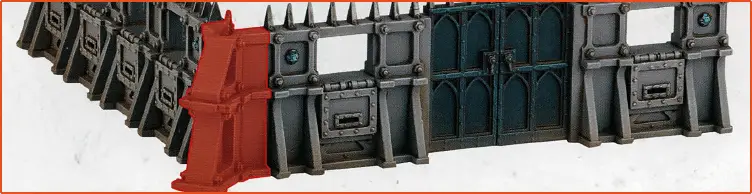
Dataslates and Datacards
Phobos Strike Team and Blooded Datacards:
Phobos Strike Team Narrative Dataslate:
Blooded Narrative Dataslate:
- Universal actions can be performed by all operatives. They are detailed below.
- Unique actions are actions detailed on an operative’s datacard that only they can perform, such as the Dakka Dash action found on the example datacard.
- Mission actions are specific to the mission you are playing, and will be detailed by that mission’s briefing. Missions can be found here (Open Play mission) and here (Spec Ops Narrative missions).
- Free actions can only be performed when another rule specifies. Each time an operative would perform a free action, the following rules apply.
- The operative can perform the action, so long as the requirements of the action are met.
- The player does not subtract any additional AP to perform the action.
- The operative would still count as performing the action for all rules purposes. For example, if it performed it during its activation, it would not be able to perform the action again during that activation.
For example, when a KOMMANDO DAKKA BOY performs a Dakka Dash action (see unique actions, above), it can perform a free Dash and free Shoot action without subtracting any additional AP (other than the AP spent on the Dakka Dash action). However, it is subject to those actions’ requirements, therefore it cannot perform the free Dash action if it is within Engagement Range of enemy operatives, and cannot perform the free Shoot action if it is within Engagement Range of enemy operatives or has a Conceal order. In addition, for each of the free actions it performs, it cannot perform them again during its activation.
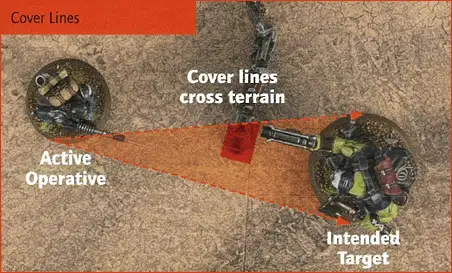
- You can draw an imaginary, unobstructed straight line (known as a Visibility line) 1 mm wide from the head of the active operative’s miniature to any part of the miniature of the intended target (not its base).
- The intended target is more than from a point at which a Cover line crosses a terrain feature that is Obscuring (see Terrain Traits). However, if the active operative is within of a point at which a Cover line crosses a terrain feature that is Obscuring, that part of the terrain feature is not treated as Obscuring.
- The intended target is more than from the active operative.
- The intended target is within of a point at which a Cover line crosses another operative’s base (unless that other operative is not itself in the active operative’s LoS), or a terrain feature that provides Cover (see Terrain Traits).