
Shadowvaults
 1.1 Deadly Juncture 1.3 Uncover Riches 2.1 Demolition Run 2.2 Storm the Vault 2.3 Hold Out 3.1 Secure Base 3.2 Covert Attack 3.3 Lightning Raid
Books
| Book | Kind | Edition | Version | Last update |
| | ||||
| | Expansion | 2 | December 2022 | |
Shadow Operations: Shadowvaults Mission Pack
The scoring parameters of the mission objectives vary across the mission pack, therefore having an expansive roster will allow you to select the right operatives for the mission. They have been designed to immerse you in the story of your operatives as they fight for key troves in the Gallowdark, with a particular mind to rewarding players who use these missions as part of a Spec Ops campaign. Therefore, they are especially suited to narrative play.
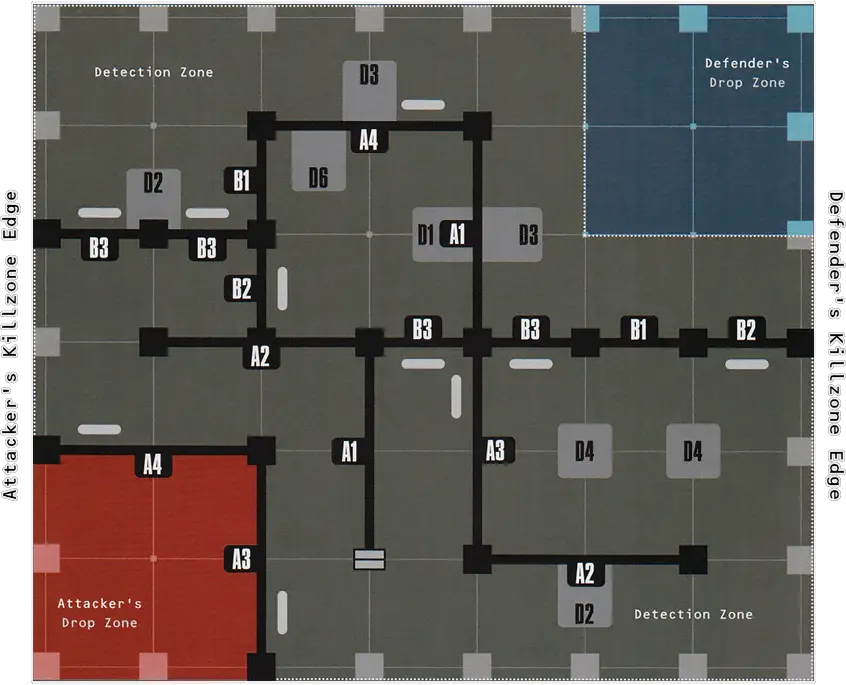
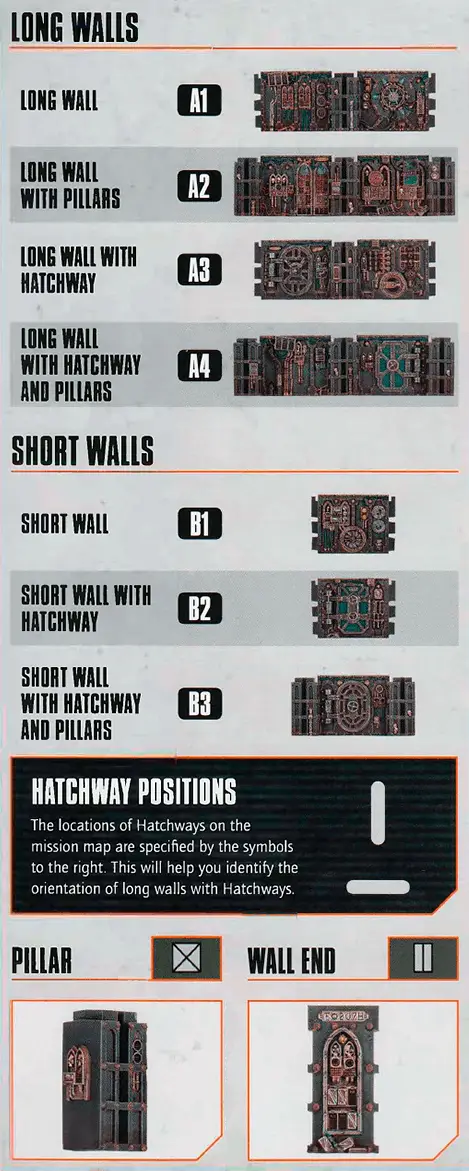
The missions use Killzone: Gallowdark, and Killzone: Shadowvaults to supplement it. The location of terrain features are specified using a key system.
To randomly determine a Shadow Operations: Shadowvaults mission, one player rolls one D3 to determine one of the tables below, then the other player rolls one D3 to determine the mission from that table.
| ||||||||||
| ||||||||||
| ||||||||||
Infiltration
- In the Set Up Operatives step, only the Attacker sets up their operatives, and they must do so wholly within their drop zone (they cannot use any rules that allow them to set up operatives elsewhere).
- Players do not complete the Scouting step. Instead, the Defender places Detection token(s) as specified by the mission, and players resolve Infiltration, as described below.
- Victory points cannot be scored during Infiltration.
- Once the alarm is raised, continue the battle as described below.
Infiltration
Raising the Alarm
The alarm is raised if any of the following conditions are met:- An operative the Attacker controls is within the detection zone and within 2 of a Detection token.
- An operative the Attacker controls is within of the Defender’s drop zone.
- The Attacker chooses to begin the assault, which automatically raises the alarm.
- Any other conditions specified by the mission.
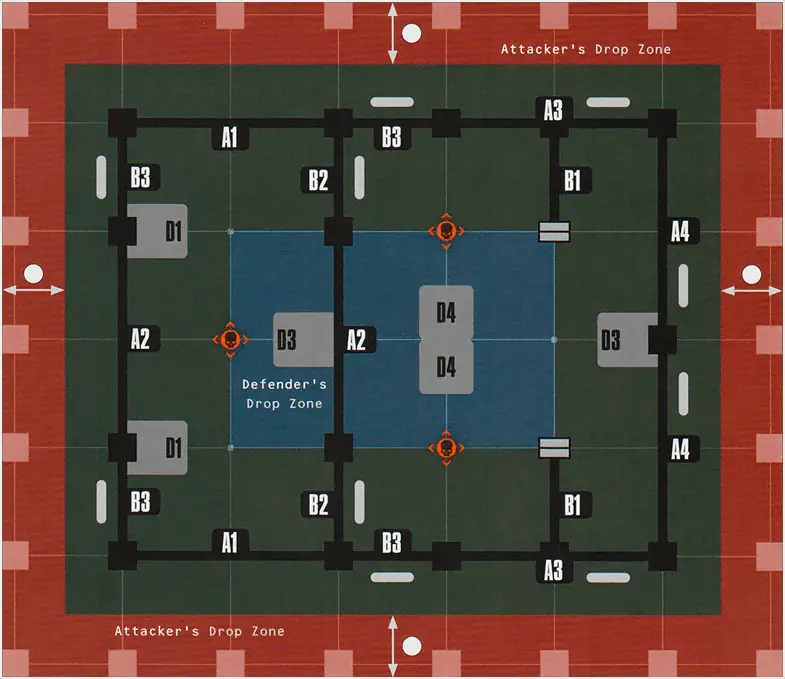
Deadly Juncture
A deadly juncture between the halls roamed by rival kill teams is guarded by a sentry turret programmed to engage anything that comes close on sight. A clash over territory begins amidst the hail of turret fire.
- For each objective marker friendly operatives control, you score 1 VP.
- If any friendly operatives are within the enemy drop zone, you score 1 VP.
SPEC OPS CAMPAIGN
If you are playing this mission as part of a Spec Ops campaign, the following mission rules also apply: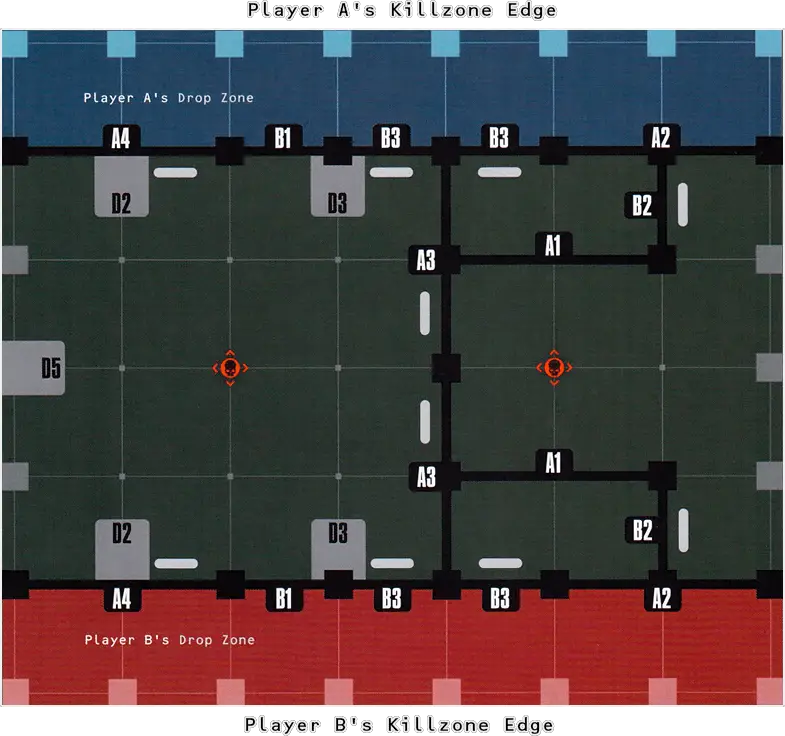
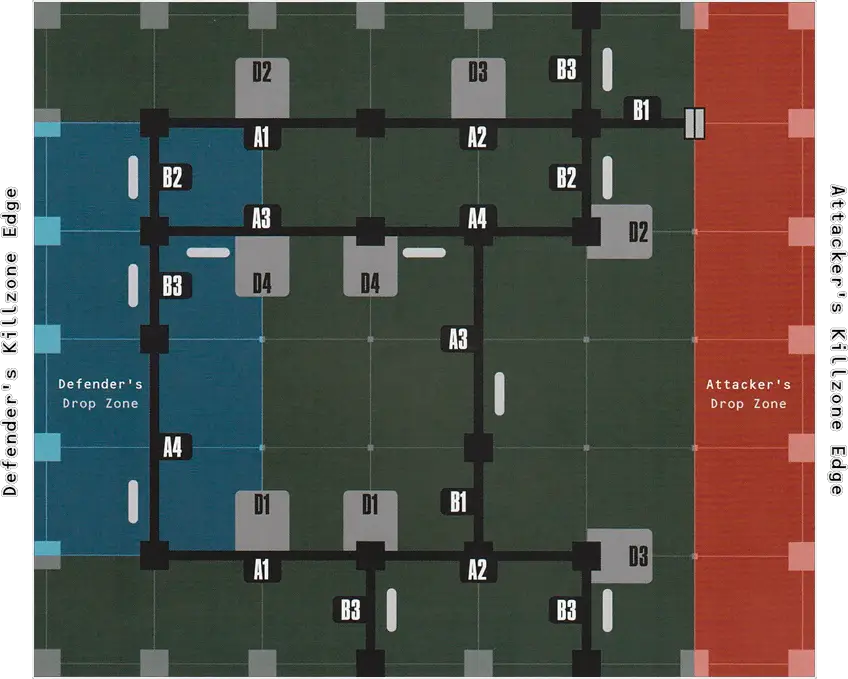
Passageway of Death
Two rooms hold a plethora of vital equipment waiting to be seized, but the passageway between them is as deadly as it is vital, for a sentry turret guards the route.
Operatives can perform the following mission actions:
LOOT1AP
PROGRAM TURRET1AP
At the end of each Turning Point, if friendly operatives control the Alpha objective marker, you score 1VP and can move that objective marker up to directly towards or away from the Sentry Turret terrain feature.
SPEC OPS CAMPAIGN
If you are playing this mission as part of a Spec Ops campaign, the following mission rules also apply: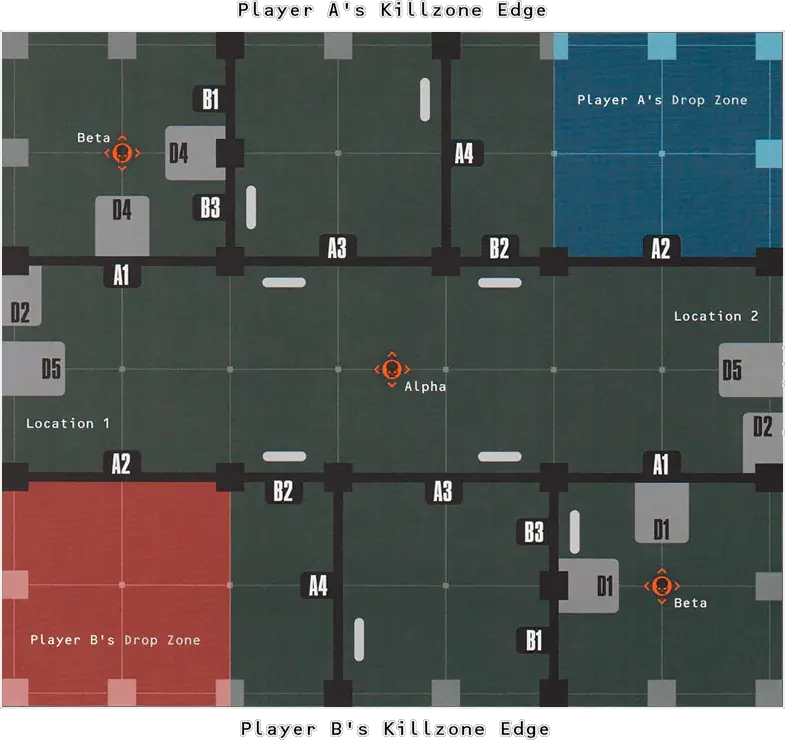
Uncover Riches
Two kill teams descend on an ancient vault intent on picking it clean and making off with as much equipment and as many artefacts as they can carry.
LOOT1AP
PROGRAM ROBOT1AP
At the end of the battle, if friendly operatives control the Robot terrain feature, you score 3VPs. If no operatives control it but you command it, you score 3VPs.
SPEC OPS CAMPAIGN
If you are playing this mission as part of a Spec Ops campaign, the following mission rules also apply: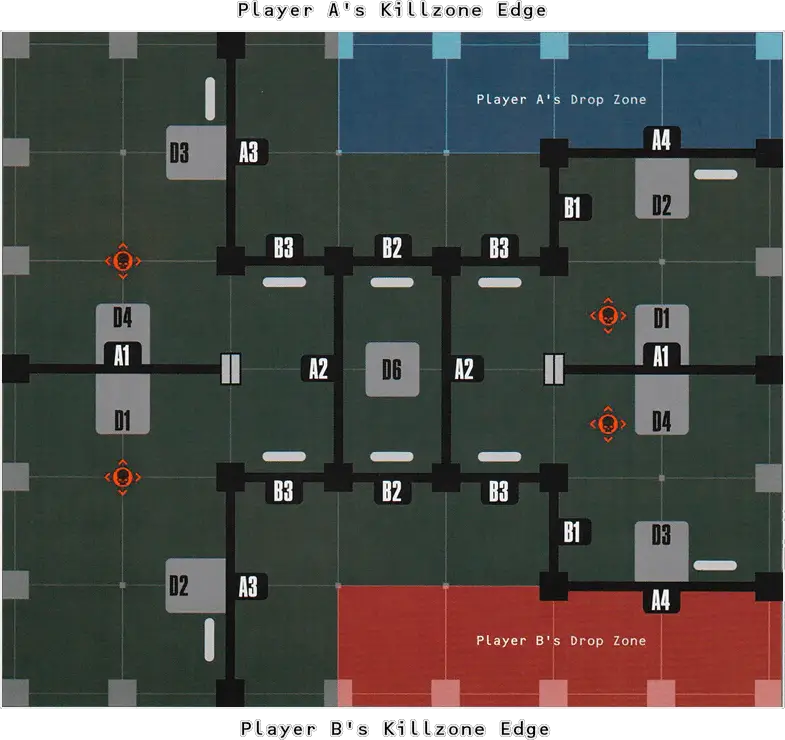
Demolition Run
The attacker plans to destroy a rival’s supply store. They have tripped a proximity alarm, however, and the defender rushes to protect their equipment and rations, aiming to repel the attackers before it’s too late.
Bomb Robot: The Attacker has an operational Robot terrain feature it commands that has a Bomb terrain feature placed upon it. In the Set Up Operatives step, when the Attacker sets up their operatives, they must also set up the Robot terrain feature wholly within their drop zone with an Engage order. If the Robot terrain feature becomes dormant (i.e. if it is incapacitated), operatives can perform the Pick Up action while they control the Bomb terrain feature; it is treated as a token for such rules purposes (e.g. the operative can drop it at any point during its activation without subtracting any additional action points). While an operative with a Wounds characteristic of 10 or less is carrying a Bomb terrain feature, it cannot perform Dash actions.
At the end of a Turning Point, if a Bomb terrain feature is armed (see Operate Bomb action below), it will explode: all operatives within of the Bomb terrain feature are incapacitated; if the Bomb terrain feature is within of an objective marker, that objective marker is sabotaged.
Operatives can perform the following mission actions:
OPERATE BOMB1AP
SABOTAGE SUPPLIES1AP
- For each objective marker that is sabotaged, the Attacker scores 2VPs. For each that isn’t, the Defender scores 2VPs.
- If the Bomb terrain feature has exploded within of an objective marker, the Attacker scores 6VPs. If it hasn’t, the Defender scores 6VPs.
SPEC OPS CAMPAIGN
If you are playing this mission as part of a Spec Ops campaign, the following mission rules also apply:Resources Held: If you are the Defender, are victorious and are currently undertaking the Perform Ritual Spec Op, then reduce by 1 the number of games required to complete that Spec Op’s Operation 1.
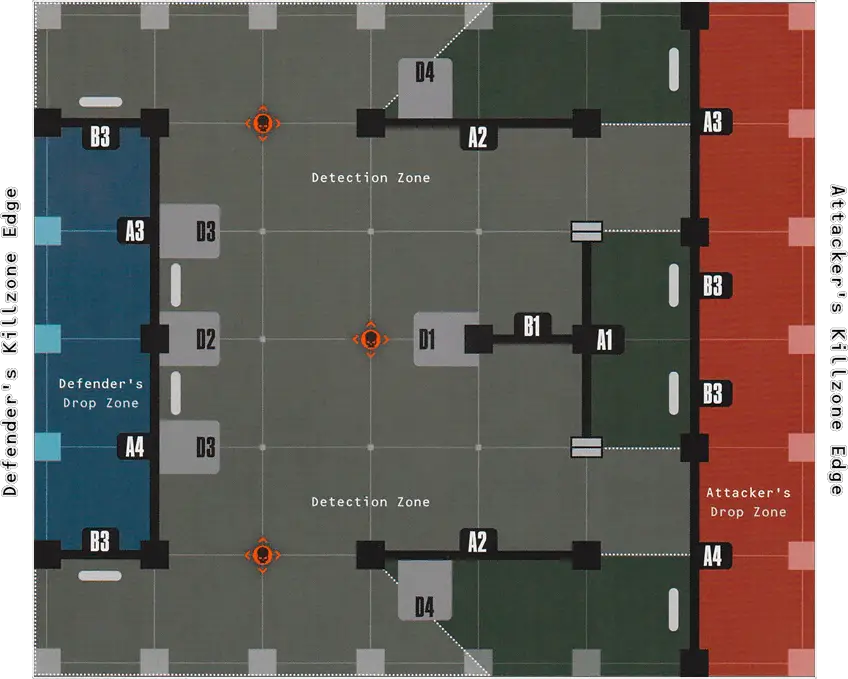
Storm the Vault
The defender has taken refuge in a well-supplied vault and has hastily fortified their position. The attacker intends on rooting them out and taking the spoils left behind for themselves.
HATCHWAY BATTENS [1EP]
In the Set Up Operatives step, when this operative is set up, you can select one Hatchway within of this operative (each Hatchway can only be selected for this once). Until it is opened, that Hatchway is battened down. While a Hatchway is battened down, the first time the Operate Hatch action is performed on that Hatchway, it is not opened (it must be performed a second time in the battle to open that Hatchway).BREACHER ROBOT [4EP]
The operative’s controlling player gains an operational Robot terrain feature it commands. In the Set Up Operatives step, when the Attacker sets up their operatives, they must also set up the Robot terrain feature wholly within their drop zone with an Engage order. Each time the Robot terrain feature is activated, instead of performing the actions specified here, it can perform the following action for free:Engage Breaching Saw: This terrain feature can perform this action while within of a closed Hatchway. Open that Hatchway and that Hatchway cannot be closed again during the battle. Note that Hatchway Battens have no effect on this action.
SPEC OPS CAMPAIGN
If you are playing this mission as part of a Spec Ops campaign, the following mission rules also apply:Vault Held: If you are the Defender, are victorious and are currently undertaking the Extraction Spec Op, then reduce by 1 the number of games required to complete that Spec Op’s Operation 1.
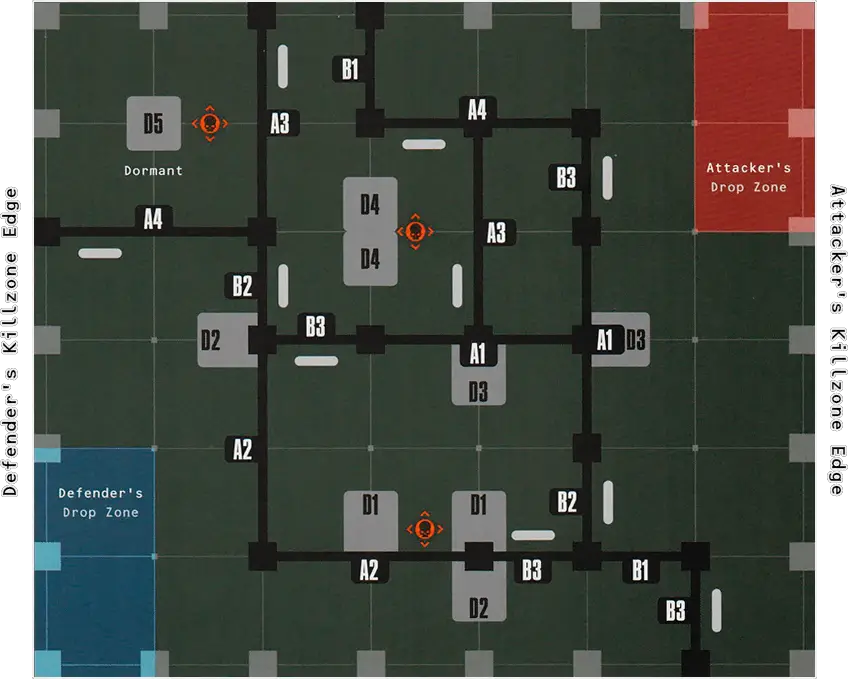
Hold Out
The attacker gears up for an assault on the defender’s position, bringing heavy equipment with them for the task. The defender must stand firm and repel the aggressors.
HATCHWAY BATTENS [1EP]
In the Set Up Operatives step, when this operative is set up, you can select one Hatchway in the killzone (each Hatchway can only be selected for this once). Until it is opened, that Hatchway is battened down. While a Hatchway is battened down, the first time the Operate Hatch action is performed on that Hatchway, it is not opened (it must be performed a second time in the battle to open that Hatchway).The Attacker’s operatives can be equipped with the following equipment:
BOMB [4EP]
The operative is carrying a Bomb terrain feature for the battle. Operatives can perform the Pick Up action upon the Bomb terrain feature; it is treated as a token for such rules purposes (e.g. the operative can drop it at any point during its activation without subtracting any additional action points). While an operative with a Wounds characteristic of 10 or less is carrying a Bomb terrain feature, it cannot perform Dash actions.At the end of a Turning Point, if a Bomb terrain feature is armed (see Operate Bomb action below), it will explode: all operatives within of the Bomb terrain feature are incapacitated and all Hatchways within of it are opened. If this equipment is being used in the battle, operatives can perform the following mission action:
OPERATE BOMB1/2AP
BREACHER ROBOT [4EP]
The operative’s controlling player gains an operational Robot terrain feature it commands. In the Set Up Operatives step, when the Attacker sets up their operatives, they must also set up the Robot terrain feature wholly within their drop zone with an Engage order. Each time the Robot terrain feature is activated, instead of performing the actions specified here, it can perform the following action for free:Engage Breaching Saw: This terrain feature can perform this action while within of a closed Hatchway. Open that Hatchway and that Hatchway cannot be closed again during the battle. Note that Hatchway Battens have no effect on this action.
- If the total APL characteristic of the Attacker’s operatives within the Defender’s drop zone is three or more, the Attacker scores 4VPs. Otherwise, the Defender scores 4VPs.
- If more than half of enemy operatives have been incapacitated, you score 4VPs.
- If more than three quarters of enemy operatives have been incapacitated, you score 4VPs.
SPEC OPS CAMPAIGN
If you are playing this mission as part of a Spec Ops campaign, the following mission rules also apply:Vault Held: If you are the Defender, are victorious and are currently undertaking the Extraction Spec Op, then reduce by 1 the number of games required to complete that Spec Op’s Operation 1.
Secure Base
The kill teams have discovered a hidden chamber with reinforced walls that is easily defendable. If they can get the power on and secure the area, it can provide a safe haven within the Gallowdark.
- For each objective marker friendly operatives control, you score 3VPs.
- For each objective marker friendly operatives control that has no enemy operatives within of it, you score 1VP.
SPEC OPS CAMPAIGN
If you are playing this mission as part of a Spec Ops campaign, the following mission rules also apply:Attack Repelled: If you are the Defender, are victorious and are currently undertaking the Honour-bound Spec Op, then reduce by 1 the number of games required to complete that Spec Op’s Operation 1.
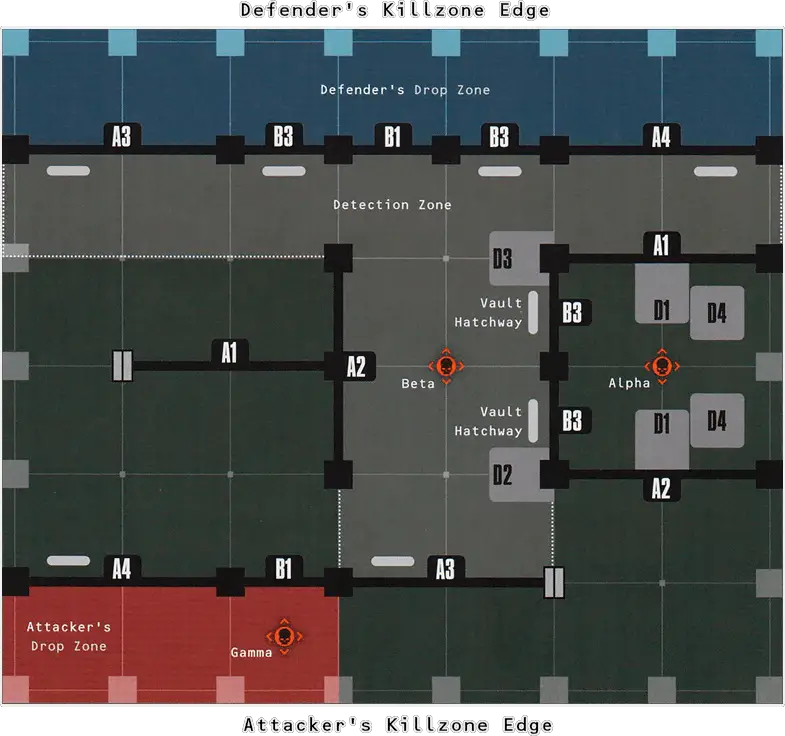
Covert Attack
The attacker has acquired the means to secretly access an enemy’s vault. They sneak forward to temporarily secure the area and escape with the spoils. The defender must react quickly to prevent the enemy from doing so and cut off their withdrawal.
Locked Vault: Vault Hatchways have two statuses: Locked and Unlocked. They begin the battle locked, and cannot be opened while they are locked. Operatives can perform the following mission action:
ACCESS VAULT1AP
- If the Attacker’s operatives control the Alpha objective marker, the Attacker scores 6VPs. Otherwise, the Defender scores 2VPs.
- If the Attacker’s operatives control the Beta objective marker, the Attacker scores 4VPs. Otherwise, the Defender scores 4VPs.
- If the Attacker’s operatives control the Gamma objective marker, the Attacker scores 2VPs. Otherwise, the Defender scores 6VPs.
SPEC OPS CAMPAIGN
If you are playing this mission as part of a Spec Ops campaign, the following mission rules also apply:Attack Repelled: If you are the Defender, are victorious and are currently undertaking the Honour-bound Spec Op, then reduce by 1 the number of games required to complete that Spec Op’s Operation 1.
Lightning Raid
The attacker has discovered where the defender is hiding their stash of supplies. A sentry drone patrols the passageways so the attackers must be quick — taking what they can and retreating before the defender can react.
Detection Drone: In each Detection phase, instead of moving their Detection token, the Defender can open or close one Hatchway within of the Detection token.
Operatives can perform the following mission actions:
LOOT1AP
PROGRAM ROBOT1AP
The Attacker scores victory points as follows:
- For each objective marker friendly operatives control, you score 2VPs.
- If you command the Robot terrain feature and it is not controlled by enemy operatives, you score 3VPs.
- If you achieved the second condition and the Robot terrain feature is wholly within your drop zone, you score 3VPs.
The Defender scores victory points as follows:
- For each objective marker enemy operatives do not control, you score 3VPs. Note that if an objective marker has not been added to the battle, enemy operatives do not control it (see Loot action above; there are three possible objective markers in total).
- If the Robot terrain feature is neither commanded by your opponent nor controlled by enemy operatives, you score 3VPs.
SPEC OPS CAMPAIGN
If you are playing this mission as part of a Spec Ops campaign, the following mission rules also apply:Attack Successful: If you are the Attacker, are victorious and are currently undertaking the Infiltrate the Enemy Spec Op, then reduce by 1 the number of games required to complete that Spec Op’s Operation 1.
Killzone: Shadowvaults
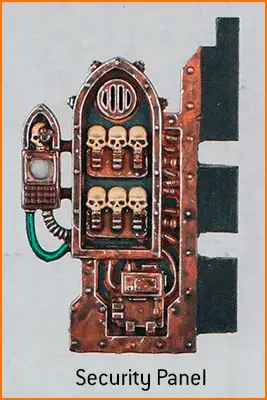
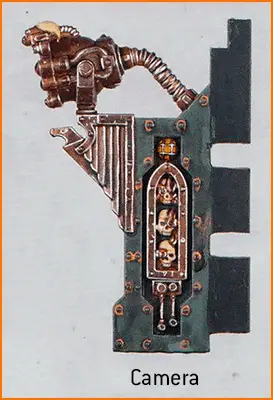
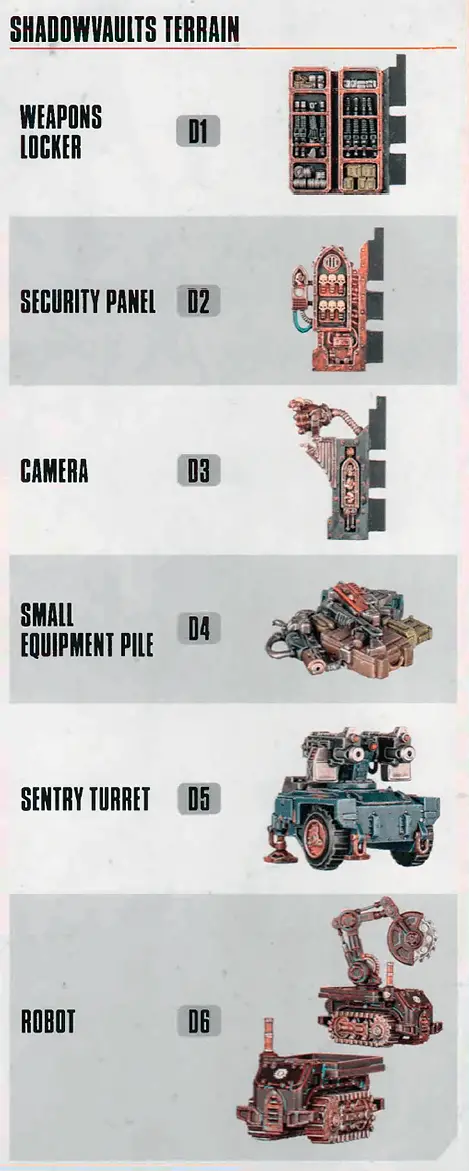
Weapons Locker, Security Panel and Camera
Weapons Locker, Security Panel and Camera terrain features have the Heavy and Traversable traits.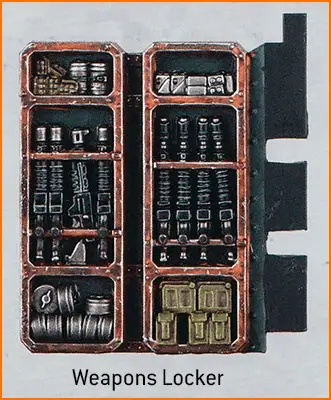
Small Equipment Pile
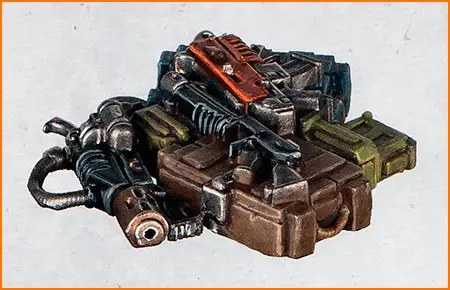
A Small Equipment Pile terrain feature has the Light and Traversable traits.
Bomb

A Bomb terrain feature does not provide Cover, nor do operatives need to climb over it; they simply move over it as if it were not there, but cannot finish a move upon it. Bomb terrain features can provide additional rules that will be specified by the mission rules.
Sentry Turret
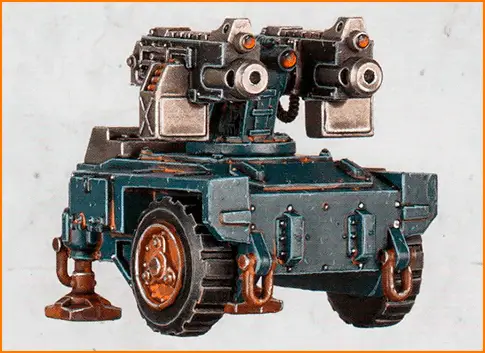
Automated Fire: In the Firefight phase, at the end of each activation, if this terrain feature has cooled down and there is a valid target for it to make a shooting attack against, it will do so against the closest valid target using its twin heavy bolter. A valid target is the closest operative within this terrain feature’s Line of Sight.
This terrain feature begins the battle cooled down. Each time after this terrain feature makes a shooting attack, it must cool down: roll two D6 and add the results together. The total result is the number of activations that must be completed until this terrain feature has cooled down.
Name | A | BS/WS | D | |||
| Sentry Turret Wargear | 5 | 5+ | 4/5 | |||
Special Rules | ! | |||||
Relentless | P1 | |||||
Robot
A Robot terrain feature has the Light and Traversable traits. It has two statuses: Operational and Dormant. While it is Dormant, it has no additional traits. While it is Operational, it has the Programming trait. Unless otherwise specified, it begins the battle Dormant.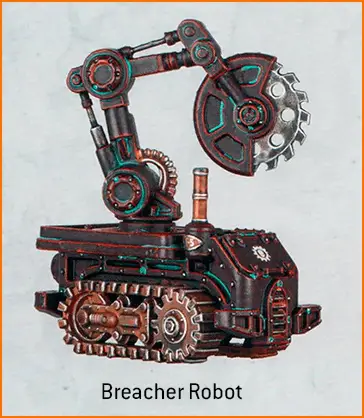
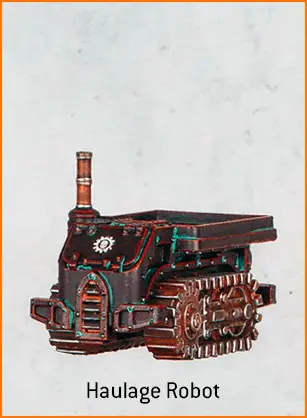
The commanding player’s opponent can treat this terrain feature as an enemy operative at any time. For example, they can charge it, fight it, shoot it, etc. Similarly they could decide not to treat it as an enemy operative. For example, they can perform a Normal Move action while within Engagement Range of it.
When making shooting attacks against this terrain feature, draw Cover lines to every part of the miniature, it has a Defence characteristic of 3 and a Save characteristic of 3+. If this terrain feature is selected as the target for combat, do not select a weapon or roll any attack dice for it.
This terrain feature has a Movement characteristic of 3 that cannot be modified.
Breacher Robot: In some missions, the robot will have a breaching role, using its breaching saw to cut through other terrain features. The mission will specify the rules impact of this (e.g. Storm the Vault), but players should place the breaching saw on the robot to show its role.
Killzone Key Reference
Dataslates and Datacards
Kasrkin and Hierotek Circle Datacards:
Kasrkin Narrative Dataslate:
Hierotek Circle Narrative Dataslate:
- Universal actions can be performed by all operatives. They are detailed below.
- Unique actions are actions detailed on an operative’s datacard that only they can perform, such as the Dakka Dash action found on the example datacard.
- Mission actions are specific to the mission you are playing, and will be detailed by that mission’s briefing. Missions can be found here (Open Play mission) and here (Spec Ops Narrative missions).
- Free actions can only be performed when another rule specifies. Each time an operative would perform a free action, the following rules apply.
- The operative can perform the action, so long as the requirements of the action are met.
- The player does not subtract any additional AP to perform the action.
- The operative would still count as performing the action for all rules purposes. For example, if it performed it during its activation, it would not be able to perform the action again during that activation.
For example, when a KOMMANDO DAKKA BOY performs a Dakka Dash action (see unique actions, above), it can perform a free Dash and free Shoot action without subtracting any additional AP (other than the AP spent on the Dakka Dash action). However, it is subject to those actions’ requirements, therefore it cannot perform the free Dash action if it is within Engagement Range of enemy operatives, and cannot perform the free Shoot action if it is within Engagement Range of enemy operatives or has a Conceal order. In addition, for each of the free actions it performs, it cannot perform them again during its activation.
OPERATE HATCH1AP
An operative can perform this action during a Dash or Normal Move action, and any remaining increments of movement can be used after it does so. Note, however, that opening a Hatchway can cause the operative to be within Engagement Range of an enemy operative, in which case that Dash or Normal Move action would immediately end (unless the operative has any rules that allow it to move within Engagement Range of an enemy operative, e.g. FLY).
Designer’s Note: If a Hatchway’s status is changed and operative placement would prevent the hatch from fully opening or closing, temporarily remove the necessary operatives from the killzone, fully open or close the hatch as appropriate, then return the operatives to the killzone as close as possible to their original location. If an operative is within an enemy operative’s Engagement Range before a hatch is opened, it must be returned within Engagement Range of that enemy operative after the hatch is opened.
- The intended target is more than from the active operative.
- The intended target is within of a point at which a Cover line crosses another operative’s base (unless that other operative is not itself in the active operative’s LoS), or a terrain feature that provides Cover (see Terrain Traits).
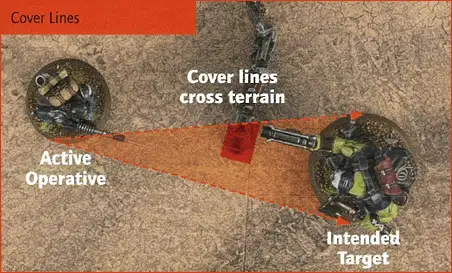
- You can draw an imaginary, unobstructed straight line (known as a Visibility line) 1 mm wide from the head of the active operative’s miniature to any part of the miniature of the intended target (not its base).
1.1 Deadly Juncture 1.3 Uncover Riches 2.1 Demolition Run 2.2 Storm the Vault 2.3 Hold Out 3.1 Secure Base 3.2 Covert Attack 3.3 Lightning Raid