General’s Handbook 2026-27
Contents • Overview | ||
")
Books
| Book | Kind | Edition | Last update | |
| | ||||
| | Expansion | 4 | June 2026 | |
General’s Handbook 2026-27
1. Pick Your Armies
Each player picks an army using the rules in Army Composition 2026-27 (Advanced Rules).Advanced RulesIn addition to the Core Rules and the Season Rules 2026-27, this battlepack uses the following Advanced Rules: | ||
2. Determine the Battleplan
One player rolls a dice to determine which battleplan table to use. On a 1-3, use battleplan table 1. On a 4-6, use battleplan table 2. The other player then rolls a dice to determine the battleplan. Alternatively, feel free to pick the battleplan you wish to play.
| ||||||||||||||||||||||||||||||||
Attacker and Defender
The players roll off. The winner chooses which player is the attacker and which is the defender.Objectives and Terrain
This battlepack contains 6 special objectives called Aqshian objectives: 2 Sun Seekers objectives, 2 Golden Lions objectives, 1 Heidenhain objective and 1 Scions of the Comet objective. The objective itself is the 40mm diameter circle located in the centre, while the surrounding area extending 3" from the objective is the control zone. To contest an Aqshian objective, a unit must be within the control zone of that objective.Some battleplans will use more than 1 of the same type of Aqshian objective. For example, they could include 2 Sun Seekers objectives and/or 2 Golden Lions objectives. In these battleplans, the rules refer to 2 of the same type of objective as a pair or paired. When a rule requires a player to control a pair of objectives, the player has to control both objectives in that pair. When a player has to pick ‘a pair of objectives’, they can only pick a single pair of Aqshian objectives of the same type.
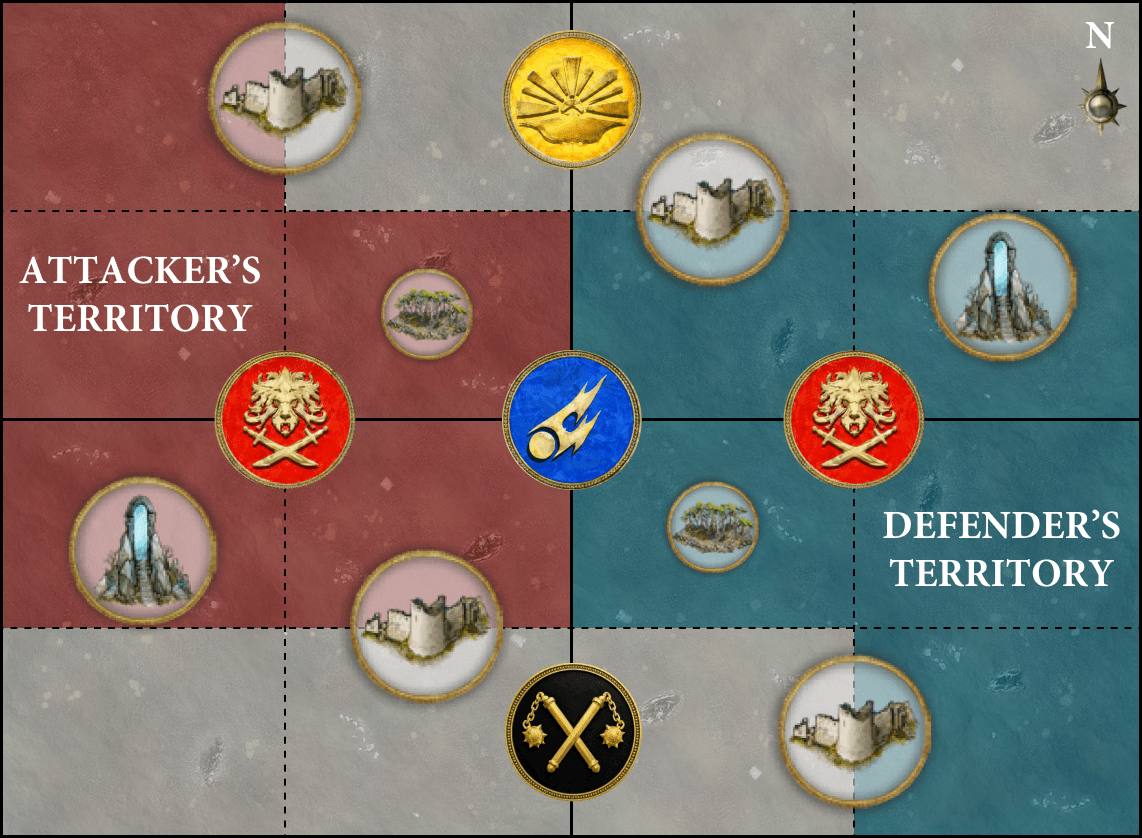
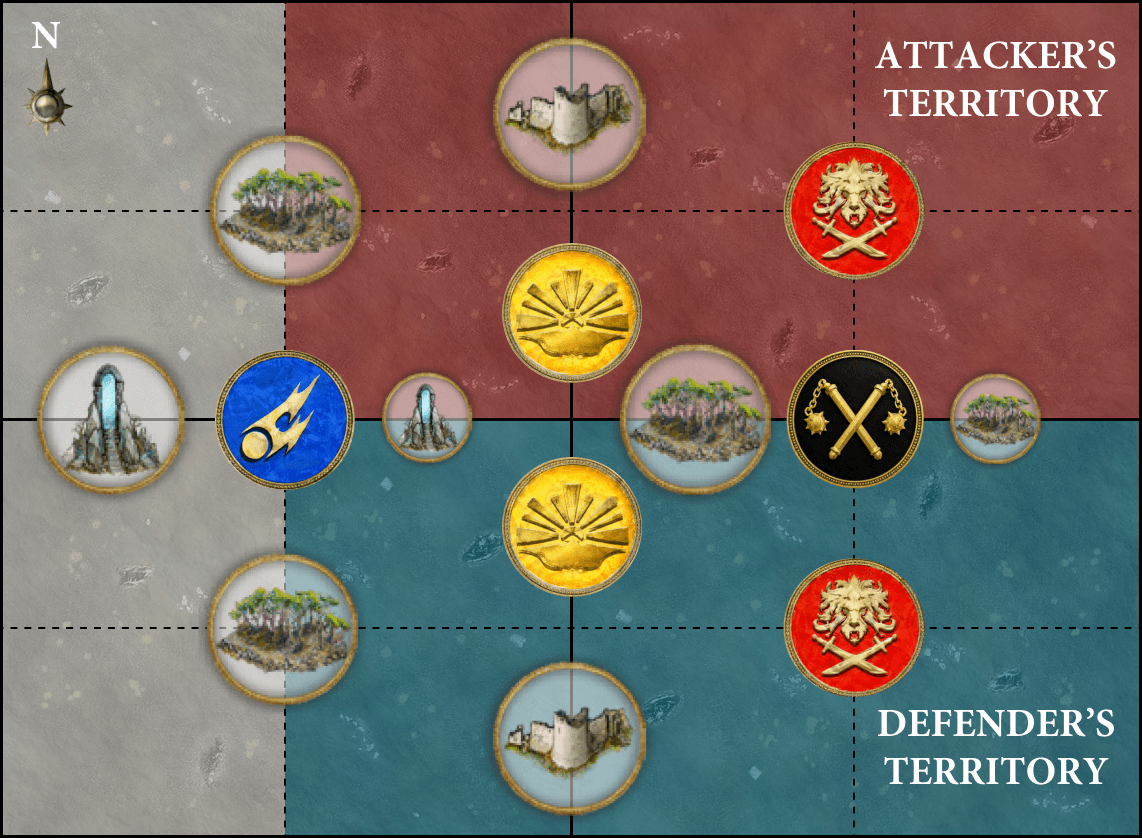
The defender sets up Aqshian objectives in the locations indicated on the battlefield map. The objectives must be those indicated on the battlefield map; for example, if the map shows a Heidenhain objective, the Heidenhain objective must be set up in that location.
Then, the defender sets up terrain features. We recommend 4 small and 4 medium terrain features. Each terrain feature must be set up more than 3” from the battlefield edge, more than 3" from all objectives and more than 6" from all other terrain features. Alternatively, the battlefield can be set up as shown on the corresponding battlefield terrain layout map while maintaining the distance restrictions between the battlefield edge, objectives and other terrain features as detailed above.
Territory
After Ghyranite objectives and terrain have been set up, the attacker picks which territory is their territory. The other territory is the defender’s territory. The players then resolve the deployment phase. The attacker begins deployment (Core Rules, 10.0).Battle Length
Battles that use this battlepack last for 5 battle rounds.Glorious Victory
Each battleplan will describe how to score victory points. At the end of the battle, if one player has at least 5 victory points more than their opponent, they win a major victory. If one player has fewer than 5 victory points more than their opponent, they win a minor victory. If the players are tied on victory points, the player who completed the most battle tactics wins a minor victory. If the players are tied on victory points and completed the same number of battle tactics, the battle is a draw.Battle Tactics
If you are using this battlepack, you must pick battle tactics cards from this battlepack to add to your army roster during army composition.At the start of the battle, you must reveal your choice of battle tactics cards to your opponent. If the battle tactics cards instruct you to pick something, you must tell your opponent what you have picked and vice versa.
Aqshian Crusades
Sometimes you might want to link together multiple battles in order to play a tournament or start a campaign. With the General’s Handbook 2026-27 battlepack, you can do this by launching an Aqshian Crusade.An Aqshian Crusade is a set of battleplans that, when played in order, give your Matched Play experience a narrative spin. Whether you intend to play a single-day or weekend tournament or embark on a long-term campaign, there is a crusade for you! In an Aqshian Crusade, the same types of terrain are used for all games that would typically be played on the same day, and, in the case of two-day crusades, the battles that would usually be fought at the end of the first day have simpler twists (because even renowned tacticians need some downtime!).
Crusade Types
To launch an Aqshian Crusade, pick 1 of the following crusade types:
|
Mapping the Warpath
Next, pick 1 of the pre-made Aqshian Crusades from the table below. Alternatively, if you’re feeling adventurous, you can mix and match battleplans to forge your own narrative.Each pre-made crusade tells a different story, as summarised in the 'Synopsis' column. The 'Battleplans' column tells you which battleplans from the General’s Handbook 2026-27 battlepack each crusade uses and the order in which to play them. A battleplan’s number can be found at the top of its card.
|
Joint Crusades
Occasionally, crusading armies with a common cause might form temporary alliances or fractious coalitions. Joint Crusades are events for teams with an equal number of players whose armies are fighting alongside one another on an Aqshian Crusade.Before starting a Joint Crusade, the event organiser picks a number of Aqshian Crusades of the same type equal to the number of players in a team divided by 2, rounding up. For instance, if there were 5 players in each team, they would pick 3 crusades. The same crusade can be picked more than once. The event organiser then numbers the crusades they picked (see 'Preparing for Battle'). Battles will be fought using the battleplans in those Aqshian Crusades.
Rounds
A Joint Crusade comprises a number of rounds. We recommend 3 rounds for a 1-day event and 5 rounds for a 2-day event.In each round, the teams are drawn against each other (either randomly or by using a format such as the Swiss system) and each player in a team is paired with a player in the team they are drawn against. The 'Pairing Armies' section contains an example method for pairing players.
Preparing for Battle
In the first round, the first two players from each team to be paired play the first battleplan in Aqshian Crusade 1, the next two play the first battleplan in Aqshian Crusade 2, and so on.In the second round, the first two players from each team to be paired play the second battleplan in Aqshian Crusade 1, the next two play the second battleplan in Aqshian Crusade 2, and so on.
Repeat this sequence for each round. If there are more rounds than battleplans in an Aqshian Crusade, cycle through the battleplans in that crusade again from the beginning.
Pairing Armies
During a Joint Crusade, you will find that some players’ armies are better suited to certain battleplans than others. Your team must work together to ensure the right armies are fighting the right battles. To decide which armies will be fighting on which battleplan, follow these steps at the start of each round. We recommend writing the names of each army on your team on separate cards to create a hand of cards to use in this process.- Each team secretly picks 1 of the armies in their hand to be the guarding army for that battleplan. The guarding armies are then revealed simultaneously.
- Each team presents 2 of their non-guarding armies to be prospective invading armies against the opposing team’s guarding army.
- Each team picks 1 of the opposing team’s invading armies to be paired with their guarding army, revealing their choices simultaneously. The army that was not picked is returned to their team’s hand.
- Repeat steps 1-3 until each team is left with either 1 or 2 unpaired armies in their hand.
- If each team has 2 unpaired armies left, follow step 1, then each team’s guarding army is automatically paired with the opposing team’s remaining army.
- If each team has 1 unpaired army left, those armies are automatically paired.
Glorious Alliance
At the end of each round, add up the victory points earned by all players on your team. The team with the highest total wins the round!Matched Play Publications 2026-27
- Warhammer Age of Sigmar Core Book
- General’s Handbook 2026-27
- Warhammer Age of Sigmar Faction Packs
- Battle Profiles & Rules Updates
- Battletome publications, excluding Warhammer Legends rules
Season Rules 2026-27
When fighting battles using the General’s Handbook 2026-27 battlepack, both players can use the following abilities: Once Per Battle (Army), Deployment Phase Once Per Battle (Army), Deployment Phase |
| Once Per Turn (Army), Start of Battle Round |
Effect: Gain a number of rage dice equal to your fury level. At the end of the battle round, any unspent rage dice are lost.
 Once Per Turn (Army), End of Any Turn Once Per Turn (Army), End of Any Turn |
Effect: Pick 1 of the melee weapons that the unit using this ability is armed with. Then, spend up to 3 rage dice.
Resolve a number of combat attacks against the target using the melee weapon you picked equal to the number of rage dice you spent.
Those attacks cannot score critical hits. Instead, for each unmodified hit roll of 6 for those attacks:
- Inflict an additional D3 mortal damage on each enemy unit in combat with the unit using this ability.
- Your opponent must increase their fury level by 1, to a maximum of 7.
For each unmodified hit roll of 1 for those attacks, allocate D3 mortal damage to this unit after the damage sequence has been resolved (ward rolls cannot be made for those damage points).
Designer’s Note: Rage dice do not add to the Attacks characteristic of the weapon you pick; if you spend 3 rage dice to use this ability, you only make 3 combat attacks.
| KEYWORDS | ATTACK, FIGHT |
 Passive Passive |
") Using The Scourge of Aqshy Rules
Using The Scourge of Aqshy Rules
The Scourge of Aqshy rules are a set of seasonal rules that include additional faction rules and alternative warscrolls for every faction. These rules are for use in battles that use the General’s Handbook 2026-27 battlepack.If you decide to use the Scourge of Aqshy version of a warscroll, you do not have to use all other Scourge of Aqshy warscrolls for your faction.
In addition, other rules that interact with the printed version of that unit interact with the Scourge of Aqshy version too. For example, a rule (including regiment options) that calls out a unit type by the name on its warscroll interacts with both the printed version of that unit and the Scourge of Aqshy version; they are synonymous in this regard.
When picking your army’s battle formation, you can pick 1 of the Scourge of Aqshy battle formations available to your faction instead of any others available to it. In other words, you can still only pick 1 battle formation for your army.
If you pick from a Scourge of Aqshy artefacts of power or heroic traits table, you pick from that table instead of other such tables available to your faction, not in addition to. This is stated in the rules that accompany the relevant table.
Some of the Scourge of Aqshy enhancement tables are special enhancements unique to that faction, for example monstrous traits. This is an enhancement table available to your faction like any other; therefore, you can pick 1 enhancement from it for your army, as per the Army Composition rules, 4.1.
We hope that you enjoy using the Scourge of Aqshy rules and that they add a fun new dimension to your faction!
Battle Tactics 2026-27
1.0 Battle Tactics Overview
During a battle, each player can score extra victory points by completing battle tactics from a battle tactics card. You can pick up to 2 battle tactics cards for your army during army composition, and the battle tactics cards you pick must be marked on your army roster.Before deployment, you must tell your opponent which battle tactics cards you have picked for your army.
Each battle tactics card has 3 battle tactics: 1 Affray battle tactic, 1 Strike battle tactic and 1 Domination battle tactic. You must complete the Affray battle tactic on that card before you can complete the Strike battle tactic on that card. Similarly, you must complete the Strike battle tactic on that card before you can complete the Domination battle tactic on that card.
You can complete 1 battle tactic on each of your battle tactics cards at the end of each of your turns, unless specified otherwise on that battle tactics card. If, at the end of your turn, you have met the conditions for completing a battle tactic and you can complete it, you must complete it.
2.0 Seizing The Initiative
If the player who went second in the previous battle round wins the priority roll and chooses to go first, unless their opponent is leading by 11 or more victory points, it is called seizing the initiative.When a player seizes the initiative, their opponent always counts as the underdog until that opponent seizes the initiative.
A player who seizes the initiative cannot complete any battle tactics in that turn.
3.0 Completing Battle Tactics
If, at the end of your turn, you have completed a battle tactic as described above, you score the number of victory points shown for that battle tactic.
| ||
Blazing Onslaught
Ushered in with smoke and fire, the battle for control of a vital holdout begins in earnest.
At the start of the battle, after using all
|
Siege of Ashes
You have manned a stronghold barring the enemy’s path and will defend it to the death
|
Flanking Firestorm
The plan is simple: outflank and surround the enemy, and make sure not one of them escapes alive.
|
Smokescreen
Draw the foe in by feigning weakness, concealing your true strength amidst the smoke of battle until the right moment.
|
Burning for Vengeance
The enemy ’s outrages merit brutal punishment. Track them down and run them to ground
At the start of the battle, after using all
|
Legend of The Parch
As raging fire and death threatens to consume all, a hero will arise and a legend will be born.
|
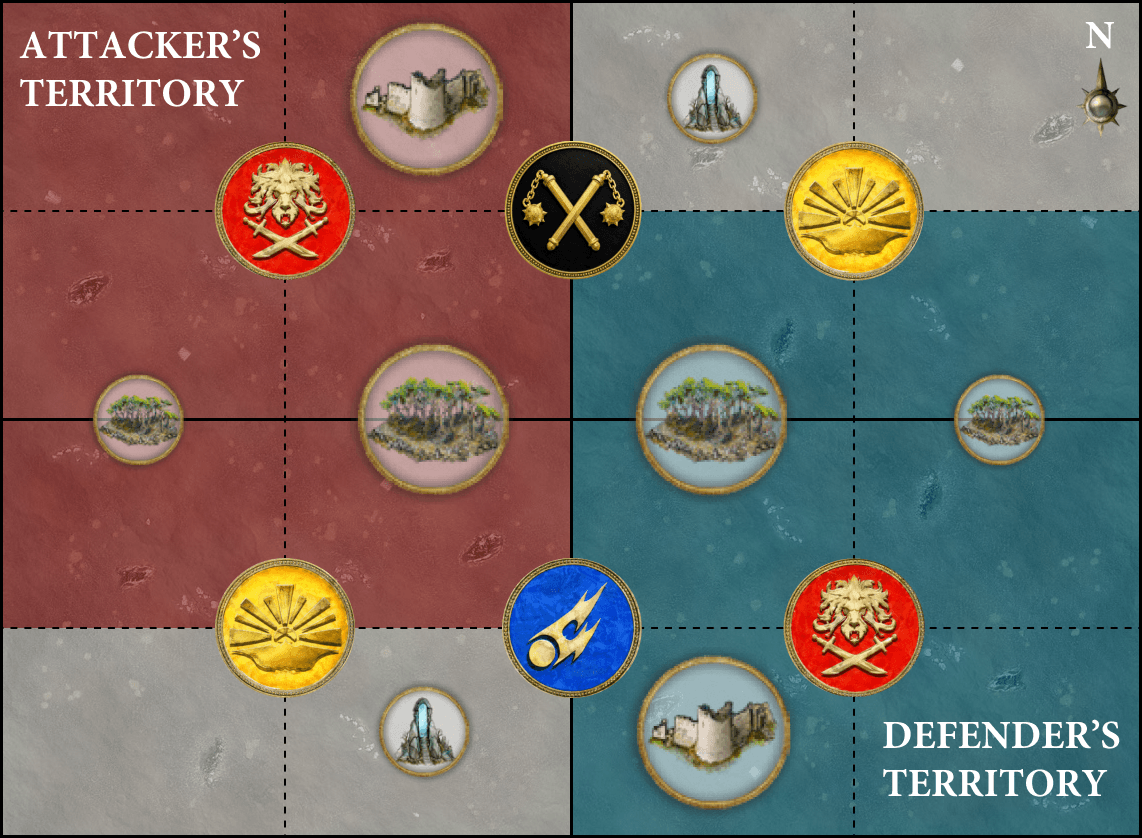
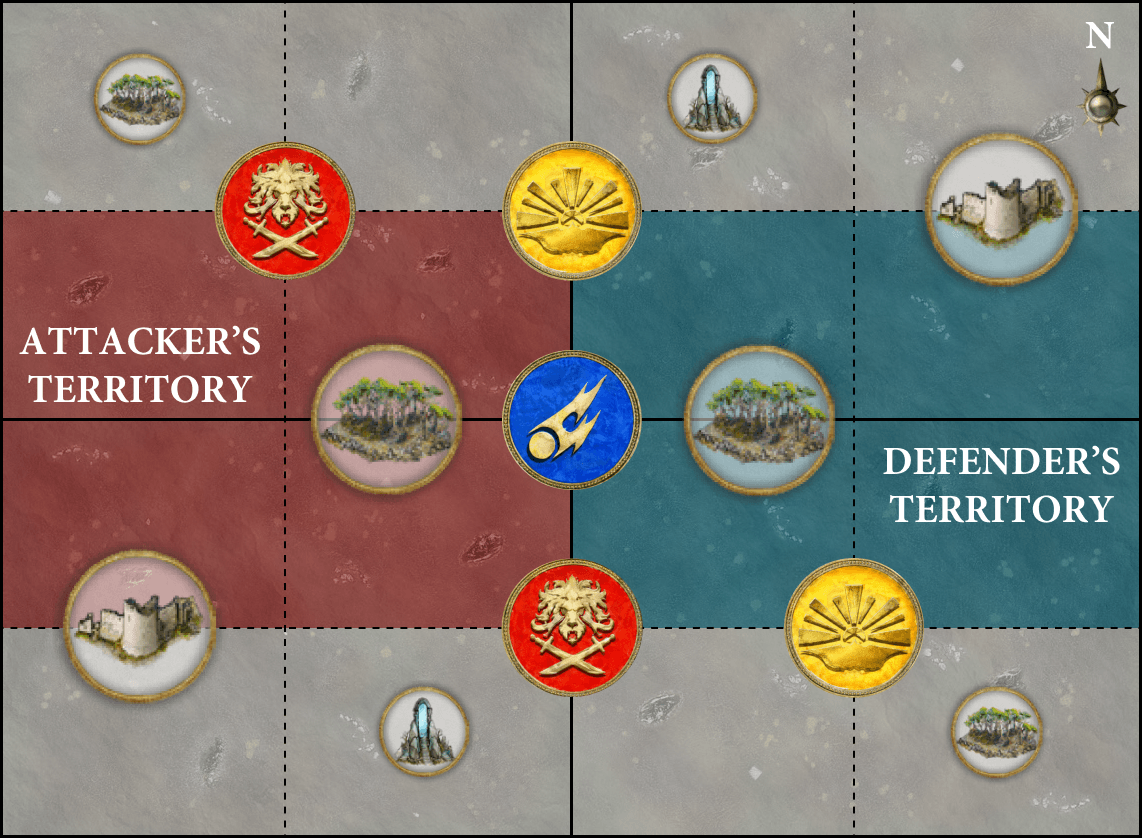
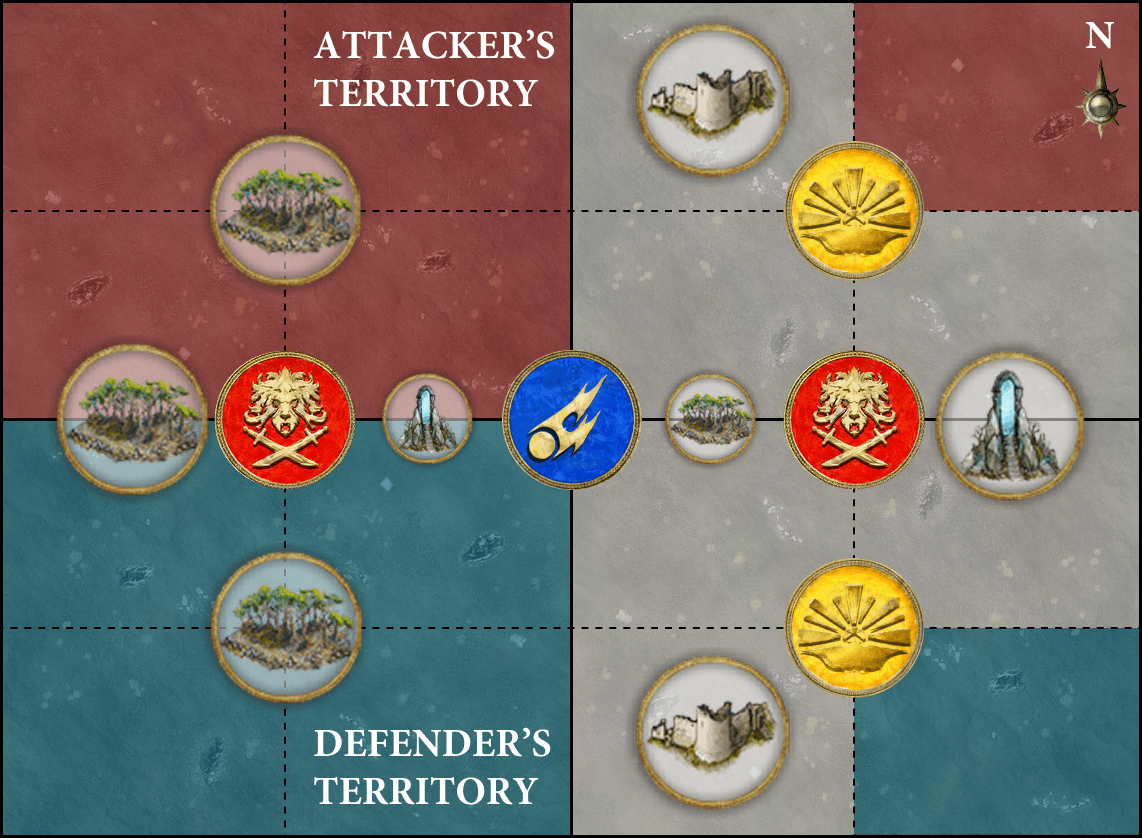
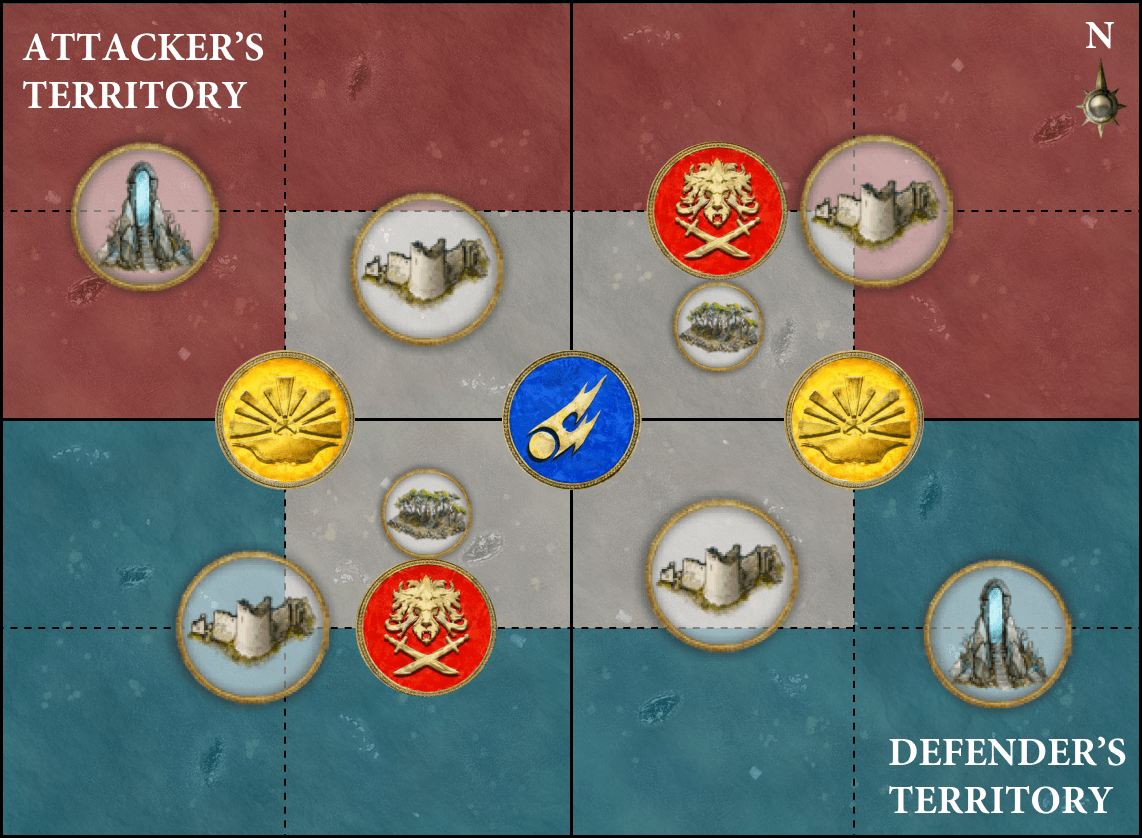
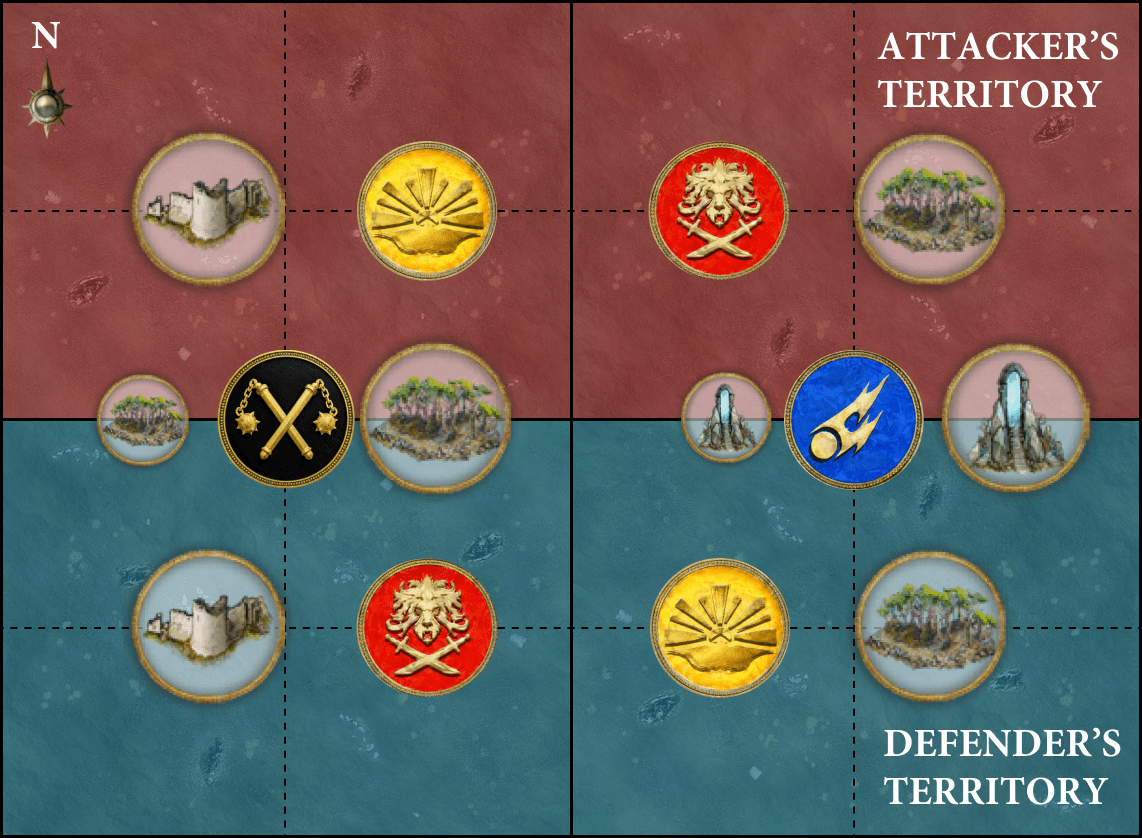
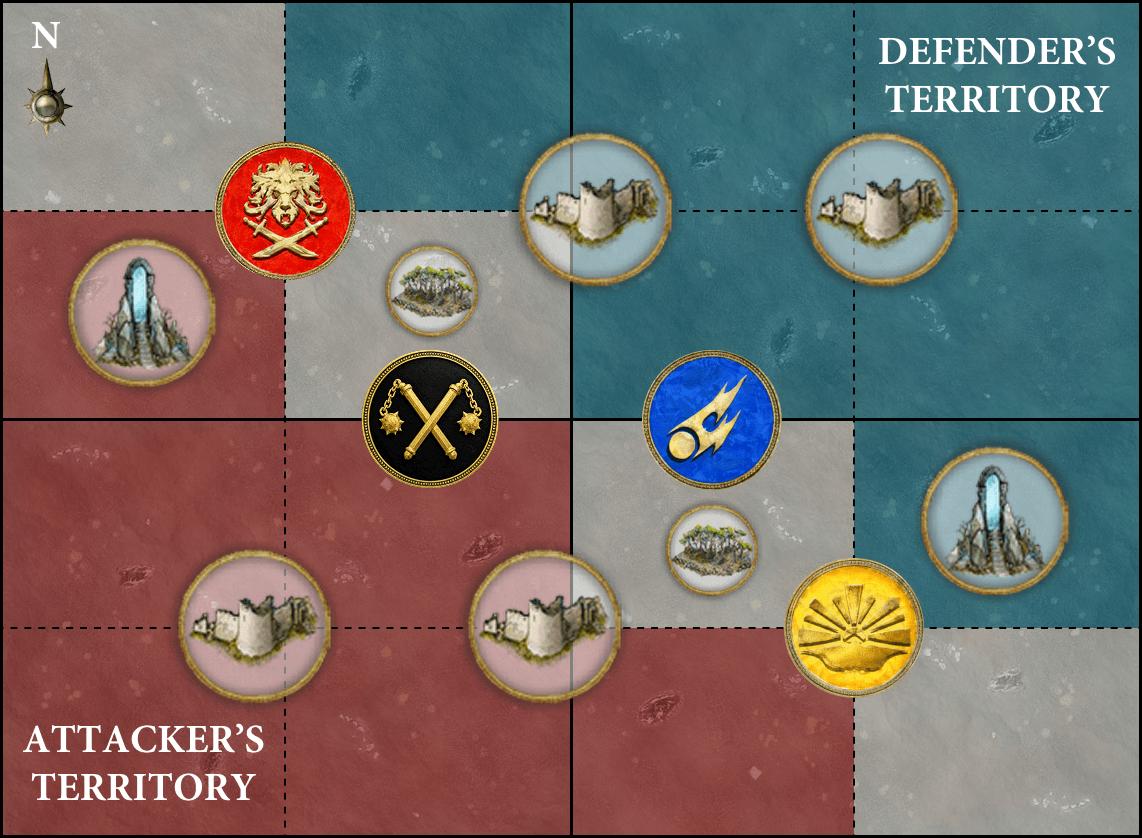
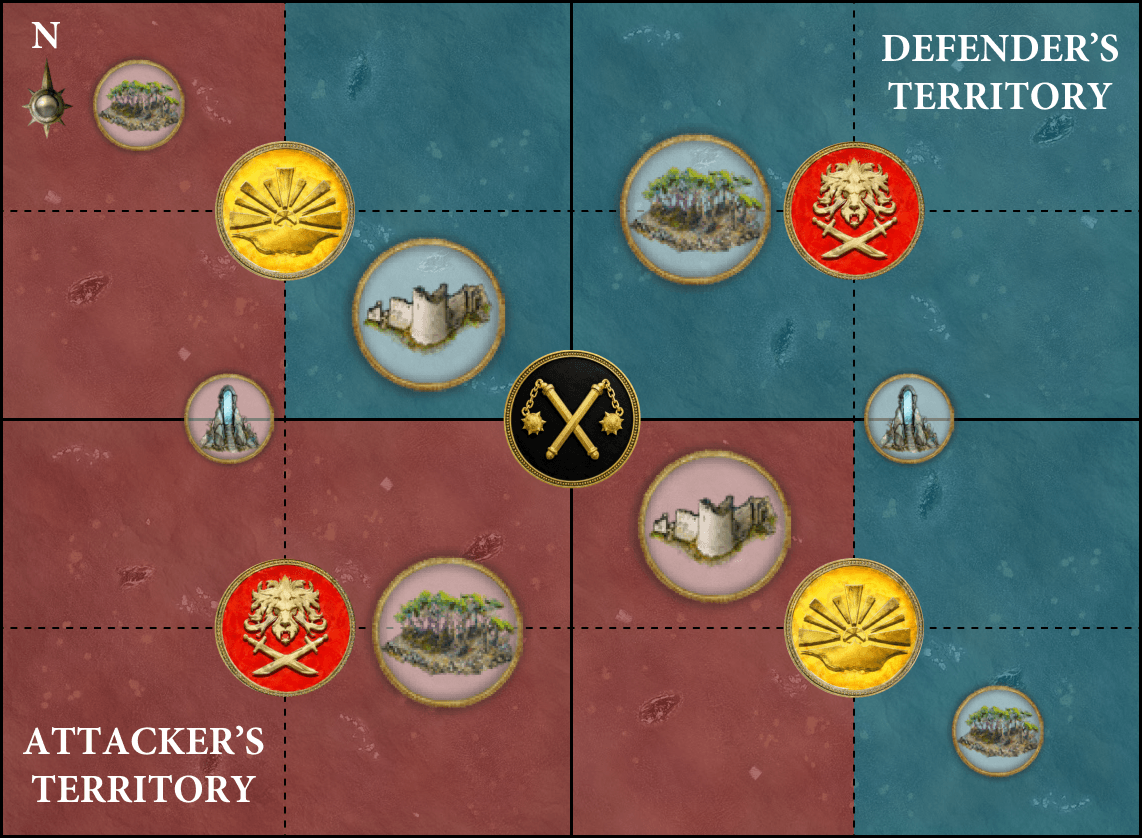
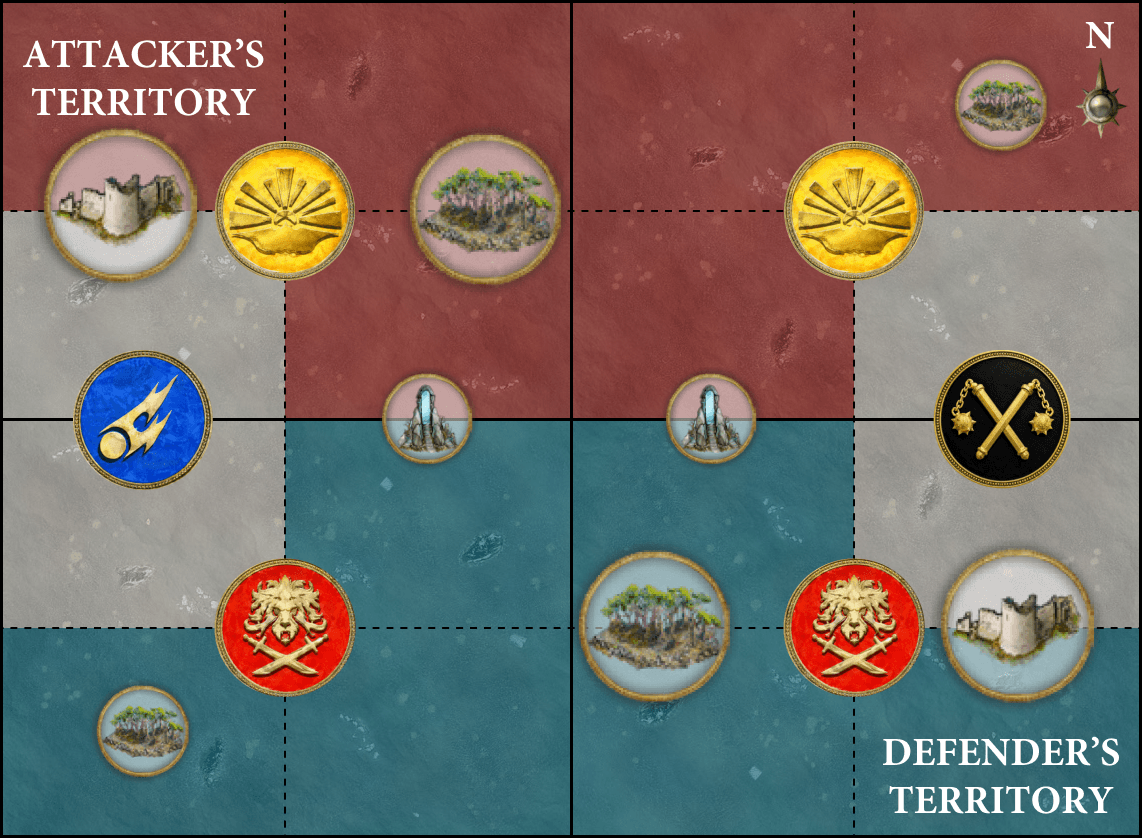
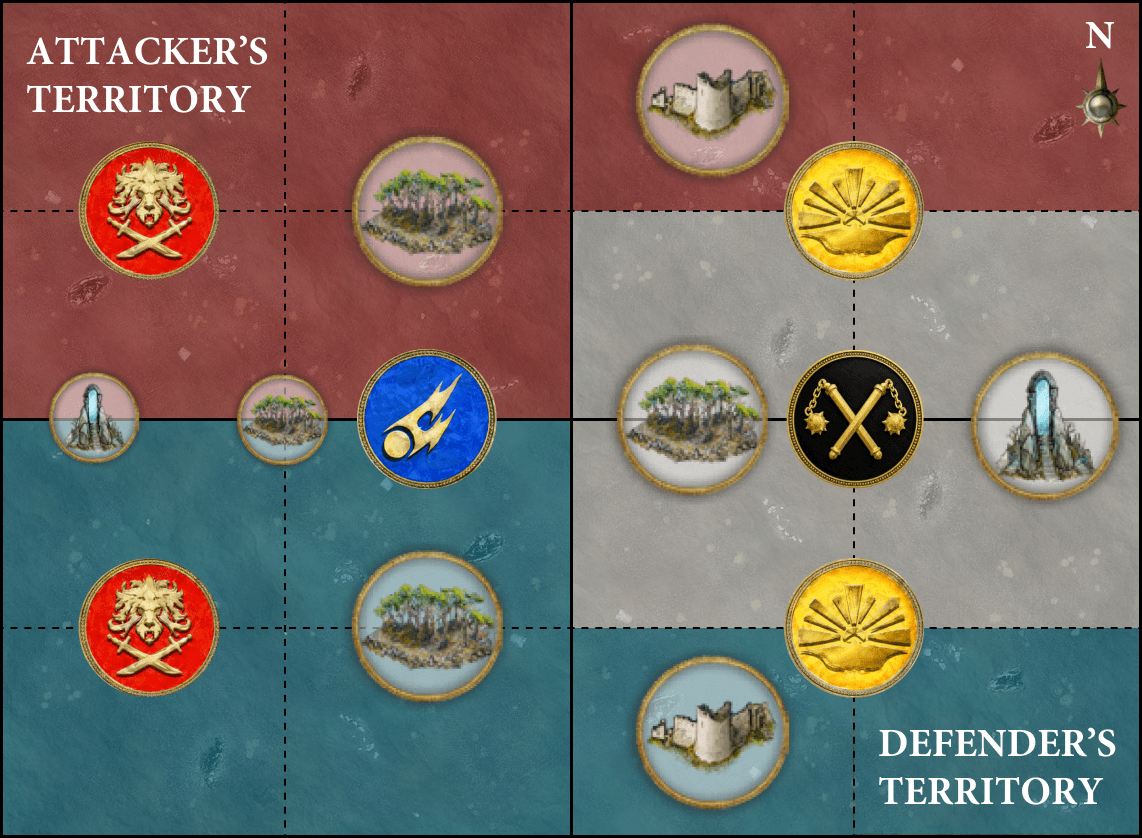
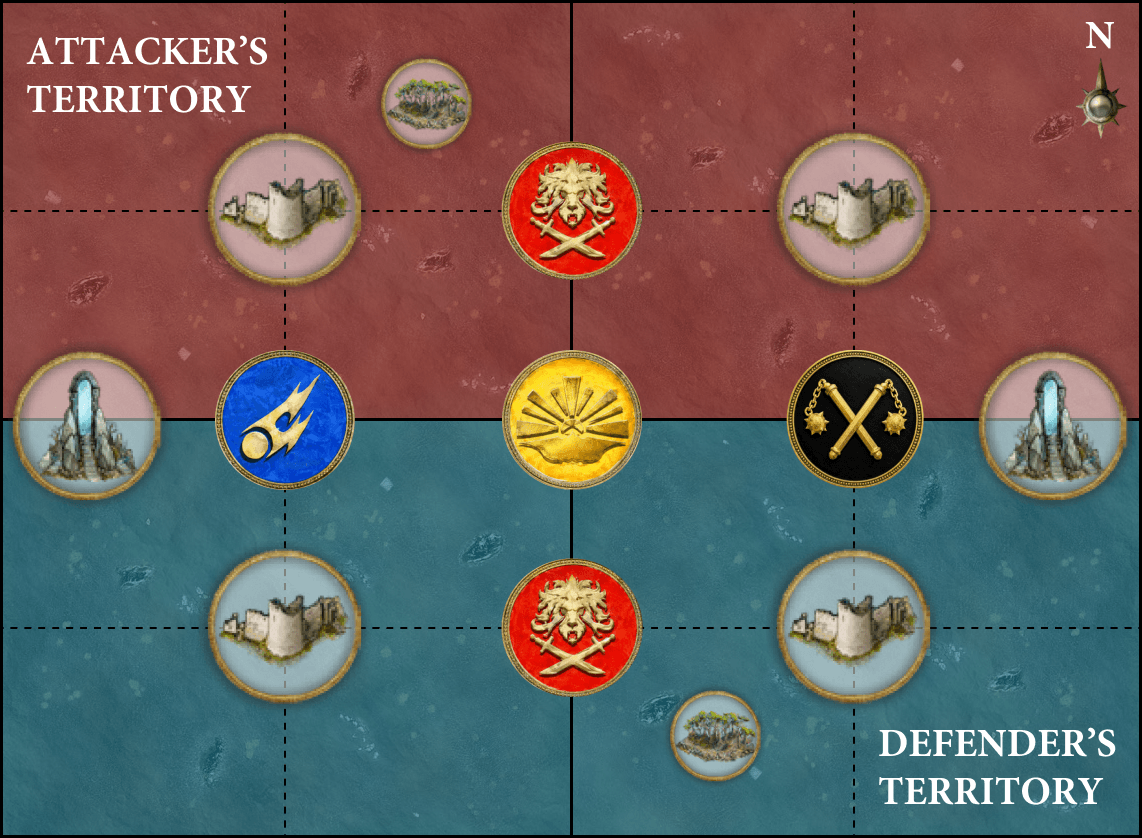
Battleplan Maps
Overview
The battleplan maps show the player territories and the locations where terrain and objectives should be placed on the battlefield.Player Territories
Each battleplan map shows two territories: one red (Attacker’s Territory) and one blue (Defender’s Territory).Objectives Locations
The locations of Aqshian objectives are indicated on the battleplan maps by the following icons.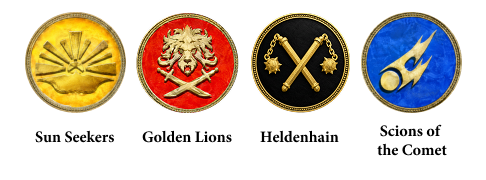 | ||
Each icon represents the Aqshian objective including its control zone. Where an objective icon is shown on the map, you must place the corresponding objective marker on the battlefield centred on the location of the objective icon shown on the map. For example, where the map shows a Heidenhain objective icon, place a Heidenhain objective on the battlefield in that location.
Terrain Locations
The terrain location icons show where terrain features should be set up and what type of terrain should be placed in each terrain location. The following key shows which terrain features correspond to which icons:
| |||||||||||

| |||||||||||


| |||||||||||


Battleplan 1 (Table 1) Into the FireTWIST: Both players’ armies have the 'Secure the Gateway' ability. While you are the underdog, your army has the 'Determined Defenders' ability. Each player scores victory points at the end of each of their turns as follows:
SECURE THE GATEWAYEffect: While you control the Place of Power wholly within friendly territory, friendly units’ melee weapons have Anti-charge (+1 Rend) while they are contesting an objective you control.
DETERMINED DEFENDERSEffect: Add 3 to the control scores of friendly units while they are wholly outside enemy territory.
 | ||||||||||||||||||||||||||
 Passive
Battleplan 2 (Table 1) Bloodstained CoastsTWIST: From the second battle round onwards, both players can use the following abilities:
EMBERSTONE-AUGMENTED WEAPONSDeclare: Pick a friendly unit that charged this turn and has any emberstone slivers to be the target. Effect: Pick 1 of the following effects to apply for the rest of the turn:
Then, if you are the underdog, remove all of the target’s emberstone slivers. Otherwise, remove all emberstone slivers from each friendly unit.
EMBERSTONE CACHEDeclare: Pick a friendly unit contesting an objective you control to be the target. Effect: Give the target an emberstone sliver.
 | ||||||||||||||||||||||||||
Battleplan 3 (Table 1) Avalanche of AshTWIST: If you are the underdog, you must use the following ability. Each player scores victory points at the end of each of their turns as follows:
COLLAPSING PASSDeclare: Pick each objective to be the targets. Then, pick 1 of the targets to be the focus. Effect: Roll a dice for each target. Add 1 to the roll for each unit (friendly and enemy) that is contesting it. If the target is the focus, you can add 3 to or subtract 3 from the roll. On a 8+, remove the target from the battlefield.
 | ||||||||||||||||||||||
Battleplan 4 (Table 1) Caverns of SlaughterTWIST: If you are the underdog, you can use the ’Shifting Passages’ ability. Both players can use the "Navigate the Tunnels" ability
SHIFTING PASSAGESDeclare: Pick 2 non-FACTION TERRAIN terrain features to be the targets. Effect: Remove all hidden passage tokens from the battlefield (if any). Then, give each target a hidden passage token.
NAVIGATE THE TUNNELSDeclare: Pick a friendly unit wholly within 6" of a terrain feature that has a hidden passage token to be the target. Effect: Remove the target from the battlefield and set it up again wholly within 6" of a different terrain feature that has a hidden passage token and more than 9" from all enemy units.
 | ||||||||||||||||||||||||||
Battleplan 5 (Table 1) What's Yours Is OursTWIST: While the battle round number is odd, the pair of Golden Lions Each player scores victory points at the end of each of their turns as follows: objectives is the coveted pair of objectives. objectives is the coveted pair of objectives.While the battle round number is even, the pair of Sun Seekers  objectives is the coveted pair of objectives. objectives is the coveted pair of objectives.If you are the underdog, you can use the following ability:
ALL THE RAGEDeclare: Pick a pair of objectives to be the target. Effect: For the rest of the battle round, the target is the coveted pair of objectives instead of the other pair of objectives.
 | ||||||||||||||||||||||
Battleplan 6 (Table 1) Hidden Under Ash-CloudsTWIST: At the start of each battle round, the underdog must pick whether or not the ash-clouds are low-lying. If there is no underdog, the ash-clouds are low-lying.The following passive ability applies this battle:
ROLLING ASH-CLOUDSEffect: While the ash-clouds are low-lying:
 | ||||||||||||||||||||||
Battleplan 7 (Table 2) Warped RuinsEach non-FACTION TERRAIN terrain feature must be set up within 12" of at least 1 other non-FACTION TERRAIN terrain feature. Each player scores victory points at the end of each of their turns as follows:TWIST: If you are the underdog, you must use the following ability.
SPREADING WARPFIREDeclare: If there are no flaming terrain features on the battlefield, pick a non-FACTION TERRAIN terrain feature to be the target. Otherwise, pick a non-FACTION TERRAIN terrain feature that is not flaming and that is within 12" of a flaming terrain feature to be the target. Effect: The target is flaming for the rest of the battle. Then, inflict D3 mortal damage on each unit (friendly and enemy) within 6" of any flaming terrain features.
 | ||||||||||||||||||||||
Battleplan 8 (Table 2) Curse of the GnawTWIST: At the start of the battle, the instability level is 1. Each time either player uses the 'Activate Place of Power' ability, add 1 to the instability level, to a maximum of 6. Each player scores victory points at the end of each of their turns as follows:After deciding who will take the first turn, the underdog can use the following ability.
ECHOES OF BLIGHT CITYDeclare: Pick an objective to be the target. Effect: Inflict an amount of mortal damage on each unit (friendly and enemy) contesting the target equal to the Instability level. Then, reset the Instability level to 1.
 | ||||||||||||||||||||||
Battleplan 9 (Table 2) Seize the EmbersTWIST: Both players can use the following abilities:
SEARCH THE RUINDeclare: Pick a friendly unit that does not have an emberstone nugget and is contesting a Sun Seekers objective to be the target.Effect: Give the target an emberstone nugget. If you are the underdog, the target can immediately move 6" but cannot end that move in combat. The target cannot use the ‘Back to Base Camp’ or ‘Power Through’ ability for the rest of the turn.
BACK TO BASE CAMPDeclare: Pick a friendly unit that has an emberstone nugget, was not set up this turn and is contesting a Golden Lions objective to be the target.Effect: Remove the target’s emberstone nugget.
 | ||||||||||||||||||||||||||
Battleplan 10 (Table 2) Treacherous GroundTWIST: At the start of the battle, all objectives are stable.Both players must use the 'Tread Carefully' ability. Then, from the second battle round onwards, if you are the underdog, you can use the 'Violent Tremor' ability.
TREAD CAREFULLYDeclare: Pick an objective within friendly territory to be the target. Effect: The target is no longer stable.
VIOLENT TREMORDeclare: Pick a pair of objectives to be the targets. Effect: The stable target objective is no longer stable. The other target objective is stable instead.
 | ||||||||||||||||||||||||||
Battleplan 11 (Table 2) Escape from the CoastTWIST: If you are the underdog, you can use the following ability. Each player scores victory points at the end of each of their turns as follows:
TO THE SHIPS!Declare: Pick the Heldenhain  or a Sun Seekers objective to be the target. or a Sun Seekers objective to be the target.Effect: Remove the target from the battlefield.
 | ||||||||||||||||||||||
Battleplan 12 (Table 2) Power of the RealmsTWIST: At the start of the battle, the Sun Seekers objective is the primary objective and the other objectives are secondary objectives.If you are the underdog, you can use the following ability.
ARCANE CHARGEDeclare: Pick a Place of Power you control to be the target. Effect: Draw a straight line from the centre of the primary objective to the target. If that line crosses any secondary objectives, the first secondary objective that the line crosses is now the primary objective and all other objectives are now secondary objectives.
 | ||||||||||||||||||||||
Each unit can only count as contesting a single objective for the purposes of determining objective control (see 32.2). Before determining objective control, for each of their units contesting two or more objectives, the active player must pick one of those objectives for it to contest. Then, their opponent does the same.
Designer’s Note: For purposes other than determining objective control, a unit can contest more than one objective.

A model is considered to be in combat with an enemy unit if that unit is within the model’s combat range and visible to it’
| ||
| Critical hits have no effect on their own but often trigger additional effects (see 20.0 Weapon Abilities). | ||
| Passive |
When allocating damage points to a unit, the damage points in its damage pool are allocated to it one at a time. Each time the number of damage points allocated to the unit equals the Health characteristic of that unit, 1 model in that unit is slain (and removed from play) and the number of damage points allocated to that unit is reset to 0. Keep allocating damage points until there are none left in the damage pool.
If the number of damage points allocated to a unit is not enough to slay a model, keep track of the number of damage points currently allocated to the unit (most players place a dice or markers next to the unit). While a unit has any damage points allocated to it, it is damaged.
Each HERO’s battle profile lists which units can be added to their regiment, and each non-HERO unit’s battle profile lists any relevant keywords it has. The battle profiles of some HEROES may say that they can be added to the regiment of another HERO in place of a non-HERO unit in that regiment.
While some abilities allow you to take extra enhancements, the same unit can never have more than 1 enhancement of the same type, and you can never include the same enhancement in your army more than once. Enhancements cannot be given to Regiment of Renown units, unless they have a keyword that matches that faction’s name.
You can pick 1 prayer lore available to your faction. If you do, all PRIESTS in your army with the same faction keyword as your general know all prayers from that lore.
You can pick 1 manifestation lore available to your faction. If you do, all WIZARDS in your army know all spells from that lore, and all PRIESTS in your army know all prayers from that lore.
 Your Charge Phase Your Charge Phase |
Effect: That unit can move a distance up to the value of the charge roll. That unit can move through the combat ranges of any enemy units and must end that move within 1/2" of a visible enemy unit. If it does so, the unit using this ability has charged.
| KEYWORDS | CORE, MOVE, CHARGE |
If a rule or ability requires a target to be both within a given range of and visible to the unit using that ability, or to a model in that unit, both conditions must be met by the same model in the target. You could not, for instance, target a unit where one model is within range but not visible and another model is not in range but is visible.
| ||
| In some cases, it might not be immediately clear whether a model is visible. If so, stoop down to get a look from behind the observing model. If any part of the other model is visible, even if it is just the tip of a spear, then that model is visible for rules purposes. | ||
1. Determine the Active Player: If it is the first battle round, the player who finished setting up their army first decides who will take the first turn (unless otherwise specified in the battlepack or battleplan).
If it is not the first battle round, the players make a roll-off called the priority roll and the winner decides who will take the first turn. If the roll-off is a tie, the player who took the first turn in the previous battle round decides who will take the first turn in the current battle round.
When it is a player’s turn, regardless of whether they take the first or second turn, they are referred to as the active player.
2. Determine the Underdog: Whichever player has the fewest victory points is the underdog for the battle round. If the players are tied (e.g. in the first battle round), then there is no underdog, unless otherwise specified.
3. Start of Battle Round Abilities: The active player can use any
- That unit is only visible to enemy units that are within its combat range.
- The Range characteristic of that unit’s ranged weapons is halved (rounding down to the nearest inch).
If the unmodified casting roll includes 2 or more rolls of 1, the spell is miscast: the spell fails, its effect is not resolved, D3 mortal damage is inflicted on the WIZARD that used it, and that WIZARD cannot use any more spells in that phase.
Enemy reactions can only be used if the casting roll equals or exceeds the spell’s casting value. So long as the spell is not unbound (see 4.0), then it is successfully cast: resolve its effect.
| Your Hero Phase | 6 |
Effect: The target has WARD (6+) this turn.
| KEYWORDS | SPELL |
Otherwise, pick one of the following:
- Give a number of ritual points to the PRIEST equal to the chanting roll (ritual points can be accumulated over multiple turns).
- Add the PRIEST’s ritual points to the chanting roll. If the chanting roll equals or exceeds the prayer’s chanting value (at the top-right corner of the prayer), it is answered: resolve the effect of the prayer, then reset the PRIEST’s ritual points total to 0.
All PRIESTS know the following prayer:
| Your Hero Phase |
Effect: Give a number to ritual points to the PRIEST equal to the unmodified chanting roll and do not reset the PRIEST’s ritual points to 0.
| KEYWORDS | PRAYER, UNLIMITED |
 Once Per Battle, Your Hero Phase Once Per Battle, Your Hero Phase | 7 |
Effect: Pick a friendly INFANTRY HERO that has been slain and return them to the battlefield. Set up that HERO wholly within 3" of this PRIEST.
| KEYWORDS | PRAYER |
| Reaction: Opponent declared a SPELL ability |
Effect: Make an unbinding roll of 2D6. If the roll exceeds the casting roll tor the spell, then the spell is unbound and its effect is not resolved. This reaction cannot be used more than once per casting roll.
| KEYWORDS | UNBIND |
| Your Hero Phase |
Effect: If the banishment roll equals or exceeds the banishment value listed on the MANIFESTATION’s warscroll, it is banished and removed from play.
| KEYWORDS | BANISH |
| Once Per Turn (Army), Start of Any Turn |
Effect: Roll a dice. On a 1, inflict D3 mortal damage on that HERO. On a 2+, pick 1 of the following effects:
- Ignite Fury: Gain 2 rage dice, then increase your fury level by 2, to a maximum of 7.
- Channel Wrath: If that HERO is a WIZARD or PRIEST, add 1 to casting rolls or chanting rolls for that HERO for the rest of the turn.
- Dizzying Rage: For the rest of the turn, if that HERO is not a WIZARD or PRIEST, they can use the ’Unbind’ or ’Banish Manifestation’ ability as if they had WIZARD (1).
| KEYWORDS | CORE |
Terrain Abilities: Cover
Terrain Abilities: Cover, Place of Power, Unstable
- Starting with the active player, each player determines the control score of each of their units that is contesting that objective. A unit’s control score is the combined Control characteristics of all the models in that unit that are contesting the objective. Some abilities modify a unit’s control score, but it cannot be reduced to less than 1.
- Each player adds up the control scores of all of their units contesting that objective. This is their army control score for that objective.
- The players compare their army control scores for that objective. If one player’s score is higher, that player gains control of that objective. Once a player gains control of an objective, it remains under their control until their opponent gains control of it.
| Sometimes objective markers get accidentally nudged while you are moving models around. This is perfectly fine - just remember to put them back in their proper positions when determining objective control. | ||
- In the combat phase, they are treated as if they were units for the purposes of movement, combat range and being in combat.
- They are affected by all enemy abilities as if they were units.
- They can be damaged in the same manner as units. However, when they are removed from play, they count as being demolished instead of slain or destroyed (this means that they do not count as destroyed units for the purposes of abilities, scoring battle tactics, etc.).
- Enemy units can finish a charge move within ½" of a terrain feature that is garrisoned (see 1.5.1). Faction terrain features cannot contest objectives even while they are garrisoned.
- If a terrain feature has any melee or ranged weapons, it can use the 'Fight' and 'Shoot' CORE abilities as if it were a unit.
- Terrain features that have a Move characteristic of 0" ('-') cannot move (note that pile-in moves are a type of move).
- Faction terrain features with a Move characteristic greater than '-' are treated as if they were units in all phases for the purposes of movement, combat range, being in combat and setting up terrain features, other manifestations and other units.
Some faction terrain features allow you to place a unit on them (this will be clearly specified in that terrain feature’s rules). When doing so, instead of measuring range or visibility to and from the unit that is on that terrain feature, measure to and from the terrain feature instead. Unless otherwise specified, units on a faction terrain feature cannot use FIGHT abilities.
If a unit placed on a terrain feature is removed from it (e.g. if an ability removes them from the battlefield), that unit counts as having left that terrain feature and loses any special role or benefits it had as a result of being placed on it.
| The Citadel Terrain List shows the number of scenery pieces each terrain feature can consist of. If you are using terrain features that are not included on that list, agree with your opponent before setting up the battlefield how many scenery pieces make up each terrain feature. | ||
If the unit is in combat, it can only target units that are in combat with it. If a model has more than one attack, you can split the attacks between eligible targets as you wish.
- Combat attacks are made with melee weapons. The target unit(s) must be within the combat range of the attacking model and visible to it. The model must attack with all of the melee weapons it is armed with.
- Shooting attacks are made with ranged weapons. The target unit(s) must be within a distance equal to the Range characteristic of the weapon being used and visible to the attacking model. Models cannot make shooting attacks if their unit is in combat, unless otherwise specified (see 20.0 Weapon Abilities).
 Your Shooting Phase Your Shooting Phase |
Effect: Resolve shooting attacks against the target unit(s).
| KEYWORDS | CORE, ATTACK, SHOOT |
| Any Combat Phase |
Effect: Resolve combat attacks against the target unit(s).
| KEYWORDS | CORE, ATTACK, FIGHT |
Manifestations are not units but can be interacted with in similar ways, as explained next:
|
|
|
| End of Any Turn | 1 |
Effect: Inflict D3 mortal damage on the target. Then, the unit using this ability can move a distance up to its Move characteristic. It can pass through and end that move within the combat ranges of enemy units that were in combat with it at the start of the move, but not those of other enemy units. It does not have to end the move in combat.
| KEYWORDS | MOVE |
Contents • Overview | ||