
Tomb World
 01
01 Books
| Book | Kind | Edition | Version | Last update |
| | ||||
| | Expansion | 3 | 1.0 | August 2025 |
| Q: | When an operative teleports, is it treated as having moved for the purposes of rules with a distance requirement (e.g. BROOD BROTHER Alpha Predator, PLAGUE MARINE Lumbering Death, VESPID STINGWING Neutron Charge)? |
| A: | No. |
Joint Ops: Tomb World Mission Pack
This is a player vs environment (PvE) mission pack for cooperative or solo gameplay using Killzone: Tomb World terrain features. It involves a player or players battling together against a collection of NPOs (non-player operatives) as they make their way through a dormant Necron tomb. If playing cooperatively, you are still one ‘player’. This means you don’t double your CP, equipment selections, etc.; you must manage them between you.If you wish, one player can be the game master. They will manage the NPOs – move them, roll dice for them, etc. – while one or more other players control a kill team. The game master will still control the NPOs as the rules in this mission pack specify, they just take the pressure and decision-making away from the player(s) so they can focus on their own operatives and having fun!
Your kill team will fight against procedurally generated non-player operatives (known as NPOs). Unlike your highly trained operatives, NPOs are more basic Necron sentries, tasked with defending the tomb against any aggressors. As such, you don’t select a kill team for them. Instead, you use the appropriate datacards here and don’t select equipment for them.
MISSION
Here you will find six missions. There you will find mission generator with six killzone maps that can be used with any of the missions, increasing the variety each time you play it. You can randomly determine a map and mission by rolling, or by selecting the one that interested you most. When setting up the battle, don’t set up objective markers unless you are playing mission 3: Recover Transponder.KILL TEAM SELECTION
The player(s) use one kill team. If you are playing solo, simply select your kill team as normal. If you are playing cooperatively, either select a kill team as normal and split the operatives between you, or take half of any kill team each. If it’s an odd number, round up (or down for more of a challenge). If you’ve taken separate teams, remember that some rules specify certain operatives through keywords, so one kill team’s rules won’t necessarily interact with another’s.Your kill team will fight against procedurally generated non-player operatives (known as NPOs). Unlike your highly trained operatives, NPOs are more basic Necron sentries, tasked with defending the tomb against any aggressors. As such, you don’t select a kill team for them. Instead, you use the appropriate datacards here and don’t select equipment for them.
Threat Level
During each game you must manage the threat level. The lower the threat level, the more undetected your kill team is and the less NPOs you will have to deal with. The higher the threat level, the more the tomb world reacts to your presence and the more NPOs will be sent in response. The threat level starts at 0 and cannot exceed 15.
Increase the threat level by 1 whenever:
In addition:
Increase the threat level by 1 whenever:
- A player operative performs the Shoot action, unless the weapon being used has the Silent weapon rule.
- A player operative performs the Fight action, unless the NPO in that sequence is incapacitated and the player operative isn’t visible to any other enemy operatives.
- A player operative performs any other action that inflicts damage on NPOs.
- An NPO performs the Shoot or Fight action.
In addition:
- Whenever a player operative performs the Operate Hatch action, roll one D6: on a 4+, increase the threat level by 1.
- Whenever a player operative performs the Breach action, increase the threat level by 1 and roll one D6: on a 4+, increase the threat level by another 1.
|
Strategy Phase
When rolling off to decide who has initiative, roll one dice for the NPOs and one dice for the player(s). If the NPOs win the roll-off, they will always choose to have initiative. NPOs don’t gain any CP, but do use STRATEGIC GAMBITS as detailed below. NPOs will always pass after all their required STRATEGIC GAMBITS have been used.Tomb World Event Cards
As an NPO STRATEGIC GAMBIT in each Strategy phase after the first, if the threat level is grade 3, randomly draw a Tomb World event card. If the NPOs don’t have initiative, or the threat level is 15, do this twice per turning point instead.Tomb World event cards provide additional rules to add variety to the battle and increase the challenge – imagine them as NPO strategy ploys. Some apply rules that are resolved when the card is drawn, otherwise they apply rules that last until the end of the turning point (as specified on each card).
In the Ready step of each Strategy phase, shuffle all Tomb World event cards used in the previous turning point back into the deck.
NPO Reinforcements
As an NPO STRATEGIC GAMBIT in each Strategy phase after the first, after resolving Tomb World event cards, set up a number of NPO reinforcements equal to the grade of the current threat level. For each NPO reinforcement:- First determine the type of NPO – roll 2D6 and consult the table here.
- Then randomly determine which hatchway it phases in from (there are six hatchways, so assign each a number and roll one D6 – it doesn’t matter if the hatchway is closed).
- Set that NPO up with a Conceal order so the access point of that hatchway is within its control range (if this isn’t possible, then set it up as close as possible).
Dormant NPOs
Whenever the threat level is 0, the player(s) automatically have initiative and all NPOs are dormant. Dormant NPOs are expended and cannot be readied. When the threat level is no longer 0, all NPOs are readied and no longer dormant.Behaviour
Each NPO’s datacard has a behaviour that determines what they do. Each behaviour will specify what order they have when activated. Whenever an NPO would perform an action (including when counteracting), perform the first action it can do from its behaviour. If it cannot do any, it’s expended (or pass, in the case of counteracting).Difficulty
If you want to increase or decrease the difficulty of the missions, here are a few methods:- Change the number of NPOs being set up. Start with one more (or less), and whenever you set up NPO Reinforcements each Strategy phase, set up one more (or less).
- Change the type of NPOs being set up. Whenever you determine which NPO should be set up, roll an additional D6 and select the two results that are worse (or better!).
- Increase or decrease the number of Tomb World event cards each turning point, or remove some from the deck to increase the likelihood of ones that threaten your kill team more. These cards add an element of unpredictability to the game, therefore the player(s) may need to be more defensive to account for them, or can be more free if the threat of event cards is reduced.
Threat Principle
When making decisions for NPOs, use the threat principle: go with the option that’s worst for you. This can determine which ready NPO activates, how an NPO moves, shoots and fights, how to resolve their dice, etc. There are a few examples below (containing decisions in order of priority) that you can use as a guide, but if one option feels worse for you – in particular to stop you winning the mission – go with that. If you still cannot decide, randomly choose one.
1. Can perform the Shoot or Fight action (as determined by its behaviour), and is the most threatening to do so (e.g. is more likely to incapacitate an enemy operative, is more likely to prevent the player(s) winning, etc.).
2. Is not in cover from a player operative.
3. Is closer to a player operative.
1. More likely to prevent the player(s) winning.
2. Better able to perform the Charge, Shoot, or Fight action (as determined by the higher priority of the NPOs behaviour).
3. Not a valid target.
1. Is more likely to incapacitate.
2. Is more likely to help the player(s) win.
3. Is ready.
1. Is more likely to incapacitate.
2. Is not obscured.
3. Is not in cover.
4. Is closest.
5. Is ready.
Activation Priority
Multiple NPOs are ready, so the player(s) activate the NPO that:1. Can perform the Shoot or Fight action (as determined by its behaviour), and is the most threatening to do so (e.g. is more likely to incapacitate an enemy operative, is more likely to prevent the player(s) winning, etc.).
2. Is not in cover from a player operative.
3. Is closer to a player operative.
Setting Up NPOs
NPOs must be set up as specified by the mission, but if there are multiple valid options, the player(s) set up each NPO so that it’s:1. More likely to prevent the player(s) winning.
2. Better able to perform the Charge, Shoot, or Fight action (as determined by the higher priority of the NPOs behaviour).
3. Not a valid target.
Fight action
An NPO performs the Fight action and multiple player operatives are within its control range. It fights the player operative that:1. Is more likely to incapacitate.
2. Is more likely to help the player(s) win.
3. Is ready.
Shoot action
An NPO performs the Shoot action and multiple player operatives are valid targets. It shoots the player operative that:1. Is more likely to incapacitate.
2. Is not obscured.
3. Is not in cover.
4. Is closest.
5. Is ready.
NPO Datacards
Kill Team: Tomb World
provides miniatures for Necron Warrior, Canoptek Scarab Swarm, Canoptek Macrocyte and Canoptek Tomb Crawler NPOs.Whenever the mission tells you to set up an NPO, randomise which one by rolling 2D6 and consulting the NPO table below. If you don’t have a miniature for an NPO you need to set up, use the next row instead.
|
NPO Limit
We recommend limiting the number of NPOs in the killzone at once to 10 – don’t set up any that would exceed this limit. 2
2 6"
6" 5
5 10
10NAME | ATK | HIT | DMG | WR | ||
| Feeder mandibles | ||||||
| Feeder mandibles | 5 | 4+ | 1/2 | - | ||
Behaviour:
2. Charge the closest player operative via the shortest possible route.
3. Reposition towards the closest player operative, to cover if possible (a subsequent Dash action can fulfil this, if able).
4. Dash towards the closest player operative, to cover if possible
This NPO will move towards the enemy to fight them, but will seek cover on its way. When activated, if it can perform either of its first two actions during that activation, give it an Engage order. If it cannot, give it a Conceal order. It will perform the Operate Hatch action where necessary to fulfil its behaviour.
1. Fight.2. Charge the closest player operative via the shortest possible route.
3. Reposition towards the closest player operative, to cover if possible (a subsequent Dash action can fulfil this, if able).
4. Dash towards the closest player operative, to cover if possible
|
|
⌀40mm |
NAME | ATK | HIT | DMG | WR | ||||
| Gauss flayer | ||||||||
| Gauss flayer | 4 | 4+ | 3/4 | Piercing 1 | Piercing 1 | |||
| Gauss reaper | ||||||||
| Gauss reaper | 4 | 3+ | 3/4 | Range 8", Piercing 1 | Range 8", Piercing 1 | |||
| Combat attachment | ||||||||
| Combat attachment | 3 | 4+ | 3/4 | - | ||||
Behaviour: This NPO will move to an ideal position to shoot the enemy, but will fight if it can’t do anything else. When activated, if it will perform the Shoot or Fight action during that activation, give it an Engage order. If it cannot, give it a Conceal order. It will perform the Operate Hatch action where necessary to fulfil its behaviour.
1. Fall Back. If possible, to a location where there’s a valid target that isn’t obscured. If not, to a location that’s appropriate for the NPOs to better win the mission.
2. Shoot.
3. Reposition. If possible, to a location where there’s a valid target that isn’t obscured. If not, to a location that’s appropriate for the NPOs to better win the mission (a subsequent Dash action can fulfil these, if able).
4. Dash. If possible, to a location where there’s a valid target that isn’t obscured. If not, to a location that’s appropriate for the NPOs to better win the mission.
5. Fight.
|
|
⌀32mm |
NAME | ATK | HIT | DMG | WR | ||||
| Twin gauss reapers (focused) | ||||||||
| Twin gauss reapers (focused) | 5 | 4+ | 4/5 | Piercing 1, Punishing | Piercing 1, Punishing | |||
| Twin gauss reapers (sweeping) | ||||||||
| Twin gauss reapers (sweeping) | 4 | 4+ | 4/5 | Piercing 1, Punishing, Torrent 1" | Piercing 1, Punishing, Torrent 1" | |||
| Transdimensional isolator | ||||||||
| Transdimensional isolator | 5 | 4+ | 5/6 | Dimensional Banishment* | Dimensional Banishment* | |||
| Claws | ||||||||
| Claws | 4 | 4+ | 4/4 | Brutal | Brutal | |||
Behaviour: This NPO will fight if necessary, but if it isn’t within control range of an enemy operative it will move to an ideal position to shoot the enemy. When activated, if it will perform the Fight or Shoot action during that activation, give it an Engage order. If it cannot, give it a Conceal order. It will perform the Operate Hatch action where necessary to fulfil its behaviour. Finally, if it has twin gauss reapers, it will always use the sweeping profile if it would target more than one player operative.
1. Fight.
2. Shoot.
3. Reposition. If possible, to a location where there's a valid target that isn't obscured. If not, to a location that's appropriate for the NPOs to better win the mission (a subsequent Dash action can fulfil these, if able).
4. Dash. If possible, to a location where there's a valid target that isn't obscured, if not, to a location that's appropriate for the NPOs to better win the mission.
Weapon Sentinel: Whenever you’re selecting a valid target, if this operative has a Conceal order, it cannot use Light terrain for cover. While this can allow this operative to betargeted (assuming it’s visible), it doesn’t remove its cover save (if any).
Steadfast: Whenever determining control of a marker, you can treat this operative’s APL stat as 3. If you do, this takes precedence over all other rules, meaning any changes to its APL stat are ignored for this.
*Dimensional Banishment: After this operative uses this weapon, if you inflicted damage or retained any critical successes, if the target wasn’t incapacitated, roll 2D6: if the result is higher than the target’s remaining wounds, the target is incapacitated.
|
|
⌀50mm |
NAME | ATK | HIT | DMG | WR | ||||
| Gauss scalpel | ||||||||
| Gauss scalpel | 4 | 4+ | 3/4 | Piercing 1 | Piercing 1 | |||
| Tesla caster (focused) | ||||||||
| Tesla caster (focused) | 5 | 4+ | 2/3 | - | ||||
| Tesla caster (living lightning) | ||||||||
| Tesla caster (living lightning) | 5 | 4+ | 2/3 | Blast 2" | Blast 2" | |||
| Claws & tail | ||||||||
| Claws & tail | 4 | 4+ | 3/4 | - | ||||
Aggressive Defence Construct: If this operative is incapacitated by an enemy operative within 2" of it, roll one D3: on a 2+, inflict damage on that enemy operative equal to the result.
Behaviour: This NPO will fight if necessary, but if it isn’t within control range of an enemy operative it will move to an ideal position to shoot the enemy. When activated, if it will perform the Fight or Shoot action during that activation, give it an Engage order. If it cannot, give it a Conceal order. It will perform the Operate Hatch action where necessary to fulfil its behaviour. Finally, if it has a tesla caster, it will always use the living lightning profile if it would target more than one player operative and no NPOs.
1. Fight.
2. Shoot.
3. Reposition. If possible, to a location where there’s a valid target that isn’t obscured. If not, to a location that’s appropriate for the NPOs to better win the mission(a subsequent Dash action can fulfil these, if able).
4. Dash. If possible, to alocation where there’s a valid target that isn’t obscured. If not, to alocation that’s appropriate for the NPOs to better, win the mission.
|
|
⌀28mm |
Game Sequence
1. SET UP THE BATTLE
- Select a kill team – or half of two kill teams – and split the operatives between you, as described on pg 60.
- Determine the mission.
- Determine a map from pgs 78–80 and set up the killzone using Killzone: Tomb World, placing terrain features as specified by the mission map. Unless you are playing mission 3: Recover Transponder, don’t set up objective markers.
- For the mission map (for territory, killzone edges, etc.), the players are ‘Player A’ and NPOs are ‘Player B’ (see Kill Team Core Book).
2. SELECT OPERATIVES
- The player(s) select their operatives for the battle, adhering to the selection requirements in their kill team’s rules.
- The player(s) select up to four equipment options (four in total, not four per player).
- Each option cannot be selected more than once. Don’t select equipment for NPOs.
- The player(s) gain 2CP (two in total, not two per player). NPOs don’t gain any CP.
3. SET UP OPERATIVES
- The player(s) set up all their equipment that’s set up before the battle (ladders, etc.).
- NPOs are set up first (excluding mission 5: Scout Sub-crypt). The location and how many are specified by the mission. Determine each type of NPO by rolling 2D6 and consulting the table here.
- The player(s) then set up their operatives. Each operative must be wholly within Player A’s drop zone and must be given a Conceal order.
4. PLAY THE BATTLE
- In the first turning point, the player(s) have initiative.
5. END THE BATTLE
- The battle ends when the mission specifies.
- The mission’s victory conditions will specify how to determine the winner
Joint Ops: Tomb World Mission 01
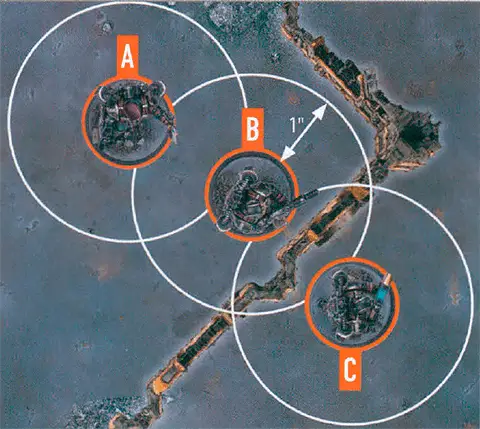
Shifting Labyrinth
The eldritch lairs of the ancient Necrons are mazes of death, whose shifting geometries can overwhelm the unwary. Kill teams with highly advanced augury technology or finely honed instincts are forced to constantly reassess their routes, or else be trapped while the tomb’s hunting inhabitants close in.MISSION RULES
NPOs: Set up 2D3+3 NPOs wholly within Player B’s territory with a Conceal order. Spread each of them out evenly across that territory with intervening terrain within their control range when viewed from Player A’s drop zone.Escape: In the Set Up Operatives step, place an Escape marker in the center of Player B’s killzone edge. Player operatives can move over that killzone edge while within 1" of the Escape marker; if any part of their base does, they are removed from the killzone and have escaped.
Auspex Calibration: As a STRATEGIC GAMBIT in each turning point after the first, if no operatives have escaped yet, roll one D3. If the result is:
1, move the Escape marker D3+3" left along the killzone edge.
2, don’t move the Escape marker.
3, move the Escape marker D3+3" right along the killzone edge.
This can cause the Escape marker to move around a corner onto a different killzone edge. If terrain would prevent the Escape marker from being placed, continue moving it in the same direction until you can place it.
VICTORY
When all player operatives have been removed from the killzone, the battle ends. If half or more player operatives have escaped, the player(s) win. Otherwise, the player(s) lose.Start New Game
Joint Ops: Tomb World Mission 02
Demolition Protocol
Orders have been received to blast a swathe of destruction through this section of the tomb complex. Whether the kill team aim to blow a stable route through the perplexing corridors, undermine overhead strata or destroy a key location, they advance with specialist munitions prepared.MISSION RULES
NPOs: Set up 2D3+3 NPOs wholly within Player B’s territory with a Conceal order. Spread each of them out evenly across this territory with intervening terrain within their control range when viewed from Player A’s drop zone.Sabotage: Player operatives can perform the Breach action while the access point of a hatchway is within their control range (instead of a breach point, and even if that hatchway is open).
If they do, open that hatchway (unless it’s already open), and the Operate Hatch action cannot close it for the rest of the battle.
VICTORY
- If seven or more breach point/hatchway terrain features are open and the Breach action has been performed on at least seven of them, the battle ends and the player(s) win.
- If every player operative is incapacitated, the battle ends and the player(s) lose.
Start New Game
Joint Ops: Tomb World Mission 03
Recover Transponder
Hidden in some cryptic vault or fallen from the dead hands of one of the tomb’s victims, a vital artefact throws out an echoing signal. It must be located and securely extracted, but the maddening refractions of the tomb cause the signal to scatter, masking its true location.MISSION RULES
Objective Markers: When setting up the battle, set up three objective Markers as the mission map specifies.NPOs: Set up 2D3+3 NPOs wholly within Player B’s territory with a Conceal order. Spread each of them out evenly across the rooms that contain an objective marker, with intervening terrain within their control range when viewed from Player A’s drop zone.
Locate Item: Player operatives can perform the Pick Up Marker action on each objective marker. Whenever a player operative does, if the item hasn’t been found, roll one D3:
- If the result is higher than the number of other objective markers in the battle, the item has been found. Remove all other objective markers from the battle (if any), and that operative is now carrying that marker as normal.
- If the result is equal to or less than the number of other objective markers in the battle, the item hasn’t been found. Remove that objective marker from the battle (the operative is not carrying it, but has still performed that action).
Escape: Player operatives can move over Player A’s killzone edge; if any part of their base does, they are removed from the killzone and have escaped.
VICTORY
- If a player operative carrying the objective marker escapes, the battle ends and the player(s) win.
- If every player operative is incapacitated, the battle ends and the player(s) lose.
Start New Game
Joint Ops: Tomb World Mission 04
Destroy Sarcophagus
Hacked data-streams have led the tomb’s invaders to a damaged stasis-crypt, the faltering systems of which are threatening to waken its occupant. The tomb’s servants are engaged in repairing the stasis-crypt, staunchly defending the noble’s Great Sleep whilst also ensuring it does not wake to prematurely upset the balance of power. The kill team, however, are set on a more terminal solution.MISSION RULES
NPOs: Set up D3+6 NPOs wholly within Player B’s territory with a Conceal order. Set up half of them (rounding down) within the room that contains the sarcophagus (C1) terrain feature. Spread the remainder out evenly across the other rooms. Each NPO should have intervening terrain within their control range when viewed from Player A’s drop zone.Sarcophagus: The sarcophagus is treated as an objective marker. Player operatives can perform the Breach action while the sarcophagus (C1) is within their control range (instead of a breach point). If they do, instead of resolving that action’s effects, that sarcophagus gains 2D6 Destruction points.
Nanoscarab Repair: In the Ready step of each Strategy phase, roll one D6, subtract 1 from the result (to a minimum of 0) for each player operative that has the sarcophagus (C1) within its control range: remove Destruction points from the sarcophagus equal to the result (to a minimum of 0).
VICTORY
If the sarcophagus (C1) has 20 or more Destruction points, the battle ends and the player(s) win.If every player operative is incapacitated, the battle ends and the player(s) lose.
Start New Game
Joint Ops: Tomb World Mission 05
Scout Sub-Crypt
A seemingly innocuous annexe is discovered. The threat this sub-crypt poses to wider missions must be ascertained and any dangers ruthlessly purged. As the aggressive exploration unfolds, however, lurking constructs and awakening guardians are triggered at every turn.MISSION RULES
NPOs: Don’t set up any NPOs. Instead, excluding rooms within Player A’s drop zone, the first time each room is opened, or the first time a player operative is within it (whichever comes first), set up D3+X NPOs (to a maximum of 5) with a Conceal order. Spread each of them out evenly wholly within that room, more than 2" from other operatives (if possible). x is the grade of the current threat level.Dormant: Whenever a player operative performs the Operate Hatch action, don’t increase the threat level.
Scout: Player operatives can perform the following mission action:
SCOUT ROOM1AP
The room the operative is in is scouted. Decrease the current threat level to the highest level of the grade below.
An operative cannot perform this action while within control range of an enemy operative, or if the current threat level is 0. It cannot perform this action if that room has any NPOs in it, if that room has already been scouted, or if that room is within Player A’s drop zone.
VICTORY
If three rooms are scouted, the battle ends and the player(s) win. Note that rooms within Player A’s drop zone cannot be scouted.If every player operative is incapacitated, the battle ends and the player(s) lose.
Start New Game
Joint Ops: Tomb World Mission 06
Regroup
The tomb’s invaders are scattered throughout the ever-shifting tomb. Flickering energies and scuttling scarabs seal once open routes. Passage walls phase in and out of being. Arcane translocations swallow warriors whole before disgorging them in unknown locations. The kill team must fight through the confounding eldritch mechanisms to regroup, or be eternally lost amidst the insane architecture.MISSION RULES
NPOs: Set up 2D3+3 NPOs wholly within Player B’s territory with a Conceal order. Spread each of them out evenly across this territory with intervening terrain within their control range when viewed from Player A’s drop zone.Access Denied: Player operatives cannot:
- Be set up before the battle in a location other than Player A’s drop zone (e.g. TEMPESTUS AQUILON operatives).
- Be removed from the killzone and set up again in a different room (e.g. MANDRAKE and RAVENER operatives), but they can be removed and set up again in the same room.
Phasing Points: Operatives cannot perform the Operate Hatch action during the Dash or Reposition action. Whenever a player operative moves through a hatchway’s access point, remove that operative from the killzone. Randomly determine an open hatchway and set it back up within x" of that hatchway’s access point. X is the remaining distance move that operative had from that action. The operative can be set up within control range of an enemy operative if that is the only way it’s possible, and it doesn’t have to finish the Charge action within control range of an enemy operative if it cannot. If it isn’t possible to set them up (e.g. there’s no space), randomly determine an open hatchway again until it is.
VICTORY
At the end of each turning point, the battle ends and the player(s) win if all of the following are true of each player operative in the killzone:- It’s wholly within Player B’s drop zone.
- It’s not within control range of NPOs.
- It’s within 3" of at least one other player operative.
Start New Game
Tombs Beyond Counting
In the spirit of exploring the locations of the 41st Millennium, the following pages offer an expansion for Tomb World Joint Ops and Adversary Ops mission packs. Included are new event cards and NPO (non-player operative) datacards that can be played using miniatures from your own collection. They represent the various idiosyncrasies and horrors of the Necron dynasties, a variety of tomb world environments and some of the different fates the inhabitants of these tomb worlds suffered during the Great Sleep.
Extra Cards!
In the Joint Ops: Tomb World mission pack, the NPO STRATEGIC GAMBITS are Tomb World event cards. There are three new event cards in this issue’s card section to add to your deck.Flayer Curse Infected Tomb
Tomb worlds on which the flayer curse has a grip can rapidly descend into dens of madness and butchery As the curse claims their sanity, an afflicted Necron will exhibit an insatiable desire to acquire gruesome trophies of flesh and bone. The living metal of its body becomes corrupted distorting it into a hunched and clawed abomination It even finds itself compelled to feast upon its victims the cursed being heedless of the fact that it is incapable of eating anything - meaning its exoskeleton clogs with gore, blood pooling at its feet.
While Flayed Ones typically disappear into charnel pocket dimensions and sane Necrons - fearing supernatural infection - often drive them away, there are tombs which are saturated with the curse. These haunted catacombs become littered with piles of rotten meat and disintegrating bones accumulated from the Flayed Ones’ victims You can evoke some of this grim atmosphere in your own Tomb World killzone, perhaps adding representations of flayed flesh and spatters of gore to the glyph-inscribed walls, or some skulls - maybe with gnaw marks! - to forgotten corners, all of which can show the Necrons’ descent into the horrifying insanity of the flayer curse.
The following datacard for Flayed Ones can be used in place of any Necron Warrior NPOs the mission pack calls for (including from event cards), and the Flesh Hunger event card (see card section) can be added to your deck of Tomb World event cards while playing.
NAME | ATK | HIT | DMG | WR | ||||
| Flayer claws | ||||||||
| Flayer claws | 4 | 3+ | 4/5 | Ceaseless, Rending | Ceaseless, Rending | |||
Horrifying Flaying: Whenever this NPO incapacitates a player operative while fighting or retaliating, select one other player operative visible to and within 3" of either this NPO or the incapacitated player operative and roll one D6; on a 3+, subtract 1 from that other player operative’s APL stat until the end of its next activation.
Behaviour:
2. Charge the closest player operative via the shortest possible route.
3. Reposition towards the closest player operative, to cover if possible (a subsequent Dash action can fulfil this, if able).
4. Dash towards the closest player operative, to cover if possible
This NPO will move towards the enemy to fight them, but will seek cover on its way. When activated, if it can perform either of its first two actions during that activation, give it an Engage order. If it cannot, give it a Conceal order. It will perform the Operate Hatch action where necessary to fulfil its behaviour.
1. Fight.2. Charge the closest player operative via the shortest possible route.
3. Reposition towards the closest player operative, to cover if possible (a subsequent Dash action can fulfil this, if able).
4. Dash towards the closest player operative, to cover if possible
|
|
⌀28mm |
Destroyer Cult Tomb
The murder-madness of the Destroyer Cults fills them with a nihilistic compulsion to exterminate all life. They eschew any ambitions - both for themselves and their dynasties - beyond this, seeking only opportunities to kill and to become ever more efficient at doing so. Where this obsessive mania comes from, the Necrons do not know, though many nobles believe it may be infectious, and fear who the Destroyers will turn their murderous drive upon when all organic victims are slain. For these reasons, a tomb’s Destroyers are kept apart from other Necrons, banished to dwell in outskirt districts or isolated fortresses. There are tombs, however, where Destroyer Cults have risen to prominence, and their death- fixated nobility enforce their rule over a dynasty’s protocols.
Destroyers have no intellect or emotion to spare upon what they consider irrelevancies. Regal magnificence, gilded holo-tapestries and sculpted icons proclaiming dynastic power are deemed worthless in comparison to adapting the Destroyers’ bodies for efficient execution. You can show this in your Tomb World killzone by adding battle damage and broken trophies that have gone unrepaired, or adding gouges across some of the more decadent glyphs to represent manic outbursts of frenzied violence by the afflicted Necrons.
The following datacards for Skorpekh Destroyers and Hexmark Destroyers can be used in place of any Canoptek Tomb Crawler NPOs the mission pack calls for, and the Rewards of Annihilation event card (see card section) can be added to your deck of Tomb World event cards while playing.
NAME | ATK | HIT | DMG | WR | ||||
| Skorpekh hyperphase weapons | ||||||||
| Skorpekh hyperphase weapons | 4 | 3+ | 4/6 | Balanced, Lethal 5+, Whirling Onslaught* | Balanced, Lethal 5+, Whirling Onslaught* | |||
*Whirling Onslaught: Whenever this NPO is fighting or retaliating with this weapon, each time it strikes with a critical success, also inflict D3 damage on each other player operative within this NPO’s control range.
Hulking: Whenever player(s) are selecting a valid target, if this NPO has a Conceal order, it cannot use Light terrain for cover. While this can allow this NPO to be targeted (assuming it’s visible), it doesn’t remove its cover save (if any).
Behaviour:
2. Charge the closest player operative via the shortest possible route.
3. Reposition towards the closest player operative, to cover if possible (a subsequent Dash action can fulfil this, if able).
4. Dash towards the closest player operative, to cover if possible
This NPO will move towards the enemy to fight them, but will seek cover on its way. When activated, if it can perform either of its first two actions during that activation, give it an Engage order. If it cannot, give it a Conceal order. It will perform the Operate Hatch action where necessary to fulfil its behaviour.
1. Fight.2. Charge the closest player operative via the shortest possible route.
3. Reposition towards the closest player operative, to cover if possible (a subsequent Dash action can fulfil this, if able).
4. Dash towards the closest player operative, to cover if possible
|
|
⌀28mm |
NAME | ATK | HIT | DMG | WR | ||||
| Enmitic disintegrator pistols (focused) | ||||||||
| Enmitic disintegrator pistols (focused) | 5 | 4+ | 3/2 | Range 9", Ceaseless, Devastating 2, Piercing 1, Saturate | Range 9", Ceaseless, Devastating 2, Piercing 1, Saturate | |||
| Enmitic disintegrator pistols (sweeping) | ||||||||
| Enmitic disintegrator pistols (sweeping) | 5 | 4+ | 3/2 | Range 9", Devastating 2, Piercing 1. Saturate, Torrent 2" | Range 9", Devastating 2, Piercing 1. Saturate, Torrent 2" | |||
| Enmitic disintegrator pistols (point-blank) | ||||||||
| Enmitic disintegrator pistols (point-blank) | 5 | 3+ | 3/4 | - | ||||
Multi-Threat Eliminator: Whenever a player operative within 8" of this NPO is shooting it, keep track of each attack dice that’s discarded as a tail. After the action, before incapacitated operatives are removed (including this one, if relevant), this NPO can perform a free Shoot action (you can change its order to Engage to do so), but it can only target that player operative with its enmitic disintegrator pistols (focused), and you only roll a number of attack dice equal to the opponent’s discarded attack dice plus one (to a maximum of four).
Behaviour: This NPO will move to an ideal position to shoot the enemy, but will fight if it can’t do anything else. When activated, if it will perform the Shoot or Fight action during that activation, give it an Engage order. If it cannot, give it a Conceal order. It will perform the Operate Hatch action where necessary to fulfil its behaviour.
1. Fall Back. If possible, to a location where there’s a valid target that isn’t obscured. If not, to a location that’s appropriate for the NPOs to better win the mission.
2. Shoot.
3. Reposition. If possible, to a location where there’s a valid target that isn’t obscured. If not, to a location that’s appropriate for the NPOs to better win the mission (a subsequent Dash action can fulfil these, if able).
4. Dash. If possible, to a location where there’s a valid target that isn’t obscured. If not, to a location that’s appropriate for the NPOs to better win the mission.
5. Fight.
1. Fall Back. If possible, to a location where there’s a valid target that isn’t obscured. If not, to a location that’s appropriate for the NPOs to better win the mission.
2. Shoot.
3. Reposition. If possible, to a location where there’s a valid target that isn’t obscured. If not, to a location that’s appropriate for the NPOs to better win the mission (a subsequent Dash action can fulfil these, if able).
4. Dash. If possible, to a location where there’s a valid target that isn’t obscured. If not, to a location that’s appropriate for the NPOs to better win the mission.
5. Fight.
|
|
⌀50mm |
Crownworld of The Dynasty Tomb
At the heart of each dynasty’s claimed territory ties their crownworld, a regal display of unimaginable power and influence - at least, such was the case millions of years in the past. Now, many are faded and crumbling grottos, though still redolent of eldritch might and harbouring artefacts far in advance of other species. Each crown world’s tomb is the seat of its phaeron’s power and majesty - a cosmic fortress that holds the highest echelons of the dynasty and their most trusted guards and advisors.
The crypts of crownworlds can be represented in your Tomb World killzone by emphasising the regality of details in its terrain, such as painting conduits in vivid colours to depict especially potent alien energies, or touches of unusual metallic hues. You could also remove rubble or add scuttling Scarabs onto damaged sections to represent how dedicated the tomb’s master programme and Canoptek constructs are to restoring the realm to the nobles’ ideals of domineering supremacy.
The first time you would set up a Canoptek Tomb Crawler NPO, instead set up a Royal Warden NPO and then a Lychguard NPO with either a hyperphase sword or warscythe within the Royal Warden NPOs control range. The datacards for each can be found below. Whenever the Awakened Warrior event card is drawn from the event card deck, you can set up a Lychguard NPO with either melee weapon instead of a Necron Warrior NPO. The Enforcer of the Phaerons event card (see card section) can be added to your deck of Tomb World event cards while playing.
NAME | ATK | HIT | DMG | WR | ||||
| Relic gauss blaster | ||||||||
| Relic gauss blaster | 4 | 3+ | 4/6 | Lethal 5+, Piercing 1 | Lethal 5+, Piercing 1 | |||
| Bayonet | ||||||||
| Bayonet | 4 | 3+ | 3/4 | - | ||||
Engrammatic Logic: Whenever an NPO is within 6" of this NPO you can ignore any changes to that NPO’s stats from being injured (including its weapons stats).
Behaviour: This NPO will move to an ideal position to shoot the enemy, but will fight if it can’t do anything else. When activated, if it will perform the Shoot or Fight action during that activation, give it an Engage order. If it cannot, give it a Conceal order. It will perform the Operate Hatch action where necessary to fulfil its behaviour.
1. Fall Back. If possible, to a location where there’s a valid target that isn’t obscured. If not, to a location that’s appropriate for the NPOs to better win the mission.
2. Shoot.
3. Reposition. If possible, to a location where there’s a valid target that isn’t obscured. If not, to a location that’s appropriate for the NPOs to better win the mission (a subsequent Dash action can fulfil these, if able).
4. Dash. If possible, to a location where there’s a valid target that isn’t obscured. If not, to a location that’s appropriate for the NPOs to better win the mission.
5. Fight.
1. Fall Back. If possible, to a location where there’s a valid target that isn’t obscured. If not, to a location that’s appropriate for the NPOs to better win the mission.
2. Shoot.
3. Reposition. If possible, to a location where there’s a valid target that isn’t obscured. If not, to a location that’s appropriate for the NPOs to better win the mission (a subsequent Dash action can fulfil these, if able).
4. Dash. If possible, to a location where there’s a valid target that isn’t obscured. If not, to a location that’s appropriate for the NPOs to better win the mission.
5. Fight.
|
|
⌀32mm |
NAME | ATK | HIT | DMG | WR | ||||
| Hyperphase sword | ||||||||
| Hyperphase sword | 4 | 3+ | 4/6 | Lethal 5+, Shield* | Lethal 5+, Shield* | |||
| Warscythe | ||||||||
| Warscythe | 4 | 3+ | 5/7 | Lethal 5+ | Lethal 5+ | |||
*Shield: Whenever this operative is fighting or retaliating with this weapon, each of your blocks can be allocated to block two unresolved successes (instead of one).
Behaviour: This NPO will stay close to the Royal Warden unless the enemy is close enough to charge or fight. If it can perform either of its first two actions during that activation, or if it can end the activation with a Royal Warden that has an Engage order within its control range, give it an Engage order. If it cannot, give it a Conceal order. It will perform the Operate Hatch action where necessary to fulfil its behaviour.
1. Fight.
2. Charge the closest player operative via the shortest possible route.
3. Reposition towards the Royal Warden NPO, to cover if possible (a subsequent Dash action can fulfil this, if able). If the Royal Warden NPO isn’t in the killzone, Reposition towards the closest player operative (following the same conditions).
4. Dash towards the Royal Warden NPO, to cover if possible. If the Royal Warden NPO isn’t in the killzone, Dash towards the closest player operative (following the same conditions).
|
|
⌀32mm |
Adversary Ops: Tomb World Mission Pack
This is a player vs player (PvP) mission pack for head-to-head gameplay using Killzone: Tomb World or Killzone: Gallowdark. While players battle one another, they must also contend with NPOs (non-player operatives) — 3rd party adversaries that will attack either player and disrupt the battle. The players will have to adapt their game plan to manage the threats NPOs pose.This mission pack also provides rules for Tomb World event cards. Use as much as you feel is appropriate – if you think all the extra rules would be too much, feel free to ignore certain parts of this mission pack, or ignore certain parts of the mission pack you’re using it with (e.g. tac ops and selecting a primary op in Approved Ops).
Maps
In Tomb World Maps, you’ll find three maps to use with this mission pack (ignore maps 4–6). You can roll one D3 to randomly determine a map, or select the one that interests you most. Alternatively, you can use PvP maps designed for Killzone: Tomb World or Killzone: Gallowdark, such as those found in Approved Ops (available separately).NPOs
Excluding rooms within drop zones, the first time each room is opened, or the first time a player operative is within it (whichever comes first), determine the NPOs within that room as follows:1. Roll one D3 to determine how many.
2. Roll 2D6 for each NPO to determine what type it is using the table in NPO Datacards section.
3. Starting with the player that opened the room, each player alternates setting up an NPO within that room until they’ve all been set up.
4. Each NPO should be set up ready with a Conceal order, more than 2" from other operatives (if possible).
Strategy Phase
NPOs don’t gain any CP. In each Strategy phase after the first, NPOs have the two STRATEGIC GAMBITS detailed below. NPOs are first in the alternating order, and NPOs will always pass after both of their required STRATEGIC GAMBITS have been used.Tomb World Event Cards
For the first NPO STRATEGIC GAMBIT, shuffle all used Tomb World event cards back into the deck, then randomly draw a new one.NPO Reinforcements
For the second NPO STRATEGIC GAMBIT, the player who didn’t win the initiative roll-off sets up one NPO reinforcement. That player rolls 2D6 to determine the type of NPO using the table. They then set that NPO up ready with a Conceal order so that a randomly determined hatchway’s access point is within its control range (there are six hatchways, so assign each a number and roll one D6 – it doesn’t matter if the hatchway is closed).VPs
For the purposes of incapacitating enemy operatives for VPs (e.g. the kill op, tac ops, etc.), ignore NPOs. This means you cannot score VPs for incapacitating them, but also your opponent cannot score VPs when an NPO incapacitates one of your operatives. Note this means that friendly operatives incapacitated by NPOs are not counted towards your opponent’s kill grade.NPO Activation
Once NPOs have been discovered and set up, they will activate. After the final player activates, but before the first player activates again, one ready NPO will activate. In other words, they activate last in the alternating sequence. If there are multiple ready NPOs, the players roll-off and the winner decides which will activate. When it activates, use its behaviour and the threat principle (explained opposite). NPOs cannot counteract. The turning point ends once all the players’ operatives and the NPOs are expended.Behaviour
Each NPO’s datacard has a behaviour that determines what they do. Each behaviour will specify what order they have when activated. Whenever an NPO would perform an action, perform the first action it can do from its behaviour. If it cannot do any, it’s expended.Threat Principle
The threat principle is used when making decisions for activated NPOs (who to charge, fight, shoot etc.). However, it differs in this mission pack from the Joint Ops mission pack, as there will rarely be an option that’s equally worse for both players. Instead, whenever an NPO activates, the closest player operative it could fight/shoot/move towards (as determined by the NPO’s behaviour) is the NPO’s target. If multiple players’ operatives are equally as close, roll-off and the winner decides. The opponent of the player who controls the NPO’s target will control the NPO for that activation, and they must make every effort to fight/shoot/move the NPO so that it threatens its target (as determined by its behaviour).The threat principle is also used when making decisions for Tomb World event cards (setting up new NPOs, etc.). Whenever you must make such a decision, roll-off and the winner decides. If multiple decisions would be required (e.g. multiple breach points/hatchways would be closed, as per the Maze Reforms event card), alternate making the decision, starting with the player that won the roll-off.
Mission generator
Start New Deck
Generate Mission
Selected Tac Ops
Archetype Tac Ops
Tomb World Cards
Tomb World All Event Card
Tomb World Event Card
Dark Of The Tomb
Whenever a player operative is shooting an operative more than 8" from it, attack dice cannot be re-rolled.
Tomb World Event Card
The Maze Reforms
One random open breach point and D3 random open hatchways close (taking precedence over the normal breach point rules).
If none can be closed, draw a different event card.
If none can be closed, draw a different event card.
Tomb World Event Card
Awakened Warrior
Set up a ready Necron Warrior NPO with a Conceal order with a terrain feature within its control range that has a Necron Warrior modelled onto it (i.e. wall end or the relevant side of A2).
If you can’t (e.g. NPO limit is reached), draw a different event card.
If you can’t (e.g. NPO limit is reached), draw a different event card.
Tomb World Event Card
A Chittering Drone
If no Canoptek Scarab Swarm NPOs are in the killzone, set one up ready with a Conceal order in a location it can be placed so that:
If a wounded Canoptek Scarab Swarm NPO is already in the killzone, it regains all lost wounds.
If you cannot do either of the above, draw a different event card.
- In Joint Ops, the access point of a random hatchway is within its control range and that NPO is wholly within NPO territory.
- In Adversary Ops, it is as near a random objective marker within its control range.
If a wounded Canoptek Scarab Swarm NPO is already in the killzone, it regains all lost wounds.
If you cannot do either of the above, draw a different event card.
Tomb World Event Card
Living Metal Flux
All NPOs immediately regain up to D3+2 lost wounds (roll separately for each).
If none can, draw a different event card.
If none can, draw a different event card.
Tomb World Event Card
Reanimation Protocols
The first time each NPO would be incapacitated during this turning point, roll one D6: on a 4+, it’s reanimated instead. Whenever an NPO is reanimated:
- It has 1 wound remaining and cannot be incapacitated for the remainder of the action. All remaining attack dice are discarded (including yours if this operative is fighting or retaliating.
- If it was ready, expend that NPO.
- Subtract 1 from that NPO’s APL stat until the end of its next activation.
Tomb World Event Card
Countertemporal Shifting
Whenever an attack dice inflicts damage of 3 or more on an NPO, roll one D6: on a 5+, subtract 1 from that inflicted damage.
Tomb World Event Card
Stirrings Of Horror
Increase the current threat level by 1. If the threat level is already at 15 or you are playing Adversary Ops, set up one additional NPO reinforcement during this Strategy phase instead.
Tomb World Event Card
Transdimensional Relocation
Randomly select two player operatives (one pair from each team if you are playing Adversary Ops). Remove both operatives from the killzone and set them back up in each other’s previous locations (in other words, swap their positions).
Repeat this process two more times (if possible).
If there is only one player operative for any team in the killzone, draw a different event card.
Repeat this process two more times (if possible).
If there is only one player operative for any team in the killzone, draw a different event card.
Tomb World Event Card
Subjugation Glyphs
Randomly select one player operative and roll one D6:
- If the result is higher than its APL stat, subtract 1 from its APL stat.
- If the result is equal to or less than its APL stat, you then randomly select a different player operative and repeat this process. In Adversary Ops, your opponent then randomly selects one of their player operatives instead and rolls D6, and this alternates between players until one operative has had an APL subtracted or all player operatives have been rolled for.
Tomb World Event Card
Flesh Hunger
If no Flayed One NPOs are In the klllzone, set one up ready with a Conceal order in a location It can be placed so that:
If one or more Payed One NPOs are already in the killzone, select one to immediately perform a free Charge or Reposition action towards the closest player operative.
If you cannot do either of the above, draw a different event card.
- In Joint Ops, the access point of a random hatchway is within its control range and that NPO is wholly within NPO territory.
- In Adversary Ops, It has a random objective marker within its control range.
If one or more Payed One NPOs are already in the killzone, select one to immediately perform a free Charge or Reposition action towards the closest player operative.
If you cannot do either of the above, draw a different event card.
Tomb World Event Card
Rewards of Annihilation
Whenever a Skorpekh Destroyer or Hexmark Destroyer NPO incapacitates a player operative, that NPO regains up to D3 lost wounds, or 2D3 if that player operative had a Wounds stat of 12 or more.
Tomb World Event Card
Enforcer Of The Phaerons
Whenever an NPO is in the same room as a Royal Warden NPO, its weapons have the Ceaseless weapon rule.
If there is no Royal Warden NPO in the killzone, draw a different event card.
If there is no Royal Warden NPO in the killzone, draw a different event card.
Tomb World Maps
Map 1

Map 2

Map 3

Map 4 (JOINT OPS ONLY)

Map 5 (JOINT OPS ONLY)

Map 6 (JOINT OPS ONLY)

Alpha Predator
Whenever an operative is shooting this operative, ignore the Piercing weapon rule. You can activate this operative twice during the turning point as long as it has AP to spend (it stays ready while it can still be activated a second time). Per turning point, it cannot move more than 9" and you cannot spend more than 4AP in total for it.Ceaseless
You can re-roll any of your attack dice results of one result (e.g. results of 2).LUMBERING DEATH
Plague Marines are methodical and uncompromising in their approach to warfare, advancing and firing with steadfast determination.
Whenever a friendly PLAGUE MARINE operative is shooting or fighting during an activation in which it hasn’t moved more than 3", or whenever it’s retaliating, its weapons have the Ceaseless weapon rule.
Neutron Charge
Neutron weapons are powered by radioactive crystals from the Vespids’ home world. The harmonic thrumming of Vespids’ wings resonates within the crystals to charge them. When unleashed, even heavy combat armour can barely protect against this atom-stripping energy charge.
Neutron weapons are any weapons that have the word ‘neutron’ in their name, e.g. neutron blaster, neutron grenade launcher, etc. Whenever a friendly VESPID STINGWING operative moves or uses FLY, its neutron weapons have the Piercing 1 weapon rule until the end of the turning point.Shoot1AP
Shoot with the active operative by following the sequence below. The active operative’s player is the attacker. The selected enemy operative’s player is the defender.
An operative cannot perform this action while it has a Conceal order, or while within control range of an enemy operative.
Fight1AP
Fight with the active operative by following the sequence below. The active operative’s player is the attacker. The selected enemy operative’s player is the defender.
An operative cannot perform this action unless an enemy operative is within its control range.
Damage
When damage is inflicted on an operative, reduce their wounds by that amount. An operative’s starting number of wounds is determined by its Wounds stat (see datacards). If an operative’s wounds are reduced to 0 or less, it’s incapacitated, then removed from the killzone. Some rules allow an incapacitated operative to perform a free action before being removed from the killzone. Such an operative cannot perform more than one free action (excluding Place Marker) in this instance, and that operative’s player decides the order of any of its rules that occur before it’s removed from the killzone (taking precedence over the player with initiative deciding).While an operative has fewer than its starting wounds remaining, it’s wounded. While it has fewer than half its starting wounds remaining, it’s also injured. Subtract 2" from the Move stat of injured operatives and worsen the Hit stat of their weapons by 1.
Keep track of each operative’s remaining wounds with dice, tokens or by writing it down.
‘Incapacitated’ and ‘removed from the killzone’ are separate. Some rules take effect when an operative is incapacitated, but before it’s removed.
‘Incapacitated’ and ‘removed from the killzone’ are separate. Some rules take effect when an operative is incapacitated, but before it’s removed.
Visible
For an intended target to be Visible, the following must be true:- You can draw an imaginary, unobstructed straight line (known as a Visibility line) 1 mm wide from the head of the active operative’s miniature to any part of the miniature of the intended target (not its base).
In the rare instance that bases or parts of the active operative’s miniature prevent an intended target from being Visible to the active operative, such as when the active operative is directly below or above the intended target, treat those bases and parts as being invisible.
Some rare rules will require you to select a point that is Visible (e.g. a point on the killzone). In such circumstances, you must be able to draw an imaginary, unobstructed straight line 1mm wide from the head of the active operative’s miniature to the point you would select.
Control Range
Many rules relate to control range such as moving, fighting and using cover. Something is within an operative’s control range if it’s visible to and within 1" of that operative.Control range between operatives is mutual, therefore operatives are within each other’s control range if one of them is visible to and within 1" of the other.
The terrain is within both operative B and C’s control range.
Because of the terrain, operative B is not visible to operative C, and vice versa, therefore they are not within each other’s control range.
Imagine control range as an area of interaction the operative has with things close to it.
Dash1AP
The same as the Reposition action, except don’t use the active operative’s Move stat — it can move up to 3" instead. In addition, it cannot climb during this move, but it can drop and jump.
An operative cannot perform this action while within control range of an enemy operative, or during the same activation in which it performed the Charge action.
Reposition1AP
Move the active operative up to its Move stat to a location it can be placed. This must be done in one or more straight-line increments, and increments are always rounded up to the nearest inch.
It cannot move within control range of an enemy operative, unless one or more other friendly operatives are already within control range of that enemy operative, in which case it can move within control range of that enemy operative but cannot finish the move there.
An operative cannot perform this action while within control range of an enemy operative, or during the same activation in which it performed the Fall Back or Charge action.
OPERATE HATCH1AP
Open or close a hatchway thats access point is within the operative’s control range.
An operative can perform this action during the Dash or Reposition action, and any remaining move distance can be used after it does so.
An operative cannot perform this action while within control range of an enemy operative, or if that hatchway is open and its access point is within an enemy operative’s control range.
Piercing x
The defender collects x less defence dice, e.g. Piercing 1. If the rule is Piercing Crits x, this only comes into effect if you retain any critical successes.Blast x
The target you select is the primary target. After shooting the primary target, shoot with this weapon against each secondary target in an order of your choice (roll each sequence separately). Secondary targets are other operatives visible to and within x of the primary target, e.g. Blast 2" (they are all valid targets, regardless of a Conceal order). Secondary targets are in cover and obscured if the primary target was.Torrent x
Select a valid target as normal as the primary target, then select any number of other valid targets within x of the first valid target, but not within control range of friendly operatives, as secondary targets, e.g. Torrent 2". Shoot with this weapon against all of them in an order of your choice (roll each sequence separately).Counteract
When you would activate a ready friendly operative, if all your operatives are expended but your opponent still has ready operatives, you can select an expended friendly operative with an Engage order to perform a 1AP action (excluding Guard) for free. Each operative can only counteract once per turning point. That operative cannot move more than 2", or must be set up wholly within 2" if it’s removed and set up again, while counteracting (this is not a change to its Move stat, and takes precedence over all other rules). Counteracting is optional, so you can choose not to. In either case, activation alternates back to your opponent afterwards.Counteracting isn’t an activation, it’s instead of activating. This difference is important; for instance, it means action restrictions won't apply.
Charge1AP
The same as the Reposition action, except the active operative can move an additional 2".
It can move, and must finish the move, within control range of an enemy operative. If it moves within control range of an enemy operative that no other friendly operatives are within control range of, it cannot leave that operative’s control range.
An operative cannot perform this action while it has a Conceal order, if it’s already within control range of an enemy operative, or during the same activation in which it performed the Reposition, Dash or Fall Back action.
BREACH2AP
Open a closed breach point thats access point is within the operative’s control range.
An operative that has the word(s) ‘breach marker’, ‘grenadier’ or ‘mine’ on its datacard, or has a weapon with the Piercing 2 or Piercing Crits 2 weapon rule (excluding weapons that have the Blast or Torrent weapon rule) can perform this action for 1 less AP (to a minimum of 1AP)
Roll one D6 separately for each operative that’s on the other side of the access point and has that access point within its control range: on a 4+, subtract 1 from that operative’s APL stat until the end of its next activation and inflict damage on it equal to the dice result halved (rounding up).
An operative cannot perform this action while within control range of an enemy operative, or if that breach point is open. It cannot perform this action for less than 2AP during an activation/counteraction in which it performed the Charge or Shoot action (or vice versa).
Roll-off
lf a rule requires a roll-off, both players roll one D6 and whoever has the highest wins the roll-off. If there’s a tie, roll-off again.
Closed
While a breach point is closed:- Its breach wall must be within its access point.
- The access point and breach wall are Heavy and Wall terrain.

|
Expended
- When you’ve finished with your operative’s activation, that operative is expended. While expended, an operative is not ready.
|

Valid Target
Some rules require you to select a valid target for an operative. This is most common when an operative is shooting, but some rare rules require it too.
|
Operate Hatch1AP
An operative can perform this action during a Dash or Reposition action, and any remaining move distance can be used after it does so.
An operative cannot perform this action while within control range of an enemy operative, or if that hatchway is open and its access point is within an enemy operative’s control range.
Range x
Only operatives within x of the active operative can be valid targets, e.g. Range 9".Fall Back2AP
The same as the Reposition action, except the active operative can move within control range of an enemy operative, but cannot finish the move there.
An operative cannot perform this action unless an enemy operative is within its control range. It cannot perform this action during the same activation in which it performed the Reposition or Charge action.
Punishing
If you retain any critical successes, you can retain one of your fails as a normal success instead of discarding it.Brutal
Your opponent can only block with critical successes.Precedence
Some rare rules will conflict with each other, so it must be established which takes precedence. In order of priority, a rule takes precedence if:1
2
3
4
5
6
If a rule on a datacard says ‘this operative can perform two Shoot actions during its activation’, this takes precedence over the core rules for action restrictions, as per precedence priority 3.
Equipment
Equipment are additional rules you can select before the battle, as specified in your game sequence. Universal equipment can be selected for any kill team whereas faction equipment is specific. Each player cannot select each equipment option more than once per game.
Open
While a breach point is open:- Its breach wall must be removed from the killzone.
- Its access point is Accessible and Insignificant terrain.
- Its access point is also Exposed terrain. This means the walls either side of it must be used for cover and obscuring instead.

BREACH2AP
Open a closed breach point thats access point is within the operative’s control range.
An operative that has the word(s) ‘breach marker’, ‘grenadier’ or ‘mine’ on its datacard, or has a weapon with the Piercing 2 or Piercing Crits 2 weapon rule (excluding weapons that have the Blast or Torrent weapon rule) can perform this action for 1 less AP (to a minimum of 1AP)
Roll one D6 separately for each operative that’s on the other side of the access point and has that access point within its control range: on a 4+, subtract 1 from that operative’s APL stat until the end of its next activation and inflict damage on it equal to the dice result halved (rounding up).
An operative cannot perform this action while within control range of an enemy operative, or if that breach point is open. It cannot perform this action for less than 2AP during an activation/counteraction in which it performed the Charge or Shoot action (or vice versa).
Pick Up Marker1AP
Remove a marker the active operative controls that the Pick Up Marker action can be performed upon. That operative is now carrying, contesting and controlling that marker.
An operative cannot perform this action while within control range of an enemy operative, or while it’s already carrying a marker.
Rending
If you retain any critical successes, you can retain one of your normal successes as a Critical success instead.Balanced
You can re-roll one of your attack dice.Lethal x+
Your successes equal to or greater than x are critical successes, e.g. Lethal 5+.Devastating x
Each retained critical success immediately inflicts x damage on the operative this weapon is being used against, e.g. Devastating 3. If the rule starts with a distance (e.g. 1" Devastating x), inflict x damage on that operative and each other operative visible to and within that distance of it. Note that success isn’t discarded after doing so — it can still be resolved later in the sequence.Saturate
The defender cannot retain cover saves.Reanimation Protocols
The body of a slain Necron becomes wreathed in an eerie glow. Severed limbs reattach and broken bodies reform in a shower of emerald sparks. Eye-lenses flicker once more and the Necron rises again to rejoin the fight.
The first time each friendly HIEROTEK CIRCLE operative is incapacitated, before it’s removed from the killzone, place one of your Reanimation markers within its control range. Then remove it as incapacitated, also removing any tokens and rules effects it had (e.g. CHRONOMANCER operative’s Chronometron action, Poison tokens, APL stat changes, being implanted, etc.).In the Ready step of each Strategy phase, select one of your Reanimation markers and roll one D6: on a 1-2, leave that Reanimation marker in the killzone and repeat this process with a different one of your Reanimation markers (if any); on a 3+, an operative is REANIMATED.
You can only select each of your Reanimation markers once per turning point, and once you roll a 3+, you don’t select any more for that turning point. Whenever an operative is REANIMATED:
- Set up the operative that Reanimation marker was placed for (it’s no longer incapacitated). It must be placed within 3" of that Reanimation marker and not within control range of enemy operatives (if you cannot do so, treat the roll as 1-2 instead).
- It has 1 wound remaining.
- It has an order of your choice and is ready.
- Remove that Reanimation marker.