
Deadly Sniper
 01
01 Books
| Book | Kind | Edition | Version | Last update |
| | ||||
| | Expansion | 3 | 1.0 | January 2024 |
Joint Ops: Deadly Sniper Mission Pack
This is a player vs environment (PvE) mission pack for cooperative or solo gameplay using Killzone: Volkus. It involves a player or players battling together against a collection of NPOs (non-player operatives) stubbornly defending a stronghold with a deadly sniper on the top level. If playing cooperatively, you are still one ‘player’. This means you don’t double your CP, equipment selections, etc.; you must manage them between you.If you wish, one player can be the game master. They will manage the NPOs – move them, roll dice for them, etc. – whilst one or more other players control a kill team. The game master will still control the NPOs as the rules in this mission pack specify, they just take this pressure and decision-making away from the player(s) so they can focus on their own operatives and having fun!
Missions
Here you will find three missions. They are intended to be played in sequence – win or lose – to tell the narrative of an ongoing battle against an expert sniper. The missions include specific maps designed using Killzone: Volkus, all showing the same area but with different angles of approach. You will have to think carefully about how to position your operatives, as many sections of the map are exposed to the sniper. What’s more, due to their positioning and the Silent weapon rule, the sniper will likely be untargetable during the first two missions, so you may have to win those missions without engaging them.Kill Team Selection
The player(s) use one kill team. If you are playing solo, simply select your kill team as normal. If you are playing cooperatively, either select a kill team as normal and split the operatives between you, or take half of any kill team each. If it’s an odd number, round up (or down for more of a challenge). If you’ve taken separate teams, remember that some rules specify certain operatives through keywords, so one kill team’s rules won’t necessarily interact with another’s.Your kill team will fight against procedurally generated non-player operatives (known as NPOs). Unlike your highly trained operatives, NPOs are mostly standard soldiers from their army – frontline troops, guards, etc. – but they are backed up by a deadly sniper. As such, you don’t select a kill team for them. Instead, you use the appropriate datacards from NPO Datacards section. Alternatively, you can create your own datacards to accurately reflect their stats using existing kill teams as a guide – just ignore rules that wouldn’t be appropriate.
Each mission specifies how many NPOs you should include to accompany the sniper, determined by their combined Wounds stat. To increase or decrease the difficulty, simply increase or decrease this number as appropriate.
Equipment
Don’t select equipment for NPOs in this mission pack.Initiative
When rolling off to decide who has initiative, roll one dice for the NPOs and one dice for the solo/co-op kill team. If the NPOs win the roll-off, they will always choose to have initiative.NPO Behaviours
Brawler
This operative will move towards the enemy to fight them, but will seek cover on the way.
When activated, if this NPO can perform either of its first two actions during that activation, give it an Engage order. If it cannot, give it a Conceal order.
1. Fight.
2. Charge the closest enemy operative via the shortest possible route.
3. Reposition towards the closest enemy operative, to cover if possible (a subsequent Dash action can fulfil this, if able).
4. Dash towards the closest enemy operative, to cover if possible.
Marksman
This operative will move to an ideal position to shoot the enemy.
When activated, if this NPO can perform the Shoot action during that activation, give it an Engage order. If it cannot, give it a Conceal order.
1. Fall Back to cover. If possible, to a location where there’s a valid target that isn’t obscured, if not, to a location that’s appropriate to better win the mission.
2. Shoot.
3. Reposition to cover. If possible, to a location where there’s a valid target that isn’t obscured, if not, to a location that’s appropriate to better win the mission (a subsequent Dash action can fulfil these, if able).
4. Dash to cover. If possible, to a location where there’s a valid target that isn’t obscured, if not, to a location that’s appropriate to better win the mission.
Threat Principle
When making decisions for NPOs, use the threat principle: go with the option that’s worst for you. This can determine which ready NPO activates, how an NPO moves, shoots and fights, how to resolve their dice, etc. There are a few examples below (containing decisions in order of priority) that you can use as a guide, but if one option feels worse for you – in particular to stop you winning the mission – go with that. If you still cannot decide, randomly choose one.Activation Priority
Multiple NPOs are ready, so the player(s) activate the NPO that:1. Can perform the Fight or Shoot action (as determined by its behaviour), and is the most threatening to do so (e.g. is more likely to incapacitate an enemy operative, is more likely to prevent the player(s) winning, etc.).
2. Is not in cover from a player operative.
3. Is closer to a player operative.
Shoot action
An NPO performs the Shoot action and multiple enemy operatives are valid targets. It shoots the enemy operative that is:1. Not obscured.
2. Not in cover.
3. Closest.
4. Wounded.
5. Ready.
Fight action
An NPO performs the Fight action and multiple enemy operatives are within its control range. It fights the enemy operative that:1. It’s more likely to incapacitate.
2. Is ready.
NPO Datacards
APL - - |
MOVE - - |
SAVE 3+ 3+ |
WOUNDS 12 12 |
NAME | ATK | HIT | DMG | WR | ||||
| Sniper rifle | ||||||||
| Sniper rifle | 4 | 2+ | 3/3 | Devastating 3, Heavy, Silent | Devastating 3, Heavy, Silent | |||
| Gun butt | ||||||||
| Gun butt | 3 | 4+ | 2/3 | - | ||||
Behaviour: This operative cannot move, have an Engage order, be readied or be activated. Whenever an NPO would activate, if this operative has reloaded (see below) and there’s a valid target for it, perform the Shoot action with this operative instead of activating an NPO, then it has no longer reloaded.
Reload: In the Ready step of each Strategy phase, this operative has reloaded. Each time after this operative performs the Shoot action, roll one D6: after a number of player operatives have been activated this turning point equal to the result, this operative has reloaded.
|
|
⌀28mm |
| ||||||||||||||||||||||||||||||||||||||||||||||||||||||||||||


| ||||||||||||||||||||||||||||||||||||||||||||||||||||||||||||||||||||||||||||||||||||||||||

| ||||||||||||||||||||||||||||||||||||||||||||||||||||||||||||
| ||||||||||||||||||||||||||||||||||||||||||||||||||||||||||||||||||||||||||||||||
| ||||||||||||||||||||||||||||||||||||||||||||||||||||||||||||||||||||||
| ||||||||||||||||||||||||||||||||||||||||||||||||||||||||||||||||||||||||||||||||
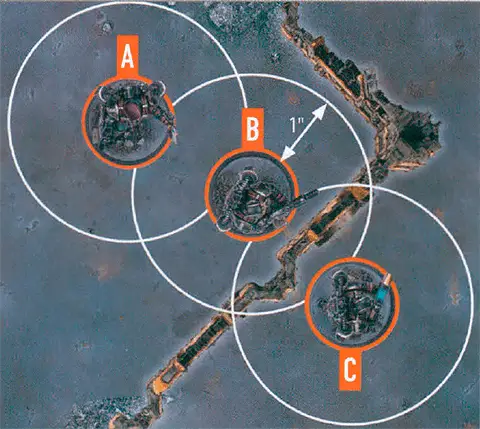
Joint Operations Mission 01
Sniper’s Alley
An assault upon an enemy stronghold has faltered and one of your senior officers has been wounded and pinned down by sniper fire. You have been chosen to lead an extraction mission. Brave the sharpshooter’s fire, repel the enemy and ensure that the injured officer is returned to safetyMISSION RULES
NPOs: One SNIPER NPO set up on the highest Vantage terrain of Stronghold B. Then, any combination of NPOs with a combined Wounds stat of up to 90. They are set up with a Conceal order wholly within Stronghold B, either not visible from the player drop zone or in cover.Rescue: Friendly operatives can perform the Pick Up Marker action on the objective marker. Whenever a friendly operative is carrying the objective marker, worsen the Hit stat of its weapons by 1 and it cannot be removed and set up again (e.g. it cannot FLY).
Escape: Player operatives can move wholly over their killzone edge. Any that do so have escaped – remove them from the killzone.
Reinforcements: In each Strategy phase, if half the NPOs are incapacitated (ignore the SNIPER when determining this), they call in reinforcements as a STRATEGIC GAMBIT. Randomly select two incapacitated NPOs (excluding Heavy NPOs) or one incapacitated Heavy NPO. Set them up with a Conceal order on the killzone floor within Stronghold B and wholly within 6" of the NPO killzone edge.
VICTORY
In the Ready step of each Strategy phase, if any NPOs are within 2" of the objective marker, the battle might end: at the end of that turning point, if any NPOs are within 2" of the objective marker and no friendly operatives are within 6" of it, the battle ends and the player(s) lose.The battle also ends if the player(s) have no operatives left in the killzone. In this instance, if a player operative carrying the objective marker has escaped, the player(s) win. Otherwise, the player(s) lose.

Joint Operations Mission 02
Flank The Sniper
The enemy sniper continues to inflict casualties upon your allies. If you are to deal with the threat, you will first have to flank their position. Enemy combatants are everywhere. By stealth or force, you must break through.MISSION RULES
NPOs: One SNIPER NPO set up on the highest Vantage terrain of Stronghold B. Then, any combination of NPOs with a combined Wounds stat of up to 90. They are set up with a Conceal order wholly within the NPO drop zone; spread them out as evenly as possible between areas 1-4 on the mission map, either not visible from the player drop zone or in cover.Reserve: When setting up each friendly operative before the battle, you can set it up in reserve instead: place it to one side instead of in the killzone. Each friendly operative that was incapacitated during the previous mission must be set up in reserve. In the first Firefight phase, each friendly operative set up in reserve is activated as normal. When it is, set it up in the killzone in a location it can be placed wholly within a distance equal to its Move stat from the left half of your killzone edge. The operative is treated as performing the Reposition action (spend the AP accordingly), then continue its activation as normal.
Escape: Player operatives can move wholly over the left half of the NPO or player killzone edge. Any that do so have escaped – remove them from the killzone. Note that the edge an operative escaped from determines its set up location in mission 3.
Reinforcements: In each Strategy phase, if half the NPOs are incapacitated (ignore the SNIPER when determining this), they call in reinforcements as a STRATEGIC GAMBIT. Randomly select two incapacitated NPOs (excluding Heavy NPOs) or one incapacitated Heavy NPO. Set them up with a Conceal order on the killzone floor within Stronghold B and wholly within 6" of the NPO killzone edge.
VICTORY
The battle ends when the player(s) have none of their operatives left in the killzone. If more than 50% of their operatives have escaped over the NPO killzone edge, the player(s) win. Otherwise, they lose.
Joint Operations Mission 03
Sniper Surrounded
You have the sniper surrounded, but they remain a lethal threat. The enemy are trapped within their last remaining strongpoint. Your operatives must fight their way through the defenders and put an end to the target.MISSION RULES
NPOs: One SNIPER NPO set up on the highest Vantage terrain of Stronghold B. Then, any combination of NPOs with a combined Wounds stat of up to 90. They are set up with a Conceal order wholly within Stronghold B, either not visible from the player drop zone or in cover.Flanking Forces: When setting up player operatives before the battle, each that escaped over the NPO killzone edge in mission 2 must be set up in the player drop zone on the right side of the mission map. All other player operatives must be set up in the player drop zone on the left side of the mission map.
Defend the Stronghold: When setting up equipment before the battle, add a barricade to the centre of Stronghold B. For the purposes of the threat principle and making decisions for NPOs, they should do what best defends Stronghold B. For example, they should only leave the stronghold if it realistically threatens player operatives and reduces the player(s)’ chances of winning the mission.
No Escape: Whenever a player operative wholly within Stronghold B is shooting an NPO that’s also wholly within Stronghold B, the player operative’s ranged weapons have the Seek Light weapon rule. Note this means they can target the SNIPER.
Reinforcements: In each Strategy phase after the second, if half the NPOs are incapacitated (ignore the SNIPER when determining this), they call in reinforcements as a STRATEGIC GAMBIT. Randomly select two incapacitated NPOs (excluding Heavy NPOs) or one incapacitated Heavy NPO. Set them up wholly within 4" of the centre of an NPO killzone edge (randomise each edge for each operative).
VICTORY
At the end of any turning point after the third, the player(s) can choose to end the battle. The battle also ends if all player operatives are incapacitated. When the battle ends, if player operatives control the stronghold terrain feature, they win. Otherwise, they lose. Player operatives control the stronghold terrain feature if the total APL of player operatives wholly within it and on the killzone floor is greater than that of NPOs.
Equipment
Equipment are additional rules you can select before the battle, as specified in your game sequence. Universal equipment can be selected for any kill team whereas faction equipment is specific. Each player cannot select each equipment option more than once per game.
Roll-off
lf a rule requires a roll-off, both players roll one D6 and whoever has the highest wins the roll-off. If there’s a tie, roll-off again.
|
Shoot1AP
Shoot with the active operative by following the sequence below. The active operative’s player is the attacker. The selected enemy operative’s player is the defender.
An operative cannot perform this action while it has a Conceal order, or while within control range of an enemy operative.
Charge1AP
The same as the Reposition action, except the active operative can move an additional 2".
It can move, and must finish the move, within control range of an enemy operative. If it moves within control range of an enemy operative that no other friendly operatives are within control range of, it cannot leave that operative’s control range.
An operative cannot perform this action while it has a Conceal order, if it’s already within control range of an enemy operative, or during the same activation in which it performed the Reposition, Dash or Fall Back action.
Counteract
When you would activate a ready friendly operative, if all your operatives are expended but your opponent still has ready operatives, you can select an expended friendly operative with an Engage order to perform a 1AP action (excluding Guard) for free. Each operative can only counteract once per turning point. That operative cannot move more than 2", or must be set up wholly within 2" if it’s removed and set up again, while counteracting (this is not a change to its Move stat, and takes precedence over all other rules). Counteracting is optional, so you can choose not to. In either case, activation alternates back to your opponent afterwards.Counteracting isn’t an activation, it’s instead of activating. This difference is important; for instance, it means action restrictions won't apply.
|
Fight1AP
Fight with the active operative by following the sequence below. The active operative’s player is the attacker. The selected enemy operative’s player is the defender.
An operative cannot perform this action unless an enemy operative is within its control range.
Reposition1AP
Move the active operative up to its Move stat to a location it can be placed. This must be done in one or more straight-line increments, and increments are always rounded up to the nearest inch.
It cannot move within control range of an enemy operative, unless one or more other friendly operatives are already within control range of that enemy operative, in which case it can move within control range of that enemy operative but cannot finish the move there.
An operative cannot perform this action while within control range of an enemy operative, or during the same activation in which it performed the Fall Back or Charge action.
Dash1AP
The same as the Reposition action, except don’t use the active operative’s Move stat — it can move up to 3" instead. In addition, it cannot climb during this move, but it can drop and jump.
An operative cannot perform this action while within control range of an enemy operative, or during the same activation in which it performed the Charge action.
Damage
When damage is inflicted on an operative, reduce their wounds by that amount. An operative’s starting number of wounds is determined by its Wounds stat (see datacards). If an operative’s wounds are reduced to 0 or less, it’s incapacitated, then removed from the killzone. Some rules allow an incapacitated operative to perform a free action before being removed from the killzone. Such an operative cannot perform more than one free action (excluding Place Marker) in this instance, and that operative’s player decides the order of any of its rules that occur before it’s removed from the killzone (taking precedence over the player with initiative deciding).While an operative has fewer than its starting wounds remaining, it’s wounded. While it has fewer than half its starting wounds remaining, it’s also injured. Subtract 2" from the Move stat of injured operatives and worsen the Hit stat of their weapons by 1.
Keep track of each operative’s remaining wounds with dice, tokens or by writing it down.
‘Incapacitated’ and ‘removed from the killzone’ are separate. Some rules take effect when an operative is incapacitated, but before it’s removed.
‘Incapacitated’ and ‘removed from the killzone’ are separate. Some rules take effect when an operative is incapacitated, but before it’s removed.
Valid Target
Some rules require you to select a valid target for an operative. This is most common when an operative is shooting, but some rare rules require it too.
|
Control Range
Many rules relate to control range such as moving, fighting and using cover. Something is within an operative’s control range if it’s visible to and within 1" of that operative.Control range between operatives is mutual, therefore operatives are within each other’s control range if one of them is visible to and within 1" of the other.
The terrain is within both operative B and C’s control range.
Because of the terrain, operative B is not visible to operative C, and vice versa, therefore they are not within each other’s control range.
Imagine control range as an area of interaction the operative has with things close to it.
Devastating x
Each retained critical success immediately inflicts x damage on the operative this weapon is being used against, e.g. Devastating 3. If the rule starts with a distance (e.g. 1" Devastating x), inflict x damage on that operative and each other operative visible to and within that distance of it. Note that success isn’t discarded after doing so — it can still be resolved later in the sequence.Visible
For an intended target to be Visible, the following must be true:- You can draw an imaginary, unobstructed straight line (known as a Visibility line) 1 mm wide from the head of the active operative’s miniature to any part of the miniature of the intended target (not its base).
In the rare instance that bases or parts of the active operative’s miniature prevent an intended target from being Visible to the active operative, such as when the active operative is directly below or above the intended target, treat those bases and parts as being invisible.
Some rare rules will require you to select a point that is Visible (e.g. a point on the killzone). In such circumstances, you must be able to draw an imaginary, unobstructed straight line 1mm wide from the head of the active operative’s miniature to the point you would select.
Ceaseless
You can re-roll any of your attack dice results of one result (e.g. results of 2).Piercing x
The defender collects x less defence dice, e.g. Piercing 1. If the rule is Piercing Crits x, this only comes into effect if you retain any critical successes.Pick Up Marker1AP
Remove a marker the active operative controls that the Pick Up Marker action can be performed upon. That operative is now carrying, contesting and controlling that marker.
An operative cannot perform this action while within control range of an enemy operative, or while it’s already carrying a marker.
Killzone Floor
The killzone floor is the lowest level of the killzone (i.e. the game board). Anything that’s on a marker that’s on the killzone floor is also on the killzone floor.
Shooting
- Whenever an enemy operative is shooting a friendly operative that’s on the other side of a bunker or stockade terrain feature and in cover from it (e.g. at its window), that friendly operative ignores the Piercing weapon rule.
- For the Blast and Torrent weapon rules, secondary targets must be on the same side of the bunker or stockade terrain feature as the primary target.
- x" Devastating can only affect operatives on the same side of the bunker or stockade terrain feature as the target.
- These have no effect when visibility/intervening for each of the above is through an open breach point.
Seek
When selecting a valid target, operatives cannot use terrain for cover. If the rule is Seek Light, operatives cannot use Light terrain for cover. Whilst this can allow such operatives to be targeted (assuming they’re visible), it doesn’t remove their cover save (if any).