
Killzones
Books
| Book | Kind | Edition | Version | Last update |
| Warhammer 40,000 Kill Team: Core Book | ||||
| Warhammer 40,000 Kill Team: Core Book | Rulebook | 3 | February ’26 | February 2026 |
| | ||||
| | Expansion | 3 | 1.0 | April 2025 |
| | ||||
| | Expansion | 3 | April 2026 | |
KILLZONES
Killzones provide an immersive experience and a tactically engaging battlefield for your operatives. There are specific killzones available on this page — simply use the game board and terrain features a killzone includes. You can also create your own killzone from the game boards and terrain features in your collection. Unless otherwise specified, a killzone game board is 30" x 22".If you are new to Kill Team, select one killzone to start with. Then, as you become more experienced, you’ll soon relish the diverse gameplay that different killzones provide.
Terrain and Movement
Operatives cannot move through terrain — they must move around, climb over or drop/jump off it.Climbing
An operative must be within 1" horizontally and 3" vertically of terrain that’s visible to them to climb it. Each climb is treated as a minimum of 2" vertically (e.g. a 1" distance is treated as 2").Operatives must finish a move in a location they can be placed — they cannot finish midway through a climb, drop or jump. If this isn’t possible, they cannot begin the move.
Dropping
Operatives drop down when they move off terrain or after they’ve jumped. Ignore 2" of vertical distance that they drop during each action. This means a vertical drop of 2" or less is ignored. If they drop multiple times during an action, only 2" total is ignored, not 2" from each drop.Jumping
Operatives can jump from Vantage terrain higher than 2" from the killzone floor when they move off it. You can move them up to 4" horizontally from the edge when they jump, done like any other move except in one straight-line increment. The operative must then drop or climb from there.When jumping from Vantage terrain, if there is a terrain part such as a rampart at the edge the operative would jump from, the operative must climb it first then jump from the highest point it must climb over. When jumping to a terrain feature, you can ignore its height difference of 1" or less, including its rampart (if any).
Jumping means operatives can move across gaps in terrain up to 4" wide, and can jump up to 4" over things lower than them.
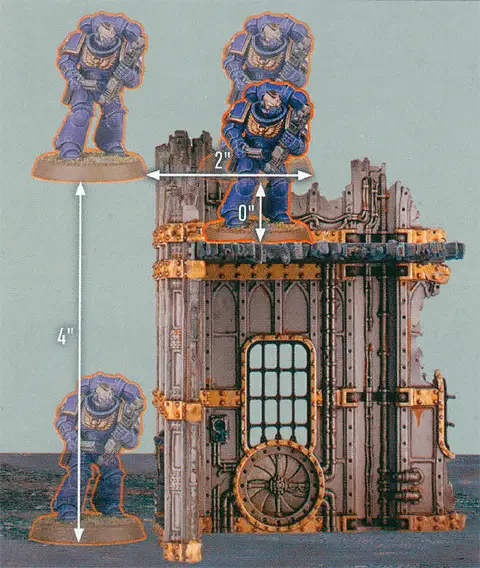
Remember that increments are rounded up, so if the operative moves 3.5", this is treated as 4".
Terrain Types
A terrain feature is composed of different parts, each of which is a type of terrain (one part can be more than one type). If you are using a terrain feature from a specific killzone, the type of each part of that terrain feature will be specified. If you are using a terrain feature from a killzone of your own creation, you must specify the type of each part of that terrain feature before the battle. The most common types of terrain are below, but some killzones have their own types.Always view terrain features in parts, rather than as one large terrain feature where everything is the same. For example, if a rule says ignore Light terrain, only ignore the parts of a terrain feature that are the Light type, not the whole terrain feature.
Heavy
Larger terrain is Heavy. It can obscure operatives.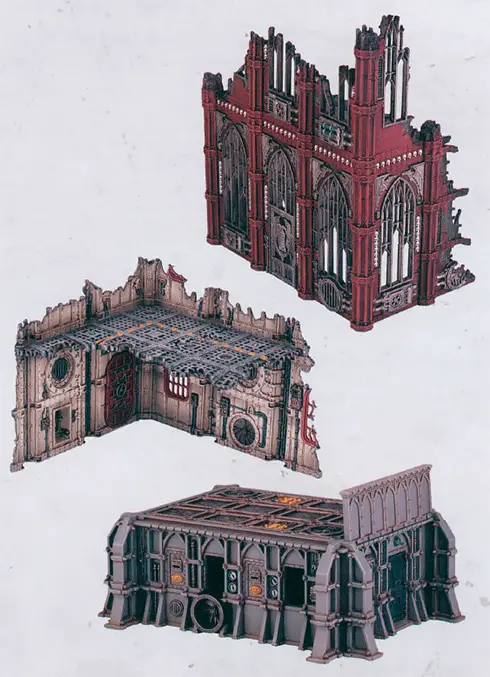
It’s good to have a mixture of Light and Heavy terrain in your killzone, as some other rules interact with each type differently.
Light
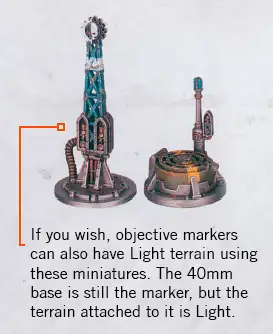
Smaller terrain is Light. It doesn’t have any additional rules, but other rules interact with it differently (e.g. Vantage terrain).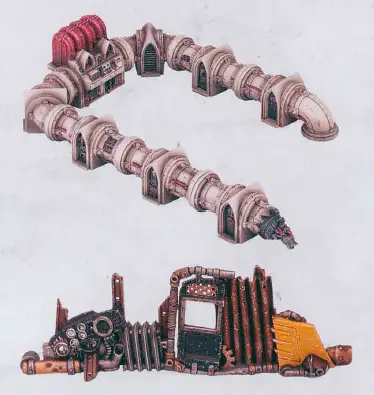
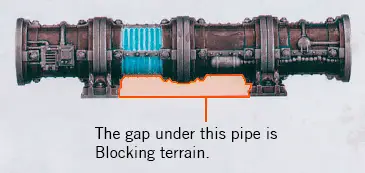
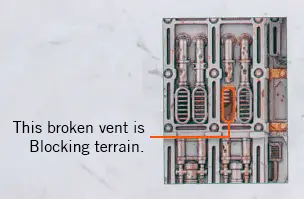
Blocking
Blocking terrain is usually attributed to gaps between or underneath a terrain feature. Visibility cannot be drawn through such gaps, and for the purposes of cover and obscured, the gaps are intervening like the terrain around it.Technically, Blocking terrain isn’t actually physical terrain, but rather the gaps operatives shouldn’t be able to see through.
Blocking terrain is rare, but it exists for the necessary instances.
Blocking terrain is rare, but it exists for the necessary instances.
Vantage
Vantage terrain is the upper levels of the killzone — areas operatives can be placed upon above the game board. If terrain is not Vantage terrain, then operatives can move over it, but they cannot finish a move or be set up on it. Vantage terrain is also Light terrain. Vantage terrain has the following main features.
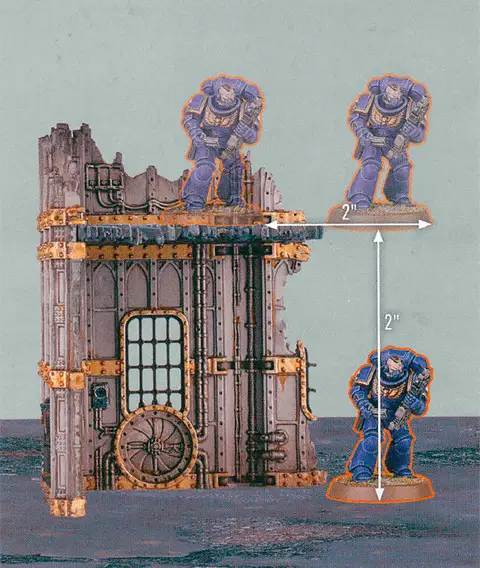
Firstly, whenever an operative on Vantage terrain is shooting an operative that has an Engage order, its ranged weapon has the Accurate 1 weapon rule if the target operative is at least 2" lower than it, or Accurate 2 if the target operative is at least 4" lower than it.
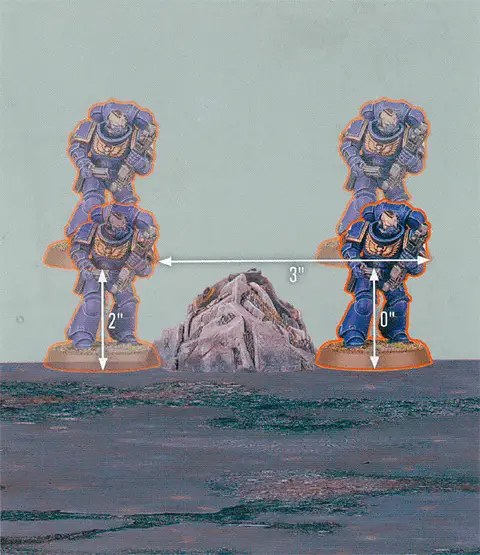
Secondly, whenever you are selecting a valid target for an operative on Vantage terrain, operatives at least 2" lower than that operative with a Conceal order cannot use Light terrain for cover. Whilst this can allow such operatives to be targeted (assuming they’re visible), it doesn’t remove their cover save, and the defender can retain it as a critical success instead, or retain one additional cover save.
Thirdly, for the purposes of obscured, ignore Heavy terrain connected to Vantage terrain the active operative or the intended target is on.
Firstly, whenever an operative on Vantage terrain is shooting an operative that has an Engage order, its ranged weapon has the Accurate 1 weapon rule if the target operative is at least 2" lower than it, or Accurate 2 if the target operative is at least 4" lower than it.
Secondly, whenever you are selecting a valid target for an operative on Vantage terrain, operatives at least 2" lower than that operative with a Conceal order cannot use Light terrain for cover. Whilst this can allow such operatives to be targeted (assuming they’re visible), it doesn’t remove their cover save, and the defender can retain it as a critical success instead, or retain one additional cover save.
Thirdly, for the purposes of obscured, ignore Heavy terrain connected to Vantage terrain the active operative or the intended target is on.
As Vantage terrain is also Light, an operative on Vantage terrain will often be in cover from operatives lower than them — imagine them crouching down to gain a cover save or avoid being a valid target.
An operative on Vantage terrain can target an operative with a Conceal order that’s 2" lower than them and only in cover from Light terrain.
If an operative is obstructed from moving across Vantage terrain by enemy operatives or other terrain features, it can move around these obstructions (without dropping off) so long as part of its base is always on the Vantage terrain.

Accessible
Operatives can move through Accessible terrain (this takes precedence over Bases, and Terrain and Movement), but it counts as an additional 1" to do so. Only the centre of an operative’s base needs to move through Accessible terrain, so base sizes are irrelevant.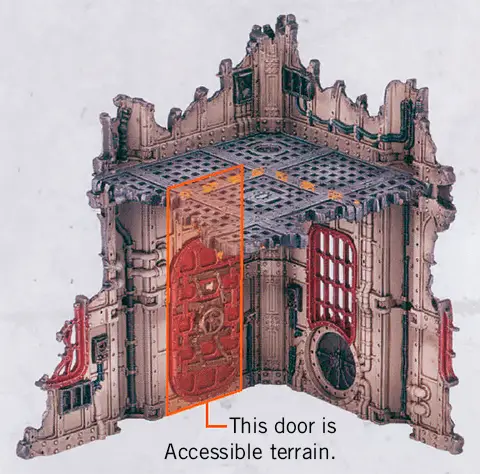
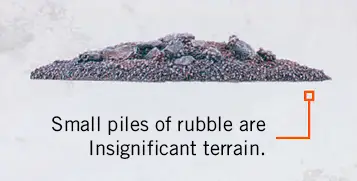
It’s particularly important to identify Insignificant and Exposed terrain before the battle, to prevent misunderstandings later on.
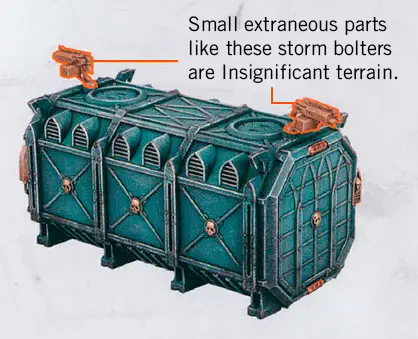
Insignificant
Insignificant terrain is usually very small. For the purposes of climbing and dropping, ignore it.An operative can move over and across Insignificant terrain without going up and down.
Exposed
Exposed terrain is usually very small, or terrain with large gaps that operatives shouldn’t be able to take cover behind. For the purposes of cover and obscured, it’s never intervening.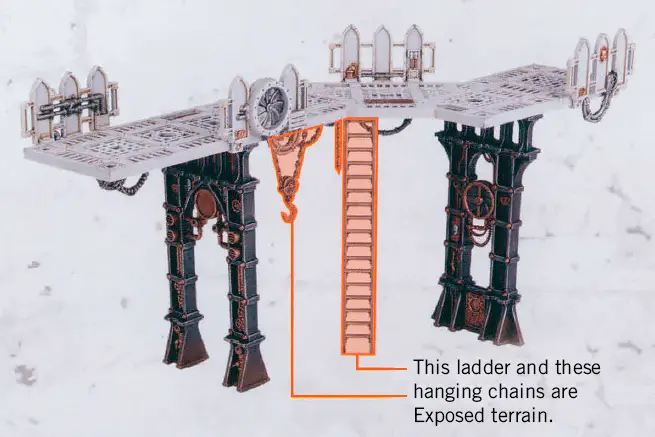
Ceiling
Operatives with a round base of 50mm or less, or an oval base of 60x35mm, can move underneath Ceiling terrain regardless of the operative’s height (this takes precedence over Terrain and Movement). The operative must still finish the action in a location it can be placed.KILLZONE: VOLKUS
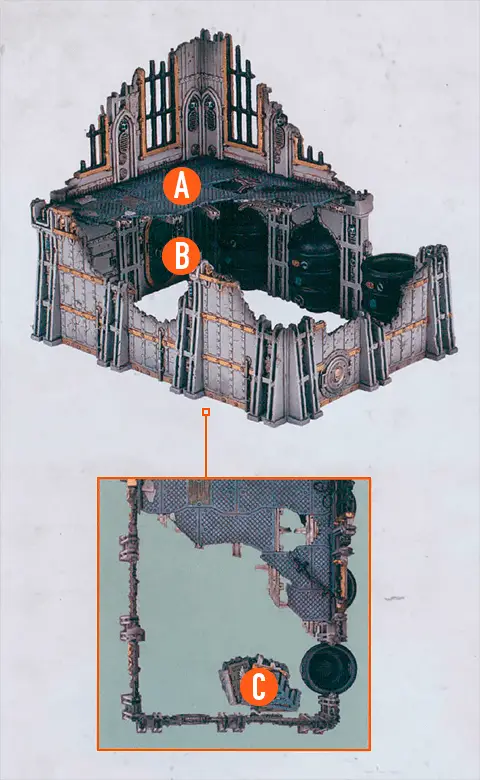
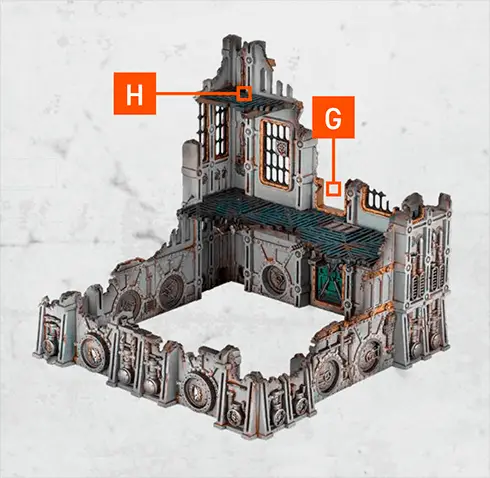
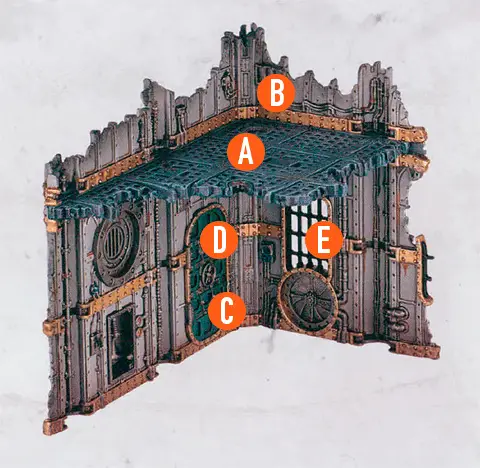
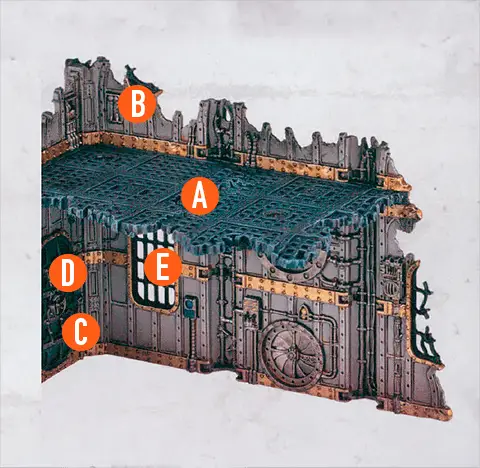
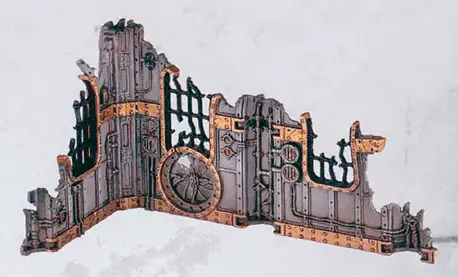
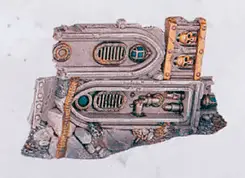
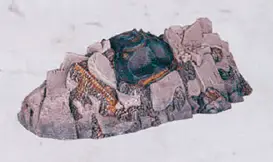
Killzone: Volkus has 2x strongholds, 2x large ruins, 2x small ruins, 2x heavy rubble and 3x light rubble.Stronghold
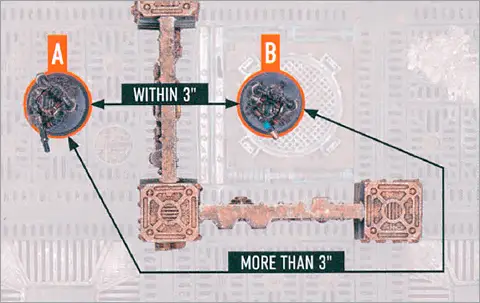
- The upper level(s) of a stronghold terrain feature is Ceiling and Vantage terrain.A
- The door is Accessible and Heavy terrain.B
- The fire steps are Vantage, Insignificant and Exposed terrain.C
- The broken vent is Blocking terrain.D
- The three barrel containers on Stronghold A are Blocking and Heavy terrain.E
- The small broken ramparts on the edge of the Vantage terrain of Stronghold A are Insignificant and Exposed terrain.F
- The gap on the lower Vantage terrain of Stronghold B is Accessible terrain.G
- You cannot have more than one friendly operative on the highest upper level of Stronghold B at once, and that operative must be placed on one side or the other of that level, it cannot be placed in the middle (this means an enemy operative cannot be prevented from moving onto or being set up on the other side). If an operative’s base is too big to be placed there, it must move (or be set up) on as far as possible (otherwise it cannot complete that move), then place it to one side instead and treat it as being there. Hold it as far on that level as possible when it matters for checking other rules (e.g. control range, visibility, distance to other operatives, etc.). This takes precedence over the rules for bases and being in a location it can be placed.H
- All other parts of it are Heavy terrain.
- For the purposes of control range, ignore the door and parts of this terrain feature less than 2" high when determining visibility.

KILLZONE: VOLKUS
STRONGHOLD A
STRONGHOLD A
KILLZONE: VOLKUS
STRONGHOLD B
STRONGHOLD B
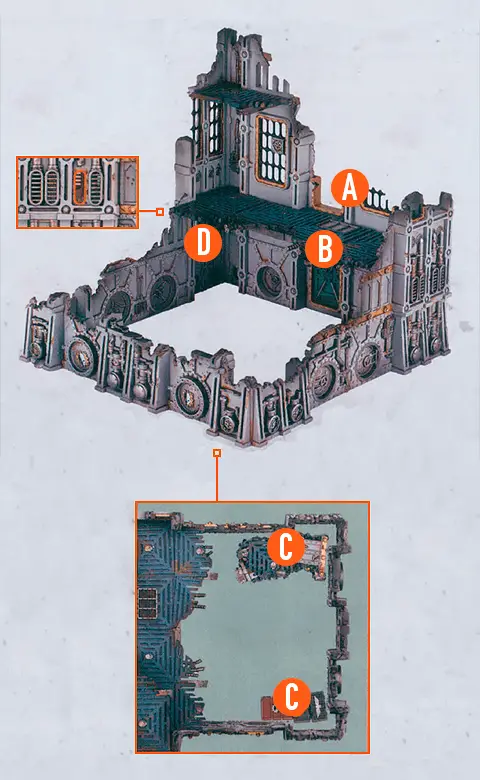
Large Ruin
- The upper level of a large ruin terrain feature is Ceiling and Vantage terrain. For the purposes of intervening and targeting lines, treat this level as the same height as the first upper level of a stronghold terrain feature.A
- The upper rampart is Light terrain.B
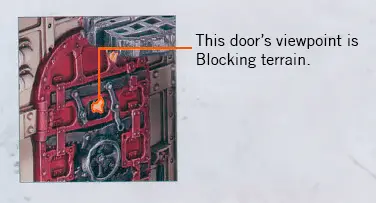
- The door is Accessible and Heavy terrain. For the purposes of control range, ignore the door when determining visibility.C
- The door’s viewpoint is Blocking terrain.D
- Unbroken windows are Barred and Heavy terrain.E
Barred terrain: Visibility cannot be drawn through this terrain unless the operative or what they’re trying to see is horizontally within 1" of it. - All other parts of it are Heavy terrain.
Small Ruin
- This is Heavy terrain.
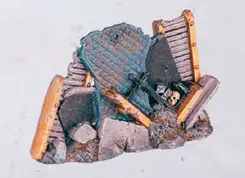
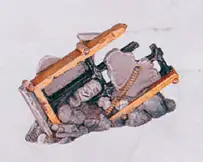
Heavy Rubble
- This is Heavy terrain.
Light Rubble
- This is Light terrain.
") COMPOUND SIEGE
COMPOUND SIEGE
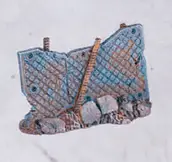
Killzone Upgrade: Compound Siege has 6x stockades, 2x bunkers and 6x fire steps; their rules are found over the following pages. This killzone is an upgrade to Killzone: Volkus (Kill Team Core Book).Stockade
A stockade terrain feature has a breach point that has two statuses: closed and open. Its terrain types depend upon that status. A stockade’s breach point begins the battle closed, and can be opened during the battle (at which point it cannot be closed again).Closed
While a stockade’s breach point is closed:


Operatives can perform the Open Stockade Door action at this stockade.
OpenWhile a stockade’s breach point is closed:
- The removable part of the stockade must be attached.
- The whole stockade is Heavy terrain.
Operatives can perform the Open Stockade Door action at this stockade.
While a stockade’s breach point is open:
- The removable part of the stockade must be removed from the killzone.
- Its breach point is Accessible, Insignificant and Exposed terrain.
- The rest of the stockade is Heavy terrain.


Bunker
A bunker terrain feature is Heavy terrain. While an operative is on the inside of a bunker that’s within its control range, it can perform the Guard action, but you can only interrupt an enemy operative when that enemy operative is on the outside of this bunker, and when you do, that friendly operative can only shoot against or fight against an enemy operative on the outside.
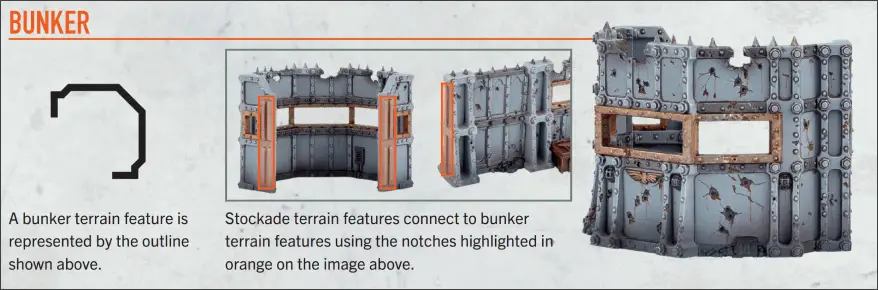
If small gaps accidentally develop between bunkers and stockades, or the strongholds they should be connected to, treat these gaps as Blocking terrain.
Fire Step

Fortified Position
Bunker and stockade terrain features create a fortified position that makes it harder for operatives to attack those on the other side of them.Visibility
- Visibility cannot be drawn over Heavy terrain of a bunker or stockade terrain feature unless the operative, or what they’re trying to see, is at least 2" higher than the bottom of that bunker or stockade (for an operative, remember to measure from its base). Note this has no effect when drawing visibility through an open breach point or window.
- Visibility cannot be drawn through the windows of a bunker or stockade terrain feature unless the operative or what they’re trying to see is horizontally within 1" of that window.

Shooting
- Whenever an enemy operative is shooting a friendly operative that’s on the other side of a bunker or stockade terrain feature and in cover from it (e.g. at its window), that friendly operative ignores the Piercing weapon rule.
- For the Blast and Torrent weapon rules, secondary targets must be on the same side of the bunker or stockade terrain feature as the primary target.
- x" Devastating can only affect operatives on the same side of the bunker or stockade terrain feature as the target.
- These have no effect when visibility/intervening for each of the above is through an open breach point.
Fighting
Whenever an operative on one side of a bunker or stockade terrain feature is retaliating against an operative on the other, the defender resolves first (this takes precedence over all other rules). This has no effect if either operative’s visibility is drawn through an open stockade’s breach point (in other words, it’s only relevant when operatives are fighting through a bunker or stockade’s window).Climbing
When climbing Heavy terrain of a bunker or stockade terrain feature, treat the vertical distance as 4" (even though the operative moves less). Note this has no effect when moving through an open breach point.Opening a Stockade
Whenever a friendly operative is performing the Shoot action:
Whenever a friendly operative is performing the Fight action:
Each stockade terrain feature has a Wounds stat of 8. If its wounds are reduced to 0 or less, its status is changed to open.
Operatives can perform the following mission action.
- You can select a stockade terrain feature as a valid target, as long as its removable part is visible to the active operative.
- The stockade can be obscured (treat its breach point as its base), but cannot be in cover.
- Treat the Hit stat of the active operative’s weapons as 2+, then apply any other changes to these stats as normal (e.g. injured).
- Your opponent rolls an additional defence dice for the stockade (usually four, unless the weapon has Piercing), but defence dice cannot be re-rolled.
- The stockade has a Save stat of 4+.
- Whenever damage of 3 or less would be inflicted on the stockade, ignore that inflicted damage. Note this is for each instance of damage, not total damage.
Whenever a friendly operative is performing the Fight action:
- You can select a stockade terrain feature to fight against, as long as its removable part is within the active operative’s control range.
- The stockade cannot retaliate.
- Treat the Hit stat of the active operative’s weapons as 2+, then apply any other changes to these stats as normal (e.g. injured).
- Whenever damage of 5 or less would be inflicted on the stockade, ignore that inflicted damage. Note this is for each instance of damage, not total damage.
Each stockade terrain feature has a Wounds stat of 8. If its wounds are reduced to 0 or less, its status is changed to open.
Operatives can perform the following mission action.
OPEN STOCKADE DOOR1AP
Open a stockade terrain feature that has a door, if the inside of its breach point is within the operative’s control range.
An operative cannot perform this action if it’s on the outside of the stockade, if that stockade is already open or it doesn’t have a door.
Cityfight
Killzone: Volkus has the following additional rules.Condensed Stronghold
Whenever an operative is shooting with a weapon that has the Blast, Torrent and/or x" Devastating (i.e. Devastating with a distance requirement) weapon rule, it also has the Lethal 5+ weapon rule if the target is wholly within a stronghold terrain feature and on the killzone floor or a fire step.The Condensed Stronghold rule always relates to the target’s location, so if the primary target is wholly within a stronghold, but the secondary target isn’t, then this rule doesn’t apply to that secondary target.
Garrisoned Stronghold
When an operative wholly within a stronghold terrain feature is retaliating against an operative that isn’t, the defender resolves first (this takes precedence over the normal fight resolution order).Action
Operatives can perform the following universal action.DOOR FIGHT1AP
Fight with the active operative (see fight sequence).
In the Select Enemy Operative step, instead select an enemy operative on the killzone floor and within 2" of, and on the other side of, a door the active operative is touching. For the duration of that action, those operatives are treated as being within each other’s control range.
This action is treated as a Fight action. An operative cannot perform this action while within control range of an enemy operative, or if its base isn’t touching a door.
This action allows an operative to fight through a door — useful if the enemy is obstructing it and preventing your operatives from moving through.
") TYRANID INFESTATION
TYRANID INFESTATION
Killzone Upgrade: Tyranid Infestation has 2x gestation sacs, 2x shardspewer growths, 2x capillary towers, 1x brood nest, 2x underbrood mounds, 2x capillary roots and 2x spore vents. It also has one additional brood nest or one spore chimney, depending on how you construct it for each battle.This killzone upgrade allows you to create a Tyranid infestation in your killzone. The missions in this publication are designed around using Killzone Upgrade: Tyranid Infestation with Killzone: Volkus (Kill Team Core Book), but with a bit of creativity, you could repurpose it to use with other killzones.
Each of the Tyranid Infestation terrain features are specified here. They don’t provide additional rules (other than the usual Light and Heavy) as they are intended to be used with Typhon’s NPOs and NPO STRATEGIC GAMBIT cards, which provide additional rules.
Each of the Tyranid Infestation terrain features are specified here. They don’t provide additional rules (other than the usual Light and Heavy) as they are intended to be used with Typhon’s NPOs and NPO STRATEGIC GAMBIT cards, which provide additional rules.


KILLZONE: GALLOWDARK
Killzone: Gallowdark uses a 606mm x 703mm game board with a 6x7 grid system for setting up. It has 4x short walls with hatchway and pillars and 2x each other terrain feature specified here. It also has 8x left and 8x right pillars, and 30x pillar caps to complete terrain configuration. Note that some mission maps use less than this.Gallowdark Wall
Gallowdark wall terrain feature is Heavy and Wall terrain. Some walls include a hatchway, which is explained separately.
Wall terrain:
Wall terrain:
- Operatives cannot move over or through Wall terrain (this takes precedence over all other rules).
- Visibility cannot be determined over or through Wall terrain.
- Other than to areas of the killzone (centre of the killzone, drop zones, etc.), distances cannot be measured over or through Wall terrain; they must be measured around it using the shortest possible route.
- For the purposes of cover and obscured, only the corners and ends of Wall terrain can intervene, unless the active operative has passed it (see examples below).
Hatchway
A hatchway has two statuses: closed and open. It has two parts — an access point and a hatch — and their terrain types depend upon the hatchway’s status. Operatives can perform the Operate Hatch mission action to change its status. Hatchways begin the battle closed.Closed
While a hatchway is closed: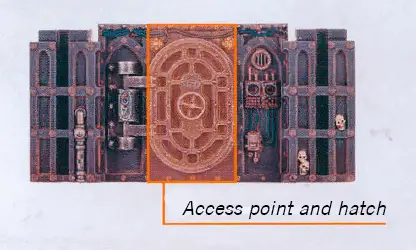
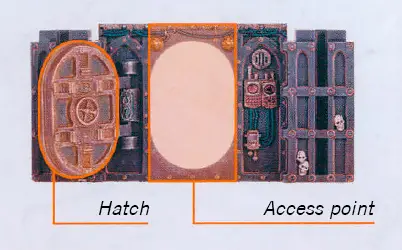
Open
While a hatchway is open:- Its hatch must be fully open (it cannot be ajar).
- Its access point is Accessible, Insignificant and Exposed terrain.
- Its hatch is Heavy and Wall terrain, and the gap directly underneath it is Blocking terrain.
Operate Hatch1AP
Open or close a hatchway that’s access point is within the operative’s control range.
An operative can perform this action during a Dash or Reposition action, and any remaining move distance can be used after it does so.
An operative cannot perform this action while within control range of an enemy operative, or if that hatchway is open and its access point is within an enemy operative’s control range.
As an open hatchway’s access point is Exposed terrain, the walls either side of it must be used for cover and obscuring instead of the access point.
If operatives would prevent the hatch from fully opening or closing, temporarily remove them from the killzone, open or close the hatch, then return the operatives as close as possible to their original location. If an operative is within an enemy operative’s control range before a hatch is opened, it must be returned there.
Opening a hatchway can cause the operative to be within control range of an enemy operative, in which case its Dash or Reposition action would immediately end (unless it has rules that allow it to move within control range of an enemy operative).
") KILLZONE: TOMB WORLD
KILLZONE: TOMB WORLD
Killzone: Tomb World uses a 606mm x 703mm game board with a 6x7 grid system for setting up. It has a sarcophagus, 4x debris and 2x each other terrain feature specified here. It also has 16x half pillars to complete terrain configuration. Note that some mission maps use less than this.Designer’s Note: This killzone is similar to Killzone: Gallowdark from the Kill Team Core Book. To maintain consistency of rules – especially for those printed elsewhere – we’ve kept the terms the same. For example, even though Killzone: Tomb World uses portals rather than hatches, we still call it a hatchway and operatives perform the Operate Hatch action.
Tomb World Wall
A Tomb World wall terrain feature is Heavy and Wall terrain. Some walls include a hatchway or a breach point (explained later).
- Operatives cannot move over or through Wall terrain (this takes precedence over all other rules).
- Visibility cannot be determined over or through Wall terrain.
- Other than to areas of the killzone (centre of the killzone, drop zones, etc.), distances cannot be measured over or through Wall terrain; they must be measured around it using the shortest possible route.
- For the purposes of cover and obscured, only the corners and ends of Wall terrain can intervene, unless the active operative has passed it (see examples bellow).


Hatchway
A hatchway has two statuses: closed and open. It has two parts – an access point and a hatch – and their terrain types depend upon the hatchway’s status. Operatives can perform the Operate Hatch mission action to change its status. Hatchways begin the battle closed.Closed
While a hatchway is closed:

- Its hatch must be within its access point.
- The access point and hatch are Heavy and Wall terrain.

Open
While a hatchway is open:

- Its hatch must be removed from the killzone.
- Its access point is Accessible and Insignificant terrain.
- Its access point is also Exposed terrain. This means the walls either side of it must be used for cover and obscuring instead.
OPERATE HATCH1AP
Open or close a hatchway thats access point is within the operative’s control range.
An operative can perform this action during the Dash or Reposition action, and any remaining move distance can be used after it does so.
An operative cannot perform this action while within control range of an enemy operative, or if that hatchway is open and its access point is within an enemy operative’s control range.
Breach Point
A breach point has two statuses: closed and open. It has two parts – an access point and a breach wall – and their terrain types depend upon the breach point’s status. Breach points begin the battle closed. To open a breach point, operatives can perform the Breach mission action (at which point it cannot be closed again).Closed
While a breach point is closed:- Its breach wall must be within its access point.
- The access point and breach wall are Heavy and Wall terrain.

Open
While a breach point is open:- Its breach wall must be removed from the killzone.
- Its access point is Accessible and Insignificant terrain.
- Its access point is also Exposed terrain. This means the walls either side of it must be used for cover and obscuring instead.

BREACH2AP
Open a closed breach point thats access point is within the operative’s control range.
An operative that has the word(s) ‘breach marker’, ‘grenadier’ or ‘mine’ on its datacard, or has a weapon with the Piercing 2 or Piercing Crits 2 weapon rule (excluding weapons that have the Blast or Torrent weapon rule) can perform this action for 1 less AP (to a minimum of 1AP)
Roll one D6 separately for each operative that’s on the other side of the access point and has that access point within its control range: on a 4+, subtract 1 from that operative’s APL stat until the end of its next activation and inflict damage on it equal to the dice result halved (rounding up).
An operative cannot perform this action while within control range of an enemy operative, or if that breach point is open. It cannot perform this action for less than 2AP during an activation/counteraction in which it performed the Charge or Shoot action (or vice versa).
Teleport Pad
A teleport pad is Exposed, Insignificant and Vantage terrain. Only one operative can be on it at once, and whilst an operative is on it, that operative cannot touch the killzone floor (in other words, an operative can’t be both on the teleport pad and on the killzone floor). Equipment terrain features cannot be set up within 2" of a teleport pad. Whenever an operative’s base is touching a teleport pad, if another operative is on that teleport pad, those operatives are treated as being within each other’s control range.

From the start of the second turning point, whenever a friendly operative on a teleport pad performs the Charge, Fall Back or Reposition action, you can teleport it. If you do, don’t move it. Instead, remove it from the killzone and set it back up on the other teleport pad. It must still fulfil all other requirements of that action, otherwise it cannot teleport (e.g. if it’s the Charge action, the operative must finish that action within control range of an enemy operative). If another operative is on the other teleport pad when an operative teleports, swap them around (if it’s an enemy operative, its controlling player sets it up). An operative cannot teleport more than once per activation.
Sarcophagus And Debris (Light Terrain)

Close Quarters
Killzone: Gallowdark has the following additional rules.Condensed Environment
Weapons with the Blast, Torrent and/or x" Devastating (i.e. Devastating with a distance requirement) weapon rule also have the Lethal 5+ weapon rule.Actions
Operatives can perform the following universal actions.Guard1AP
The operative goes on guard until any of the following are true:
This action is treated as a Shoot action. An operative cannot perform this action while it has a Conceal order, or while it’s within control range of an enemy operative.
Guard is a powerful action that allows an operative to attack later, at the opportune moment. It can change the dynamic of the game, so try to avoid enemy operatives on guard, or consider how best to utilise it yourself. Use the token above to indicated any operatives that are on guard.
On Guard
Once during each enemy operative’s activation, after that enemy operative performs an action, you can interrupt that activation and select one friendly operative on guard to perform the Fight or Shoot action for free (including actions that are treated as such, e.g. Hatchway Fight below). If you do, that friendly operative cannot counteract during the turning point.Determine the target as normal for these actions. This means you don’t have to target the operative you interrupted.
That friendly operative can even perform the Shoot action while within control range of an enemy operative (this takes precedence over the normal Shoot action conditions). This is known as a point-blank shot and has the following additional rules while your operative is doing it:
- Target the enemy operative within your operative’s control range (even if it wouldn’t normally be a valid target).
- Worsen the Hit stat of your operative’s weapons by 1.
- Until the end of the interrupted enemy operative’s activation, your operative cannot retaliate.
Hatchway Fight1AP
Fight with the active operative (see fight sequence).In the Select Enemy Operative step, instead select an enemy operative within 2" of, and on the other side of, an open hatchway’s access point the active operative is touching. For the duration of that action, those operatives are treated as being within each other’s control range.
This action is treated as a Fight action. An operative cannot perform this action while within control range of an enemy operative, or if its base isn’t touching an open hatchway’s access point.
This action allows an operative to fight across an open hatchway — useful if the enemy is obstructing it and preventing your operatives from moving through.
KILLZONE: BHETA-DECIMA
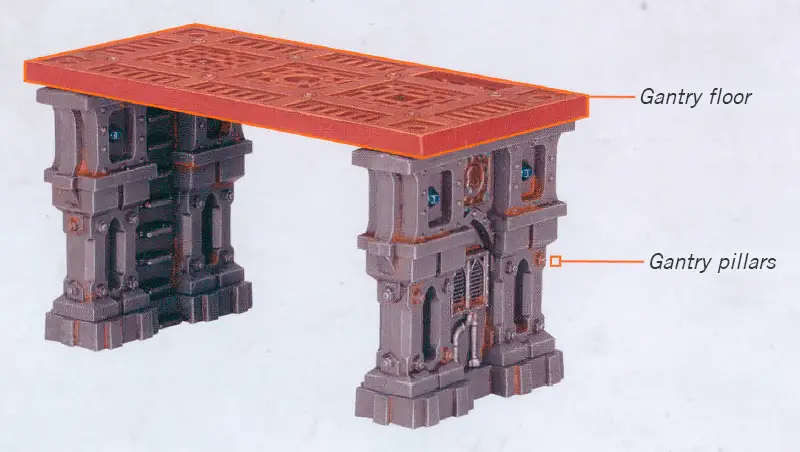
Killzone: Bheta-Decima has 2x short gantries, 4x medium gantries, 2x long gantries and 1x thermometric condenser.Gantry
- Gantry floors are Accessible and Vantage terrain.
- Gantry pillars are Heavy terrain.
- Gantry terrain features come in three sizes: long, medium and short. When they are connected (i.e. their gantry floors are touching each other), they are treated as the same terrain.
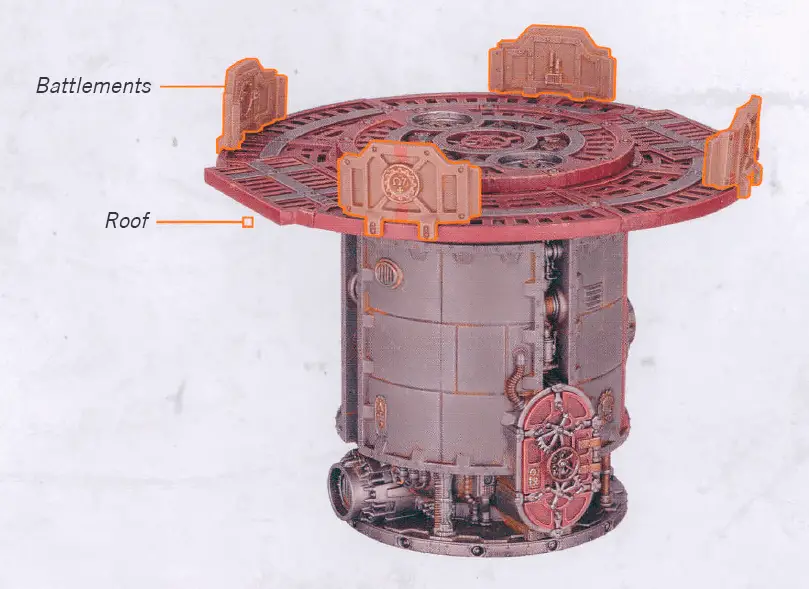
Thermometric Condenser
- The roof is Accessible and Vantage terrain.
- The inner-ledge of the roof is Exposed and Insignificant terrain. In other words, ignore the slight difference in height between the outer and inner area of the roof.
- The battlements on the roof are Light terrain.
- All other parts of it are Heavy terrain.
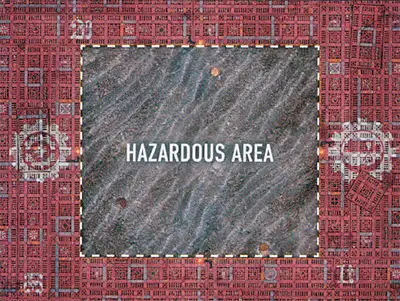
Hazardous Area
Killzone: Bheta-Decima has the following additional rules that use hazardous areas marked on the game board.Restricted Movement
No part of an operative’s base can be touching a hazardous area.Restricted Targeting
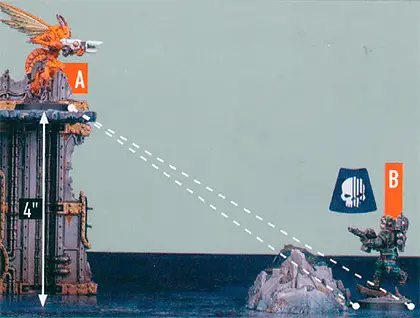
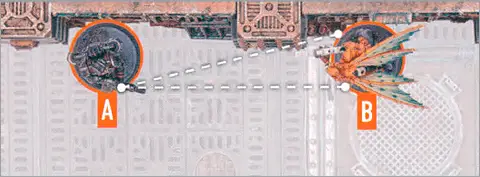
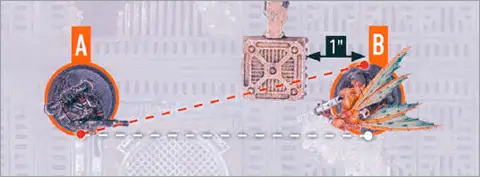
When selecting a valid target for an operative on the killzone floor, an intended target on the killzone floor is not a valid target if 4" of hazardous area is between them.
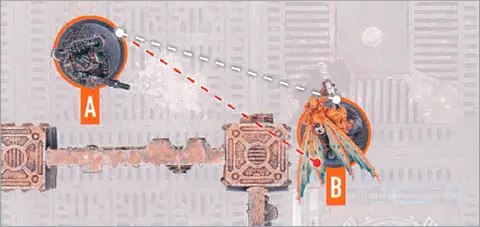
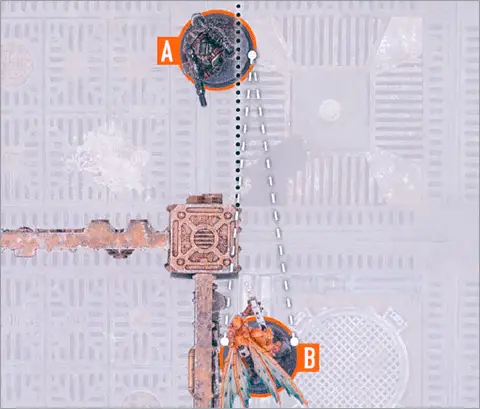
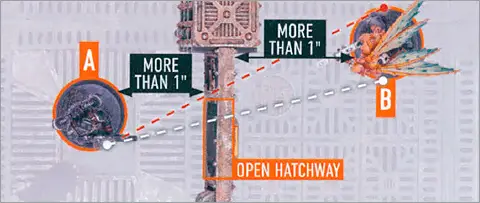
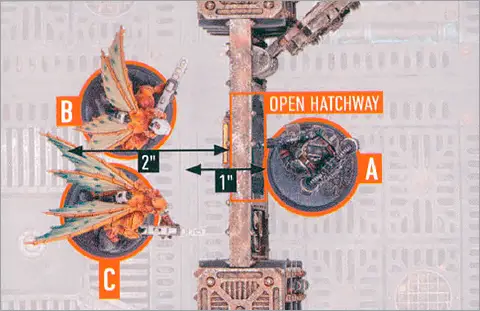
When selecting a valid target for an operative on Vantage terrain, an intended target on the killzone floor is not a valid target if the footprint of a gantry is between them. The same is also true in reverse (an operative on the killzone floor to an intended target on Vantage terrain). However, in both cases, ignore the footprint of gantry terrain features the operative or the intended target is on or in.
In both cases, use targeting lines to determine if a hazardous area or the footprint of a gantry is between them.
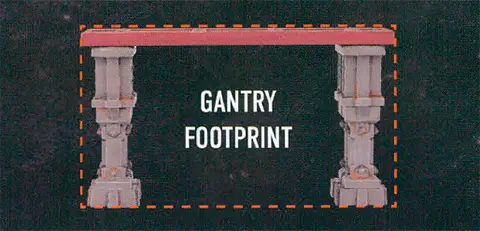 A gantry’s footprint is the gantry itself, plus the area underneath it.
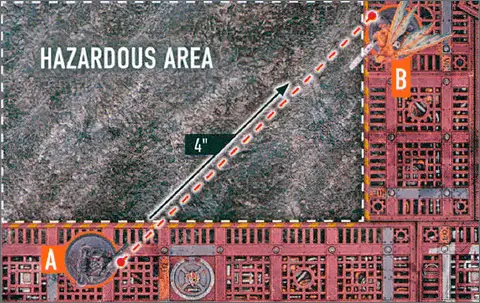 4" of hazardous area is between operatives A and B, therefore operative B is not a valid target (and neither would operative A be in reverse).
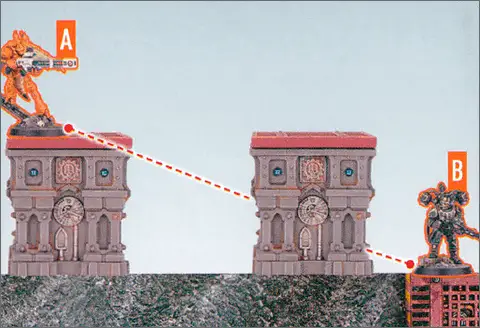 The footprint of a gantry is between operatives A and B, therefore operative B is not a valid target (and neither would operative A be in reverse). Note that the left gantry is ignored when determining this, as operative A is on it.
When selecting a valid target for an operative on Vantage terrain, an intended target on the killzone floor is not a valid target if the footprint of a gantry is between them. The same is also true in reverse (an operative on the killzone floor to an intended target on Vantage terrain). However, in both cases, ignore the footprint of gantry terrain features the operative or the intended target is on or in.
In both cases, use targeting lines to determine if a hazardous area or the footprint of a gantry is between them.
Lurking predators stop operatives from venturing too close to the ocean, while strong currents and toxic water prevent them from entering it.
Relentless waves, sea mist and industrial smog make it harder for operatives to see targets over the ocean’s surface.
Restricted targeting only matters if one or more of the operatives in question are on the killzone floor; if they are both on Vantage terrain, it has no effect.
Relentless waves, sea mist and industrial smog make it harder for operatives to see targets over the ocean’s surface.
Restricted targeting only matters if one or more of the operatives in question are on the killzone floor; if they are both on Vantage terrain, it has no effect.
Equipment
Equipment can be set up on Vantage terrain and within 2" of Accessible terrain (this takes precedence over the usual restrictions).SETTING UP KILLZONES
Terrain features are critical to a good game of Kill Team, so setting up the killzone correctly is crucial. In mission packs that use specific killzones, mission maps will often show you where to place terrain features. However, for universal mission maps (those that don’t specify the location of terrain features) or mission maps of your own creation, here’s some guidance.
Try to avoid symmetrical killzones. Asymmetrical set ups are harder to get right, but they provide more variety in gameplay and encourage better generalship. Drop zone selection, tactical variety and player adaptability are three areas of the game that can benefit from asymmetrical set ups. This doesn’t mean asymmetrical set ups are unbalanced — certain fundamentals exist to ensure the killzone is still fair for both players.
There must be multiple terrain features at the edge of your drop zone. You should be able to safely conceal your Operatives during set up so they aren’t incapacitated before you’ve activated them; Heavy terrain is best for hiding from operatives on Vantage terrain. If this is unachievable, you can select a Heavy barricade from your equipment.
Limit Vantage terrain within your drop zone. It makes things more exciting if operatives are moving around to gain a better position.
Concentrate terrain features outside of drop zones. This creates natural fire lanes, encouraging crossfires and tactical movement as operatives manoeuvre for the better position. It also allows operatives to safely move forwards, so long as their flanks are protected.
The example below is a simple but suitable set up. It has symmetrically inspired elements, whereby each player has a stronghold, a large ruin and a ruined wall within their territory. However, there are differences in size, location and orientation. This ensures the killzone is asymmetrical.
Each player has two areas with Heavy terrain to safely set up their operatives, and two different Vantage terrain features nearby. There is a healthy spacing between the four dominant buildings, and a varied selection of smaller terrain features between them. This creates an outline of a city block that looks thematic, and creates channels for your operatives to move, shoot and charge through.
Visible
For an intended target to be Visible, the following must be true:- You can draw an imaginary, unobstructed straight line (known as a Visibility line) 1 mm wide from the head of the active operative’s miniature to any part of the miniature of the intended target (not its base).
In the rare instance that bases or parts of the active operative’s miniature prevent an intended target from being Visible to the active operative, such as when the active operative is directly below or above the intended target, treat those bases and parts as being invisible.
Some rare rules will require you to select a point that is Visible (e.g. a point on the killzone). In such circumstances, you must be able to draw an imaginary, unobstructed straight line 1mm wide from the head of the active operative’s miniature to the point you would select.
Killzone Floor
The killzone floor is the lowest level of the killzone (i.e. the game board). Anything that’s on a marker that’s on the killzone floor is also on the killzone floor.
Dropping
Operatives drop down when they move off terrain or after they’ve jumped. Ignore 2" of vertical distance that they drop during each action. This means a vertical drop of 2" or less is ignored. If they drop multiple times during an action, only 2" total is ignored, not 2" from each drop.
Climbing
An operative must be within 1" horizontally and 3" vertically of terrain that’s visible to them to climb it. Each climb is treated as a minimum of 2" vertically (e.g. a 1" distance is treated as 2").
Jumping
Operatives can jump from Vantage terrain higher than 2" from the killzone floor when they move off it. You can move them up to 4" horizontally from the edge when they jump, done like any other move except in one straight-line increment. The operative must then drop or climb from there.When jumping from Vantage terrain, if there is a terrain part such as a rampart at the edge the operative would jump from, the operative must climb it first then jump from the highest point it must climb over. When jumping to a terrain feature, you can ignore its height difference of 1" or less, including its rampart (if any).
|
Accurate x
You can retain up to x attack dice as normal successes without rolling them. If a weapon has more than one instance of Accurate x, you can treat it as one instance of Accurate 2 instead (this takes precedence over x rules).Shoot1AP
Shoot with the active operative by following the sequence below. The active operative’s player is the attacker. The selected enemy operative’s player is the defender.
An operative cannot perform this action while it has a Conceal order, or while within control range of an enemy operative.
Charge1AP
The same as the Reposition action, except the active operative can move an additional 2".
It can move, and must finish the move, within control range of an enemy operative. If it moves within control range of an enemy operative that no other friendly operatives are within control range of, it cannot leave that operative’s control range.
An operative cannot perform this action while it has a Conceal order, if it’s already within control range of an enemy operative, or during the same activation in which it performed the Reposition, Dash or Fall Back action.
Counteract
When you would activate a ready friendly operative, if all your operatives are expended but your opponent still has ready operatives, you can select an expended friendly operative with an Engage order to perform a 1AP action (excluding Guard) for free. Each operative can only counteract once per turning point. That operative cannot move more than 2", or must be set up wholly within 2" if it’s removed and set up again, while counteracting (this is not a change to its Move stat, and takes precedence over all other rules). Counteracting is optional, so you can choose not to. In either case, activation alternates back to your opponent afterwards.Counteracting isn’t an activation, it’s instead of activating. This difference is important; for instance, it means action restrictions won't apply.
|
Valid Target
Some rules require you to select a valid target for an operative. This is most common when an operative is shooting, but some rare rules require it too.
|
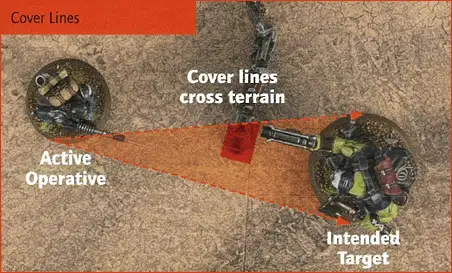
Cover
If an operative positions themselves in Cover, they will use it for protection while they have an Engage order, or hide behind it while they have a Conceal order. For an intended target to be in Cover, both of the following must be true:- The intended target is more than from the active operative.
- The intended target is within of a point at which a Cover line crosses another operative’s base (unless that other operative is not itself in the active operative’s LoS), or a terrain feature that provides Cover (see Terrain Traits).
Note that an intended target that has an Engage order can gain a defensive benefit for being in Cover as specified in the shooting sequence.
Bases
All operatives are on bases. The base is an important part of the miniature for rules purposes, in particular measuring distances. Each operative’s base size is specified on its datacard. The sides of different bases can touch, but a base cannot be placed on another. Friendly operatives can move through other friendly operatives (the base and the miniature), but not through enemy operatives. Bases cannot move through terrain, or be over the edge of the killzone.
Precedence
Some rare rules will conflict with each other, so it must be established which takes precedence. In order of priority, a rule takes precedence if:1
2
3
4
5
6
If a rule on a datacard says ‘this operative can perform two Shoot actions during its activation’, this takes precedence over the core rules for action restrictions, as per precedence priority 3.
Control Range
Many rules relate to control range such as moving, fighting and using cover. Something is within an operative’s control range if it’s visible to and within 1" of that operative.Control range between operatives is mutual, therefore operatives are within each other’s control range if one of them is visible to and within 1" of the other.
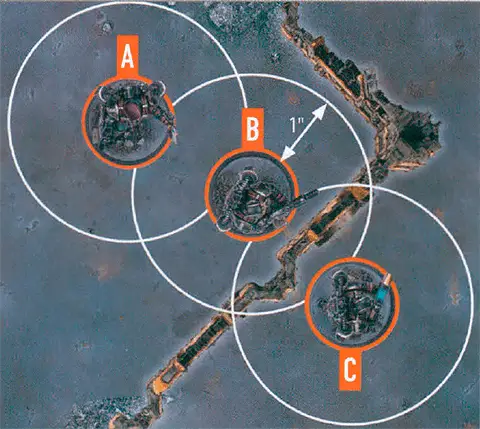
The terrain is within both operative B and C’s control range.
Because of the terrain, operative B is not visible to operative C, and vice versa, therefore they are not within each other’s control range.
Imagine control range as an area of interaction the operative has with things close to it.
OPEN STOCKADE DOOR1AP
Open a stockade terrain feature that has a door, if the inside of its breach point is within the operative’s control range.
An operative cannot perform this action if it’s on the outside of the stockade, if that stockade is already open or it doesn’t have a door.
Guard1AP
The operative goes on guard until any of the following are true:
- It performs any action, moves or is set up.
- An enemy operative ends an action within its control range and you don’t interrupt that activation (see On Guard).
- Its order is changed.
- It’s the start of the next turning point.
Fight1AP
Fight with the active operative by following the sequence below. The active operative’s player is the attacker. The selected enemy operative’s player is the defender.
An operative cannot perform this action unless an enemy operative is within its control range.
Piercing x
The defender collects x less defence dice, e.g. Piercing 1. If the rule is Piercing Crits x, this only comes into effect if you retain any critical successes.Blast x
The target you select is the primary target. After shooting the primary target, shoot with this weapon against each secondary target in an order of your choice (roll each sequence separately). Secondary targets are other operatives visible to and within x of the primary target, e.g. Blast 2" (they are all valid targets, regardless of a Conceal order). Secondary targets are in cover and obscured if the primary target was.Torrent x
Select a valid target as normal as the primary target, then select any number of other valid targets within x of the first valid target, but not within control range of friendly operatives, as secondary targets, e.g. Torrent 2". Shoot with this weapon against all of them in an order of your choice (roll each sequence separately).Devastating x
Each retained critical success immediately inflicts x damage on the operative this weapon is being used against, e.g. Devastating 3. If the rule starts with a distance (e.g. 1" Devastating x), inflict x damage on that operative and each other operative visible to and within that distance of it. Note that success isn’t discarded after doing so — it can still be resolved later in the sequence.Damage
When damage is inflicted on an operative, reduce their wounds by that amount. An operative’s starting number of wounds is determined by its Wounds stat (see datacards). If an operative’s wounds are reduced to 0 or less, it’s incapacitated, then removed from the killzone. Some rules allow an incapacitated operative to perform a free action before being removed from the killzone. Such an operative cannot perform more than one free action (excluding Place Marker) in this instance, and that operative’s player decides the order of any of its rules that occur before it’s removed from the killzone (taking precedence over the player with initiative deciding).While an operative has fewer than its starting wounds remaining, it’s wounded. While it has fewer than half its starting wounds remaining, it’s also injured. Subtract 2" from the Move stat of injured operatives and worsen the Hit stat of their weapons by 1.
Keep track of each operative’s remaining wounds with dice, tokens or by writing it down.
‘Incapacitated’ and ‘removed from the killzone’ are separate. Some rules take effect when an operative is incapacitated, but before it’s removed.
‘Incapacitated’ and ‘removed from the killzone’ are separate. Some rules take effect when an operative is incapacitated, but before it’s removed.
Lethal x+
Your successes equal to or greater than x are critical successes, e.g. Lethal 5+.Open
While a hatchway is open:- Its hatch must be fully open (it cannot be ajar).
- Its access point is Accessible, Insignificant and Exposed terrain.
- Its hatch is Heavy and Wall terrain, and the gap directly underneath it is Blocking terrain.
Operate Hatch1AP
An operative can perform this action during a Dash or Reposition action, and any remaining move distance can be used after it does so.
An operative cannot perform this action while within control range of an enemy operative, or if that hatchway is open and its access point is within an enemy operative’s control range.
Dash1AP
The same as the Reposition action, except don’t use the active operative’s Move stat — it can move up to 3" instead. In addition, it cannot climb during this move, but it can drop and jump.
An operative cannot perform this action while within control range of an enemy operative, or during the same activation in which it performed the Charge action.
Reposition1AP
Move the active operative up to its Move stat to a location it can be placed. This must be done in one or more straight-line increments, and increments are always rounded up to the nearest inch.
It cannot move within control range of an enemy operative, unless one or more other friendly operatives are already within control range of that enemy operative, in which case it can move within control range of that enemy operative but cannot finish the move there.
An operative cannot perform this action while within control range of an enemy operative, or during the same activation in which it performed the Fall Back or Charge action.
BREACH2AP
Open a closed breach point thats access point is within the operative’s control range.
An operative that has the word(s) ‘breach marker’, ‘grenadier’ or ‘mine’ on its datacard, or has a weapon with the Piercing 2 or Piercing Crits 2 weapon rule (excluding weapons that have the Blast or Torrent weapon rule) can perform this action for 1 less AP (to a minimum of 1AP)
Roll one D6 separately for each operative that’s on the other side of the access point and has that access point within its control range: on a 4+, subtract 1 from that operative’s APL stat until the end of its next activation and inflict damage on it equal to the dice result halved (rounding up).
An operative cannot perform this action while within control range of an enemy operative, or if that breach point is open. It cannot perform this action for less than 2AP during an activation/counteraction in which it performed the Charge or Shoot action (or vice versa).
Fall Back2AP
The same as the Reposition action, except the active operative can move within control range of an enemy operative, but cannot finish the move there.
An operative cannot perform this action unless an enemy operative is within its control range. It cannot perform this action during the same activation in which it performed the Reposition or Charge action.