
Core Rules
Welcome to the rules section. Over the following pages you will find the fundamental rules for conducting operations with your Kill Team in the killzones of the 41st Millennium. When combined with your kill team’s rules, you are ready to begin skirmish combat.

Books
|
Show History | ||||
| Book | Kind | Edition | Version | Last update |
| Warhammer 40,000 Kill Team: Core Book | ||||
| Warhammer 40,000 Kill Team: Core Book | Rulebook | 3 | June 2026 | |
CORE RULES
Warhammer 40,000: Kill Team is a tactical skirmish combat game. Teams of specialist operatives will engage in brutal firefights and back-and-forth close combats, where careful moving and positioning will be required to take cover and secure vital objectives.
To play a game of Kill Team, you will need the following:
- A kill team — collection of Citadel miniatures (operatives) for each player.
- Their accompanying rules (available for free at warhammer-community.com).
- A measuring device in inches.
- A minimum of 10 six-sided dice (D6).
- Tokens and markers.
- A killzone — game board and terrain features.
- A mission pack.
You will find many side notes in the core rules like this one. These are designer’s notes to give you greater context and understanding.
Each game has a sequence that tells you how to set up the playing area, prepare your kill team and achieve victory. This can be found here for the mission packs in this book, whilst other mission packs will have the game sequence presented separately.
The main step of the game sequence is the battle, where your operatives fight one another and you attempt to achieve victory. A battle consists of multiple turning points, and each turning point includes a Strategy phase and a Firefight phase. They must be completed in order and in full, at which point the turning point ends and the next begins. Repeat this process until the battle ends, as specified by your mission pack.
The main step of the game sequence is the battle, where your operatives fight one another and you attempt to achieve victory. A battle consists of multiple turning points, and each turning point includes a Strategy phase and a Firefight phase. They must be completed in order and in full, at which point the turning point ends and the next begins. Repeat this process until the battle ends, as specified by your mission pack.
As you read through the core rules you may find terms you won’t be familiar with. These are explained in alphabetical order in the Key Principles section. Don’t worry about these at first — keep reading to get an overview of how the game flows.
|


 Strategy Phase
1.Initiative
- The player with initiative activates first in the turning point and decides the order of resolution for rules that would happen at the same time. In the first turning point, the player with initiative is determined by the game sequence of your mission pack. In subsequent turning points, the players roll-off and the winner decides who has initiative. However, if the roll-off is a tie, the player who didn’t have initiative in the previous turning point decides who has initiative (this takes precedence over roll-offs and ties).
In some mission packs you will also determine initiative when setting up the battle. The player with initiative decides the order of resolution for simultaneous rules that happen before the battle begins.

2. Ready
- Each player gains 1 Command point (CP). In each turning point after the first, the player who doesn’t have initiative gains 2CP instead. Players keep CP until spent.
- Each player readies all friendly operatives.
CP are a valuable resource used to activate additional rules called ploys.
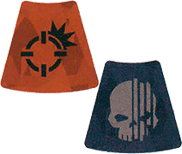
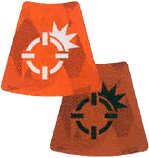
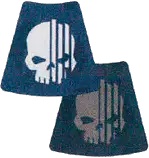
An order token with the lighter side up shows an operative as ready.
3. Gambit
- Starting with the player who has initiative, each player alternates either using a STRATEGIC GAMBIT or passing. The players repeat this process until they have both passed in succession. Strategy ploys are the most common STRATEGIC GAMBIT, but any rule labelled STRATEGIC GAMBIT can be used. You cannot use each STRATEGIC GAMBIT more than once per turning point.
 Firefight Phase
The player who has initiative activates a ready friendly operative. Once that activation ends, their opponent activates one of their ready friendly operatives. The players repeat this process, alternating activations until all of one player’s operatives are expended, in which case they can counteract between their opponent’s remaining activations. Once all operatives are expended, the Firefight phase ends.
| |||||||||||||||||||||

1. Determine Order
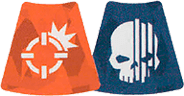
- Select the operative’s order (Engage or Conceal). It has this order until it’s next activated.
|
|
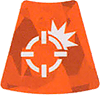
Giving your operatives the right order is key. As you play through a few games, you’ll gain a greater understanding of when to use an Engage order and when to use a Conceal order.
2. Perform Actions
- The operative performs actions. While an operative is doing so it’s known as the active operative.
- Each action costs Action points (AP), and you cannot spend more AP during an operative’s activation than its Action point limit (APL, see datacards). In addition, an operative cannot perform the same action more than once during its activation — this is known as action restrictions. Some rare rules will change the cost of actions. Regardless of how many AP changes an action is affected by, the minimum is always 0AP. This takes precedence over all AP changes.
- You don’t need to declare all your operative’s actions when it’s activated. Instead, your operative can perform an action, and then you can decide the next action after seeing its effects.
- lf an action is declared or begun but it’s not possible to complete, the action is cancelled. Revert back to the game state before that action. For example, if an operative has moved but cannot complete its move, return the operative to where it was before it moved; it hasn’t performed that action and you haven’t spent AP on it.
An operative with an APL of 2 could perform the Reposition (1AP) and Shoot (1AP) actions, totalling 2AP, but couldn’t perform the Fall Back (2AP) and Shoot (1AP) actions, totalling 3AP.
An order token with the lighter side up shows an operative as ready.
3. Expended
- When you’ve finished with your operative’s activation, that operative is expended. While expended, an operative is not ready.
Counteract
When you would activate a ready friendly operative, if all your operatives are expended but your opponent still has ready operatives, you can select an expended friendly operative with an Engage order to perform a 1AP action (excluding Guard) for free. Each operative can only counteract once per turning point. That operative cannot move more than 2", or must be set up wholly within 2" if it’s removed and set up again, while counteracting (this is not a change to its Move stat, and takes precedence over all other rules). Counteracting is optional, so you can choose not to. In either case, activation alternates back to your opponent afterwards.Counteracting isn’t an activation, it’s instead of activating. This difference is important; for instance, it means action restrictions won't apply.
Actions
Actions have effects ( ) and conditions (
  ). are conditions that must be fulfilled for the operative to perform that action, whilst are effects when an operative is performing that action, including any requirements when doing so. There are four different types of actions: universal, unique, mission and free.
Universal actions are the most common actions you will use and can be performed by all operatives unless specified otherwise.
Unique actions are rarer actions in your kill team’s rules. Only specified operatives can perform them.
Mission actions are specific to the mission or killzone you are playing. If there are any, they will be in your mission pack, killzone rules or the equipment you’ve selected.
Unique actions are rarer actions in your kill team’s rules. Only specified operatives can perform them.
Mission actions are specific to the mission or killzone you are playing. If there are any, they will be in your mission pack, killzone rules or the equipment you’ve selected.
Free actions can only be performed when another rule specifies, and the following rules apply:
- The conditions of the action must be met.
- It does not cost the operative any additional AP to perform the action.
- The operative would still count as performing the action for all other rules purposes. For example, if it performed the action during its activation, it wouldn’t be able to perform it again during that activation.
lf an operative performs a free action outside of their activation, it does not prevent them from performing that action during their activation, or vice versa.
Universal Actions
Reposition1AP
Move the active operative up to its Move stat to a location it can be placed. This must be done in one or more straight-line increments, and increments are always rounded up to the nearest inch.
It cannot move within control range of an enemy operative, unless one or more other friendly operatives are already within control range of that enemy operative, in which case it can move within control range of that enemy operative but cannot finish the move there.
An operative cannot perform this action while within control range of an enemy operative, or during the same activation in which it performed the Fall Back or Charge action.
Moving in increments allows for greater precision and clarity.
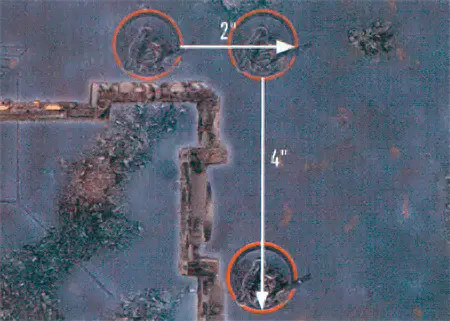
The operative has a Move stat of 6". It first moves in a straight-line increment of 2" to clear the corner of a wall. It then moves ina straight-line increment of 4" — the remaining distance it can move without exceeding its Move stat.
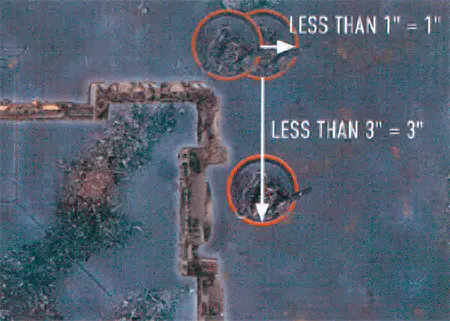
The operative first moves in a straight-line increment of 0.5" to clear the corner of a wall, but as increments are rounded up, this is treated as 1". It then moves in a straight-line increment of 2.75", but again, this is rounded up to 3". It has moved 4" in total.
These movements are done in straight-line increments, rather than curves around the corner.
Dash1AP
The same as the Reposition action, except don’t use the active operative’s Move stat — it can move up to 3" instead. In addition, it cannot climb during this move, but it can drop and jump.
An operative cannot perform this action while within control range of an enemy operative, or during the same activation in which it performed the Charge action.
As operatives cannot perform the same action more than once in their activation, Dash actions are how operatives move even further.
Fall Back2AP
The same as the Reposition action, except the active operative can move within control range of an enemy operative, but cannot finish the move there.
An operative cannot perform this action unless an enemy operative is within its control range. It cannot perform this action during the same activation in which it performed the Reposition or Charge action.
If an operative is activated within control range of an enemy operative, the Fall Back action is a way to withdraw. It costs 2AP, so most operatives could do no other actions in that activation.
Charge1AP
The same as the Reposition action, except the active operative can move an additional 2".
It can move, and must finish the move, within control range of an enemy operative. If it moves within control range of an enemy operative that no other friendly operatives are within control range of, it cannot leave that operative’s control range.
An operative cannot perform this action while it has a Conceal order, if it’s already within control range of an enemy operative, or during the same activation in which it performed the Reposition, Dash or Fall Back action.
The Charge action allows operatives to effectively close down enemies, but as they must have an Engage order to do so, they can be vulnerable to enemy shooting later on.
Pick Up Marker1AP
Remove a marker the active operative controls that the Pick Up Marker action can be performed upon. That operative is now carrying, contesting and controlling that marker.
An operative cannot perform this action while within control range of an enemy operative, or while it’s already carrying a marker.
If there are any such markers that the Pick Up Marker action can be performed upon, it will be specified elsewhere, e.g. your mission pack.
Place Marker1AP
Place a marker the active operative is carrying within its control range.
If an operative carrying a marker is incapacitated, it must perform this action before being removed from the killzone, but does so for 0AP. This takes precedence over all rules that prevent it from doing so.
An operative cannot perform this action during the same activation in which it already performed the Pick Up Marker action (unless incapacitated).
As above, if there are any markers the operative is carrying, it will be specified elsewhere.
Shoot1AP
Shoot with the active operative by following the sequence below. The active operative’s player is the attacker. The selected enemy operative’s player is the defender.
An operative cannot perform this action while it has a Conceal order, or while within control range of an enemy operative.
Unsurprisingly, Kill Team can be a very deadly game, so if you are frequently losing operatives to enemy shooting, consider playing more defensively with operatives in cover ona Conceal order.
1. Select Weapon
The attacker selects one ranged weapon ( ) to use that their operative has and collects their attack dice — a number of D6 equal to the weapon’s Atk stat.
2. Select Valid Target
The attacker selects an enemy operative that’s a valid target and has no friendly operatives within its control range.
|
An operative is visible if the active operative can see it. An operative is in cover if there’s intervening terrain within its control range. However, it cannot be in cover while within 2" of the active operative. An operative cannot be in cover from and obscured by the same terrain feature. If it would be, the defender must select one of them (cover or obscured) for that sequence when their operative is selected as the valid target.
In some rare instances you will be the attacker and defender, such as when shooting a friendly operative as a result of the Blast weapon rule. When this happens, you roll attack and defence dice (not your opponent).
3. Roll Attack Dice
The attacker rolls their attack dice. Each result that equals or beats the weapon’s Hit stat is a success and is retained. Each result that doesn’t is a fail and is discarded. Each result of 6 is always a critical success. Each other success is a normal success. Each result of 1 is always a fail.If the target operative is obscured:
- The attacker must discard one success of their choice instead of retaining it.
- All the attacker’s critical successes are retained as normal successes and cannot be changed to critical successes (this takes precedence over all other rules).
An operative is obscured if there’s intervening Heavy terrain. However, it cannot be obscured by intervening Heavy terrain that’s within 1" of either operative.
Obscuring means it’s less efficient to target an enemy operative through large intervening obstructions. However, this is ignored when operatives are at such obstructions — imagine them leaning around corners or through windows.
4. Roll Defence Dice
The defender collects three defence dice. If the target operative is in cover, they can retain one normal success without rolling it — this is known as a cover save. They roll the remainder.Each result that equals or beats the target’s Save stat is a success and is retained. Each result that doesn’t is a fail and is discarded. Each result of 6 is always a critical success. Each other success is a normal success. Each result of 1 is always a fail.
Remember, cover in this step usually applies to operatives with an Engage order, as a Conceal order would have prevented it from being a valid target in the first place.
5. Resolve Defence Dice
The defender allocates all their successful defence dice to block successful attack dice.- A normal success can block a normal success.
- Two normal successes can block a critical success.
- Acritical success can block a normal success or a critical success.
6. Resolve Attack Dice
All successful unblocked attack dice inflict damage on the target operative.- A normal success inflicts damage equal to the weapon’s Normal Dmg stat.
- A critical success inflicts damage equal to the weapon’s Critical Dmg stat.
Any operatives that were incapacitated are removed after the active operative has finished the action.
Some weapons shoot multiple times in one action, such as those with the Blast and Torrent weapon rules. Therefore, operatives aren’t removed until the whole action has been resolved.
Fight1AP
Fight with the active operative by following the sequence below. The active operative’s player is the attacker. The selected enemy operative’s player is the defender.
An operative cannot perform this action unless an enemy operative is within its control range.
Unlike shooting, fighting is a brutal back and forth duel. Be mindful of who you select to fight against, as they retaliate.
1. Select Enemy Operative
The attacker selects an enemy operative within the active operative’s control range to fight against. That enemy operative will retaliate in this action.The difference between when an operative is fighting and when it’s retaliating is important. The operative fighting is the active operative, whilst the operative retaliating is the selected enemy operative.
2. Select Weapons
Both players select one melee weapon ( ) to use that their operative has and collect their attack dice — a number of D6 equal to the weapon’s Atk stat.
If a rule says an operative cannot retaliate, then they can still be fought against, but attack dice cannot be collected or resolved for them.
3. Roll Attack Dice
Both players roll their attack dice simultaneously. Each result that equals or beats their selected weapon’s Hit stat is a success and is retained. Each result that doesn’t is a fail and is discarded. Each result of 6 is always a critical success. Each other success is a normal success. Each result of 1 is always a fail.While a friendly operative is assisted by other friendly operatives, improve the Hit stat of its melee weapons by 1 for each doing so. For a friendly operative to assist them, it must be within control range of the enemy operative in that fight and not within control range of another enemy operative.
4. Resolve Attack Dice
Starting with the attacker, the players alternate resolving one of their successful unblocked attack dice. The players repeat this process until one player has resolved all their dice (in which case their opponent resolves all their remaining dice), or one operative in that fight is incapacitated. When a player resolves a dice, they must strike or block with it.lf they strike, inflict damage on the enemy operative, then discard that dice.
- A normal success inflicts damage equal to the weapon’s Normal Dmg stat.
- A critical success inflicts damage equal to the weapon’s Critical Dmg stat.
Striking inflicts damage straight away, so it can be an effective way of damaging enemies.
If they block, they can allocate that dice to block one of their opponent’s unresolved successes.
- A normal success can block a normal success.
- A critical success can block a normal success or a critical success.
Blocking doesn’t stop a strike as it’s happening, it stops a success that’s yet to be resolved.
You can still block even if your opponent has no unresolved successes remaining. This is useful if you don’t want to incapacitate the enemy operative yet.
KEY PRINCIPLES
As you play through your first few games, you’ll gain better context for applying key principles, and can simply refer back to them when needed.
Bases
All operatives are on bases. The base is an important part of the miniature for rules purposes, in particular measuring distances. Each operative’s base size is specified on its datacard. The sides of different bases can touch, but a base cannot be placed on another. Friendly operatives can move through other friendly operatives (the base and the miniature), but not through enemy operatives. Bases cannot move through terrain, or be over the edge of the killzone.Control Range
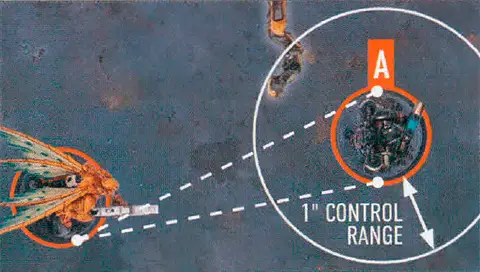
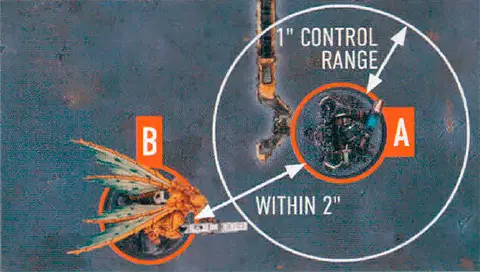
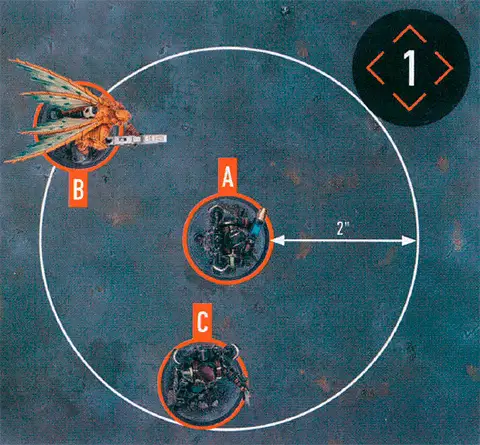
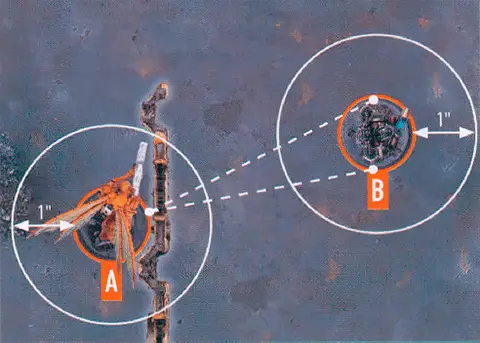
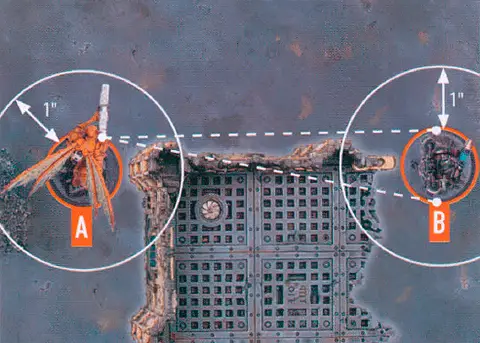
Many rules relate to control range such as moving, fighting and using cover. Something is within an operative’s control range if it’s visible to and within 1" of that operative.Control range between operatives is mutual, therefore operatives are within each other’s control range if one of them is visible to and within 1" of the other.
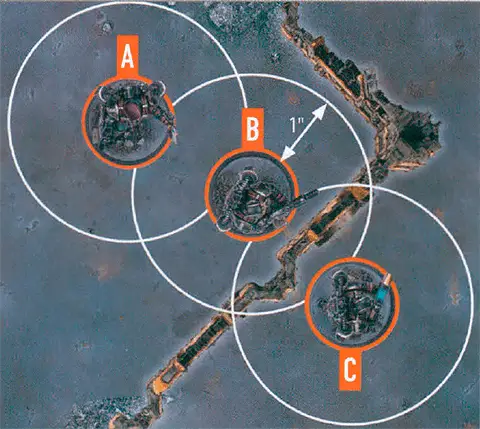
The terrain is within both operative B and C’s control range.
Because of the terrain, operative B is not visible to operative C, and vice versa, therefore they are not within each other’s control range.
Imagine control range as an area of interaction the operative has with things close to it.
Damage
When damage is inflicted on an operative, reduce their wounds by that amount. An operative’s starting number of wounds is determined by its Wounds stat (see datacards). If an operative’s wounds are reduced to 0 or less, it’s incapacitated, then removed from the killzone. Some rules allow an incapacitated operative to perform a free action before being removed from the killzone. Such an operative cannot perform more than one free action (excluding Place Marker) in this instance, and that operative’s player decides the order of any of its rules that occur before it’s removed from the killzone (taking precedence over the player with initiative deciding).While an operative has fewer than its starting wounds remaining, it’s wounded. While it has fewer than half its starting wounds remaining, it’s also injured. Subtract 2" from the Move stat of injured operatives and worsen the Hit stat of their weapons by 1.
Keep track of each operative’s remaining wounds with dice, tokens or by writing it down.
‘Incapacitated’ and ‘removed from the killzone’ are separate. Some rules take effect when an operative is incapacitated, but before it’s removed.
‘Incapacitated’ and ‘removed from the killzone’ are separate. Some rules take effect when an operative is incapacitated, but before it’s removed.
Cover
Cover is determined from one operative to another, usually when one of them is shooting. An operative is in cover if there’s intervening terrain within its control range. However, it cannot be in cover while within 2" of the other operative. Intervening is explained here.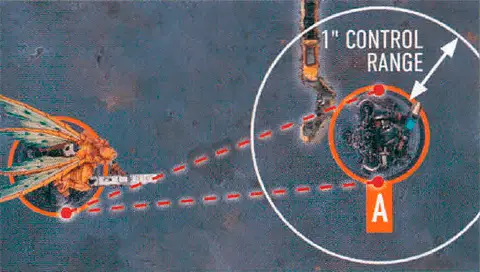

An operative in cover with a Conceal order is not a valid target. An operative in cover with an Engage order is a valid target, but has a cover save (see Shoot action).
Datacards
Datacards contain specific rules for each operative, including key stats.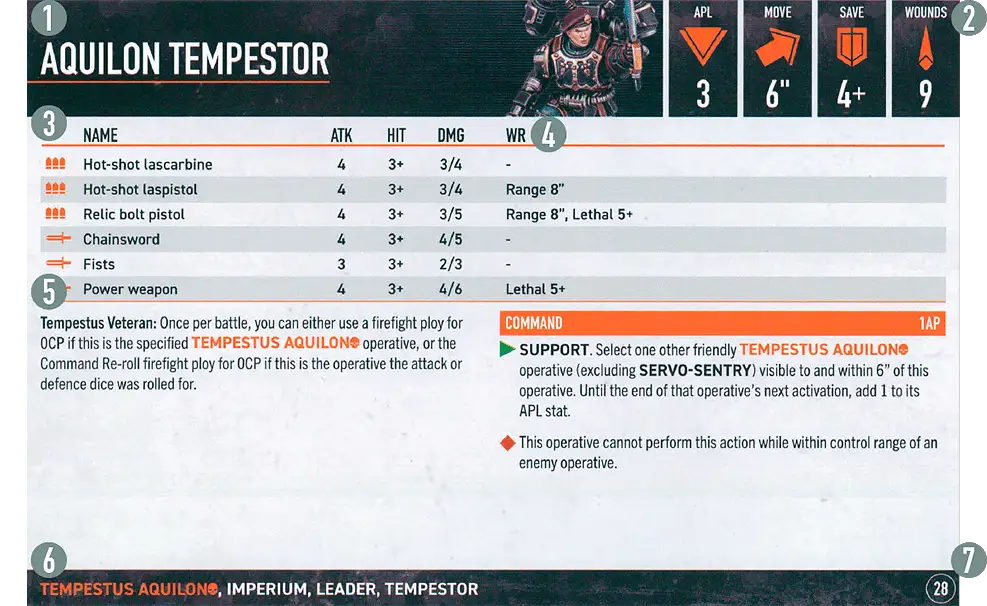
1
2
 APL (Action point limit): The total. cost of actions an operative can perform during its activation, and a stat used to determine control of markers. Some rare rules change an operative’s APL. Regardless of how many APL stat changes an operative is affected by, the total can never be more than -1 or +1 from its normal APL. This takes precedence over all stat changes.
 Move: The operative’s move distance, used when performing the Reposition, Fall Back and Charge actions. An operative’s Move stat can never be changed to less than 4". This takes precedence over all stat changes.
 Save: The result required for successful defence dice whenever another operative is shooting the operative.
 Wounds: The operative’s starting number of wounds, which is reduced as damage is inflicted upon it.
If an operative has an APL of 2, and two rules say to add 1 to the operative’s APL, it would have an APL of 3.
If an operative’s stats or its weapons’ stats are changed during an action, apply the change once the action has been completed. Note that changes to weapon rules are applied immediately.
If an operative’s stats or its weapons’ stats are changed during an action, apply the change once the action has been completed. Note that changes to weapon rules are applied immediately.
3
- The kill team selection pages in your kill team’s rules specify what weapons an operative has. lf it doesn’t specify, an operative has all the weapons on its datacard.
- or : Weapon type — are ranged weapons for whenever an operative is shooting, are melee weapons for whenever an operative is fighting or retaliating.
- Atk: The number of attack dice to roll whenever an operative uses this weapon.
- Hit: The result required for successful attack dice whenever an operative uses this weapon.
- Dmg: The damage each attack dice inflicts with this weapon. The first value is its Normal Dmg stat (damage from a normal success), the second value is its Critical Dmg stat (damage from a critical success).
- Sometimes different weapons will have the same primary name but different secondary names, represented in brackets, e.g. ‘plasma gun (standard)’ and ‘plasma gun (supercharge)’. These are effectively separate profiles of the same weapon, but used as different weapons. If a rule refers to just the primary name, it includes all weapons with that primary name.
Note that a higher numbered Hit and Save stat is worse because your chance of rolling a success decreases. This is important if a rule requires you to improve or worsen such a Stat. For example, a 4+ Hit stat worsened by 1 is 5+.
4
- Additional rules that apply whenever the operative uses this weapon, explained here.
5
- Additional rules the operative has.
- Unique actions that can be performed by the operative. Actions are explained here.
6
- Used to identify the operative for rules — some rules will only affect operatives with the relevant keywords.
- Shown in KEYWORD BOLD font.
- Keywords in orange with a skull symbol, e.g. TEMPESTUS AQUILON, are faction keywords — used to identify all operatives from that kill team.
7
Dice (D6, D3)
Use 6-sided dice to determine the outcome of various rules. This will often require x+, where x is the lowest possible result, e.g. 3+. Sometimes a result within a range will be required, e.g. 1-3. Some rare rules require you to roll a D3. To do so, roll one D6 and halve the result (rounding up). Some require xD6 or xD3 (e.g. 2D6 or 3D3). Roll x number of dice and add the results together. Some require D6+x or D3+x (e.g. D6+2 or D3+3). Roll that dice and add x to the result.Some rules allow you to re-roll a dice roll. You can never re-roll a dice roll more than once, and you cannot select the original result, even if the new result is worse. If it’s an attack or defence dice, you re-roll before it’s retained or discarded. If you can re-roll multiple different dice, you can do this in any order, including seeing the result of one re-roll before deciding on the next. If multiple players can re-roll dice at the same time (e.g. during a Fight action), they alternate either re-rolling a dice or passing until they both pass in succession, starting with the player with initiative (this takes precedence over initiative and rules that would happen at the same time).
For example, if a 4+ is required, a dice result of 4, 5 or 6 fulfils this, and if a 1-4 is required, a dice result of 1, 2, 3 or 4 fulfils this.
Distances
Various rules have a distance requirement in inches. When measuring to and from something, do so from the closest part of it. For an operative, do so from its base, ignoring all parts of its miniature. When measuring to and from an area of the killzone, measure the horizontal distance only (in other words, look from above to ignore the vertical distance).If a rule requires something to be ‘within’ a distance, the requirement is fulfilled if any part of it is that distance or less. If a rule requires something to be ‘wholly within’ a distance, the requirement is fulfilled if every part of it is that distance or less. An operative is always within and wholly within distance requirements of itself and a marker it’s carrying. If an operative is carrying a mission or objective marker, that marker is the same distance as that operative.
Operatives within a certain distance of an operative that’s carrying a marker are also within the same distance of that marker.
Equipment
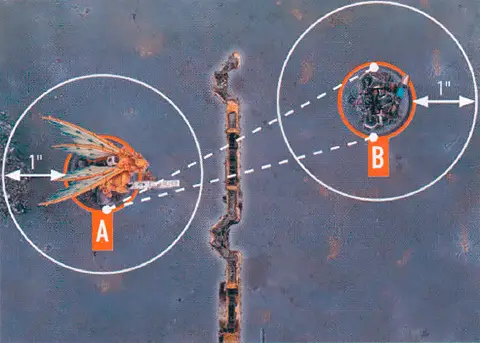
Equipment are additional rules you can select before the battle, as specified in your game sequence. Universal equipment can be selected for any kill team whereas faction equipment is specific. Each player cannot select each equipment option more than once per game.Intervening
Rules such as cover and obscured require you to determine if something is intervening, e.g. terrain. Most of the time this is easily determined — if it’s between the operative and the intended target, it’s intervening. Sometimes this will be unclear, so we use targeting lines.To use targeting lines, the operative’s player draws imaginary straight lines 1mm in diameter from any point of its base to every facing part of the intended target’s base. Anything at least one of these lines cross is intervening. Anything all of these lines cross is wholly intervening.
Most commonly, targeting lines can be drawn in a two-dimensional (top down) manner for ease. However, if there’s a difference in height between the operatives (e.g. one of them is on Vantage terrain), targeting lines should be drawn in a three-dimensional manner.
Keywords
Keywords are an identification method for certain rules. You will most commonly use keywords with operatives (see datacards) — some rules will only affect operatives with the relevant keywords.Some rare rules also have keywords, e.g. SUPPORT or STRATEGIC GAMBIT. These keywords mean nothing on their own, but other rules interact with them. Keywords are shown in KEYWORD BOLD font. Those in orange with a skull symbol, e.g. TEMPESTUS AQUILON, are faction keywords used to identify all operatives/rules from that kill team.
Killzone Floor
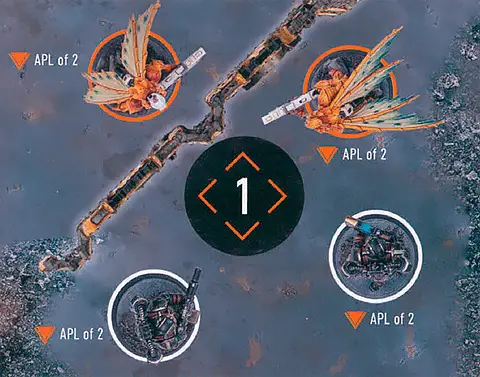
The killzone floor is the lowest level of the killzone (i.e. the game board). Anything that’s on a marker that’s on the killzone floor is also on the killzone floor.Markers
Markers are placed in precise locations (this must be a location in which they can be placed) and impact the game and operatives around them. They can be placed underneath operatives (temporarily remove operatives to do so), and operatives can be placed upon them. Objective markers are 40mm in diameter. All other markers are 20mm in diameter. Some markers are known as mission markers. This means nothing on its own, but other rules interact with it.Operatives contest markers within their control range. Friendly operatives control a marker if the total APL of those contesting it is greater than that of enemy operatives, but control cannot change during an action. While an operative is carrying a marker (see Pick Up Marker action) it contests and controls that marker, and is the only operative that can.

Obscured
Obscured is determined from one operative to another, usually when one of them is shooting. An operative is obscured if there’s intervening Heavy terrain. However, it cannot be obscured by intervening Heavy terrain that’s within 1" of either operative.Obscured is when an operative is a valid target, but intervening obstacles (usually terrain) make it a less efficient target. Imagine the operative having to target the enemy through a ruin or distant window.
When an operative is shooting, if the target operative is obscured:
- The attacker must discard one success of their choice instead of retaining it.
- All the attacker’s critical successes are retained as normal successes and cannot be changed to critical successes (this takes precedence over all other rules).
In other words, an operative being within 1" of a terrain feature doesn’t prevent the whole terrain feature from being obscuring, only the part within 1" of the operative.
Operatives
Operatives are the Citadel miniatures used in the game. Your operatives are friendly operatives, and your opponent’s operatives are enemy operatives.Orders
|
|
Operatives are given a Conceal order when they are set up before the battle. You can change an operative’s order whenever it’s activated.
Order tokens have two sides. The lighter side shows an operative is ready (it can be activated in the Firefight phase) and the darker side shows an operative is expended (it has been activated in the Firefight phase).
Ploys
Players can spend CP on ploys to gain rules bonuses at the opportune moment. Unless otherwise specified, all ploys cost 1CP. There are two types of ploys:- Every strategy ploy is a STRATEGIC GAMBIT (used in the Gambit step of the Strategy phase). Some apply rules that are resolved ‘immediately’, otherwise they apply rules that last until the end of the turning point.
- Firefight ploys are used in the Firefight phase and apply rules as the ploy specifies.
All players have access to the Command Re-roll firefight ploy below and the ploys in their kill team’s rules. Other than Command Re-roll, each player cannot use each ploy more than once per turning point.
COMMAND RE-ROLL1CP
Tactical Ploy
Use this firefight ploy after rolling your attack or defence dice. You can re-roll one of those dice.
Precedence
Some rare rules will conflict with each other, so it must be established which takes precedence. In order of priority, a rule takes precedence if:1
2
3
4
5
6
If a rule on a datacard says ‘this operative can perform two Shoot actions during its activation’, this takes precedence over the core rules for action restrictions, as per precedence priority 3.
Roll-off
lf a rule requires a roll-off, both players roll one D6 and whoever has the highest wins the roll-off. If there’s a tie, roll-off again.Order tokens are the most common token, showing an operative’s order and if it’s ready or expended.
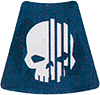
A Conceal order simulates an operative making the most of available cover, so even if it’s fully visible, we imagine it ducking down behind intervening terrain within its control range to avoid being a valid target.
Valid Target
Some rules require you to select a valid target for an operative. This is most common when an operative is shooting, but some rare rules require it too.
|
Visible
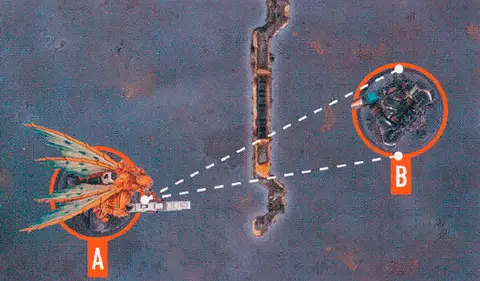
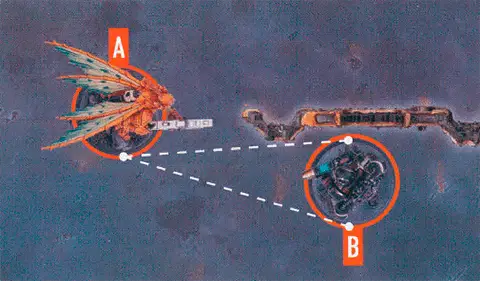
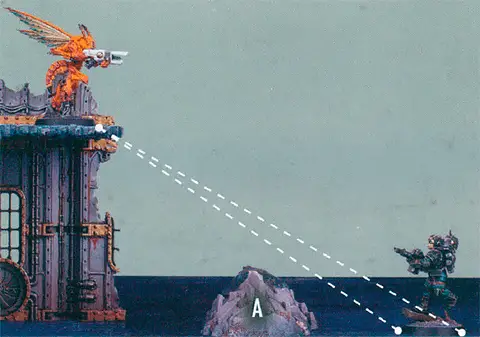
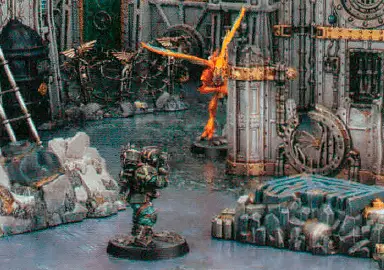
For something to be visible, the operative must be able to see it. To check visibility, look from behind the operative and determine if you can draw an unobstructed straight line 1mm in diameter from its head to any part of what it’s trying to see. Ignore operatives’ bases when determining this. An operative is always visible to itself. The enemy operative is visible in both images below, even when partially behind the nearby ruin.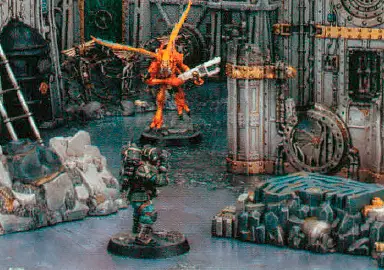
Dice (D6, D3)
Use 6-sided dice to determine the outcome of various rules. This will often require x+, where x is the lowest possible result, e.g. 3+. Sometimes a result within a range will be required, e.g. 1-3. Some rare rules require you to roll a D3. To do so, roll one D6 and halve the result (rounding up). Some require xD6 or xD3 (e.g. 2D6 or 3D3). Roll x number of dice and add the results together. Some require D6+x or D3+x (e.g. D6+2 or D3+3). Roll that dice and add x to the result.Some rules allow you to re-roll a dice roll. You can never re-roll a dice roll more than once, and you cannot select the original result, even if the new result is worse. If it’s an attack or defence dice, you re-roll before it’s retained or discarded. If you can re-roll multiple different dice, you can do this in any order, including seeing the result of one re-roll before deciding on the next. If multiple players can re-roll dice at the same time (e.g. during a Fight action), they alternate either re-rolling a dice or passing until they both pass in succession, starting with the player with initiative (this takes precedence over initiative and rules that would happen at the same time).
For example, if a 4+ is required, a dice result of 4, 5 or 6 fulfils this, and if a 1-4 is required, a dice result of 1, 2, 3 or 4 fulfils this.
Roll-off
lf a rule requires a roll-off, both players roll one D6 and whoever has the highest wins the roll-off. If there’s a tie, roll-off again.
Shoot1AP
Shoot with the active operative by following the sequence below. The active operative’s player is the attacker. The selected enemy operative’s player is the defender.
An operative cannot perform this action while it has a Conceal order, or while within control range of an enemy operative.
Precedence
Some rare rules will conflict with each other, so it must be established which takes precedence. In order of priority, a rule takes precedence if:1
2
3
4
5
6
If a rule on a datacard says ‘this operative can perform two Shoot actions during its activation’, this takes precedence over the core rules for action restrictions, as per precedence priority 3.
Ploys
Players can spend CP on ploys to gain rules bonuses at the opportune moment. Unless otherwise specified, all ploys cost 1CP. There are two types of ploys:- Every strategy ploy is a STRATEGIC GAMBIT (used in the Gambit step of the Strategy phase). Some apply rules that are resolved ‘immediately’, otherwise they apply rules that last until the end of the turning point.
- Firefight ploys are used in the Firefight phase and apply rules as the ploy specifies.
All players have access to the Command Re-roll firefight ploy below and the ploys in their kill team’s rules. Other than Command Re-roll, each player cannot use each ploy more than once per turning point.
COMMAND RE-ROLL1CP
Tactical Ploy
Use this firefight ploy after rolling your attack or defence dice. You can re-roll one of those dice.
Expended
- When you’ve finished with your operative’s activation, that operative is expended. While expended, an operative is not ready.
Counteract
When you would activate a ready friendly operative, if all your operatives are expended but your opponent still has ready operatives, you can select an expended friendly operative with an Engage order to perform a 1AP action (excluding Guard) for free. Each operative can only counteract once per turning point. That operative cannot move more than 2", or must be set up wholly within 2" if it’s removed and set up again, while counteracting (this is not a change to its Move stat, and takes precedence over all other rules). Counteracting is optional, so you can choose not to. In either case, activation alternates back to your opponent afterwards.Counteracting isn’t an activation, it’s instead of activating. This difference is important; for instance, it means action restrictions won't apply.
Charge1AP
The same as the Reposition action, except the active operative can move an additional 2".
It can move, and must finish the move, within control range of an enemy operative. If it moves within control range of an enemy operative that no other friendly operatives are within control range of, it cannot leave that operative’s control range.
An operative cannot perform this action while it has a Conceal order, if it’s already within control range of an enemy operative, or during the same activation in which it performed the Reposition, Dash or Fall Back action.
Reposition1AP
Move the active operative up to its Move stat to a location it can be placed. This must be done in one or more straight-line increments, and increments are always rounded up to the nearest inch.
It cannot move within control range of an enemy operative, unless one or more other friendly operatives are already within control range of that enemy operative, in which case it can move within control range of that enemy operative but cannot finish the move there.
An operative cannot perform this action while within control range of an enemy operative, or during the same activation in which it performed the Fall Back or Charge action.
Fall Back2AP
The same as the Reposition action, except the active operative can move within control range of an enemy operative, but cannot finish the move there.
An operative cannot perform this action unless an enemy operative is within its control range. It cannot perform this action during the same activation in which it performed the Reposition or Charge action.
|
Guard1AP
The operative goes on guard until any of the following are true:
- It performs any action, moves or is set up.
- An enemy operative ends an action within its control range and you don’t interrupt that activation (see On Guard).
- Its order is changed.
- It’s the start of the next turning point.
Equipment
Equipment are additional rules you can select before the battle, as specified in your game sequence. Universal equipment can be selected for any kill team whereas faction equipment is specific. Each player cannot select each equipment option more than once per game.
Control Range
Many rules relate to control range such as moving, fighting and using cover. Something is within an operative’s control range if it’s visible to and within 1" of that operative.Control range between operatives is mutual, therefore operatives are within each other’s control range if one of them is visible to and within 1" of the other.
The terrain is within both operative B and C’s control range.
Because of the terrain, operative B is not visible to operative C, and vice versa, therefore they are not within each other’s control range.
Imagine control range as an area of interaction the operative has with things close to it.
Climbing
An operative must be within 1" horizontally and 3" vertically of terrain that’s visible to them to climb it. Each climb is treated as a minimum of 2" vertically (e.g. a 1" distance is treated as 2").
Dropping
Operatives drop down when they move off terrain or after they’ve jumped. Ignore 2" of vertical distance that they drop during each action. This means a vertical drop of 2" or less is ignored. If they drop multiple times during an action, only 2" total is ignored, not 2" from each drop.
Jumping
Operatives can jump from Vantage terrain higher than 2" from the killzone floor when they move off it. You can move them up to 4" horizontally from the edge when they jump, done like any other move except in one straight-line increment. The operative must then drop or climb from there.When jumping from Vantage terrain, if there is a terrain part such as a rampart at the edge the operative would jump from, the operative must climb it first then jump from the highest point it must climb over. When jumping to a terrain feature, you can ignore its height difference of 1" or less, including its rampart (if any).
|
Damage
When damage is inflicted on an operative, reduce their wounds by that amount. An operative’s starting number of wounds is determined by its Wounds stat (see datacards). If an operative’s wounds are reduced to 0 or less, it’s incapacitated, then removed from the killzone. Some rules allow an incapacitated operative to perform a free action before being removed from the killzone. Such an operative cannot perform more than one free action (excluding Place Marker) in this instance, and that operative’s player decides the order of any of its rules that occur before it’s removed from the killzone (taking precedence over the player with initiative deciding).While an operative has fewer than its starting wounds remaining, it’s wounded. While it has fewer than half its starting wounds remaining, it’s also injured. Subtract 2" from the Move stat of injured operatives and worsen the Hit stat of their weapons by 1.
Keep track of each operative’s remaining wounds with dice, tokens or by writing it down.
‘Incapacitated’ and ‘removed from the killzone’ are separate. Some rules take effect when an operative is incapacitated, but before it’s removed.
‘Incapacitated’ and ‘removed from the killzone’ are separate. Some rules take effect when an operative is incapacitated, but before it’s removed.
Pick Up Marker1AP
Remove a marker the active operative controls that the Pick Up Marker action can be performed upon. That operative is now carrying, contesting and controlling that marker.
An operative cannot perform this action while within control range of an enemy operative, or while it’s already carrying a marker.
Visible
For an intended target to be Visible, the following must be true:- You can draw an imaginary, unobstructed straight line (known as a Visibility line) 1 mm wide from the head of the active operative’s miniature to any part of the miniature of the intended target (not its base).
In the rare instance that bases or parts of the active operative’s miniature prevent an intended target from being Visible to the active operative, such as when the active operative is directly below or above the intended target, treat those bases and parts as being invisible.
Some rare rules will require you to select a point that is Visible (e.g. a point on the killzone). In such circumstances, you must be able to draw an imaginary, unobstructed straight line 1mm wide from the head of the active operative’s miniature to the point you would select.
Blast x
The target you select is the primary target. After shooting the primary target, shoot with this weapon against each secondary target in an order of your choice (roll each sequence separately). Secondary targets are other operatives visible to and within x of the primary target, e.g. Blast 2" (they are all valid targets, regardless of a Conceal order). Secondary targets are in cover and obscured if the primary target was.Torrent x
Select a valid target as normal as the primary target, then select any number of other valid targets within x of the first valid target, but not within control range of friendly operatives, as secondary targets, e.g. Torrent 2". Shoot with this weapon against all of them in an order of your choice (roll each sequence separately).Place Marker1AP
Place a marker the active operative is carrying within its control range.
If an operative carrying a marker is incapacitated, it must perform this action before being removed from the killzone, but does so for 0AP. This takes precedence over all rules that prevent it from doing so.
An operative cannot perform this action during the same activation in which it already performed the Pick Up Marker action (unless incapacitated).
Fight1AP
Fight with the active operative by following the sequence below. The active operative’s player is the attacker. The selected enemy operative’s player is the defender.
An operative cannot perform this action unless an enemy operative is within its control range.
Operatives
Operatives are the Citadel miniatures used in the game. Your operatives are friendly operatives, and your opponent’s operatives are enemy operatives.
Bases
All operatives are on bases. The base is an important part of the miniature for rules purposes, in particular measuring distances. Each operative’s base size is specified on its datacard. The sides of different bases can touch, but a base cannot be placed on another. Friendly operatives can move through other friendly operatives (the base and the miniature), but not through enemy operatives. Bases cannot move through terrain, or be over the edge of the killzone.