Imperial Navy Breacher
Books
| Book | Kind | Edition | Version | Last update |
| | ||||
| | Faction | 3 | January ’26 | January 2026 |
Imperial Navy Breacher Kill Team
Operatives
- 1 IMPERIAL NAVY BREACHER SERGEANT-AT-ARMS operative with the following option:
- Navis shotgun and Navis hatchet
- Bolt pistol or heirloom autopistol
- Chainsword or power weapon
- 10 IMPERIAL NAVY BREACHER operatives selected from the following list:
- ARMSMAN
- AXEJACK
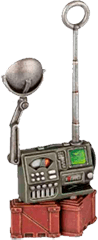
- C.A.T. UNIT*
- ENDURANT
- GHEISTSKULL*
- GRENADIER
- GUNNER with Navis las-volley and gun butt
- GUNNER with meltagun and gun butt
- GUNNER with plasma gun and gun butt
- HATCHCUTTER
- SURVEYOR
- VOID-JAMMER
Your kill team can only include a GHEISTSKULL operative if it also includes a VOID-JAMMER operative, and it can only include a C.A.T. UNIT operative if it also includes a SURVEYOR operative.
*These operatives count as half a selection each, meaning you can select both of them and it’s treated as one selection in total.


Faction Rules
Void Armour
The armour worn by Imperial Navy Armsmen is void-sealed, meaning that they can fight in environments devoid of gravity or atmosphere. Such armour also serves to protect them from explosive blasts and flaming torrents.
Whenever an operative is shooting a friendly IMPERIAL NAVY BREACHER operative, if the ranged weapon in that sequence has the Blast or Torrent weapon rule (excluding weapons that have a sweeping profile), you can re-roll one of your defence dice, or up to two of your defence dice if that friendly operative is a GRENADIER.Friendly IMPERIAL NAVY BREACHER operatives aren’t affected by the x" Devastating x weapon rule (i.e. Devastating with a distance) unless they are the target during that sequence.
Breach and Clear
Methodical, professional and well-drilled, Imperial Navy Breachers work as a unit to breach and clear the corridors and chambers of enemy voidcraft, space hulks, orbital stations and more.
Once per turning point, when a ready friendly IMPERIAL NAVY BREACHER operative is activated, you can use this rule. If you do, select one other ready friendly IMPERIAL NAVY BREACHER operative visible to and within 3" of that operative. When that first friendly operative is expended, you can activate that other friendly operative before your opponent activates. When that other operative is expended, your opponent then activates as normal.Strategy Ploys
When directed to assault a designated position, Imperial Navy Breachers achieve their goal through coordination and determination.
When called upon to hold a position, Imperial Navy Breachers move into tight formation, creating an impenetrable wall of shields and guns.
Breachers are used to fighting in the close confines of a voidship's decks and are devastatingly effective when engaging foes at close range.
- Add 1 to both Dmg stats of all profiles of its Navis shotguns or Navis heavy shotguns (if any).
- If you roll two or more fails, you can discard one of them to retain another as a normal success instead.
Taking up a defensive stance, the Breachers prepare to repel the oncoming enemy.
Firefight Ploys
As some Breachers lay down pinning fire, others break cover in at attempt to outflank the foe.
The keys to a successful boarding action are speed and violence. Breachers advance quickly, maintaining a rapid rate of fire and cutting down any who block their progress.
Heavily armed and armoured, Breachers are adept at holding the positions they seize.
Spending the vast majority of their lives aboard voidships, Breachers are used to fighting their way across decks and through cramped hatchways and bulkheads.
Faction Equipment
These masks recycle a supply of oxygen, allowing the bearer to survive for extended periods in poisonous atmospheres, underwater or in the vacuum of space.
These heavy projectiles can be fired from a shotgun, trading close-quarters impact for increased range and lethality against a single target.
Many Imperial soldiers carry combat stimms designed to stave off fatigue, dull pain and enhance concentration.
This device, when attached to cogitator panels, reroutes power away from locking mechanisms, allowing Breachers to force entry.
Datacards
APL 2 2 |
MOVE 6" 6" |
SAVE 4+ 4+ |
WOUNDS 9 9 |
NAME | ATK | HIT | DMG | WR | ||||
| Bolt pistol | ||||||||
| Bolt pistol | 4 | 4+ | 3/4 | Range 8" | Range 8" | |||
| Heirloom autopistol | ||||||||
| Heirloom autopistol | 4 | 3+ | 2/4 | Range 8", Lethal 5+ | Range 8", Lethal 5+ | |||
| Navis shotgun (close range) | ||||||||
| Navis shotgun (close range) | 4 | 3+ | 3/3 | Range 6" | Range 6" | |||
| Navis shotgun (long range) | ||||||||
| Navis shotgun (long range) | 4 | 5+ | 1/2 | - | ||||
| Chainsword | ||||||||
| Chainsword | 4 | 3+ | 4/5 | - | ||||
| Navis hatchet | ||||||||
| Navis hatchet | 3 | 4+ | 3/4 | - | ||||
| Power weapon | ||||||||
| Power weapon | 4 | 3+ | 4/6 | Lethal 5+ | Lethal 5+ | |||
- Remove that marker and place it again.
- Change the selected ploy to the other (e.g. your Attack Order becomes a Defence Order).
|
IMPERIAL NAVY BREACHER, IMPERIUM, LEADER, SERGEANT-AT-ARMS
|
⌀25mm |
| APL2 |
MOVE6" |
SAVE4+ |
WOUNDS8 |
NAME | ATK | HIT | DMG | WR | ||||
| Navis shotgun (close range) | ||||||||
| Navis shotgun (close range) | 4 | 3+ | 3/3 | Range 6" | Range 6" | |||
| Navis shotgun (long range) | ||||||||
| Navis shotgun (long range) | 4 | 5+ | 1/2 | - | ||||
| Navis hatchet | ||||||||
| Navis hatchet | 3 | 4+ | 3/4 | - | ||||
|
IMPERIAL NAVY BREACHER, IMPERIUM, ARMSMAN
|
⌀25mm |
| APL2 |
MOVE6" |
SAVE4+ |
WOUNDS8 |
NAME | ATK | HIT | DMG | WR | ||||
| Autopistol | ||||||||
| Autopistol | 4 | 4+ | 2/3 | Range 8" | Range 8" | |||
| Power weapon | ||||||||
| Power weapon | 4 | 3+ | 4/6 | Lethal 5+ | Lethal 5+ | |||
|
IMPERIAL NAVY BREACHER, IMPERIUM, AXEJACK
|
⌀25mm |
| APL2 |
MOVE8" |
SAVE5+ |
WOUNDS5 |
- This operative cannot be activated or perform actions if it’s within control range of an enemy operative, or if a friendly IMPERIAL NAVY BREACHER SURVEYOR operative has been incapacitated. The turning point can end even if this operative is still ready.
- This operative cannot perform any actions other than Charge, Dash, Fall Back, Reposition and Spot.
- It cannot retaliate, assist in a fight, climb or jump.
- Whenever determining control of a marker, treat this operative’s APL stat as 1 lower. Note this isn’t a change to its APL stat, so any changes are cumulative with this.
- Whenever this operative has a Conceal order and is in cover, it cannot be selected as a valid target, taking precedence over all other rules (e.g. Seek, Vantage terrain) except being within 2".
- Whenever determining what’s visible to this operative, draw the line from any part of the miniature.
SPOT1AP
- That friendly operative’s ranged weapons have the Seek Light weapon rule.
- That enemy operative cannot be obscured.
|
IMPERIAL NAVY BREACHER, IMPERIUM, C.A.T. UNIT
|
⌀25mm |
| APL2 |
MOVE4" |
SAVE2+ |
WOUNDS11 |
NAME | ATK | HIT | DMG | WR | ||||
| Navis heavy shotgun (close range) | ||||||||
| Navis heavy shotgun (close range) | 4 | 3+ | 3/3 | Range 6", Relentless | Range 6", Relentless | |||
| Navis heavy shotgun (long range) | ||||||||
| Navis heavy shotgun (long range) | 4 | 5+ | 1/2 | Relentless | Relentless | |||
| Shield bash | ||||||||
| Shield bash | 3 | 4+ | 1/2 | Brutal, Shield* | Brutal, Shield* | |||
|
IMPERIAL NAVY BREACHER, IMPERIUM, ENDURANT
|
⌀28mm |
These servo-skulls are often made from the heads of former Imperial Navy Breachers. As a result, they are often named ‘Dead Man’s Revenge’ or regarded as the perished soldier’s ‘Last Laugh’ for their ability to detonate and kill all around them in a final act of defiance towards the enemy.
These servo-skulls are often made from the heads of former Imperial Navy Breachers. As a result, they are often named ‘Dead Man’s Revenge’ or regarded as the perished soldier’s ‘Last Laugh’ for their ability to detonate and kill all around them in a final act of defiance towards the enemy. |
APL2 |
MOVE8" |
SAVE5+ |
WOUNDS5 |
- This operative cannot perform any actions other than Boost, Charge, Dash, Fall Back and Reposition.
- It cannot retaliate or assist in a fight.
- Whenever determining control of a marker, treat this operative’s APL stat as 1 lower. Note this isn’t a change to its APL stat, so any changes are cumulative with this.
- Whenever this operative has a Conceal order and is in cover, it cannot be selected as a valid target, taking precedence over all other rules (e.g. Seek, Vantage terrain) except being within 2".
BOOST1AP
|
IMPERIAL NAVY BREACHER, IMPERIUM, GHEISTSKULL
|
⌀25mm |
| APL2 |
MOVE6" |
SAVE4+ |
WOUNDS8 |
NAME | ATK | HIT | DMG | WR | ||||
| Demolition charge | ||||||||
| Demolition charge | 4 | 3+ | 4/6 | Range 3", Blast 2", Heavy (Reposition only), Limited 1, Piercing 1, Saturate | Range 3", Blast 2", Heavy (Reposition only), Limited 1, Piercing 1, Saturate | |||
| Navis shotgun (close range) | ||||||||
| Navis shotgun (close range) | 4 | 3+ | 3/3 | Range 6" | Range 6" | |||
| Navis shotgun (long range) | ||||||||
| Navis shotgun (long range) | 4 | 5+ | 1/2 | - | ||||
| Navis hatchet | ||||||||
| Navis hatchet | 3 | 4+ | 3/4 | - | ||||
|
IMPERIAL NAVY BREACHER, IMPERIUM, GRENADIER
|
⌀25mm |
The largest troops in the squad who don’t fulfil the role of Endurants carry their squad’s heaviest ranged weapons. A las-volley unleashes devastating salvoes, the searing heat of a meltagun shot burns through a reinforced bulkhead, and even heavily-armoured enemies cannot withstand a plasma gun.
The largest troops in the squad who don’t fulfil the role of Endurants carry their squad’s heaviest ranged weapons. A las-volley unleashes devastating salvoes, the searing heat of a meltagun shot burns through a reinforced bulkhead, and even heavily-armoured enemies cannot withstand a plasma gun. |
APL2 |
MOVE6" |
SAVE4+ |
WOUNDS9 |
NAME | ATK | HIT | DMG | WR | ||||
| Meltagun | ||||||||
| Meltagun | 4 | 4+ | 6/3 | Range 6", Devastating 4, Piercing 2 | Range 6", Devastating 4, Piercing 2 | |||
| Navis las-volley (focused) | ||||||||
| Navis las-volley (focused) | 5 | 4+ | 4/5 | Heavy (Dash only), Rending | Heavy (Dash only), Rending | |||
| Navis las-volley (sweeping) | ||||||||
| Navis las-volley (sweeping) | 4 | 4+ | 4/5 | Heavy (Dash only), Rending, Torrent 1" | Heavy (Dash only), Rending, Torrent 1" | |||
| Plasma gun (standard) | ||||||||
| Plasma gun (standard) | 4 | 4+ | 4/6 | Piercing 1 | Piercing 1 | |||
| Plasma gun (supercharge) | ||||||||
| Plasma gun (supercharge) | 4 | 4+ | 5/6 | Hot, Lethal 5+, Piercing 1 | Hot, Lethal 5+, Piercing 1 | |||
| Gun butt | ||||||||
| Gun butt | 3 | 4+ | 2/3 | - | ||||
|
IMPERIAL NAVY BREACHER, IMPERIUM, GUNNER
|
⌀28mm |
| APL2 |
MOVE6" |
SAVE4+ |
WOUNDS8 |
NAME | ATK | HIT | DMG | WR | ||||
| Autopistol | ||||||||
| Autopistol | 4 | 4+ | 2/3 | Range 8" | Range 8" | |||
| Chainfist | ||||||||
| Chainfist | 4 | 4+ | 5/6 | Brutal, Rending | Brutal, Rending | |||
WELD SHUT1AP
BREACH POINT1AP
|
IMPERIAL NAVY BREACHER, IMPERIUM, HATCHCUTTER
|
⌀25mm |
| APL2 |
MOVE6" |
SAVE4+ |
WOUNDS8 |
NAME | ATK | HIT | DMG | WR | ||||
| Navis shotgun (close range) | ||||||||
| Navis shotgun (close range) | 4 | 3+ | 3/3 | Range 6" | Range 6" | |||
| Navis shotgun (long range) | ||||||||
| Navis shotgun (long range) | 4 | 5+ | 1/2 | - | ||||
| Navis hatchet | ||||||||
| Navis hatchet | 3 | 4+ | 3/4 | - | ||||
WAYFIND1AP
REMOTE CONTROL1AP
|
IMPERIAL NAVY BREACHER, IMPERIUM, SURVEYOR
|
⌀25mm |
It falls to the Void-jammers in an Imperial Navy Breacher kill team to operate gheistskulls – servo-skullls fitted with an explosive device and an electro-magnetic pulse emitter. These devices can move quickly, fly through the air and navigate terrain far too dense for the Armsmen in order to reach the foe.
It falls to the Void-jammers in an Imperial Navy Breacher kill team to operate gheistskulls – servo-skullls fitted with an explosive device and an electro-magnetic pulse emitter. These devices can move quickly, fly through the air and navigate terrain far too dense for the Armsmen in order to reach the foe. |
APL2 |
MOVE6" |
SAVE4+ |
WOUNDS8 |
NAME | ATK | HIT | DMG | WR | ||||
| Gheistskull detonator | ||||||||
| Gheistskull detonator | 4 | 3+ | 3/4 | Blast 1", Lethal 4+, Limited 1, Silent, Stun, Detonate* | Blast 1", Lethal 4+, Limited 1, Silent, Stun, Detonate* | |||
| Navis shotgun (close range) | ||||||||
| Navis shotgun (close range) | 4 | 3+ | 3/3 | Range 6" | Range 6" | |||
| Navis shotgun (long range) | ||||||||
| Navis shotgun (long range) | 4 | 5+ | 1/2 | - | ||||
| Navis hatchet | ||||||||
| Navis hatchet | 3 | 4+ | 3/4 | - | ||||
INTERFERENCE PULSE1AP
|
IMPERIAL NAVY BREACHER, IMPERIUM, VOID-JAMMER
|
⌀25mm |
- You can draw an imaginary, unobstructed straight line (known as a Visibility line) 1 mm wide from the head of the active operative’s miniature to any part of the miniature of the intended target (not its base).
- When you’ve finished with your operative’s activation, that operative is expended. While expended, an operative is not ready.
Charge1AP
Fall Back2AP
Reposition1AP
Methodical, professional and well-drilled, Imperial Navy Breachers work as a unit to breach and clear the corridors and chambers of enemy voidcraft, space hulks, orbital stations and more.
Once per turning point, when a ready friendly IMPERIAL NAVY BREACHER operative is activated, you can use this rule. If you do, select one other ready friendly IMPERIAL NAVY BREACHER operative visible to and within 3" of that operative. When that first friendly operative is expended, you can activate that other friendly operative before your opponent activates. When that other operative is expended, your opponent then activates as normal.Shoot1AP
Fight1AP
|

|

|
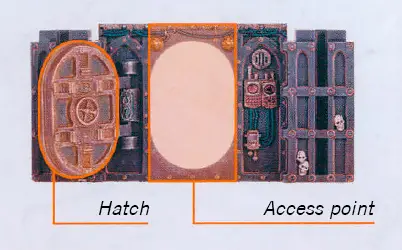
Operate Hatch1AP
While an operative has fewer than its starting wounds remaining, it’s wounded. While it has fewer than half its starting wounds remaining, it’s also injured. Subtract 2" from the Move stat of injured operatives and worsen the Hit stat of their weapons by 1.
‘Incapacitated’ and ‘removed from the killzone’ are separate. Some rules take effect when an operative is incapacitated, but before it’s removed.
When directed to assault a designated position, Imperial Navy Breachers achieve their goal through coordination and determination.
When called upon to hold a position, Imperial Navy Breachers move into tight formation, creating an impenetrable wall of shields and guns.
The IMPERIAL NAVY BREACHER keyword is used in the following Imperial Navy Breacher datacards:
The IMPERIUM keyword is used in the following Imperial Navy Breacher datacards:
Control range between operatives is mutual, therefore operatives are within each other’s control range if one of them is visible to and within 1" of the other.
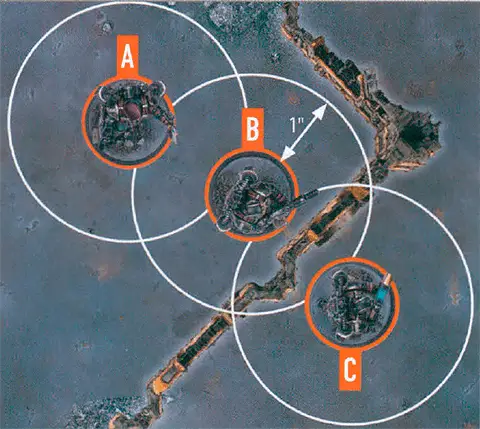
The terrain is within both operative B and C’s control range.
Because of the terrain, operative B is not visible to operative C, and vice versa, therefore they are not within each other’s control range.
Dash1AP
When jumping from Vantage terrain, if there is a terrain part such as a rampart at the edge the operative would jump from, the operative must climb it first then jump from the highest point it must climb over. When jumping to a terrain feature, you can ignore its height difference of 1" or less, including its rampart (if any).
Frag grenade
NAME | ATK | HIT | DMG | |
| Frag grenade | 4 | 4+ | 2/4 | |
WR | ||||
Range 6", Blast 2", Saturate | ||||
Krak grenade
NAME | ATK | HIT | DMG | |
| Krak grenade | 4 | 4+ | 4/5 | |
WR | ||||
Range 6", Piercing 1, Saturate | ||||
- Its hatch must be fully open (it cannot be ajar).
- Its access point is Accessible, Insignificant and Exposed terrain.
- Its hatch is Heavy and Wall terrain, and the gap directly underneath it is Blocking terrain.
Communications devices can be swiftly hijacked and employed to coordinate operations or call in support during a firefight.