
Kasrkin
Books
| Book | Kind | Edition | Version | Last update |
| | ||||
| | Faction | 3 | APRIL ’26 | April 2026 |
Kasrkin Kill Team
Below you will find a list of the operatives that make up a KASRKIN kill team, including, where relevant, any weapons specified for that operative.
Operatives
- 1 KASRKIN SERGEANT operative with one of the following options:
- Bolt pistol; power weapon
- Hot-shot lasgun; gun butt
- Hot-shot laspistol; power weapon
- Plasma pistol; chainsword
- 9 KASRKIN operatives selected from the following list:
- COMBAT MEDIC
- DEMO-TROOPER
- GUNNER with flamer and gun butt*
- GUNNER with grenade launcher and gun butt*
- GUNNER with hot-shot volley gun and gun butt*
- GUNNER with meltagun and gun butt*
- GUNNER with plasma gun and gun butt*
- RECON-TROOPER
- SHARPSHOOTER*
- TROOPER
- VOX-TROOPER
* You cannot select more than four of these operatives combined.


Faction Rules
Skill at Arms
The Kasrkin go where they are needed. Battle-hardened, uncompromising and equipped with the best weapons available, these elites pursue their objectives with professionalism, hard-won experience and rigid determination.
STRATEGIC GAMBIT. Select a SKILL AT ARMS for friendly KASRKIN operatives to have until the Ready step of the next Strategy phase.
|
|
|
|
Rapid Fire
Ruthlessly drilled and murderously efficient, Kasrkin lay down hails of high-powered fire against the foe.
Each friendly KASRKIN operative that doesn’t perform an action in which it moves during its activation can perform two Shoot actions (excluding Guard) during that activation, but a bolt pistol, hot-shot lasgun or hot-shot laspistol must be selected for both of those actions.Strategy Ploys
Having already outmanoeuvred the foe, the Kasrkin attempt to fell their target in a single volley.
Kasrkin are used to being outnumbered and outgunned, using cover to avoid incoming fire as they engage.
The Kasrkin advance steadily towards their objectives, clearing the battlefield of enemies quadrant by quadrant.
The Kasrkin are always on the move, advancing swiftly across the battlefield to take up new firing positions.
Firefight Ploys
Kasrkin squads are bold and decisive, acting with speed and clarity even in the confusion of battle.
Designating an exposed enemy operative as a priority target, this operative levels their weapon and fires a volley of rounds.
Should a Kasrkin soldier need to retreat, their allies may lay down a withering barrage of covering fire.
Hardened by a lifetime spent defending the Imperium from the horrific denizens of the Eye of Terror, the Kasrkin demonstrate unwavering discipline in the face of the enemy.
Faction Equipment
Fitted under the barrel of the gun, this foregrip helps stabilise the bearer’s weapon, improving its handling at close range.
Small personal effects remind the Kasrkin of their homeworld, those they have lost, and that which they fight for.
This weapon is fitted with a marksman’s scope, enabling great accuracy even at long range.
Datacards
APL 3 3 |
MOVE 6" 6" |
SAVE 4+ 4+ |
WOUNDS 9 9 |
NAME | ATK | HIT | DMG | WR | ||||
| Bolt pistol | ||||||||
| Bolt pistol | 4 | 3+ | 3/4 | Range 8" | Range 8" | |||
| Hot-shot lasgun | ||||||||
| Hot-shot lasgun | 4 | 3+ | 3/4 | - | ||||
| Hot-shot laspistol | ||||||||
| Hot-shot laspistol | 4 | 3+ | 3/4 | Range 8" | Range 8" | |||
| Plasma pistol (standard) | ||||||||
| Plasma pistol (standard) | 4 | 3+ | 3/5 | Range 8", Piercing 1 | Range 8", Piercing 1 | |||
| Plasma pistol (supercharge) | ||||||||
| Plasma pistol (supercharge) | 4 | 3+ | 4/5 | Range 8", Hot, Lethal 5+, Piercing 1 | Range 8", Hot, Lethal 5+, Piercing 1 | |||
| Chainsword | ||||||||
| Chainsword | 4 | 3+ | 4/5 | - | ||||
| Gun butt | ||||||||
| Gun butt | 3 | 3+ | 2/3 | - | ||||
| Power weapon | ||||||||
| Power weapon | 4 | 3+ | 4/6 | - | ||||
TACTICAL COMMAND0AP
|
KASRKIN, IMPERIUM, ASTRA MILITARUM, LEADER, SERGEANT
|
⌀28mm |
| APL2 |
MOVE6" |
SAVE4+ |
WOUNDS8 |
NAME | ATK | HIT | DMG | WR | ||
| Hot-shot lasgun | ||||||
| Hot-shot lasgun | 4 | 3+ | 3/4 | - | ||
| Gun butt | ||||||
| Gun butt | 3 | 4+ | 2/3 | - | ||
MEDIKIT0AP
|
KASRKIN, IMPERIUM, ASTRA MILITARUM, MEDIC, COMBAT MEDIC
|
⌀28mm |
Clad in heavier armour and carrying a devastating melta mine, these Kasrkin serve in a necessary but incredibly dangerous role. It is their job – often under enemy fire – to place, prepare and detonate a melta mine, blasting their way into an armoured bunker or through fortress walls.
Clad in heavier armour and carrying a devastating melta mine, these Kasrkin serve in a necessary but incredibly dangerous role. It is their job – often under enemy fire – to place, prepare and detonate a melta mine, blasting their way into an armoured bunker or through fortress walls. |
APL2 |
MOVE6" |
SAVE4+ |
WOUNDS8 |
NAME | ATK | HIT | DMG | WR | ||||
| Hot-shot laspistol | ||||||||
| Hot-shot laspistol | 4 | 3+ | 3/4 | Range 8" | Range 8" | |||
| Gun butt | ||||||||
| Gun butt | 3 | 4+ | 2/3 | - | ||||
|
KASRKIN, IMPERIUM, ASTRA MILITARUM, DEMO-TROOPER
|
⌀28mm |
| APL2 |
MOVE6" |
SAVE4+ |
WOUNDS8 |
NAME | ATK | HIT | DMG | WR | ||||
| Flamer | ||||||||
| Flamer | 4 | 2+ | 3/3 | Range 8", Saturate, Torrent 2" | Range 8", Saturate, Torrent 2" | |||
| Grenade launcher (frag) | ||||||||
| Grenade launcher (frag) | 4 | 3+ | 2/4 | Blast 2" | Blast 2" | |||
| Grenade launcher (krak) | ||||||||
| Grenade launcher (krak) | 4 | 3+ | 4/5 | Piercing 1 | Piercing 1 | |||
| Hot-shot volley gun (focused) | ||||||||
| Hot-shot volley gun (focused) | 5 | 3+ | 3/4 | Piercing Crits 1 | Piercing Crits 1 | |||
| Hot-shot volley gun (sweeping) | ||||||||
| Hot-shot volley gun (sweeping) | 4 | 3+ | 3/4 | Piercing Crits 1, Torrent 1" | Piercing Crits 1, Torrent 1" | |||
| Meltagun | ||||||||
| Meltagun | 4 | 3+ | 6/3 | Range 6", Devastating 4, Piercing 2 | Range 6", Devastating 4, Piercing 2 | |||
| Plasma gun (standard) | ||||||||
| Plasma gun (standard) | 4 | 3+ | 4/6 | Piercing 1 | Piercing 1 | |||
| Plasma gun (supercharge) | ||||||||
| Plasma gun (supercharge) | 4 | 3+ | 5/6 | Hot, Lethal 5+, Piercing 1 | Hot, Lethal 5+, Piercing 1 | |||
| Gun butt | ||||||||
| Gun butt | 3 | 4+ | 2/3 | - | ||||
|
KASRKIN, IMPERIUM, ASTRA MILITARUM, GUNNER
|
⌀28mm |
| APL2 |
MOVE6" |
SAVE4+ |
WOUNDS8 |
NAME | ATK | HIT | DMG | WR | ||
| Hot-shot lasgun | ||||||
| Hot-shot lasgun | 4 | 3+ | 3/4 | - | ||
| Gun butt | ||||||
| Gun butt | 3 | 4+ | 2/3 | - | ||
AUSPEX SCAN1AP
|
KASRKIN, IMPERIUM, ASTRA MILITARUM, RECON-TROOPER
|
⌀28mm |
These patient, keen-eyed Kasrkin are skilled snipers. With their hot-shot marksman rifles they can kill key targets and provide covering fire for the rest of their kill team. Thanks to their camo cloaks, Sharpshooters can infiltrate contested areas and remain hidden for protracted periods.
These patient, keen-eyed Kasrkin are skilled snipers. With their hot-shot marksman rifles they can kill key targets and provide covering fire for the rest of their kill team. Thanks to their camo cloaks, Sharpshooters can infiltrate contested areas and remain hidden for protracted periods. |
APL2 |
MOVE6" |
SAVE4+ |
WOUNDS8 |
NAME | ATK | HIT | DMG | WR | ||||
| Hot-shot marksman rifle (concealed) | ||||||||
| Hot-shot marksman rifle (concealed) | 4 | 2+ | 3/3 | Devastating 3, Heavy, Silent, Concealed Position* | Devastating 3, Heavy, Silent, Concealed Position* | |||
| Hot-shot marksman rifle (mobile) | ||||||||
| Hot-shot marksman rifle (mobile) | 4 | 3+ | 3/4 | - | ||||
| Hot-shot marksman rifle (stationary) | ||||||||
| Hot-shot marksman rifle (stationary) | 4 | 2+ | 3/3 | Devastating 3, Heavy | Devastating 3, Heavy | |||
| Gun butt | ||||||||
| Gun butt | 3 | 4+ | 2/3 | - | ||||
- Ignore the Saturate weapon rule.
- If you can retain any cover saves, you can retain one additional cover save, or you can retain one cover save as a critical success instead. This isn’t cumulative with improved cover saves from Vantage terrain.
|
KASRKIN, IMPERIUM, ASTRA MILITARUM, SHARPSHOOTER
|
⌀28mm |
| APL2 |
MOVE6" |
SAVE4+ |
WOUNDS8 |
NAME | ATK | HIT | DMG | WR | ||
| Hot-shot lasgun | ||||||
| Hot-shot lasgun | 4 | 3+ | 3/4 | - | ||
| Gun butt | ||||||
| Gun butt | 3 | 4+ | 2/3 | - | ||
- One friendly KASRKIN TROOPER operative can perform the Smoke Grenade action.
- One friendly KASRKIN TROOPER operative can perform the Stun Grenade action.
|
KASRKIN, IMPERIUM, ASTRA MILITARUM, TROOPER
|
⌀28mm |
| APL2 |
MOVE6" |
SAVE4+ |
WOUNDS8 |
NAME | ATK | HIT | DMG | WR | ||
| Hot-shot lasgun | ||||||
| Hot-shot lasgun | 4 | 3+ | 3/4 | - | ||
| Gun butt | ||||||
| Gun butt | 3 | 4+ | 2/3 | - | ||
BATTLE COMMS1AP
|
KASRKIN, IMPERIUM, ASTRA MILITARUM, VOX-TROOPER
|
⌀28mm |
Reposition1AP
Shoot1AP
Guard1AP
- It performs any action, moves or is set up.
- An enemy operative ends an action within its control range and you don’t interrupt that activation (see On Guard).
- Its order is changed.
- It’s the start of the next turning point.
While an operative has fewer than its starting wounds remaining, it’s wounded. While it has fewer than half its starting wounds remaining, it’s also injured. Subtract 2" from the Move stat of injured operatives and worsen the Hit stat of their weapons by 1.
‘Incapacitated’ and ‘removed from the killzone’ are separate. Some rules take effect when an operative is incapacitated, but before it’s removed.
Control range between operatives is mutual, therefore operatives are within each other’s control range if one of them is visible to and within 1" of the other.
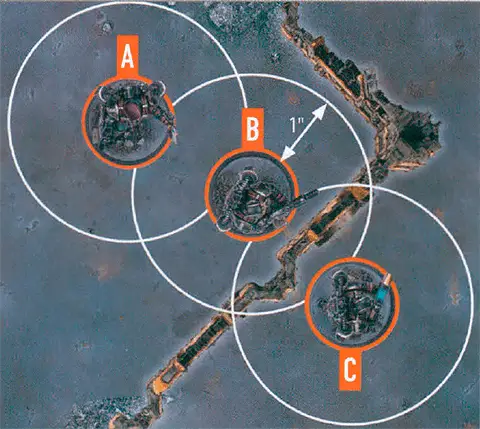
The terrain is within both operative B and C’s control range.
Because of the terrain, operative B is not visible to operative C, and vice versa, therefore they are not within each other’s control range.
AUSPEX SCAN1AP
Dash1AP
Fall Back2AP
- You can draw an imaginary, unobstructed straight line (known as a Visibility line) 1 mm wide from the head of the active operative’s miniature to any part of the miniature of the intended target (not its base).
|

The Kasrkin go where they are needed. Battle-hardened, uncompromising and equipped with the best weapons available, these elites pursue their objectives with professionalism, hard-won experience and rigid determination.
STRATEGIC GAMBIT. Select a SKILL AT ARMS for friendly KASRKIN operatives to have until the Ready step of the next Strategy phase.
|
|
|
|
The Kasrkin advance steadily towards their objectives, clearing the battlefield of enemies quadrant by quadrant.
The KASRKIN keyword is used in the following Kasrkin datacards:
The IMPERIUM keyword is used in the following Kasrkin datacards:
The ASTRA MILITARUM keyword is used in the following Kasrkin datacards:
Pick Up Marker1AP
Place Marker1AP
The Kasrkin are always on the move, advancing swiftly across the battlefield to take up new firing positions.
- You can draw an imaginary, unobstructed straight line (known as a Visibility line) 1 mm wide from the head of the active operative’s miniature to any part of the miniature of the intended target (not its base).
Control range between operatives is mutual, therefore operatives are within each other’s control range if one of them is visible to and within 1" of the other.
The terrain is within both operative B and C’s control range.
Because of the terrain, operative B is not visible to operative C, and vice versa, therefore they are not within each other’s control range.
SMOKE GRENADE 1AP
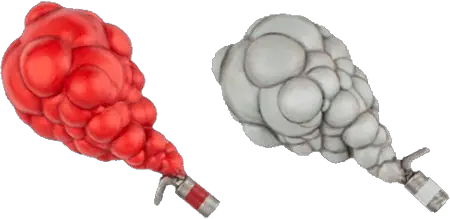
STUN GRENADE 1AP
