
Wrecka Krew
Books
|
Show History | ||||
| Book | Kind | Edition | Version | Last update |
| | ||||
| | Faction | 3 | June 2026 | |
FAQ
Wrecka Krew
| Q: | If a WRECKA KREW BOMB SQUIG is incapacitated during a Door Fight or Hatchway Fight action, is the other operative in that action a secondary target for a Shoot action caused by the Boom! rule? |
| A: | Not as a result of the Door Fight or Hatchway Fight rules. Note that the Kaboom! firefight ploy may cause that other operative to become a valid target during some Hatchway Fight actions. |
| Q: | If a WRECKA KREW KRUSHA operative using its Smash weapon rule moves an enemy operative, and during that move a marker that would ‘end its action’ is within that enemy operative’s control range (e.g. HERNKYN YAEGIR IRONBRAEK Hy-Pex Mines) but not the KRUSHA operative’s control range, does the Fight action end? |
| A: | No. |
| Q: | If a WRECKA KREW BOMB SQUIG is incapacitated during a Door Fight or Hatchway Fight action, or through a door which is ignored when determining visibility for control range, is the other operative in that action a secondary target for a Shoot action caused by the Boom! rule? |
| A: | No, except if the other operative is within 2" and visible during a Hatchway Fight and you use the Kaboom! firefight ploy. |
Wrecka Krew Kill Team
Operatives
- BOSS NOB operative with one
of the following options:- Rokkit pistol; smash hammer
- Two rokkit pistols; choppa
- 2 WRECKA KREW BOMB SQUIG operatives
- 5 WRECKA KREW operatives selected from the following list:
- BREAKA BOY DEMOLISHA
- FIGHTER
- KRUSHA
- GUNNER with one of the following options:
- ’Eavy rokkit launcha; fists
- Rokkit launcha; fists
- ROKKITEER with one of the following options:
- Rokkit launcha; pulsa rokkit; fists
- Rokkit launcha; rokkit rack; fists
Other than BOMB SQUIG, BREAKA BOY FIGHTER and TANKBUSTA GUNNER operatives, your kill team can only include each operative on this list once.


Faction Rules
Wrecka Rampage
The sound of explosions, the acrid stench of smoke and the screams of battle drive Wrecka Krews forwards to ever more destructive acts.
Whenever a friendly WRECKA KREW operative is shooting, fighting or retaliating, in the Roll Attack Dice step:- For each attack dice result of 6 you retain, you gain one Wrecka point.
- You can spend up to 2 of your Wrecka points (unless it’s a BOMB SQUIG, then you cannot spend any). For each point you spend this way, retain one of your fails as a normal success instead of discarding it.
Tanked Up
Wrecka Krews are empowered by the thrill of explosive combat, lending them fresh impetus as they undertake their murderous rampages.
The first time a friendly WRECKA KREW operative (excluding BOMB SQUIG) that has an Engage order performs either the Charge, Shoot or Fight action (excluding Guard) during each of its activations/counteractions, add 1 to its APL stat until the start of its next activation.Strategy Ploys
When the Wrecka Krew’s violent rampage reaches its crescendo, a rage overcomes them. They bellow the infamous Ork battle cry as they set upon their enemies with hammer and fist.
If an enemy takes cover, this just provides Wrecka Krews with the opportunity to blow more stuff up.
Wrecka Krews don’t have time for mukkin’ about. They’ll gladly take a hit if it means they get to land a few of their own.
Orks thrive in the chaos and cacophony of battle. The greater the explosions and destruction around them, the more their adrenaline kicks in. When whipped up into such a fury, they can fight on through injuries that would ordinarily lay them low.
Firefight Ploys
Orks have a remarkable ability to shrug off grievous damage that would incapacitate most other creatures.
Orks like nothing better than a good scrap. With fist or hammer, they seek to demonstrate that might is right.
Should a prime target present itself, the Wrecka Krew will unleash their combined destructive might, demolishing anything in the vicinity.
The more intense the dakka and the louder the boom of explosions, the more satisfying the carnage!
Faction Equipment
Mek ingenuity knows few bounds. Drill rokkits are designed to strike a target and bore through thick armour before exploding.
Wrecka Krews are known to ingest the oils of vehicles they have destroyed. The intoxicating fluid bolsters their natural resilience.
Scrap metal Ork armour may appear haphazard, but it is no less effective for its simple construction.
Back-banners, crude markings and glyph-scrawled armour proudly display the Wrecka Krew’s favoured method of destruction.
Datacards
The biggest, strongest and nastiest Tankbusta or Breaka Boy will typically rise to lead a Wrecka Krew as its Boss Nob. It takes a Boss Nob of singular determination and force of will to keep his ladz in line and prevent them from simply tearing off after the biggest target of opportunity.
The biggest, strongest and nastiest Tankbusta or Breaka Boy will typically rise to lead a Wrecka Krew as its Boss Nob. It takes a Boss Nob of singular determination and force of will to keep his ladz in line and prevent them from simply tearing off after the biggest target of opportunity. |
APL 2 2 |
MOVE 6" 6" |
SAVE 4+ 4+ |
WOUNDS 14 14 |
NAME | ATK | HIT | DMG | WR | ||||
| Rokkit pistol | ||||||||
| Rokkit pistol | 6 | 5+ | 4/5 | Range 8", Blast 1" | Range 8", Blast 1" | |||
| Two rokkit pistols (focused) | ||||||||
| Two rokkit pistols (focused) | 6 | 4+ | 4/5 | Range 8", Blast 1", Ceaseless | Range 8", Blast 1", Ceaseless | |||
| Two rokkit pistols (salvo) | ||||||||
| Two rokkit pistols (salvo) | 6 | 5+ | 4/5 | Range 8", Blast 1", Salvo* | Range 8", Blast 1", Salvo* | |||
| Choppa | ||||||||
| Choppa | 4 | 3+ | 4/5 | - | ||||
| Smash hammer | ||||||||
| Smash hammer | 4 | 3+ | 5/6 | Brutal | Brutal | |||
|
WRECKA KREW, ORK, LEADER, BOSS NOB
|
⌀40mm |
| APL2 |
MOVE6" |
SAVE5+ |
WOUNDS5 |
NAME | ATK | HIT | DMG | WR | ||||
| Explosives | ||||||||
| Explosives | 6 | 4+ | 4/5 | Blast 1", Limited 1, Explosive* | Blast 1", Limited 1, Explosive* | |||
| Bite | ||||||||
| Bite | 3 | 4+ | 4/5 | - | ||||
|
WRECKA KREW, ORK, BOMB SQUIG
|
⌀25mm |
Demolishas aren’t satisfied with simply swinging a hammer at their chosen target. Instead, they strap explosive rockets to the heads of their weapons before swinging them in anger. Whilst the resultant explosions are potentially lethal to the Demolisha, they are almost certain to obliterate the target.
Demolishas aren’t satisfied with simply swinging a hammer at their chosen target. Instead, they strap explosive rockets to the heads of their weapons before swinging them in anger. Whilst the resultant explosions are potentially lethal to the Demolisha, they are almost certain to obliterate the target. |
APL2 |
MOVE6" |
SAVE4+ |
WOUNDS12 |
NAME | ATK | HIT | DMG | WR | ||||
| Tankhammer (bash) | ||||||||
| Tankhammer (bash) | 4 | 3+ | 4/5 | - | ||||
| Tankhammer (detonate) | ||||||||
| Tankhammer (detonate) | 4 | 3+ | * | Lethal 5+, Limited 1, Detonate* | Lethal 5+, Limited 1, Detonate* | |||
|
WRECKA KREW, ORK, BREAKA BOY, DEMOLISHA
|
⌀32mm |
Wreckas drawn from Breaka Boy mobs prefer to get up close and personal. Whilst they always try to take on the biggest and meanest foes, they are more than happy to pulp anything the boss points at. Their weapons – referred to simply as smash hammers – are simplistic in nature, but no less effective for it.
Wreckas drawn from Breaka Boy mobs prefer to get up close and personal. Whilst they always try to take on the biggest and meanest foes, they are more than happy to pulp anything the boss points at. Their weapons – referred to simply as smash hammers – are simplistic in nature, but no less effective for it. |
APL2 |
MOVE6" |
SAVE4+ |
WOUNDS12 |
NAME | ATK | HIT | DMG | WR | ||||
| Smash hammer | ||||||||
| Smash hammer | 4 | 3+ | 5/6 | Brutal | Brutal | |||
Break Stuff1AP
|
WRECKA KREW, ORK, BREAKA BOY, FIGHTER
|
⌀32mm |
Clad in bulky scrap metal armour, Breaka Boy Krushas often lead the Wrecka Krew’s advance. Their pneumatic knucklebustas make them expert siege-breakers, providing them with a right hook powerful enough to cave in a bunker door, or punch a hole bigger than a Boss Nob’s head in the armoured shell of a battle tank.
Clad in bulky scrap metal armour, Breaka Boy Krushas often lead the Wrecka Krew’s advance. Their pneumatic knucklebustas make them expert siege-breakers, providing them with a right hook powerful enough to cave in a bunker door, or punch a hole bigger than a Boss Nob’s head in the armoured shell of a battle tank. |
APL2 |
MOVE6" |
SAVE4+ |
WOUNDS12 |
NAME | ATK | HIT | DMG | WR | ||||
| Knucklebustas | ||||||||
| Knucklebustas | 4 | 3+ | 5/6 | Brutal, Shock, Smash* | Brutal, Shock, Smash* | |||
|
WRECKA KREW, ORK, BREAKA BOY, KRUSHA
|
⌀32mm |
Armed with various forms of rokkit launcha, Tankbusta Gunners possess incredibly itchy trigger fingers. Their natural desire to chase and destroy armoured vehicles can only be reined in for so long. Thus, their Boss Nob must continually present them with opportunities to blow things up, lest they be distracted by bigger game.
Armed with various forms of rokkit launcha, Tankbusta Gunners possess incredibly itchy trigger fingers. Their natural desire to chase and destroy armoured vehicles can only be reined in for so long. Thus, their Boss Nob must continually present them with opportunities to blow things up, lest they be distracted by bigger game. |
APL2 |
MOVE6" |
SAVE4+ |
WOUNDS12 |
NAME | ATK | HIT | DMG | WR | ||||
| ’Eavy rokkit launcha | ||||||||
| ’Eavy rokkit launcha | 6 | 4+ | 4/5 | Blast 1", Heavy (Dash only) | Blast 1", Heavy (Dash only) | |||
| Rokkit launcha | ||||||||
| Rokkit launcha | 6 | 5+ | 4/5 | Blast 1" | Blast 1" | |||
| Fists | ||||||||
| Fists | 3 | 3+ | 3/4 | - | ||||
|
WRECKA KREW, ORK, TANKBUSTA, GUNNER
|
⌀32mm |
Unsatisfied with the amount of firepower of a simple rokkit launcha, Tankbusta Rokkiteers have spent all their teef on additional explody gubbinz in the form of rokkit racks and pulsa rokkits. The latter is a particularly nasty weapon that knocks those caught in its blast radius from their feet, allowing the Orks to close in and club any survivors to death.
Unsatisfied with the amount of firepower of a simple rokkit launcha, Tankbusta Rokkiteers have spent all their teef on additional explody gubbinz in the form of rokkit racks and pulsa rokkits. The latter is a particularly nasty weapon that knocks those caught in its blast radius from their feet, allowing the Orks to close in and club any survivors to death. |
APL2 |
MOVE6" |
SAVE4+ |
WOUNDS12 |
NAME | ATK | HIT | DMG | WR | ||||
| Pulsa rokkit | ||||||||
| Pulsa rokkit | 6 | 5+ | - | Heavy (Reposition only), Limited 1, Pulsa* | Heavy (Reposition only), Limited 1, Pulsa* | |||
| Rokkit launcha | ||||||||
| Rokkit launcha | 6 | 5+ | 4/5 | Blast 1" | Blast 1" | |||
| Rokkit rack | ||||||||
| Rokkit rack | 6 | 5+ | 4/5 | Blast 2", Heavy (Reposition only), Limited 1, Relentless | Blast 2", Heavy (Reposition only), Limited 1, Relentless | |||
| Fists | ||||||||
| Fists | 3 | 3+ | 3/4 | - | ||||
|
WRECKA KREW, ORK, TANKBUSTA, ROKKITEER
|
⌀32mm |
While an operative has fewer than its starting wounds remaining, it’s wounded. While it has fewer than half its starting wounds remaining, it’s also injured. Subtract 2" from the Move stat of injured operatives and worsen the Hit stat of their weapons by 1.
‘Incapacitated’ and ‘removed from the killzone’ are separate. Some rules take effect when an operative is incapacitated, but before it’s removed.
Control range between operatives is mutual, therefore operatives are within each other’s control range if one of them is visible to and within 1" of the other.
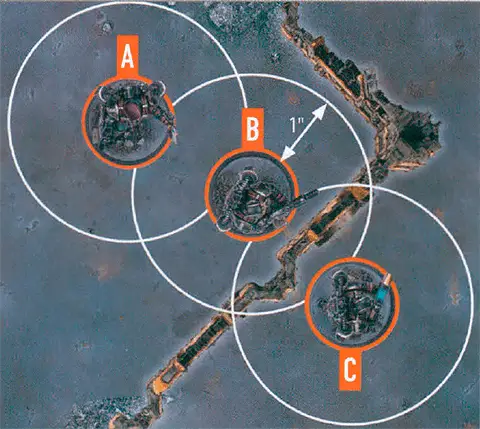
The terrain is within both operative B and C’s control range.
Because of the terrain, operative B is not visible to operative C, and vice versa, therefore they are not within each other’s control range.
Fight1AP
DOOR FIGHT1AP
Shoot1AP
Mek ingenuity knows few bounds. Drill rokkits are designed to strike a target and bore through thick armour before exploding.
The sound of explosions, the acrid stench of smoke and the screams of battle drive Wrecka Krews forwards to ever more destructive acts.
Whenever a friendly WRECKA KREW operative is shooting, fighting or retaliating, in the Roll Attack Dice step:- For each attack dice result of 6 you retain, you gain one Wrecka point.
- You can spend up to 2 of your Wrecka points (unless it’s a BOMB SQUIG, then you cannot spend any). For each point you spend this way, retain one of your fails as a normal success instead of discarding it.
The more intense the dakka and the louder the boom of explosions, the more satisfying the carnage!
|

Charge1AP
|
|
Control range between operatives is mutual, therefore operatives are within each other’s control range if one of them is visible to and within 1" of the other.
The terrain is within both operative B and C’s control range.
Because of the terrain, operative B is not visible to operative C, and vice versa, therefore they are not within each other’s control range.
Fight1AP
- You can draw an imaginary, unobstructed straight line (known as a Visibility line) 1 mm wide from the head of the active operative’s miniature to any part of the miniature of the intended target (not its base).
Guard1AP
- It performs any action, moves or is set up.
- An enemy operative ends an action within its control range and you don’t interrupt that activation (see On Guard).
- Its order is changed.
- It’s the start of the next turning point.
The BREAKA BOY keyword is used in the following Wrecka Krew datacards:
Reposition1AP
When jumping from Vantage terrain, if there is a terrain part such as a rampart at the edge the operative would jump from, the operative must climb it first then jump from the highest point it must climb over. When jumping to a terrain feature, you can ignore its height difference of 1" or less, including its rampart (if any).
Fall Back2AP
Charge1AP
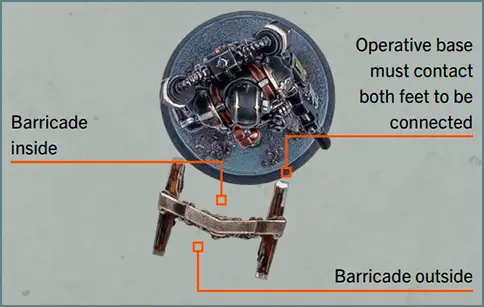
A suppression shield with armoured feet that provides mobile cover.
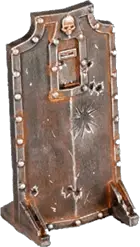
Protective: While an operative is in cover from this terrain feature, improve its Save stat by 1 (to a maximum of 2+).
Portable: This terrain feature only provides cover while an operative is connected to it and if the shield is intervening (ignore its feet). Operatives connected to the inside of it can perform the following unique action during the battle.
MOVE WITH BARRICADE 1AP
When the Wrecka Krew’s violent rampage reaches its crescendo, a rage overcomes them. They bellow the infamous Ork battle cry as they set upon their enemies with hammer and fist.
If an enemy takes cover, this just provides Wrecka Krews with the opportunity to blow more stuff up.
The WRECKA KREW keyword is used in the following Wrecka Krew datacards:
The ORK keyword is used in the following Wrecka Krew datacards:
Dash1AP
Reposition1AP
The BREAKA BOY keyword is used in the following Wrecka Krew datacards:
The TANKBUSTA keyword is used in the following Wrecka Krew datacards: