Death Korps

Grim, fatalistic and utterly uncompromising, the Death Korps of Krieg are famed for their endurance and ability to do battle in the most horrific conditions. Death Korps kill teams are made up of veteran specialists who have seen more fighting that many Astra Militarum soldiers will experience in their entire lifetime.

Books

BookKindEditionVersionLast update
  Death Korps
  Death KorpsFaction31.2April 2025

Death Korps Kill Team

Operatives


  • 1 DEATH KORPS WATCHMASTER operative with the following:
    • Boltgun; bayonet
    Or one option from each of the following:
    • Bolt pistol, plasma pistol or relic laspistol
    • Chainsword or power weapon
  • 4 TROOPER operatives*
  • 9 DEATH KORPS operatives selected from the following list:
Other than TROOPER operatives, your kill team can only include each operative on this list once.

* Up to four times, instead of selecting one of these TROOPER operatives, you can select one DEATH KORPS ploy to cost you 0CP for the battle.

Marker/Token Guide

Remote Detonator token

Bruiser token

Move Move Move token

Spot token

Take Aim token

Dig In token

Medic token

Fix Bayonets token

Mine marker

Gas marker

Faction Rules

Guardsmen Orders

The soldiers of the Death Korps of Krieg are unquestioningly loyal to their officers, following barked orders with a speed and efficiency that is the envy of many other regiments.

STRATEGIC GAMBIT and SUPPORT. A friendly DEATH KORPS WATCHMASTER operative can issue a GUARDSMAN ORDER. Whenever it does, select one GUARDSMAN ORDER for all friendly DEATH KORPS operatives within 6" of it to receive.

Whenever a friendly operative receives a GUARDSMAN ORDER, apply its rules until the end of the turning point. Operatives cannot benefit from more than one GUARDSMAN ORDER at once; they only benefit from the most recent order they received during the turning point.

Take Aim!
Outfitted and trained for attritional infantry combat, the soldiers of Krieg have undertaken endless hours of lasgun drills.
Ranged weapons of operatives that received this order (excluding mortar barrage and remote detonator) have the Ceaseless weapon rule.

Fix Bayonets!
The kind of warfare undertaken by the Death Korps of Krieg requires their troopers to be well versed in close-quarters fighting and trench clearance.
Melee weapons of operatives that received this order have the Ceaseless weapon rule.

Dig In!
Obstinate to the last, the soldiers of Krieg establish defensive positions and hold them with grim determination.
Whenever an operative is shooting a friendly operative that’s received this order, if you can retain any cover saves, you can re-roll any of your defence dice results of one result (e.g. results of 2).

Move! Move! Move!
Responding to a barked order from their Watchmaster, the soldiers of Krieg pick up the pace and hustle towards their next objective.
Whenever an operative that’s received this order is performing the Reposition action, add 1" to its Move stat.

Strategy Ploys

SIEGE WARFARE

Death Korps infantry are at home in the dreadful grind of siege warfare, repelling their foes with overlapping fields of withering fire.

Friendly DEATH KORPS operatives’ ranged weapons have the Saturate and Accurate 1 weapon rules.
TAKE COVER

Used to fighting in the close confines of trenches and tunnels, Krieg soldiers make excellent use of whatever meagre cover they can find.

Whenever an operative is shooting a friendly DEATH KORPS operative, if you can retain any cover saves, improve that friendly operative’s Save stat by 1.
CLEAR THE LINE

Should the enemy break through, the soldiers of Krieg are disciplined enough to retain their composure and repel the foe.

Friendly DEATH KORPS operatives’ melee weapons have the Accurate 1 weapon rule. Whenever a friendly DEATH KORPS operative is fighting wholly within your territory, or whenever it’s retaliating, its melee weapons also have the Severe weapon rule.
REGROUP

Even in the confusion of combat, the Death Korps of Krieg retain their focus, returning to formation as they destroy the enemy with accurate las fire.

SUPPORT. Select one friendly DEATH KORPS operative that’s more than 3" from enemy operatives. Each other friendly DEATH KORPS operative within 5" of that operative and not within control range of enemy operatives can immediately perform a free Dash action in an order of your choice, but each that does so must end that move closer to that operative. Note that a Comms Device from universal equipment only affects the second distance of this rule.

You cannot use this ploy and the Chronometer faction equipment STRATEGIC GAMBIT in the same turning point.

Firefight Ploys

INSPIRATIONAL LEADERSHIP

The greatest officers lead by example, issuing orders with calm precision even as they cut down their foes.

SUPPORT. Use this firefight ploy during a friendly DEATH KORPS WATCHMASTER or DEATH KORPS CONFIDANT operative’s activation, before or after it performs an action. It issues a GUARDSMAN ORDER.
COMBINED ARMS

Precisely coordinated fire is capable of taking down even the most potent of enemies.

Use this firefight ploy after rolling your attack dice for a friendly DEATH KORPS operative, if it’s shooting an enemy operative that’s been shot by another friendly DEATH KORPS operative during this turning point. You can re-roll any of your attack dice.
IN LIFE, SHAME

The Cult of Krieg demand sacrifice in the name of the Emperor, so those who are yet to give their lives must atone by achieving ever greater feats upon the battlefield.

Use this firefight ploy when a friendly DEATH KORPS operative is activated and given an Engage order. It receives every GUARDSMAN</SPAN> <SPAN CLASS="TT KWBU">ORDER. This takes precedence over the normal rule that operatives cannot benefit from more than one GUARDSMAN ORDER at once.
IN DEATH, ATONEMENT

All soldiers of Krieg are destined to die in battle. The Cult of Sacrifice teaches that in death they will earn forgiveness for the sins of their forebears.

Use this firefight ploy when a ready friendly DEATH KORPS operative is incapacitated, if it isn’t within control range of enemy operatives. Before it’s removed from the killzone, it can immediately perform one free action. Note that friendly operative is injured for the duration of that action.

Faction Equipment

CHRONOMETER

Krieg combat operations are performed to strict schedules. Synchronised chronometers ensure operatives adhere to the time frames laid down by command.

Once per battle STRATEGIC GAMBIT in the first or second turning point. Each friendly DEATH KORPS operative wholly within your territory can immediately perform a free Dash action in an order of your choice, but each that does so must end that move closer to an opponent’s drop zone or killzone edge.

You cannot use this STRATEGIC GAMBIT and the Regroup strategy ploy during the same turning point.
COMM-BEADS

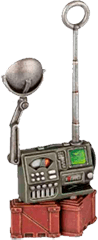
Vox-casters and receivers allow Death Korps soldiers to remain in contact even as they are separated in the confusion of battle.

Whenever a friendly DEATH KORPS WATCHMASTER or friendly DEATH KORPS CONFIDANT operative issues a GUARDSMAN ORDER, you can use this rule. If you do, instead of each friendly DEATH KORPS operative within 6" of it receiving that order, you can select one friendly DEATH KORPS operative to receive that order.
HAND AXES

Issued primarily as tools rather than weapons, these sharp-bladed axes can be utilised in melee should close confines prevent the use of bayonets.

Friendly DEATH KORPS operatives have the following melee weapon:

Hand axe

 
NAME
ATK
HIT
DMG
Hand axe
3
4+
3/4
GAS BOMBARDMENT

Calling for artillery support, the Death Korps request a chemical barrage, knowing full well that even enviro-sealed uniforms will not protect them from the poisonous fumes.

Once per battle STRATEGIC GAMBIT. Place your Gas marker in the killzone; it cannot be placed underneath Vantage terrain. Whenever an operative is within 3" of that marker, subtract 1 from its APL stat. In the Ready step of the next Strategy phase, remove that marker. Note that an operative’s APL stat is only changed while it’s within 3" of that marker. If it moves more than 3" from that marker, its APL stat is no longer changed by this rule.

Datacards


Death Korps Watchmaster

Watchmasters command squads of Death Korps in battle. Calm under pressure and unphased by the horrors of war, they are solid combat leaders who will fight tooth and nail to achieve victory as well as see their comrades survive to fight another day.

Death Korps Watchmaster

Watchmasters command squads of Death Korps in battle. Calm under pressure and unphased by the horrors of war, they are solid combat leaders who will fight tooth and nail to achieve victory as well as see their comrades survive to fight another day.

APL
2
MOVE
6"
SAVE
5+
WOUNDS
8
 
NAME
ATK
HIT
DMG
WR
Bolt pistol
Bolt pistol
4
3+
3/4
Range 8"Range 8"
Boltgun
Boltgun
4
3+
3/4
-
Plasma pistol (standard)
4
4+
3/5
Range 8", Piercing 1Range 8", Piercing 1
Plasma pistol (supercharge)
4
4+
4/5
Range 8", Hot, Lethal 5+, Piercing 1Range 8", Hot, Lethal 5+, Piercing 1
Relic laspistol
Relic laspistol
4
3+
2/4
Range 8", Lethal 5+Range 8", Lethal 5+
Bayonet
Bayonet
4
3+
2/3
-
Chainsword
Chainsword
4
3+
4/5
-
Power weapon
Power weapon
4
3+
4/6
Lethal 5+Lethal 5+
Adaptive Orders: If this operative doesn’t issue a GUARDSMAN ORDER as a STRATEGIC GAMBIT, you can use the Inspirational Leadership firefight ploy for 0CP during this operative’s activation.
DEATH KORPS, IMPERIUM, ASTRA MILITARUM, LEADER, WATCHMASTER
⌀25mm


Death Korps Bruiser

For some, war and fighting just agrees with them. Bruisers are such people. They look the galaxy’s endless malevolent threats in the eye with a trench club in their hand, ready to bludgeon anything and everything to death.

Death Korps Bruiser

For some, war and fighting just agrees with them. Bruisers are such people. They look the galaxy’s endless malevolent threats in the eye with a trench club in their hand, ready to bludgeon anything and everything to death.

APL
2
MOVE
6"
SAVE
5+
WOUNDS
7
 
NAME
ATK
HIT
DMG
WR
Lasgun
Lasgun
4
4+
2/3
-
Trench club
Trench club
4
3+
3/3
ShockShock
Bruiser: Once per turning point, when this operative is fighting or retaliating, in the Resolve Attack Dice step, you can ignore the damage inflicted on it from one normal success.
DEATH KORPS, IMPERIUM, ASTRA MILITARUM, BRUISER
⌀25mm


Death Korps Confidant

Even the best Watchmasters need to call on solid tactical advice – and their Confidants are experts. Experienced troops and capable leaders themselves, they can be trusted to carry out the Watchmaster’s orders in the field as well as contribute to the formulation of a solid battle plan.

APL
2
MOVE
6"
SAVE
5+
WOUNDS
7
 
NAME
ATK
HIT
DMG
WR
Bolt pistol
Bolt pistol
4
4+
3/4
Range 8"Range 8"
Boltgun
Boltgun
4
4+
3/4
-
Lasgun
Lasgun
4
4+
2/3
-
Relic laspistol
Relic laspistol
4
4+
2/4
Range 8", Lethal 5+Range 8", Lethal 5+
Bayonet
Bayonet
3
4+
2/3
-
Chainsword
Chainsword
4
4+
4/5
-
Second in Command: If a friendly WATCHMASTER operative is incapacitated and removed from the killzone, you can use this rule. If you do, until the end of the battle, this operative can issue a GUARDSMAN ORDER as a STRATEGIC GAMBIT (even though it’s not a WATCHMASTER operative).
Directive: Whenever this operative is activated, if you haven’t used the Second in Command rule during the battle, you can select one other ready friendly DEATH KORPS operative visible to and within 6" of it. When this operative is expended, activate that other friendly operative before your opponent activates (if that operative is a TROOPER, ignore its Group Activation rule).
DEATH KORPS, IMPERIUM, ASTRA MILITARUM, CONFIDANT
⌀25mm


Death Korps Gunner

With experience and skills in wielding a whole host of specialist weapons, Death Korps Gunners are called whether a Watchmaster needs a xenos nest burned to nothing, a bunker reduced to melted sludge or to bring down heavy enemy infantry that lasguns are insufficient for.

Death Korps Gunner

With experience and skills in wielding a whole host of specialist weapons, Death Korps Gunners are called whether a Watchmaster needs a xenos nest burned to nothing, a bunker reduced to melted sludge or to bring down heavy enemy infantry that lasguns are insufficient for.

APL
2
MOVE
6"
SAVE
5+
WOUNDS
7
 
NAME
ATK
HIT
DMG
WR
Flamer
Flamer
4
2+
3/3
Range 8", Saturate, Torrent 2"Range 8", Saturate, Torrent 2"
Grenade launcher (frag)
4
4+
2/4
Blast 2"Blast 2"
Grenade launcher (krak)
4
4+
4/5
Piercing 1Piercing 1
Meltagun
Meltagun
4
4+
6/3
Range 6", Devastating 4, Piercing 2Range 6", Devastating 4, Piercing 2
Plasma gun (standard)
4
4+
4/6
Piercing 1Piercing 1
Plasma gun (supercharge)
4
4+
5/6
Hot, Lethal 5+, Piercing 1Hot, Lethal 5+, Piercing 1
Bayonet
Bayonet
3
4+
2/3
-
DEATH KORPS, IMPERIUM, ASTRA MILITARUM, GUNNER
⌀25mm


Death Korps Medic

The efforts of the Medic is all that stands between life and miserable death for the troops of his squad. Equipped with little more than basic medical equipment, they strive to keep their comrades alive in the most hazardous conditions.

Death Korps Medic

The efforts of the Medic is all that stands between life and miserable death for the troops of his squad. Equipped with little more than basic medical equipment, they strive to keep their comrades alive in the most hazardous conditions.

APL
2
MOVE
6"
SAVE
5+
WOUNDS
7
 
NAME
ATK
HIT
DMG
WR
Lasgun
Lasgun
4
4+
2/3
-
Bayonet
Bayonet
3
4+
2/3
-
Medic!: The first time during each turning point that another friendly DEATH KORPS operative would be incapacitated while visible to and within 3" of this operative, you can use this rule, providing neither this nor that operative is within control range of an enemy operative. If you do, that friendly operative isn’t incapacitated, has 1 wound remaining and cannot be incapacitated for the remainder of the action. After that action, that friendly operative can immediately perform a free Dash action, but must end that move within this operative’s control range. Subtract 1 from this and that operative’s APL stats until the end of their next activations respectively, and if this rule was used during that friendly operative’s activation, that activation ends. You cannot use this rule if this operative is incapacitated, or if it’s a Shoot action and this operative would be a primary or secondary target.

MEDIKIT1AP

Select one friendly DEATH KORPS operative within this operative’s control range to regain up to 2D3 lost wounds. It cannot be an operative that the Medic! rule was used on during this turning point.

This operative cannot perform this action while within control range of an enemy operative.
DEATH KORPS, IMPERIUM, ASTRA MILITARUM, MEDIC
⌀25mm


Death Korps Sapper

Whether blowing up ammo dumps or cracking open defences, many kill teams need explosives experts. Death Korps Sappers are such troops. Naturally daring, they often have to put themselves in harm’s way to plant their remote mines at the optimum point to blow their target into smithereens.

APL
2
MOVE
6"
SAVE
5+
WOUNDS
7
 
NAME
ATK
HIT
DMG
WR
Lasgun
Lasgun
4
4+
2/3
-
Remote detonator
Remote detonator
4
2+
5/6
Heavy (Dash only), Limited 1, Piercing 1, Silent, Detonate*Heavy (Dash only), Limited 1, Piercing 1, Silent, Detonate*
Bayonet
Bayonet
3
4+
2/3
-
Mine Layer: This operative is carrying your Mine marker. It can perform the Pick Up Marker action on that marker, and whenever it performs the Place Marker action on that marker, it can immediately perform a free Dash action.
*Detonate: Don’t select a valid target. Instead, shoot against each operative within 2" of your Mine marker, unless Heavy terrain is wholly intervening between that operative and that marker. Each of those operatives cannot be in cover or obscured. Roll each sequence separately in an order of your choice. This weapon cannot be selected if your Mine marker isn’t in the killzone. At the end of the action, remove your Mine marker from the killzone.
DEATH KORPS, IMPERIUM, ASTRA MILITARUM, SAPPER
⌀25mm


Death Korps Sniper

Expert marksmen, their skills honed in the harsh conditions of numerous battlefields, Death Korps Snipers are sharpshooters who specialise in cutting down key enemy troops at extreme ranges – all unseen by the foe.

Death Korps Sniper

Expert marksmen, their skills honed in the harsh conditions of numerous battlefields, Death Korps Snipers are sharpshooters who specialise in cutting down key enemy troops at extreme ranges – all unseen by the foe.

APL
2
MOVE
6"
SAVE
5+
WOUNDS
7
 
NAME
ATK
HIT
DMG
WR
Long-las (concealed)
4
2+
3/3
Devastating 3, Heavy, Silent, Concealed Position*Devastating 3, Heavy, Silent, Concealed Position*
Long-las (mobile)
Long-las (mobile)
4
3+
3/4
-
Long-las (stationary)
4
2+
3/3
Devastating 3, HeavyDevastating 3, Heavy
Bayonet
Bayonet
3
4+
2/3
-
*Concealed Position: This operative can only use this weapon the first time it’s performing the Shoot action during the battle.
DEATH KORPS, IMPERIUM, ASTRA MILITARUM, SNIPER
⌀25mm


Death Korps Spotter

To direct battle-winning heavy fire, forward observers form a part of kill teams. Spotters possess great focus, accurately guiding salvoes of mortar fire from safe lines even when under immense pressure. With this they can stymie enemy attacks or pin them down in their defences.

APL
2
MOVE
6"
SAVE
5+
WOUNDS
7
 
NAME
ATK
HIT
DMG
WR
Lasgun
Lasgun
4
4+
2/3
-
Mortar barrage
Mortar barrage
4
4+
3/5
Blast 2", Heavy (Dash only), SilentBlast 2", Heavy (Dash only), Silent
Bayonet
Bayonet
3
4+
2/3
-

SPOT1AP

SUPPORT. Select one enemy operative visible to this operative. Once during this turning point, when a friendly DEATH KORPS operative within 3" of this operative is shooting that enemy operative, you can use this effect. If you do:
  • That friendly operative’s ranged weapons have the Seek Light weapon rule.
  • That enemy operative cannot be obscured.
This operative cannot perform this action while within control range of an enemy operative.
DEATH KORPS, IMPERIUM, ASTRA MILITARUM, SPOTTER
⌀25mm


Death Korps Trooper

These Troopers have a great deal of combat experience, gained over harsh fighting for months or even years. Armed with lasguns and bayonets, they have faced down terrible danger time and time again.

Death Korps Trooper

These Troopers have a great deal of combat experience, gained over harsh fighting for months or even years. Armed with lasguns and bayonets, they have faced down terrible danger time and time again.

APL
2
MOVE
6"
SAVE
5+
WOUNDS
7
 
NAME
ATK
HIT
DMG
WR
Lasgun
Lasgun
4
4+
2/3
-
Bayonet
Bayonet
3
4+
2/3
-
Group Activation: Whenever this operative is expended, you must then activate one other ready friendly DEATH KORPS TROOPER operative (if able) before your opponent activates. When that other operative is expended, your opponent then activates as normal (in other words, you cannot activate more than two operatives in succession with this rule).
DEATH KORPS, IMPERIUM, ASTRA MILITARUM, TROOPER
⌀25mm


Death Korps Veteran

Death Korps Veterans are resilient above and beyond even their peers. These troops are steel in body as well as in mind, with bionics in the place of body parts lost in battle. Despite the horrific wounds they have suffered, they fight on still, unbowed.

Death Korps Veteran

Death Korps Veterans are resilient above and beyond even their peers. These troops are steel in body as well as in mind, with bionics in the place of body parts lost in battle. Despite the horrific wounds they have suffered, they fight on still, unbowed.

APL
2
MOVE
6"
SAVE
5+
WOUNDS
7
 
NAME
ATK
HIT
DMG
WR
Lasgun
Lasgun
4
4+
2/3
-
Bionic arm
Bionic arm
3
4+
4/5
-
Veteran Guardsman: Whenever this operative is activated, it can receive one GUARDSMAN ORDER.
Bionics: Normal Dmg of 3 or more inflicts 1 less damage on this operative.
DEATH KORPS, IMPERIUM, ASTRA MILITARUM, VETERAN
⌀25mm


Death Korps Vox-Operator

Vox-operators are consummate professionals, accompanying their leaders wherever required whilst carrying heavy equipment, all to receive and transmit communications that are vital for their comrades and superiors to understand the inevitable confusion of battle.

Death Korps Vox-Operator

Vox-operators are consummate professionals, accompanying their leaders wherever required whilst carrying heavy equipment, all to receive and transmit communications that are vital for their comrades and superiors to understand the inevitable confusion of battle.

APL
2
MOVE
6"
SAVE
5+
WOUNDS
7
 
NAME
ATK
HIT
DMG
WR
Lasgun
Lasgun
4
4+
2/3
-
Bayonet
Bayonet
3
4+
2/3
-
Relay Orders: Once per turning point, when this operative receives a GUARDSMAN ORDER, if it’s not within control range of enemy operatives, it can relay that order. Whenever an order is relayed, all friendly DEATH KORPS operatives in the killzone receive that order, then subtract 1 from this operative’s APL stat until the end of its next activation.

SIGNAL1AP

SUPPORT. Select one other friendly DEATH KORPS operative visible to and within 6" of this operative. Until the end of that operative’s next activation, add 1 to its APL stat.

This operative cannot perform this action while within control range of an enemy operative.
DEATH KORPS, IMPERIUM, ASTRA MILITARUM, VOX-OPERATOR
⌀25mm


Death Korps Zealot

Death Korps Zealots are deeply spiritual warriors, often claiming their survival through the horrifying battlefields they’ve experienced is only thanks to the direct intervention of the Emperor himself.

Death Korps Zealot

Death Korps Zealots are deeply spiritual warriors, often claiming their survival through the horrifying battlefields they’ve experienced is only thanks to the direct intervention of the Emperor himself.

APL
2
MOVE
6"
SAVE
5+
WOUNDS
7
 
NAME
ATK
HIT
DMG
WR
Lasgun
Lasgun
4
4+
2/3
-
Bayonet
Bayonet
3
4+
2/3
-
The Emperor Protects: Whenever an operative is shooting this operative, you can re-roll any of your defence dice.
Uplifting Primer: SUPPORT. Whenever a friendly DEATH KORPS operative is within 3" of this operative, that friendly operative’s weapons have the Severe weapon rule.
DEATH KORPS, IMPERIUM, ASTRA MILITARUM, ZEALOT
⌀25mm
Ceaseless
You can re-roll any of your attack dice results of one result (e.g. results of 2).

Reposition1AP

Move the active operative up to its Move stat to a location it can be placed. This must be done in one or more straight-line increments, and increments are always rounded up to the nearest inch.

It cannot move within control range of an enemy operative, unless one or more other friendly operatives are already within control range of that enemy operative, in which case it can move within control range of that enemy operative but cannot finish the move there.

An operative cannot perform this action while within control range of an enemy operative, or during the same activation in which it performed the Fall Back or Charge action.
Saturate
The defender cannot retain cover saves.
Accurate x
You can retain up to x attack dice as normal successes without rolling them. If a weapon has more than one instance of Accurate x, you can treat it as one instance of Accurate 2 instead (this takes precedence over x rules).
Devastating x
Each retained critical success immediately inflicts x damage on the operative this weapon is being used against, e.g. Devastating 3. If the rule starts with a distance (e.g. 1" Devastating x), inflict x damage on that operative and each other operative visible to and within that distance of it. Note that success isn’t discarded after doing so — it can still be resolved later in the sequence.
Piercing x
The defender collects x less defence dice, e.g. Piercing 1. If the rule is Piercing Crits x, this only comes into effect if you retain any critical successes.
Severe
If you don’t retain any critical successes, you can change one of your normal successes to a critical success. Any rules that take effect as a result of retaining a critical success (e.g. Devastating, Piercing Crits, etc.) still do.
Control Range
Many rules relate to control range such as moving, fighting and using cover. Something is within an operative’s control range if it’s visible to and within 1" of that operative.

Control range between operatives is mutual, therefore operatives are within each other’s control range if one of them is visible to and within 1" of the other.

Operatives A and B are within each other’s control range.

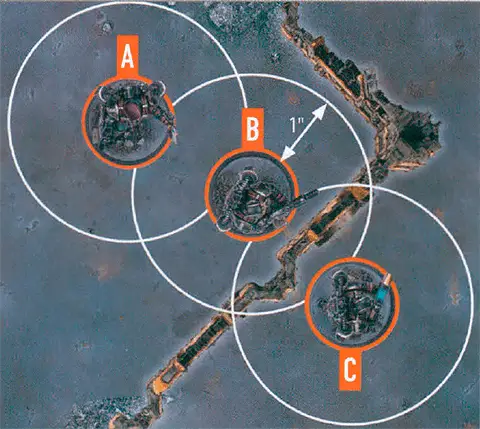
The terrain is within both operative B and C’s control range.

Because of the terrain, operative B is not visible to operative C, and vice versa, therefore they are not within each other’s control range.


Imagine control range as an area of interaction the operative has with things close to it.

Dash1AP

The same as the Reposition action, except don’t use the active operative’s Move stat — it can move up to 3" instead. In addition, it cannot climb during this move, but it can drop and jump.

An operative cannot perform this action while within control range of an enemy operative, or during the same activation in which it performed the Charge action.
1X COMMS DEVICE

Communications devices can be swiftly hijacked and employed to coordinate operations or call in support during a firefight.

Before the battle, you can set up one of your Comms Device markers wholly within your territory. While a friendly operative controls this marker, add 3" to the distance requirements of its SUPPORT rules that refer to friendly operatives (e.g. ‘select one friendly operative within 6"’ would be 9" instead). Note that you cannot benefit from your opponent’s Comms Device markers.
Guardsmen Orders

The soldiers of the Death Korps of Krieg are unquestioningly loyal to their officers, following barked orders with a speed and efficiency that is the envy of many other regiments.

STRATEGIC GAMBIT and SUPPORT. A friendly DEATH KORPS WATCHMASTER operative can issue a GUARDSMAN ORDER. Whenever it does, select one GUARDSMAN ORDER for all friendly DEATH KORPS operatives within 6" of it to receive.

Whenever a friendly operative receives a GUARDSMAN ORDER, apply its rules until the end of the turning point. Operatives cannot benefit from more than one GUARDSMAN ORDER at once; they only benefit from the most recent order they received during the turning point.

Take Aim!
Outfitted and trained for attritional infantry combat, the soldiers of Krieg have undertaken endless hours of lasgun drills.
Ranged weapons of operatives that received this order (excluding mortar barrage and remote detonator) have the Ceaseless weapon rule.

Fix Bayonets!
The kind of warfare undertaken by the Death Korps of Krieg requires their troopers to be well versed in close-quarters fighting and trench clearance.
Melee weapons of operatives that received this order have the Ceaseless weapon rule.

Dig In!
Obstinate to the last, the soldiers of Krieg establish defensive positions and hold them with grim determination.
Whenever an operative is shooting a friendly operative that’s received this order, if you can retain any cover saves, you can re-roll any of your defence dice results of one result (e.g. results of 2).

Move! Move! Move!
Responding to a barked order from their Watchmaster, the soldiers of Krieg pick up the pace and hustle towards their next objective.
Whenever an operative that’s received this order is performing the Reposition action, add 1" to its Move stat.

Engage: The operative can perform actions as normal and can counteract.

Shoot1AP

Shoot with the active operative by following the sequence below. The active operative’s player is the attacker. The selected enemy operative’s player is the defender.

An operative cannot perform this action while it has a Conceal order, or while within control range of an enemy operative.
Precedence
Some rare rules will conflict with each other, so it must be established which takes precedence. In order of priority, a rule takes precedence if:

1
It specifically says so.

2
The online designer’s commentary says so.

3
It’s not found in the core book (i.e. other rules take precedence over core book rules).

4
It says ‘cannot’.

5
The player with initiative decides.

If a rule on a datacard says ‘this operative can perform two Shoot actions during its activation’, this takes precedence over the core rules for action restrictions, as per precedence priority 3.
Damage
When damage is inflicted on an operative, reduce their wounds by that amount. An operative’s starting number of wounds is determined by its Wounds stat (see datacards). If an operative’s wounds are reduced to 0 or less, it’s incapacitated, then removed from the killzone. Some rules allow an incapacitated operative to perform a free action before being removed from the killzone. Such an operative cannot perform more than one free action (excluding Place Marker) in this instance, and that operative’s player decides the order of any of its rules that occur before it’s removed from the killzone (taking precedence over the player with initiative deciding).

While an operative has fewer than its starting wounds remaining, it’s wounded. While it has fewer than half its starting wounds remaining, it’s also injured. Subtract 2" from the Move stat of injured operatives and worsen the Hit stat of their weapons by 1.

Keep track of each operative’s remaining wounds with dice, tokens or by writing it down.

‘Incapacitated’ and ‘removed from the killzone’ are separate. Some rules take effect when an operative is incapacitated, but before it’s removed.

REGROUP

Even in the confusion of combat, the Death Korps of Krieg retain their focus, returning to formation as they destroy the enemy with accurate las fire.

SUPPORT. Select one friendly DEATH KORPS operative that’s more than 3" from enemy operatives. Each other friendly DEATH KORPS operative within 5" of that operative and not within control range of enemy operatives can immediately perform a free Dash action in an order of your choice, but each that does so must end that move closer to that operative. Note that a Comms Device from universal equipment only affects the second distance of this rule.

You cannot use this ploy and the Chronometer faction equipment STRATEGIC GAMBIT in the same turning point.
Range x
Only operatives within x of the active operative can be valid targets, e.g. Range 9".
Blast x
The target you select is the primary target. After shooting the primary target, shoot with this weapon against each secondary target in an order of your choice (roll each sequence separately). Secondary targets are other operatives visible to and within x of the primary target, e.g. Blast 2" (they are all valid targets, regardless of a Conceal order). Secondary targets are in cover and obscured if the primary target was.
Hot
After an operative uses this weapon, roll one D6. If the result is less than the weapon’s Hit stat, inflict damage on that operative equal to the result multiplied by two. If it’s used multiple times in one action (e.g. Blast), still only roll one D6.
Lethal x+
Your successes equal to or greater than x are critical successes, e.g. Lethal 5+.
INSPIRATIONAL LEADERSHIP

The greatest officers lead by example, issuing orders with calm precision even as they cut down their foes.

SUPPORT. Use this firefight ploy during a friendly DEATH KORPS WATCHMASTER or DEATH KORPS CONFIDANT operative’s activation, before or after it performs an action. It issues a GUARDSMAN ORDER.
Shock
The first time you strike with a critical success in each sequence, also discard one of your opponent’s unresolved normal successes (or a critical success if there are none).
Visible
For an intended target to be Visible, the following must be true:
  • You can draw an imaginary, unobstructed straight line (known as a Visibility line) 1 mm wide from the head of the active operative’s miniature to any part of the miniature of the intended target (not its base).
In the rare instance that bases or parts of the active operative’s miniature prevent an intended target from being Visible to the active operative, such as when the active operative is directly below or above the intended target, treat those bases and parts as being invisible.

Some rare rules will require you to select a point that is Visible (e.g. a point on the killzone). In such circumstances, you must be able to draw an imaginary, unobstructed straight line 1mm wide from the head of the active operative’s miniature to the point you would select.
Expended
  • When you’ve finished with your operative’s activation, that operative is expended. While expended, an operative is not ready.
Torrent x
Select a valid target as normal as the primary target, then select any number of other valid targets within x of the first valid target as secondary targets, e.g. Torrent 2". Shoot with this weapon against all of them in an order of your choice (roll each sequence separately).
Heavy
An operative cannot use this weapon in an activation or counteraction in which it moved, and it cannot move in an activation or counteraction in which it used this weapon. If the rule is Heavy (x only), where x is a move action, only that move is allowed, e.g. Heavy (Dash only). This weapon rule has no effect on preventing the Guard action.
Limited x
After an operative uses this weapon a number of times in the battle equal to x, they no longer have it. If it’s used multiple times in one action (e.g. Blast), treat this as one use.
Silent
An operative can perform the Shoot action with this weapon while it has a Conceal order.

Pick Up Marker1AP

Remove a marker the active operative controls that the Pick Up Marker action can be performed upon. That operative is now carrying, contesting and controlling that marker.

An operative cannot perform this action while within control range of an enemy operative, or while it’s already carrying a marker.

Place Marker1AP

Remove a marker the active operative controls that the Pick Up Marker action can be performed upon. That operative is now carrying, contesting and controlling that marker.

An operative cannot perform this action while within control range of an enemy operative, or while it’s already carrying a marker.

Charge1AP

The same as the Reposition action, except the active operative can move an additional 2".

It can move, and must finish the move, within control range of an enemy operative. If it moves within control range of an enemy operative that no other friendly operatives are within control range of, it cannot leave that operative’s control range.

An operative cannot perform this action while it has a Conceal order, if it’s already within control range of an enemy operative, or during the same activation in which it performed the Reposition, Dash or Fall Back action.
Counteract
When you would activate a ready friendly operative, if all your operatives are expended but your opponent still has ready operatives, you can select an expended friendly operative with an Engage order to perform a 1AP action (excluding Guard) for free. Each operative can only counteract once per turning point. That operative cannot move more than 2", or must be set up wholly within 2" if it’s removed and set up again, while counteracting (this is not a change to its Move stat, and takes precedence over all other rules). Counteracting is optional, so you can choose not to. In either case, activation alternates back to your opponent afterwards.

Counteracting isn’t an activation, it’s instead of activating. This difference is important; for instance, it means action restrictions won't apply.
Conceal: The operative cannot perform Shoot and Charge actions, and it cannot counteract. However, it’s not a valid target while in cover.
Valid Target
Some rules require you to select a valid target for an operative. This is most common when an operative is shooting, but some rare rules require it too.

If the intended target has an Engage order, it’s a valid target if it’s visible to the active operative.
If the intended target has a Conceal order, it’s a valid target if it’s visible to the active operative and not in cover.
Seek
When selecting a valid target, operatives cannot use terrain for cover. If the rule is Seek Light, operatives cannot use Light terrain for cover. Whilst this can allow such operatives to be targeted (assuming they’re visible), it doesn’t remove their cover save (if any).

Disable Ads


Boosty subscribers may disable ads:
1. Enter e-mail you have used to login on Boosty.
2. Press Get new pin code button (if you don’t have it already)
3. Enter pin code.

Note that login database updated once a day. So, if you are a new booster - try tomorrow. And thank you!
© Vyacheslav Maltsev 2013-2025