Critical Ops 2022

Books
| Book | Kind | Edition | Version | Last update |
| | ||||
| | Rulebook | 2 | December 2022 | |
| | ||||
| | Expansion | 2 | December 2022 | |
| | ||||
| | Expansion | 2 | January 2024 | |
Matched Play Game Sequence
To play a matched play game, each player must have a matched roster as described in the Kill Team Core Book. A matched play game is then completed by following the sequence below:
The Attacker chooses two mission cards to put forward. The Defender selects one of them to use.
The Defender chooses three map cards to put forward. The Attacker selects one of them to be discarded. The Defender selects one of the remaining cards to use.
The Defender selects their drop zone after setting up the objective markers and killzone as normal.
They then select one of the map types (i.e. 1-3, 4-6 or 7-9) that was not used in the previous battle, and the loser selects one of the map cards from that type.
For example, in the map category, if one player bids 2 tokens and another bids 4, the latter would decide which map card to use. Both players would discard those tokens, then repeat this process for determining who decides Attacker and Defender.
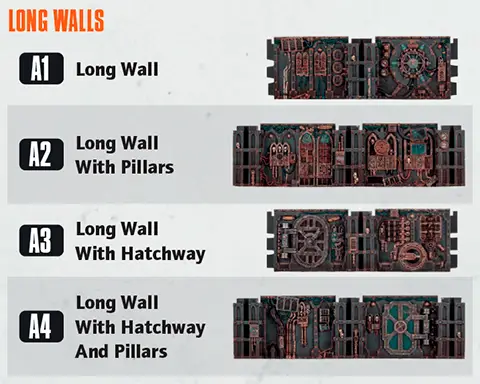
Determine the killzone and set up its terrain features, ensuring the traits of each terrain feature and its parts are specified.
Here you will find alternative methods you can use to determine Tac Ops:
To bid, each player will secretly put any of their tokens into their hand as their bid (or zero if they wish), then reveal their bid simultaneously. The player that bids the most wins. If it’s a draw, that bid is cancelled and the players bid again, unless they both bid zero, in which case the players roll off to determine who wins. Once the bid is resolved, both players discard their bid tokens.
1. Determine Mission and Map
Determine the mission and map. Here you will find a variety of methods to do this:ORGANISED
Specify beforehand which combination of mission and map will be used e.g. Loot+Strait (A4) or Secure+Junction (B7), etc. If a series of games are being played (e.g. at a tournament), each round can be specified beforehand. Alternatively, each subsequent round can be determined by the organiser beforehand, but only revealed after the previous round has been completed.RANDOM
Shuffle the mission cards and map cards separately, then deal one of each to randomly determine the mission and map.VETO
The players roll off to decide Attacker and Defender first. The Attacker takes the mission cards and the Defender takes the map cards.The Attacker chooses two mission cards to put forward. The Defender selects one of them to use.
The Defender chooses three map cards to put forward. The Attacker selects one of them to be discarded. The Defender selects one of the remaining cards to use.
The Defender selects their drop zone after setting up the objective markers and killzone as normal.
CONTROL
If the players are playing a series of games against each other, the winner of the previous game selects one of the mission cards that was not used in the previous battle.They then select one of the map types (i.e. 1-3, 4-6 or 7-9) that was not used in the previous battle, and the loser selects one of the map cards from that type.
BID
Each player collects 10 tokens they will use to bid on the following categories:- Mission
- Map
- Attacker and Defender (instead of rolling off)
- First initiative (instead of selections in the Scouting step)
For example, in the map category, if one player bids 2 tokens and another bids 4, the latter would decide which map card to use. Both players would discard those tokens, then repeat this process for determining who decides Attacker and Defender.
2. Set Up Objective Markers and Killzone
Set up objective markers in the locations specified by the map card.Determine the killzone and set up its terrain features, ensuring the traits of each terrain feature and its parts are specified.
3. Determine Attacker and Defender
The players roll off and the winner decides Attacker and Defender. The Defender selects one of the drop zones as theirs; the Attacker has the other.4. Select a Kill Team
Each player selects operatives from their matched roster to fulfil their faction’s kill team requirements, then reveals their selections to their opponent. Each player adds 3CP to their pool.5. Select Tac Ops
Each player secretly selects three Tac Ops. They can select up to one of their faction Tac Ops; all of their remaining Tac Ops must be selected from one of their archetypes. Players only reveal each Tac Op when it specifies, and they do not have to reveal which archetype they are using until they reveal one of its Tac Ops.Here you will find alternative methods you can use to determine Tac Ops:
RANDOM
Each player shuffles a deck of 27 Tac Ops cards (all archetypes and their faction Tac Ops). They draw two cards from their deck, select one and discard the other. They repeat this process until three Tac Ops cards have been selected.CONSTRUCTED RANDOM
Each player builds a deck of 6 Tac Ops cards, then shuffles it. Up to 3 can be their faction’s Tac Ops; the remaining must be selected from one of their faction’s archetypes. They draw two cards from their deck, select one and discard the other. They repeat this process until three Tac Ops cards have been selected.FREE SELECTION
Each player selects any 3 Tac Ops from their deck of 27.ACQUIRED
The players use one deck of 27 Tac Ops. They shuffle the deck and deal out 6 in a row. The Attacker selects one Tac Op from the row, then adds a random Tac Op from the deck to the row. The Defender then does the same. The players repeat this process until they have 3 Tac Ops each. With this method, Tac Ops aren’t secret.BID
Each player collects 10 tokens they will use to bid on archetype and Tac Ops. They will first bid on the archetype, with the winner deciding which one archetype both players will use for the battle. Thereafter, the players randomly pair Tac Ops from that archetype and bid for each pair. The winner of each bid selects one Tac Op from the pair and the loser has the other. With this method, Tac Ops aren’t secret.To bid, each player will secretly put any of their tokens into their hand as their bid (or zero if they wish), then reveal their bid simultaneously. The player that bids the most wins. If it’s a draw, that bid is cancelled and the players bid again, unless they both bid zero, in which case the players roll off to determine who wins. Once the bid is resolved, both players discard their bid tokens.
6. Select Equipment
Each player selects up to 10 points worth of their faction’s equipment for the battle, assigns it to their operatives as specified, then reveals it to their opponent.7. Set Up Barricades
Starting with the Defender, players alternate setting up barricades one at a time until they’ve set up two each. Each time a player sets up a barricade, it must be within of their drop zone, more than from all other barricades and not on a terrain feature (unless it has the Insignificant trait).8. Set Up Operatives
Each player separates their operatives as numerically evenly as possible into three groups. If a player wants to use any rules (if they have any) to set up operatives in a location alternative to their drop zone, they must declare them now, including the relevant operatives for this.Starting with the Defender, each player alternates setting up their operatives one group at a time. When a player sets up an operative, it must be wholly within their drop zone and must be given an Engage or Conceal order.
9. Scouting
Each player secretly selects one of the pre-game scouting options, either by using the scouting cards provided or by placing a number of dice in their hand to match their selection. Once both players have selected, they reveal their selection simultaneously. They then resolve their selection starting with the Attacker. The scouting options are below, and their effects are specified on the scouting cards.
|
10. Play the Battle
The first Turning Point of the battle begins. In the first Initiative phase, initiative is determined by the players’ choices in the Scouting step: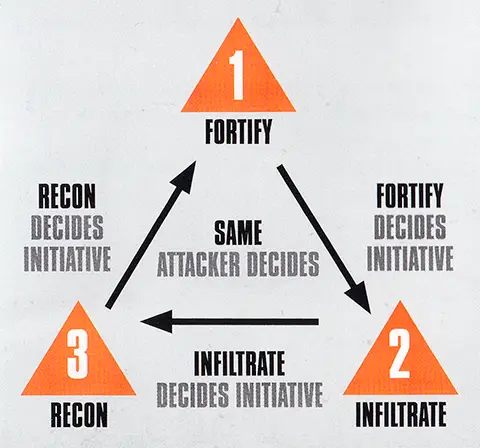
11. End the Battle
The battle ends after four Turning Points have been completed. If one player has no operatives remaining in the killzone, the other player continues to play out each remaining Turning Point until the battle ends.At the end of the battle, the player with the most victory points is the winner of the game. If players are tied, the game is a draw.
- Each player can score a maximum of 4 victory points from the mission objective each Turning Point, however each player cannot score more than 16 victory points in total from the mission objective during the battle.
- Each player can score a maximum of 2 victory points from each Tac Op. Therefore a player’s Tac Ops are worth 6 victory points in total.
- If every operative on a player’s matched roster is painted to a Battle Ready standard, that player scores 2 victory points.
- In total, each player can score a maximum of 24 victory points from the game.
Crit Ops 2022: Close Quarters
The Critical Operations 2022 Tac Ops and Mission card pack offers a new and updated way to play matched play games in Kill Team. This document explains how you can use that pack in a battle that uses the Close Quarters rules.
When determining mission and map, use the pack’s missions (Loot, Secure and Capture) as normal, but use one of the 10 new map layouts in this document instead (use Close Quarters checkbox at Mission Generator). We intend for these maps to use Killzone: Gallowdark only, but players or tournament organisers can use killzone supplements (e.g. Killzone: Into the Dark) if they wish.
For the pack’s Tac Ops, two new Tac Ops have been introduced to replace two others:
In addition, for the Secure Centre Line Tac Op, walls over the centre line block that part of the centre line. However an operative is on the centre line if their base is touching an open access point that’s over the centre line (the operative is still wholly within the relevant territory).For the pack’s Tac Ops, two new Tac Ops have been introduced to replace two others:
- Seize Access Point replaces Seize Ground.
- Secure Unexplored Rooms replaces Secure Vantage.
Finally, your barricades must be set up within your territory, and more than from access points and all other barricades.
Approved Ops 2023: Hazardous Areas
This document explains how you can use the Approved Ops Tac Ops and Mission card pack in a battle that uses the Hazardous Areas rules.
When determining mission and map, use the pack’s missions (Loot, Secure and Capture) as normal, but use one of the 6 new map layouts in this document instead. We intend for these maps to use Killzone: Bheta-Decima only, but players or tournament organisers can use killzone supplements (e.g. Killzone: Salvation) and/or Bheta-Decima objective markers if they wish.
A Bheta-Decima objective marker is an objective marker as normal, but it’s also a terrain feature with the Light and Traversable traits. Parts of it no more than tall (e.g. its base and hatch, but not its aerial) also have the Vantage Point trait. Unlike normal Traversable terrain, this means operatives can finish a move on top of such parts, so long as the operative can be physically placed there.
Operatives cross the gap between different gantries (i.e. ones that aren’t connected) by jumping (see the Kill Team Core Book). Yellow lines on the mission map indicate the terrain features where operatives can do this to and from. When setting up the killzone, ensure the related gantries are an appropriate distance from one another so operatives can jump.
For the pack’s Tac Ops, the following changes are in effect:A Bheta-Decima objective marker is an objective marker as normal, but it’s also a terrain feature with the Light and Traversable traits. Parts of it no more than tall (e.g. its base and hatch, but not its aerial) also have the Vantage Point trait. Unlike normal Traversable terrain, this means operatives can finish a move on top of such parts, so long as the operative can be physically placed there.
Operatives cross the gap between different gantries (i.e. ones that aren’t connected) by jumping (see the Kill Team Core Book). Yellow lines on the mission map indicate the terrain features where operatives can do this to and from. When setting up the killzone, ensure the related gantries are an appropriate distance from one another so operatives can jump.
- Plant Transponder (Recon): When determining if an operative is more than from terrain features to perform this action, ignore gantries underneath it, and the ferratonic furnace if it’s on that terrain feature’s roof.
- Secure Vantage (Recon): At least half of the Vantage Point you control must be within your opponent’s territory.
- Secure Centre Line (Security): Operatives can be on a Vantage Point.
- Central Control (Security): Replaced with Ferratonic Furnace Control. You can use the Central Control card as a proxy if you wish (i.e. so it matches the other Tac Ops cards to keep your selections secret), but use the rules for Ferratonic Furnace Control instead.
Mission Generator
This is the mission generator, and it is intended to replace the Critical Operations card pack. Press the ‘Generate Mission’ button to pick up the mission and map as specified by the RANDOM method (see Determine Mission and Map). Use ‘Mission’ and ‘Map’ dropdown lists if you prefer other methods. Check ‘Close Quarters’ checkbox if you want to switch to Close Quarters map set and hide Tac Ops not allowed.
Press ‘Select’ button ( ) to add Tac Op to your Selected Tac Ops list. ‘Remove’ button (
  ) used to remove Tac Op from the list. Note that generator limits only the maximum number of Tac Ops allowed (three) - Select Tac Ops rule omitted so you are free to pick any Tac Ops.
If you accidentally close the browser or refresh the page your card selection will be safe. It is saved in cookies of the browser on the current device.
Press ‘Select’ button (
) to add Tac Op to your Selected Tac Ops list. ‘Remove’ button ( ) used to remove Tac Op from the list. Note that generator limits only the maximum number of Tac Ops allowed (three) - Select Tac Ops rule omitted so you are free to pick any Tac Ops.If you accidentally close the browser or refresh the page your card selection will be safe. It is saved in cookies of the browser on the current device.
MATCHED PLAY MAP KEY
|


KILLZONE: BHETA-DECIMA MAP KEY
|


KILLZONE GALLOWDARK KEY REFERENCE
Generate Mission
Selected Tac Ops
Archetype Tac Ops
Card Decks
Crit Ops
Crit Op
1. Secure
MISSION ACTION
Secure1AP
One objective marker the active operative controls is secured by your kill team until the enemy kill team secures that objective marker.
An operative cannot perform this action during the first turning point, or while within control range of an enemy operative.
VICTORY POINTS
At the end of each turning point after the first:- If any objective markers are secured by your kill team, you score 1VP.
- If more objective markers are secured by your kill team than your opponent’s kill team, you score 1VP.
Crit Op
2. Loot
MISSION ACTION
Loot1AP
One objective marker the active operative controls is looted.
An operative cannot perform this action during the first turning point, while within control range of an enemy operative, or if that objective marker has already been looted during this turning point.
VICTORY POINTS
Whenever a friendly operative performs the Loot action, you score 1VP (to a maximum of 2VP per turning point).Crit Op
3. Transmission
MISSION ACTION
Initiate Transmission1AP
One objective marker the active operative controls is transmitting until the start of the next turning point.
An operative cannot perform this action during the first turning point, or while within control range of an enemy operative.
VICTORY POINTS
At the end of each turning point after the first:- If friendly operatives control any transmitting objective markers, you score 1VP.
- If friendly operatives control more transmitting objective markers than enemy operatives do, you score 1VP.
Crit Op
4. Orb
MISSION ACTION
Move Orb1AP
If the active operative controls the objective marker that has the Orb token, move that token as follows:
- If the centre objective marker has it, move it to either player’s objective marker (your choice).
- If a player’s objective marker has it, move it to the centre objective marker.
An operative cannot perform this action during the first turning point, while within control range of an enemy operative, or if it doesn’t control the objective marker that has the Orb token.
ADITIONAL RULES
At the start of the battle, the centre objective marker has the Orb token.VICTORY POINTS
At the end of each turning point after the first, for each objective marker that friendly operatives control that doesn’t have the Orb token, you score 1VP.Crit Op
5. Stake Claim
ADITIONAL RULES
At the start of the Gambit step of each Strategy phase after the first, starting with the player with initiative, each player must select both one objective marker and one of the following claims for that turning point:- Friendly operatives will control that objective marker at the end of this turning point.
- Enemy operatives won’t contest that objective marker at the end of this turning point.
VICTORY POINTS
- If friendly operatives control more objective markers than enemy operatives do, you score 1VP.
- If your selected claim is true, you score 1VP.
Crit Op
6. Energy Cells
ADITIONAL RULES
Operatives can perform the Pick Up Marker action upon each objective marker in the following turning points:- 2, but you must spend an additional 2AP (that action cannot be free and its AP cannot be reduced).
- 3, but you must spend an additional 1AP (that action cannot be free and its AP cannot be reduced).
- 4 (as normal).
VICTORY POINTS
At the end of each turning point, if friendly operatives control more objective markers than enemy operatives do, you score 1VP.At the end of the battle, for each objective marker friendly operatives are carrying, you score 1VP.
Crit Op
7. Download
MISSION ACTION
Download1AP
One centre or opponent’s objective marker the active operative controls is downloaded.
An operative cannot perform this action during the first or second turning point, while within control range of an enemy operative, or if that objective marker has already been downloaded during the battle.
VICTORY POINTS
At the end of each turning point after the first, if friendly operatives control more objective markers than enemy operatives do, you score 1VP. Ignore downloaded objective markers when determining this.Whenever a friendly operative performs the Download action during the third turning point, you score 1VP.
Whenever a friendly operative performs the Download action during the fourth turning point, you score 2VP.
Crit Op
8. Data
MISSION ACTION
Compile Data1AP
One objective marker the active operative controls gains 1 Data point. Use a dice as a token to keep track of Data points at that objective marker.
An operative cannot perform this action during the first turning point, while within control range of an enemy operative, or if that objective marker has already gained a Data point during this turning point.
Send Data1AP
Remove all Data points from an objective marker the active operative controls.
An operative cannot perform this action during the first, second or third turning point, while within control range of an enemy operative, or if that objective marker doesn’t have any Data points to remove.
VICTORY POINTS
At the end of the second and third turning point, if friendly operatives have performed more Compile Data actions during that turning point than enemy operatives have, you score 1VP.Whenever a friendly operative performs the Send Data action, you score a number of VP equal to the number of Data points removed.
Crit Op
9. Reboot
ADITIONAL RULES
When setting up the battle, after setting up objective markers, number each objective marker 1–3. At the start of the Gambit step of each Strategy phase, each player secretly selects one objective marker by putting a number of dice in their hand that matches that marker’s number, then reveal simultaneously: If both players selected the same one, that objective marker is inert during this turning point. If not, the objective marker that neither player selected is inert during this turning point.MISSION ACTION
Send Data1AP
Remove all Data points from an objective marker the active operative controls.
An operative cannot perform this action during the first, second or third turning point, while within control range of an enemy operative, or if that objective marker doesn’t have any Data points to remove.
VICTORY POINTS
At the end of each turning point after the first, for each objective marker friendly operatives control, you score 1VP. Ignore inert objective markers when determining this.Volkus
1.

2.

3.

4.

5.

6.

Gallowdark
1.

2.

3.

4.

5.

6.

Non-Specific Killzone Maps
1.

2.

3.

4.

5.

6.

Tomb World
1.

2.

3.

4.

5.

6.

Bheta-Decima
1.

2.

3.

4.

5.

6.

Control Range
Many rules relate to control range such as moving, fighting and using cover. Something is within an operative’s control range if it’s visible to and within 1" of that operative.Control range between operatives is mutual, therefore operatives are within each other’s control range if one of them is visible to and within 1" of the other.
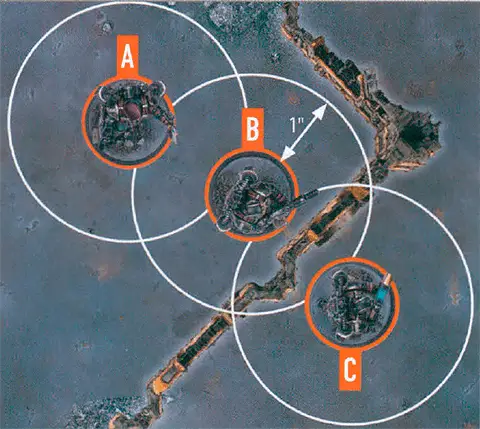
The terrain is within both operative B and C’s control range.
Because of the terrain, operative B is not visible to operative C, and vice versa, therefore they are not within each other’s control range.
Imagine control range as an area of interaction the operative has with things close to it.
Pick Up Marker1AP
Remove a marker the active operative controls that the Pick Up Marker action can be performed upon. That operative is now carrying, contesting and controlling that marker.
An operative cannot perform this action while within control range of an enemy operative, or while it’s already carrying a marker.
Damage
When damage is inflicted on an operative, reduce their wounds by that amount. An operative’s starting number of wounds is determined by its Wounds stat (see datacards). If an operative’s wounds are reduced to 0 or less, it’s incapacitated, then removed from the killzone. Some rules allow an incapacitated operative to perform a free action before being removed from the killzone. Such an operative cannot perform more than one free action (excluding Place Marker) in this instance, and that operative’s player decides the order of any of its rules that occur before it’s removed from the killzone (taking precedence over the player with initiative deciding).While an operative has fewer than its starting wounds remaining, it’s wounded. While it has fewer than half its starting wounds remaining, it’s also injured. Subtract 2" from the Move stat of injured operatives and worsen the Hit stat of their weapons by 1.
Keep track of each operative’s remaining wounds with dice, tokens or by writing it down.
‘Incapacitated’ and ‘removed from the killzone’ are separate. Some rules take effect when an operative is incapacitated, but before it’s removed.
‘Incapacitated’ and ‘removed from the killzone’ are separate. Some rules take effect when an operative is incapacitated, but before it’s removed.
|

Shoot1AP
Shoot with the active operative by following the sequence below. The active operative’s player is the attacker. The selected enemy operative’s player is the defender.
An operative cannot perform this action while it has a Conceal order, or while within control range of an enemy operative.
Charge1AP
The same as the Reposition action, except the active operative can move an additional 2".
It can move, and must finish the move, within control range of an enemy operative. If it moves within control range of an enemy operative that no other friendly operatives are within control range of, it cannot leave that operative’s control range.
An operative cannot perform this action while it has a Conceal order, if it’s already within control range of an enemy operative, or during the same activation in which it performed the Reposition, Dash or Fall Back action.
Counteract
When you would activate a ready friendly operative, if all your operatives are expended but your opponent still has ready operatives, you can select an expended friendly operative with an Engage order to perform a 1AP action (excluding Guard) for free. Each operative can only counteract once per turning point. That operative cannot move more than 2", or must be set up wholly within 2" if it’s removed and set up again, while counteracting (this is not a change to its Move stat, and takes precedence over all other rules). Counteracting is optional, so you can choose not to. In either case, activation alternates back to your opponent afterwards.Counteracting isn’t an activation, it’s instead of activating. This difference is important; for instance, it means action restrictions won't apply.
|

Valid Target
Some rules require you to select a valid target for an operative. This is most common when an operative is shooting, but some rare rules require it too.
|
Visible
For an intended target to be Visible, the following must be true:- You can draw an imaginary, unobstructed straight line (known as a Visibility line) 1 mm wide from the head of the active operative’s miniature to any part of the miniature of the intended target (not its base).
In the rare instance that bases or parts of the active operative’s miniature prevent an intended target from being Visible to the active operative, such as when the active operative is directly below or above the intended target, treat those bases and parts as being invisible.
Some rare rules will require you to select a point that is Visible (e.g. a point on the killzone). In such circumstances, you must be able to draw an imaginary, unobstructed straight line 1mm wide from the head of the active operative’s miniature to the point you would select.