
Imperial Knights
To the sound of fanfare and ground-shaking footfalls, the mighty war engines of the Questor Imperialis - often called Imperial Knights - stride onto the battlefield. Enemy fire clangs harmlessly off armour, or flares brilliantly as protective ion shields repel incoming shots. When the Knights bring their blades and cannon to bear, even the bravest of foes quake in fear.
Books
|
Show History | ||||
| Book | Kind | Edition | Version | Last update |
| | ||||
| | Faction Pack | 10 | 1.2 | April 2026 |
| | ||||
| | Expansion | 10 | 4.3 | May 2026 |
| | ||||
| | Faction Pack | 10 | 1.1 | April 2026 |
| | ||||
| | Rulebook | 10 | 3.4 | March 2026 |
FAQ
Faction Pack: Imperial Knights
| Q: | Can Adeptus Mechanicus units use the Doctrina Imperatives ability when taken as part of the Questor Forgepact Detachment? |
| A: | No. |
Keywords
The keywords presented in this section have a number of special features:
- CLICK on the link to open the tooltip.
- The number in parentheses indicates the number of datasheets containing this keyword. This number represents the total number of datasheets in the faction, regardless of the filter.
- The list does not include named keywords that match the datasheet’s name (unless there are other datasheets with such a keyword).
Introduction
Welcome to the rules section of Codex: Imperial Knights. Whether forging your own tales of glory and infamy with narrative play or pitting yourself against your opponents in nail-biting matched play contests, the following present all the rules you will need to bring your Imperial Knights collection to life on the tabletop.
These include Detachment rules that Imperial Knights armies can use, along with the Imperial Knights army rule - Code Chivalric - which is common to many of your units. This section also includes datasheets for Imperial Knights units; you can find out more about how to use datasheets here.
The Detachment rule listed here will apply to either your whole army or to particular units within it. If any additional restrictions or benefits apply to a Detachment, they will be listed here. This can include additional keywords some of your units may gain.
When mustering your army, your chosen Detachment enables you to upgrade CHARACTERS using the Enhancements listed here, as described in the Core Rules (see the Select Units step). If you are playing a Crusade battle, you can instead use the Renowned Heroes Requisition to give your CHARACTERS Enhancements, as described in the main Crusade rules.
Your chosen Detachment gives you access to the Stratagems listed here in addition to the Core Stratagems listed in the Core Rules. During the battle, you can spend Command points (CP) to use these Stratagems. You can find out more about how to use Stratagems here.
Army Rules
Code Chivalric
Imperial Knights fight by a stringent set of codes. In addition to defeating the foe, honour must always be upheld.
To determine your army’s Deed, you can either select one Deed or you can randomly select one Deed by rolling a D6 and consulting the relevant table below. The selected Deed will describe what needs to be achieved in order to complete that Deed.
The first time your selected Deed is completed your Oath is fulfilled and, until the end of the battle, your army becomes Honoured and you gain 2CP, or 3CP if you randomly selected your Deed and/or Quality (CP gained in this way are an exemption to the Core Rules that limit the maximum number of CP you can gain per battle round to 1).
|


|
Bondsman
Those honoured to serve a great hero do so unto death.
Some IMPERIAL KNIGHTS models have a Bondsman ability, tagged with the word ‘Bondsman’. In your Command phase, one or more models from your army with a Bondsman ability can use that ability. For each one that does, select one friendly ARMIGER model within 12" of that model (you cannot select an ARMIGER model that is already being affected by a Bondsman ability). Until the start of your next Command phase, that ARMIGER model is affected by that Bondsman ability.Super-heavy Walker
Imperial Knights tower over the battlefield, striding over lesser warriors to eagerly engage the foe.
Each time a model with this ability makes a Normal, Advance or Fall Back move, it can move through models (excluding TITANIC models) and sections of terrain features that are 4" or less in height. When doing so:- It can move within Engagement Range of enemy models, but cannot end that move within Engagement Range of them.
- It can also move through sections of terrain features that are more than 4" in height, but if it does, after it has moved, roll one D6: on a 1, that model is Battle-shocked.
Freeblades
Freeblades often wander the galaxy, aiding the armies of the Imperium against the xenos and heretics who threaten the Emperor’s realm.
If every model in your army has the IMPERIUM keyword, you can include either one TITANIC IMPERIAL KNIGHTS model or up to three ARMIGER models in your army, even if they do not have the Faction keyword you selected in the Select Army Faction step. None of these models can be your WARLORD, and they cannot be given Enhancements.Valourstrike Lance
To crusade as part of a lance of Knightly companions is to be inspired to heights of noble heroism and feel the surge of honour that flows through the Throne Mechanicum. Valourstrike Lances epitomise the bold gallantry of Imperial Knights and the unbreakable fellowship that binds them. Their Noble warriors and loyal squires thunder into battle like an iron-shod storm. Barrages of unremitting firepower herald their assault, bolts of energy and clusters of heavy ordnance lancing out to punish the dishonourable foe. The Knights do not slow for a moment; their enemy deserves no such sufferance. The speed of their long strides carries the Noble companions into the foes’ holdouts. With the monumental power at their command, valorous groups of Knights lay waste to one swathe of enemies after another. Theirs is a selfless strength that shields and inspires their fellow Knights. It is a thunderous power that sees them punch through defensive lines, artillery emplacements and desperate counterstrikes by the foe until nothing but ruin is left in their wake.
Bold Gallantry
With their companions beside them - kin of their blood, allies in honour - Knightly Nobles are inspired to near-reckless heroism. Their fervour spreads through neural interfaces to reach the machine spirits of their towering Knight suits. The Knights’ power cores flare with motive energy. Target stabilisers sputter into life, glaring balefully at the foe. Servo-motors and fibre bundles thrum, powering the Nobles’ steeds to a thunderous speed, such that the ground trembles.
Each time an IMPERIAL KNIGHTS unit from your army Advances, until the end of the turn, ranged weapons equipped by IMPERIAL KNIGHTS models from your army have the [ASSAULT] ability.Enhancements
Deep within the Knight’s chassis is an ancient STC artefact. The device communes with its weakened machine spirit kin, bolstering their resolve to endure. IMPERIAL KNIGHTS model only. At the end of your Movement phase, select one other IMPERIAL KNIGHTS model from your army that is within 12" of and visible to the bearer. That selected model regains up to D3 lost wounds, or up to 3 lost wounds if your army is Honoured. |
This Knight’s ion shield projects a stream of nictitating particles that can obscure fellow Nobles from sight. IMPERIAL KNIGHTS model only. At the end of your Movement phase, select one other IMPERIAL KNIGHTS model from your army that is within 12" of and visible to the bearer. Until the start of your next Movement phase, that selected model has the Stealth ability. |
A courtly counsellor against deception and a visionary hunter of lurking prey, this Noble’s sage advice unmasks the contemptible before their companions. IMPERIAL KNIGHTS model only. At the start of your Shooting phase, select one other IMPERIAL KNIGHTS model from your army that is within 12" of and visible to the bearer. Until the end of the phase, ranged weapons equipped by that selected model have the [ignores cover] ability. |
Honoured with a vivid heraldic insignia, this Noble is a wise mentor in the deadly art of battlefield intercession. IMPERIAL KNIGHTS model only. At the start of your Charge phase, select one other IMPERIAL KNIGHTS model from your army that is within 12" of and visible to the bearer. Until the end of the phase, you can re-roll Charge rolls made for that selected model. |
Stratagems
TARGET: One IMPERIAL KNIGHTS unit from your army that has not been selected to fight this phase.
EFFECT: Until the end of the phase, melee weapons equipped by your models have the [LANCE] ability.
TARGET: One IMPERIAL KNIGHTS model from your army that has not been selected to fight this phase.
EFFECT: Until the end of the phase, the Attacks characteristic of any armoured Feet melee weapons equipped by your model is 8, the Attacks characteristic of any titanic Feet melee weapons equipped by your model is 12, and improve the Armour Penetration characteristic of those weapons by 1.
TARGET: One IMPERIAL KNIGHTS unit from your army that has not been selected to move this phase.
EFFECT: Until the end of the phase, add 2" to the Move characteristic of your models and add 2 to Advance rolls made for those model’s units.
TARGET: One IMPERIAL KNIGHTS unit from your army that has not been selected to shoot this phase.
EFFECT: Until the end of the phase, ranged weapons equipped by your models have the [LETHAL HITS] ability.
TARGET: One IMPERIAL KNIGHTS model from your army that is within 9" of that unit.
EFFECT: Your model can make a Normal move of up to D6".
TARGET: One IMPERIAL KNIGHTS unit from your army that was selected as the target of one or more of the attacking unit’s attacks.
EFFECT: Until the end of the phase, models in your unit have a 4+ invulnerable save.
Gate Warden Lance
The forebears of Knightly Nobles secured their sprawling citadels through Old Night and whispered advice from those times still haunts the oldest Thrones Mechanicum. For generations since, Gate Warden Lances of Knights have thrown back xenos, heretics and mutants not only from their own walls but from those on worlds across the galaxy. Whether a physical revetment exists to guard or not, the Nobles know their duty. They treat the battlefield as their walled realm, with themselves as its bastions. Gigantic Dominus-class Knights anchor defensive positions, hurling murderous salvoes at encroaching enemies. Bondsmen piloting swift Armigers stand ready to lope forwards and stem encirclements of the Knights’ lines. Knights Crusader scythe down infantry besieging their chosen embrasures while Knights Defender stride into line to bolster positions with thrumming void shields. Should the enemy attempt to breach the Knights’ lines, the Nobles sally forth in a thunderous countercharge, challenges blaring from war horns as they dam the tide.
Dauntless Defenders
With a rigid, strategic intuition born of the unyielding fortifications defended by their ancestors, the Nobles of a Gate Warden Lance hold their ground with an arrogant superiority. While even one defends the marches of their claimed realm, they will fight to the ends of their honour to hurl back the besiegers.
At the start of the first battle round, select two objective markers on the battlefield to be your foundations. When you draw a line from any part of one of your foundations to the other, if any part of a model’s base (or any part of a model’s hull, for a model without a base) crosses that line, that model’s unit is said to be on your defensive line.While an IMPERIAL KNIGHTS unit from your army is on your defensive line, that unit has the following ability:
Against the Horde: Each time a model in this unit makes an attack that targets a visible enemy unit, you can ignore any or all modifiers to the Hit roll, and weapons equipped by models in this unit have the [sustained hits 1] ability.
Each time one of your foundations is removed from the battlefield (e.g. by a Primary Mission rule), just after it is removed, select a new objective marker on the battlefield to be one of your foundations.
Enhancements
This stern Noble serves their household by seizing territories and domains deemed the property of their lord. They are a grim and fearsome agent who inspires their charges with an unwillingness to relent. IMPERIAL KNIGHTS model only. While the bearer is on your defensive line and there are no enemy units on your defensive line, add the bearers Objective Control characteristic to that of each model affected by the bearers Bondsman ability. |
The Noble dubbed with this honourable title has sworn to purge the frontiers of their realm, scouring it clean of the stain of everything foul and inimical to the Code. IMPERIAL KNIGHTS model only. Each time the bearer makes a melee attack, if the bearer is on your defensive line, re-roll a Hit roll of 1 and re-roll a Wound roll of 1. |
This web of neuro-couplings has been worked into a richly ornamented helmet. Through it, the Noble pilot can access nearby hidden augur nodes deployed by servitor clades of the Sacristans, inloading targeting data to pick out the locations of shrouded besiegers. IMPERIAL KNIGHTS model only. Each time the bearer makes a ranged attack, while the bearer is on your defensive line, weapons equipped by the bearer have the [ignores cover] ability. |
The punitive anger of this pilot towards those who dare defile their realm is terrifying to behold. War horns blaring, they barge and trample forward, crushing their lessers in a terminal lesson of humility. IMPERIAL KNIGHTS model only. Once per turn, you can target the bearer with the Tank Shock Stratagem for 0CP. |
Stratagems
TARGET: One IMPERIAL KNIGHTS unit from your army that has not been selected to shoot or fight this phase.
EFFECT: Until the end of the phase, each time a model in your unit makes an attack that targets an enemy unit on your defensive line, an unmodified Hit roll of 5+ scores a Critical Hit.
TARGET: One IMPERIAL KNIGHTS unit from your army that was selected as the target of one or more of the attacking unit’s attacks and is on your defensive line.
EFFECT: Until the end of the phase, each time an attack targets your unit, if the Strength characteristic of that attack is greaterthan the Toughness characteristic of your unit, subtract 1 from the Wound roll
TARGET: One IMPERIAL KNIGHTS unit from your army that is within Engagement Range of one or more enemy units, that is on your defensive line and that has not already been selected to fight this phase.
EFFECT: Until the end of the phase, each time a model in your unit makes an attack, you can re-roll the Hit roll.
TARGET: Up to two IMPERIAL KNIGHTS units from your army that have not been selected to move this phase.
EFFECT: Until the end of the phase, add 3" to the Move characteristic of models in your units.
TARGET: One IMPERIAL KNIGHTS TITANIC unit from your army that Remained Stationary this turn, that is on your defensive line and that has not been selected to shoot this phase.
EFFECT: Until the end of the phase, ranged weapons equipped by models in your unit have the [SUSTAINED HITS 2] ability.
TARGET: One IMPERIAL KNIGHTS TITANIC unit from your army that is on your defensive line.
EFFECT: Until the end of the phase, each time an enemy unit selects your unit as a target of a charge, that unit must take a Battle-shock test, subtracting 1 from the result.
Questoris Companions
The legendary deeds of groups of Knightly champions are known across the Imperium. Epic lays have been inspired by crusading lances of a household’s greatest warriors, isolated bands of Knights who have fought their way to victory and honoured fellowships of Freeblades oathed to fight in chivalrous companionship until death claims them. Bonded by vows of honour, these Questoris Companions marshal their strength, their courage and the incredible power of their titanic Knight suits to undertake heroic feats of epic gallantry to achieve their quest. Individual Knights hold back armoured columns in glorious acts of selflessness to guard their companions’ flanks. Others wade alone into overwhelming odds, slamming enemy battle tanks through the air and crushing infantry underfoot. The most threatening of the foe are singled out for thunderous duels, and their humbling is a terrifying blow to enemy morale. With a rigid notion of their quest’s righteousness, the companions drive onwards in a ferocious display of titanic might.
Heroes of Legend
To those who quest for honour - in service to their liege, to avenge atrocities, to wipe clean the stain of disfavour - there can be no end. The Imperium’s foes are legion, an endless horde from which more arise. As one quest ends, another always begins.
At the start of your turn, if your current Oath is fulfilled, determine an additional Oath as described here, with the exception that you cannot select a Deed or Quality you have already selected (if you are randomly selecting the Deed and/or Quality and roll any result that you have already selected, select a Deed or Quality you have not already selected instead). If you cannot determine an additional Oath because you have already selected each Deed and each Quality, do not determine an additional Oath.The Qualities from Oaths you have fulfilled continue to apply to all models in your army with the Code Chivalric ability. When the Deed for an additional Oath is completed, you instead gain 1CP, regardless of how you selected the Deed or Quality.
Valour’s Reward
With every deed sealed with honour, every clarion call heralding a duty met, a champions spirit is strengthened and their ardour restored.
The Enhancements shown below can become expended. You cannot use such Enhancements while they are expended. Each time you fulfil your Oath, each expended Enhancement is no longer expended.Enhancements
This Noble’s arrogant challenges herald a feat of victory, a promise of death that blares from their suit’s emitters. IMPERIAL KNIGHTS model only. When the bearer ends a Charge move, it can use this Enhancement. If it does, this Enhancement is expended, then each enemy unit within Engagement Range of the bearer must take a Battle-shock test, subtracting 1 from the result. |
Whispered to a Knights machine spirit before battle, this techno-omen prophesies doom for airborne foes. IMPERIAL KNIGHTS model only. In your Shooting phase, when the bearer is selected to shoot, it can use this Enhancement. If it does, this Enhancement is expended, then until the end of the phase, each time it makes an attack that targets a unit that can FLY, you can re-roll the Hit roll. |
This circuit-etched pennant marks a slayer of hordes and is linked to a glowing electoo beneath the pilot’s skin. IMPERIAL KNIGHTS model only. When the bearer is selected to fight, it can use this Enhancement. If it does, this Enhancement is expended, then until the end of the phase, melee weapons equipped by the bearer have the [sustained hits 2] ability. |
With the sweep of an armoured limb, the Noble can cast wreckage and ruin towards yet another foe. IMPERIAL KNIGHTS model only. When the bearer is selected to fight, after resolving its attacks, if one or more enemy units were destroyed by those attacks, the bearer can use this Enhancement. If it does, this Enhancement is expended, then select one enemy unit that is not within Engagement Range of any units from your army and is within 12" of and visible to the bearer. Roll six D6: for each 4+, that enemy unit suffers 1 mortal wound. |
Stratagems
TARGET: One IMPERIAL KNIGHTS TITANIC unit from your army that was selected as the target of one or more of the attacking unit’s attacks.
EFFECT: Until the end of the phase, models in your unit have the Feel No Pain 6+ ability.
TARGET: One IMPERIAL KNIGHTS TITANIC model from your army that has not been selected to shoot or fight this phase.
EFFECT: Until the end of the phase, each time your model makes an attack that targets a MONSTER, TITANIC or WALKER unit, add 1 to the Hit roll and add 1 to the Wound roll.
TARGET: That IMPERIAL KNIGHTS TITANIC unit.
EFFECT: Until the end of the phase, each time your unit Consolidates, models in it can move an additional 3" provided your unit can end that move within Engagement Range of one or more enemy units.
TARGET: One IMPERIAL KNIGHTS TITANIC model from your army that is within range of an objective marker you control.
EFFECT: Your Level of Control over that objective marker is 5 (unless it would otherwise be higher), until your opponent’s Level of Control over that objective marker is greater than yours at the end of a phase.
TARGET: That IMPERIAL KNIGHTS TITANIC unit.
EFFECT: Until the end of the turn, your unit is eligible to shoot and declare a charge in a turn in which it Fell Back.
TARGET: One IMPERIAL KNIGHTS TITANIC unit from your army.
EFFECT: Until the end of the turn, your unit is eligible to declare a charge in a turn in which it Advanced.
Spearhead-At-Arms
When deployed in large numbers, the swift and agile Armiger-class Knight suits can outmanoeuvre most foes. They strike and withdraw on simultaneous fronts to cut apart more unwieldy armies. Deployed as a Spearhead-at-Arms, meanwhile, and leashed to their Noble masters’ stern wisdom, their loyal conditioning and rapid adoption of complex strategies enable them to eviscerate any enemy. With loping strides, the lead Armigers fan out as a swift vanguard. They devastate enemy scouts and flush war engines into the sights of their lords and ladies. Banners of Armiger Helverins stalk into firing positions like towering assassins, spitting death into assigned targets of heavy infantry or snatching grav-tanks from the sky in blazing fireballs. Armiger Warglaives pounce on enemy fire points or ambush enemy assault formations, their reaper chain-cleavers howling as they chew through armour. They are their masters’ hounds, shield-bearers and heavily armed retainers in one, galvanised into deadly coordination through honoured service.
Knightly Teachings
Knightly Nobles are exalted paragons of honour who uphold the tenets of the Code Chivalric and the glorious histories of their household. Through stern teachings and heroic tales, and no less their own deeds, they exemplify the virtues which Bondsmen aspire to emulate. It is not only in courtly life, upon the practice fields and during thrilling hunts that a Nobles squires and retainers cleave to their duty, but also in the fiery heart of every battle. There such teachings are tested as never before, and also find their most lauded expressions.
Each time a model from your army uses its Bondsman ability, if no other model from your army has used that Bondsman ability that turn, you can select up to three friendly ARMIGER models (instead of one) within 12" of that model, or within 15" of that model while your army is Honoured (you still cannot select a model that is already being affected by a Bondsman ability). Until the start of your next Command phase, those models are affected by that Bondsman ability.KEYWORDS
ARMIGER models from your army gain the BATTLELINE keyword.
Enhancements
A draconian enforcer of stringent standards, when this stern Noble does acknowledge pride in their servants, their Bondsmen zealously strive to retain it. IMPERIAL KNIGHTS model only. While two or more ARMIGER models are under the effects of the bearers Bondsman ability, each time each of those ARMIGER models makes an attack, you can re-roll a Hit roll of 1. |
Many are the fiends and unnamed dooms that lead hosts of darkness in the oldest tales. Their retelling spurs this Noble’s Bondsmen to seek out the lurking commanders of the foe and cut them down, so that they may end the spread of their evil. IMPERIAL KNIGHTS model only. While two or more ARMIGER models are under the effects of the bearer’s Bondsman ability, melee weapons equipped by those ARMIGER models have the [precision] ability. |
Recounting the valorous feats of legendary Nobles, this champion inspires their squires to deride and denounce the foes every attempt at evading a just execution. IMPERIAL KNIGHTS model only. While two or more ARMIGER models are under the effects of the bearer’s Bondsman ability, each time one of those ARMIGER models makes a melee attack, you can ignore any or all modifiers to the Hit roll and/or the Wound roll. |
Long has this Noble trained their Bondsmen in hunting the deadliest prey, instilling in them the skills to honourably exploit any opening in an enemy’s defence. IMPERIAL KNIGHTS model only. While two or more ARMIGER models arc under the effects of the bearer’s Bondsman ability, once per turn, you can target one of those ARMIGER models with the Counter-offensive Stratagem for 0CP. |
Stratagems
TARGET: One ARMIGER model from your army, or one IMPERIAL KNIGHTS TITANIC model from your army, and one or more friendly ARMIGER models affected by that model’s Bondsman ability.
EFFECT: Select one enemy unit. Until the end of the phase, each time one of your ARMIGER models makes an attack that targets that enemy unit, add 1 to the Hit roll.
TARGET: That IMPERIAL KNIGHTS TITANIC model, and one or more friendly ARMIGER models affected by that model’s Bondsman ability.
EFFECT: Select one enemy unit hit by one or more of those attacks. Until the end of the phase, each time one of your ARMIGER models makes an attack that targets that enemy unit, improve the Armour Penetration characteristic of that attack by 1.
TARGET: One ARMIGER model from your army, or one IMPERIAL KNIGHTS TITANIC model from your army, and one or more friendly ARMIGER models affected by that model’s Bondsman ability.
EFFECT: Until the end of the phase, your ARMIGER models are eligible to shoot in a turn in which they Fell Back.
TARGET: One ARMIGER model from your army, or one IMPERIAL KNIGHTS TITANIC model from your army, and one or more friendly ARMIGER models affected by that model’s Bondsman ability.
EFFECT: Until the end of the phase, ranged weapons equipped by your ARMIGER models have the [RAPID FIRE 1] ability.
TARGET: One ARMIGER unit from your army that was selected as the target of one or more of the attacking units attacks.
EFFECT: Until the attacking unit has finished making its attacks, each time an attack targets your unit, worsen the Armour Penetration characteristic of that attack by 1.
TARGET: One ARMIGER model from your army, or one IMPERIAL KNIGHTS TITANIC model from your army, and one or more friendly ARMIGER models affected by that model’s Bondsman ability.
EFFECT: For each of your ARMIGER models that is within 9" of one or more battlefield edges and not within Engagement Range of one or more enemy units, remove that ARMIGER model from the battlefield and place it into Strategic Reserves.
") Freeblade Company
Freeblade Company
Many Freeblades become figures of legend, whether for their mighty deeds or thanks to their strange and supernatural natures. Often they fight alone. However, when fate brings several such wanderers together they are capable of defeating entire armies, and of carving out names for themselves that echo through the ages. Each brings unique skills and experiences to the muster. Some wield ancient relic weapons from the Dark Age of Technology. Others are masters of battling a particular foe, exemplars of an unusual way of war, or have been turned fey and dangerous by the touch of sorcery or strange cosmic phenomena. Combining such unusual abilities and tactics, Freeblades can surprise their enemies at every turn by attacking in unorthodox ways and unleashing unexpected weapons and powers. Each scion amongst them is a storied veteran who knows just where to place their shots and land their blows to inflict maximum devastation. Against such titanic and canny foes, few enemies can stand for long
Knights of Legend
Warriors such as these are truly indomitable. Driven on by deadly oaths, bolstered by ancient technology or shimmering with supernatural energies, they stride through the most punishing firestorms to emerge victorious on the other side.
IMPERIAL KNIGHTS models from your army have the Feel No Pain 6+ ability. In addition, at the start of your Command phase, each IMPERIAL KNIGHTS model from your army regains 1 lost wound.Enhancements
It is said that whenever this famed weapon is brought to life, it shall not fall silent until it has slaked its thirst for justice. IMPERIAL KNIGHTS model only. Improve the Attacks characteristic of melee weapons equipped by the bearer by 2, and each time the bearer makes a melee attack, add 1 to the Hit roll. |
This remarkable data‑manifold surrounds a scion with holo‑projected bioscans and engine‑signature readouts, whose gaze penetrates the densest terrain as though it was not there. IMPERIAL KNIGHTS model only. Ranged weapons equipped by the bearer have the [IGNORES COVER] ability. |
Manifesting as though from nowhere, this Knight is an elemental force of vengeance against the Emperor of Mankind’s foes. At battle’s end, it disappears as mysteriously as it arrived. IMPERIAL KNIGHTS model only. The bearer has the Deep Strike ability. Once per battle, at the end of your opponent’s turn, if the bearer is not within Engagement Range of one or more enemy units, it can use this Enhancement. If it does, remove the bearer from the battlefield. In the Reinforcements step of your subsequent Movement phase, set the bearer up anywhere on the battlefield that is more than 9" horizontally away from all enemy units. If the battle ends and the bearer is not on the battlefield, it is destroyed. |
Through the projection of rapidly modulating ion fields, this unique generator’s effects wreathe the suit in an all encompassing fog of protective energies that defend it from close‑quarters attacks. IMPERIAL KNIGHTS model only. The bearer has a 5+ invulnerable save. |
Stratagems
TARGET: One IMPERIAL KNIGHTS unit from your army that was just destroyed. You can target that unit with this Stratagem even though it was just destroyed.
EFFECT: Your unit’s Deadly Demise ability inflicts mortal wounds on a D6 roll of 4+, adding 1 to the result if it is an ARMIGER unit, instead of only a 6.
TARGET: One IMPERIAL KNIGHTS unit from your army that has not been selected to shoot or fight this phase.
EFFECT: Until the end of the phase, each time a model in your unit makes an attack, if there are no other friendly units within 9" of your unit, re-roll a Hit roll of 1 and re-roll a Wound roll of 1.
TARGET: One IMPERIAL KNIGHTS unit from your army.
EFFECT: Until the end of the phase, if your unit Advances, do not make an Advance roll for it. Instead, until the end of the phase, add 6" to the Move characteristic of models in your unit, or 9" instead if your unit is an ARMIGER or
TARGET: One IMPERIAL KNIGHTS unit from your army that has not been selected to shoot this phase.
EFFECT: Until the end of the phase, when making ranged attacks with Blast weapons, models in your unit can target enemy units within Engagement Range of your unit (provided no other friendly units are also within Engagement Range of that enemy unit). In addition, until the end of the phase, your unit does not suffer the penalty to its Hit rolls for being within Engagement Range of one or more enemy units, but each time a model in your unit makes an attack with a Blast weapon that targets a unit within Engagement Range of your unit, on an unmodified Hit roll of 1, your unit suffers 1 mortal wound after all of its attacks have been resolved.
TARGET: One IMPERIAL KNIGHTS unit from your army that was selected as the target of one or more of the attacking unit’s attacks.
EFFECT: Until the end of the phase, each time an attack targets your unit, if the Strength characteristic of that attack is greater than the Toughness characteristic of your unit, subtract 1 from the Wound roll.
TARGET: One ARMIGER unit from your army that is within 9" of one or more battlefield edges and not within Engagement Range of one or more enemy units.
EFFECT: Remove your unit from the battlefield and place it into Strategic Reserves.
Questor Forgepact
Bound by oaths of fealty or not, many Knightly houses enjoy close relations with the priesthood of the Adeptus Mechanicus. Whether answering the Martian priesthood’s calls to arms or prosecuting their own wars of liberation against the Emperor’s foes, Noble families regularly pilot their war suits to battle alongside their Tech-Priest allies. The Skitarii soldiery are inspired by the presence of these ancient engines of destruction, uttering awestruck psalms of veneration as they advance fearlessly towards the foe. In turn, the Noble champions are blessed and inspired by the chanted prayers of the Machine Cult and their war suits empowered by the skill of Tech-Priests and artificers of incomparable talent.
Cogbound Alliance
The Nobles of Questor Mechanicus houses commonly fight alongside the armies of forge worlds. They are bound together by their shared devotion to the Machine Cult.
IMPERIAL KNIGHTS units from your army have the following the ability:Sacristan Pledge: In your Command phase, one model in this unit regains 1 lost wound. If this unit is within 3" of one or more friendly TECH-PRIEST models, one model in this unit regains up to D3 lost wounds instead.
ADEPTUS MECHANICUS units from your army have the following ability:
Divine Inspiration: Each time a model in this unit makes a ranged attack, re-roll a Hit roll of 1. If this unit is within 6" of one or more friendly IMPERIAL KNIGHTS units, re-roll a Wound roll of 1 as well.
FORGE WORLD ALLIES
You can include the following ADEPTUS MECHANICUS units in your army: TECH-PRIEST DOMINUS; TECH-PRIEST MANIPULUS; SKITARII MARSHAL; SKITARII RANGERS; SKITARII VANGUARD. The combined points cost of such units depends on your battle size:
- Incursion: Up to 250 pts
- Strike Force: Up to 500 pts
- Onslaught: Up to 750 pts
No ADEPTUS MECHANICUS models from your army can be your WARLORD.
Enhancements
The Omnissian priesthood has thrice blessed this champion of the Machine God and their Knight suit’s core; it burns with a zeal that cannot be quenched. IMPERIAL KNIGHTS model only. Add 4 to the bearer’s Wounds characteristic. |
A devotee of the Omnissian creed, this Noble is inspired by the presence of the Adeptus Mechanicus, fighting with greater zeal and vigour in their holy presence. IMPERIAL KNIGHTS model only. Each time the bearer makes a ranged attack, if the bearer is within 6" of one or more friendly ADEPTUS MECHANICUS units, re-roll a Hit roll of 1. |
An expert in the intricate mechanisms and weapons systems of Imperial Knights, this Tech-Priest taught Sacristans their craft. They now walk in the shadow of these war machines and make field repairs in the midst of battle. TECH-PRIEST model only. While the bearer is within 3" of one or more friendly IMPERIAL KNIGHTS units, it has the Lone Operative ability. In your Command phase, select one friendly Imperial Knights model within 3" of the bearer. That model regains up to 2 lost wounds. |
This titanic war machine’s carapace bristles with vox-grilles and laud hailers that project binharic prayers to the Machine God; these static chants serve both to unnerve the foe and fill the faithful of the Omnissiah with holy fervour. IMPERIAL KNIGHTS model only. While an enemy unit is within 6" of the bearer, worsen the Leadership characteristic of models in that unit by 1. While a friendly ADEPTUS MECHANICUS unit is within 6" of the bearer, improve the Leadership characteristic of models in that ADEPTUS MECHANICUS unit by 1. |
Stratagems
TARGET: That IMPERIAL KNIGHTS or ADEPTUS MECHANICUS unit.
EFFECT: Until the end of the phase, models in your unit have the Feel No Pain 5+ ability against mortal wounds.
TARGET: One IMPERIAL KNIGHTS unit from your army that was just destroyed. You can use this Stratagem on that unit even though it was just destroyed.
EFFECT: Until the end of the battle, the enemy unit that destroyed your unit is Marked. Each time an ADEPTUS MECHANICUS model from your army makes an attack that targets a Marked unit, that attack has the [LETHAL HITS] ability.
TARGET: That IMPERIAL KNIGHTS CHARACTER unit.
EFFECT: When selecting targets for that use of that Bondsman ability, you can select one friendly ADEPTUS MECHANICUS unit within 12" of your unit in addition, or instead of selecting one ARMIGER model. Until the start of your next Command phase, every model in that ADEPTUS MECHANICUS unit is affected by that Bondsman ability.
RESTRICTIONS: You cannot target a KNIGHT PRECEPTOR with this Stratagem.
TARGET: One IMPERIAL KNIGHTS unit from your army.
EFFECT: Until the start of your next turn, your unit
can ignore any or all modifiers to the following: the Weapon Skill or Ballistic Skill characteristics of weapons equipped by its models; any Hit roll or Wound roll made for it.
TARGET: One IMPERIAL KNIGHTS unit from your army or one IMPERIAL KNIGHTS CHARACTER unit from your army and one friendly ADEPTUS MECHANICUS unit that is within 6" of that unit.
EFFECT: Until the end of the phase, ranged weapons equipped by models in your units have the [ASSAULT] ability.
TARGET: One IMPERIAL KNIGHTS TITANIC unit from your army that is within 24" of and visible to that enemy unit.
EFFECT: Select one ranged weapon equipped by a model in your unit. That model can shoot at that enemy unit (and only if it is an eligible target). When doing so, that model can only make attacks with that weapon and each time it makes a ranged attack, an unmodified Hit roll of 6 is required to score a hit, irrespective of the attacking weapon’s Ballistic Skill or any modifiers.
Crusade Rules
In this section you’ll find additional rules for playing Crusade battles that are bespoke to IMPERIAL KNIGHTS units. You can find out more about Crusade armies in the main Crusade rules.
Whether they fight under the banners of the Questor Imperialis, the Questor Mechanicus or as Freeblades, those who pilot Knight suits are bold and noble warriors for whom honour is all. These rules allow you to follow the progression of your pilots as they complete Chivalric Quests and ascend through the Levels of Honour of their chosen Mastery, acquiring benefits befitting champions of the Imperium.
AGENDAS
IMPERIAL KNIGHTS armies can attempt to achieve unique Agendas in addition to those found in other publications. These represent the factions unique goals and their particular methods of waging war.
REQUISITIONS
IMPERIAL KNIGHTS armies have access to a number of bespoke Requisitions in addition to those found in other publications.
Themed to the warriors that make up an Imperial Knights household, these Battle Scars represent dishonourable burdens that units from your Crusade force may come to bear.
CRUSADE RELICS
In addition to the Crusade Relics presented in other publications, Imperial Knights models can claim one of the Crusade Relics found here.
CRUSADE BADGES
Here you will find three Crusade Badges representing goals you can set yourself when campaigning with your Crusade force. Once one is achieved, you could set yourself a new goal, or take the opportunity to start a new Crusade force.
Pilot and Knight
A Noble's Duty
Over the course of a campaign, pilots can gain abilities (called Masteries) and burdens. A pilot’s abilities and burdens apply to the IMPERIAL KNIGHTS unit it is assigned to.Vacant Knights and Unseated Pilots
During your Crusade, there may be opportunities to reassign a pilot to a different IMPERIAL KNIGHTS model. To do so, select a pilot to become unseated and their IMPERIAL KNIGHTS model to become vacant. Then select an IMPERIAL KNIGHTS model: That IMPERIAL KNIGHTS model is assigned to that pilot. If that IMPERIAL KNIGHTS model was assigned to another pilot, that other pilot is unseated.
Lost to Legend
If an IMPERIAL KNIGHTS unit is removed from your Order of Battle, you can choose to retain its pilot: that pilot is unseated. You can choose to remove a pilot from your Order of Battle at any time.
Such quests may involve slaying a sworn enemy, reclaiming lost Imperial territory, purging xenos infestations or seeking out lost knowledge. They will take the sworn pilot and their kinsmen far, from frozen death worlds to the sprawling metropolises of burning hive worlds.
When mustering your Crusade army, if you have no active Chivalric Quest and your WARLORD is an IMPERIAL KNIGHTS model, you can swear your Knights to one of the following Chivalric Quests:
- To Strike Down the Unclean Behemoths
- To Raise High the Pennants of Victory
- To Stamp Out the Champions of Dishonour
- To Secure the Realm
Make a note of your selection on one of your Pilot and Knight Crusade cards (we recommend using your WARLORD’s). During your next three battles, keep a tally of how many times you achieve the objective of your chosen Chivalric Quest (see below).
Once you have fought three battles, consult the Tally Rewards section of your chosen Chivalric Quest. You gain the number of Chivalric points stated based on the number of tally marks you accrued during those battles, which can then be allocated to your pilots (see below). If you have fewer than four tally points, your Crusade force is said to be Dishonoured instead.
Dishonoured
During your crusade, your Crusade force may fail to complete a Chivalric Quest and become Dishonoured. Similarly, before a battle, when mustering your Crusade army, you can choose to abandon your current Chivalric Quest. If you do, your Crusade force is said to be Dishonoured, and you cannot swear your Knights to a new Chivalric Quest until you complete the Death Before Dishonour Agenda during a battle.Chivalric Points
During the Update Crusade Cards step, you can allocate any Chivalric points you have gained to your pilots.The first time a pilot is allocated Chivalric points, you must select a Mastery for them. Accruing further Chivalric points will improve a pilot’s Level of Honour within that Mastery, unlocking the associated benefits.

To Strike Down the Unclean BehemothsThe slaughter of hulking nightmares is a noble aspiration. It harks many back to the Knights’ origins, defending their keeps from vile beasts. While this Chivalric Quest is active, add 1 to its tally each time a MONSTER or VEHICLE unit is destroyed by an attack made by an IMPERIAL KNIGHTS model from your Crusade force. For each of those detroyed units that was TITANIC, you gain 1 additional tally mark.
| ||||||||||||


To Stamp Out the Champions of DishonourNobles never forget - nor forgive - the generals, priests, witches and champions who wrong them. The Code Chivalric demands their death. While this Chivalric Quest is active, add 1 to its tally each time a CHARACTER unit is destroyed by an attack made by an IMPERIAL KNIGHTS model from your Crusade force. For each of those detroyed units that was your opponent’s WARLORD, you gain 1 additional tally mark.
| ||||||||||||
To Secure the RealmThe dark and infested reaches of the galaxy, so Knightly teachings reveal, yearn for liberation, even if it must be bought with blood. While this Chivalric Quest is active, al the end of each battle, add 1 to its tally for each of the following conditions you satisfy: one or more IMPERIAL KNIGHTS units from your Crusade army are within 6" of the centre of the battlefield; no enemy units are within 6" of the centre of the battlefield; one or more Imperial Knights units from your Crusade army are wholly within your opponent’s deployment zone.
| ||||||||||||
Masteries
The first time a pilot is allocated one or more Chivalric points, select one Mastery for them from those below (some Masteries are restricted to pilots with a specific Sworn Alignment or an assigned TITANIC IMPERIAL KNIGHTS model). You can only select a Mastery that no other pilot from your Crusade force has. Track each pilot’s Mastery progress on their Pilot Crusade card. There are three levels, each with an associated benefit, within each Mastery. Compare a pilots allocated Chivalric points with their Mastery to determine which level they are at, and which corresponding benefit they have.You cannot assign more than 6 Chivalric points to a pilot whose assigned IMPERIAL KNIGHTS model is an ARMIGER.
Add 1 to an IMPERIAL KNIGHTS unit’s Crusade points while the pilot it is assigned to has a Mastery.
Level of Honour

1-3 Chivalric points

4-6 Chivalric points

7+ Chivalric points
Mastery of ObduracyA warrior who displays a particularly haughty intractability may earn the right to represent the unchanging tenets of their house or Freeblade lance in war. Such champions plant their feet, brazenly declare their dominance and deny any foe that faces them.  While this unit is not Battle-shocked, add 1 to its Objective Control characteristic.  While this unit is not Battle-shocked, add 3 to its Objective Control characteristic.  While this unit is not Battle-shocked, add 5 to its Objective Control characteristic. | ||
Mastery of ClarionTo convey the voice of one’s liege is a privilege. Such Nobles are adept at relaying commands - suitably couched in imperious authority - to Bondsmen within their lance. Though they may use augmented vox-arrays or flocks of servo-troubadours to extend their reach, it is their voice that elicits obedience. Pilot of a TITANIC unit only. Each time this unit uses its Bondsman ability, it can select a friendly ARMIGER unit that is within 18" of and visible to this unit. Pilot of a TITANIC unit only. Each time this unit uses its Bondsman ability, it can select a friendly ARMIGER unit that is within 24" of and visible to this unit. Pilot of a TITANIC unit only. Each time this unit uses its Bondsman ability, it can select a friendly ARMIGER unit that is anywhere on the battlefield and visible to this unit. | ||
Mastery of TuitionAncient lore and the martial wisdom reaped from countless battlefields must be harnessed and passed on. A robust lineage only prospers when hard-won knowledge reaches those who rise in succession. At the end of each battle, if this unit gains any XP, you can select one other IMPERIAL KNIGHTS unit from your Crusade army that survived that battle. The selected unit gains 1XP. At the end of each battle, if this unit gains any XP, you can select up to two other IMPERIAL KNIGHTS units from your Crusade army that survived that battle. The selected units gain 1XP. At the end of each battle, if this unit gains any XP, you can select up to three other IMPERIAL KNIGHTS units from your Crusade army that survived that battle. The selected units gain 1XP. | ||
Mastery of AmbushThose who excel at the hunt never fail to bring their skills to bear upon the battlefield. Their advice enables a lance to outmanoeuvre the quarry before the battle lines are even drawn. After both players have deployed their armies, you can redeploy this unit. After both players have deployed their armies, you can redeploy this unit and one friendly IMPERIAL KNIGHTS ARMIGER unit. After both players have deployed their armies, you can redeploy this unit and one friendly IMPERIAL KNIGHTS unit. | ||
Mastery of CondemnationThese Nobles act as foci for Knightly ire, bellowing a litany of the worst treachery or ignobility amongst the dishonourable foe. They ruthlessly guide their kin’s firepower, drawing upon their status within the hierarchy of bloodlines or as a rallying hero amongst exiled companions to see their hated foes annihilated. Once per battle, at the start of your Shooting phase, select one enemy unit within 18" of and visible to this unit. Until the end of the phase, each time an IMPERIAL KNIGHTS unit from your Crusade army makes an attack that targets that unit, you can re-roll a Hit roll of 1. Once per battle, at the start of your Shooting phase, select one enemy unit within 18" of and visible to this unit. Until the end of the phase, each time an IMPERIAL KNIGHTS unit from your Crusade army makes an attack that targets that unit, you can re-roll a Hit roll of 1 and you can re-roll a Wound roll of 1. Once per turn, at the start of your Shooting phase, select one enemy unit within 18" of and visible to this unit. Until the end of the phase, each time an IMPERIAL KNIGHTS unit from your Crusade army makes an attack that targets that unit, you can re-roll a Hit roll of 1 and you can re-roll a Wound roll of 1. | ||
Mastery of JoustQuestor Imperialis pilots only Few things can bring such elation to a Knight pilot as a full tilt charge, driving their armoured steed onwards, and smashing into the foe like a meteor. This Noble is an expert at assessing strategic cartoliths and coordinating their forces’ advance. Such eager warriors push their Knight suits to their limits, they and their steed’s machine spirit goading each other into one aggressive advance after another. Add 2" to this unit’s Move characteristic. Add 2" to this unit’s Move characteristic. This unit is eligible to shoot in a turn in which it Advanced. Add 2" to this unit’s Move characteristic. This unit is eligible to shoot and declare a charge in a turn in which it Advanced. | ||
Mastery of MechanismsQuestor Mechanicus pilots only This. Knightly pilot is attended within their keep by many Sacristans sworn to their service. Through their advice, and with their ritualised ministrations, the Noble has an intensely strong bond with the machine spirit of Knight suits and is capable of entreating them to surge once more with vengeful strength despite the hurt done to them by the foe. In your Command phase, you can select one friendly IMPERIAL KNIGHTS model within 6" of this unit. That friendly model regains up to D3 lost wounds. In your Command phase, you can select one friendly IMPERIAL KNIGHTS model within 6" of this unit. That friendly model regains up to 3 lost wounds. In your Command phase, you can select one friendly IMPERIAL KNIGHTS model within 6" of this unit. That friendly model regains up to D3+3 lost wounds. | ||
Mastery of ExecutionFreeblade pilots only The death of a specific vilified foe may decide the outcome of a battle, or go some way to erasing a wrong the enemy once committed upon a Knight’s honour. Some Noble champions see the singular destruction of such an enemy as their calling, a manifestation of their duty within the Code Chivalric. At the start of the first battle round, select one enemy unit. Until the end of the battle, each time this unit makes an attack that targets that enemy unit, add 1 to the Damage characteristic of that attack. At the start of the first battle round, select one enemy unit. Until the end of the battle, each time this unit makes an attack that targets that enemy unit, add 1 to the Damage characteristic of that attack and that attack has the [sustained hits 1] ability. At the start of the first battle round, select one enemy unit. Until the end of the battle, each time this unit makes an attack that targets that enemy unit, add 1 to the Damage characteristic of that attack and that attack has the [sustained hits D3] ability. | ||
Agendas
If your Crusade army includes any IMPERIAL KNIGHTS units, you can select Agendas from those presented here.
The joys of battle are upon you, surging through your systems, firing your blood. With the Code Chivalric as your guide only glory awaits. For the honour of the household! Attack!
Suffer not the enemy to live, for their existence is an offence to our oaths. They must be shown that to stand against Humanity is to invite the wrath of its colossal defenders.
Whether answering a call for aid from an Imperial commander on a campaign, responding to the distress call of some neighbouring world or setting off on a crusade, Noble houses will not be found wanting in their duty. They march to war with honour in their sights, reclaiming the Emperor’s realm one adamantine footfall at a time.
The Noble households do not forget those who have deeply wronged them, and the vengeance of their Nobles can only be tempered in the blood of the hated foe.
Nothing tears at the noble heart so much as being anything less than dutiful. From such a nadir of self-doubt and with the disapproval of one’s peers, only the most heroic feats can lift a worthy soul back to the heights of nobility.
- That unit destroyed three or more enemy units during the battle.
- That unit destroyed the enemy WARLORD during the battle.
- That unit is within range of one or more objective markers you control that are wholly within your opponent’s deployment zone.
Requisitions
If your Crusade force includes any IMPERIAL KNIGHTS units, you can spend Requisition points (RP) on any of the following Requisitions.
With the success of an honourable quest hanging in the balance, abandonment of one’s oaths is the last thing in the mind of the virtuous.
While most Armigers can operate independently, it is common for their Helms Mechanician to be neurally slaved to the command impulses of a larger Knight, rendering them subordinate. To accept such mental serfdom is to possess the rank of Bondsman.
As the needs of the lance change, a Noble can petition the Sacristans who serve their needs to transplant their bonded neural interface - whether Throne or Helm - from one suitable steed to another.
Some Knights forsake their houses to wander alone amongst the stars, or else are cast out as exiles. Such warriors are known as Freeblades and must carve out their path to glory.
The unique origins of those who take up the mantle of the Freeblade, the necessities of survival and the influence of those allies they pledge themselves to mean that many of these lone warriors acquire a breadth of experience denied to the more hidebound.
BurdensD6
This Knight's failure is a deeply personal insult to those who live and die by the Code Chivalric, and their inclusion in the lance caused much politicalfriction before battle, and much time lost that should have been used in war preparations.
Such is the magnitude of this pilot’s failure that they have become a pariah in their own household. They are one failure away from being exiled in shame.
Losing a Knight in battle is matched with a loss of standing and respect within a pilot's household. Determined to regain their honour, they will reject no challenge, no matter how deadly.
Crusade Relics
When an IMPERIAL KNIGHTS model gains a Crusade Relic, you can select one of the Crusade Relics presented here.
Artificer Relics
This vox-system was installed into the Knight of a trusted vassal to an aloof High Monarch, and so the Noble was able to command the lowly masses without having to sully his own Knight by getting too close to the low-born.
Each time the bearer uses its Bondsman ability, you can select one other friendly ARMIGER model within 9" of the ARMIGER you selected with that ability; that other model is also affected by that Bondsman ability.The Noble houses suspected of harbouring this Dark Age augury protocol claim that the machine spirits of their secondary weapons can scent dishonour. Those who would hide behind their thralls are swiftly hunted out and punished for their cowardice.
If the bearer is equipped with one or more Questoris heavy stubbers or Questoris multi-lasers, those weapons have the [precision] and [ignores cover] abilities, and each time an attack is made with one of those weapons, you can re-roll the Hit roll.This fabled plasma reactor is thought to have been made from one of the original STC blueprints created in the Dark Age of Technology. It is capable of channelling the primal wrath of plasma fire, imbuing the Knight with immense, if temporary, bursts of power. Such surges of the Omnissiahs holy lifeblood invariably damage the Knight, but it is only through sacrifice that great deeds can be achieved.
In your Command phase, the bearer can activate this Crusade Relic. If it does, the bearer suffers D3 mortal wounds, then select one of the following effects (if you select the third effect, you must also select one weapon equipped by the bearer):- Until the start of your next Command phase, add 2" to the bearer’s Move characteristic.
- Until the start of your next Command phase, add 2 to Advance and Charge rolls made for the bearer.
- Until the start of your next Command phase, each time the bearer makes an attack with the selected weapon, add 1 to the Wound roll.
Antiquity Relics
Despite whispers of its uncertain origins, the potent ion shield generator known as Sanctuary is a venerated war relic. Through the projection of rapidly modulating and overlapping energy fields, coupled with an emission ofcleansing incense and a cycling barrage of data-hynmals, this device wards away the attacks of the enemy. The all-encompassing field clings to the Knight like an energised second skin, flexing and shifting with its movement and protecting it from even close-quarters attacks.
The bearer has a 5+ invulnerable save against melee attacks.Tins carapace bodyglove is worn by the Knightly pilot. It is studded with electro-sockets that couple with the machinery of the Throne Mechanician. Once bonded, micro-generators within the armour project streams of ionic energy, not only wreathing the pilot and their Throne in a protective shield but reinforcing and protecting the Knight’s internal systems.
The bearer has a Save characteristic of 2+.Legendary Relics
Though many great heroes through the ages have mounted this face plate upon their Knight suits, the names of both the suit and the valiant pilot who first bore this helm have been lost to history. Regardless of its origins, the Helm of the Nameless Warrior has become synonymous with murderous ferocity in battle.
Melee weapons equipped by the bearer have the [devastating wounds] ability.Crusade Badges
When your Crusade force accomplishes specific long-term goals, you can earn the Crusade badges shown below, representing your warriors’ successes over many battles.
Chivalric Champion
The legend of the warriors of your lance grows with each victory and valiant deed. Their names are known by the inhabitants of liberated hive cities, unshackled forge temples, freed orbital stations and cursed by those few foes that escape their wrath. Their time will come yet.
- You have completed one Chivalric Quest.
- You have won two or more battles.

Chivalric Paladin
You have upheld the Code Chivalric with glory, and the honour of you, your steed and your Noble companions is vaunted by millions of Imperial souls who inhabit the worlds you have stridden. The list of honours accrued by the warriors of your lance grows with each victory. Your crusade cannot stop now, duty demands it.
- You have completed two different Chivalric Quests.
- You have won five or more battles.
- Your Crusade force includes at least one pilot whose Level of Honour is Esteemed.

Chivalric Exemplar
The names of the warriors of your lance will live on in the myths and legends of a dozen star systems. The tally of foes slain and realms conquered in the name of those to whom you have sworn your undying oath of allegiance exceeds those of any other warrior to sit upon a Throne Mechanician. Your steeds machine spirit echoes your shout of victory!
- You have completed four different Chivalric Quests.
- You have won ten or more battles.
- Your Crusade force includes at least one pilot whose Level of Honour is Virtuous.

Heavy weapons are amongst the biggest guns on the battlefield, but require bracing to fire at full effect and are unwieldy to bring to bear at close quarters.
Weapons with [HEAVY] in their profile are known as Heavy weapons. Each time an attack is made with such a weapon, if the attacking model’s unit Remained Stationary this turn, add 1 to that attack’s Hit roll.- Add 1 to Hit rolls if the bearer’s unit Remained Stationary this turn.
The BATTLELINE keyword is used in the following Adeptus Mechanicus datasheets:
An unmodified Hit roll of 6 is called a Critical Hit and is always successful. An unmodified Hit roll of 1 always fails. A Hit roll can never be modified by more than -1 or +1.
- Hit Roll (Ranged Attack): A hit is scored if the D6 result equals or exceeds that attack’s BS.
- Hit Roll (Melee Attack): A hit is scored if the D6 result equals or exceeds that attack’s WS.
- Critical Hit: Unmodified Hit roll of 6. Always successful.
- An unmodified Hit roll of 1 always fails.
- A Hit roll can never be modified by more than -1 or +1.
Assault weapons fire so indiscriminately that they can be shot from the hip as warriors dash forward.
Weapons with [ASSAULT] in their profile are known as Assault weapons. If a unit that Advanced this turn contains any models equipped with Assault weapons, it is still eligible to shoot in this turn’s Shooting phase. When such a unit is selected to shoot, you can only resolve attacks using Assault weapons its models are equipped with.- Can be shot even if the bearer’s unit Advanced.
An Adeptus Mechanicus army marching to war is a sight both terrifying and glorious, each holy warrior a disturbing fusion of Human and machine. While the ruling Tech-Priests and their fanatical followers raise modified voices in praise of the Machine God, their Skitarii soldiery and Servitor creations are controlled by doctrina imperatives loaded by their masters to augment and adapt the warriors’ abilities.
At the start of the battle round, you can select one of the Doctrina Imperatives below. Until the end of the battle round, that Doctrina Imperative is active for your army, and all units from your army that have the Doctrina Imperatives ability gain the relevant abilities shown below.Protector Imperative
|
Conqueror Imperative
|
The ACASTUS keyword is used in the following Imperial Knights datasheets:
The ADEPTUS MECHANICUS keyword is used in the following Imperial Knights datasheets:
The ARMIGER keyword is used in the following Imperial Knights datasheets:
The BATTLELINE keyword is used in the following Imperial Knights datasheets:
The CERASTUS keyword is used in the following Imperial Knights datasheets:
The CHARACTER keyword is used in the following Imperial Knights datasheets:
The CULT MECHANICUS keyword is used in the following Imperial Knights datasheets:
The DOMINUS keyword is used in the following Imperial Knights datasheets:
The EPIC HERO keyword is used in the following Imperial Knights datasheets:
The IMPERIAL KNIGHTS keyword is used in the following Imperial Knights datasheets:
The IMPERIUM keyword is used in the following Imperial Knights datasheets:
The INFANTRY keyword is used in the following Imperial Knights datasheets:
The KNIGHT ACHERON keyword is used in the following Imperial Knights datasheets:
The KNIGHT ASTERIUS keyword is used in the following Imperial Knights datasheets:
The KNIGHT ATRAPOS keyword is used in the following Imperial Knights datasheets:
The KNIGHT CASTIGATOR keyword is used in the following Imperial Knights datasheets:
The KNIGHT LANCER keyword is used in the following Imperial Knights datasheets:
The KNIGHT MAGAERA keyword is used in the following Imperial Knights datasheets:
The KNIGHT PORPHYRION keyword is used in the following Imperial Knights datasheets:
The KNIGHT STYRIX keyword is used in the following Imperial Knights datasheets:
The MANIPULUS keyword is used in the following Imperial Knights datasheets:
The MARSHAL keyword is used in the following Imperial Knights datasheets:
The MOIRAX keyword is used in the following Imperial Knights datasheets:
The QUESTORIS keyword is used in the following Imperial Knights datasheets:
The RANGERS keyword is used in the following Imperial Knights datasheets:
The SKITARII keyword is used in the following Imperial Knights datasheets:
The TECH-PRIEST keyword is used in the following Imperial Knights datasheets:
The TITANIC keyword is used in the following Imperial Knights datasheets:
The TOWERING keyword is used in the following Imperial Knights datasheets:
The VANGUARD keyword is used in the following Imperial Knights datasheets:
The VEHICLE keyword is used in the following Imperial Knights datasheets:
The WALKER keyword is used in the following Imperial Knights datasheets:
There are several categories of Battle Honours that can be bestowed upon a unit, such as Battle Traits, Weapon Modifications and Crusade Relics. Other categories of Battle Honour may be found in other publications. Each time a unit gains a Battle Honour, you can select from any category.
- Once a unit gains enough XP it will gain a rank.
- Only CHARACTER units can gain the Heroic or Legendary ranks.
- Each time a unit gains a rank, it can gain a Battle Honour.
- There are several categories of Battle Honours, which include:
- Battle Traits: New skills and abilities.
- Weapon Modifications: Upgrade an item of wargear.
- Crusade Relic: Gain a rare and powerful artefact.
- Each time a unit gains a Battle Honour, increase its Crusade points total by 1 (or by 2 if TITANIC).
The greatest warriors, most cunning tacticians and seers lead their armies to war possessed of hard-won skills and powerful artefacts that mark them out as legendary commanders.
You can select one Enhancement that unit has access to (if using this Requisition when that unit gains a rank, this is instead of it gaining a Battle Honour). When doing so, that unit has access to any Enhancements described within any Detachment rules that it could use, even though you have not yet started to muster your army and so have not selected any Detachment rules yet.
If the selected Enhancement replaces a weapon that is a Crusade Relic or a weapon upgraded by Weapon Modifications, that Crusade Relic or Weapon Modifications are lost. Recalculate the unit’s points value as a result of gaining this Enhancement and update its Crusade card. You cannot make any changes that would cause you to exceed your Supply Limit.
This Requisition costs 1RP plus 1 additional RP for each other Enhancement that your Order of Battle contains (to a maximum of 3RP).
When setting objective markers up on the battlefield, place them so they are centred on the point specified by the mission. When measuring distances to and from objective markers, measure to and from the closest part of them. Models can move over objective markers as if they were not there, but they cannot end a move on top of an objective marker.
At the start of the battle, each objective marker on the battlefield is said to be contested, and so is not controlled by either player. To control an objective marker, a player will first need to move models within range of it. A model is within range of an objective marker if it is within 3" horizontally and 5" vertically of that objective marker.
Every model has an Objective Control (OC) characteristic listed on its datasheet. To determine a player’s Level of Control over an objective marker, add together the OC characteristics of all the models from that player’s army that are within range of that objective marker. A player will control an objective marker at the end of any phase or turn if their Level of Control over it is greater than their opponent’s. If both players have the same Level of Control over an objective marker, that objective marker is contested.
- A model is within range of an objective marker if within 3" horizontally and 5" vertically.
- Level of Control: Add together the OC characteristics of all of a player’s models within range of the objective marker.
- An objective marker is controlled by the player with the highest Level of Control over it (in a tie, it is contested).
- Models cannot end a move on top of an objective marker.
| ||||||||||||||
If the result of the Wound roll is greater than or equal to the required number shown in the table above, then that Wound roll is successful and scores one wound against the target unit. Otherwise, the attack fails and the attack sequence ends.
An unmodified Wound roll of 6 is called a Critical Wound and is always successful. An unmodified Wound roll of 1 always fails. A Wound roll can never be modified by more than -1 or +1.
- Critical Wound: Unmodified Wound roll of 6. Always successful.
- An unmodified Wound roll of 1 always fails.
- A Wound roll can never be modified by more than -1 or +1.
- Advance Move: Models move up to M+D6".
- Cannot move within Engagement Range of any enemy models.
- Units that Advance cannot shoot or charge this turn.
You then make a Charge roll for the charging unit by rolling 2D6. The result is the maximum number of inches each model in that unit can be moved if a Charge move is possible. For a Charge move to be possible, the Charge roll must be sufficient to enable the charging unit to end that move:
- Within Engagement Range of every unit that you selected as a target of the charge.
- Without moving within Engagement Range of any enemy units that were not a target of the charge.
- In Unit Coherency.
- Charge Roll: 2D6".
- Targets of a charge must be within 12" but do not need to be visible.
- If the distance rolled is insufficient to move within Engagement Range of all targets while maintaining Unit Coherency, the charge fails.
- Cannot move within Engagement Range of any unit that was not a target of the charge.
- If the charge is successful, each model makes a Charge move less than or equal to the Charge roll, and must move into base-to-base contact with an enemy model if possible.
- Normal Move: Models move up to M".
- Cannot move within Engagement Range of any enemy models.
A unit cannot shoot or declare a charge in the same turn that it Fell Back.
Desperate Escape Tests
Unlike when making other types of move, models can move over enemy models when making a Fall Back move as if those enemy models were not there, but you must take a Desperate Escape test for each model that will do so (excluding models that are TITANIC or can FLY) before any models in that unit are moved. In addition, if a unit is Battle-shocked when it is selected to Fall Back, you must take a Desperate Escape test for every model in that unit before any are moved.
- Fall Back Move: Models move up to M".
- Units that Fall Back cannot shoot or declare a charge in the same turn.
- Models can move over enemy models when Falling Back, but you must take Desperate Escape tests for them before they do so (excluding models that are TITANIC or can FLY).
- If a Battle-shocked unit is selected to Fall Back, take a Desperate Escape test for every model in that unit.
- Desperate Escape Test: Roll one D6. On a 1-2, one model from that unit is destroyed.
Models cannot be set up or end a Normal, Advance or Fall Back move within Engagement Range of any enemy models. If for any reason a model cannot meet this condition, that model is destroyed.
- Engagement Range: Within 1" horizontally and 5" vertically.
- Models cannot be set up or end a Normal, Advance or Fall Back move within Engagement Range of any enemy models.
While a unit is Battle-shocked:
- The Objective Control characteristic of all of its models is 0.
- If it Falls Back, you must take a Desperate Escape test for every model in that unit.
- Its controlling player cannot use Stratagems to affect that unit.
Once you have taken Battle-shock tests for all of your units that require them, your Command phase ends and you progress to your Movement phase.
In this step, if for any reason a unit is forced to take a Battle-shock test for being below its Starting Strength, unless otherwise stated, that unit does not also have to take a Battle-shock test for being Below Half-strength. While a unit is Battle-shocked, all models in that unit are also Battle-shocked.
- Take a Battle-shock test for each unit from your army on the battlefield that is Below Half-strength.
- Roll 2D6: if the result is greater than or equal to the unit’s Leadership, the test is passed. Otherwise, the unit is Battle-shocked until the start of your next Command phase.
- Battle-shocked units have an OC of 0 and their controlling player cannot use Stratagems to affect them.
- Battle-shocked units must take Desperate Escape tests if they Fall Back.
The IMPERIAL KNIGHTS and TITANIC keywords are used in the following Imperial Knights datasheets:
Imperial Knights fight by a stringent set of codes. In addition to defeating the foe, honour must always be upheld.
To determine your army’s Deed, you can either select one Deed or you can randomly select one Deed by rolling a D6 and consulting the relevant table below. The selected Deed will describe what needs to be achieved in order to complete that Deed.
The first time your selected Deed is completed your Oath is fulfilled and, until the end of the battle, your army becomes Honoured and you gain 2CP, or 3CP if you randomly selected your Deed and/or Quality (CP gained in this way are an exemption to the Core Rules that limit the maximum number of CP you can gain per battle round to 1).
|
|
Some warriors are masters of disguise and concealment.
If every model in a unit has this ability, then each time a ranged attack is made against it, subtract 1 from that attack’s Hit roll.Some weapons are designed to root enemy formations out of entrenched positions.
Weapons with [IGNORES COVER] in their profile are known as Ignores Cover weapons. Each time an attack is made with such a weapon, the target cannot have the Benefit of Cover against that attack.Lance weapons are deadly on the charge.
Weapons with [LANCE] in their profile are known as Lance weapons. Each time an attack is made with such a weapon, if the bearer made a Charge move this turn, add 1 to that attack’s Wound roll.Some weapons can inflict fatal injuries on any foe, no matter their resilience.
Weapons with [LETHAL HITS] in their profile are known as Lethal Hits weapons. Each time an attack is made with such a weapon, a Critical Hit automatically wounds the target.Whether shielded by force fields, enveloped in mystical energies or simply possessed of preternatural senses and lightning-fast reflexes, some warriors are protected by more than mere physical armour.
Some models have an invulnerable save listed on their datasheet. Each time an attack is allocated to a model with an invulnerable save, the controlling player must choose to use either that model’s Save characteristic or its invulnerable save, but not both. If a model has more than one invulnerable save, it can only use one of them – choose which it will use.Unlike armour saving throws (which use a model’s Save characteristic), invulnerable saving throws are never modified by an attack’s Armour Penetration characteristic, but otherwise follow the normal rules for saving throws.
- Invulnerable Save: Never modified by an attack’s AP.
- The controlling player can choose to use either a model’s invulnerable save or its Save characteristic.
Some weapons strike in a flurry of blows, tearing the foe apart with relentless ferocity.
Weapons with [SUSTAINED HITS X] in their profile are known as Sustained Hits weapons. Each time an attack is made with such a weapon, if a Critical Hit is rolled, that attack scores a number of additional hits on the target as denoted by ‘x’.- [SUSTAINED HITS X]: Each Critical Hit scores ‘x’ additional hits on the target.
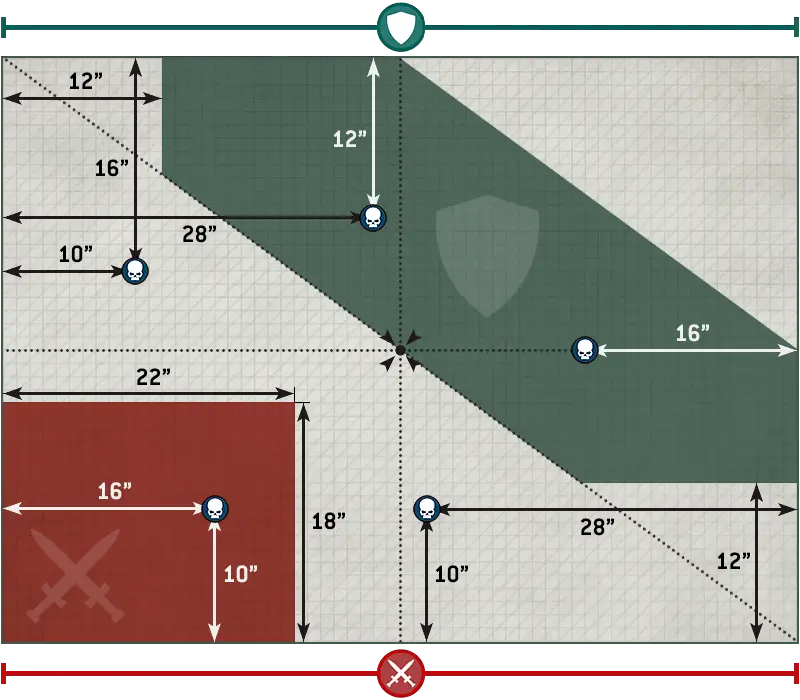
DEFENSIVE LINE
Designer’s Note: This deployment works best when terrain is set up in and around the ‘front’ of the Defender’s deployment zone - the diagonal across the centre of the battlefield - to make a well-fortified position.
Those honoured to serve a great hero do so unto death.
Some IMPERIAL KNIGHTS models have a Bondsman ability, tagged with the word ‘Bondsman’. In your Command phase, one or more models from your army with a Bondsman ability can use that ability. For each one that does, select one friendly ARMIGER model within 12" of that model (you cannot select an ARMIGER model that is already being affected by a Bondsman ability). Until the start of your next Command phase, that ARMIGER model is affected by that Bondsman ability.With a rigid, strategic intuition born of the unyielding fortifications defended by their ancestors, the Nobles of a Gate Warden Lance hold their ground with an arrogant superiority. While even one defends the marches of their claimed realm, they will fight to the ends of their honour to hurl back the besiegers.
At the start of the first battle round, select two objective markers on the battlefield to be your foundations. When you draw a line from any part of one of your foundations to the other, if any part of a model’s base (or any part of a model’s hull, for a model without a base) crosses that line, that model’s unit is said to be on your defensive line.While an IMPERIAL KNIGHTS unit from your army is on your defensive line, that unit has the following ability:
Against the Horde: Each time a model in this unit makes an attack that targets a visible enemy unit, you can ignore any or all modifiers to the Hit roll, and weapons equipped by models in this unit have the [sustained hits 1] ability.
Each time one of your foundations is removed from the battlefield (e.g. by a Primary Mission rule), just after it is removed, select a new objective marker on the battlefield to be one of your foundations.
Weapons powered by unstable and dangerous energy sources pose a substantial risk to the wielder every time they are used.
Weapons with [HAZARDOUS] in their profile are known as Hazardous weapons. Each time a unit is selected to shoot or fight, after that unit has resolved all of its attacks, for each Hazardous weapon that targets were selected for when resolving those attacks, that unit must take one Hazardous test. To do so, roll one D6: on a 1, that test is failed. For each failed test you must resolve the following sequence (resolve each failed test one at a time):- If possible, select one model in that unit that has lost one or more wounds and is equipped with one or more Hazardous weapons.
- Otherwise, if possible, select one model in that unit (excluding CHARACTER models) equipped with one or more Hazardous weapons.
- Otherwise, select one CHARACTER model in that unit equipped with one or more Hazardous weapons.
If a unit from a player’s army is selected as the target of the Fire Overwatch Stratagem in their opponent’s Charge phase, any mortal wounds inflicted by Hazardous tests are allocated after the charging unit has ended its Charge move.
- After a unit shoots or fights, roll one Hazardous test (one D6) for each Hazardous weapon used. For each 1, a model equipped with a hazardous weapon suffers 3 mortal wounds, that must be allocated to the selected model.
- A Critical Wound inflicts mortal wounds equal to the weapon’s Damage characteristic, instead of any normal damage.
Some attacks are so powerful that no armour or force field can withstand their fury.
Some rules inflict mortal wounds on units. Each time mortal wounds are inflicted on a unit, each of those mortal wounds inflicts one point of damage to that unit, and they are always applied one at a time. Each mortal wound is allocated to a model in the same manner as allocating an attack. Excess damage from mortal wounds is not lost if the damage can be allocated to another model. Instead, keep allocating damage to another model in the target unit until either all the damage has been allocated or the target unit is destroyed.If an attack inflicts mortal wounds in addition to any normal damage, do not make a Wound roll or saving throw (including invulnerable saving throws) against those mortal wounds. If those mortal wounds are inflicted by an attack that has the [PRECISION] ability, the attacking model’s controlling player can allocate those mortal wounds to a CHARACTER model in that unit.
If mortal wounds are being inflicted as a result of the [HAZARDOUS] ability or by an attack with the [DEVASTATING WOUNDS] ability that scored a Critical Wound, each time those mortal wounds are allocated to a model, if that model is destroyed as a result of those mortal wounds, the remaining mortal wounds from that attack are lost, just as with a normal attack.
If, when a unit is selected to shoot or fight, one or more of its attacks can inflict mortal wounds on the target, resolve any normal damage inflicted by the attacking unit’s attacks on that target before inflicting any mortal wounds on that target. If an attack inflicts mortal wounds in addition to any normal damage, but the normal damage is subsequently saved, the target unit still suffers those mortal wounds, as described above.
- Each mortal wound inflicted on a unit causes one model in that unit to lose one wound.
- Unless the source of the mortal wounds is the [HAZARDOUS] ability or an attack with the [DEVASTATING WOUNDS] ability, damage from mortal wounds is not lost if it can be allocated to another model.
- No saving throws can be made against mortal wounds.
- Mortal wounds inflicted by attacks always apply after any normal damage, even if that damage was saved.
TARGET: That VEHICLE unit.
EFFECT: Select one enemy unit within Engagement Range of your unit, and select one VEHICLE model in your unit that is within Engagement Range of that enemy unit. Roll a number of D6 equal to the Toughness characteristic of the selected VEHICLE model. For each 5+, that enemy unit suffers 1 mortal wound (to a maximum of 6 mortal wounds).
When a model that can FLY starts or ends a move on a terrain feature, instead of measuring the path it has moved across the battlefield, you instead measure its path ‘through the air’, as shown in the diagram below.
- FLY models can move over enemy models when they make a Normal, Advance or Fall Back move.
- FLY models that start or end a move on a terrain feature measure distance moved through the air when they make a Normal, Advance or Fall Back move.
Some warriors refuse to be laid low, even by what should be fatal wounds.
Some models have ‘Feel No Pain x+’ listed in their abilities. Each time a model with this ability suffers damage and so would lose a wound (including wounds lost due to mortal wounds), roll one D6: if the result is greater than or equal to the number denoted by ‘x’, that wound is ignored and is not lost. If a model has more than one Feel No Pain ability, you can only use one of those abilities each time that model suffers damage and so would lose a wound.- Feel No Pain x+: Each time this model would lose a wound, roll one D6: if the result equals or exceeds ‘x’, that wound is not lost.
If a unit can end its Consolidation within Engagement Range of one or more enemy units, then each time one of its models makes a Consolidation move, it must end that move closer to the closest enemy model. If it can also end that move in base-to-base contact with one or more enemy models while still satisfying all of the conditions above, it must do so. The controlling player chooses the order in which to move their models.
- Consolidation Move: Up to 3".
- Every model that moves must end closer to the closest enemy model, and in base-to-base contact with an enemy model if possible. The unit must end in Unit Coherency and within Engagement Range of at least one enemy unit if possible.
- If the above is not possible, each model can move towards the closest objective marker, but this must result in the unit being within range of it and in Unit Coherency.
- If the above is also not possible, no models can Consolidate.
Precision attacks can pick high-value targets out in a crowd, whether through the unerring aim of a sniper or the pinpoint accuracy of a blade-master’s strike.
Weapons with [PRECISION] in their profile are known as Precision weapons. Each time an attack made with such a weapon successfully wounds an Attached unit (see Leader ability), if a CHARACTER model in that unit is visible to the attacking model, the attacking model’s player can choose to have that attack allocated to that CHARACTER model instead of following the normal attack sequence.- When targeting an Attached unit, the attacking model’s player can have the attack allocated to a CHARACTER model in that unit visible to the bearer.
TARGET: One unit from your army that is within Engagement Range of one or more enemy units and that has not already been selected to fight this phase.
EFFECT: Your unit fights next.
Rapid fire weapons are capable of long-ranged precision shots or controlled bursts at nearby targets.
Weapons with [RAPID FIRE X] in their profile are known as Rapid Fire weapons. Each time such a weapon targets a unit within half that weapon’s range, the Attacks characteristic of that weapon is increased by the amount denoted by ‘x’.- [RAPID FIRE X]: Increase the Attacks by ‘x’ when targeting units within half range.
The IMPERIAL KNIGHTS and CHARACTER keywords are used in the following Imperial Knights datasheets:
Some units make their way to battle via tunnelling, teleportation, high-altitude descent or other extraordinary means that allow them to appear suddenly in the thick of the fighting.
During the Declare Battle Formations step, if every model in a unit has this ability, you can set it up in Reserves instead of setting it up on the battlefield. If you do, in the Reinforcements step of one of your Movement phases you can set up this unit anywhere on the battlefield that is more than 9" horizontally away from all enemy models. If a unit with the Deep Strike ability arrives from Strategic Reserves, the controlling player can choose for that unit to be set up either using the rules for Strategic Reserves or using the Deep Strike ability.- Unit can be set up in Reserves instead of on the battlefield.
- Unit can be set up in your Reinforcements step, more than 9" horizontally away from all enemy models.
When a unit disembarks from a TRANSPORT model, set it up on the battlefield so that it is wholly within 3" of that TRANSPORT model and not within Engagement Range of any enemy models. If, for any reason, a disembarking model cannot be set up, that model’s unit cannot disembark.
Units that disembark from a TRANSPORT model that either Remained Stationary this phase or has not yet made a Normal, Advance or Fall Back move this phase can then act normally (make a Normal move, Advance, shoot, declare a charge, fight, etc.) in the remainder of the turn. Such a disembarking unit cannot choose to Remain Stationary.
Units that disembark from a TRANSPORT model that made a Normal move this phase count as having made a Normal move themselves; they cannot move further during this phase. Such a unit also cannot declare a charge in the same turn, but can otherwise act normally in the remainder of the turn.
Units cannot disembark from a TRANSPORT model that either Advanced or Fell Back this turn.
- Units that start your Movement phase embarked within a TRANSPORT can disembark this phase, provided their TRANSPORT has not Advanced or Fallen Back.
- If a unit disembarks before its TRANSPORT moves, it can act normally.
- If a unit disembarks after its TRANSPORT moves, it cannot move or charge this turn, but can otherwise act normally.
- Disembarking units must be set up wholly within 3" of their TRANSPORT and not within Engagement Range of any enemy models (or the unit cannot disembark).
- Units that disembark this turn cannot Remain Stationary.
From detonating ammo stores to corrosive innards or frenzied death throes, some targets are deadly even in defeat.
Some models have ‘Deadly Demise x’ listed in their abilities. When such a model is destroyed, roll one D6 before removing it from play (if such a model is a TRANSPORT, roll before any embarked models disembark). On a 6, each unit within 6" of that model suffers a number of mortal wounds denoted by ‘x’ (if this is a random number, roll separately for each unit within 6").- Deadly Demise x: When this model is destroyed, roll one D6. On a 6, each unit within 6" suffers ‘x’ mortal wounds.
High-explosives can fell several warriors in a single blast, but firing them where your comrades will get caught in the ensuing detonation is simply unwise.
Weapons with [BLAST] in their profile are known as Blast weapons, and they make a random number of attacks. Each time you determine how many attacks are made with a Blast weapon, add 1 to the result for every five models that were in the target unit when you selected it as the target (rounding down). Blast weapons can never be used to make attacks against a unit that is within Engagement Range of one or more units from the attacking model’s army (including its own unit).- Add 1 to the Attacks characteristic for every five models in the target unit (rounding down).
- Can never be used against a target that is within Engagement Range of any units from the attacking model’s army (including its own).
Mighty heroes fight at the forefront of battle.
Some CHARACTER units have ‘Leader’ listed on their datasheets. Such CHARACTER units are known as Leaders, and the units they can lead – known as their Bodyguard units – are listed on their datasheet.During the Declare Battle Formations step, for each Leader in your army, if your army also includes one or more of that Leader’s Bodyguard units, you can select one of those Bodyguard units. That Leader will then attach to that Bodyguard unit for the duration of the battle and is said to be leading that unit. Each Bodyguard unit can only have one Leader attached to it.
While a Bodyguard unit contains a Leader, it is known as an Attached unit and, with the exception of rules that are triggered when units are destroyed, it is treated as a single unit for all rules purposes. Each time an attack targets an Attached unit, until the attacking unit has resolved all of its attacks, you must use the Toughness characteristic of the Bodyguard models in that unit, even if a Leader in that unit has a different Toughness characteristic. Each time an attack sucessfully wounds an Attached unit, that attack cannot be allocated to a CHARACTER model in that unit, even if that CHARACTER model has lost one or more wounds or has already had attacks allocated to it this phase. As soon as the last Bodyguard model in an Attached unit has been destroyed, any attacks made against that unit that have yet to be allocated can then be allocated to CHARACTER models in that unit.
Each time the last model in a Bodyguard unit is destroyed, each CHARACTER unit that is part of that Attached unit is no longer part of an Attached unit. It becomes a separate unit, with its original Starting Strength. If this happens as the result of an attack, they become separate units after the attacking unit has resolved all of its attacks.
Each time the last model in a CHARACTER unit that is attached to a Bodyguard unit is destroyed and there is not another CHARACTER unit attached, that Attached unit’s Bodyguard unit is no longer part of an Attached unit. It becomes a separate unit, with its original Starting Strength. If this happens as the result of an attack, they become separate units after the attacking unit has resolved all of its attacks.
Each time a unit that is part of an Attached unit is destroyed, it does not have the keywords of any other units that make up that Attached unit (unless it has those keywords on its own datasheet) for the purposes of any rules that would be triggered when that unit is destroyed.
- Before the battle, CHARACTER units with the Leader ability can be attached to one of their Bodyguard units to form an Attached unit.
- Attached units can only contain one Leader.
- Attacks cannot be allocated to CHARACTER models in Attached units.
Assassins and other covert agents are difficult to track and pinpoint in the swirling maelstrom of battle.
Unless part of an Attached unit (see Leader), this unit can only be selected as the target of a ranged attack if the attacking model is within 12".Nothing tears at the noble heart so much as being anything less than dutiful. From such a nadir of self-doubt and with the disapproval of one’s peers, only the most heroic feats can lift a worthy soul back to the heights of nobility.
- That unit destroyed three or more enemy units during the battle.
- That unit destroyed the enemy WARLORD during the battle.
- That unit is within range of one or more objective markers you control that are wholly within your opponent’s deployment zone.
The IMPERIAL KNIGHTS and ARMIGER keywords are used in the following Imperial Knights datasheets:
- If a unit has a Starting Strength of 1, then it is said to be Below Half-strength while its remaining number of wounds is less than half of its Wounds characteristic.
- For any other unit, while the number of models in that unit is less than half of its Starting Strength, that unit is said to be Below Half-strength.