
Tyrannic War

Books
| Book | Kind | Edition | Version | Last update |
| | ||||
| | Expansion | 10 | June 2023 | |
Introduction
In this section you will find a number of new Battle Honours you can give to your warriors as they fight their way through the Tyrannic War, as well as a swathe of new missions and unique Crusade Blessings that can come into effect in your games.
These rules cover all of the skills and new capabilities your forces can learn from fighting in this specific theatre of war as they gain experience and achieve new ranks.
CRUSADE RELICS
Many powerful artefacts, found within this section, can be discovered hidden away amidst the worlds rent by this violent conflict.
MONSTERS AND THOSE WHO HUNT THEM
Terrifying monsters stride the battlefields of the Tyrannic War, causing mass destruction as the few brave enough to fight against them rise to the challenge. In this section you will find new ways to upgrade these units, with bespoke upgrade paths available to each.
PLAYING A CRUSADE MISSION
The rules presented in this section outline the sequence to follow when playing a Crusade mission and walk you through all of the steps to get you up and running.
This section provides a range of new Crusade Blessings that can be used by an Underdog to get a leg-up on their more experienced opponent, ensuring every Crusade game provides a fair battle.
When playing one of the Crusade missions presented in this book, you can choose from these Agendas, which provide unique ways for your units to gain experience on the battlefield.
TYRANNIC WAR CAMPAIGN
These rules allow you and your friends to play through a combined Crusade experience across a campaign, working together in your alliances to take the fight to the enemy.
CRUSADE MISSIONS
This section includes a variety of missions of all game sizes, allowing you to replay many of the dramatic battles from the accompanying narrative.
Battle Traits
Battle Traits are skills or upgrades that units have acquired during their years of warfare, and help to give them a vital edge on the battlefield. Each time a unit gains a Battle Trait, either roll one D6 and consult the table below to randomly determine which Battle Trait the unit has gained, or choose the Battle Trait that you think tells the best narrative. A unit can have more than one Battle Trait, but it cannot have the same Battle Trait more than once (if a duplicate result is rolled, roll again until a different result is rolled).
| ||||||||||||||||||


|
|
|
|
Crusade Relics
When fighting in the Tyrannic War, units from your Crusade army can gain the following Crusade Relics.Artificer Relics
This elaborate decoration is the highest honour afforded to Imperial defenders of the Bastior Sub-sector. It comes in the form of a physical medal or, on occasion, a finely woven sash. It also doubles as a gene-coded command priority strategic uplink and coordination micro-cogitator whose worth could be measured in worlds.
At the start of your Command phase, if the bearer is within range of an objective marker that you control, roll one D6: on a 4+, you gain 1 CP.This gem-sized fleshy sac is woven from a dense mass of bio-neural strands that quiver with empyric harmonies. Implanted in a warrior organism’s chest, it is powered by energetic action. The pent-up energy is released like an arcane dynamo, the host’s form appearing to fracture into abhorrent splinters, confusing and startling attackers who hack at fragmentary phantasms.
Each time the bearer’s unit ends a Charge move, select one enemy unit within Engagement Range of the bearer. Until the end of the turn, each time a model in that enemy unit makes an attack, subtract 1 from that attack’s Hit roll.It is as inappropriate and insulting to call such a sublime tool of destruction a mere weapon as it would be to compare a child’s crude scrawl to an artistic masterpiece. Fashioned by artisans of unparalleled skill and imbued with supernaturally lethal energies, everything from this device’s malevolent machine spirit to its magnificently wrought components is one of a kind.
Select one weapon that the bearer is equipped with (excluding a weapon that has been replaced by an Enhancements or upgraded via the Weapon Modifications Battle Trait). Make a note on the bearer’s Crusade card of this weapon and give it a suitable name. That weapon is now a Crusade Relic and each time the bearer makes an attack with it, on a Critical Hit, the target suffers 1 mortal wound in addition to any normal damage.Fashioned by an armourer of sublime skill, this armour is proof against the most deadly weapons and dread foes of the 41st Millennium.
Add 1 to armour saving throws made for the bearer.Antiquity Relics
Worn around the collar on gilded chains, worked into a metallic wreath, this icon is an explicit measure of the bearer’s authority among the Solblades. Archopathic filaments within the sigil encase a powerful communications device, enabling the bearer to transmit their demands for strategic and tactical assets and manoeuvres alongside meta-echoes of command to ensure their calculated orders are carried out swiftly.
Once per battle round, if the bearer is on the battlefield when you use a Strategic Ploy Stratagem, you can use that Stratagem without spending any CP.This heavily warded reliquary contains pulverised segments of cranial carapace harvested from Neurotyrants slain on the fortress world of Unspake. Suspended in a solution of martyr’s blood, these charnel Tyranid remains dismay the mind-spirits of heathen sorcerers and ward away xenos and heretic perversity alike, for surely they are proof of Humanity’s victory over even the foulest of the galaxy’s many monsters.
Cannot be taken by PSYKER models. Each time a Psychic Attack targets the bearer’s unit, subtract 1 from that attack’s Hit roll.Seen limp and still, this multi-layered hooded cloak is a drab ash-grey in colour. Yet in motion it catches the light in strange ways. Oil-like prismatic hues flicker from its folds as little-understood technology woven into the fabric shrouds the wearer in darkness.
Unless the bearer is part of an Attached unit at the start of the battle, it has the Lone Operative.This ancient archeobrazier was brought forth from the deepest vaults of the Holdfast itself in response to the looming xenos threat. It is a beacon of hatred, a blinding light of intolerance toward the alien that causes such inhuman beings to falter and recoil from its uncompromising glare.
At the start of your opponent’s Movement phase, for each enemy unit (excluding IMPERIUM and CHAOS units) within Engagement Range of the bearer, roll one D6: on a 4+, until the end of the phase, that unit cannot be selected to Fall Back.Once the pride of the mortuary world of Krematos, this eerie crystal is said to have been so steeped in the energies of departed souls that it has become a bridge between the realms of the living and the dead. Whatever the truth, in the hands of a potent psyker, their otherworldly powers blaze more furiously.
PSYKER model only. Each time the bearer makes a Psychic Attack, add 1 to that attack’s Wound roll.This small casket of iron hails from the vaults of Lembyq. It is rimed in frost that obscures the strange carvings upon it, incisions said to echo an ancient sigil of the Rejuvenat Adepts. A single drop of blood into a macabre mouth-like aperture establishes a gene-locked connection with the casket’s millions of microscopic automata. Should the bearer suffer catastrophic injury, they flood out from an irised opening in a silvery cloud, reknitting flesh and repairing bone before their limited power is expended.
INFANTRY model only. The first time the bearer is destroyed, you can choose to roll one D6 at the end of the phase instead of using any rules that are triggered when a model is destroyed. If you do, on a 4+, set the bearer back up on the battlefield as close as possible to where they were destroyed and more than 1" away from all enemy models, with D3 wounds remaining. If the bearer was part of an Attached unit when it was destroyed, and its Bodyguard unit is still on the battlefield when the bearer is set back up, it must be placed in Unit Coherency with that unit again to form an Attached unit. You do not need to take an Out of Action test for the bearer at the end of the battle unless it is destroyed again.Legendary Relics
GHEIST PRISM FIELD This ancient force field is believed to originate from xenos designs, and when activated it draws the wearer out of phase, allowing them to pass through them like a phantom. As they do, the ghostly reflections cast by the field reach out like scything claws, scoring fissures and cuts in the wearer’s wake as if the phantom-like figure had thrown out vicious prismatic shards. Each time the bearer makes a Normal, Advance or Fall Back move, until that move is finished, it can move horizontally through models and terrain features (it cannot finish a move on top of another model or its base). If doing so when making a Fall Back move, models in this unit do not need to take a Desperate Escape test. After it has finished moving, select one enemy unit it moved across (if any) and roll one D6: on a 2+, that unit suffers D3 mortal wounds. |
VERTEBRAX OF VODUN This twisted mass of chiasmic fibres and clusters of lobes, globular organelles and mucal sacs is said to have been torn from the Beast of Vodun. This creature was proudly named the last of a xenos race endemic to Vodun, but Solblade Genetors have noted worrying similarities to Tyrannic genera. The quivering brain matter creates a neural connection between the bearer and another, enabling a flood of thoughts and instinct to pass between them. Quite how this is achieved is unknown, for no emissions or warp anomalies have been detected around it. At the start of your Command phase, select one friendly model on the battlefield (excluding the bearer) and then select one Aura ability that selected model has. Until the start of your next Command phase, the bearer has that Aura ability. |
VORTEX GRENADE inside this heavy sphere is technology so arcane and dangerous that its deployment is rarely sanctioned. When detonated, it can crack the fabric of space and time to create a miniature warp rift that sucks anything nearby into the limitless empyrean. The vortex of warp energy is unpredictable and can swell or move, tearing, crushing and disintegrating anything in its path until it finally - hopefully - dissipates and vanishes. The bearer is equipped with a vortex grenade that has the following profile:
Abilities: The bearer can only shoot with this weapon once per battle. When an attack is made with this weapon, if a hit is scored, roll one D6 foreach unit within 6" of the target unit (excluding the target unit itself); on a 4+, the unit being rolled for suffers D3 mortal wounds. The target unit then suffers 3D3 mortal wounds. | ||||||||||||||||||||
NULL-FIELD DISRUPTOR Short-ranged waves of energistic quietus pulsate from this small artefact, hobbling whatever esoteric defences the wearer’s enemies possess. Under its enervating emissions, technological force fields splutter and die, arcane veils are blown aside and unnatural reflexes are deadened, leaving the foe vulnerable against any deadly strike. Each time the bearer makes a melee attack, invulnerable saving throws cannot be made against that attack. |
Monsters And Those Who Hunt Them
This Crusade mission pack offers several new ways for your units to gain skills on the battlefield as they stalk their chosen prey across the ruined wastelands and shattered hives of the enemy.
There are two upgrade paths presented, each dependent on the type of unit involved (see below). You can start a unit along one of these upgrade paths using the Tyrannic War Veteran Requisition (see below). Each of these paths has a number of new Battle Honours, called Tyrannic War Battle Honours. When a unit begins along one of these upgrade paths it will gain the starting Battle Honour specified in that upgrade path (remember to upgrade the unit’s Crusade points accordingly when it gains one of these Battle Honours). Further Tyrannic War Battle Honours can be gained by earning Tyrannic War Veteran points (see below).
It is a victory to survive upon battlefields that shake beneath the tread of monstrous terrors and swarm with skilled and merciless hunters. Those who do learn many bloody lessons.
- If you selected the Monster Hunters upgrade path, it gains the MONSTER HUNTERS keyword.
- If you selected the Striding Behemoths upgrade path, it gains the STRIDING BEHEMOTHS keyword.
Monster Hunters
Beset by the terrifying biomass and fiendish mutations of the enemy, INFANTRY and MOUNTED units can become experts in hunting behemoths and bringing them down with a range of new skills focused on tackling large targets.Striding Behemoths
MONSTERS and WALKERS can gain a large array of different abilities with these upgrades as they stride across the battlefield. Becoming able to smash through the thickest of opposition or weather the mightiest of blows, they will instil true terror in their foes.Unlocking Tyrannic War Battle Honours
Each time a TYRANNIC WAR VETERAN unit:- Destroys an enemy unit, add 1 to the attacker’s Tyrannic War Veteran tally.
- Destroys an enemy STRIDING BEHEMOTHS unit, add 3 to the attacker’s Tyrannic War Veteran tally. If that enemy unit is TITANIC, add 6 to that tally instead.
Monster Hunters Upgrade Path
When a unit starts on this upgrade path, the starting Tyrannic War Battle Honour it gains is Giantslayers.
| |||||||||||||||||||||||||||||||||||||||||||||||||||||||||||||||||||||||||||
Striding Behemoths Upgrade Path
When a unit starts on this upgrade path, the starting Tyrannic War Battle Honour it gains is Thunderous Blows.
| ||||||||||||||||||||||||||||||||||||||||||||||||||||||||||||||||||||||||||||||||||||||||||||||||||||||||||||||||||||||
Playing A Crusade Mission
A Tyrannic War Crusade battle is waged by following the sequence below.
Select Battle Size
Players must first select the battle size they wish to play: Incursion, Strike Force or Onslaught. The table below gives a rough guide of how long each battle should take.
| |||||||||||||||
Muster Crusade Armies
Each player must then muster a Crusade army and provide a copy of their Army Roster for their opponent to read through.Determine Mission
Next players determine which mission will be used for the battle; they can choose from the missions presented in the tables (see below) for their chosen battle size. This will determine the deployment map that is used, as well as the specific mission briefing. Players can either simply agree which they will use with their opponent, or they can roll a dice to randomly select a mission.When rolling to determine an Incursion or Strike Force mission, first roll one D6 to determine which table to use: on a 1-3, use the Incursion/Strike Force A table; on a 4-6, use the Incursion/Strike Force B table. Then roll one D6 to determine which mission to play. For Onslaught missions, roll one D6 to determine which mission to play on the Onslaught table.
| ||||||||||||||||
| ||||||||||||||||
|
Determine Attacker And Defender
Players roll off and the winner decides who will be the Attacker and who will be the Defender.Read Mission
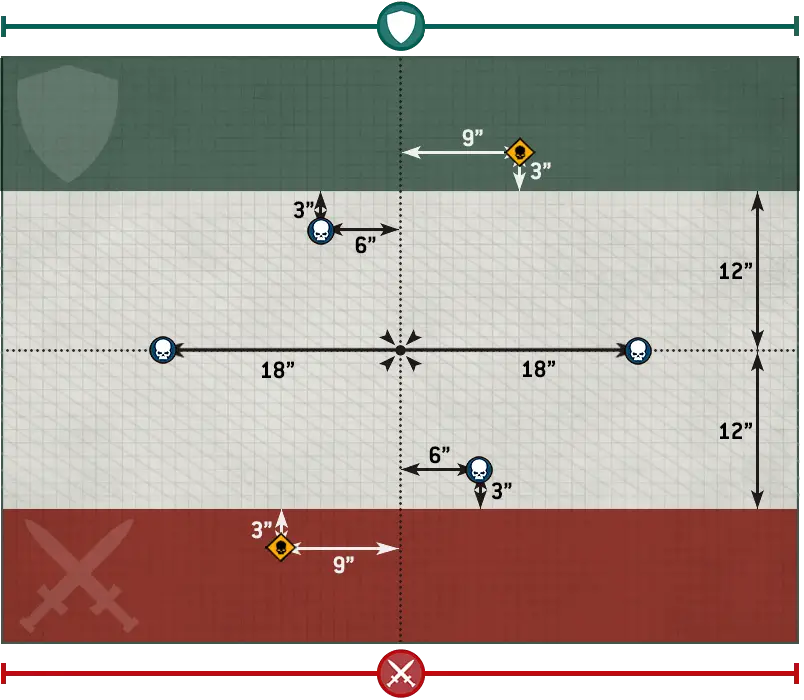
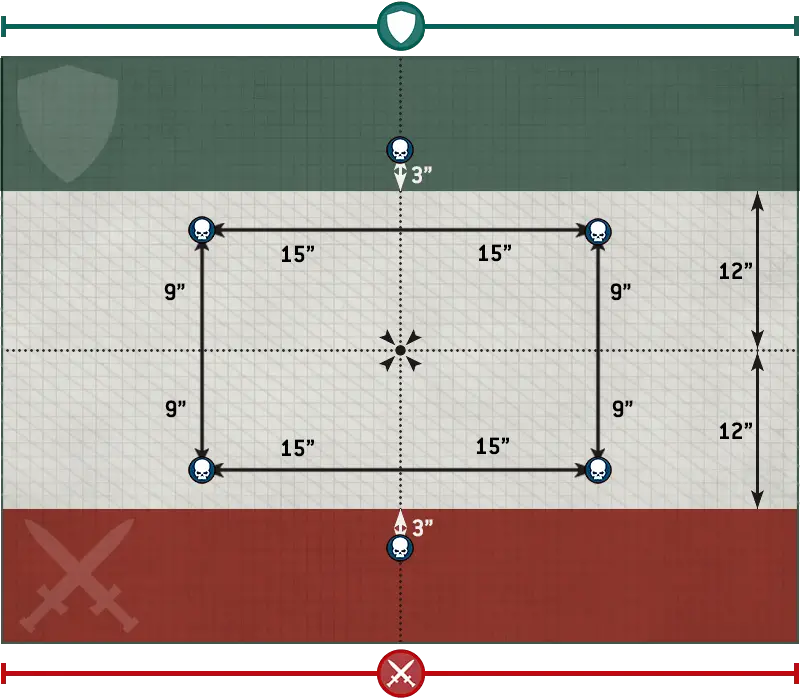
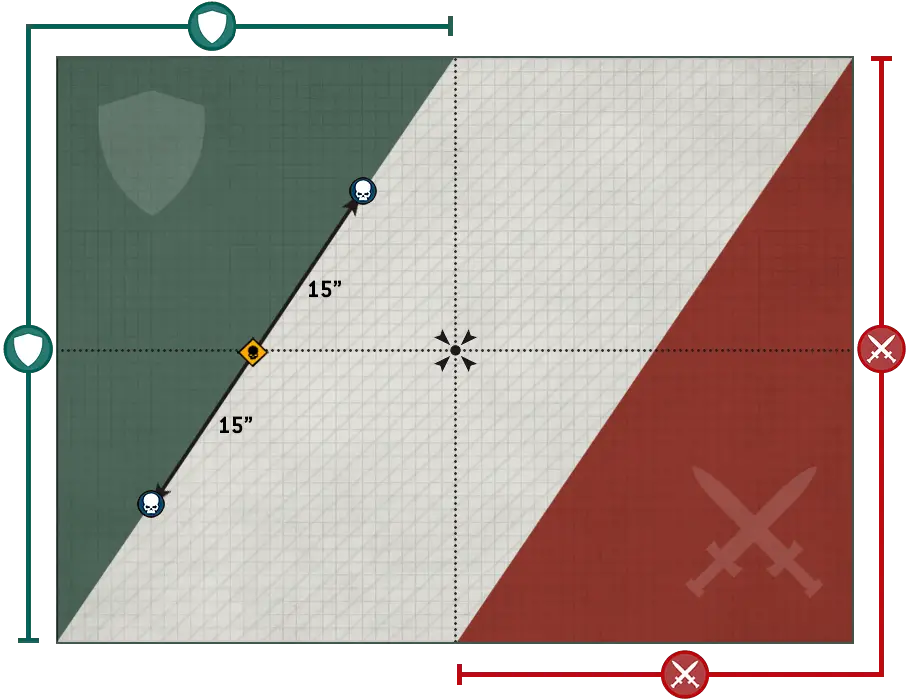
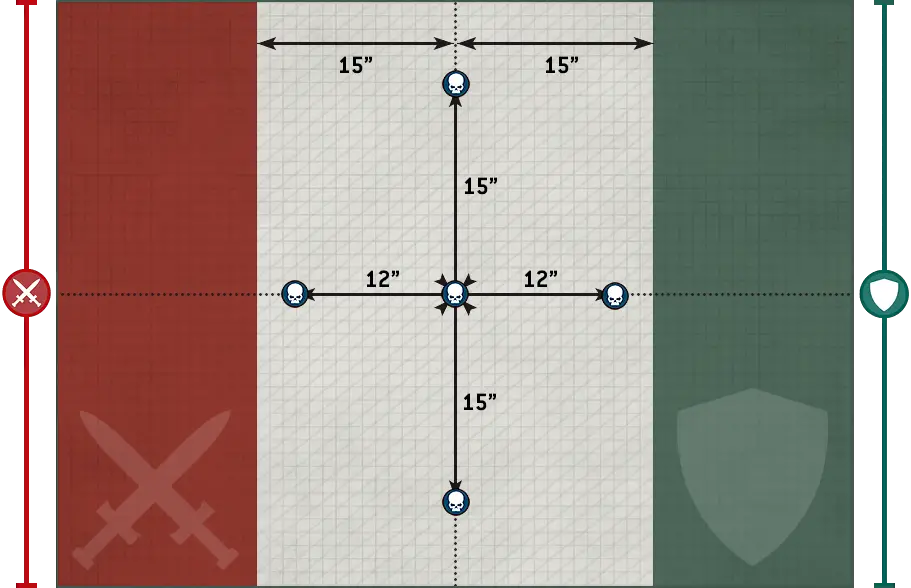
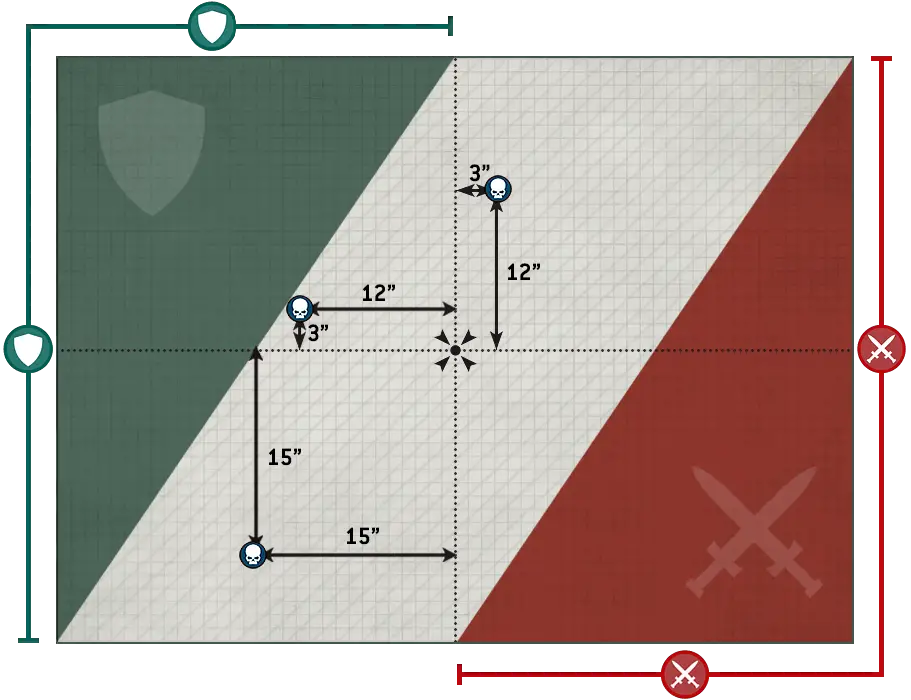
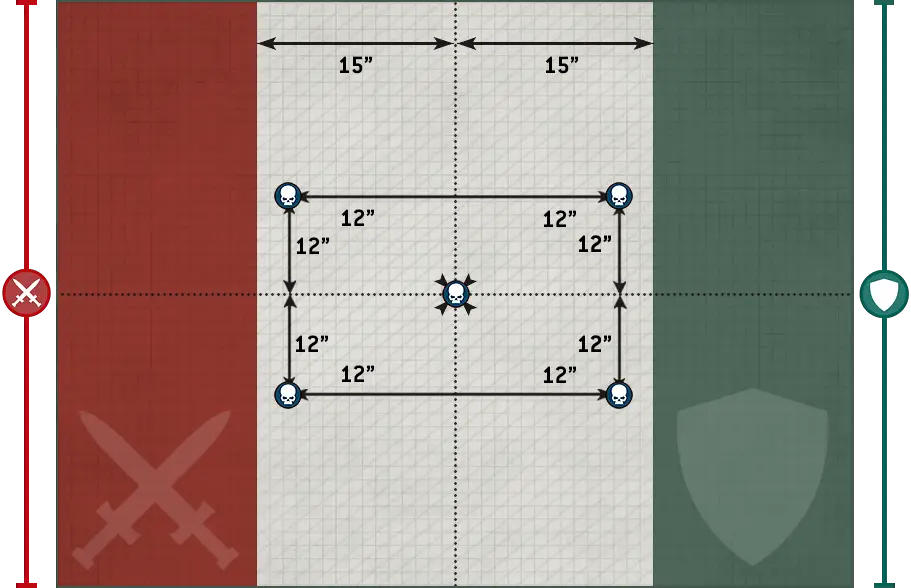
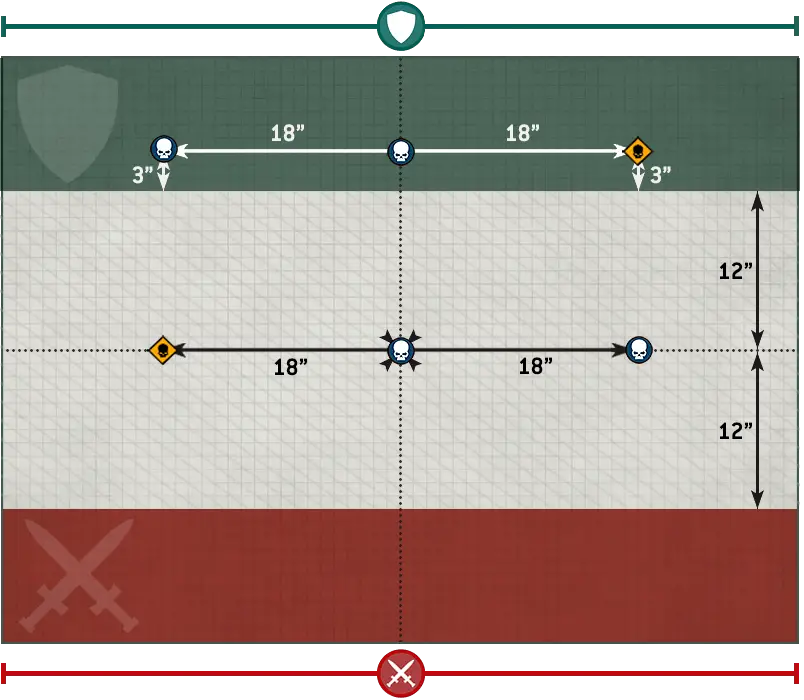
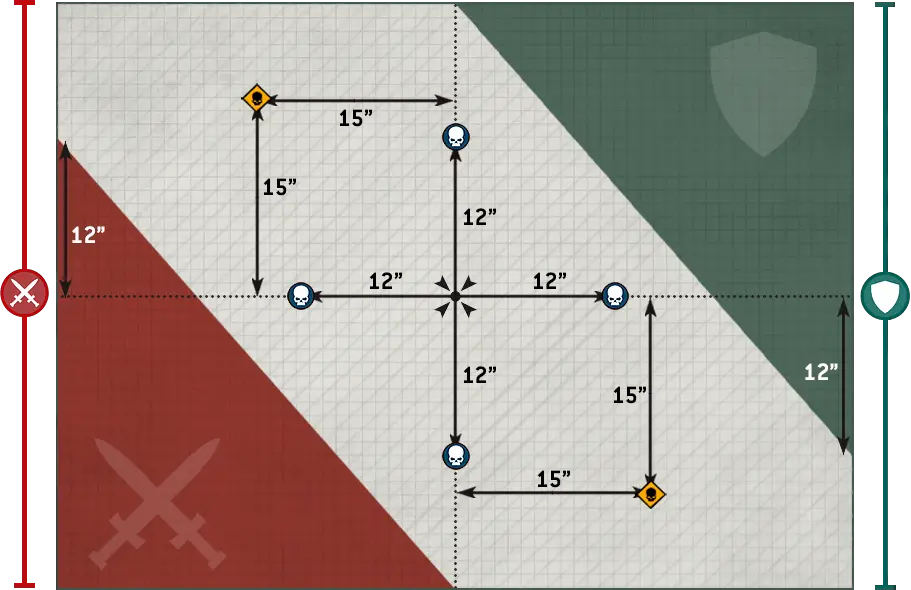
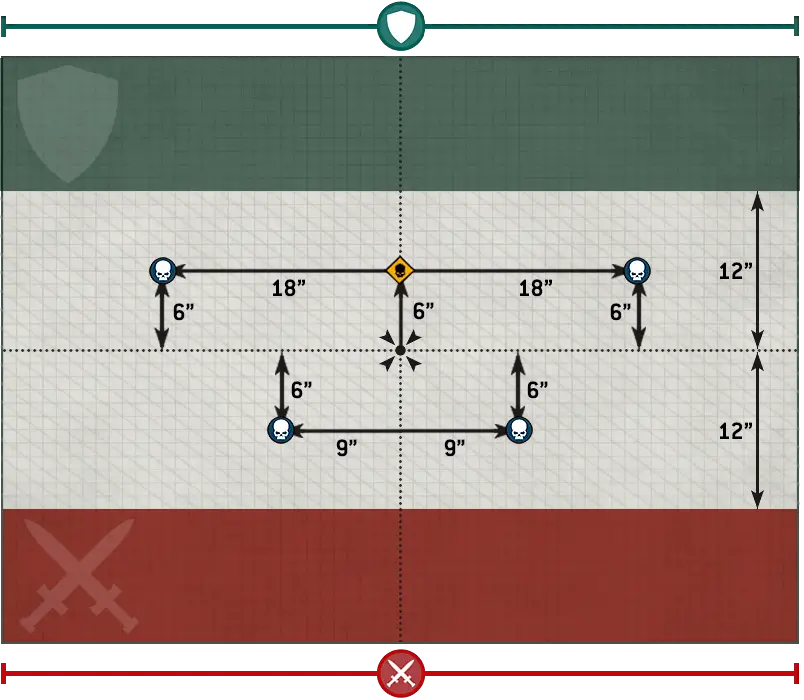
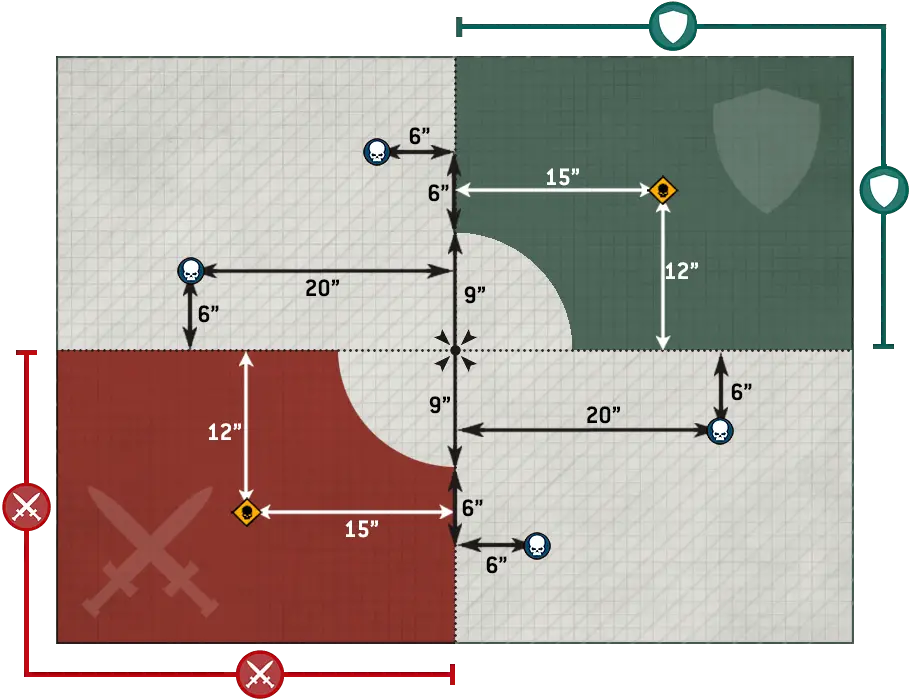
Each mission has a mission briefing that will detail the aims of the battle. Each mission will also list one or more additional mission rules that will apply for the duration of the battle and a series of objectives, which may be different for the Attacker and the Defender. Players should read and familiarise themselves with these before proceeding.Place Objective Markers
Players now set objective markers up on the battlefield. Each mission’s deployment map will show the players how many to set up and where each should be placed.Create The Battlefield
Next players create the battlefield and set up terrain features. The size of the battlefield depends on the battle size selected, as shown in the table below (the table shows the minimum size of battlefields).
| ||||||||
Unless otherwise stated, when setting up terrain features, use the guidelines detailed in the Core Rules. Players must use the rules presented in the Core Rules for terrain features.
Terrain features should not be set up with any impassable sections (such as the walls of a ruin) within 1" of any objective markers.
Purchase Requisitions
If you have access to any Requisitions that are used before a battle, you can spend RP to use them now. lf any of these upgrade one or more of your units for the coming battle, make a note of that upgrade on your Army Roster.Select Agendas
Each player then secretly selects two Agendas for the battle and writes them down. Each can award Experience points to certain units in that player’s Crusade army, as described on the Agenda itself. Once both players have selected their Agendas, they reveal their selections to their opponent.Select Crusade Blessings
When two Crusade armies battle each other, it is likely that one or the other will be more experienced. To determine this, both players should compare the combined Crusade points total of all the units that are on their Army Rosters.If there is a difference of at least 5 between the players’ Crusade points totals, the player whose Army Roster has the lower total number of Crusade points is the Underdog and gains a number of Crusade Blessings to use in that battle, depending on the difference. This represents high command funnelling additional resources to the Underdog to help them combat a more experienced foe.
The Crusade Blessings available depend on the war zone the battle is being fought in - if the battle is being fought in the Tyrannic War (or if you are playing in a war zone that does not list Crusade Blessings) use them.
Mission Objectives
During the battle, players can gain Victory points (VP) by achieving mission objectives. Mission objectives can either be ‘Progressive’ or ‘End Game’. Progressive mission objectives are scored during the battle (exactly when is detailed on the mission objective itself), and can be achieved, and hence award Victory points, several times. End Game mission objectives are scored at the end of the battle.Some Progressive objectives will award Victory points ‘each time’ an enemy model or unit is destroyed. A model or unit can, if it is resurrected for any reason (i.e. it was destroyed and subsequently returned to the battlefield}, potentially contribute several Victory points due to these types of mission objectives (assuming it is resurrected and subsequently destroyed several times over}.
Declare Battle Formations
In the order stated below, both players now secretly note down:- Which of their Leader units will start the battle attached (they must specify which Leader unit is attached to which Bodyguard unit).
- Which of their units will start the battle embarked within TRANSPORT models (they must specify which units are embarked on which models)
- Which of their units will start in Reserves (including Strategic Reserves).
In Tyrannic War Crusade missions, Reserves units cannot arrive during the first battle round, and any Strategic Reserves or Reserves unit that has not arrived on the battlefield by the end of the third battle round counts as having been destroyed, as do any units embarked within them (this does not apply to units that are placed into Strategic Reserves after the first battle round has started).
Deploy Crusade Armies
Players now alternate setting up their remaining units one at a time, starting with the Defender. A player’s units must be set up wholly within their deployment zone - the Attacker’s and the Defender’s deployment zones are shown on the deployment map of each mission. If one player finishes deploying all their units, their opponent then deploys the remainder of their units.Determine First Turn
Unless the mission briefing says otherwise, players roll off and the winner takes the first turn.Resolve Pre-Battle Rules
Players alternate resolving any pre-battle rules units from their army may have, starting with the player who will take the first turn.Begin The Battle
The first battle round begins. Players continue to resolve battle rounds until the battle ends.End The Battle
The battle ends after five battle rounds have been completed. If one player has no models remaining in their Crusade army at the start of their turn, the other player may continue to play out their turns until the battle ends.Determine Victor
At the end of the battle, the player with the most Victory points is the winner. If players are tied, the battle is a draw.If every model in a player’s Crusade army is painted to a Battle Ready standard, that player is awarded a bonus 10 Victory points. This gives the players a maximum total score out of 100 Victory points.
The victor of a mission can then claim the Victor bonus listed on that mission. If the game is a draw, neither player can claim the bonus.
Update Crusade Cards
The players must now update their Crusade cards for all the units they used in the battle by taking Out of Action tests for any that were destroyed, and selecting a unit to be Marked for Greatness. If this results in any units gaining a rank, before the next battle they can gain Battle Honours.Update Order Of Battle
Increase your Battle tally and Requisition points by 1, and make any notes that you wish to record following your battle. If you wish to add any units to your Order of Battle or spend any Requisition points, do so and update your Order of Battle accordingly before your next battle.Crusade Blessings
An Underdog in a Tyrannic War battle can select one or more Crusade Blessings from those presented here. The number they can select depends on the difference in Crusade points between the armies, as shown in the table below. The same Crusade Blessing cannot be selected more than once.
| ||||||||||||
Be it entrenched Imperial defence networks or extrusions of chitinous barricades, the warring forces throughout the Bastior Sub-sector have access to many fixed fortifications.
A larger army’s monolithic manoeuvres, chattering streams of vox traffic or the disturbance made to the warp by its deployment gifts a more compact force enough advance warning to lay their plans against them.
Last-minute information of a highly sensitive nature has been received, offering greater opportunities for the commander with the strength of will to seize them.
Warriors who face elite foes and survive will emerge from battle with a wealth of hard-won experience.
Luring the enemy into an ambush long planned, or spurred by a sudden surge of predatory vigour, rampaging assaults are lent greater impetus.
Many who survived the first bloody battles in the Bastior Sub-sector swiftly learned to stay mobile, stealing a march on enemies in the race for vital ground, drawing the foe into range of vanguard elements or closing in their prey with insatiable hunger.
Those who defend the Bastior Sub-sector and its many worlds know they are fighting for a pivotal warp route that must be held at all costs. Such knowledge breeds fanatical devotion and selfless courage. The creatures that prey upon them, meanwhile, know no will but that which drives them on to ever greater slaughter with no thought for their own survival.
The ravenous broods of Hive Fleet Leviathan exist only to feed the Hive Mind’s need for biomass. Yet this is a hunger that cannot be sated, a cycle of feasting as eternal and indifferent as the void itself.
Mankind, and many other races in the Tyranids’ relentless path, draw in increasing desperation on esoteric technologies to drive the xenos back. From the mutagenic acids of hellfire shells to arcing bolts of star matter and devices that weaponise fundamental energies, all are brought forth to slay Leviathan’s monstrosities.
Agendas
Agendas offer unique and exciting ways for your units to gain additional Experience points in a Crusade battle. From assassinating key enemy leaders to going on guerrilla recon missions, there are a whole range of different Agendas you can choose from to best suit your Crusade force’s narrative. When playing a Tyrannic War Crusade mission you can select from the following Agendas.Some Agendas will award experience points or tally marks ‘each time’ an enemy model or unit is destroyed. A model or unit can, if it is resurrected for any reason (i.e. it was destroyed and subsequently returned to the battlefield), potentially contribute several Experience points or tally marks to these types of Agendas (assuming it is resurrected and subsequently destroyed several times over).
For those who make war against the Tyranid swarms, the mere act of surviving their onslaught is an instinctive victory in its own right.
- If that unit has not been destroyed, it gains 2XP.
- If that unit is not Below Half-strength, it gains 1 additional Experience point.
The Tyranid swarms are concerned only with the absolute infestation and consumption of each new prey-world they assail, funnelling all their reserves of biomass in creating organisms that can swiftly achieve these aims.
Whether destroying nodal organisms or steely-eyed officers, eliminating the enemy’s command structure is a sure way to advance your cause.
The bigger and more terrifying the foe, the greater the rewards and renown to those who lay it low.
When faced with overwhelming numbers, a sound strategy is to thin the enemy ranks as swiftly as possible. Those who excel in this task soon become deadly reapers of foes.
Be it desperately needed supply crates, strategically vital communication uplinks, or pulsating organic hive-structures of monstrous function, capturing from the foe that which they consider vital may prove the key to victory.
Few missions are as dangerous as being charged with breaking through the enemy's lines in the face of ferocious opposition. Yet for those who survive and prevail, there are bloody lessons to be learned.
Whether scouring away creeping bio-infestations or rapidly scouring regions of viable biomass, it is vital that your forces sweep and cleanse this region swiftly before pressing on.
At the start of your Shooting phase, you can select one unit from your Crusade army that is not Battle-shocked and is eligible to shoot. That unit is tasked to cleanse an objective marker and until the end of your turn is not eligible to shoot or declare a charge.
At the end of that turn, if that unit is in range of an infested objective marker that you control, that objective marker is cleansed and that unit gains 2XP.
Those forces able to slip behind their enemies' lines can swiftly gather valuable intelligence, whether it be the oncoming patterns of attack swarms or the hastily digested contents of some unfortunate strategist's brain pan.
At the end of your opponent’s next turn, or at the end of the battle (whichever comes first) if that unit is wholly within your opponent’s deployment zone, that unit gains 2XP and you gain 1CP.
Snatching up vital data-repositories or seizing the foe's strategic coordinators from amidst the madness of the battlefield can yield valuable results.
At the end of your turn, if that unit is within range of an objective marker that you control that is not in your deployment zone, roll one D6: on a 4-5, that unit gains 1XP; on a 6, that unit gains 2XP and you gain 1CP.
War between the Tyranids and their prey takes place t1pon mental battlefields awash with smothering psychostatic as well as across the realm of the physical. Eliminating those foes able to fight on both planes at once is an especially valuable achievement.
Tyrannic War Campaign
Crusade offers a fantastic narrative experience to the Warhammer 40,000 player, letting you take your collection on its own unique journey. But you might also want to share that journey with other players, weaving combined tales of heroism and victory as you fight both with and against each other in a multi-game campaign. The rules on the following pages provide a framework that you can use to take your Crusade forces on just such a path, scaling the experience to whatever duration you and your friends desire.
Introduction
A Tyrannic War campaign allows a group of players to get together, form alliances and play a series of games. It is split into three campaign phases, each of which consists of numerous battles between the factions. At the end of each campaign phase, the alliance with the most Campaign points in that phase will achieve victory, earning them Strategic points that count towards the campaign’s final winners. As the campaign phases progress, each is worth more and more Strategic points, ensuring that the ultimate victors are not decided right up until the end of the campaign.Campaign Badges
At the end of any Tyrannic War campaign battle, every unit that was part of your Crusade army for that battle that does not already have it gains the Tyrannic War campaign badge.As the unit fights in other campaigns, it can gain additional campaign badges. As well as being a visual record of a unit’s fighting history, various Battle Honours are only available to units with particular campaign badges. Note that a unit keeps its campaign badges - and therefore - any associated Battle Honours, for future battles, even if those battles take part in a different campaign.
Campaign Master
A Tyrannic War campaign is best run with a Campaign Master. They will take on the mobilisation and organisation of the campaign so that the other players can focus on playing games. A Campaign Master can indeed play in the campaign, but their primary role is to facilitate a smooth and enjoyable experience for all players involved.Forming Alliances
Once a Campaign Master has stepped forward, their first task is to gather the players and sort them into alliances. The system can support anything from just two players, up to dozens of players. The campaign works particularly well with a small group of like- minded and enthusiastic players who can meet on a regular basis.Alliances should be organised as evenly as possible and, when feasible, based on the Factions being played. Once players are assigned to an alliance, their Crusade forte is committed to that cause. For this reason, players should play the same Faction throughout the campaign. If they wish to change their Faction, they can do so at the Campaign Master’s discretion. The alliances are as follows.
The Defenders
The worlds of the Bastior Sub-sector fall under Imperial jurisdiction. Any army loyal to the lmperium of Man is best suited to this alliance.The Invaders
The Tyranid Hive Mind is devouring everything in its way. Tyranid armies and any opportunistic warbands of Chaos or xenos forces seeking to take advantage of the situation are best suited to this alliance.The Raiders
Whether it is the Asuryani striking at both sides in order to stem the flood of biomass being absorbed by the Tyranid menace, or the Necrons seeing it as an opportunity to reassert dominion over their lost territory, this alliance suits any of the factions that do not fit into either of the above alternatives.Allies Of Convenience
Note that the opposite are guidelines on how to organise players into an alliance, rather than a requirement. If it suits the group better to organise the alliances differently, the Campaign Master should feel free to do so.For example, if many of the players in the group have Crusade forces associated with a single alliance, to make the alliances more evenly numbered some of them may have to fight for a different alliance than what we have recommended. You could always create some interesting narrative to explain why one side fights for another.
Campaign Length
A Tyrannic War campaign is split into three phases, each of which involves battling in a different stage of the war. Before the campaign begins, the Campaign Master should determine the length of time allocated to each campaign phase and the total number of games that can be played in that phase. Once either of those conditions have been met, that campaign phase ends and the victorious alliance in that phase is determined. Once the third campaign phase ends, the campaign ends and the overall winning alliance is determined.A campaign can be a long and expansive experience where each campaign phase takes place over a month, with many battles fought and mighty heroes lost to the fires of war. Equally, it can be a short and focused campaign played over a weekend, with each campaign phase consisting of just one battle representing the key moments of the conflict.
As a guide, if each member of your campaign group will play one game a week, we recommended each phase of the campaign lasts as follows:
- Length of Time: 2 weeks
- Total Number of Games: Equal to the number of players
Campaign Phases
Over a campaign phase, players from opposing alliances will battle each other to gain Campaign points for their alliance. The Campaign Master has a few options concerning how players are matched up for games. They can leave players to arrange games themselves, with challenges thrown down and honour at stake. Alternatively, it may be appropriate to introduce more structure to the match ups. For example, a game schedule will ensure that everyone gets an equal amount of games, or, in campaigns with a large number of players, each alliance can be broken down into smaller subgroups that are then matched against each other to make arranging games even simpler.CAMPAIGN POINTS
Each time you play a game, your alliance gains a number of Campaign points based on the size of the game and what the outcome was, as shown in the table below.
Once the campaign phase comes to an end, the victor of that phase is the alliance with the most Campaign points. If any alliances are tied for the most Campaign points, the alliance that won the most battles in that campaign phase is the victor of that phase. If there is still a tie, there is no victor of that phase. The victorious alliance of a campaign phase will gain a number of Strategic points (see below).
When the next campaign phase begins, each alliance’s Campaign points are reset to 0, putting alliances on an equal footing for the next phase of the campaign.
| ||||||||||||||||||||
STRATEGIC POINTS
At the end of each campaign phase, the victorious alliance gains the number of Strategic points shown in the table below, based on which phase of the campaign they won.
At the end of the campaign, the alliance with the most Strategic points wins the campaign and its players are declared the victors!
| ||||||||||
Rotting Biomass 1
1
1Biohazard: At the start of the turn, for each unit within 3" of one or more objective markers, roll one D6: if the result is higher than that unit’s Toughness characteristic, until the end of the turn, each time a model in that unit makes an attack, the controlling player cannot re-roll the Hit roll and cannot re-roll the Wound roll.
VICTOR BONUS
The victor increases their Crusade force’s Supply Limit by 200 points.
The largest carcasses or most promising piles of biomass are categorised as vital targets that must be held at all costs for their potential to turn the course of the war.
- They control one or more objective markers.
- They control two or more objective markers.
- They control more objective markers than their opponent.
The enemy's cohesion can be fractured with the stroke of a single blade across the right throat; eliminate the foe's commander or leader-beast.
Only used in Strike Force games.
Secure The Tunnels 2
2Locate Entrance: From the second battle round onwards, at the start of the battle round, each player rolls one D6 for each objective marker they control that has not had an entrance located at it: on a 5+, an entrance is located at that objective marker.
VICTOR BONUS
The victor can select one additional unit from their Crusade army to be Marked for Greatness, but at the end of the battle that unit must have been within range of an objective marker that had an entrance located at it.
Whether in the name of sealing up dangerous xenos slitherways, or to prevent prey organisms from compromising the network of strategically vital assault burrows, the entrances to the tunnels below must be taken and held.
- They control one or more objective markers.
- They control more objective markers than their opponent.
- They control one or more objective markers that have had an entrance located at them.
- They control more objective markers that have had entrances located at them than their opponent.
Screaming Into The Void 3
3Driving Attack: The Attacker has the first turn.
Send the Signal: At the start of each of the Attacker’s Shooting phases, the Attacker can select one unit from their army that is not Battle-shocked and is eligible to shoot. That unit is tasked to send the signal and until the end of the Attacker’s turn is not eligible to shoot or declare a charge.
At the end of the Defender’s next turn, if that unit is within range of an objective marker the Attacker controls, the signal has been sent.
VICTOR BONUS


With larger swarms of Tyranids poised to descend and consume this world, it is imperative that a signal is punched through the falling Shadow before it is too late.
|


Only used in Strike Force games.
Bio-Sample Acquisition 4
4Extract Sample: At the start of the battle, each objective marker on the battlefield contains one bio-sample, which remains until extracted.
At the start of each player’s Shooting phase, the player whose turn it is can select one CHARACTER unit from their army that is not Battle-shocked and is eligible to shoot. That unit is tasked with extracting a bio-sample from an objective marker, and until the end of that player’s turn is not eligible to shoot or declare a charge.
At the end of that player’s turn, if that unit is within range of an objective marker they control that contains a bio-sample, it extracts that bio-sample.
VICTOR BONUS
The victor can select up to three different units from their Crusade army that extracted one or more bio-samples from an objective marker during the battle. Each of these units gains 2XP.
Having located sources of promising bio-samples, these must be aggressively laid claim to and attempts to pillage or taint them denied with lethal force.
- They control one or more objective markers.
- They control more objective markers than their opponent.
Sealed in bio-stasis canisters, spirited away through pan-dimensional portals or digested in pulsating sacs, such bio-samples could prove the enemy's undoing.
Spawning Ground 5
5Driving Attack: The Attacker has the first turn.
Gestation Sacs: At the start of the battle, each objective marker has a Gestation tally of 0 and each starts under the Defender’s control, and remains so until controlled by the Attacker.
At the start of each player’s turn, for each objective marker under the Defender’s control, add 1 to that objective marker’s Gestation tally, and for each objective marker under the Attacker’s control, subtract 1 from that objective marker’s Gestation tally (to a minimum of 0).
Birthing a Terror: If at any point there are two or more objective markers with a Gestation tally of 6 or more each, the battle ends.
MISSION OBJECTIVES
The hulking monstrosity or multitudinous brood ready to burst out of these flesh sacs could mean this region's total consumption.
- If any objective markers had a Gestation tally of 6 or more, the Defender scores 90VP and the Attacker scores 0VP.
- If no objective markers had a Gestation tally of 6 or more, the Defender scores 0VP and the Attacker scores 90VP.
Kicking The Nest 6
6Neuro-synaptic Nodes: While a unit with an Aura ability is within range of an objective marker that you control, the range of that Aura ability is increased by 6".
Sweep and Clear: If you control an objective marker at the end of your Command phase, it remains under your control, even if you have no models within range of it, unless your opponent controls it at the end of any subsequent Command phase.
VICTOR BONUS
The victor’s Crusade Force gains 1 additional Requisition point.
The crackling neuro-synaptic network infesting this war zone is seen by some as worthy of study and by others as deserving of swift destruction. Field commanders are directed to oversee the securing of these sites in person, ensuring the enemy are driven from the network while the work is completed.
- They control one or more objective markers.
- They control more objective markers than their opponent.
- Their WARLORD is within range of an objective marker that they control.
- They control the objective marker in the centre of the battlefield.
Empty The Vaults 1
1Auto-seal Protocols: At the start of each battle round, from the second battle round onwards, the Defender randomly selects one objective marker on the battlefield and removes it.
VICTOR BONUS
The victor can select one CHARACTER unit (excluding EPIC HEROES) from their Crusade army; that unit gains a Crusade Relic.
For some, the ancient contents of this site are worth any number of lives. To others, they represent black market riches, trophies to be crowed over or just another lure that draws prey into the jaws of a trap. Whatever the case, they must be secured or overrun with haste.
- They control one or more objective markers.
- They control two or more objective markers.
Against The Swarm 2
2Sudden Assault: When the Attacker places units into Strategic Reserves, the points total of all of their units that they can place into Strategic Reserves can be up to half their Crusade army’s points total.
Driving Attack: The Attacker has the first turn.
Esoteric Defences: When Reinforcement units from the Attacker’s Crusade army arrive on the battlefield, they cannot be set up within 12" of any objective markers.
Destroy the Hard Points: At the start of each of the Attacker’s Shooting phases, the Attacker can select one unit from their army that is not Battle-shocked and is eligible to shoot. That unit is tasked to destroy a hard point, and until the end of the Attacker’s turn is not eligible to shoot or declare a charge.
At the end of the Attacker’s turn, if that unit is within range of an objective marker they control, that objective marker is destroyed and removed from the battlefield.
The victor increases their Crusade force’s Supply Limit by 200 points.
MISSION OBJECTIVE
Holding back massed aerial assault is the only thing keeping this war zone from being overwhelmed.
Destroy the defence points and secure a beachhead!
Only used in Strike Force games.
Scattered Supplies 3
3Secure Supply Drops: At the end of each turn, units from both players’ Crusade armies can pick up any objective markers that they control. To be able to pick up an objective marker, a unit must be within range of it. AIRCRAFT, FORTIFICATIONS and Battle-shocked units cannot pick up an objective marker. When a unit picks up an objective marker, remove that objective marker from the battlefield and make a note of which unit is carrying it. A unit cannot carry more than one objective marker. While a unit is carrying an objective marker, it cannot move more than 6" per turn (excluding when making a Charge move).
Opportunistic Acquisition: Each time a unit carrying an objective marker is destroyed, before removing the last model from that unit, place the objective marker it is carrying on the battlefield anywhere within 1" of that model. If this is not possible, place the objective marker as close as possible to that model. If the unit was destroyed as the result of a melee attack, the attacking unit can immediately pick up that objective marker and carry it if it wishes.
Each unit from the victor’s Crusade army that is carrying an objective marker at the end of the battle gains 2XP. If one or more of those units carrying objective markers are wholly within the victor’s deployment zone, the victor also gains 1RP.
MISSION OBJECTIVE
The scattered resources and munitions must not only be secured, but marshalled from the enemy’s reach and towards safer retrieval locations.
Only used in Strike Force games.
Insurgency 4
4Counter-assault Engagement: The Defender has the first turn.
Prime Explosives: At the start of the battle, all objective markers on the battlefield have unprimed explosives on them, and they remain so until primed.
At the start of each player’s Shooting phase, the player whose turn it is can select one unit from their army that is not Battle-shocked and is eligible to shoot. If that unit is one of the Attacker’s units, it is tasked with priming explosives; if that unit is one of the Defender’s units, it is tasked with defusing explosives. In either case, until the end of the turn, the selected unit is not eligible to shoot or declare a charge.
At the end of the turn:
- If a unit tasked with priming explosives that turn is within range of an unprimed objective marker that the Attacker controls, that objective marker becomes primed.
- If a unit tasked with defusing explosives that turn is within range of a primed objective marker that the Defender controls, that objective marker becomes unprimed.
The victor can select one unit from their army that either primed or defused explosives during the battle. That unit is Marked for Greatness
MISSION OBJECTIVE
The fuse of sedition, once lit, is not easy to snuff out.
- The Attacker scores 20VP for each primed objective marker on the battlefield.
- The Defender scores 15VP for each unprimed objective marker on the battlefield.
Only used in Strike Force games.
The Gathering Shroud 5
5Rising Shadow: At the start of the battle, the Rising Shadow level starts at 0. From the second battle round onwards, at the start of each battle round, the player who took the first turn rolls one D6: on a 2-5, add 1 to the Rising Shadow level; on a 6, add 2 to the Rising Shadow level. The effects of the Rising Shadow level can be seen in the table on the left.
|
Before the next battle, the victor can use the Rearm and Resupply Requisition up to two times without spending any Requisition points to do so.
MISSION OBJECTIVE
Many who are trapped on worlds subjected to Tyranid invasion lose their nerve or minds, and fight wildly to seize whatever valuable resources they believe may help them survive for even a few more hours. Such supply caches must therefore be swiftly secured, or else infested and devoured.
- They control one or more objective markers.
- They control two or more objective markers.
- They control more objective markers than their opponent.
- If playing a Strike Force battle, they control the objective marker within their opponent’s deployment zone.
Only used in Strike Force games.
Routed Prey 6
6The Coming Swarm: Any units in the Attacker’s army that are not already set up in Reserves, start the battle set up in Strategic Reserves. When a Strategic Reserves unit from the Attacker’s Crusade army is set up on the battlefield, it must be set up wholly within 6" of their battlefield edge.
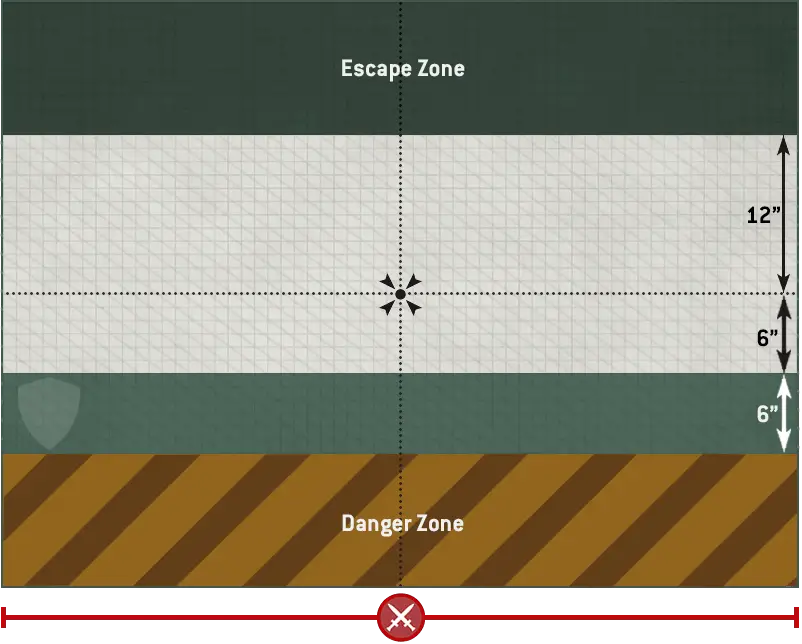
Out of Time: The Defender cannot set up any units from their Crusade army in Reserves (including Strategic Reserves). Units from the Defender’s Crusade army cannot end a move within the Danger Zone.
Counter-assault Engagement: The Defender has the first turn.
Covering Fire: Units in the Defender’s Crusade army are eligible to shoot in a turn in which they Fell Back, but if they do, until the end of the turn, each time a model in that unit makes a ranged attack, subtract 1 from that attack’s Hit roll.
VICTOR BONUS
The victor can select one unit from their Crusade army that was not destroyed to gain a Battle Trait. This must be a unit that can gain a Battle Trait.
A final evacuation is the only option left, but is there enough time even for that?
| ||||||||||||||||||||||||||||||||||||||
Fire From The Skies 1-2
1-2Driving Attack: The Attacker has the first turn.
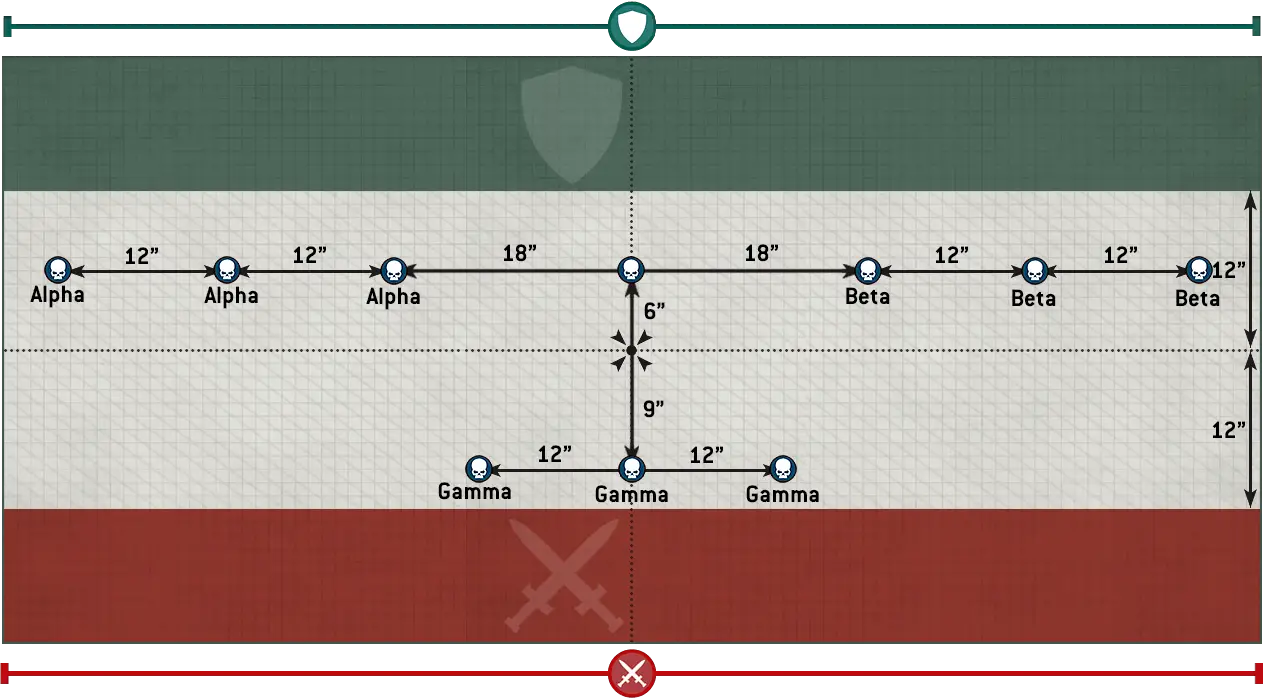
Targeting Ritual: At the end of each of the Attacker’s turns, they select one Alpha objective marker, one Beta objective marker and one Gamma objective marker. If, at the end of the Defender’s next turn, the Attacker controls all three of these selected objective markers, the target’s position is triangulated and the battle ends.
With the target triangulated and its defences mapped or neutralised, directed orbital bombardment is unleashed. The clouds glow with fury and boil away as titanic energy blasts spear down through them to annihilate the target completely.
- If the target’s position was triangulated, the Attacker scores 90VP and the Defender scores 0VP.
- If the target’s position was not triangulated, the Attacker scores 0VP and the Defender scores 90VP.
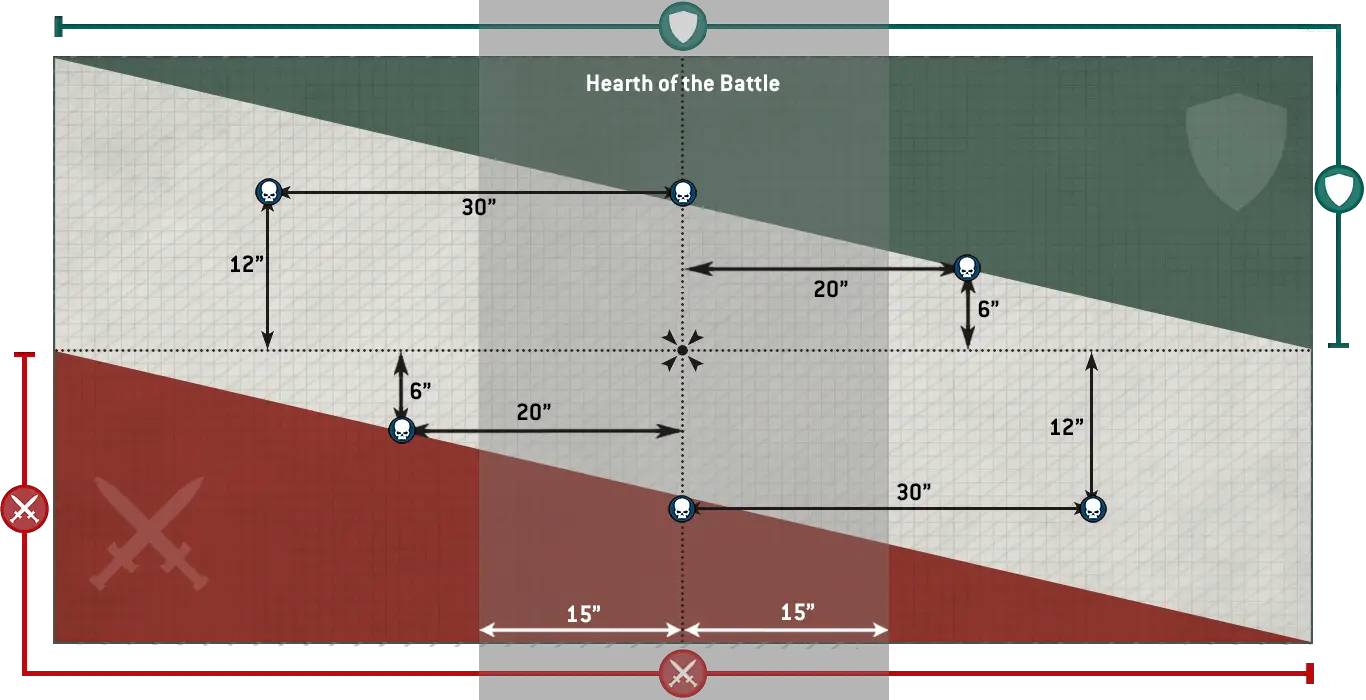
Myths And Monsters 3-4
3-4Battlefield Exemplars: At the start of the battle, each player selects one unit from their Crusade army that is within the Heart of the Battle (see below) to be their Heroic Champions unit. If a player does not have any units within the Heart of the Battle, they must select the unit from their Crusade army that is closest to the Heart of the Battle. At the end of each player’s turn, if their Heroic Champions unit is not within the Heart of the Battle, it suffers D6 mortal wounds. At the end of the turn, for each player, if that player does not have an undestroyed Heroic Champions unit, they must select a new unit from their Crusade army (following the instructions above) to take on this mantle.
Designer’s Note: When selecting a Heroic Champions unit, we recommend selecting something suitably imposing, like a large monster or a powerful character - any unit that would inspire fear in their enemies and hone in their compatriots.
VICTOR BONUS
The victor’s Heroic Champions unit gains 1 Battle Honour.
There is great value in annihilating the enemy’s most inspirational or terrifying champions.
Harder for your foes to fashion legends, and easier for your own forces to do so, if you control the field of war.
- They control one or more objective markers.
- They control two or more objective markers.
- They control more objective markers than their opponent.
Planetary Evacuation 5-6
5-6Driving Attack: The Attacker has the first turn.
VICTOR BONUS
The victor’s Crusade Force gains D3 additional Requisition Points. If the victor scored more than twice as many Victory points as their opponent, they can re-roll this roll.
The longer the evacuation site can be held and defended, the more craft will be able to boost skywards for the dubious safety of the void. Whether they will escape the gathering tendrils of the Tyranids after that is not your immediate concern ...
The sooner the evacuation point is overrun, the more prey will remain trapped in the path of the swarm to be slain and then assimilated.
There are several categories of Battle Honours that can be bestowed upon a unit, such as Battle Traits, Weapon Modifications and Crusade Relics. Other categories of Battle Honour may be found in other publications. Each time a unit gains a Battle Honour, you can select from any category.
- Once a unit gains enough XP it will gain a rank.
- Only CHARACTER units can gain the Heroic or Legendary ranks.
- Each time a unit gains a rank, it can gain a Battle Honour.
- There are several categories of Battle Honours, which include:
- Battle Traits: New skills and abilities.
- Weapon Modifications: Upgrade an item of wargear.
- Crusade Relic: Gain a rare and powerful artefact.
- Each time a unit gains a Battle Honour, increase its Crusade points total by 1 (or by 2 if TITANIC).
The Starting Strength of an Attached unit is equal to the combined Starting Strengths of all of its units (i.e. the number of models in the Leader unit added to the number of models in the Bodyguard unit). If either the Leader unit or the Bodyguard unit in an Attached unit is destroyed, the Starting Strength of the remaining unit is changed to be equal to its original Starting Strength.
For the purposes of rules that are triggered when a unit is destroyed, such rules are still triggered when one of the individual units that made up an Attached unit is destroyed (the Leader or the Bodyguard unit).
Scouts form the vanguard of many armies. Unnoticed by the enemy, they range ahead of the main force.
Some units have ‘Scouts x"’ listed in their abilities. If every model in a unit has this ability, then at the start of the first battle round, before the first turn begins, it can make a Normal move of up to x", with the exception that, while making that move, the distance moved by each model in that unit can be greater than that model's Move characteristic, as long as it is not greater than x".DEDICATED TRANSPORT models can make use of any Scouts x" ability listed in their abilities, or a Scouts x" ability that a unit that starts the battle embarked within that DEDICATED TRANSPORT model has (provided only models with this ability are embarked within that DEDICATED TRANSPORT model), regardless of how that embarked unit gained this ability (e.g. listed in their abilities, conferred by an Enhancement or by an attached CHARACTER, etc.).
A unit that moves using this ability must end that move more than 9" horizontally away from all enemy models. If both players have units that can do this, the player who is taking the first turn moves their units first.
- Scouts x": Unit can make a Normal move of up to x" before the first turn begins.
- If embarked in a DEDICATED TRANSPORT, that DEDICATED TRANSPORT can make this move instead.
- Must end this move more than 9" horizontally away from all enemy models.
Weapons powered by unstable and dangerous energy sources pose a substantial risk to the wielder every time they are used.
Weapons with [HAZARDOUS] in their profile are known as Hazardous weapons. Each time a unit is selected to shoot or fight, after that unit has resolved all of its attacks, for each Hazardous weapon that targets were selected for when resolving those attacks, that unit must take one Hazardous test. To do so, roll one D6: on a 1, that test is failed. For each failed test you must resolve the following sequence (resolve each failed test one at a time):- If possible, select one model in that unit that has lost one or more wounds and is equipped with one or more Hazardous weapons.
- Otherwise, if possible, select one model in that unit (excluding CHARACTER models) equipped with one or more Hazardous weapons.
- Otherwise, select one CHARACTER model in that unit equipped with one or more Hazardous weapons.
If a unit from a player’s army is selected as the target of the Fire Overwatch Stratagem in their opponent’s Charge phase, any mortal wounds inflicted by Hazardous tests are allocated after the charging unit has ended its Charge move.
- After a unit shoots or fights, roll one Hazardous test (one D6) for each Hazardous weapon used. For each 1, a model equipped with a hazardous weapon suffers 3 mortal wounds, that must be allocated to the selected model.
- A Critical Wound inflicts mortal wounds equal to the weapon’s Damage characteristic, instead of any normal damage.
Some attacks are so powerful that no armour or force field can withstand their fury.
Some rules inflict mortal wounds on units. Each time mortal wounds are inflicted on a unit, each of those mortal wounds inflicts one point of damage to that unit, and they are always applied one at a time. Each mortal wound is allocated to a model in the same manner as allocating an attack. Excess damage from mortal wounds is not lost if the damage can be allocated to another model. Instead, keep allocating damage to another model in the target unit until either all the damage has been allocated or the target unit is destroyed.If an attack inflicts mortal wounds in addition to any normal damage, do not make a Wound roll or saving throw (including invulnerable saving throws) against those mortal wounds. If those mortal wounds are inflicted by an attack that has the [PRECISION] ability, the attacking model’s controlling player can allocate those mortal wounds to a CHARACTER model in that unit.
If mortal wounds are being inflicted as a result of the [HAZARDOUS] ability or by an attack with the [DEVASTATING WOUNDS] ability that scored a Critical Wound, each time those mortal wounds are allocated to a model, if that model is destroyed as a result of those mortal wounds, the remaining mortal wounds from that attack are lost, just as with a normal attack.
If, when a unit is selected to shoot or fight, one or more of its attacks can inflict mortal wounds on the target, resolve any normal damage inflicted by the attacking unit’s attacks on that target before inflicting any mortal wounds on that target. If an attack inflicts mortal wounds in addition to any normal damage, but the normal damage is subsequently saved, the target unit still suffers those mortal wounds, as described above.
- Each mortal wound inflicted on a unit causes one model in that unit to lose one wound.
- Unless the source of the mortal wounds is the [HAZARDOUS] ability or an attack with the [DEVASTATING WOUNDS] ability, damage from mortal wounds is not lost if it can be allocated to another model.
- No saving throws can be made against mortal wounds.
- Mortal wounds inflicted by attacks always apply after any normal damage, even if that damage was saved.
Some warriors refuse to be laid low, even by what should be fatal wounds.
Some models have ‘Feel No Pain x+’ listed in their abilities. Each time a model with this ability suffers damage and so would lose a wound (including wounds lost due to mortal wounds), roll one D6: if the result is greater than or equal to the number denoted by ‘x’, that wound is ignored and is not lost. If a model has more than one Feel No Pain ability, you can only use one of those abilities each time that model suffers damage and so would lose a wound.- Feel No Pain x+: Each time this model would lose a wound, roll one D6: if the result equals or exceeds ‘x’, that wound is not lost.
While a unit is Battle-shocked:
- The Objective Control characteristic of all of its models is 0.
- If it Falls Back, you must take a Desperate Escape test for every model in that unit.
- Its controlling player cannot use Stratagems to affect that unit.
Once you have taken Battle-shock tests for all of your units that require them, your Command phase ends and you progress to your Movement phase.
In this step, if for any reason a unit is forced to take a Battle-shock test for being below its Starting Strength, unless otherwise stated, that unit does not also have to take a Battle-shock test for being Below Half-strength. While a unit is Battle-shocked, all models in that unit are also Battle-shocked.
- Take a Battle-shock test for each unit from your army on the battlefield that is Below Half-strength.
- Roll 2D6: if the result is greater than or equal to the unit’s Leadership, the test is passed. Otherwise, the unit is Battle-shocked until the start of your next Command phase.
- Battle-shocked units have an OC of 0 and their controlling player cannot use Stratagems to affect them.
- Battle-shocked units must take Desperate Escape tests if they Fall Back.
Some weapons strike in a flurry of blows, tearing the foe apart with relentless ferocity.
Weapons with [SUSTAINED HITS X] in their profile are known as Sustained Hits weapons. Each time an attack is made with such a weapon, if a Critical Hit is rolled, that attack scores a number of additional hits on the target as denoted by ‘x’.- [SUSTAINED HITS X]: Each Critical Hit scores ‘x’ additional hits on the target.
An unmodified Hit roll of 6 is called a Critical Hit and is always successful. An unmodified Hit roll of 1 always fails. A Hit roll can never be modified by more than -1 or +1.
- Hit Roll (Ranged Attack): A hit is scored if the D6 result equals or exceeds that attack’s BS.
- Hit Roll (Melee Attack): A hit is scored if the D6 result equals or exceeds that attack’s WS.
- Critical Hit: Unmodified Hit roll of 6. Always successful.
- An unmodified Hit roll of 1 always fails.
- A Hit roll can never be modified by more than -1 or +1.
Some warriors are masters of disguise and concealment.
If every model in a unit has this ability, then each time a ranged attack is made against it, subtract 1 from that attack’s Hit roll.Whether shielded by force fields, enveloped in mystical energies or simply possessed of preternatural senses and lightning-fast reflexes, some warriors are protected by more than mere physical armour.
Some models have an invulnerable save listed on their datasheet. Each time an attack is allocated to a model with an invulnerable save, the controlling player must choose to use either that model’s Save characteristic or its invulnerable save, but not both. If a model has more than one invulnerable save, it can only use one of them – choose which it will use.Unlike armour saving throws (which use a model’s Save characteristic), invulnerable saving throws are never modified by an attack’s Armour Penetration characteristic, but otherwise follow the normal rules for saving throws.
- Invulnerable Save: Never modified by an attack’s AP.
- The controlling player can choose to use either a model’s invulnerable save or its Save characteristic.
Models cannot be set up or end a Normal, Advance or Fall Back move within Engagement Range of any enemy models. If for any reason a model cannot meet this condition, that model is destroyed.
- Engagement Range: Within 1" horizontally and 5" vertically.
- Models cannot be set up or end a Normal, Advance or Fall Back move within Engagement Range of any enemy models.
A unit cannot shoot or declare a charge in the same turn that it Fell Back.
Desperate Escape Tests
Unlike when making other types of move, models can move over enemy models when making a Fall Back move as if those enemy models were not there, but you must take a Desperate Escape test for each model that will do so (excluding models that are TITANIC or can FLY) before any models in that unit are moved. In addition, if a unit is Battle-shocked when it is selected to Fall Back, you must take a Desperate Escape test for every model in that unit before any are moved.
- Fall Back Move: Models move up to M".
- Units that Fall Back cannot shoot or declare a charge in the same turn.
- Models can move over enemy models when Falling Back, but you must take Desperate Escape tests for them before they do so (excluding models that are TITANIC or can FLY).
- If a Battle-shocked unit is selected to Fall Back, take a Desperate Escape test for every model in that unit.
- Desperate Escape Test: Roll one D6. On a 1-2, one model from that unit is destroyed.
- Advance Move: Models move up to M+D6".
- Cannot move within Engagement Range of any enemy models.
- Units that Advance cannot shoot or charge this turn.
You then make a Charge roll for the charging unit by rolling 2D6. The result is the maximum number of inches each model in that unit can be moved if a Charge move is possible. For a Charge move to be possible, the Charge roll must be sufficient to enable the charging unit to end that move:
- Within Engagement Range of every unit that you selected as a target of the charge.
- Without moving within Engagement Range of any enemy units that were not a target of the charge.
- In Unit Coherency.
- Charge Roll: 2D6".
- Targets of a charge must be within 12" but do not need to be visible.
- If the distance rolled is insufficient to move within Engagement Range of all targets while maintaining Unit Coherency, the charge fails.
- Cannot move within Engagement Range of any unit that was not a target of the charge.
- If the charge is successful, each model makes a Charge move less than or equal to the Charge roll, and must move into base-to-base contact with an enemy model if possible.
| ||||||||||||||
If the result of the Wound roll is greater than or equal to the required number shown in the table above, then that Wound roll is successful and scores one wound against the target unit. Otherwise, the attack fails and the attack sequence ends.
An unmodified Wound roll of 6 is called a Critical Wound and is always successful. An unmodified Wound roll of 1 always fails. A Wound roll can never be modified by more than -1 or +1.
- Critical Wound: Unmodified Wound roll of 6. Always successful.
- An unmodified Wound roll of 1 always fails.
- A Wound roll can never be modified by more than -1 or +1.
Assault weapons fire so indiscriminately that they can be shot from the hip as warriors dash forward.
Weapons with [ASSAULT] in their profile are known as Assault weapons. If a unit that Advanced this turn contains any models equipped with Assault weapons, it is still eligible to shoot in this turn’s Shooting phase. When such a unit is selected to shoot, you can only resolve attacks using Assault weapons its models are equipped with.- Can be shot even if the bearer’s unit Advanced.
It is a victory to survive upon battlefields that shake beneath the tread of monstrous terrors and swarm with skilled and merciless hunters. Those who do learn many bloody lessons.
- If you selected the Monster Hunters upgrade path, it gains the MONSTER HUNTERS keyword.
- If you selected the Striding Behemoths upgrade path, it gains the STRIDING BEHEMOTHS keyword.
When setting objective markers up on the battlefield, place them so they are centred on the point specified by the mission. When measuring distances to and from objective markers, measure to and from the closest part of them. Models can move over objective markers as if they were not there, but they cannot end a move on top of an objective marker.
At the start of the battle, each objective marker on the battlefield is said to be contested, and so is not controlled by either player. To control an objective marker, a player will first need to move models within range of it. A model is within range of an objective marker if it is within 3" horizontally and 5" vertically of that objective marker.
Every model has an Objective Control (OC) characteristic listed on its datasheet. To determine a player’s Level of Control over an objective marker, add together the OC characteristics of all the models from that player’s army that are within range of that objective marker. A player will control an objective marker at the end of any phase or turn if their Level of Control over it is greater than their opponent’s. If both players have the same Level of Control over an objective marker, that objective marker is contested.
- A model is within range of an objective marker if within 3" horizontally and 5" vertically.
- Level of Control: Add together the OC characteristics of all of a player’s models within range of the objective marker.
- An objective marker is controlled by the player with the highest Level of Control over it (in a tie, it is contested).
- Models cannot end a move on top of an objective marker.
If the result is greater than or equal to the Save characteristic of the model the attack was allocated to, then that saving throw is successful and the attack sequence ends. Otherwise, that saving throw fails and that model suffers damage.
An unmodified saving throw of 1 always fails. A saving throw can never be improved by more than +1.
- Saving Throw: Roll one D6 and modify by the attack’s AP. If the result is less than the Save of the model being rolled for, the saving throw is failed and that model suffers damage. Otherwise, that attack is saved.
- An unmodified saving throw of 1 always fails.
- A saving throw can never be improved by more than +1.
Mighty heroes fight at the forefront of battle.
Some CHARACTER units have ‘Leader’ listed on their datasheets. Such CHARACTER units are known as Leaders, and the units they can lead – known as their Bodyguard units – are listed on their datasheet.During the Declare Battle Formations step, for each Leader in your army, if your army also includes one or more of that Leader’s Bodyguard units, you can select one of those Bodyguard units. That Leader will then attach to that Bodyguard unit for the duration of the battle and is said to be leading that unit. Each Bodyguard unit can only have one Leader attached to it.
While a Bodyguard unit contains a Leader, it is known as an Attached unit and, with the exception of rules that are triggered when units are destroyed, it is treated as a single unit for all rules purposes. Each time an attack targets an Attached unit, until the attacking unit has resolved all of its attacks, you must use the Toughness characteristic of the Bodyguard models in that unit, even if a Leader in that unit has a different Toughness characteristic. Each time an attack sucessfully wounds an Attached unit, that attack cannot be allocated to a CHARACTER model in that unit, even if that CHARACTER model has lost one or more wounds or has already had attacks allocated to it this phase. As soon as the last Bodyguard model in an Attached unit has been destroyed, any attacks made against that unit that have yet to be allocated can then be allocated to CHARACTER models in that unit.
Each time the last model in a Bodyguard unit is destroyed, each CHARACTER unit that is part of that Attached unit is no longer part of an Attached unit. It becomes a separate unit, with its original Starting Strength. If this happens as the result of an attack, they become separate units after the attacking unit has resolved all of its attacks.
Each time the last model in a CHARACTER unit that is attached to a Bodyguard unit is destroyed and there is not another CHARACTER unit attached, that Attached unit’s Bodyguard unit is no longer part of an Attached unit. It becomes a separate unit, with its original Starting Strength. If this happens as the result of an attack, they become separate units after the attacking unit has resolved all of its attacks.
Each time a unit that is part of an Attached unit is destroyed, it does not have the keywords of any other units that make up that Attached unit (unless it has those keywords on its own datasheet) for the purposes of any rules that would be triggered when that unit is destroyed.
- Before the battle, CHARACTER units with the Leader ability can be attached to one of their Bodyguard units to form an Attached unit.
- Attached units can only contain one Leader.
- Attacks cannot be allocated to CHARACTER models in Attached units.
Assassins and other covert agents are difficult to track and pinpoint in the swirling maelstrom of battle.
Unless part of an Attached unit (see Leader), this unit can only be selected as the target of a ranged attack if the attacking model is within 12".If for any reason a model cannot be set up in Unit Coherency, or cannot be set up following any restrictions stated by other rules (e.g. while setting up using the Deep Strike ability), that unit cannot be set up. If a unit cannot end a move in Unit Coherency, it cannot make that move and its models are returned to their previous positions.
At the end of every turn, each player must remove models, one at a time, from any of the units from their armies that are no longer in Unit Coherency, until only a single group of models from each of those units remains in play and in Unit Coherency. Models removed in this way count as having been destroyed, but they never trigger any rules that apply when a model is destroyed.
- Unit Coherency: Within 2" horizontally and 5" vertically of:
- One other model from the same unit (in units of 2-6 models).
- Two other models from the same unit (in units of 7+ models).
- At the end of every turn, if a unit is not in Unit Coherency, the controlling player must remove models until that unit is in Unit Coherency again.
- Normal Move: Models move up to M".
- Cannot move within Engagement Range of any enemy models.
The datasheets using INFANTRY keyword can be found in the following Factions:
Unaligned: Unaligned Forces.Chaos: Chaos Daemons, Chaos Knights, Chaos Space Marines, Death Guard, Emperor’s Children, Thousand Sons, World Eaters.
Imperium: Adepta Sororitas, Adeptus Custodes, Adeptus Mechanicus, Astra Militarum, Grey Knights, Imperial Agents, Imperial Knights, Space Marines.
Xenos: Aeldari, Drukhari, Genestealer Cults, Leagues of Votann, Necrons, Orks, T’au Empire, Tyranids.
The INFANTRY keyword is used in the following datasheets:
and others...
The datasheets using MOUNTED keyword can be found in the following Factions:
Chaos: Chaos Daemons, Chaos Space Marines, Death Guard, Emperor’s Children, Thousand Sons, World Eaters.Imperium: Adepta Sororitas, Adeptus Custodes, Adeptus Mechanicus, Astra Militarum, Imperial Agents, Space Marines.
Xenos: Aeldari, Drukhari, Genestealer Cults, Leagues of Votann, Necrons, Orks, T’au Empire.
The MOUNTED keyword is used in the following datasheets:
and others...
The datasheets using MONSTER keyword can be found in the following Factions:
Unaligned: Unaligned Forces.Chaos: Chaos Daemons, Chaos Space Marines, Death Guard, Emperor’s Children, Thousand Sons, World Eaters.
Imperium: Adeptus Mechanicus, Space Marines.
Xenos: Aeldari, Drukhari, Genestealer Cults, Necrons, Orks, T’au Empire, Tyranids.
The MONSTER keyword is used in the following datasheets:
and others...
The datasheets using WALKER keyword can be found in the following Factions:
Chaos: Chaos Daemons, Chaos Knights, Chaos Space Marines, Death Guard, Emperor’s Children, Thousand Sons, World Eaters.Imperium: Adepta Sororitas, Adeptus Custodes, Adeptus Mechanicus, Adeptus Titanicus, Astra Militarum, Grey Knights, Imperial Agents, Imperial Knights, Space Marines.
Xenos: Aeldari, Genestealer Cults, Necrons, Orks, T’au Empire.
The WALKER keyword is used in the following datasheets:
The datasheets using TITANIC keyword can be found in the following Factions:
Unaligned: Unaligned Forces.Chaos: Chaos Daemons, Chaos Knights, Chaos Space Marines, Death Guard, Thousand Sons, World Eaters.
Imperium: Adeptus Titanicus, Astra Militarum, Grey Knights, Imperial Knights, Space Marines.
Xenos: Aeldari, Genestealer Cults, Necrons, Orks, T’au Empire, Tyranids.
The TITANIC keyword is used in the following datasheets:
Certain weapons are the bane of a particular foe.
Weapons with [ANTI-KEYWORD X+] in their profile are known as Anti weapons. Each time an attack is made with such a weapon against a target with the keyword after the word ‘Anti-’, an unmodified Wound roll of ‘x+’ scores a Critical Wound.- [ANTI-KEYWORD X+]: An unmodified Wound roll of ‘x+’ against a target with the matching keyword scores a Critical Wound.
TARGET: That unit from your army.
EFFECT: Your unit automatically passes that Battle-shock test.
RESTRICTIONS: You cannot use this Stratagem more than once per battle.
- A unit can embark within a friendly TRANSPORT if all of its models end a Normal, Advance or Fall Back move within 3" of that TRANSPORT.
- A unit cannot embark and disembark in the same phase.
Shattered ruins and twisted wreckage afford much-needed shelter from enemy salvoes. Even heavily armoured warriors unfazed by small arms fire are thankful for such cover when foes bring their biggest guns to bear.
Models can sometimes gain a measure of protection from terrain features. The rules below detail the conditions under which a terrain feature confers the Benefit of Cover on a model.Each time a ranged attack is allocated to a model that has the Benefit of Cover, add 1 to the saving throw made for that attack (excluding invulnerable saving throws). Models with a Save characteristic of 3+ or better cannot have the Benefit of Cover against attacks with an Armour Penetration characteristic of 0. Multiple instances of the Benefit of Cover are not cumulative – a model cannot benefit from this rule more than once at any one time.
- Benefit of Cover: Add 1 to armour saving throws against ranged attacks.
- Does not apply to models with a Save of 3+ or better against attacks with an AP of 0.
- Multiple instances are not cumulative.
- If a unit has a Starting Strength of 1, then it is said to be Below Half-strength while its remaining number of wounds is less than half of its Wounds characteristic.
- For any other unit, while the number of models in that unit is less than half of its Starting Strength, that unit is said to be Below Half-strength.
The SYNAPSE keyword is used in the following Tyranids datasheets:
The changing nature of the war zone and the demands from high command necessitate the opening of arms caches and wargear vaults to ensure your warriors face the enemy with the most effective killing tools.