
Leviathan
Books
| Book | Kind | Edition | Version | Last update |
| | ||||
| | Expansion | 10 | June 2023 | |
| | ||||
| | Expansion | 10 | 1.0 | June 2023 |
Leviathan Games
A Leviathan Chapter Approved battle is waged by following the sequence below. Chapter Approved battles are designed for Incursion and Strike Force battle sizes.
Muster Armies
Players first muster their armies, as described in the Core Rules. Remember, all details of a player’s army must be recorded on their Army Roster.Determine Mission
Players split the cards into their respective decks: Deployment deck; Mission Rule deck; Primary Mission deck; Secondary Mission decks (one for the Attacker, one for the Defender); Gambit decks (one for the Attacker, one for the Defender). Set aside the Secondary Mission and Gambit decks (players will receive these later).Players determine their mission by shuffling and randomly drawing one card from the Deployment, Mission Rule and Primary Mission Decks.
Instead of shuffling and drawing from the Deployment, Mission Rule and Primary Mission decks, players should use the pre-generated missions from the Leviathan Tournament Mission Pool. Set aside the Secondary Mission and Gambit decks as normal (players will receive these later).
Read Mission
Next players read the Primary Mission and Mission Rule cards they have drawn.The Primary Mission card details how and when players score Victory Points (VP). Players will also score VP by achieving Secondary Missions and Gambits, which are detailed later. Some Primary Mission cards also include additional rules that will apply to the battle.
The Mission Rule card details any special rules that apply for the duration of the battle. Players should read and familiarise themselves with these before proceeding.
Place Objective Markers
Players now set up objective markers on the battlefield. Each Deployment card’s deployment map will show players how many objective markers to set up and where each should be placed.Players now set up objective markers on the battlefield. Each Deployment card’s deployment map will show players how many objective markers to set up and where each should be placed. In Leviathan Tournament Missions, models can end any type of move on top of an objective marker.
Create The Battlefield
Players now create the battlefield and set up terrain features.Missions are played on rectangular battlefields whose dimensions are approximately 44" by 60". This can be achieved by placing four Battlezone boards flat on a surface next to each other.
Unless otherwise stated,when setting up terrain features, use the guidelines detailed in the Cores Rules. Players must use the rules for terrain features detailed in the Core Rules. Terrain features should not be set up with any impassable sections (such as the walls of a ruin) within 1" of any objective markers.
Players now create the battlefield and set up terrain features. Missions are played on rectangular battlefields whose dimensions are approximately 44" by 60".
When setting up terrain features, use the guidelines detailed in the Terrain Layouts section of this pack. Players must use the rules for terrain features detailed in the Core Rules. While other approaches to terrain layout may work within the collections of experienced organisers, we recommend these terrain guidelines when otherwise in doubt.
Determine Attacker and Defender
Players consult the Deployment card drawn for the mission and agree which battlefield edge is the Attacker’s and which is the Defender’s. The players then roll off and the winner decides who will be the Attacker and who will be the Defender - this will determine which player uses which deployment zone in the coming battle.Players take their respective Secondary Mission and Gambit decks, shuffle them and place them nearby for later.
Select Secondary Missions
There are two Secondary Mission decks (one for the Attacker, one for the Defender), meaning players can draw the same Secondary Missions. These describe goals that players can achieve to score VP. Each Secondary Mission card will detail when and how it is achieved, as well as how many VP that player scores for achieving it.Each player must now choose whether to use Fixed or Tactical Missions during the battle. To do so, each player first takes their respective Secondary Mission deck. If a player wishes to use Fixed Missions, that player secretly selects two Fixed Mission cards (denoted by the Fixed Mission symbol - see below) from their Secondary Mission deck and places them face down on the battlefield. If a player wishes to use Tactical Missions, they should instead select any two Secondary Mission cards from their deck that do not have the Fixed Mission symbol and place them face down on the battlefield. Once both players have done so, players reveal their selections.
Fixed Mission cards are Secondary Mission cards marked with this symbol.
If a player selects two Fixed Mission cards, those Secondary Mission cards are active in every battle round during the battle, and can be achieved and scored in every battle round. The remainder of their Secondary Mission deck will not be used in the coming battle and can be placed to one side.
Players’ selected Fixed Mission cards cannot be discarded for any reason.
If a player did not select two Fixed Mission cards, then they will use Tactical Missions in the coming battle and they should now reshuffle their Secondary Mission deck. At the start of each of that player’s Command phases, that player must determine which Secondary Mission cards are active for them by drawing cards from their Secondary Mission deck, if they have fewer than two active Secondary Mission cards. That player has access to the New Orders Stratagem (see below), and can spend CP to use it after drawing their Secondary Mission cards if they wish. If a player’s Secondary Mission deck runs out, they cannot generate any additional Secondary Missions during the battle. Each time that player achieves a Secondary Mission, after scoring the VP described on that card, that Secondary Mission is then discarded.
TARGET: One of your active Secondary Mission cards.
EFFECT: Discard it and draw one new Secondary Mission card.
RESTRICTIONS: You can only use this Stratagem once per battle.
Declare Battle Formations
In the order below, both players secretly note:- Which of their Leader units will start the battle attached (they must specify which Leader unit is attached to which Bodyguard unit).
- Which of their units will start the battle embarked within TRANSPORT models (they must specify which units are embarked within which models).
- Which of their units will start the battle in Reserves (including Strategic Reserves). No more than half the number of units in a player’s army can start the battle in Reserves, and the combined points total of those units cannot be more than half the total of their army. Units embarked within a TRANSPORT that are set up in Reserves also count as being set up in Reserves for these limits.
When both players have done so, then they reveal their selections to their opponent.
Reserves units cannot arrive during the first battle round and any Strategic Reserves or Reserves that have not arrived on the battlefield by the end of the third battle round count as having been destroyed, as are any units embarked within them (this does not apply to units that are placed into Strategic Reserves after the first battle round has started).
Deploy Armies
Players alternate setting up their remaining units one at a time, starting with the Defender. A player’s models must be set up wholly within their deployment zone. If one player finishes deploying all their units, their opponent then deploys the remainder of their units.Determine First Turn
Players roll off and the winner takes the first turn.Resolve Pre-battle Rules
Players alternate resolving any pre-battle rules units from their armies have, starting with the player who will take the first turn.Begin the Battle
The first battle round begins. Players continue to resolve battle rounds until the battle ends.At the end of each player’s turn, if that player is using Tactical Missions, they can discard one or more of their active Secondary Mission cards. If they do, and if it is not the fifth battle round, that player gains 1CP. This represents high command diverting strategic resources that had been allocated to now-obsolete objectives to instead engage new targets of opportunity.
At the end of the third battle round, players generate Gambits.
End the Battle
The battle ends after five battle rounds have been completed. If one player has no models remaining in their army at the start of their turn, the other player can continue to play out their turns until the battle ends.Determine Victor
At the end of the battle, the player with the most VP is the winner. If the players are tied, the battle is a draw.Each player can score a maximum of 50VP from Primary Missions and/or Gambits (any excess VP awarded are lost) and a maximum of 40VP from Secondary Missions (any excess VP awarded are lost), for a possible total of 90VP. If a player is using Fixed Missions, that player can score a maximum of 20VP from each of the Fixed Mission cards they selected before the battle (any excess VP awarded are lost). If every model in a player’s army is painted to a Battle Ready standard, that player is awarded a bonus 10VP. This gives each player a maximum total score of 100VP.
Gambit Deck
At the end of the third battle round, before starting the next battle round, players can generate Gambits and choose whether to attempt to achieve one.
Each player takes their Gambit deck and removes the Proceed as Planned card, placing it to one side, before shuffling the remaining Gambit cards and randomly discarding one. Each player then adds their Proceed as Planned card back in, to have a hand containing three cards.
If a player reveals their Proceed as Planned card, they are not attempting a Gambit in this battle and continue to score VP for achieving the goals as listed on their Primary Mission card.
Otherwise, the player is attempting a Gambit, and until the end of the battle that player cannot score any more VP as described on their Primary Mission card (any VP scored so far are kept). Instead, at the end of the battle, if they successfully completed the goal described on the Gambit card, they score VP as detailed on that Gambit card.
Battle Ready
Playing games of Warhammer is a shared experience that we all want to look and feel great. To reflect this, Leviathan games reward you for having a fully painted ‘Battle Ready’ army. Here we explain what that means, and where to find achievable online tutorials and painting guides to get your army ready for action!
This is considered to be the minimum standard of miniature painting for a Leviathan mission, as well as a guaranteed method of scoring some victory points before the dice even start rolling.
Leviathan Tournament Companion
Introduction
Welcome to the Leviathan Tournament Companion! The following guidelines are designed to support organisers of Warhammer 40,000 events in delivering a fine-tuned tournament experience using the Leviathan Mission Pack. That product offers unprecedented scope for all kinds of matched play, and its many variables create a dizzying array of potential missions – thousands, in fact! Some of these are particularly well suited to the most hotly contested scenarios, and this pack provides suggestions for the best event configurations. We have also taken the opportunity to optimise certain Core Rules concepts for tournament play.This document provides a ready-made framework for levelling the playing field and getting games underway quickly, whether you are planning your first matched play event or have years of experience organising the largest and most acclaimed tournaments. Its recommendations will be followed in full at most Games Workshop matched play events, and are considered the official way to play Warhammer 40,000 in a tournament setting, but can be adapted to suit your own circumstances – the terrain layout advice is aimed primarily at newer organisers, for example, and those with large established terrain collections should feel free to interpret it accordingly.
The recommendations are presented as follows:
- Leviathan Tournament Mission Sequence: Adjustments to the steps players would normally follow to generate a mission and prepare the battlefield (these adjustments are shown above, in the Leviathan Games section.).
- Leviathan Card Updates: Tweaks to certain cards in the Leviathan Mission Pack (these tweaks are already included below, in the Mission Generator).
- Leviathan Tournament Mission Pool: 15 recommended tournament rounds to draw from, with pre-set Primary Missions, Mission Rules and deployment modes that put all players on an equal footing and minimise pre-game admin.
- Terrain Layouts: A suite of carefully designed terrain setups to be used in conjunction with the Leviathan Tournament Mission Pool.
- Pairings and Rankings: Advice for fairly pairing players and determining rankings.
Leviathan Tournament Mission Pool
The 15 Leviathan Tournament Missions in this section are designed to act as a pool from which organisers can build their events, selecting from it in random order. Further commentary on these is given below.
Every Primary Mission from the Leviathan Mission Pack is included in this mission pool. If you are running an event with only 3-6 rounds, we recommend selecting options that span a variety of different Primary Missions. For example, if running a 3-round Saturday tournament, you might use missions A, B, and C, or D, F, and G. For those running longer-format events, or whose attendees are particularly expectant of a perfectly balanced mission every time, we have included the more straightforward Primary Missions in a greater number of configurations.
Mission Rules are an exciting component of the Leviathan Mission Pack, providing twists to the way a mission is normally played, and the ones recommended here are particularly suited to tournament play. For the Leviathan season of play, we recommend using Chilling Rain (i.e. no effect), Hidden Supplies, Chosen Battlefield and Scrambler Fields, as shown in the configurations below.
When using the recommended terrain layouts in this pack, please note the layouts best suited for each deployment mode, as shown in the table below. We recommend structuring your mission order to facilitate any changes to terrain layouts you will need to make during your event.
| |||||||||||||||||||||||||||||||||||||||||||||||||||||||||||||||||||||||||||||||||||||
Terrain Layouts
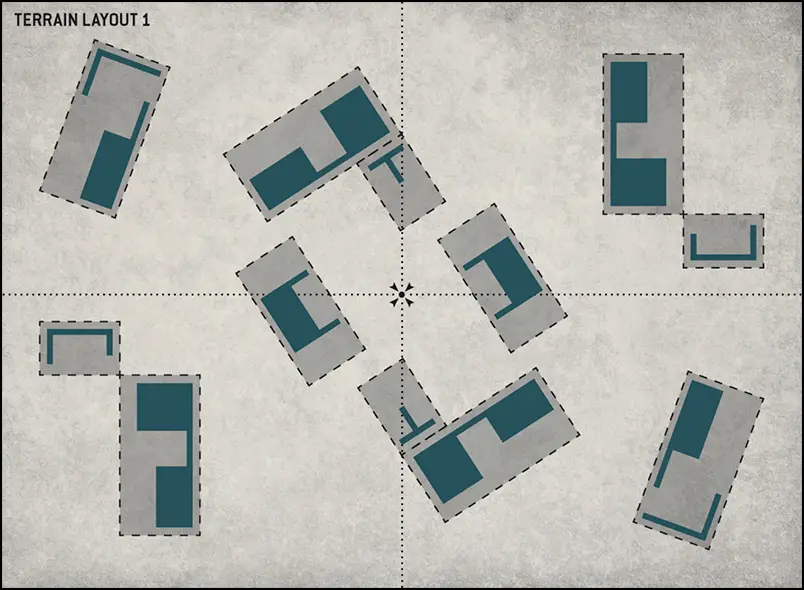
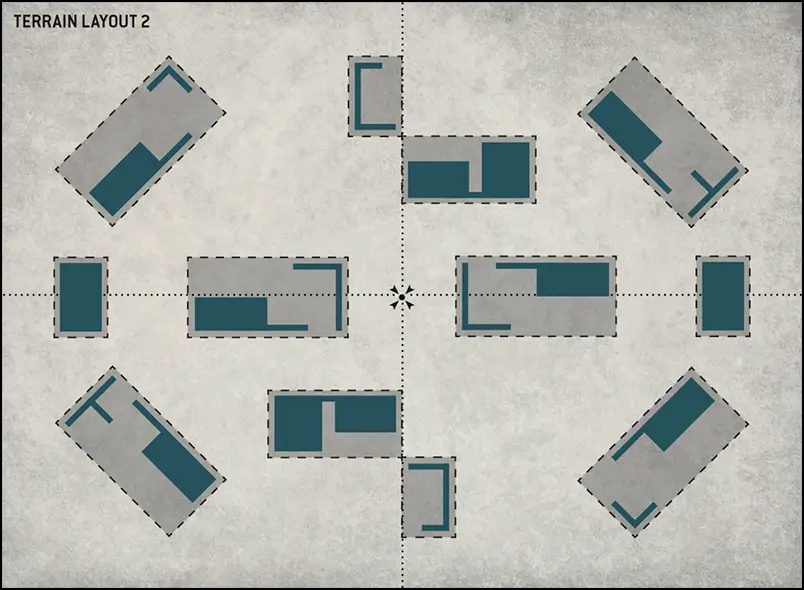
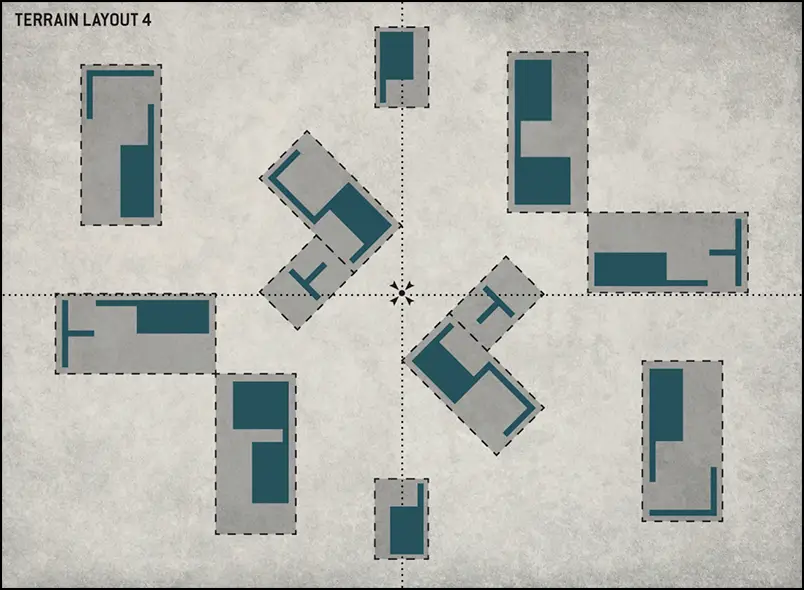
The following battlefield recommendations are intended primarily for newer organisers and those looking for a steer in building up a terrain collection for regular tournament play. These layouts will be seen at most Games Workshop matched play events, and reflect the type of terrain density that creates risk-and-reward decisions that a wide variety of army types can engage with. They are by no means the only way to set up a battlefield for balanced play, but represent a reliable starting point when in doubt.
No Fixed Measurements
Precisely locked terrain layouts with fixed measurements are not recommended. As well as limiting the variety of terrain organisers may feel permitted to field, such strictures can encourage army construction that plans for guaranteed measurements for the purposes of line of sight, objective control and so on. Furthermore, it can create problematic mid-game situations should players notice their terrain does not meet prescribed limits. When using these layouts, players should ensure they are as close to the illustrated positions as possible, but organisers should avoid mandating precise locations for each piece.In general, however, there should be at least 4" between the physical edges of each terrain feature. This is primarily to avoid situations where certain factions (e.g. Imperial Knights) are unable to interact with areas of the battlefield due to Ruins and other impediments being too close together.
Objective Markers
Objective markers can and sometimes will be either hidden within terrain or placed in the open, but the markers themselves should never intersect a wall or similar element.Use of Ruins
The following layouts primarily use the Ruins terrain feature. This efficiently achieves a good amount of line-of-sight blockage and cover appropriate for balanced games, thanks to the natural abstraction of line of sight within the rules for Ruins. Remember that a variety of terrain heights not only adds to the immersive nature of the battlefield, but is also important for line of sight and rules such as Plunging Fire. For organisers and players with a more robust terrain collection (especially elements that block true line of sight), incorporating features such as Woods, Barricades and Hills into your chosen layouts is perfectly acceptable.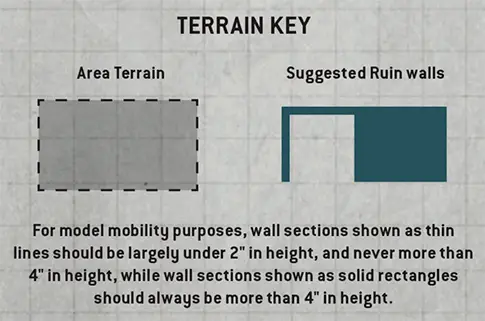

Pairings and Rankings
Pairing Players
While the first round of most tournaments is randomly paired, subsequent round pairing can be done in a number of ways. The first pairing metric will almost always be player record, i.e. pairing a 3-1 player with another 3-1 player, and so on. Given that most rounds will include numerous players with the same record, however, deciding pairings beyond this metric can be quite nuanced, and the different methods available can have significant impacts on the experience of players at an event. We recommend pairing players by the following criteria:- First – by record (i.e. the number of wins, losses and draws)
- Second – by win path (i.e. the timing of the rounds in which a player won or lost their games)
- Third – randomly within players of the same ranking
A player’s ‘win path’ refers not to their number of wins and losses, but to the timing of those wins and losses. While pairing by win path has an incidental tendency to pair people by strength of schedule, its greatest impact is on the overall enjoyment experienced by all players, as it tends to pair players based upon shared experience.
For example, let’s take two 3-1 players. One of them lost their first game; they likely lowered their expectations for winning the whole event after this, but are probably in a great mood after three consecutive victories. The other won their first three games then lost their fourth – a sharp disappointment after a 3-0 start. Should these players face off, their shared enjoyment may be at odds as they are in very different emotional places. Win path ensures players enter their match with recent common experiences upon which to build a friendship during their next game of Warhammer.
Ranking Players
In many tournaments, the overall Best General will be the single remaining undefeated player at the end of the event. Sometimes, however, there are not enough rounds available to determine a single undefeated player, and players often wish to know their ranking regardless of whether they won the whole event. To help break ties between players who end an event with the same record, we recommend ranking players by the following criteria:- First – by overall record (wins, losses and draws)
- Second – by their opponents’ win records (i.e. those with more wins against opponents with better win records would place higher)
- Third – by total Victory points (VP)
As such, we do not recommend using VP as a pairing metric, nor as a ranking metric until all other metrics have been exhausted, or when further tie-breaking is required (e.g. in larger events where identical rankings become more likely). By contrast, opponent win record is an ideal metric, because when two players end up with the same record, the overall skill of their opponents is a better indicator of which player had the more challenging path along the way.
There are myriad ways to enjoy the Warhammer hobby, and these all manifest themselves at a tournament: gifted hobbyists with beautiful armies, skilled competitors aiming for Best General, casual players looking to face new opponents and make new friends (by far the most common type of attendee), and even practitioners of the niche hobby of Rules Lawyer! These particular hobbyists often find unusual rules interactions at the very fringes of Warhammer 40,000, which can create interesting challenges for tournament organisers looking to provide clear answers and an easy gaming experience for their attendees. For the current edition, the Warhammer Design Studio has created its most robust and comprehensive Rules Commentary to date. Available to download on warhammer-community.com, this living document will be reviewed periodically to clarify any issues that may be causing uncertainty. Should an odd rules interaction come up during your event and the Core Rules do not provide a clear answer, we recommend consulting the Rules Commentary.
Mission Generator
To use the mission generator, first press the ‘Start New Game’ button. This will "draw" a new set of Mission Rule, Primary Mission, and Deployment cards. This will also reset the Secondary Mission decks.
Next, choose whether you want to use Tactical or Fixed Secondary Missions using the slider. If you select Fixed, the cards available to you will appear below, and you can use the ‘Pick’ (
 ) and ‘Reject’ (
 ) buttons to select two cards. Once you have your selection, click ‘Confirm’ to begin the game.
During the battle, you can use the ‘Draw’ and ‘Discard’ (
 ) buttons to move through your Secondary Mission deck according to the mission rules. In the few cases where you might need to reshuffle a card back into the deck, a ‘Reshuffle’ (
 ) button will appear. If you press this instead of the ‘Discard’ button, the card will still be available to draw later in the game.
When you wish to choose a Gambit, select the ‘Show Gambit cards’ checkbox. This will draw Gambit cards for you as described in the mission sequence above. Select one, then press ‘Confirm’ to lock in your choice.
- If you accidentally close the browser or refresh the page your progress will be safe. It is saved on your device in the browser’s local storage.
- If you change the Mission Rule, Primary Mission, or Deployment cards, the generator will see it as a new game and reset the Secondary Mission and Gambit decks, losing all progress on your current game.
- It is not recommended to use this generator on multiple tabs of the same browser on the same device. It’s useless enough and also definitely will break the game.
Selected Secondary Missions
Attacker’s Selected Secondary Missions
Secondary Mission Deck
Attacker’s Secondary Mission Deck
Selected Gambit
Selected Attacker’s Gambit
Gambit Deck
Attacker’s Gambit Deck
Defender’s Selected Secondary Missions
Defender’s Secondary Mission Deck
Selected Defender’s Gambit
Defender’s Gambit Deck
Card Decks
Mission Rule deck
Both sides have scouted the area extensively, pinpointing the exact location of vital sites.
One objective marker must be placed wholly within each deployment zone, and the remaining objective markers must be placed wholly within No Man’s Land, as shown on the Deployment card drawn. Objective markers must be placed more than 6" away from any battlefield edge and more than 9" away from all other objective markers.
If for whatever reason it is not possible to set up an objective marker as described above, it is not placed on the battlefield.
If any rules require players to set up additional objective markers (e.g. Hidden Supplies) during the Place Objective Markers step, players set them up as described on this Mission Rule card.
If any rules instruct players to remove one or more objective markers, do so after setting them all up.
Intense winds gust across the battlefield, whipping through the shattered remains of bombed ruins and heavy with the stench of death. Icy rain drenches and chills the warriors, only adding to their misery and discomfort.
Forces have been ordered to perform a firesweep of this battlefield, methodically cleansing strategic sites of enemies one at a time before moving on.
Reconnaissance units have uncovered a hidden cache of ammunition, fuel and rations in this war zone.
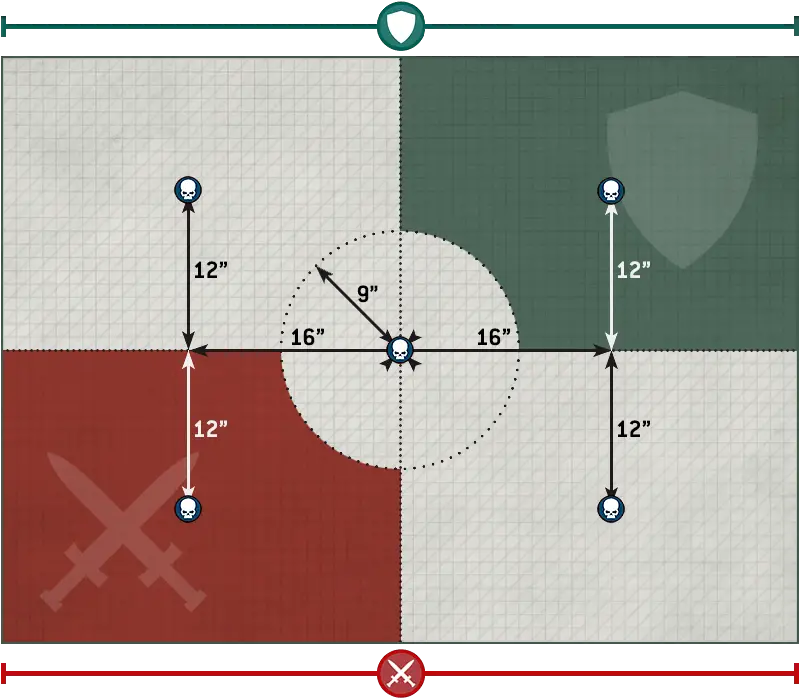
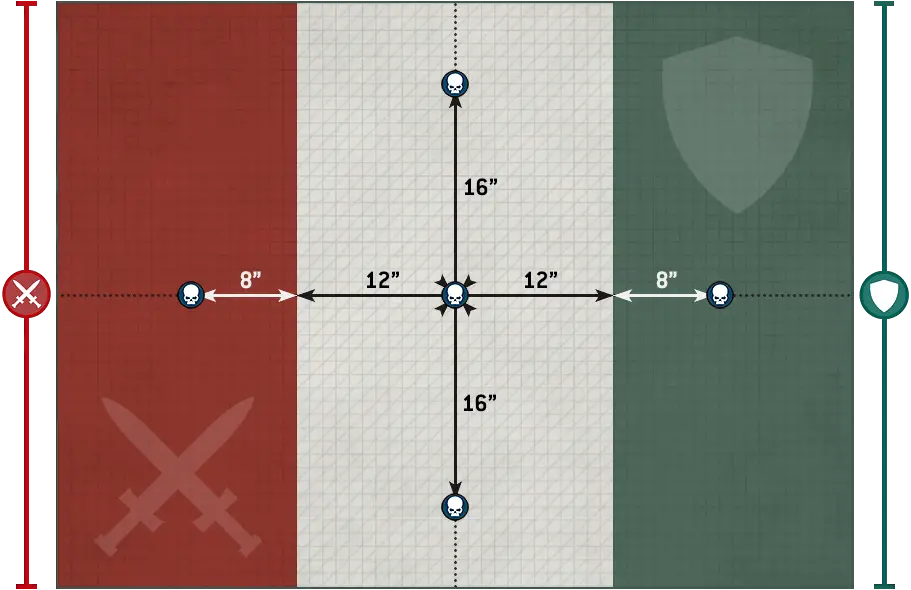
Unless the Chosen Battlefield mission rule is also in effect, before setting up this new objective marker, players must first move the objective marker in the centre of the battlefield 6" directly towards one of the corners of the battlefield (if No Man’s Land touches any of the corners of the battlefield, you must move the objective marker towards one of those corners). Players then set up the new objective marker 6" from the centre of the battlefield towards the diagonally opposite corner of the battlefield to the previously moved objective marker.
Buried ordnance and hidden boody traps litter this battlefield, posing a threat to all units that advance recklessly and without due care.
This bottle zone is replete with tactical targets of opportunity, ideal for warlords who are eager for glory.
In this mission, if a player is using Fixed Missions, then in addition to the 2 Fixed Mission cards, that player will also draw cards from their Secondary Mission deck during the battle. At the end of the Select Secondary Missions step, that player should retrieve their Secondary Mission deck, remove all the Fixed Mission cards that they did not select at the start of that step, then shuffle the remaining cards. Then, at the start of each of that player’s Command phases, if that player has fewer than 3 active Secondary Mission cards (including their Fixed Mission cards), they draw from their Secondary Mission deck until they have 3 Secondary Mission cards. That player has access to the New Orders Stratagem, and can spend CP to use it after drawing their Secondary Mission cards if they wish (remember that Fixed Mission cards cannot be discarded for any reason).
Scrambler fields and more esoteric devices have been activated in this area, restricting the use of advanced stealth and teleportation technologies.
- Players’ units with the Infiltrators ability cannot be set up within range of an objective marker that is either in No Man’s Land or their opponent’s deployment zone.
- Players’ units with the Scouts ability that make a move before the first turn begins cannot end that move within range of an objective marker that is either in No Man’s Land or their opponent’s deployment zone.
- If any rule is used to redeploy a unit, that rule cannot be used to set up that unit within range of an objective marker in No Man’s Land.
- When a player’s Reserves and Strategic Reserves units are set up on the battlefield, they cannot be set up within range of an objective marker that is either in No Man’s Land or their opponent’s deployment zone.
Enemy interceptors roam the skies, strafing and bombing any of our reinforcement units they discover. Our forces will inevitably be delayed as they attempt to dodge these vicious aerial patrols.
Little respite or sanctuary is available across the battlefields of the 41st Millennium.
If either of these new Mission Rule cards is Chilling Rain, discard that Mission Rule card and draw 2 additional new Mission Rule cards (for a total of 3 new Mission Rule cards).
Apply all the drawn Mission Rule cards to the battle.
Enemy infiltrators are attempting to sabotage and disrupt your supply lines. Maintain vigilance to secure lines of communication and safeguard vital strategic resources.
Our spies and recon teams have reported back with secret intelligence, allowing us to better coordinate our next tactical move.
Stellar flares, malicious scrapcode and electromagnetic energy restrict communications.
Primary Mission deck
Several strategic locations have been identified in your vicinity. You are ordered to assault these positions, secure them and hold them at any cost.
- The player who has the first turn scores VP as described above.
- The player who has the second turn scores VP as described above, but does so at the end of their turn instead of at the end of their Command phase.
What cannot be secured must be burned to ash.
- The player who has the first turn scores VP as described above.
- The player who has the second turn scores VP as described above, but does so at the end of their turn instead of at the end of their Command phase.
Exterminate the enemy. Show them no mercy.
- The player who has the first turn scores VP as described above.
- The player who has the second turn scores VP as described above, but does so at the end of their turn instead of at the end of their Command phase.
Note that a unit can. if it is returned to the battlefield for any reason, potentially contribute to this Primary Mission several times (assuming it is returned and subsequently destroyed several times over).
There is great power for those bold enough to claim it.
- 3VP for each objective marker they control.
- 3VP for each site of power that they have empowered.
- The player who has the first turn scores VP as described above.
- The player who has the second turn scores VP as described above, but does so at the end of their turn instead of at the end of their Command phase.
Bitter foes clash in a race to finish a ritual to either sanctify or corrupt the battlefield.
In each player’s Shooting phase, the player whose turn it is can select one unit from their army that is not Battle-shocked and is eligible to shoot. Until the end of that turn, that unit is not eligible to shoot or declare a charge. At the end of that turn, the player whose turn it is can set up one objective marker wholly within No Man’s Land and within 1" of that unit provided it can be set up exactly 9" from one other objective marker and not within 6" of any other objective marker.
- The player who has the first turn scores VP as described above.
- The player who has the second turn scores VP as described above, but does so at the end of their turn instead of at the end of their Command phase.
The objectives in this area are vital to our war effort and securing them is your highest priority. Spare nothing in ensuring that they do not fall into enemy hands.
Supplies are inbound. Secure the drop coordinates.
- The player who has the first turn scores 15VP at the end of their Command phase if they control the objective marker in No Man’s Land.
- The player who has the second turn scores 15VP at the end of their turn if they control the objective marker in No Man’s Land.
This area is littered with valuable relics. Secure these artefacts behind our front lines.
- 2VP for each servo-skull that is wholly within 12" of their opponent’s deployment zone.
- 5VP for each servo-skull that is wholly within 6" of their opponent’s deployment zone.
- 8VP for each servo-skull that is wholly within their opponent’s deployment zone.
Note that these conditions are not cumulative; if more than one applies, the player whose turn it is scores the applicable condition that carries the highest VP reward.
The most vital ground in the region is in enemy hands.
After setting up the battlefield, remove the objective marker in No Man’s Land that is closest to the centre of the battlefield.
- If they control the objective marker in their own deployment zone, they score 2VP.
- For each objective marker in No Man’s Land that they control, they score 5VP.
- If they control the objective marker in their opponent’s deployment zone, they score 6VP.
- The player who has the first turn scores VP as described above.
- The player who has the second turn scores VP as described above, but does so at the end of their turn instead of at the end of their Command phase.
Deployment deck
Secondary Mission deck
The battleground is won one yard at a time. Continue to establish a strong military presence in the area.
If you only have one unit remaining in your army, then this Secondary Mission is instead achieved at the end of your turn if that unit controls one objective marker in No Man’s Land, but in this instance you score 2VP instead of 5VP.
Break through the foe’s army and cut off their lines of escape.
If, at the end of your turn, only one unit from your army (excluding AIRCRAFT) is wholly within your opponent’s deployment zone, then this Secondary Mission is still achieved, but in this instance you score 3VP instead of 4VP (or instead of 5VP).
The enemy looks to their champions for courage. Identify and eliminate them with extreme prejudice.
If you are using Tactical Missions, then at the end of the turn, if either of the conditions below are satisfied, this Secondary Mission is achieved and you score 5VP:
- One or more enemy CHARACTER units were destroyed during this turn.
- All CHARACTER units from your opponent’s Army Roster have been destroyed during the battle.
The opposing army contains numerous heavily armoured units. Take any opportunity to bring them down.
- The destroyed model had a Wounds characteristic of 10+.
- The destroyed model had a Wounds characteristic of 15+.
- The destroyed model had a Wounds characteristic of 20+.
If you are using Tactical Missions, then when this Secondary Mission is achieved you score an extra 1VP. However, if you are using Tactical Missions, you cannot score more than 8VP in total from this Secondary Mission.
This area is of extreme importance. You are to lead an immediate all-out assault to capture it and deny it to our enemy for good.
While a unit is Battle-shocked, it is not a qualifying unit.
If, when you draw this Secondary Mission card, you only have one or two qualifying units remaining in your army, you can discard this Secondary Mission card and draw a new Secondary Mission card.
If you are using Tactical Missions, then when this Secondary Mission is achieved you score an extra 1VP (for a maximum of 5VP).
Dominate the field of battle. Storm every site of tactical import and leave the foe with no place to hide.
- You control one or more objective markers that were controlled by your opponent at the start of your turn.
- Your opponent did not control any objective markers at the start of your turn and you control one or more objective markers that you did not control at the start of your turn.
The objectives in this area have been tainted and must be cleansed with ritual and purifying flame.
At the end of your turn, each objective marker that is not within your deployment zone that you control that has one or more of these selected units within range is cleansed by your army.
If one or more objective markers are cleansed by your army this turn, this Secondary Mission is achieved and you score a number of VP depending on the number of objective markers cleansed by your army this turn, as follows:
- 1 objective marker cleansed = 2VP if you are using Fixed Missions, or 3VP if you are using Tactical Missions.
- 2 or more objective markers cleansed = 4VP if you are using Fixed Missions, or 5VP if you are using Tactical Missions.
An allied fleet approaches ready to launch a full-scale invasion of this planet. If our vanguard forces deploy a series of teleport homers and landing beacons deep within enemy territory, troops aboard our ships will be able to launch a deadly surprise assault from orbit.
At the end of your turn, if that unit is within your opponent’s deployment zone, or within 6" of the centre of the battlefield, it deploys a teleport homer at that location, this Secondary Mission is achieved and you score a number of VP depending on where the teleport homer was deployed, as follows:
- Centre of battlefield = 3VP.
- Opponent’s deployment zone = 4VP if you are using Fixed Missions, or 5VP if you are using Tactical Missions.
Our fleet has received a mysterious signal in this war zone, and its source has been identified as originating somewhere in the vicinity of this battlefield. Locate and secure it without delay.
At the end of your turn, each corner of the battlefield that has one or more of these selected units wholly within 9" of it is scanned by your army.
If one or more corners are scanned by your army, this Secondary Mission is achieved and you score 2VP for each corner scanned by your army this turn.
Exterminate your enemies.
Note that VP are scored even if such a unit is destroyed and then subsequently resurrected for any reason. If you score any VP from this Secondary Mission during a turn, then at the end of that turn this Secondary Mission is achieved.
You are charged with the defence of a key objective. It must not be permitted to fall into enemy hands.
This Secondary Mission cannot be achieved during the first battle round; if you draw this Secondary Mission card during the first battle round, draw a new Secondary Mission card and shuffle this Secondary Mission card back into your Secondary Mission deck.
Scour the enemy from the face of the battlefield.
Note that VP are scored even if such a unit is destroyed and then subsequently resurrected for any reason. If you score any VP from this Secondary Mission during a turn, then at the end of that turn this Secondary Mission is achieved.
You must advance swiftly into no man’s land and seize it before the enemy can, lest they take control of the entire battlefield.
If, at the end of your turn, you only control one objective marker in No Man’s Land, this Secondary Mission is still achieved, but in this instance you score 2VP instead of 5VP.
It is critical that this area is dominated. No enemy vanguard or guerrilla units can be allowed to disrupt our plans.
If, at the end of your turn, there are one or more enemy units wholly within 6" of the centre of the battlefield, but there are no enemy units within 3" of the centre of the battlefield, then this Secondary Mission is still achieved, but in this instance you score 3VP instead of 5VP.
An opportunity to seize a valuable asset has been identified, but the enemy are likely to use it as bait in a trap. Move to secure the site, but be wary of enemy ambushes.
At the end of your turn, if you control that selected objective marker, this Secondary Mission is achieved and you score 5VP.
A vital objective has been identified in your vicinity, but it is currently held by the enemy. You are ordered to capture it at any cost.
Gambit deck
Your battle plan is unfolding as you had foreseen, and the time to stake the fatal blow is almost at hand. Stay the course, and victory is all but assured.
Until the end of the battle, you continue to score VP from your Primary Mission.
The whole battle was a ruse to buy our covert kill teams the time they need to successfully complete a mission that could turn the tide of the entire war.
DISTRACT ENEMY UNITS: At the end of your fifth turn, roll one D6 for each enemy unit that is within Engagement Range of one or more units from your army. Add 1 to the result if that enemy unit is Battle-shocked and subtract 1 if one or more of the units from your army that are within Engagement Range of it are Battle-shocked. On a 4+, that enemy unit has been successfully delayed.
DETERMINE GAMBIT SUCCESS: If the number of enemy units that have been successfully delayed is greater than or equal to your Distraction target, this Gambit is successfully completed and you score 30VP.
Remaining in this battlezone is folly Teleportahums are being sanctified and orbital transports are inbound to exfiltrate what forces remain. Prepare for immediate extraction.
EVACUATE UNITS: At the end of your fifth turn, roll one D6 for each unit from your army that is wholly within 6" of the centre of the battlefield, subtracting 1 from the result if that unit is Battle-shocked. On a 4+, that unit (and any units embarked within it) are marked for evacuation.
DETERMINE GAMBIT SUCCESS: If the number of your units that are marked for evacuation is greater than or equal to your Evacuation target, this Gambit is successfully completed and you score 30VP.
The battlefield is lost. Triangulate coordinates and transmit them to our orbital assets so that they can unleash their fury and deny the enemy their prize.
Add 1 to the result for every other corner of the battlefield that has one or more units from your army wholly within 9" of it (excluding units that are Battle-shocked or within Engagement Range of any enemy units).
If the final result is 12 or more, this Gambit is successfully completed and you score 30VP.
When setting objective markers up on the battlefield, place them so they are centred on the point specified by the mission. When measuring distances to and from objective markers, measure to and from the closest part of them. Models can move over objective markers as if they were not there, but they cannot end a move on top of an objective marker.
At the start of the battle, each objective marker on the battlefield is said to be contested, and so is not controlled by either player. To control an objective marker, a player will first need to move models within range of it. A model is within range of an objective marker if it is within 3" horizontally and 5" vertically of that objective marker.
Every model has an Objective Control (OC) characteristic listed on its datasheet. To determine a player’s Level of Control over an objective marker, add together the OC characteristics of all the models from that player’s army that are within range of that objective marker. A player will control an objective marker at the end of any phase or turn if their Level of Control over it is greater than their opponent’s. If both players have the same Level of Control over an objective marker, that objective marker is contested.
- A model is within range of an objective marker if within 3" horizontally and 5" vertically.
- Level of Control: Add together the OC characteristics of all of a player’s models within range of the objective marker.
- An objective marker is controlled by the player with the highest Level of Control over it (in a tie, it is contested).
- Models cannot end a move on top of an objective marker.
TARGET: One of your active Secondary Mission cards.
EFFECT: Discard it and draw one new Secondary Mission card.
RESTRICTIONS: You can only use this Stratagem once per battle.
Mighty heroes fight at the forefront of battle.
Some CHARACTER units have ‘Leader’ listed on their datasheets. Such CHARACTER units are known as Leaders, and the units they can lead – known as their Bodyguard units – are listed on their datasheet.During the Declare Battle Formations step, for each Leader in your army, if your army also includes one or more of that Leader’s Bodyguard units, you can select one of those Bodyguard units. That Leader will then attach to that Bodyguard unit for the duration of the battle and is said to be leading that unit. Each Bodyguard unit can only have one Leader attached to it.
While a Bodyguard unit contains a Leader, it is known as an Attached unit and, with the exception of rules that are triggered when units are destroyed, it is treated as a single unit for all rules purposes. Each time an attack targets an Attached unit, until the attacking unit has resolved all of its attacks, you must use the Toughness characteristic of the Bodyguard models in that unit, even if a Leader in that unit has a different Toughness characteristic. Each time an attack sucessfully wounds an Attached unit, that attack cannot be allocated to a CHARACTER model in that unit, even if that CHARACTER model has lost one or more wounds or has already had attacks allocated to it this phase. As soon as the last Bodyguard model in an Attached unit has been destroyed, any attacks made against that unit that have yet to be allocated can then be allocated to CHARACTER models in that unit.
Each time the last model in a Bodyguard unit is destroyed, each CHARACTER unit that is part of that Attached unit is no longer part of an Attached unit. It becomes a separate unit, with its original Starting Strength. If this happens as the result of an attack, they become separate units after the attacking unit has resolved all of its attacks.
Each time the last model in a CHARACTER unit that is attached to a Bodyguard unit is destroyed and there is not another CHARACTER unit attached, that Attached unit’s Bodyguard unit is no longer part of an Attached unit. It becomes a separate unit, with its original Starting Strength. If this happens as the result of an attack, they become separate units after the attacking unit has resolved all of its attacks.
Each time a unit that is part of an Attached unit is destroyed, it does not have the keywords of any other units that make up that Attached unit (unless it has those keywords on its own datasheet) for the purposes of any rules that would be triggered when that unit is destroyed.
- Before the battle, CHARACTER units with the Leader ability can be attached to one of their Bodyguard units to form an Attached unit.
- Attached units can only contain one Leader.
- Attacks cannot be allocated to CHARACTER models in Attached units.
The Starting Strength of an Attached unit is equal to the combined Starting Strengths of all of its units (i.e. the number of models in the Leader unit added to the number of models in the Bodyguard unit). If either the Leader unit or the Bodyguard unit in an Attached unit is destroyed, the Starting Strength of the remaining unit is changed to be equal to its original Starting Strength.
For the purposes of rules that are triggered when a unit is destroyed, such rules are still triggered when one of the individual units that made up an Attached unit is destroyed (the Leader or the Bodyguard unit).
Lance weapons are deadly on the charge.
Weapons with [LANCE] in their profile are known as Lance weapons. Each time an attack is made with such a weapon, if the bearer made a Charge move this turn, add 1 to that attack’s Wound roll.TAKE AND HOLD
Several strategic locations have been identified in your vicinity. You are ordered to assault these positions, secure them and hold them at any cost.
- The player who has the first turn scores VP as described above.
- The player who has the second turn scores VP as described above, but does so at the end of their turn instead of at the end of their Command phase.
CHILLING RAIN
Intense winds gust across the battlefield, whipping through the shattered remains of bombed ruins and heavy with the stench of death. Icy rain drenches and chills the warriors, only adding to their misery and discomfort.
In this mission, no additional mission rules apply.
SEARCH AND DESTROY
PRIORITY TARGETS
The objectives in this area are vital to our war effort and securing them is your highest priority. Spare nothing in ensuring that they do not fall into enemy hands.
HIDDEN SUPPLIES
Reconnaissance units have uncovered a hidden cache of ammunition, fuel and rations in this war zone.
In this mission, players must set up one additional objective marker in No Man’s Land.
Unless the Chosen Battlefield mission rule is also in effect, before setting up this new objective marker, players must first move the objective marker in the centre of the battlefield 6" directly towards one of the corners of the battlefield (if No Man’s Land touches any of the corners of the battlefield, you must move the objective marker towards one of those corners). Players then set up the new objective marker 6" from the centre of the battlefield towards the diagonally opposite corner of the battlefield to the previously moved objective marker.
While a unit is Battle-shocked:
- The Objective Control characteristic of all of its models is 0.
- If it Falls Back, you must take a Desperate Escape test for every model in that unit.
- Its controlling player cannot use Stratagems to affect that unit.
Once you have taken Battle-shock tests for all of your units that require them, your Command phase ends and you progress to your Movement phase.
In this step, if for any reason a unit is forced to take a Battle-shock test for being below its Starting Strength, unless otherwise stated, that unit does not also have to take a Battle-shock test for being Below Half-strength. While a unit is Battle-shocked, all models in that unit are also Battle-shocked.
- Take a Battle-shock test for each unit from your army on the battlefield that is Below Half-strength.
- Roll 2D6: if the result is greater than or equal to the unit’s Leadership, the test is passed. Otherwise, the unit is Battle-shocked until the start of your next Command phase.
- Battle-shocked units have an OC of 0 and their controlling player cannot use Stratagems to affect them.
- Battle-shocked units must take Desperate Escape tests if they Fall Back.
THE RITUAL
Bitter foes clash in a race to finish a ritual to either sanctify or corrupt the battlefield.
When setting up the battlefield, remove all objective markers in No Man’s Land except the one closest to the centre of the battlefield.
In each player’s Shooting phase, the player whose turn it is can select one unit from their army that is not Battle-shocked and is eligible to shoot. Until the end of that turn, that unit is not eligible to shoot or declare a charge. At the end of that turn, the player whose turn it is can set up one objective marker wholly within No Man’s Land and within 1" of that unit provided it can be set up exactly 9" from one other objective marker and not within 6" of any other objective marker.
- The player who has the first turn scores VP as described above.
- The player who has the second turn scores VP as described above, but does so at the end of their turn instead of at the end of their Command phase.
Many armies employ reconnaissance units who can sit concealed, waiting for the right moment to strike.
During deployment, if every model in a unit has this ability, then when you set it up, it can be set up anywhere on the battlefield that is more than 9" horizontally away from the enemy deployment zone and all enemy models.Scouts form the vanguard of many armies. Unnoticed by the enemy, they range ahead of the main force.
Some units have ‘Scouts x"’ listed in their abilities. If every model in a unit has this ability, then at the start of the first battle round, before the first turn begins, it can make a Normal move of up to x", with the exception that, while making that move, the distance moved by each model in that unit can be greater than that model's Move characteristic, as long as it is not greater than x".DEDICATED TRANSPORT models can make use of any Scouts x" ability listed in their abilities, or a Scouts x" ability that a unit that starts the battle embarked within that DEDICATED TRANSPORT model has (provided only models with this ability are embarked within that DEDICATED TRANSPORT model), regardless of how that embarked unit gained this ability (e.g. listed in their abilities, conferred by an Enhancement or by an attached CHARACTER, etc.).
A unit that moves using this ability must end that move more than 9" horizontally away from all enemy models. If both players have units that can do this, the player who is taking the first turn moves their units first.
- Scouts x": Unit can make a Normal move of up to x" before the first turn begins.
- If embarked in a DEDICATED TRANSPORT, that DEDICATED TRANSPORT can make this move instead.
- Must end this move more than 9" horizontally away from all enemy models.
SCRAMBLER FIELDS
Scrambler fields and more esoteric devices have been activated in this area, restricting the use of advanced stealth and teleportation technologies.
In this mission:
- Players’ units with the Infiltrators ability cannot be set up within range of an objective marker that is either in No Man’s Land or their opponent’s deployment zone.
- Players’ units with the Scouts ability that make a move before the first turn begins cannot end that move within range of an objective marker that is either in No Man’s Land or their opponent’s deployment zone.
- If any rule is used to redeploy a unit, that rule cannot be used to set up that unit within range of an objective marker in No Man’s Land.
- When a player’s Reserves and Strategic Reserves units are set up on the battlefield, they cannot be set up within range of an objective marker that is either in No Man’s Land or their opponent’s deployment zone.
SWEEPING ENGAGEMENT
DEPLOY SERVO-SKULLS
This area is littered with valuable relics. Secure these artefacts behind our front lines.
The objective markers that start the battle in No Man’s Land are servo-skulls. At the end of each turn, each of these objective markers can be moved up to 6" in any direction by the player that controls it. When moving objective markers, they cannot end that move on top of any other objective marker or model, or inside impassable parts of terrain features (such as the walls of a ruin).
- 2VP for each servo-skull that is wholly within 12" of their opponent’s deployment zone.
- 5VP for each servo-skull that is wholly within 6" of their opponent’s deployment zone.
- 8VP for each servo-skull that is wholly within their opponent’s deployment zone.
Note that these conditions are not cumulative; if more than one applies, the player whose turn it is scores the applicable condition that carries the highest VP reward.
CHOSEN BATTLEFIELD
Both sides have scouted the area extensively, pinpointing the exact location of vital sites.
In this mission, objective markers are not placed as shown on the Deployment card drawn. Instead, players roll off at the start of the Place Objective Markers step, then alternate setting up objective markers, one at a time, starting with the winner of the roll off.
One objective marker must be placed wholly within each deployment zone, and the remaining objective markers must be placed wholly within No Man’s Land, as shown on the Deployment card drawn. Objective markers must be placed more than 6" away from any battlefield edge and more than 9" away from all other objective markers.
If for whatever reason it is not possible to set up an objective marker as described above, it is not placed on the battlefield.
If any rules require players to set up additional objective markers (e.g. Hidden Supplies) during the Place Objective Markers step, players set them up as described on this Mission Rule card.
If any rules instruct players to remove one or more objective markers, do so after setting them all up.
SUPPLY DROP
Supplies are inbound. Secure the drop coordinates.
At the start of the battle, players randomly select two different objective markers in No Man’s Land: the first selected is the Alpha objective, the second selected is the Omega objective. At the start of the fourth battle round, the Alpha objective is removed from the battlefield. At the start of the fifth battle round, all objective markers in No Man’s Land apart from the Omega objective are also removed.
- The player who has the first turn scores 15VP at the end of their Command phase if they control the objective marker in No Man’s Land.
- The player who has the second turn scores 15VP at the end of their turn if they control the objective marker in No Man’s Land.
SITES OF POWER
There is great power for those bold enough to claim it.
The objective markers in No Man’s Land are sites of power. At the end of each Command phase, the player whose turn it is empowers all sites of power that they control that have one or more CHARACTER models from their army within range; each site of power remains empowered by that player while one or more of their CHARACTER models remains within range of it.
- 3VP for each objective marker they control.
- 3VP for each site of power that they have empowered.
- The player who has the first turn scores VP as described above.
- The player who has the second turn scores VP as described above, but does so at the end of their turn instead of at the end of their Command phase.
HAMMER AND ANVIL
CRUCIBLE OF BATTLE
SCORCHED EARTH
What cannot be secured must be burned to ash.
From the second battle round, in each player’s Shooting phase, the player whose turn it is can select one unit from their army that is not Battle-shocked and is eligible to shoot. Until the end of that turn, that unit is not eligible to shoot or declare a charge. At the start of its controlling player’s next Command phase, if that unit is within 1" of an objective marker that the player whose turn it is controls, that objective marker is burned and removed from the battlefield.
- The player who has the first turn scores VP as described above.
- The player who has the second turn scores VP as described above, but does so at the end of their turn instead of at the end of their Command phase.
DAWN OF WAR
PURGE THE FOE
Exterminate the enemy. Show them no mercy.
- The player who has the first turn scores VP as described above.
- The player who has the second turn scores VP as described above, but does so at the end of their turn instead of at the end of their Command phase.
Note that a unit can. if it is returned to the battlefield for any reason, potentially contribute to this Primary Mission several times (assuming it is returned and subsequently destroyed several times over).
VITAL GROUND
The most vital ground in the region is in enemy hands.
If you draw this and the Hidden Supplies Mission Rule card, discard this card and draw a new Primary Mission card.
After setting up the battlefield, remove the objective marker in No Man’s Land that is closest to the centre of the battlefield.
- If they control the objective marker in their own deployment zone, they score 2VP.
- For each objective marker in No Man’s Land that they control, they score 5VP.
- If they control the objective marker in their opponent’s deployment zone, they score 6VP.
- The player who has the first turn scores VP as described above.
- The player who has the second turn scores VP as described above, but does so at the end of their turn instead of at the end of their Command phase.
- Advance Move: Models move up to M+D6".
- Cannot move within Engagement Range of any enemy models.
- Units that Advance cannot shoot or charge this turn.
Weapons powered by unstable and dangerous energy sources pose a substantial risk to the wielder every time they are used.
Weapons with [HAZARDOUS] in their profile are known as Hazardous weapons. Each time a unit is selected to shoot or fight, after that unit has resolved all of its attacks, for each Hazardous weapon that targets were selected for when resolving those attacks, that unit must take one Hazardous test. To do so, roll one D6: on a 1, that test is failed. For each failed test you must resolve the following sequence (resolve each failed test one at a time):- If possible, select one model in that unit that has lost one or more wounds and is equipped with one or more Hazardous weapons.
- Otherwise, if possible, select one model in that unit (excluding CHARACTER models) equipped with one or more Hazardous weapons.
- Otherwise, select one CHARACTER model in that unit equipped with one or more Hazardous weapons.
If a unit from a player’s army is selected as the target of the Fire Overwatch Stratagem in their opponent’s Charge phase, any mortal wounds inflicted by Hazardous tests are allocated after the charging unit has ended its Charge move.
- After a unit shoots or fights, roll one Hazardous test (one D6) for each Hazardous weapon used. For each 1, a model equipped with a hazardous weapon suffers 3 mortal wounds, that must be allocated to the selected model.
- A Critical Wound inflicts mortal wounds equal to the weapon’s Damage characteristic, instead of any normal damage.
Some attacks are so powerful that no armour or force field can withstand their fury.
Some rules inflict mortal wounds on units. Each time mortal wounds are inflicted on a unit, each of those mortal wounds inflicts one point of damage to that unit, and they are always applied one at a time. Each mortal wound is allocated to a model in the same manner as allocating an attack. Excess damage from mortal wounds is not lost if the damage can be allocated to another model. Instead, keep allocating damage to another model in the target unit until either all the damage has been allocated or the target unit is destroyed.If an attack inflicts mortal wounds in addition to any normal damage, do not make a Wound roll or saving throw (including invulnerable saving throws) against those mortal wounds. If those mortal wounds are inflicted by an attack that has the [PRECISION] ability, the attacking model’s controlling player can allocate those mortal wounds to a CHARACTER model in that unit.
If mortal wounds are being inflicted as a result of the [HAZARDOUS] ability or by an attack with the [DEVASTATING WOUNDS] ability that scored a Critical Wound, each time those mortal wounds are allocated to a model, if that model is destroyed as a result of those mortal wounds, the remaining mortal wounds from that attack are lost, just as with a normal attack.
If, when a unit is selected to shoot or fight, one or more of its attacks can inflict mortal wounds on the target, resolve any normal damage inflicted by the attacking unit’s attacks on that target before inflicting any mortal wounds on that target. If an attack inflicts mortal wounds in addition to any normal damage, but the normal damage is subsequently saved, the target unit still suffers those mortal wounds, as described above.
- Each mortal wound inflicted on a unit causes one model in that unit to lose one wound.
- Unless the source of the mortal wounds is the [HAZARDOUS] ability or an attack with the [DEVASTATING WOUNDS] ability, damage from mortal wounds is not lost if it can be allocated to another model.
- No saving throws can be made against mortal wounds.
- Mortal wounds inflicted by attacks always apply after any normal damage, even if that damage was saved.
You then make a Charge roll for the charging unit by rolling 2D6. The result is the maximum number of inches each model in that unit can be moved if a Charge move is possible. For a Charge move to be possible, the Charge roll must be sufficient to enable the charging unit to end that move:
- Within Engagement Range of every unit that you selected as a target of the charge.
- Without moving within Engagement Range of any enemy units that were not a target of the charge.
- In Unit Coherency.
- Charge Roll: 2D6".
- Targets of a charge must be within 12" but do not need to be visible.
- If the distance rolled is insufficient to move within Engagement Range of all targets while maintaining Unit Coherency, the charge fails.
- Cannot move within Engagement Range of any unit that was not a target of the charge.
- If the charge is successful, each model makes a Charge move less than or equal to the Charge roll, and must move into base-to-base contact with an enemy model if possible.
A unit cannot shoot or declare a charge in the same turn that it Fell Back.
Desperate Escape Tests
Unlike when making other types of move, models can move over enemy models when making a Fall Back move as if those enemy models were not there, but you must take a Desperate Escape test for each model that will do so (excluding models that are TITANIC or can FLY) before any models in that unit are moved. In addition, if a unit is Battle-shocked when it is selected to Fall Back, you must take a Desperate Escape test for every model in that unit before any are moved.
- Fall Back Move: Models move up to M".
- Units that Fall Back cannot shoot or declare a charge in the same turn.
- Models can move over enemy models when Falling Back, but you must take Desperate Escape tests for them before they do so (excluding models that are TITANIC or can FLY).
- If a Battle-shocked unit is selected to Fall Back, take a Desperate Escape test for every model in that unit.
- Desperate Escape Test: Roll one D6. On a 1-2, one model from that unit is destroyed.
An unmodified Hit roll of 6 is called a Critical Hit and is always successful. An unmodified Hit roll of 1 always fails. A Hit roll can never be modified by more than -1 or +1.
- Hit Roll (Ranged Attack): A hit is scored if the D6 result equals or exceeds that attack’s BS.
- Hit Roll (Melee Attack): A hit is scored if the D6 result equals or exceeds that attack’s WS.
- Critical Hit: Unmodified Hit roll of 6. Always successful.
- An unmodified Hit roll of 1 always fails.
- A Hit roll can never be modified by more than -1 or +1.
| ||||||||||||||


If the result of the Wound roll is greater than or equal to the required number shown in the table above, then that Wound roll is successful and scores one wound against the target unit. Otherwise, the attack fails and the attack sequence ends.
An unmodified Wound roll of 6 is called a Critical Wound and is always successful. An unmodified Wound roll of 1 always fails. A Wound roll can never be modified by more than -1 or +1.
- Critical Wound: Unmodified Wound roll of 6. Always successful.
- An unmodified Wound roll of 1 always fails.
- A Wound roll can never be modified by more than -1 or +1.
If the result is greater than or equal to the Save characteristic of the model the attack was allocated to, then that saving throw is successful and the attack sequence ends. Otherwise, that saving throw fails and that model suffers damage.
An unmodified saving throw of 1 always fails. A saving throw can never be improved by more than +1.
- Saving Throw: Roll one D6 and modify by the attack’s AP. If the result is less than the Save of the model being rolled for, the saving throw is failed and that model suffers damage. Otherwise, that attack is saved.
- An unmodified saving throw of 1 always fails.
- A saving throw can never be improved by more than +1.
You can never re-roll a dice more than once, and re-rolls happen before modifiers (if any) are applied. Rules that refer to the value of an ‘unmodified’ dice roll are referring to the dice result after any re-rolls, but before any modifiers are applied.
- Unmodified Dice: the result after re-rolls, but before any modifiers.
- A dice can never be re-rolled more than once.
- You must re-roll all dice if several need adding together (e.g. 2D6).
- Re-rolls are applied before any modifiers.
TARGET: That unit or model from your army.
EFFECT: You re-roll that roll, test or saving throw. If you are using fast dice rolling, select one of those rolls or saving throws to re-roll.
Models cannot be set up or end a Normal, Advance or Fall Back move within Engagement Range of any enemy models. If for any reason a model cannot meet this condition, that model is destroyed.
- Engagement Range: Within 1" horizontally and 5" vertically.
- Models cannot be set up or end a Normal, Advance or Fall Back move within Engagement Range of any enemy models.