
Pariah Nexus

Books
| Book | Kind | Edition | Version | Last update |
| | ||||
| | Expansion | 10 | January 2024 | |
Introduction
In this section you will find a wide variety of new Battle Honours you can give to your warriors as they fight in the dreaded Pariah Nexus, as well as new missions and unique Crusade Blessings that can come into effect in your games. Additionally, you’ll find rules for gathering Blackstone Fragments to purchase bespoke upgrades, and guidance on howto organise a Pariah Nexus campaign.
Forces of all allegiances seek to gather the mysterious substance known as blackstone, whether to create prototype weapons, offer it to a benefactor or for more nefarious reasons. This section explains how to gain and then utilise this resource in your Crusade games.
BATTLE TRAITS
These rules cover all of the skills and new capabilities your forces can learn from fighting in this specific theatre of war as they gain experience and achieve new ranks.
CRUSADE RELICS
Many powerful artefacts, found within these pages, can be utilised to tip the scales in this horrific war zone.
PLAYING A PARIAH NEXUS CRUSADE MISSION
Follow the sequence in this section to set up and play Pariah Nexus Crusade missions.
This section provides a range of new Crusade Blessings that can be used by an Underdog to get a leg-up on their more experienced opponent, ensuring every Crusade game provides a fair battle.
When playing one of the Crusade missions presented in this book, you can choose from these Agendas, which provide unique ways for your units to gain experience on the battlefield.
CRUSADE BADGES
Here you will find nine Crusade Badges representing goals you can set yourself depending on the alliance you decide to fight for in your Pariah Nexus campaign.
PARIAH NEXUS CAMPAIGN
These rules allow you and your friends to play through a combined Crusade experience across a campaign, working together in your alliance to take the fight to the enemy.
CRUSADE MISSIONS
This section includes a variety of missions of all game sizes, allowing you to play your own narrative battles as they might take place in the Pariah Nexus.
Blackstone Discovery
The Necron Crypteks and the forces of the Adeptus Mechanicus are seeking a key resource in the Pariah Nexus: blackstone. While some factions are happy to assist in the acquisition of this substance, others are determined to interrupt it.While playing in a Pariah Nexus campaign, your Crusade force will accrue Blackstone Fragments, a powerful resource that will help empower your units in a number of ways. Blackstone Fragments can be gained as a result of Pariah Nexus Agendas and mission rules, as well as through other means such as Crusade Relics. Keep a Blackstone tally on your Order of Battle, adding 1 to it each time you gain a Blackstone Fragment. Each time you harness or salvage Blackstone Fragments as described below, reduce your Blackstone tally by the necessary amount. You can also use the Order of Battle to keep a log of your Blackstone Fragments.
During a Pariah Nexus campaign, you use Blackstone Fragments in a variety of ways, ranging from accessing unique Blackstone Upgrades such as Battle Honours and Crusade Relics. If you are playing a Pariah Nexus campaign using alliances, your Blackstone Fragments can even be the deciding factor in whether or not your alliance wins the campaign!
In addition to being used to purchase Blackstone Upgrades, you can also salvage excess Blackstone Fragments in return for XP. This could represent utilising it for new archeotech or sending it to your forces benefactors - whatever best fits the narrative of your Crusade force.
If you wish to do so, after a battle, you can spend 5 Blackstone Fragments to grant 5XP to one Character unit from your Crusade force. While playing in a Pariah Nexus campaign, you can only salvage Blackstone Fragments in this way once per campaign phase.
Blackstone Battle Honours
CHARACTERS ONLYThe following Battle Honours can be purchased using Blackstone Fragments. Once purchased, each Battle Honour can only be applied to one CHARACTER model from your Crusade army. To apply the same Battle Honour to another CHARACTER, you must purchase it again.
With each fresh blackstone deposit discovered and recorded, it becomes ever easier to determine where the next such hidden prize may be secured.
While the bearer is within range of an objective marker, if the bearers unit is Battle-shocked, change the Objective Control characteristic of models in that unit to 1, instead of 0.
Locating the strange riches of this region only feeds this commander’s desire to accrue more such esoteric wealth.
If the bearer is your Warlord, at the end of the battle, roll one D6, adding 2 to the roll if you won the battle. On a 6+, you gain 3 Blackstone Fragments.
Thanks to the stifling effects of the nodal matrix, many commanders fighting in this region are forced to do so in relative ignorance or while wrestling with the nightmare effects of the Stilling. This warlord has become adept at recognising these weaknesses in their foes and adapting accordingly.
At the start of the battle, if the bearer is your WARLORD, until the end of the battle, it gains the ability below that corresponds with the Strategic Footing you selected in the Select Strategic Footing step:
- Aggressive: Models in the bearer’s unit have the Scouts 6" ability.
- Balanced: The bearer has the Lone Operative ability.
- Defensive: Models in the bearer’s unit have the Stealth ability.
Blackstone Crusade Relics
You can spend Blackstone Fragments to purchase the unique Crusade Relics below. Each one can only be purchased once. When a CHARACTER gains a Crusade Relic, you can select one of these Crusade Relics you have purchased for that CHARACTER to gain.This experimental neuro-emitter can be energistically entangled with local deposits of blackstone, causing them to resonate on micro-frequencies cogitated to trigger disturbing visual hallucinations amongst the foe. Enemies so much as looking in that direction have their aim fouled and their blows robbed of strength by the horrors they see.
At the start of the battle, select one objective marker. While the bearer is on the battlefield, friendly units within range of that objective marker have a 5+ invulnerable save.
Many would consider it reckless to augment a weapon with shards of empyrically charged blackstone. It cannot be denied, however, that the results can be impressive...
Select one melee weapon equipped by the bearer (excluding a weapon that has been replaced by an Enhancement or upgraded via the Weapon Modifications table). That weapon is now a Crusade Relic; note this on the bearers Crusade card and give the weapon a suitable name. Once per battle, in the Fight phase, the bearer can activate this Crusade Relic. If it does, until the end of the phase, each time an attack is made with that weapon, invulnerable saving throws cannot be made against that attack.
This soul-sapping periapt may destroy its wearer given time. However, in the short term it renders even their mere presence baleful.
Each time a melee attack is allocated to the bearer, on an unmodified saving throw of 6, the attacking unit suffers 1 mortal wound after it has finished making its attacks. If that attack was made with a Psychic weapon, this effect applies on an unmodified saving throw of 5+ instead.
Battle Traits
Battle Traits are skills or upgrades that units have acquired during their years of warfare, and help to give them a vital edge on the battlefield. Each time a unit gains a Battle Trait, either roll one D6 and consult the table below to randomly determine which Battle Trait the unit has gained, or choose the Battle Trait that you think tells the best narrative. A unit can have more than one Battle Trait, but it cannot have the same Battle Trait more than once (if a duplicate result is rolled, roll again until a different result is rolled).
| ||||||||||||||||||


|
| ||||||||||||||||||
| ||||||||||||||||||
Crusade Relics
When fighting in the Pariah Nexus, units from your Crusade army can gain the following Crusade Relics.Artificer Relics
Which crazed engineer fashioned this esoteric device of brass and wires is unknown. ’There is no denying, however, that the strange contraption’s shrilling note indicates deposits of noctilith near at hand.
After you win a battle, if the bearer is on the battlefield, you gain an additional 2 Blackstone Fragments.During the frenzied excavations throughout the Nephilim Sector, more has been unearthed than just noctilith. This strange energy-emitter is of a design unfamiliar even to the Crypteks of the Necrons, yet the efficacy of the shimmering shield-cloak it creates cannot be denied.
The bearer has a 4+ invulnerable save.Legitimised anew by Szarekh’s patronage, the rogue Crypteks known as the Technomandrites have wasted no time in fashioning and unleashing terrifying new weapons. Some of these, lost amidst the carnage on blazing battlefields, have since been scavenged by many warring factions.
Select one weapon equipped by the bearer (excluding a weapon that has been replaced by an Enhancement or upgraded via the Weapon Modifications table), then select one of the abilities below for that weapon to gain. That weapon is now a Crusade Relic; note this on the bearer’s Crusade card and give the weapon a suitable name.- [LETHAL HITS]
- [PRECISION]
- [SUSTAINED HITS 1]
Deep beneath the surface of Cherist, explorator teams discovered a shrine to an unknown alien god. Its guardian, an ancient being of a sort unknown to Humanity, had been rendered soul-dead by the Stilling. The creature was taken for study, but the armour it wore went mysteriously missing. Whether it was stolen or found some other, more sinister means of evading destruction, this unearthly suit of highly adaptable and sublimely protective plate has surfaced several times since.
Improve the Toughness and Save characteristics of the bearer by 1.Antiquity Relics
This finely wrought icon of noctilith is inlaid with theldrite circuitry and psycho-resonant slivers of a wraithbonelike substance. It protects not only its bearer, but also nearby allies, from the infernal energies of warpcraft.
Non-PSYKER model only. Models in the bearer’s unit have the Feel No Pain 4+ ability against Psychic Attacks.The dolmen gates of the Necrons lace their captive tunnels through the Nephilim Sector. This mysterious - seemingly semi-sentient - device is able to locate and hack a quantum path into these interstitial tunnels, allowing its bearer to walk these hidden roads at will.
Models in the bearer’s unit have the Deep Strike ability. In addition, you can target the bearer’s unit with the Rapid Ingress Stratagem for 0CP, and when resolving that Stratagem, you can set up that unit anywhere on the battlefield that is more than 6" horizontally away from all enemy units and within range of an objective marker. Until the end of the turn, that unit is not eligible to declare a charge.This sinister device was brought from the deepest vaults of Dantris III by Magos Charth. Rumoured to be a relic of Old Night, it warps the realspace presence of its bearer and nearby allies, confusing enemy senses in a most unnatural fashion. Rumours that the bearer slowly fades from reality altogether may be lent some credence by the unexplained disappearance of Charth and his entourage.
Models in the bearer’s unit have the Stealth ability. In addition, each time the bearer’s unit is selected as a target of a charge, subtract 2 from the Charge roll.This thrumming, fist-sized device entered the war zone worn upon a servo-torque by Ausipcatrix Magna Ohlm. Though subsequently seized as a trophy when it was cut from Ohlm’s neck along with her head, its powers of strategic perspicacity and tactical early warning remain undimmed.
After both players have deployed their armies, select one unit from your Crusade army and redeploy it. When doing so, you can set that unit up in Strategic Reserves if you wish, regardless of how many units are already in Strategic Reserves.Legendary Relics
BLADE OF THE DYNAST This is a flowing and many-formed weapon sheathed in living metal and powered by a shard of a captive star. It was forged for use by Necron dynastic champions to wield in honour duels whose outcome could, by Triarchal code, decide the fate of worlds. Improve the Strength, Damage and Armour Penetration characteristics of the bearers melee weapons by 1. Once per battle, in your Charge phase, if your Crusade army is in the Aggressive Strategic Footing, the bearer can activate this Crusade Relic. If it does, until the end of the phase, add 2 to Charge rolls made for the bearer’s unit. |
NOCTIC SHIELD It is unclear which warring faction fashioned this seemingly crude and unwieldy shield. Anti-gravitic microsuspensors counteract the weight of what is essentially a worked slab of noctilith, laced through with esoteric circuitry and fluctuating between empyrically polarised states. The defensive properties of the Noetic Shield cannot be gainsaid, however, for it both wards away projectiles and blades with kinetic pulses even as it drains the will and strength of those who assail its bearer. Add 1 to the Toughness and Wounds characteristics of the bearer. Once per battle, when an attack targets the bearer’s unit, if your Crusade army is in the Defensive Strategic Footing, the bearer can activate this Crusade Relic. If it does, until the end of the phase, each time an attack is allocated to a model in the bearer’s unit, subtract 1 from the Damage characteristic of that attack. |
ROD OF THE OMNISSIAH What may once have been a simple data-wand or command stave has been augmented with bone-caged arcane runes, coiling nests of esoteric wiring, and slivers of blackstone suspended in solutions of blood and sacred unguents. The result is a singular device that channels the motive force of organic, mechanical and even supernatural entities, both giving and - on certain horrifying occasions - leeching away. At the start of your Command phase, the bearer regains up to D3 lost wounds. Once per battle, at the start of your Command phase, if your Crusade army is in the Balanced Strategic Footing, the bearer can activate this Crusade Relic. If it does, select one enemy unit within Engagement Range of the bearer. That enemy unit suffers a number of mortal wounds equal to the number of wounds the bearer has regained as a result of this Crusade Relic during the battle. |
Playing A Pariah Nexus Crusade Mission
A Pariah Nexus Crusade battle is waged by following the sequence below.
Select Battle Size
Players must first select the battle size they wish to play: Incursion, Strike Force or Onslaught. The table below gives a rough guide of how long each battle should take.
| |||||||||||||||
Muster Crusade Armies
Each player must then muster a Crusade army and provide a copy of their Army Roster for their opponent to read through.Determine Mission
Next players determine which mission will be used for the battle; they can choose from the missions presented in the tables (see below) for their chosen battle size. This will determine the deployment map that is used, as well as the specific mission briefing. Players can either simply agree which they will use with their opponent, or they can roll a dice to randomly select a mission.When rolling to determine an Incursion or Strike Force mission, first roll one D6 to determine which table to use: on a 1-3, use the Incursion/Strike Force A table; on a 4-6, use the Incursion/Strike Force B table. Then roll one D6 to determine which mission to play. For Onslaught missions, roll one D6 to determine which mission to play on the Onslaught table.
| ||||||||||||||||
| ||||||||||||||||
|
Select Strategic Footing
Each player secretly selects a Strategic Footing and reveals it. This will determine which player is the Attacker and which player is the Defender.Read Mission
Each mission has a mission briefing that will detail the aims of the battle. Each mission will also list one or more additional mission rules that will apply for the duration of the battle and a series of objectives, which may be different for the Attacker and the Defender. Players should read and familiarise themselves with these before proceeding.Place Objective Markers
Players now set objective markers up on the battlefield. Each mission’s deployment map will show the players how many to set up and where each should be placed.Create The Battlefield
Next players create the battlefield and set up terrain features. The size of the battlefield depends on the battle size selected, as shown in the table below (the table shows the minimum size of battlefields).
| ||||||||
Unless otherwise stated, when setting up terrain features, use the guidelines detailed in the Core Rules. Players must use the rules presented in the Core Rules for terrain features.
Terrain features should not be set up with any impassable sections (such as the walls of a ruin) within 1" of any objective markers.
Purchase Requisitions
If you have access to any Requisitions that are used before a battle, you can spend RP to use them now. lf any of these upgrade one or more of your units for the coming battle, make a note of that upgrade on your Army Roster.Select Agendas
Each player then secretly selects two Agendas for the battle and writes them down. Each can award Experience points to certain units in that player’s Crusade army, as described on the Agenda itself. Once both players have selected their Agendas, they reveal their selections to their opponent.Select Crusade Blessings
When two Crusade armies battle each other, it is likely that one or the other will be more experienced. To determine this, both players should compare the combined Crusade points total of all the units that are on their Army Rosters.If there is a difference of at least 5 between the players’ Crusade points tot er whose Army Roster has the lower total number of Crusade points is the Underdog and gains a number of Crusade Blessings to use in that battle, depending on the difference. This represents high command funnelling additional resources to the Underdog to help them combat a more experienced foe.
The Crusade Blessings available depend on the war zone the battle is being fought in - if the battle is being fought in the Pariah Nexus (or if you are playing in a war zone that does not list Crusade Blessings) use them.
Mission Objectives
During the battle, players can gain Victory points (VP) by achieving mission objectives. Mission objectives can either be ‘Progressive’ or ‘End Game’. Progressive mission objectives are scored during the battle (exactly when is detailed on the mission objective itself), and can be achieved, and hence award Victory points, several times. End Game mission objectives are scored at the end of the battle.Some Progressive objectives will award Victory points ‘each time’ an enemy model or unit is destroyed. A model or unit can, if it is resurrected for any reason (i.e. it was destroyed and subsequently returned to the battlefield}, potentially contribute several Victory points due to these types of mission objectives (assuming it is resurrected and subsequently destroyed several times over}.
Declare Battle Formations
In the order stated below, both players now secretly note down:- Which of their Leader units will start the battle attached (they must specify which Leader unit is attached to which Bodyguard unit).
- Which of their units will start the battle embarked within TRANSPORT models (they must specify which units are embarked on which models)
- Which of their units will start in Reserves (including Strategic Reserves).
In Pariah Nexus Crusade missions, Reserves units cannot arrive during the first battle round, and any Strategic Reserves or Reserves unit that has not arrived on the battlefield by the end of the third battle round counts as having been destroyed, as do any units embarked within them (this does not apply to units that are placed into Strategic Reserves after the first battle round has started).
Deploy Crusade Armies
Players now alternate setting up their remaining units one at a time, starting with the Defender. A player’s units must be set up wholly within their deployment zone - the Attacker’s and the Defender’s deployment zones are shown on the deployment map of each mission. If one player finishes deploying all their units, their opponent then deploys the remainder of their units.Determine First Turn
Unless the mission briefing says otherwise, players roll off and the winner takes the first turn.Resolve Pre-Battle Rules
Players alternate resolving any pre-battle rules units from their army may have, starting with the player who will take the first turn.Begin The Battle
The first battle round begins. Players continue to resolve battle rounds until the battle ends.End The Battle
The battle ends after five battle rounds have been completed. If one player has no models remaining in their Crusade army at the start of their turn, the other player may continue to play out their turns until the battle ends.Determine Victor
At the end of the battle, the player with the most Victory points is the winner. If players are tied, the battle is a draw. If every model in a player’s Crusade army is painted to a Battle Ready standard, that player is awarded a bonus 10 Victory points.The victor of a mission can then claim the Victor bonus listed on that mission. If the game is a draw, neither player can claim the bonus.
Update Crusade Cards
The players must now update their Crusade cards for all the units they used in the battle by taking Out of Action tests for any that were destroyed, and selecting a unit to be Marked for Greatness. If this results in any units gaining a rank, before the next battle they can gain Battle Honours.Update Order Of Battle
Increase your Battle tally and Requisition points by 1, and make any notes that you wish to record following your battle. If you wish to add any units to your Order of Battle or spend any Requisition points, do so and update your Order of Battle accordingly before your next battle.Crusade Blessings
An Underdog in a Pariah Nexus battle can select one or more Crusade Blessings from those presented here. The number they can select depends on the difference in Crusade points between the armies, as shown in the table below. The same Crusade Blessing cannot be selected more than once.
| ||||||||||||
Between the apocalyptic collapse of dozens of Imperial settlements and complexes, and the successive waves of warfare and siege that have swept the worlds of this war zone since, many defensive positions lie abandoned. It is the work of hours for experienced soldiery to garrison them afresh, repairing damaged structures and heaving aside glassy-eyed heaps of the Stilled.
Beneath the smothering shroud cast by the nodal matrix, those commanders who can either resist its powers or remain immune to them have a distinct advantage. More than most, this is a war zone where securing reliable lines of communication and supply can win entire battles before the first shot is fired!
Faced with the risk of operating in isolation for long periods of time, or communications being severed without warning, many commanders have taken to drawing up their own emergency plans. Should the situation deteriorate suddenly, these emergency directives may save lives or even entire war fronts.
The gruelling conditions of this war zone wear down those who fight here with every stifling hour that crawls past. Yet with every battle survived, and every victory claimed, their morale is bolstered anew and they learn better how to survive this living nightmare.
No matter where a commander may lead their armies, nor the perils and terrors of the foes they face, sometimes there is no substitute for simple good luck. This is just such an instance.
Entropy is the enemy of all who wage war within the Nephilim Sector. Driven by this urgent knowledge, commanders drive their warriors hard into battle, knowing they must seize victory quickly before their forces degrade or the strategic situation shifts around them.
With armies enduring the horrors of the Stilling, of unexpected civil war, and of witnessing the effects of apocalyptic nightmare weapons, firm leadership from their commanders is more important than ever.
Cached and forgotten or lost by an army long since driven from this location, you find a wealth of noctilith just waiting to be seized.
Your extractors are in the midst of unearthing a rich noctilith deposit, but they must be defended against an enemy breakthrough.
Wearing experimental charms fashioned from blackstone may be deeply unpleasant and ultimately harmful for many beings, but it does help to ward off hostile psychic energies.
Suspended in an esoteric solution, empyrically polarised slivers of blackstone can be used to perform empath-augury, scrying out the thoughts and intentions of the foe. Beneath the unnatural pall of the nodal matrix, such insights can prove especially valuable.
Faction Crusade Blessings
You can only select one of the following Crusade Blessings if every model from your Crusade army meets the keyword restrictions indicated.A surfeit of zeal allows the warriors of the Imperium to throw off the smothering effects of the Stilling, at least long enough to seize victory in battle.
Once per battle, at the start of your Command phase, you can use this Crusade Blessing. If you do, until the start of your next Command phase, each time an Attached unit from your Crusade army takes a Battle-shock or Leadership test, you can re-roll that test.
To the android minds of the Necrons, the galaxy is rightfully theirs to reclaim. The Silent King has commanded that this wholesale reconquest begin in the Nephilim Anomaly, and his legions march out to obey.
At the start of your Command phase, select one NECRONS INFANTRY unit from your Crusade army. Until the start of your next Command phase, add 1 to the Objective Control characteristic of models in that unit.
Humanity and the Necrons are far from the only warring factions seeking conquest or survival within War Zone Nephilim. Raiding parties and warbands of many factions carve their own bloody paths through contested systems, exploiting their enemies' preoccupation with one another to attack without warning.
After both players have deployed their armies, you can select up to two units from your Crusade army and redeploy them. When doing so, those units can be placed into Strategic Reserves, regardless of how many units are already in Strategic Reserves.
Agendas
Agendas offer unique and exciting ways for your units to gain additional Experience points in a Crusade battle. From assassinating key enemy leaders to going on guerrilla recon missions, there are a whole range of different Agendas you can choose from to best suit your Crusade force’s narrative. When playing a Pariah Nexus Crusade mission you can select from the following Agendas.Some Agendas will award Experience points or tally marks each time’ an enemy model or unit is destroyed. A model or unit can, if it is resurrected for any reason (i.e. it was destroyed and subsequently returned to the battlefield), potentially contribute several Experience points or tally marks to these types of Agendas (assuming it is resurrected and subsequently destroyed several times over).
For every band of warriors consumed by the horrors of unbound technology or laid low by despair and the blades of the foe, another squad perseveres in the face of horrors uncounted to rise stronger than ever.
- If that unit is not destroyed, it gains 2XP.
- If that unit is not Below Half-strength, it gains 1XP.
- For each of those units that is not destroyed, you gain 1 Blackstone Fragment.
Many are the battlefields in this war zone where abandoned material and resources can be claimed by those willing to pick through carrion and ruin.
There is always strategic value to eliminating the enemy's leadership structure. Amidst the gruelling horror of this war zone, those benefits are magnified tenfold.
Few missions are as dangerous as being charged with breaking through the enemy’s lines in the face of ferocious opposition. Yet for those who survive and prevail, there are bloody lessons to be learned.
Crucial data-caches have been lost in this region, each one holding the key to triangulating the location of a rich deposit of noctilith. This information must be seized before the enemy can secure or destroy it.
At the end of that turn, if that unit is within range of an objective marker you control that is not in your deployment zone, roll one D6: on a 4-5, that unit gains 1XP; on a 6, that unit gains 2XP and you gain 1CP. Each time a unit from your Crusade army gains XP as a result of this Agenda, you gain 1 Blackstone Fragment (to a maximum of 3).
Striking at the key point near the heart of the enemy's battle line, you have a chance to divide their disordered forces, encircle and destroy them one after another then claim the blackstone bounty of this region.
The enemy in this region are on the verge of breaking. If you can inflict sufficiently horrific casualties upon them, you will smash their morale altogether.
Determined to force a vital message through the miasma of the Stilling, your most powerful psychic operatives must take up ritual positions to act as channelling conduits for the crucial missive.
You have a vital chance to end your army's temporary isolation from its parent force. To seize it, you will need to secure a hardened communications relay on this battlefield and hold on long enough to get a distress call through to high command.
Strategic Footing Agendas
You can only select one of the following Agendas if you have chosen the corresponding Strategic Footing.The shock value of hurling your forces headlong into the enemy lines cannot be understated. Moreover, those warriors who survive the experience will doubtless learn bloody lessons.
At the end of the first battle round, select up to three units from your Crusade army that are within Engagement Range of one or more enemy units. The selected unit gains 2XP and you gain 1 Blackstone Fragment for each unit selected.
You have an opportunity on this battlefield to shift the balance of the wider war front in your favour. This needs to be done with precision, cunning and measured aggression.
Each time a unit from your Crusade army destroys an enemy unit that was within range of an objective marker, it gains 1XP (to a maximum of 3XP per unit). For every 3 enemy units destroyed in this way, you gain 1 Blackstone Fragment (to a maximum of 2).
Overstretched and undersupplied, now is not the moment for reckless action. Instead, you must hold the line, eliminate your enemies, and minimise your own casualties so as to stabilise your situation.
At the end of the battle, if at least half of your Crusade army’s units are not destroyed, you can select up to three units from your Crusade army that are not destroyed. The selected units each gain 2XP and you gain 3 Blackstone Fragments.
Crusade Badges
Seekers Alliance
If you participate in a Pariah Nexus campaign as a member of the Seekers alliance, you can earn the Crusade Badges below.- Gained 10 or more Blackstone Fragments during a Pariah Nexus campaign.
- Won three or more battles during a Pariah Nexus campaign.
- Purchased two or more Blackstone upgrades.
- Gained 20 or more Blackstone Fragments during a Pariah Nexus campaign.
- Won five or more battles during a Pariah Nexus campaign.
- Purchased three or more Blackstone upgrades.
- Gained 30 or more Blackstone Fragments during a Pariah Nexus campaign.
- Won eight or more battles during a Pariah Nexus campaign.
- Purchased five or more Blackstone upgrades.
Protectors Alliance
If you participate in a Pariah Nexus campaign as a member of the Protectors alliance, you can earn the Crusade Badges below.- Gained 10 or more Blackstone Fragments during a Pariah Nexus campaign.
- Won three or more battles during a Pariah Nexus campaign.
- Salvaged Blackstone Fragments one or more times.
- Gained 20 or more Blackstone Fragments during a Pariah Nexus campaign.
- Won five or more battles during a Pariah Nexus campaign.
- Salvaged Blackstone Fragments three or more times.
- Gained 30 or more Blackstone Fragments during a Pariah Nexus campaign.
- Won eight or more battles during a Pariah Nexus campaign.
- Salvaged Blackstone Fragments five or more times.
Interlopers Alliance
If you participate in a Pariah Nexus campaign as a member of the Interlopers alliance, you can earn the Crusade Badges below.- Gained 10 or more Blackstone Fragments during a Pariah Nexus campaign.
- Won three or more battles during a Pariah Nexus campaign.
- Gained Advantage in a battle three or more times.
- Gained 20 or more Blackstone Fragments during a Pariah Nexus campaign.
- Won five or more battles during a Pariah Nexus campaign.
- Gained Advantage in a battle three or more times.
- Gained 30 or more Blackstone Fragments during a Pariah Nexus campaign.
- Won eight or more battles during a Pariah Nexus campaign.
- Gained Advantage in a battle five or more times.
Pariah Nexus Campaign
Crusade offers a fantastic narrative experience to the Warhammer 40,000 player, letting you take your collection on its own unique journey. But you might also want to share that journey with other players, weaving combined tales of heroism and victory as you fight both with and against each other in a multi-game campaign. The rules on the following pages provide a framework that you can use to take your Crusade forces on just such a path, scaling the experience to whatever duration you and your friends desire.
Introduction
A Pariah Nexus campaign allows a group of players to get together, form alliances and play a series of games. It is split into three campaign phases, each of which consists of numerous battles between the factions. At the end of each campaign phase, the alliance with the most Campaign points in that phase will achieve victory, earning them Strategic points that count towards the campaign’s final winners. As the campaign phases progress, each is worth more and more Strategic points, ensuring that the ultimate victors are not decided right up until the end of the campaign.For Pariah Nexus campaigns, players can exchange their Blackstone Fragments as a team each campaign phase to earn either special bonuses or Strategic points to contribute to their alliances’ overall goals. This means that each player is responsible for managing their Blackstone Fragments as they see fit during the campaign, but must always consider that they can pool resources to achieve total victory.
Campaign Badges
At the end of any Pariah Nexus campaign battle, every unit that was part of your Crusade army for that battle that does not already have it gains the Pariah Nexus campaign badge.As the unit fights in other campaigns, it can gain additional campaign badges. As well as being a visual record of a unit’s fighting history, various Battle Honours are only available to units with particular campaign badges. Note that a unit keeps its campaign badges - and therefore - any associated Battle Honours, for future battles, even if those battles take part in a different campaign.
Campaign Master
A Pariah Nexus campaign is best run with a Campaign Master. They will take on the mobilisation and organisation of the campaign so that the other players can focus on playing games. A Campaign Master can indeed play in the campaign, but their primary role is to facilitate a smooth and enjoyable experience for all players involved.Forming Alliances
Once a Campaign Master has stepped forward, their first task is to gather the players and sort them into alliances. The system can support anything from just two players, up to dozens of players. The campaign works particularly well with a small group of like-minded and enthusiastic players who can meet on a regular basis.Alliances should be organised as evenly as possible, and when feasible, based on the Factions being played. Once players are assigned to an alliance, their Crusade force is committed to that cause. For this reason, players should play the same Faction through the campaign. If they wish to change their Faction, they can do so at the Campaign Master’s discretion. The alliances are as follows.
Seekers
Those who seek to harvest the blackstone for their own will as well as put an end to the Stilling. The forces of the Imperium would be best suited to this alliance.Protectors
Those who wish to protect the blackstone from others. The Necrons and any others who may have their own goals for the noctilith in the Pariah Nexus are best suited to this alliance.Interlopers
The Interlopers range from Chaos warlords who seek to use the cover of the Stilling for raids on Imperial forces to mysterious Aeldari and Ork raiders. This alliance is best suited to those who carve their own path - even if they aren’t all working towards the same goals.Allies Of Convenience
Note that these are guidelines on how to organise players into an alliance, rather than a requirement. If it suits the group better to organise the alliances differently, the Campaign Master should feel free to do so.For example, if many of the players in the group have Crusade forces associated with a single alliance, to make the alliances more evenly numbered some of them may have to fight for a different alliance than what we have recommended. You could always create some interesting narrative to explain why one side fights for another.
Campaign Length
A Pariah Nexus campaign is split into three phases, each of which involves battling in a different stage of the war. Before the campaign begins, the Campaign Master should determine the length of time allocated to each campaign phase and the total number of games that can be played in that phase. Once either of those conditions have been met, that campaign phase ends and the victorious alliance in that phase is determined. Once the third campaign phase ends, the campaign ends and the overall winning alliance is determined.A campaign can be a long and expansive experience where each campaign phase takes place over a month, with many battles fought and mighty heroes lost to the fires of war. Equally, it can be a short and focused campaign played over a weekend, with each campaign phase consisting of just one battle representing the key moments of the conflict.
As a guide, if each member of your campaign group will play one game a week, we recommend each phase of the campaign lasts as follows:
- Length of Time: 2 weeks
- Total Number of Games: Equal to the number of players
Campaign Phases
Over a campaign phase, players from opposing alliances will battle each other to gain Campaign points for their alliance. The Campaign Master has a few options concerning how players are matched up for games. They can leave players to arrange games themselves, with challenges thrown down and honour at stake. Alternatively, it may be appropriate to introduce more structure to the match ups. For example, a game schedule will ensure that everyone gets an equal amount of games, or, in campaigns with a large number of players, each alliance can be broken down into smaller subgroups that are then matched against each other to make arranging games even simpler.CAMPAIGN POINTS
Each time you play a game, your alliance gains a number of Campaign points based on the size of the game and what the outcome was, as shown in the table below.
Once the campaign phase comes to an end, the victor of that phase is the alliance with the most Campaign points, and the alliance with the second most Campaign points is the runner-up alliance (use the total number of battles won by each alliance as a tie-breaker - if there is still a tie, the Campaign Master randomly selects between the tied alliances). The victorious and runner-up alliances of a campaign phase will gain a number of Strategic points (see below).
When the next campaign phase begins, each alliance’s Campaign points are reset to 0, putting alliances on an equal footing for the next phase of the campaign.
| ||||||||||||||||||||
BLACKSTONE ALLIANCE UPGRADES
At the end of each campaign phase, an alliance can work together to select Alliance Upgrades (see below). For this process, we recommend electing a captain to coordinate each alliance, especially in larger campaigns. These Alliance Upgrades are limited - once they’ve been purchased by an alliance, others cannot purchase them for the rest of the campaign, and they offer benefits to every member of the alliance.
SELECTING ALLIANCE UPGRADES
At the start of the second and third campaign phase, before any battles are fought, each alliance can select an upgrade (see below) that lasts until the end of the next campaign phase and applies to the entire alliance. Selection begins with the alliance who currently has the lowest Campaign points and ascends.
STRATEGIC POINTS
At the end of each campaign phase, the victorious and runner-up alliances gain the number of Strategic points shown in the table below, based on which phase of the campaign it is.
At the end of the campaign, the alliance with the most Strategic points wins the campaign and its players are declared the victors!
If any alliances are tied, tally up the total number of Blackstone Fragments between all members of each alliance. The alliance with the most Blackstone Fragments is the winner.
| |||||||||||||||
Alliance Upgrades
There is some strategic advantage to being underestimated by your enemies, and you intend to seize it.
Recognising that your alliances efforts in this region are crucial to the wider war effort, elements behind the lines have diverted more resources in your direction.
Whether they come by fortuitous warp jump, glowing dolmen gate or some other more esoteric means, you have received a sudden and substantial influx of much-needed reinforcements.
In the face of adversity on every front, your alliance has sanctioned the deployment of ancient war relics and supernatural super-weapons. So armed, surely you cannot fail.
For a select few, the nightmarish conditions within the nodal matrix draw out their inner martial excellence.
Foretelling the future through psychic or hyper-cogitational means provides your alliance with potent insights to exploit.
Whether by ancient technologies, dark sorcery or powers altogether stranger, your alliance is ready to hurl their finest warriors into the very heart of battle in a sudden shock assault.
Shapes vast and dark slide into attack positions above the contested world as your warships prepare to rain death upon the armies battling far below.
Orbital Bombardment: Once per battle, at the start of your Shooting phase, place a marker anywhere on the battlefield. At the start of your next Shooting phase, place another marker anywhere on the battlefield with its centre within 9" of the centre of the first marker, then draw a line between the centre of those two markers. For each unit that line passes over or through, roll one D6: on a 2+, that unit suffers D3 mortal wounds. Both markers are then removed.
Exploiting the rubble, wrecks and ruin of countless previous battles, your hosts are able to swiftly assemble improvised defences ready to help them weather the next enemy onslaught.
Fortified Defences: Once per battle, at the start of your Command phase, you can use this ability. If you do, until the start of your next Command phase, each time a ranged attack targets a unit from your Crusade army, if that unit is within range of an objective marker you control, models in that unit have the Benefit of Cover against that attack.
Certain that it can be put to myriad potent uses, your alliance shares out a portion of their hoarded blackstone.
Strategic Footings
Due to the effects of the Stilling, combat in the Pariah Nexus is chaotic - communications are strained, and enemies can be hard to detect amongst the mental haze. Because of this, your Crusade army will often have to deploy with less strategic information than it would normally possess, and you must make decisions as a commander as to the strategic footing you will adopt.It is not just your army struggling, however - your opponent will have to decide how they want to take on each battle as well, leading to last-minute decisions that could make all the difference in how the conflict plays out.
During the Select Strategic Footing step, each player must secretly select an Aggressive, Balanced or Defensive Strategic Footing for that mission. Once both players have selected, you must reveal your Strategic Footings at the same time and compare your results using the table opposite (referencing the key below). The upper icon in each cell dictates which player is the Attacker, and the lower icon dictates which piayer (if any) gains Advantage. Note that some situations require both players to roll off to determine the outcome: the winner of this roll-off becomes the Attacker or gains Advantage, respectively.
The effects of gaining Advantage vary from mission to mission, and are described in each Pariah Nexus mission. Note that other rules may also be affected by gaining Advantage.

Attacker gains Advantage
Player A is the Attacker
Player B is the Attacker
Defender gains Advantage
Neither player gains Advantage
Roll off
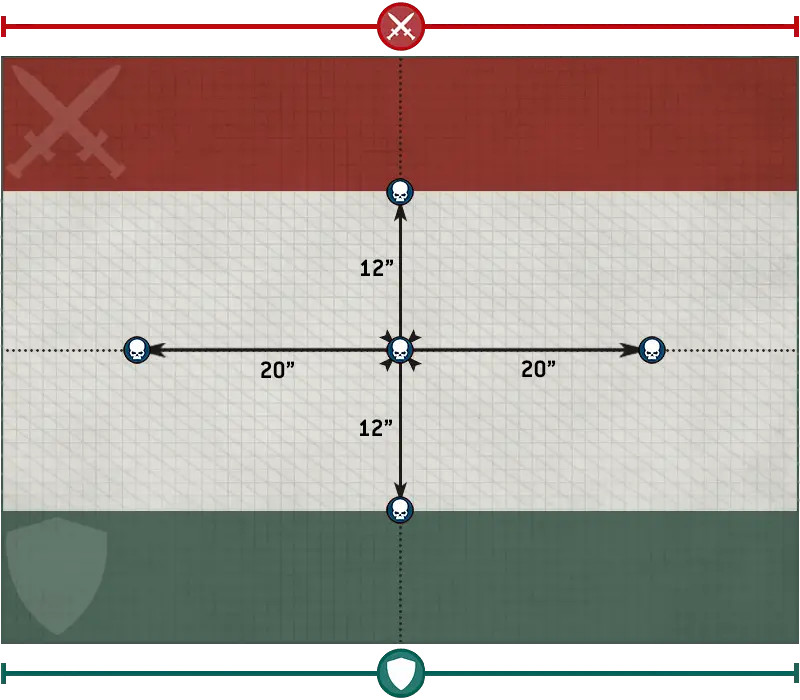
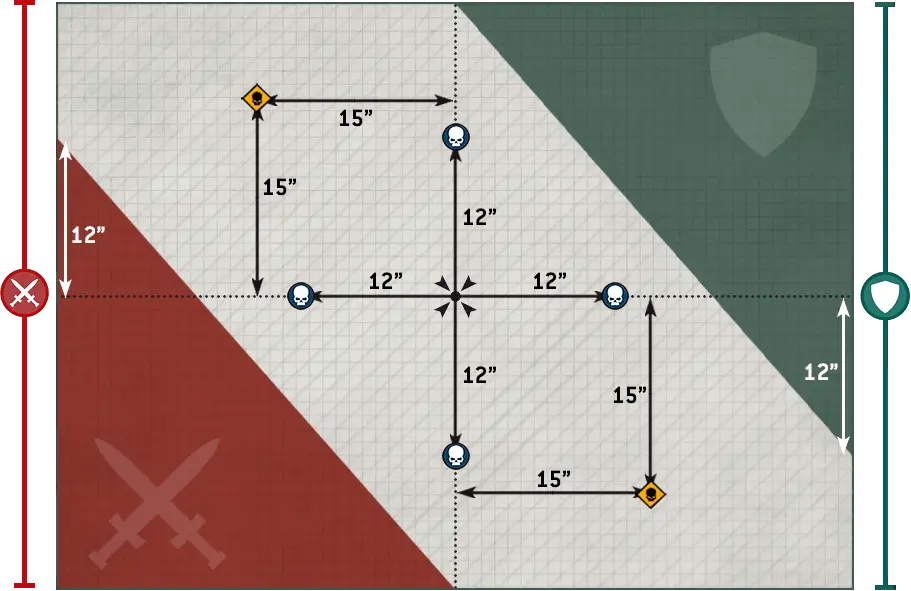
Gheists In The Static 1
1
1Advantage: Before the battle, select one unit from your Crusade army. Until the end of the battle, that unit has the Infiltrators rule, but it cannot begin the battle within range of an objective marker in No Man’s Land.
Attacker: The Attacker has the first turn.
Comms Blackout: At the start of the Command phase, each player only gains the 1CP they normally would if one of more units from their army are within range of one or more objective markers in No Man’s Land that they control.
VICTOR BONUS
The victors Crusade force gains 1 additional Requisition point and 3 Blackstone Fragments.
Amidst such grim and confused conditions, whichever force has the bloody-minded determination to dig in and hang on will stand a good chance of seizing victory.
- They control one or more objective markers.
- They control more objective markers than their opponent.
- If they are the Attacker, they control one or more objective markers that were controlled by their opponent at the start of that battle round.
- If they are the Defender, they control one or more objective markers that they controlled at the end of the previous battle round.
Dig Site Raid 2
2Advantage: Once per battle, you can target a CHARACTER unit with the Epic Challenge Stratagem for 0CP.
Blackstone Collecting: At the start of the battle, each objective marker on the battlefield contains one Blackstone Fragment. At the start of your turn,
if a CHARACTER model from your Crusade army is within range of an objective marker you control that contains a Blackstone Fragment, that model can collect it. If it does, that model takes possession of that Blackstone Fragment and that objective marker no longer contains a Blackstone Fragment.
Raiding Their Cache: If a CHARACTER model in possession of a Blackstone Fragment is destroyed, place a marker as close as possible to where that model was destroyed. For the purposes of the Blackstone Collecting rule, that marker counts as an objective marker containing one Blackstone Fragment (which can be collected as described above), but does not count as an objective marker for any other rules purposes.
VICTOR BONUS
Select one unit that collected one or more Blackstone Fragments during the battle; that unit gains D3+3XP.
Seizing and defending the blackstone caches at this site will prevent the enemy from laying claim to them.
- They control one or more objective markers.
- They control more objective markers than their opponent.
Ultimately, the true prize in this battle will go to whichever force is able to amass the most cached noctilith and extract it from the combat zone.
Quantum Siege 3
3Advantage: Once per battle, in your Command phase, you can select one unit from your Crusade army Until the start of your next Command phase, add 1 to the Objective Control characteristic of models in that unit.
Siege Offensive: The Attacker has the first turn.
Quantum Shielded: At the start of the battle, each objective marker is considered to have its quantum shield enabled. While a unit is within range of an objective marker with its quantum shield enabled, models in that unit have a 5+ invulnerable save against ranged attacks.
Configure Shield Conduit: At the end of each player’s Movement phase, the player whose turn it is can select one objective marker they do not control that has one or more units from their Crusade army (excluding Battle-shocked units) within range of it. That player can choose to enable or disable that objective markers quantum shield.
VICTOR BONUS
Before the next battle, the victor can use the Rearm and Resupply Requisition up to two times without spending any Requisition points to do so.
Control of these thrumming hubs of Necron technology is crucial to this conflict, whether in order to defend them or to wreak violent sabotage upon them.
- They control one or more objective markers.
- They control more objective markers than their opponent.
Whether the shields have fallen or not by battles end will likely determine the victor.
- The Attacker scores 20VP for each disabled quantum shield on the battlefield.
- The Defender scores 15VP for each enabled quantum shield on the battlefield.
Outflank 4
4Advantage: You can select which deployment zones will be used for this mission: either those marked A or those marked B. If you select B, the Attacker must set up at least one third of their army’s units in each of their deployment zones marked B and the Defender always has the first turn. If neither player has Advantage, use the zones marked A.
Flanking Strike: The Defender cannot place any units into Strategic Reserves or Reserves (excluding units that must always be placed in Reserves, e.g. AIRCRAFT that cannot Hover, Drop Pods).
VICTOR BONUS


The attackers dynamic gamble leaves the battle in flux, offering the opportunity for a decisive commander to drive home or resolutely blunt this sudden offensive.
- They control one or more objective markers.
- They control more objective markers than their opponent.
Defending or seizing so crucial a strategic objective will make or break the fates of this sudden and bloody clash.
Overwhelming Dread 5
5Advantage: Before the battle, select one objective marker on the battlefield. Until the end of the battle, that objective marker is not affected by the Stilled Nodes or Disruption mission rules.
Stilled Nodes: While a unit is within range of an objective marker, each time that unit takes a Battle-shock or Leadership test, subtract 1 from that test.
Disruption: While a unit from your Crusade army with an Aura ability is within range of an objective marker you control, the range of that Aura ability is decreased by 3" (to a minimum of 1").
VICTOR BONUS
The victor gains 2 additional Requisition points.
It is not enough simply to seize strategic control of this area - commanders and armies must also hold their collective nerve in the face of mounting horrors.
- They control one or more objective markers.
- They control more objective markers than their opponent.
- One or more units from their Crusade army passed a Battle-shock test while within range of an objective marker that battle round.
Only used in Strike Force games.
Unstable Archeotech 6
6Advantage: Once per battle, at the start of your Shooting phase, you can select one objective marker you control. Until the start of your next Shooting phase, that objective marker can be moved using the Delivery mission rule without preventing a unit from shooting or charging.
Delivery: At the start of each players Shooting phase, the player whose turn it is can select one or more units from their Crusade army (excluding Battle-shocked units) that are eligible to shoot and within range of an objective marker. Until the end of the turn, the selected units are not eligible to shoot or declare a charge.
At the start of that players next Command phase, for each of those units, if that unit is still within range of the same objective marker and not within Engagement Range of one or more enemy units, that player can move that objective marker up to 6", provided it ends that move closer to their opponent’s battlefield edge.
VICTOR BONUS
Each unit from the victor’s Crusade army that ended the battle within range of an objective marker the victor controls gains 1XP.
The payloads must be secured and hastily relocated into enemy territory.
Its machine spirit driven to apoplexy, the device unleashes its wrath on those within the blast radius.
- The Attacker scores 20VP for each objective marker that detonates in their opponent’s deployment zone.
- The Defender scores 20VP for each objective marker that detonates in their opponent’s deployment zone.
- If an objective marker detonates in No Man’s Land, the player who controls it scores 10VP
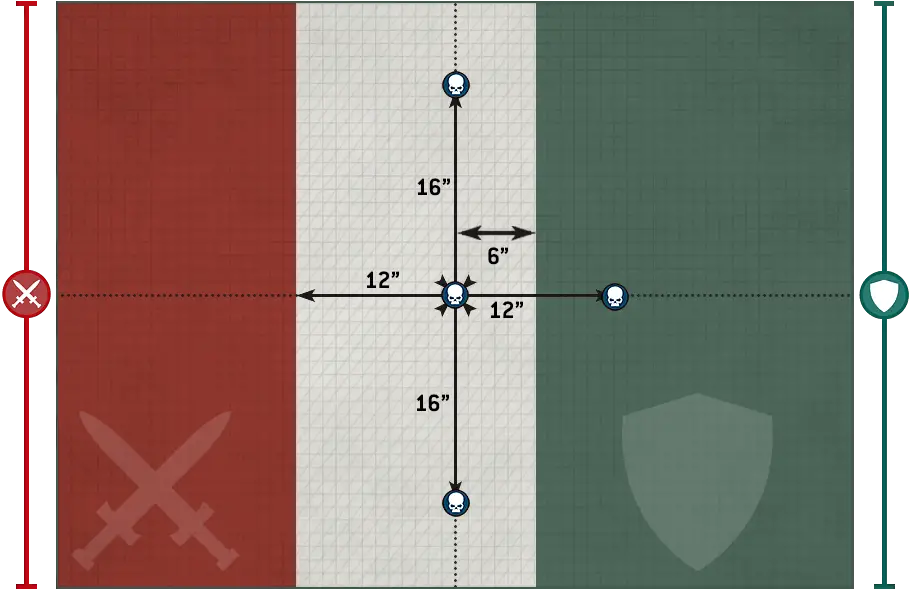
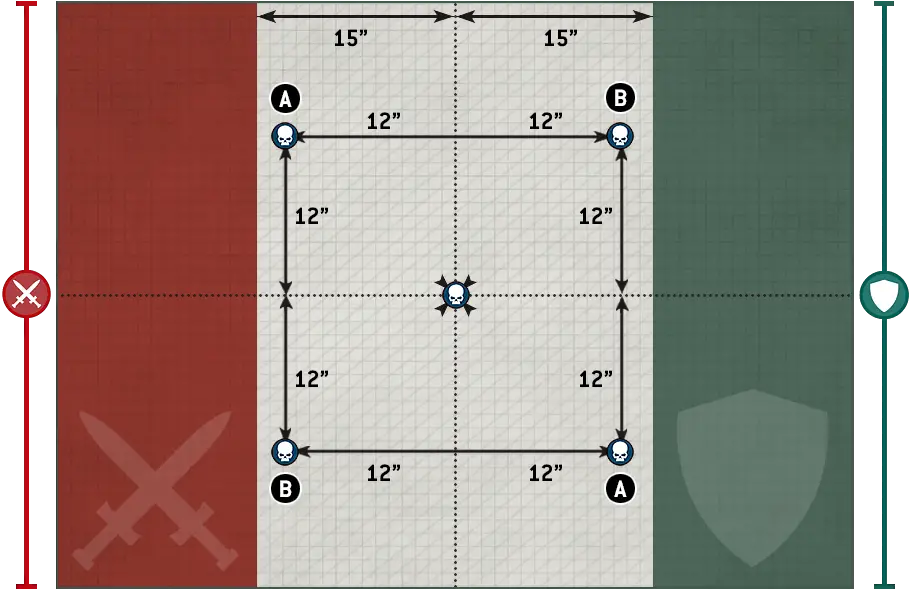
Polarising Energies 1
1Advantage: Once per battle, at the start of the battle round, you can choose for the polarity of the objective markers not to shift that battle round.
Positively Charged: Objective markers marked A begin the battle positively charged. While a unit is within range of a positively charged objective marker, that unit has the Benefit of Cover.
Negatively Charged: Objective markers marked B begin the battle negatively charged. At the end of the battle round, each unit within range of a negatively charged objective marker suffers 1 mortal wound.
Shifting Polarity: From the second battle round onwards, at the start of the battle round, each objective marker shifts polarity (i.e. positively charged objective markers become negatively charged, and vice versa).
VICTOR BONUS
The victor gains 3 Blackstone Fragments.
By seizing these strangely polarised deposits, it may be possible to exploit their energies or study what has caused this bizarre and seemingly spontaneous phenomenon.
- The player whose turn it is scores 5VP if they control one or more objective markers.
- If the player whose turn it is controls more objective markers than their opponent, the player whose turn it is scores 15VP.
Amidst The Miasma 2
2Advantage: At the start of the battle, select one unit from your Crusade army. Until the end of the battle, that unit is not affected by the Shambling Through the Fog mission rule.
Shambling Through the Fog: Each time a unit is selected to Advance, if it is within No Man’s Land, subtract 2 from the Advance roll.
Fight Through The Haze: Each time a model makes an attack that targets a unit within No Man’s Land, subtract 1 from the Hit roll.
VICTOR BONUS
The victor can select one additional unit from their Crusade army to be Marked for Greatness.
With the battling armies badly disrupted and struggling with hostile conditions, the battle becomes an anarchic fight to assert control.
- They control one or more objective markers.
- They control more objective markers than their opponent.
Little is to be gained from remaining within the churning horror of this conflict to be torn apart. Retreat in good order is surely the wisest course.
False Intel 3
3Advantage: Once per battle, before rolling off for the Intel Discovery mission rule, you can choose to automatically win that roll off.
Intel Discovery: At the start of the battle round, both players roll off. The winner can set up one objective marker wholly within No Man’s Land, more than 9" away from all other objective markers and within 1" of a unit from their Crusade army that is not Battle-shocked and is not within Engagement Range of one or more enemy units. If that player does not have an eligible unit, their opponent can set up one objective marker as described above instead.
VICTOR BONUS
The victor can select one unit from their Crusade army that was not destroyed to gain a Battle Trait. This must be a unit that can gain a Battle Trait.
There are genuine strategic secrets to be gleaned from this conflict, but only by those swift enough to seize their opportunities and sift the false leads from genuine facts.
- They control one or more objective markers.
- They control an objective marker that was set up during this battle round.
- They control the objective marker at the centre of the battlefield.
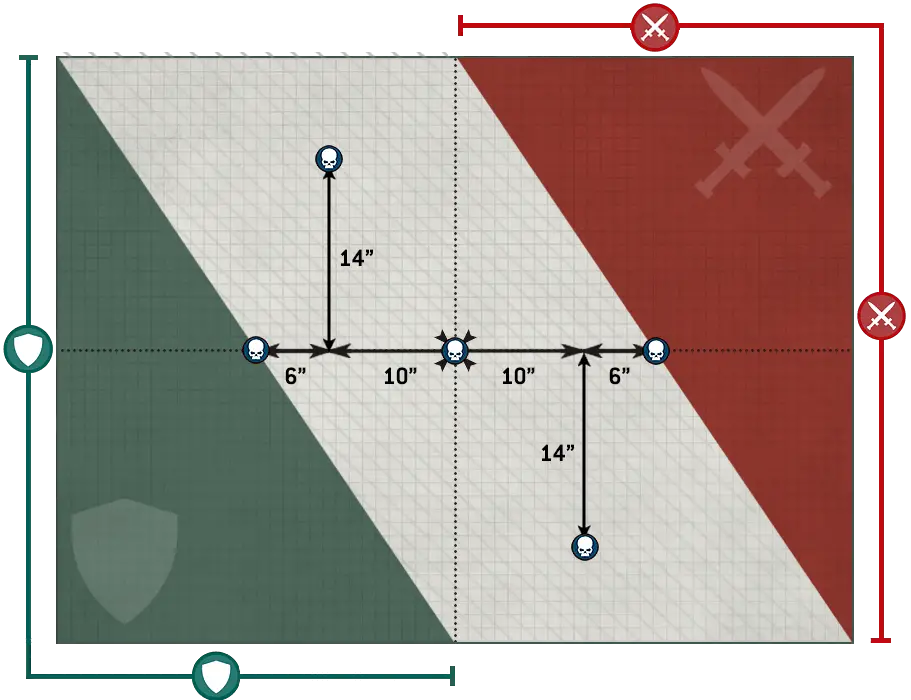
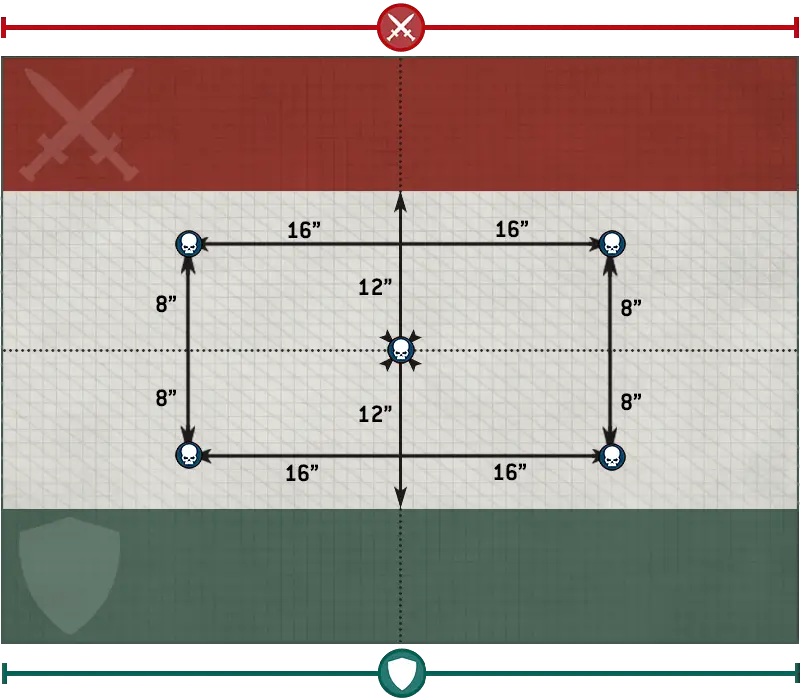
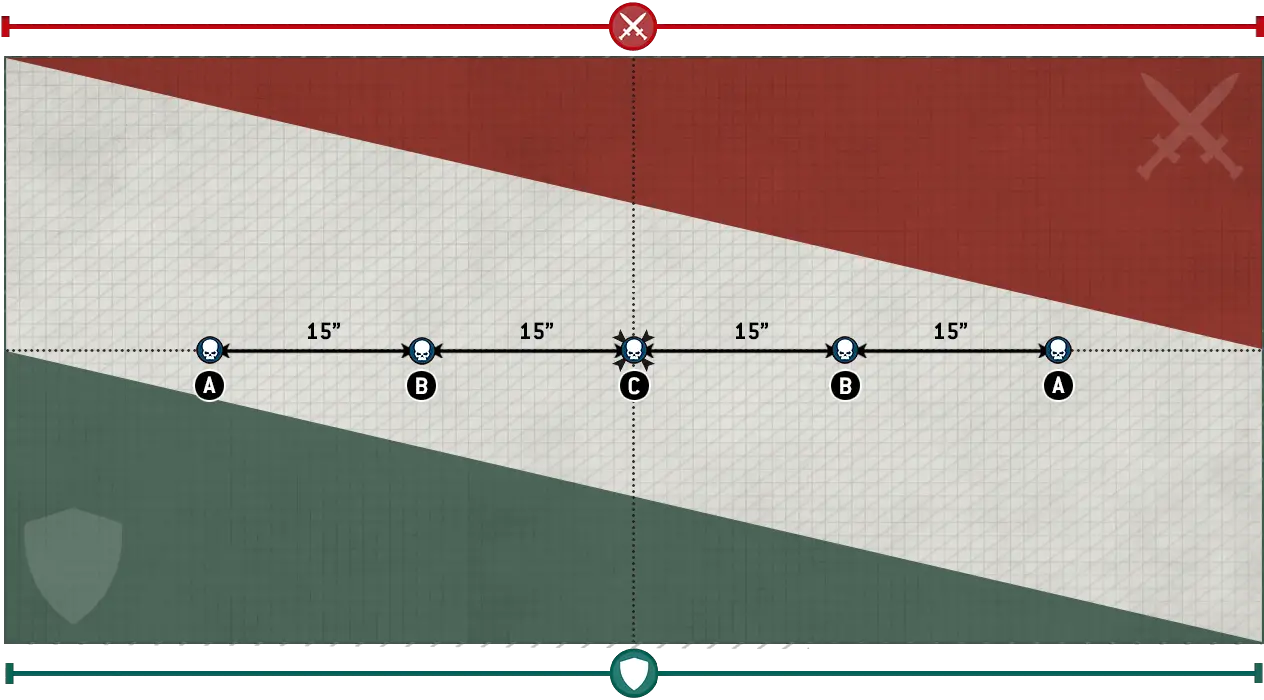
Tortured Worldscape 4
4Advantage: Once per battle, at the start of the battle round, you can select one fissure; until the end of the battle round, while a unit from your Crusade army is within that fissure, models in that unit have the Feel No Pain 4+ ability against mortal wounds inflicted by the Open Fissure rule.
Open Fissure: At the start of the battle round, each unit within an open fissure (see deployment map) must take a Leadership test. If that test is failed, that unit suffers D3 mortal wounds.
Splitting Earth: At the start of the first battle round, Fissure 1 is open and Fissures 2 and 3 are closed. At the start of the third battle round, Fissure 2 opens, and at the start of the fifth battle round, Fissure 3 opens.
VICTOR BONUS
The victor can select one unit from their Crusade army that was not destroyed. That unit gains 5XP.
Capture your prizes while the heaving earth allows it.
- They control one or more objective markers.
- They control one or more objective markers within an open fissure.
- They control more objective markers than their opponent.
Match the volcanic ferocity of the battlefield itself
- They destroyed one or more enemy units.
- One or more enemy units were destroyed as a result of the Open Fissure mission rule.
Interdimensional Clash 5
5Advantage: If you are the Attacker, extend your deployment zone by 3" towards your opponents battlefield edge. If you are the Defender, reduce the Attacker’s deployment zone by 6" towards their battlefield edge.
Danger Close: When resolving the Deadly Demise ability, increase its range by 3" and add 1 to the roll.
Designer’s Note: We recommend placing a higher volume of terrain such as ruins in No Mans Land and the Defenders deployment zone to represent a tight, close-quarters battlefield.
VICTOR BONUS
Amidst such unpredictable and dimensionally unstable conditions, it is imperative to secure a solid foothold and push the enemy back long enough to rally your forces.
- They control one or more objective markers.
- They control more objective markers than their opponent.
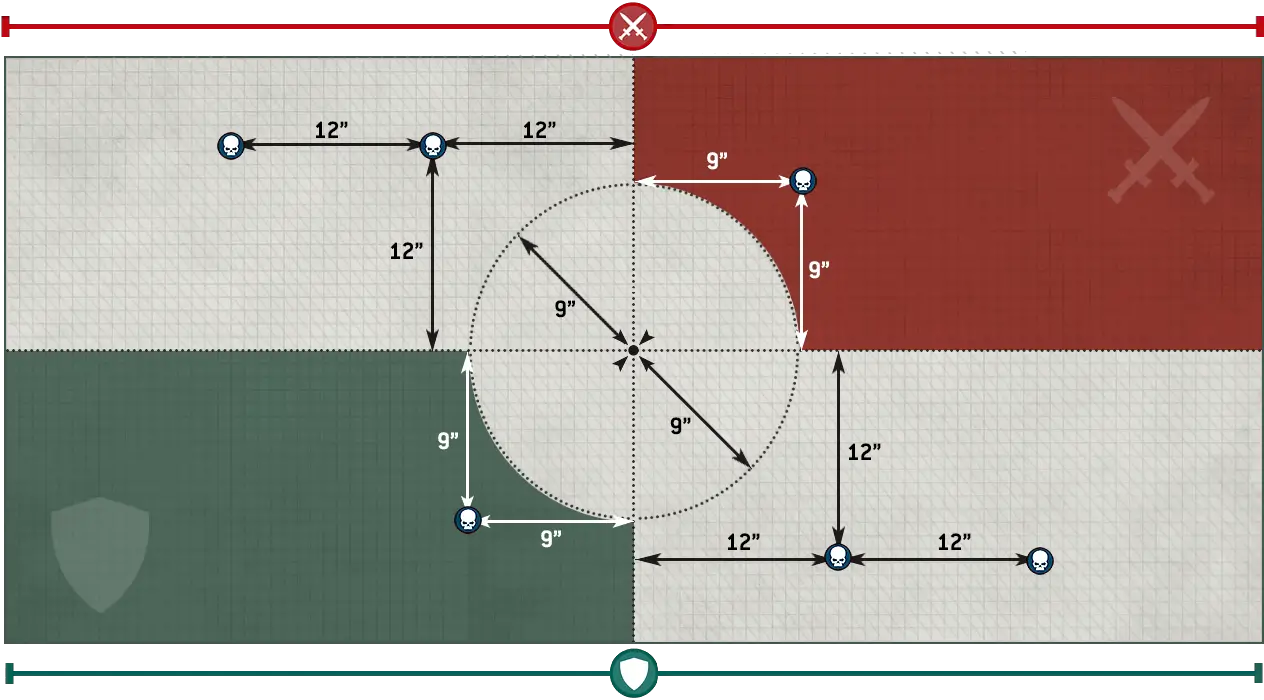
Nullification Field 6
6Advantage: Select one objective marker within the Null Field, excluding the one at the centre of the battlefield. You can move that objective marker up to 6“ in any direction, so long as it ends that move not within the Nullification Field and within No Mans Land.
Nullification Field: While a model is within 12" of the centre of the battlefield, invulnerable saving throws cannot be made for that model.
VICTOR BONUS
The victor can select two units from their Crusade army to be Marked for Greatness.
There can be no victory on this battlefield without forcing a path forward into the heart of the nullification field.
- They control one or more objective markers.
- They control one or more objective markers that are within the Null Field.
- They control the objective marker at the centre of the battlefield.
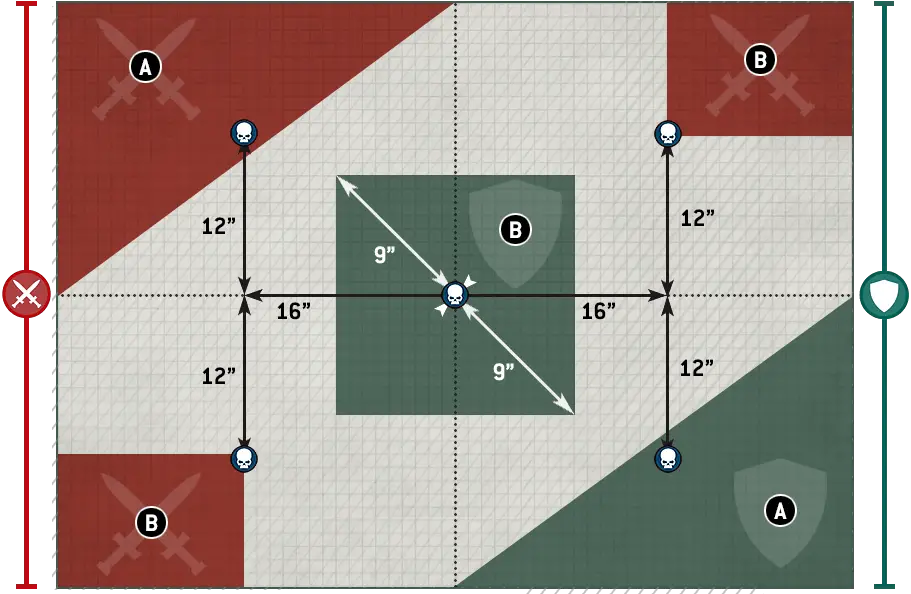
Into The Tomb 1-2
1-2Advantage: Once per battle, you can select one objective marker and add 1 to or subtract 1 from that objective markers Power tally (to a minimum of 0).
Besiege the System: The Attacker has the first turn.
Power System Override: At the start of the battle, each objective marker has a Power tally of 0, and each starts under the Defender’s control, and remains so until controlled by the Attacker.
At the start of each player’s turn, for each objective marker the Defender controls, add 1 to the Power tally of that objective marker. For each objective marker the Attacker controls, subtract 1 from the Power tally of that objective marker (to a minimum of 0).
Overloaded Systems: If at any point an objective marker’s Power tally reaches 5 or more, that objective marker is overloaded and removed from the game.
VICTOR BONUS
One unit from the victor’s Crusade army that is not destroyed at the end of the battle gains D3+3XP.
What better way to eliminate the threat posed by this complex and its denizens than to reduce them all to blazing rubble?
Raiding and wreaking havoc is one thing, but true strategic victory will likely belong to whichever commander secures the complex, its entrances, exits and vital systems.

Reawakening 3-4
3-4Advantage: Once per battle, you can target a unit with the Rapid Ingress Stratagem for 0CP.
Drop Zone Blocked: Units arriving from Reserves or deploying using the Infiltrators ability cannot be set up within range of any objective markers.
Narrow Window: During the first and second battle rounds, objective markers marked A are active and can be controlled normally (all other objective markers cannot be controlled). During the third and fourth battle rounds, objective markers marked B are active and can be controlled normally (all other objective markers cannot be controlled). During the fifth battle round, the objective marker marked C is active and can be controlled normally (all other objective markers cannot be controlled).
VICTOR BONUS
The next time the victor uses the Legendary Veterans Requisition, it costs 1RP.
With so few strategic sites viable at any given moment, this battle will soon become a savage brawl to control those that can be accessed.
- They control one or more objective markers.
- They control more objective markers than their opponent.
The greatest concentration of Necron technology lies at the very heart of this site. Surely, the commander who seizes this central node stands the best chance of securing or sabotaging the entire system.
Final Acquisition 5-6
5-6Sweep and Clear: If a player controls an objective marker at the end of their Command phase, that objective marker remains under their control, even if they have no models within range of it, until their opponent controls it at the end of any turn.
VICTOR BONUS
The victor gains 5 Blackstone Fragments.
Drive the enemy from this vital strategic site wholesale, securing the region one cache of blackstone at a time until all of its riches are yours.
- They control one or more objective markers.
- They control more objective markers than their opponent.
Exploit your enemy's singular focus and incaution, sweeping your own forces around or through their battle lines to lay claim to riches they should have guarded better.
There are several categories of Battle Honours that can be bestowed upon a unit, such as Battle Traits, Weapon Modifications and Crusade Relics. Other categories of Battle Honour may be found in other publications. Each time a unit gains a Battle Honour, you can select from any category.
- Once a unit gains enough XP it will gain a rank.
- Only CHARACTER units can gain the Heroic or Legendary ranks.
- Each time a unit gains a rank, it can gain a Battle Honour.
- There are several categories of Battle Honours, which include:
- Battle Traits: New skills and abilities.
- Weapon Modifications: Upgrade an item of wargear.
- Crusade Relic: Gain a rare and powerful artefact.
- Each time a unit gains a Battle Honour, increase its Crusade points total by 1 (or by 2 if TITANIC).
The datasheets using CHARACTER keyword can be found in the following Factions:
Unaligned: Unaligned Forces.Chaos: Chaos Daemons, Chaos Knights, Chaos Space Marines, Death Guard, Emperor’s Children, Thousand Sons, World Eaters.
Imperium: Adepta Sororitas, Adeptus Custodes, Adeptus Mechanicus, Astra Militarum, Grey Knights, Imperial Agents, Imperial Knights, Space Marines.
Xenos: Aeldari, Drukhari, Genestealer Cults, Leagues of Votann, Necrons, Orks, T’au Empire, Tyranids.
The CHARACTER keyword is used in the following datasheets:
and others...
When setting objective markers up on the battlefield, place them so they are centred on the point specified by the mission. When measuring distances to and from objective markers, measure to and from the closest part of them. Models can move over objective markers as if they were not there, but they cannot end a move on top of an objective marker.
At the start of the battle, each objective marker on the battlefield is said to be contested, and so is not controlled by either player. To control an objective marker, a player will first need to move models within range of it. A model is within range of an objective marker if it is within 3" horizontally and 5" vertically of that objective marker.
Every model has an Objective Control (OC) characteristic listed on its datasheet. To determine a player’s Level of Control over an objective marker, add together the OC characteristics of all the models from that player’s army that are within range of that objective marker. A player will control an objective marker at the end of any phase or turn if their Level of Control over it is greater than their opponent’s. If both players have the same Level of Control over an objective marker, that objective marker is contested.
- A model is within range of an objective marker if within 3" horizontally and 5" vertically.
- Level of Control: Add together the OC characteristics of all of a player’s models within range of the objective marker.
- An objective marker is controlled by the player with the highest Level of Control over it (in a tie, it is contested).
- Models cannot end a move on top of an objective marker.
While a unit is Battle-shocked:
- The Objective Control characteristic of all of its models is 0.
- If it Falls Back, you must take a Desperate Escape test for every model in that unit.
- Its controlling player cannot use Stratagems to affect that unit.
Once you have taken Battle-shock tests for all of your units that require them, your Command phase ends and you progress to your Movement phase.
In this step, if for any reason a unit is forced to take a Battle-shock test for being below its Starting Strength, unless otherwise stated, that unit does not also have to take a Battle-shock test for being Below Half-strength. While a unit is Battle-shocked, all models in that unit are also Battle-shocked.
- Take a Battle-shock test for each unit from your army on the battlefield that is Below Half-strength.
- Roll 2D6: if the result is greater than or equal to the unit’s Leadership, the test is passed. Otherwise, the unit is Battle-shocked until the start of your next Command phase.
- Battle-shocked units have an OC of 0 and their controlling player cannot use Stratagems to affect them.
- Battle-shocked units must take Desperate Escape tests if they Fall Back.
The Starting Strength of an Attached unit is equal to the combined Starting Strengths of all of its units (i.e. the number of models in the Leader unit added to the number of models in the Bodyguard unit). If either the Leader unit or the Bodyguard unit in an Attached unit is destroyed, the Starting Strength of the remaining unit is changed to be equal to its original Starting Strength.
For the purposes of rules that are triggered when a unit is destroyed, such rules are still triggered when one of the individual units that made up an Attached unit is destroyed (the Leader or the Bodyguard unit).
Scouts form the vanguard of many armies. Unnoticed by the enemy, they range ahead of the main force.
Some units have ‘Scouts x"’ listed in their abilities. If every model in a unit has this ability, then at the start of the first battle round, before the first turn begins, it can make a Normal move of up to x", with the exception that, while making that move, the distance moved by each model in that unit can be greater than that model's Move characteristic, as long as it is not greater than x".DEDICATED TRANSPORT models can make use of any Scouts x" ability listed in their abilities, or a Scouts x" ability that a unit that starts the battle embarked within that DEDICATED TRANSPORT model has (provided only models with this ability are embarked within that DEDICATED TRANSPORT model), regardless of how that embarked unit gained this ability (e.g. listed in their abilities, conferred by an Enhancement or by an attached CHARACTER, etc.).
A unit that moves using this ability must end that move more than 9" horizontally away from all enemy models. If both players have units that can do this, the player who is taking the first turn moves their units first.
- Scouts x": Unit can make a Normal move of up to x" before the first turn begins.
- If embarked in a DEDICATED TRANSPORT, that DEDICATED TRANSPORT can make this move instead.
- Must end this move more than 9" horizontally away from all enemy models.
Mighty heroes fight at the forefront of battle.
Some CHARACTER units have ‘Leader’ listed on their datasheets. Such CHARACTER units are known as Leaders, and the units they can lead – known as their Bodyguard units – are listed on their datasheet.During the Declare Battle Formations step, for each Leader in your army, if your army also includes one or more of that Leader’s Bodyguard units, you can select one of those Bodyguard units. That Leader will then attach to that Bodyguard unit for the duration of the battle and is said to be leading that unit. Each Bodyguard unit can only have one Leader attached to it.
While a Bodyguard unit contains a Leader, it is known as an Attached unit and, with the exception of rules that are triggered when units are destroyed, it is treated as a single unit for all rules purposes. Each time an attack targets an Attached unit, until the attacking unit has resolved all of its attacks, you must use the Toughness characteristic of the Bodyguard models in that unit, even if a Leader in that unit has a different Toughness characteristic. Each time an attack sucessfully wounds an Attached unit, that attack cannot be allocated to a CHARACTER model in that unit, even if that CHARACTER model has lost one or more wounds or has already had attacks allocated to it this phase. As soon as the last Bodyguard model in an Attached unit has been destroyed, any attacks made against that unit that have yet to be allocated can then be allocated to CHARACTER models in that unit.
Each time the last model in a Bodyguard unit is destroyed, each CHARACTER unit that is part of that Attached unit is no longer part of an Attached unit. It becomes a separate unit, with its original Starting Strength. If this happens as the result of an attack, they become separate units after the attacking unit has resolved all of its attacks.
Each time the last model in a CHARACTER unit that is attached to a Bodyguard unit is destroyed and there is not another CHARACTER unit attached, that Attached unit’s Bodyguard unit is no longer part of an Attached unit. It becomes a separate unit, with its original Starting Strength. If this happens as the result of an attack, they become separate units after the attacking unit has resolved all of its attacks.
Each time a unit that is part of an Attached unit is destroyed, it does not have the keywords of any other units that make up that Attached unit (unless it has those keywords on its own datasheet) for the purposes of any rules that would be triggered when that unit is destroyed.
- Before the battle, CHARACTER units with the Leader ability can be attached to one of their Bodyguard units to form an Attached unit.
- Attached units can only contain one Leader.
- Attacks cannot be allocated to CHARACTER models in Attached units.
Assassins and other covert agents are difficult to track and pinpoint in the swirling maelstrom of battle.
Unless part of an Attached unit (see Leader), this unit can only be selected as the target of a ranged attack if the attacking model is within 12".An unmodified Hit roll of 6 is called a Critical Hit and is always successful. An unmodified Hit roll of 1 always fails. A Hit roll can never be modified by more than -1 or +1.
- Hit Roll (Ranged Attack): A hit is scored if the D6 result equals or exceeds that attack’s BS.
- Hit Roll (Melee Attack): A hit is scored if the D6 result equals or exceeds that attack’s WS.
- Critical Hit: Unmodified Hit roll of 6. Always successful.
- An unmodified Hit roll of 1 always fails.
- A Hit roll can never be modified by more than -1 or +1.
Some warriors are masters of disguise and concealment.
If every model in a unit has this ability, then each time a ranged attack is made against it, subtract 1 from that attack’s Hit roll.Whether shielded by force fields, enveloped in mystical energies or simply possessed of preternatural senses and lightning-fast reflexes, some warriors are protected by more than mere physical armour.
Some models have an invulnerable save listed on their datasheet. Each time an attack is allocated to a model with an invulnerable save, the controlling player must choose to use either that model’s Save characteristic or its invulnerable save, but not both. If a model has more than one invulnerable save, it can only use one of them – choose which it will use.Unlike armour saving throws (which use a model’s Save characteristic), invulnerable saving throws are never modified by an attack’s Armour Penetration characteristic, but otherwise follow the normal rules for saving throws.
- Invulnerable Save: Never modified by an attack’s AP.
- The controlling player can choose to use either a model’s invulnerable save or its Save characteristic.
If the result is greater than or equal to the Save characteristic of the model the attack was allocated to, then that saving throw is successful and the attack sequence ends. Otherwise, that saving throw fails and that model suffers damage.
An unmodified saving throw of 1 always fails. A saving throw can never be improved by more than +1.
- Saving Throw: Roll one D6 and modify by the attack’s AP. If the result is less than the Save of the model being rolled for, the saving throw is failed and that model suffers damage. Otherwise, that attack is saved.
- An unmodified saving throw of 1 always fails.
- A saving throw can never be improved by more than +1.
Weapons powered by unstable and dangerous energy sources pose a substantial risk to the wielder every time they are used.
Weapons with [HAZARDOUS] in their profile are known as Hazardous weapons. Each time a unit is selected to shoot or fight, after that unit has resolved all of its attacks, for each Hazardous weapon that targets were selected for when resolving those attacks, that unit must take one Hazardous test. To do so, roll one D6: on a 1, that test is failed. For each failed test you must resolve the following sequence (resolve each failed test one at a time):- If possible, select one model in that unit that has lost one or more wounds and is equipped with one or more Hazardous weapons.
- Otherwise, if possible, select one model in that unit (excluding CHARACTER models) equipped with one or more Hazardous weapons.
- Otherwise, select one CHARACTER model in that unit equipped with one or more Hazardous weapons.
If a unit from a player’s army is selected as the target of the Fire Overwatch Stratagem in their opponent’s Charge phase, any mortal wounds inflicted by Hazardous tests are allocated after the charging unit has ended its Charge move.
- After a unit shoots or fights, roll one Hazardous test (one D6) for each Hazardous weapon used. For each 1, a model equipped with a hazardous weapon suffers 3 mortal wounds, that must be allocated to the selected model.
- A Critical Wound inflicts mortal wounds equal to the weapon’s Damage characteristic, instead of any normal damage.
Some attacks are so powerful that no armour or force field can withstand their fury.
Some rules inflict mortal wounds on units. Each time mortal wounds are inflicted on a unit, each of those mortal wounds inflicts one point of damage to that unit, and they are always applied one at a time. Each mortal wound is allocated to a model in the same manner as allocating an attack. Excess damage from mortal wounds is not lost if the damage can be allocated to another model. Instead, keep allocating damage to another model in the target unit until either all the damage has been allocated or the target unit is destroyed.If an attack inflicts mortal wounds in addition to any normal damage, do not make a Wound roll or saving throw (including invulnerable saving throws) against those mortal wounds. If those mortal wounds are inflicted by an attack that has the [PRECISION] ability, the attacking model’s controlling player can allocate those mortal wounds to a CHARACTER model in that unit.
If mortal wounds are being inflicted as a result of the [HAZARDOUS] ability or by an attack with the [DEVASTATING WOUNDS] ability that scored a Critical Wound, each time those mortal wounds are allocated to a model, if that model is destroyed as a result of those mortal wounds, the remaining mortal wounds from that attack are lost, just as with a normal attack.
If, when a unit is selected to shoot or fight, one or more of its attacks can inflict mortal wounds on the target, resolve any normal damage inflicted by the attacking unit’s attacks on that target before inflicting any mortal wounds on that target. If an attack inflicts mortal wounds in addition to any normal damage, but the normal damage is subsequently saved, the target unit still suffers those mortal wounds, as described above.
- Each mortal wound inflicted on a unit causes one model in that unit to lose one wound.
- Unless the source of the mortal wounds is the [HAZARDOUS] ability or an attack with the [DEVASTATING WOUNDS] ability, damage from mortal wounds is not lost if it can be allocated to another model.
- No saving throws can be made against mortal wounds.
- Mortal wounds inflicted by attacks always apply after any normal damage, even if that damage was saved.
Many armies employ reconnaissance units who can sit concealed, waiting for the right moment to strike.
During deployment, if every model in a unit has this ability, then when you set it up, it can be set up anywhere on the battlefield that is more than 9" horizontally away from the enemy deployment zone and all enemy models.Some warriors refuse to be laid low, even by what should be fatal wounds.
Some models have ‘Feel No Pain x+’ listed in their abilities. Each time a model with this ability suffers damage and so would lose a wound (including wounds lost due to mortal wounds), roll one D6: if the result is greater than or equal to the number denoted by ‘x’, that wound is ignored and is not lost. If a model has more than one Feel No Pain ability, you can only use one of those abilities each time that model suffers damage and so would lose a wound.- Feel No Pain x+: Each time this model would lose a wound, roll one D6: if the result equals or exceeds ‘x’, that wound is not lost.
| ||||||||||||||
If the result of the Wound roll is greater than or equal to the required number shown in the table above, then that Wound roll is successful and scores one wound against the target unit. Otherwise, the attack fails and the attack sequence ends.
An unmodified Wound roll of 6 is called a Critical Wound and is always successful. An unmodified Wound roll of 1 always fails. A Wound roll can never be modified by more than -1 or +1.
- Critical Wound: Unmodified Wound roll of 6. Always successful.
- An unmodified Wound roll of 1 always fails.
- A Wound roll can never be modified by more than -1 or +1.
- Normal Move: Models move up to M".
- Cannot move within Engagement Range of any enemy models.
- Advance Move: Models move up to M+D6".
- Cannot move within Engagement Range of any enemy models.
- Units that Advance cannot shoot or charge this turn.
You then make a Charge roll for the charging unit by rolling 2D6. The result is the maximum number of inches each model in that unit can be moved if a Charge move is possible. For a Charge move to be possible, the Charge roll must be sufficient to enable the charging unit to end that move:
- Within Engagement Range of every unit that you selected as a target of the charge.
- Without moving within Engagement Range of any enemy units that were not a target of the charge.
- In Unit Coherency.
- Charge Roll: 2D6".
- Targets of a charge must be within 12" but do not need to be visible.
- If the distance rolled is insufficient to move within Engagement Range of all targets while maintaining Unit Coherency, the charge fails.
- Cannot move within Engagement Range of any unit that was not a target of the charge.
- If the charge is successful, each model makes a Charge move less than or equal to the Charge roll, and must move into base-to-base contact with an enemy model if possible.
Many warriors thunder headlong into combat, using the impetus of their charge to bring swift death to their foes.
Each time a unit makes a Charge move, until the end of the turn, that unit has the Fights First ability.TARGET: One unit from your army that is within 6" of that enemy unit and would be eligible to declare a charge against that enemy unit if it were your Charge phase.
EFFECT: Your unit now declares a charge that targets only that enemy unit, and you resolve that charge as if it were your Charge phase.
RESTRICTIONS: You can only select a VEHICLE unit from your army if it is a WALKER. Note that even if this charge is successful, your unit does not receive any Charge bonus this turn.
TARGET: One GRENADES unit from your army (excluding units that Advanced, Fell Back or have shot this turn) that is not within Engagement Range of one or more enemy units.
EFFECT: Select one GRENADES model in your unit and one enemy unit that is not within Engagement Range of any units from your army and is within 8" of and visible to your GRENADES model. Roll six D6: for each 4+, that enemy unit suffers 1 mortal wound.
Models cannot be set up or end a Normal, Advance or Fall Back move within Engagement Range of any enemy models. If for any reason a model cannot meet this condition, that model is destroyed.
- Engagement Range: Within 1" horizontally and 5" vertically.
- Models cannot be set up or end a Normal, Advance or Fall Back move within Engagement Range of any enemy models.
Some weapons strike in a flurry of blows, tearing the foe apart with relentless ferocity.
Weapons with [SUSTAINED HITS X] in their profile are known as Sustained Hits weapons. Each time an attack is made with such a weapon, if a Critical Hit is rolled, that attack scores a number of additional hits on the target as denoted by ‘x’.- [SUSTAINED HITS X]: Each Critical Hit scores ‘x’ additional hits on the target.
Some weapons can inflict fatal injuries on any foe, no matter their resilience.
Weapons with [LETHAL HITS] in their profile are known as Lethal Hits weapons. Each time an attack is made with such a weapon, a Critical Hit automatically wounds the target.Precision attacks can pick high-value targets out in a crowd, whether through the unerring aim of a sniper or the pinpoint accuracy of a blade-master’s strike.
Weapons with [PRECISION] in their profile are known as Precision weapons. Each time an attack made with such a weapon successfully wounds an Attached unit (see Leader ability), if a CHARACTER model in that unit is visible to the attacking model, the attacking model’s player can choose to have that attack allocated to that CHARACTER model instead of following the normal attack sequence.- When targeting an Attached unit, the attacking model’s player can have the attack allocated to a CHARACTER model in that unit visible to the bearer.
The datasheets using PSYKER keyword can be found in the following Factions:
Chaos: Chaos Daemons, Chaos Knights, Chaos Space Marines, Death Guard, Emperor’s Children, Thousand Sons.Imperium: Astra Militarum, Grey Knights, Imperial Agents, Space Marines.
Xenos: Aeldari, Drukhari, Genestealer Cults, Leagues of Votann, Orks, Tyranids.
The PSYKER keyword is used in the following datasheets:
and others...
Some units make their way to battle via tunnelling, teleportation, high-altitude descent or other extraordinary means that allow them to appear suddenly in the thick of the fighting.
During the Declare Battle Formations step, if every model in a unit has this ability, you can set it up in Reserves instead of setting it up on the battlefield. If you do, in the Reinforcements step of one of your Movement phases you can set up this unit anywhere on the battlefield that is more than 9" horizontally away from all enemy models. If a unit with the Deep Strike ability arrives from Strategic Reserves, the controlling player can choose for that unit to be set up either using the rules for Strategic Reserves or using the Deep Strike ability.- Unit can be set up in Reserves instead of on the battlefield.
- Unit can be set up in your Reinforcements step, more than 9" horizontally away from all enemy models.
TARGET: One unit from your army that is in Reserves.
EFFECT: Your unit can arrive on the battlefield as if it were the Reinforcements step of your Movement phase, and if every model in that unit has the Deep Strike ability, you can set that unit up as described in the Deep Strike ability (even though it is not your Movement phase).
RESTRICTIONS: You cannot use this Stratagem to enable a unit to arrive on the battlefield during a battle round it would not normally be able to do so in.
- A unit can embark within a friendly TRANSPORT if all of its models end a Normal, Advance or Fall Back move within 3" of that TRANSPORT.
- A unit cannot embark and disembark in the same phase.
Shattered ruins and twisted wreckage afford much-needed shelter from enemy salvoes. Even heavily armoured warriors unfazed by small arms fire are thankful for such cover when foes bring their biggest guns to bear.
Models can sometimes gain a measure of protection from terrain features. The rules below detail the conditions under which a terrain feature confers the Benefit of Cover on a model.Each time a ranged attack is allocated to a model that has the Benefit of Cover, add 1 to the saving throw made for that attack (excluding invulnerable saving throws). Models with a Save characteristic of 3+ or better cannot have the Benefit of Cover against attacks with an Armour Penetration characteristic of 0. Multiple instances of the Benefit of Cover are not cumulative – a model cannot benefit from this rule more than once at any one time.
- Benefit of Cover: Add 1 to armour saving throws against ranged attacks.
- Does not apply to models with a Save of 3+ or better against attacks with an AP of 0.
- Multiple instances are not cumulative.
The NECRONS and INFANTRY keywords are used in the following Necrons datasheets:
- If a unit has a Starting Strength of 1, then it is said to be Below Half-strength while its remaining number of wounds is less than half of its Wounds characteristic.
- For any other unit, while the number of models in that unit is less than half of its Starting Strength, that unit is said to be Below Half-strength.
The datasheets using PSYKER and CHARACTER keywords can be found in the following Factions:
Chaos: Chaos Daemons, Chaos Knights, Chaos Space Marines, Death Guard, Emperor’s Children, Thousand Sons.Imperium: Astra Militarum, Grey Knights, Imperial Agents, Space Marines.
Xenos: Aeldari, Drukhari, Genestealer Cults, Leagues of Votann, Orks, Tyranids.
The PSYKER and CHARACTER keywords are used in the following datasheets:
and others...
TARGET: One CHARACTER model in your unit.
EFFECT: Until the end of the phase, all melee attacks made by that model have the [PRECISION] ability.
The changing nature of the war zone and the demands from high command necessitate the opening of arms caches and wargear vaults to ensure your warriors face the enemy with the most effective killing tools.
Some aircraft can use vectored thrusters or anti-grav technology to hover over the battlefield, the better to hunt their prey or deploy embarked troops.
Some AIRCRAFT models have ‘Hover’ listed in their abilities. When you are instructed to Declare Battle Formations, before doing anything else, you must first declare which models from your army with this ability will be in Hover mode.If a model is in Hover mode, then until the end of the battle, its Move characteristic is changed to 20", it loses the AIRCRAFT keyword and it loses all associated rules for being an AIRCRAFT model. Models in Hover mode do not start the battle in Reserves, but you can choose to place them into Strategic Reserves following the normal rules if you wish.
When a unit disembarks from a TRANSPORT model, set it up on the battlefield so that it is wholly within 3" of that TRANSPORT model and not within Engagement Range of any enemy models. If, for any reason, a disembarking model cannot be set up, that model’s unit cannot disembark.
Units that disembark from a TRANSPORT model that either Remained Stationary this phase or has not yet made a Normal, Advance or Fall Back move this phase can then act normally (make a Normal move, Advance, shoot, declare a charge, fight, etc.) in the remainder of the turn. Such a disembarking unit cannot choose to Remain Stationary.
Units that disembark from a TRANSPORT model that made a Normal move this phase count as having made a Normal move themselves; they cannot move further during this phase. Such a unit also cannot declare a charge in the same turn, but can otherwise act normally in the remainder of the turn.
Units cannot disembark from a TRANSPORT model that either Advanced or Fell Back this turn.
- Units that start your Movement phase embarked within a TRANSPORT can disembark this phase, provided their TRANSPORT has not Advanced or Fallen Back.
- If a unit disembarks before its TRANSPORT moves, it can act normally.
- If a unit disembarks after its TRANSPORT moves, it cannot move or charge this turn, but can otherwise act normally.
- Disembarking units must be set up wholly within 3" of their TRANSPORT and not within Engagement Range of any enemy models (or the unit cannot disembark).
- Units that disembark this turn cannot Remain Stationary.
From detonating ammo stores to corrosive innards or frenzied death throes, some targets are deadly even in defeat.
Some models have ‘Deadly Demise x’ listed in their abilities. When such a model is destroyed, roll one D6 before removing it from play (if such a model is a TRANSPORT, roll before any embarked models disembark). On a 6, each unit within 6" of that model suffers a number of mortal wounds denoted by ‘x’ (if this is a random number, roll separately for each unit within 6").- Deadly Demise x: When this model is destroyed, roll one D6. On a 6, each unit within 6" suffers ‘x’ mortal wounds.
Occasionally, a group of warriors will climb the ranks across a score of battles, forging a legendary reputation that is known by friend and foe. Such veterans possess skills and honours to rival those of the most glorified heroes.