
Death Guard – Mutoid Vermin

MELEE WEAPONS | RANGE | A | WS | S | AP | D | |
| Diseased claws and fangs lethal hits | |||||||
| Diseased claws and fangs lethal hits | Melee | 2 | 4+ | 2 | 0 | 1 | |
- None
- 16 Mutoid Vermin
| 16 models | 85 |
DEATH GUARD
The DEATH GUARD keyword is used in the following Death Guard datasheets:
An unmodified Hit roll of 6 is called a Critical Hit and is always successful. An unmodified Hit roll of 1 always fails. A Hit roll can never be modified by more than -1 or +1.
- Hit Roll (Ranged Attack): A hit is scored if the D6 result equals or exceeds that attack’s BS.
- Hit Roll (Melee Attack): A hit is scored if the D6 result equals or exceeds that attack’s WS.
- Critical Hit: Unmodified Hit roll of 6. Always successful.
- An unmodified Hit roll of 1 always fails.
- A Hit roll can never be modified by more than -1 or +1.
The Death Guard are warriors of the Plague God Nurgle. Their bloated bodies are riddled with corruption, and their mere presence causes the foe to sicken and wither in the grip of supernatural diseases while the battlefield falls to rot and ruin around them.
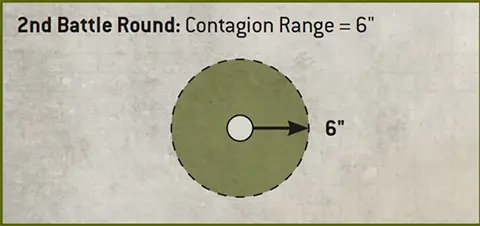
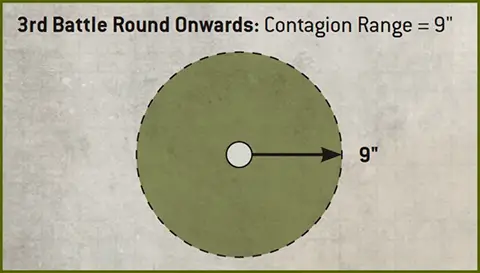
CONTAGION RANGE
Contagion Range changes over the course of the battle:

During the Declare Battle Formations step, select one of the Plagues below. Until the end of the battle, while an enemy unit is Afflicted, subtract 1 from the Toughness characteristic of models in that unit, and that unit has the effect of your chosen Plague.
Skullsquirm Blight This horrifying affliction sees the minds and senses of the victim gnawed gradually away from within. Each time a model in this unit makes an attack, subtract 1 from the Hit roll. |
Rattlejoint Ague Limbs shuddering with fever palsy, bones turned brittle as glass, these warriors can barely act to defend themselves. Worsen the Save characteristic of models in this unit by 1. |
Scabrous Soulrot Victims of this insidious ailment become glassy eyed and morose as their very animus and essence decay. Worsen the Move, Leadership, and Objective Control characteristics of models in this unit by 1 (this rule can only worsen a model’s Objective Control characteristic to a minimum of 1). |
The Starting Strength of an Attached unit is equal to the combined Starting Strengths of all of its units (i.e. the number of models in the Leader unit added to the number of models in the Bodyguard unit). If either the Leader unit or the Bodyguard unit in an Attached unit is destroyed, the Starting Strength of the remaining unit is changed to be equal to its original Starting Strength.
For the purposes of rules that are triggered when a unit is destroyed, such rules are still triggered when one of the individual units that made up an Attached unit is destroyed (the Leader or the Bodyguard unit).
Weapons powered by unstable and dangerous energy sources pose a substantial risk to the wielder every time they are used.
Weapons with [HAZARDOUS] in their profile are known as Hazardous weapons. Each time a unit is selected to shoot or fight, after that unit has resolved all of its attacks, for each Hazardous weapon that targets were selected for when resolving those attacks, that unit must take one Hazardous test. To do so, roll one D6: on a 1, that test is failed. For each failed test you must resolve the following sequence (resolve each failed test one at a time):- If possible, select one model in that unit that has lost one or more wounds and is equipped with one or more Hazardous weapons.
- Otherwise, if possible, select one model in that unit (excluding CHARACTER models) equipped with one or more Hazardous weapons.
- Otherwise, select one CHARACTER model in that unit equipped with one or more Hazardous weapons.
If a unit from a player’s army is selected as the target of the Fire Overwatch Stratagem in their opponent’s Charge phase, any mortal wounds inflicted by Hazardous tests are allocated after the charging unit has ended its Charge move.
- After a unit shoots or fights, roll one Hazardous test (one D6) for each Hazardous weapon used. For each 1, a model equipped with a hazardous weapon suffers 3 mortal wounds, that must be allocated to the selected model.
The DEATH GUARD keyword is used in the following Death Guard datasheets:
The CHARACTER keyword is used in the following Death Guard datasheets:
The CHAOS keyword is used in the following Death Guard datasheets:
and others...
The NURGLE keyword is used in the following Death Guard datasheets:
and others...
| ||||||||||||||


If the result of the Wound roll is greater than or equal to the required number shown in the table above, then that Wound roll is successful and scores one wound against the target unit. Otherwise, the attack fails and the attack sequence ends.
An unmodified Wound roll of 6 is called a Critical Wound and is always successful. An unmodified Wound roll of 1 always fails. A Wound roll can never be modified by more than -1 or +1.
- Critical Wound: Unmodified Wound roll of 6. Always successful.
- An unmodified Wound roll of 1 always fails.
- A Wound roll can never be modified by more than -1 or +1.
If the result is greater than or equal to the Save characteristic of the model the attack was allocated to, then that saving throw is successful and the attack sequence ends. Otherwise, that saving throw fails and that model suffers damage.
An unmodified saving throw of 1 always fails. A saving throw can never be improved by more than +1.
- Saving Throw: Roll one D6 and modify by the attack’s AP. If the result is less than the Save of the model being rolled for, the saving throw is failed and that model suffers damage. Otherwise, that attack is saved.
- An unmodified saving throw of 1 always fails.
- A saving throw can never be improved by more than +1.
- Advance Move: Models move up to M+D6".
- Cannot move within Engagement Range of any enemy models.
- Units that Advance cannot shoot or charge this turn.
You then make a Charge roll for the charging unit by rolling 2D6. The result is the maximum number of inches each model in that unit can be moved if a Charge move is possible. For a Charge move to be possible, the Charge roll must be sufficient to enable the charging unit to end that move:
- Within Engagement Range of every unit that you selected as a target of the charge.
- Without moving within Engagement Range of any enemy units that were not a target of the charge.
- In Unit Coherency.
- Charge Roll: 2D6".
- Targets of a charge must be within 12" but do not need to be visible.
- If the distance rolled is insufficient to move within Engagement Range of all targets while maintaining Unit Coherency, the charge fails.
- Cannot move within Engagement Range of any unit that was not a target of the charge.
- If the charge is successful, each model makes a Charge move less than or equal to the Charge roll, and must move into base-to-base contact with an enemy model if possible.
A unit cannot shoot or declare a charge in the same turn that it Fell Back.
Desperate Escape Tests
Unlike when making other types of move, models can move over enemy models when making a Fall Back move as if those enemy models were not there, but you must take a Desperate Escape test for each model that will do so (excluding models that are TITANIC or can FLY) before any models in that unit are moved. In addition, if a unit is Battle-shocked when it is selected to Fall Back, you must take a Desperate Escape test for every model in that unit before any are moved.
- Fall Back Move: Models move up to M".
- Units that Fall Back cannot shoot or declare a charge in the same turn.
- Models can move over enemy models when Falling Back, but you must take Desperate Escape tests for them before they do so (excluding models that are TITANIC or can FLY).
- If a Battle-shocked unit is selected to Fall Back, take a Desperate Escape test for every model in that unit.
- Desperate Escape Test: Roll one D6. On a 1-2, one model from that unit is destroyed.
TARGET: That unit or model from your army.
EFFECT: You re-roll that roll, test or saving throw.
While a unit is Battle-shocked:
- The Objective Control characteristic of all of its models is 0.
- If it Falls Back, you must take a Desperate Escape test for every model in that unit.
- Its controlling player cannot use Stratagems to affect that unit.
Once you have taken Battle-shock tests for all of your units that require them, your Command phase ends and you progress to your Movement phase.
In this step, if for any reason a unit is forced to take a Battle-shock test for being below its Starting Strength, unless otherwise stated, that unit does not also have to take a Battle-shock test for being Below Half-strength. While a unit is Battle-shocked, all models in that unit are also Battle-shocked.
- Take a Battle-shock test for each unit from your army on the battlefield that is Below Half-strength.
- Roll 2D6: if the result is greater than or equal to the unit’s Leadership, the test is passed. Otherwise, the unit is Battle-shocked until the start of your next Command phase.
- Battle-shocked units have an OC of 0 and their controlling player cannot use Stratagems to affect them.
- Battle-shocked units must take Desperate Escape tests if they Fall Back.
TARGET: The unit from your army that Battle-shock test was just taken for (even though your Battle-shocked units cannot normally be affected by your Stratagems).
EFFECT: Your unit is treated as having passed that test instead, and is not Battle-shocked as a result.
High-explosives can fell several warriors in a single blast, but firing them where your comrades will get caught in the ensuing detonation is simply unwise.
Weapons with [BLAST] in their profile are known as Blast weapons, and they make a random number of attacks. Each time you determine how many attacks are made with a Blast weapon, add 1 to the result for every five models that were in the target unit when you selected it as the target (rounding down). Blast weapons can never be used to make attacks against a unit that is within Engagement Range of one or more units from the attacking model’s army (including its own unit).- Add 1 to the Attacks characteristic for every five models in the target unit (rounding down).
- Can never be used against a target that is within Engagement Range of any units from the attacking model’s army (including its own).
TARGET: One unit from your army that has not been selected to shoot this phase.
EFFECT: Select one model in your unit that is equipped with a weapon with the [BLAST] ability. Until the end of the phase, when determining how many models are in the target unit for the purpose of that ability, include models that are not visible to the attacking model. In addition, attacks made with that weapon can be allocated to models that are not visible to the attacking model.
Models cannot be set up or end a Normal, Advance or Fall Back move within Engagement Range of any enemy models. If for any reason a model cannot meet this condition, that model is destroyed.
- Engagement Range: Within 1" horizontally and 5" vertically.
- Models cannot be set up or end a Normal, Advance or Fall Back move within Engagement Range of any enemy models.
TARGET: One unit from your army that is within Engagement Range of one or more enemy units and that has not already been selected to fight this phase.
EFFECT: Your unit fights next.
TARGET: One DEATH GUARD Attached unit from your army that has not been selected to shoot or fight this phase.
EFFECT: Until the end of the phase, each time a model in your unit makes an attack, an unmodified Hit roll of 5+ scores a Critical Hit.
TARGET: One DEATH GUARD Attached unit from your army that was selected as the target of one or more of the attacking unit’s attacks.
EFFECT: Until the end of the phase, add 2 to the Toughness characteristic of models in your unit.
TARGET: One DEATH GUARD Attached unit from your army that has not been selected to shoot or fight this phase.
EFFECT: Until the end of the phase, each time a model in your unit makes an attack that targets a unit that is below its Starting Strength, you can re-roll the Hit roll and you can re-roll the Wound roll.
Some warriors attack with blinding speed, landing their blows before their foes can react.
Units with this ability that are eligible to fight do so in the Fights First step, provided every model in the unit has this ability.TARGET: One DEATH GUARD unit from your army that includes two CHARACTER models.
EFFECT: Until the end of the phase, your unit has the Fights First ability.
You can never re-roll a dice more than once, and re-rolls happen before modifiers (if any) are applied. Rules that refer to the value of an ‘unmodified’ dice roll are referring to the dice result after any re-rolls, but before any modifiers are applied.
- Unmodified Dice: the result after re-rolls, but before any modifiers.
- A dice can never be re-rolled more than once.
- You must re-roll all dice if several need adding together (e.g. 2D6).
- Re-rolls are applied before any modifiers.
TARGET: That unit or model from your army.
EFFECT: You re-roll that roll, test or saving throw. If you are using fast dice rolling, select one of those rolls or saving throws to re-roll.
TARGET: That unit from your army.
EFFECT: Your unit automatically passes that Battle-shock test.
RESTRICTIONS: You cannot use this Stratagem more than once per battle.
Some units make their way to battle via tunnelling, teleportation, high-altitude descent or other extraordinary means that allow them to appear suddenly in the thick of the fighting.
During the Declare Battle Formations step, if every model in a unit has this ability, you can set it up in Reserves instead of setting it up on the battlefield. If you do, in the Reinforcements step of one of your Movement phases you can set up this unit anywhere on the battlefield that is more than 9" horizontally away from all enemy models. If a unit with the Deep Strike ability arrives from Strategic Reserves, the controlling player can choose for that unit to be set up either using the rules for Strategic Reserves or using the Deep Strike ability.- Unit can be set up in Reserves instead of on the battlefield.
- Unit can be set up in your Reinforcements step, more than 9" horizontally away from all enemy models.
TARGET: One unit from your army that is in Reserves.
EFFECT: Your unit can arrive on the battlefield as if it were the Reinforcements step of your Movement phase, and if every model in that unit has the Deep Strike ability, you can set that unit up as described in the Deep Strike ability (even though it is not your Movement phase).
RESTRICTIONS: You cannot use this Stratagem to enable a unit to arrive on the battlefield during a battle round it would not normally be able to do so in.
Many warriors thunder headlong into combat, using the impetus of their charge to bring swift death to their foes.
Each time a unit makes a Charge move, until the end of the turn, that unit has the Fights First ability.TARGET: One unit from your army that is within 6" of that enemy unit and would be eligible to declare a charge against that enemy unit if it were your Charge phase.
EFFECT: Your unit now declares a charge that targets only that enemy unit, and you resolve that charge as if it were your Charge phase.
RESTRICTIONS: You can only select a VEHICLE unit from your army if it is a WALKER. Note that even if this charge is successful, your unit does not receive any Charge bonus this turn.
TARGET: One unit from your army that is within Engagement Range of one or more enemy units and that has not already been selected to fight this phase.
EFFECT: Your unit fights next.
- A Critical Wound inflicts mortal wounds equal to the weapon’s Damage characteristic, instead of any normal damage.
Some attacks are so powerful that no armour or force field can withstand their fury.
Some rules inflict mortal wounds on units. Each time mortal wounds are inflicted on a unit, each of those mortal wounds inflicts one point of damage to that unit, and they are always applied one at a time. Each mortal wound is allocated to a model in the same manner as allocating an attack. Excess damage from mortal wounds is not lost if the damage can be allocated to another model. Instead, keep allocating damage to another model in the target unit until either all the damage has been allocated or the target unit is destroyed.If an attack inflicts mortal wounds in addition to any normal damage, do not make a Wound roll or saving throw (including invulnerable saving throws) against those mortal wounds. If those mortal wounds are inflicted by an attack that has the [PRECISION] ability, the attacking model’s controlling player can allocate those mortal wounds to a CHARACTER model in that unit.
If mortal wounds are being inflicted as a result of the [HAZARDOUS] ability or by an attack with the [DEVASTATING WOUNDS] ability that scored a Critical Wound, each time those mortal wounds are allocated to a model, if that model is destroyed as a result of those mortal wounds, the remaining mortal wounds from that attack are lost, just as with a normal attack.
If, when a unit is selected to shoot or fight, one or more of its attacks can inflict mortal wounds on the target, resolve any normal damage inflicted by the attacking unit’s attacks on that target before inflicting any mortal wounds on that target. If an attack inflicts mortal wounds in addition to any normal damage, but the normal damage is subsequently saved, the target unit still suffers those mortal wounds, as described above.
- Each mortal wound inflicted on a unit causes one model in that unit to lose one wound.
- Unless the source of the mortal wounds is the [HAZARDOUS] ability or an attack with the [DEVASTATING WOUNDS] ability, damage from mortal wounds is not lost if it can be allocated to another model.
- No saving throws can be made against mortal wounds.
- Mortal wounds inflicted by attacks always apply after any normal damage, even if that damage was saved.
TARGET: One DEATH GUARD unit from your army that has not been selected to shoot this phase.
EFFECT: Until the end of the phase, each time a model in your unit makes an attack that targets a visible enemy unit (excluding AIRCRAFT) within your opponent’s deployment zone, you can re-roll the Hit roll.
TARGET: One DEATH GUARD unit from your army that was selected as the target of one or more of the attacking unit’s attacks, and one friendly POXWALKERS unit within 3" of your unit and visible to both your unit and the attacking unit.
EFFECT: Until the end of the phase, each time you would allocate an attack to a model in your DEATH GUARD unit, if your POXWALKERS unit is visible to the attacking model and is an eligible target for that attack, no saving throw is made for that attack; instead a number of POXWALKERS from your POXWALKERS unit equal to the Damage characteristic of that attack are destroyed.
TARGET: That DEATH GUARD unit.
EFFECT: Each enemy unit within Engagement Range of your unit must take a Battle-shock test, subtracting 1 from that test.
The PLAGUE LEGIONS keyword is used in the following Death Guard datasheets:
TARGET: One DEATH GUARD unit from your army that has not been selected to fight this phase.
EFFECT: Until the end of the phase, each time a model in your unit makes an attack that targets an enemy unit that is within Engagement Range of one or more PLAGUE LEGIONS units from your army, you can re-roll the Hit roll.
TARGET: One DEATH GUARD model your army that has lost one or more wounds.
EFFECT: Select one enemy unit within 3" of your model. Roll a number of D6 equal to the number of wounds your model has lost: for each 5+, that enemy unit suffers one mortal wound (to a maximum of 6 mortal wounds) and your model regains 1 lost wound (to a maximum of 6 lost wounds).
TARGET: Your DEATH GUARD WARLORD that is on the battlefield.
EFFECT: Until the start of your next Command phase, add 3" to the Contagion Range of models from your army.
TARGET: One DEATH GUARD unit from your army that was selected as the target of one or more of the attacking unit’s attacks.
EFFECT: Until the end of the phase, each time an attack is allocated to a model in your unit, subtract 1 from the Damage characteristic of that attack.
As the foul tendrils of the Death Guard quest further across the battlefield, they infest even the most secure, holy and heavily warded sites with supernatural disease. To fight amidst such foulness is a virtual death sentence to the foe, win or lose.
If you control an objective marker at the end of your Command phase and a DEATH GUARD unit from your army (excluding Battle-shocked units) is within range of that objective marker, that objective marker remains under your control until your opponent’s Level of Control over that objective marker is greater than yours at the end of a phase. In addition, until you lose control of that objective marker, it has the Nurgle’s Gift ability as if it were a DEATH GUARD model from your army.In the wake of preparatory bombardment by artillery weapons both forbidden and foul, the surviving foe are left reeling amidst clouds of plague smog. With their flesh running like tallow and their weapons rusting in their hands, they will be hard-pressed to fight back.
At the start of the battle round, select a number of enemy units more than 12" away from every model from your army that is on the battlefield. Until the end of the battle round, those enemy units are Afflicted. The maximum number of units you can select in this way depends on the battle size, as shown below.
|
A spirit of competition infects Nurgle’s champions when they fight alongside one another. With each vying to outdo the others in virulence, the foes are subjected to a riotous string of nightmarish outbreaks amongst their ranks.
At the start of the battle round, you can select one of the Plagues listed in Nurgle’s Gift. Until the end of the battle, that is your chosen Plague instead of any previously chosen Plague.Reality rings like a struck bell as it rebels against the sheer wrongness of Nurgle’s daemons. Borne upon these jarring waves of metaphysical disease, magnified and redoubled with every dolorous peal, the Plague God’s myriad infections spread and multiply all the faster.
While a PLAGUE LEGIONS unit from your army is within 7" of one or more DEATH GUARD units from your army, that PLAGUE LEGIONS unit has the Nurgle’s Gift ability.While a DEATH GUARD unit from your army is within 7" of one or more PLAGUE LEGIONS units from your army, add 3" to that DEATH GUARD units Contagion Range.
PLAGUE LEGIONS
You can include PLAGUE LEGIONS units in your army, even though they do not have the DEATH GUARD Faction keyword. The combined points cost of such units you can include in your army is:
- Incursion: Up to 500 pts
- Strike Force: Up to 1000 pts
- Onslaught: Up to 1500 pts
No PLAGUE LEGIONS models from your army can be your WARLORD.
No matter how many Poxwalkers the enemy gun down or tear limb-from-limb at close quarters, more groaning mutants keep coming from every side.
In your Command phase in each of the following battle rounds, depending on your chosen battle size, add a new POXWALKERS unit with a Starting Strength of 10 to your army, in Strategic Reserves.
|
KEYWORDS
POXWALKERS units from your army gain the BATTLELINE keyword.
The plagues and parasites to which these elite warriors play host are amongst the most lethal in the galaxy. Moment by moment, even the most resilient foes sicken and wither in their presence until all that remains is rotted matter deliquescing sloppily from mouldering bones.
In your opponent’s Command phase, roll 2D6 for each Afflicted enemy unit, subtracting 1 from the result if that unit is Below Half-strength. If the result is 6 or less, that enemy unit suffers D3 mortal wounds.Some warriors refuse to be laid low, even by what should be fatal wounds.
Some models have ‘Feel No Pain x+’ listed in their abilities. Each time a model with this ability suffers damage and so would lose a wound (including wounds lost due to mortal wounds), roll one D6: if the result is greater than or equal to the number denoted by ‘x’, that wound is ignored and is not lost. If a model has more than one Feel No Pain ability, you can only use one of those abilities each time that model suffers damage and so would lose a wound.- Feel No Pain x+: Each time this model would lose a wound, roll one D6: if the result equals or exceeds ‘x’, that wound is not lost.
Some weapons can inflict fatal injuries on any foe, no matter their resilience.
Weapons with [LETHAL HITS] in their profile are known as Lethal Hits weapons. Each time an attack is made with such a weapon, a Critical Hit automatically wounds the target.The DAMNED keyword is used in the following Death Guard datasheets:
The SWARM keyword is used in the following Death Guard datasheets: