
Volkus Compound
 1
1 Books
| Book | Kind | Edition | Version | Last update |
| | ||||
| | Expansion | 3 | 1.0 | April 2025 |
Volkus Compound
This is a PvP (player vs player) and PvE (player vs environment) mission pack for thematic and narrative gameplay. It’s defined by Killzone Upgrade: Compound Siege – one kill team is attacking the compound, while another defends it.Theme and narrative are the primary focuses of this mission pack. Players should think about selecting appropriate kill teams for each of the roles (Offence and Defence explained below). For example, a shooting kill team that’s defensive is suitable for guarding the compound, whilst an aggressive kill team is suitable for attacking it. After your first battle, you can even try swapping roles for a different experience.
This mission pack use the terms ‘Offence’ and ‘Defence’. Offence is the player attacking the compound, whilst Defence is the player that occupies it and must repel the attackers. Players are assigned to Offence or Defence in the Set Up the Battle step of the game sequence, and the mission maps specify Offence and Defence drop zones, territories and killzone edges (although Defence doesn’t have a killzone edge).
The aim of a compound siege is simple: hold the compound at the end of the battle, either by controlling its centre point, or by incapacitating all opposition. These victory conditions are specified in the game sequence.
This mission pack includes a section for PvE (cooperative and solo gameplay); if you are playing PvP, ignore that section. Finally, it includes a section for ruses to add further variety to the mission, as well as a helping hand for any teams that need it.
Game Sequence
1. SET UP THE BATTLE
- Decide if you are playing PvP or PvE.
- Each player selects a kill team for the battle. If playing PvE, see the Kill Team Selection section.
- Assign the players to Offence or Defence as appropriate, or roll-off and the winner decides.
- Defence selects a mission map.
- Set up the killzone using Killzone: Volkus and Killzone Upgrade: Compound Siege, placing terrain features and objective markers as specified by that mission map. Defence can also place up to six fire step terrain features if they wish.
- Drop zones are assigned to Offence and Defence as specified by the mission map.
2. SELECT OPERATIVES
- Each player secretly selects their operatives for the battle, adhering to the selection requirements in their kill team’s rules. They then reveal their selections simultaneously.
- Each player secretly selects up to four equipment options. Each option cannot be selected more than once per player. They then reveal their selections simultaneously.
- Each player gains 2CP.
3. SET UP OPERATIVES
- Each player alternates setting up an item of equipment that’s set up before the battle (ladders etc.), starting with Defence. Note it’s item by item, not option by option.
- Each player alternates setting up one third of their kill team (rounding up), starting with Defence. When a player sets up an operative, it must be wholly within their drop zone and must be given a Conceal order.
4. PLAY THE BATTLE
- In the first turning point, Offence decides who has initiative.
5. END THE BATTLE
- The battle ends after four turning points have been completed, or when all of one kill team is incapacitated (whichever comes first).
- If all of one kill team is incapacitated, their opponent is the winner. Otherwise, if a player’s operatives control the objective marker when the battle ends, they are the winner.
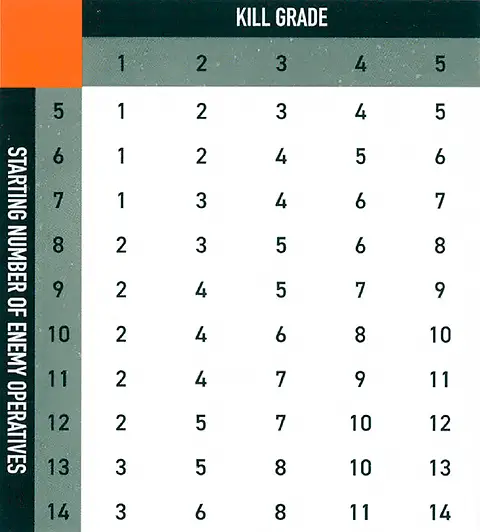
- If neither of these are true, work out your kill grade by adding up the number of enemy operatives that are incapacitated and consulting the table below (the row you use is determined by the starting number of enemy operatives). The player with the higher kill grade is the winner. If the players are tied, it’s a draw.
Mission Map Key
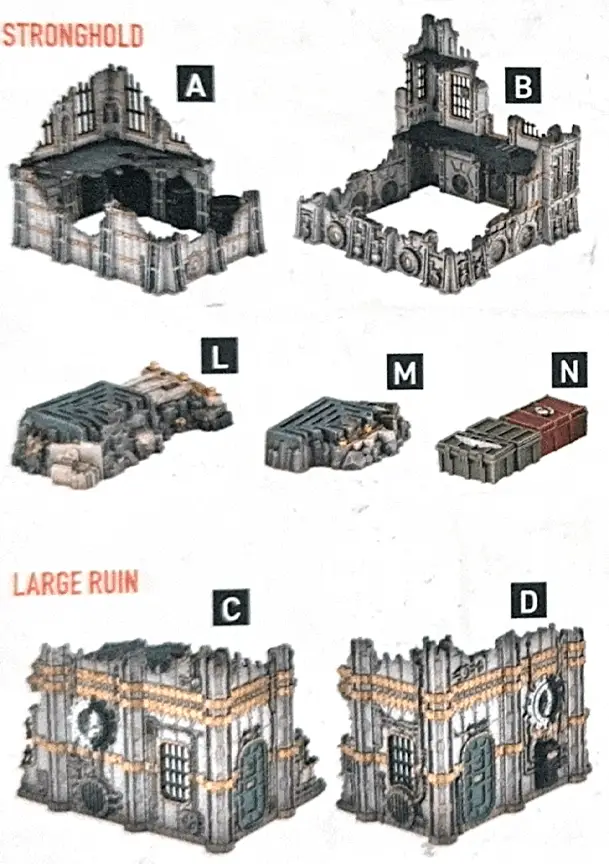
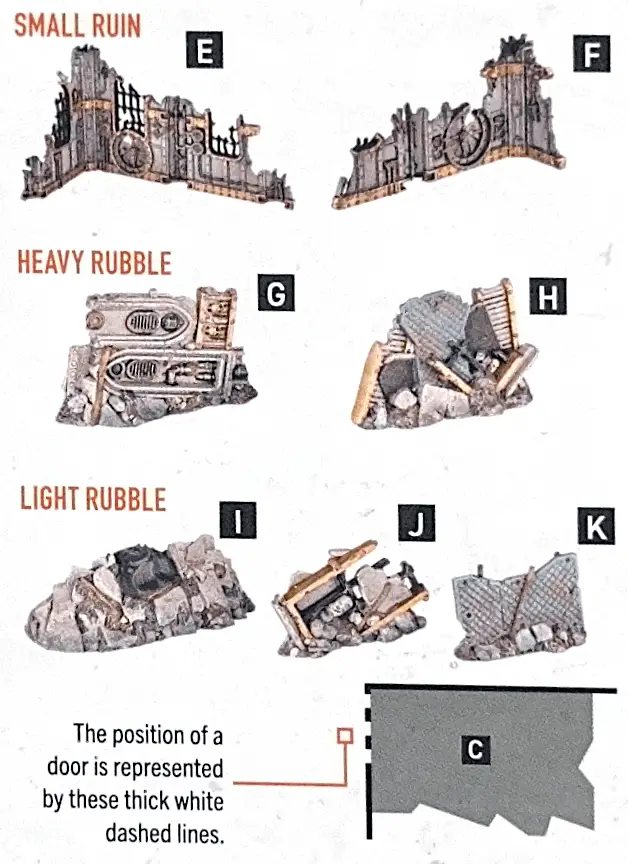
The maps in this mission pack use the terrain features found in Killzone Upgrade: Compound Siege and Killzone: Volkus below. Killzone: Volkus has 2x strongholds, 2x large ruins, 2x small ruins, 2x heavy rubble and 3x light rubble; their rules can be found here.KILLZONE: VOLKUS MAP KEY
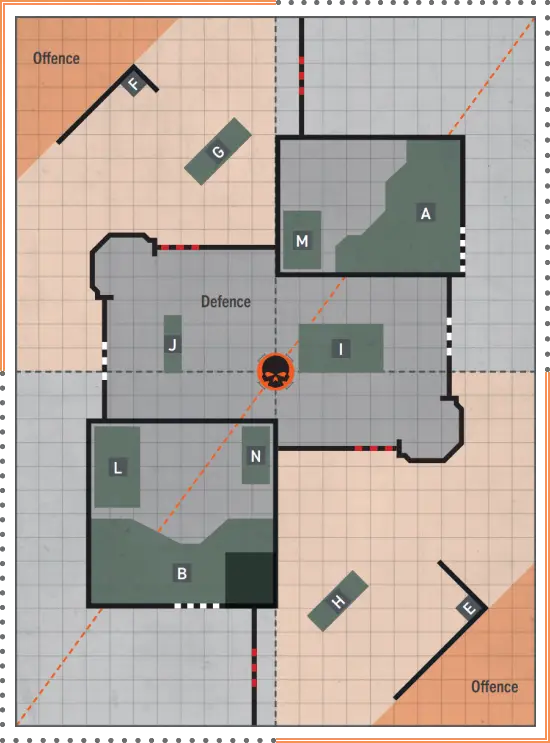
VOLKUS COMPOUND 1
Mission Map
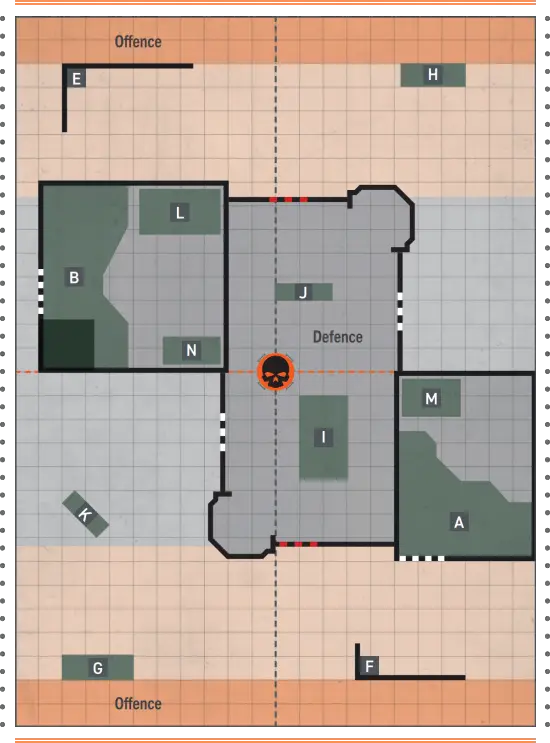
VOLKUS COMPOUND 2
Mission Map
PVE Cooperative/Solo Rules
Kill Team Selection
The players use one kill team. If you are playing solo, simply select your kill team as normal. If you are playing cooperatively, either select a kill team as normal and split the operatives between you, or take half of any kill team each. If it’s an odd number, round up (or down for more of a challenge). If you’ve taken separate teams, remember that some rules specify certain operatives through keywords, so one kill team’s rules won’t necessarily interact with another’s.Your kill team will fight against procedurally generated nonplayer operatives (known as NPOs). Unlike your highly trained operatives, NPOs are standard soldiers from their army – sentries, frontline troops, guards, etc. As such, you don’t select a kill team for them. Instead, you select the appropriate datacards from this mission pack. Alternatively, you can create your own datacards to accurately reflect their stats using existing kill teams as a guide – just ignore rules that wouldn’t be appropriate for standard soldiers.
Select any combination of NPOs with a combined Wounds stat of up to 90. To increase or decrease the difficulty, simply increase or decrease this number as appropriate.
Equipment
When selecting equipment for NPOs, use options from the Kill Team Upgrade: Equipment Pack (light barricades, ammo pile, etc.) and set them up as feels appropriate.Set Up
Set up NPOs as normal, except spread them out in cover relatively evenly so they can attack/defend from either side of the compound as appropriate. If they are Defence, spread them out between the bunker, stockade and stronghold terrain features and the middle of the compound.Initiative
When rolling off to decide who has initiative, roll one dice for the NPOs and one dice for the solo/co-op kill team. If the NPOs win the roll-off, they will always choose to have initiative.Gambit Step
In the Gambit step, NPOs will always pass.Behaviour
NPOs have a behaviour in their name that determines what they do.- Each behaviour will specify what order they have when activated.
- Whenever an NPO would perform an action (including when counteracting), perform the first action it can do from its behaviour. If it cannot do any, it’s expended (or pass, in the case of counteracting).
The behaviours in this mission pack will be familiar from those found in the Joint Ops mission pack (Kill Team Core Book). This time, however, the following exceptions apply:
- If NPOs are Defence, they shouldn’t move out of their drop zone (the compound) unless it feels appropriate in the circumstances. They’ll also perform Guard actions (even though it’s not mentioned in their behaviour), but only one operative can be on guard at each bunker terrain feature. This should only be done when appropriate, particularly at the start of a turning point if they couldn’t otherwise Shoot or Fight.
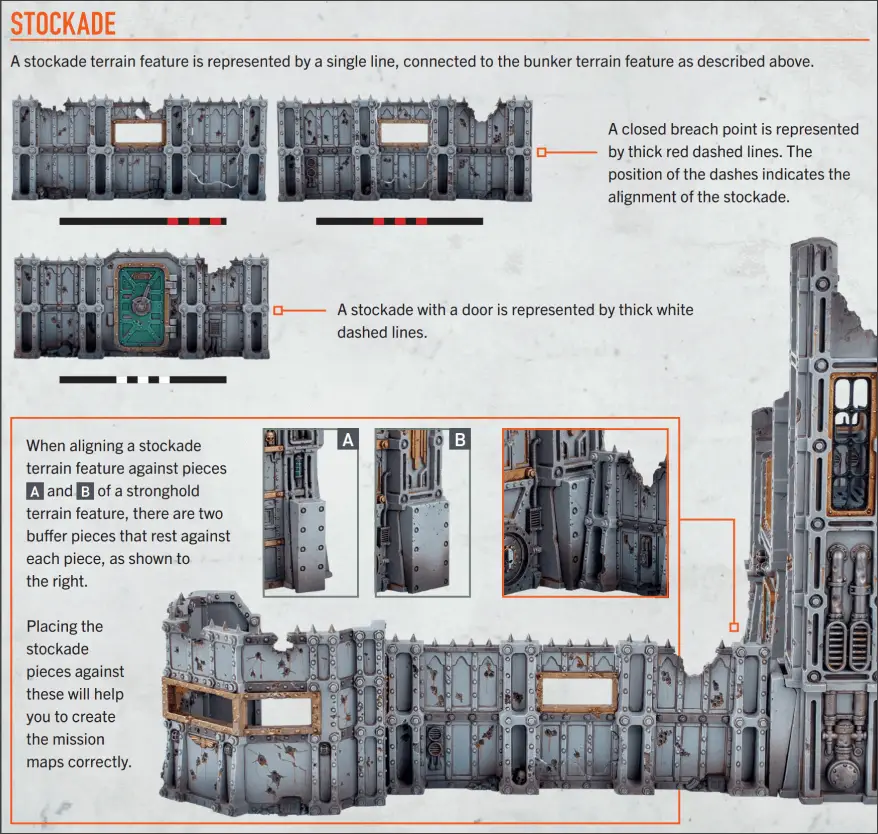
- If NPOs are Offence, they’ll try to move into Defence’s drop zone (the compound) as safely as possible to control the objective marker. This means they’ll climb the stockade terrain features and attempt to open them, but will do so with caution (unless four turning points are nearly complete and they need to move fast to control the objective marker).
NPO Behaviours
Brawler
This operative will move towards the enemy to fight them, but will seek cover on the way.
When activated, if this NPO can perform either of its first two actions during that activation, give it an Engage order. If it cannot, give it a Conceal order.
1. Fight.
2. Charge the closest enemy operative via the shortest possible route.
3. Reposition towards the closest enemy operative, to cover if possible (a subsequent Dash action can fulfil this, if able).
4. Dash towards the closest enemy operative, to cover if possible.
Marksman
This operative will move to an ideal position to shoot the enemy.
When activated, if this NPO can perform the Shoot action during that activation, give it an Engage order. If it cannot, give it a Conceal order.
1. Fall Back to cover. If possible, to a location where there’s a valid target that isn’t obscured. If not, where there’s an objective marker visible to this NPO.
2. Shoot.
3. Reposition to cover. If possible, to a location where there’s a valid target that isn’t obscured, if not, where there’s an objective marker visible to this NPO (a subsequent Dash action can fulfil these, if able).
4. Dash to cover. If possible, to a location where there’s a valid target that isn’t obscured, if not, where there’s an objective marker visible to this NPO.
Threat Principle
When making decisions for NPOs, use the threat principle: go with the option that’s worst for you. This can determine which ready NPO activates, how an NPO moves, shoots and fights, how to resolve their dice, etc. There are a few examples below (containing decisions in order of priority) that you can use as a guide, but if one option feels worse for you, go with that. If you still cannot decide, randomly choose one.Activation Priority
Multiple NPOs are ready, so the players activate the NPO that:1. Can perform the Fight or Shoot action (as determined by its behaviour), and is the most threatening to do so (e.g. it has a better weapon, is more likely to incapacitate an enemy operative, etc.).
2. Is not in cover from a player’s operative.
3. Is closer to a player’s operative.
Reposition or Dash action
An NPO moves to cover where there’s a valid target. If there are multiple locations for this, then the best valid target is determined as per a Shoot action below.Shoot action
An NPO performs a Shoot action and multiple enemy operatives are valid targets. It shoots the enemy operative that is/has:1. Not obscured.
2. Not in cover.
3. An objective marker within its control range.
4. Closest.
5. Wounded.
6. Ready.
Fight action
An NPO performs a Fight action and multiple enemy operatives are within its control range. It fights the enemy operative that is/has:1. Wounded.
2. An objective marker within its control range.
3. Ready.
NPO Datacards
| ||||||||||||||||||||||||||||||||||||||||||||||||||||||||||||


| ||||||||||||||||||||||||||||||||||||||||||||||||||||||||||||||||||||||||||||||||||||||||||

| ||||||||||||||||||||||||||||||||||||||||||||||||||||||||||||
| ||||||||||||||||||||||||||||||||||||||||||||||||||||||||||||||||||||||||||||||||
| ||||||||||||||||||||||||||||||||||||||||||||||||||||||||||||||||||||||
| ||||||||||||||||||||||||||||||||||||||||||||||||||||||||||||||||||||||||||||||||
RUSES
This section provides a selection of optional rules that can be used at players’ discretion. Both players could select one to add further variety, one player could select some to aid them in the battle ahead, or they could be used to adjust the experience as appropriate for a solo/cooperative game. If you are using ruses, select and reveal them at the same time as equipment.Offence
Surprise Attack
He who strikes first strikes hardest. Even the most formidable fortifications can be overcome if the enemy is caught flatfooted.In each Strategy phase, Offence rolls two D6 for the initiative roll-off and selects which to use. However, the first time they don’t have initiative during the battle (e.g. they lose the roll-off, or choose not to have it), they can no longer use this ruse.
Night Assault
Sparsely lit by search-lumen, the darkened compound provides plenty of opportunities for combatants to conceal themselves in shadow.Whenever an operative is shooting, the target is obscured unless any of the following are true:
- The target is within 6" of it.
- The target is wholly within Defence’s drop zone.
- The target is a stockade terrain feature.
- It’s using a weapon with the Blast weapon rule, the target is a secondary target, and the primary target wasn’t obscured.
Breaching Charges
The use of explosives allows opposing forces to bring down walls and barricades, burying their enemies in rubble.Offence operatives have the following melee weapon, but it can only be selected when fighting against a stockade terrain feature.
Breaching Charge
NAME | ATK | HIT | DMG | |
| Breaching Charge | 3 | 2+ | 5/8 |
Preliminary Bombardment
The compound is well fortified against bombardments, but a preparatory barrage still forces defenders to take cover.During the first turning point:
- Whenever a Defence operative is performing an action in which it moves (or is removed and set up again), it cannot move more than 3" (or be set up more than 3" away).
- Offence operatives cannot move in Defence’s drop zone unless their base is underneath Vantage terrain while they do so.
- Offence operatives cannot be removed and set up in Defence’s drop zone unless their base is underneath Vantage terrain when they are set up there.
Defence
Razor Wire Perimeter
Coils of razor wire have been carefully placed so as to slow advancing foes.Whenever an operative climbs over a stockade or bunker terrain feature, or moves into/out of a stronghold terrain feature, inflict D3 damage on that operative. This has no effect if an operative moves into/out of a stronghold and remains wholly within Defence’s drop zone while it does so (i.e. it’s only when an operative is moving into or out of the compound).
Booby Traps
Tripwire bombs, pitfall traps, snares and mines have been placed throughout the compound.The first time an operative moves through each door and each breach point during the battle, roll one D6: on a 4+, inflict that much damage on that operative. Note you only roll for each door and each breach point once during the battle.
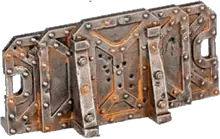
Stockpile
The defenders have stockpiled equipment and ammunition in order to repel the foe.Defence can select one additional equipment option.
Command Station
The compound is a command centre for the area that contains advanced vox and surveillance systems.At the end of the Select Operatives step, Defence gains 1 additional CP.
Roll-off
lf a rule requires a roll-off, both players roll one D6 and whoever has the highest wins the roll-off. If there’s a tie, roll-off again.
Equipment
Equipment are additional rules you can select before the battle, as specified in your game sequence. Universal equipment can be selected for any kill team whereas faction equipment is specific. Each player cannot select each equipment option more than once per game.
Shoot1AP
Shoot with the active operative by following the sequence below. The active operative’s player is the attacker. The selected enemy operative’s player is the defender.
An operative cannot perform this action while it has a Conceal order, or while within control range of an enemy operative.
Charge1AP
The same as the Reposition action, except the active operative can move an additional 2".
It can move, and must finish the move, within control range of an enemy operative. If it moves within control range of an enemy operative that no other friendly operatives are within control range of, it cannot leave that operative’s control range.
An operative cannot perform this action while it has a Conceal order, if it’s already within control range of an enemy operative, or during the same activation in which it performed the Reposition, Dash or Fall Back action.
Counteract
When you would activate a ready friendly operative, if all your operatives are expended but your opponent still has ready operatives, you can select an expended friendly operative with an Engage order to perform a 1AP action (excluding Guard) for free. Each operative can only counteract once per turning point. That operative cannot move more than 2", or must be set up wholly within 2" if it’s removed and set up again, while counteracting (this is not a change to its Move stat, and takes precedence over all other rules). Counteracting is optional, so you can choose not to. In either case, activation alternates back to your opponent afterwards.Counteracting isn’t an activation, it’s instead of activating. This difference is important; for instance, it means action restrictions won't apply.
|
Damage
When damage is inflicted on an operative, reduce their wounds by that amount. An operative’s starting number of wounds is determined by its Wounds stat (see datacards). If an operative’s wounds are reduced to 0 or less, it’s incapacitated, then removed from the killzone. Some rules allow an incapacitated operative to perform a free action before being removed from the killzone. Such an operative cannot perform more than one free action (excluding Place Marker) in this instance, and that operative’s player decides the order of any of its rules that occur before it’s removed from the killzone (taking precedence over the player with initiative deciding).While an operative has fewer than its starting wounds remaining, it’s wounded. While it has fewer than half its starting wounds remaining, it’s also injured. Subtract 2" from the Move stat of injured operatives and worsen the Hit stat of their weapons by 1.
Keep track of each operative’s remaining wounds with dice, tokens or by writing it down.
‘Incapacitated’ and ‘removed from the killzone’ are separate. Some rules take effect when an operative is incapacitated, but before it’s removed.
‘Incapacitated’ and ‘removed from the killzone’ are separate. Some rules take effect when an operative is incapacitated, but before it’s removed.
Killzone Floor
The killzone floor is the lowest level of the killzone (i.e. the game board). Anything that’s on a marker that’s on the killzone floor is also on the killzone floor.
2X LIGHT BARRICADES
Designed to be lugged into place and then deployed by operatives and combat engineers, these barriers are proof against small arms fire.
Control Range
Many rules relate to control range such as moving, fighting and using cover. Something is within an operative’s control range if it’s visible to and within 1" of that operative.Control range between operatives is mutual, therefore operatives are within each other’s control range if one of them is visible to and within 1" of the other.
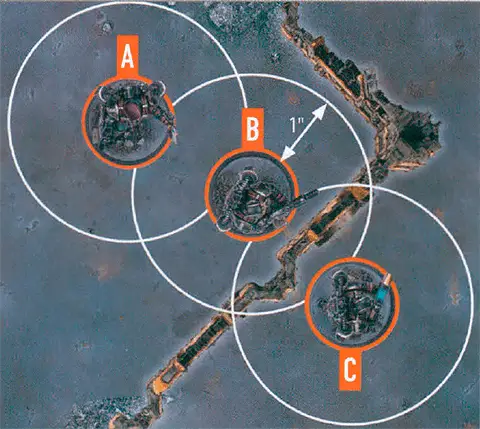
The terrain is within both operative B and C’s control range.
Because of the terrain, operative B is not visible to operative C, and vice versa, therefore they are not within each other’s control range.
Imagine control range as an area of interaction the operative has with things close to it.
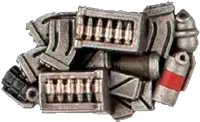
1X AMMO CACHE
Whether stockpiles deliberately set out for warriors to access quickly, or the abandoned munitions of the slain, these caches can prove vital for a swift reload in the heat of battle.
AMMO RESUPPLY0AP
One of your Ammo Cache markers the active operative controls is used during this turning point.
Until the start of the next turning point, whenever this operative is shooting with a weapon from its datacard, you can re-roll one of your attack dice.
An operative cannot perform this action while within control range of an enemy operative, if that marker isn’t yours, or if that marker has been used this turning point.
Expended
- When you’ve finished with your operative’s activation, that operative is expended. While expended, an operative is not ready.
Guard1AP
The operative goes on guard until any of the following are true:
- It performs any action, moves or is set up.
- An enemy operative ends an action within its control range and you don’t interrupt that activation (see On Guard).
- Its order is changed.
- It’s the start of the next turning point.
Fight1AP
Fight with the active operative by following the sequence below. The active operative’s player is the attacker. The selected enemy operative’s player is the defender.
An operative cannot perform this action unless an enemy operative is within its control range.
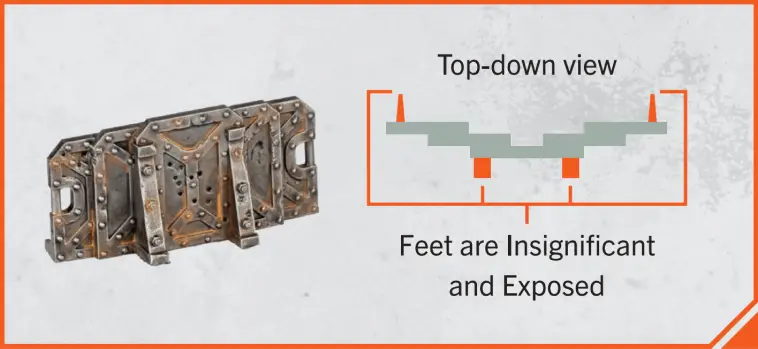
Climbing
An operative must be within 1" horizontally and 3" vertically of terrain that’s visible to them to climb it. Each climb is treated as a minimum of 2" vertically (e.g. a 1" distance is treated as 2").
|
Reposition1AP
Move the active operative up to its Move stat to a location it can be placed. This must be done in one or more straight-line increments, and increments are always rounded up to the nearest inch.
It cannot move within control range of an enemy operative, unless one or more other friendly operatives are already within control range of that enemy operative, in which case it can move within control range of that enemy operative but cannot finish the move there.
An operative cannot perform this action while within control range of an enemy operative, or during the same activation in which it performed the Fall Back or Charge action.
Dash1AP
The same as the Reposition action, except don’t use the active operative’s Move stat — it can move up to 3" instead. In addition, it cannot climb during this move, but it can drop and jump.
An operative cannot perform this action while within control range of an enemy operative, or during the same activation in which it performed the Charge action.
Fall Back2AP
The same as the Reposition action, except the active operative can move within control range of an enemy operative, but cannot finish the move there.
An operative cannot perform this action unless an enemy operative is within its control range. It cannot perform this action during the same activation in which it performed the Reposition or Charge action.
Valid Target
Some rules require you to select a valid target for an operative. This is most common when an operative is shooting, but some rare rules require it too.
|
Visible
For an intended target to be Visible, the following must be true:- You can draw an imaginary, unobstructed straight line (known as a Visibility line) 1 mm wide from the head of the active operative’s miniature to any part of the miniature of the intended target (not its base).
In the rare instance that bases or parts of the active operative’s miniature prevent an intended target from being Visible to the active operative, such as when the active operative is directly below or above the intended target, treat those bases and parts as being invisible.
Some rare rules will require you to select a point that is Visible (e.g. a point on the killzone). In such circumstances, you must be able to draw an imaginary, unobstructed straight line 1mm wide from the head of the active operative’s miniature to the point you would select.
Ceaseless
You can re-roll any of your attack dice results of one result (e.g. results of 2).Piercing x
The defender collects x less defence dice, e.g. Piercing 1. If the rule is Piercing Crits x, this only comes into effect if you retain any critical successes.Blast x
The target you select is the primary target. After shooting the primary target, shoot with this weapon against each secondary target in an order of your choice (roll each sequence separately). Secondary targets are other operatives visible to and within x of the primary target, e.g. Blast 2" (they are all valid targets, regardless of a Conceal order). Secondary targets are in cover and obscured if the primary target was.