
Typhon
Contents
 01
01 Books
| Book | Kind | Edition | Version | Last update |
| | ||||
| | Expansion | 3 | 1.0 | August 2025 |
Joint Ops: Typhon Mission Pack
This is a player vs environment (PvE) mission pack for cooperative or solo gameplay using Killzone: Volkus and Killzone Upgrade: Tyranid Infestation terrain features. It involves a player or players battling together against a Tyranid infestation – represented by a collection of NPOs (non-player operatives). If playing cooperatively, you are still one ‘player’. This means you don’t double your CP, equipment selections, etc.; you must manage them between you.If you wish, one player can be the game master. They will manage the NPOs – move them, roll dice for them, etc. – while one or more other players control a kill team. The game master will still control the NPOs as the rules in this mission pack specify, they just take the pressure and decision-making away from the player(s) so they can focus on their own operatives and having fun!
Your kill team will fight against procedurally generated non-player operatives (known as NPOs). Unlike your highly trained operatives, NPOs are base Tyranid xenos, subject to instinctive behaviour – Hormagaunts, Termagants, Ripper Swarms, etc. As such, you don’t select a kill team for them. Instead, you use the appropriate datacards in this mission pack. Alternatively, you can create your own datacards to accurately reflect their stats using existing kill teams as a guide – just ignore rules that wouldn’t be appropriate.
MISSION
In this mission pack you will find six missions. For a one-off game, you can randomly determine a mission by rolling one D6, or select the one that interests you most. Alternatively, you can link the games together in a tree campaign. Begin with mission 1: Delve the Xenosprawl, then all subsequent missions are determined by the outcome of the previous one, as shown below. If the player(s) win, follow the green arrow. If the player(s) lose, follow the red arrow.KILL TEAM SELECTION
The player(s) use one kill team. If you are playing solo, simply select your kill team as normal. If you are playing cooperatively, either select a kill team as normal and split the operatives between you, or take half of any kill team each. If it’s an odd number, round up (or down for more of a challenge). If you’ve taken separate teams, remember that some rules specify certain operatives through keywords, so one kill team’s rules won’t necessarily interact with another’s.Your kill team will fight against procedurally generated non-player operatives (known as NPOs). Unlike your highly trained operatives, NPOs are base Tyranid xenos, subject to instinctive behaviour – Hormagaunts, Termagants, Ripper Swarms, etc. As such, you don’t select a kill team for them. Instead, you use the appropriate datacards in this mission pack. Alternatively, you can create your own datacards to accurately reflect their stats using existing kill teams as a guide – just ignore rules that wouldn’t be appropriate.

Game Sequence
1. Set Up the Battle
- Select a kill team – or half of two kill teams – and split the operatives between you.
- Determine the mission.
- Set up the killzone using Killzone: Volkus and Killzone Upgrade: Tyranid Infestation, placing terrain features as specified by the mission map.
- Drop zones are assigned to the player(s) and NPOs as specified by the mission map.
- The player(s) select their operatives for the battle, adhering to the selection requirements in their kill team’s rules.
- The player(s) choose which NPOs they will use. Kill Team: Typhon provides miniatures for Raveners, Hormagaunts and Ripper Swarms, but the player(s) are free to use other miniatures from their collection, even using a mixture of different NPOs if they wish.
- The player(s) select up to four equipment options (four in total, not four per player). Each option cannot be selected more than once. Don’t select equipment for NPOs.
- The player(s) gain 2CP (two in total, not two per player). NPOs don’t gain any CP.
3. Set Up Operatives
- The player(s) set up all their equipment that’s set up before the battle (ladders, etc.).
- NPOs are set up first – the mission will specify how and where.
- The player(s) then set up their operatives. Each operative must be wholly within their drop zone and must be given a Conceal order.
- In the first turning point, the player(s) have initiative
- The battle ends when the mission specifies.
- The mission’s victory conditions will specify how to determine the winner.
Equipment
Don’t select equipment for NPOs in this mission pack.Strategy Phase
When rolling off to decide who has initiative, roll one dice for the NPOs and one dice for the player(s). If the NPOs win the roll-off, they will always choose to have initiative.NPOs don’t gain any CP. As an NPO STRATEGIC GAMBIT in each Strategy phase, randomly draw a Typhon event card. In each Strategy phase after the first, if the NPOs don’t have initiative, do this twice per turning point instead. NPOs will always pass after all their required STRATEGIC GAMBITS have been used.
Typhon event cards provide additional rules to add variety to the battle and increase the challenge – imagine them as NPO strategy ploys. In the Ready step of each Strategy phase, shuffle all Typhon event cards used in the previous turning point back into the deck.
Behaviour
Each NPO’s datacard has a behaviour that determines what they do. Each behaviour will specify what order they have when activated. Whenever an NPO would perform an action (including when counteracting), perform the first action it can do from its behaviour. If it cannot do any, it’s expended (or pass, in the case of counteracting).Threat Principle
Each NPO’s datacard has a behaviour that determines what they do. Each behaviour will specify what order they have when activated. Whenever an NPO would perform an action (including when counteracting), perform the first action it can do from its behaviour. If it cannot do any, it’s expended (or pass, in the case of counteracting). When making decisions for NPOs, use the threat principle: go with the option that’s worst for you. This can determine which ready NPO activates, how an NPO moves, shoots and fights, how to resolve their dice, etc. There are a few examples below (containing decisions in order of priority) that you can use as a guide, but if one option feels worse for you – in particular to stop you winning the mission – go with that. If you still cannot decide, randomly choose one.
1. Can perform the Fight or Shoot action (as determined by its behaviour), and is the most threatening to do so (e.g. is more likely to incapacitate an enemy operative, is more likely to prevent the player(s) winning, etc.).
2. Is not in cover from a player operative.
3. Is closer to a player operative.
1. More likely to prevent the player(s) winning (many missions require player operatives to control terrain features where NPOs are set up in order to win, and setting them up appropriately could prevent that).
2. Within control range of a player operative to better perform the Fight action (if the NPO has this behaviour).
3. Not a valid target.
4. Better able to perform the Charge or Shoot action (if the NPO has this behaviour).
1. It’s more likely to incapacitate.
2. Is more likely to help the player(s) win.
3. Ready.
1. Not obscured.
2. Not in cover.
3. Closest.
4. Wounded.
5. Is ready.
Activation Priority
Multiple NPOs are ready, so the player(s) activate the NPO that:1. Can perform the Fight or Shoot action (as determined by its behaviour), and is the most threatening to do so (e.g. is more likely to incapacitate an enemy operative, is more likely to prevent the player(s) winning, etc.).
2. Is not in cover from a player operative.
3. Is closer to a player operative.
Setting Up NPOs
NPOs must be set up as specified by the mission, but if there are multiple valid options, the player(s) set up each NPO so that it’s:1. More likely to prevent the player(s) winning (many missions require player operatives to control terrain features where NPOs are set up in order to win, and setting them up appropriately could prevent that).
2. Within control range of a player operative to better perform the Fight action (if the NPO has this behaviour).
3. Not a valid target.
4. Better able to perform the Charge or Shoot action (if the NPO has this behaviour).
Fight action
An NPO performs the Fight action and multiple enemy operatives are within its control range. It fights the enemy operative that:1. It’s more likely to incapacitate.
2. Is more likely to help the player(s) win.
3. Ready.
Shoot action
An NPO performs the Shoot action and multiple enemy operatives are valid targets. It shoots the enemy operative that is:1. Not obscured.
2. Not in cover.
3. Closest.
4. Wounded.
5. Is ready.
Difficulty
If you want to increase or decrease the difficulty of the missions, here are a few methods:- Change the number of NPOs being set up. When it’s random, increase or decrease the amount and/ or likelihood.
- Change the type of NPOs being set up. Hormagaunts can be deadly, but you can prepare once you understand their behaviour. More varied NPOs – those who are faster, tougher, can shoot, etc. – can make it harder.
- Increase or decrease the amount of Typhon event cards each turning point, or remove some from the deck to increase the likelihood of ones that threaten your kill team more. These cards add an element of unpredictability to the game, therefore the player(s) may need to be more defensive to account for them, or can be more free if the threat of event cards is reduced.
NPO Datacards
Kill Team: Typhon provides miniatures for Ravener, Hormagaunt and Ripper Swarm NPOs. Whenever the mission tells you to set up an NPO, set up a Hormagaunt NPO (the Ripper Swarm NPO is only set up using a Typhon event card).If you wish, you can use other Tyranid miniatures from your collection. This will provide a different challenge and increase the replayability of missions from this pack. A collection of other NPO datacards have been provided for the most common Tyranid miniatures (found in this product and in Warhammer 40,000 Combat Patrol: Tyranids). As an optional rule all players must agree upon before the game, whenever the mission tells you to set up an NPO, randomise which one by rolling 2D6 and consulting the following table, or a table of your own creation:
|
NPO Limit
We recommend limiting the number of NPOs in the killzone at once to 10 – don’t set up any that would exceed this limit. If you would set up a number of NPOs that exceed this number, but they would all be in different locations, use the threat principle to determine which ones to set up without exceeding the NPO limit. 2
2 7"
7" 5
5 7
7NAME | ATK | HIT | DMG | WR | ||
| Scything talons | ||||||
| Scything talons | 4 | 3+ | 3/4 | - | ||
Behaviour:
2. Charge the closest player operative via the shortest possible route.
3. Reposition towards the closest player operative, to cover if possible (a subsequent Dash action can fulfil this, if able).
4. Dash towards the closest player operative, to cover if possible
This NPO will move towards the enemy to fight them, but will seek cover on its way. When activated, if it can perform either of its first two actions during that activation, give it an Engage order. If it cannot, give it a Conceal order.
1. Fight.2. Charge the closest player operative via the shortest possible route.
3. Reposition towards the closest player operative, to cover if possible (a subsequent Dash action can fulfil this, if able).
4. Dash towards the closest player operative, to cover if possible
|
|
⌀28mm |
NAME | ATK | HIT | DMG | WR | ||
| Claws & teeth | ||||||
| Claws & teeth | 5 | 4+ | 1/2 | - | ||
Hidden Horrors: Whenever this operative has a Conceal order and is in cover, it cannot be selected as a valid target, taking precedence over all other rules (e.g. Seek, Vantage terrain) except being within 2"
Behaviour:
2. Charge the closest player operative via the shortest possible route.
3. Reposition towards the closest player operative, to cover if possible (a subsequent Dash action can fulfil this, if able).
4. Dash towards the closest player operative, to cover if possible
This NPO will move towards the enemy to fight them, but will seek cover on its way. When activated, if it can perform either of its first two actions during that activation, give it an Engage order. If it cannot, give it a Conceal order.
1. Fight.2. Charge the closest player operative via the shortest possible route.
3. Reposition towards the closest player operative, to cover if possible (a subsequent Dash action can fulfil this, if able).
4. Dash towards the closest player operative, to cover if possible
|
|
⌀40mm |
NAME | ATK | HIT | DMG | WR | ||||
| Claws & teeth | ||||||||
| Claws & teeth | 3 | 4+ | 2/3 | - | ||||
| Barblauncher (mobile) | ||||||||
| Barblauncher (mobile) | 5 | 4+ | 3/5 | Blast 2" | Blast 2" | |||
| Barblauncher (stationary) | ||||||||
| Barblauncher (stationary) | 5 | 4+ | 3/5 | Blast 2", Ceaseless, Heavy | Blast 2", Ceaseless, Heavy | |||
Hidden Horrors: Whenever this operative has a Conceal order and is in cover, it cannot be selected as a valid target, taking precedence over all other rules (e.g. Seek, Vantage terrain) except being within 2"
Behaviour: This NPO will move to an ideal position to shoot the enemy. When activated, if it can perform the Shoot action during that activation, give it an Engage order. If it cannot, give it a Conceal order.
1. Fall Back to cover. If possible, to a location where there’s a valid target that isn’t obscured, if not, to a location where there’s an objective marker visible to this NPO.
2. Shoot.
3. Reposition to cover. If possible, to a location where there’s a valid target that isn’t obscured, if not, to a location that’s appropriate to better win the mission (a subsequent Dash action can fulfil these, if able).
4. Dash to cover. If possible, to a location where there’s a valid target that isn’t obscured, if not, to a location that’s appropriate to better win the mission.
|
|
⌀40mm |
NAME | ATK | HIT | DMG | WR | ||
| Scything talons | ||||||
| Scything talons | 5 | 3+ | 4/5 | - | ||
Behaviour:
2. Charge the closest player operative via the shortest possible route.
3. Reposition towards the closest player operative, to cover if possible (a subsequent Dash action can fulfil this, if able).
4. Dash towards the closest player operative, to cover if possible
This NPO will move towards the enemy to fight them, but will seek cover on its way. When activated, if it can perform either of its first two actions during that activation, give it an Engage order. If it cannot, give it a Conceal order.
1. Fight.2. Charge the closest player operative via the shortest possible route.
3. Reposition towards the closest player operative, to cover if possible (a subsequent Dash action can fulfil this, if able).
4. Dash towards the closest player operative, to cover if possible
|
|
⌀40mm |
NAME | ATK | HIT | DMG | WR | ||
| Fleshborer | ||||||
| Fleshborer | 4 | 4+ | 3/4 | - | ||
| Claws & teeth | ||||||
| Claws & teeth | 3 | 4+ | 2/3 | - | ||
Behaviour: This NPO will move to an ideal position to shoot the enemy. When activated, if it can perform the Shoot action during that activation, give it an Engage order. If it cannot, give it a Conceal order.
1. Fall Back to cover. If possible, to a location where there’s a valid target that isn’t obscured, if not, to a location where there’s an objective marker visible to this NPO.
2. Shoot.
3. Reposition to cover. If possible, to a location where there’s a valid target that isn’t obscured, if not, to a location that’s appropriate to better win the mission (a subsequent Dash action can fulfil these, if able).
4. Dash to cover. If possible, to a location where there’s a valid target that isn’t obscured, if not, to a location that’s appropriate to better win the mission.
1. Fall Back to cover. If possible, to a location where there’s a valid target that isn’t obscured, if not, to a location where there’s an objective marker visible to this NPO.
2. Shoot.
3. Reposition to cover. If possible, to a location where there’s a valid target that isn’t obscured, if not, to a location that’s appropriate to better win the mission (a subsequent Dash action can fulfil these, if able).
4. Dash to cover. If possible, to a location where there’s a valid target that isn’t obscured, if not, to a location that’s appropriate to better win the mission.
|
|
⌀28mm |
NAME | ATK | HIT | DMG | WR | ||
| Scything talons | ||||||
| Scything talons | 5 | 3+ | 4/5 | - | ||
Behaviour:
2. Charge the closest player operative via the shortest possible route.
3. Reposition towards the closest player operative, to cover if possible (a subsequent Dash action can fulfil this, if able).
4. Dash towards the closest player operative, to cover if possible
This NPO will move towards the enemy to fight them, but will seek cover on its way. When activated, if it can perform either of its first two actions during that activation, give it an Engage order. If it cannot, give it a Conceal order.
1. Fight.2. Charge the closest player operative via the shortest possible route.
3. Reposition towards the closest player operative, to cover if possible (a subsequent Dash action can fulfil this, if able).
4. Dash towards the closest player operative, to cover if possible
|
|
⌀40mm |
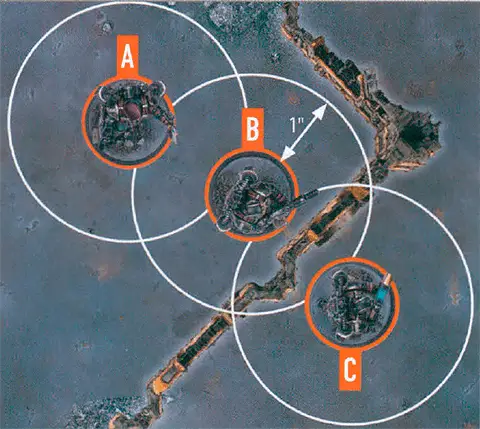
Mission Map Key
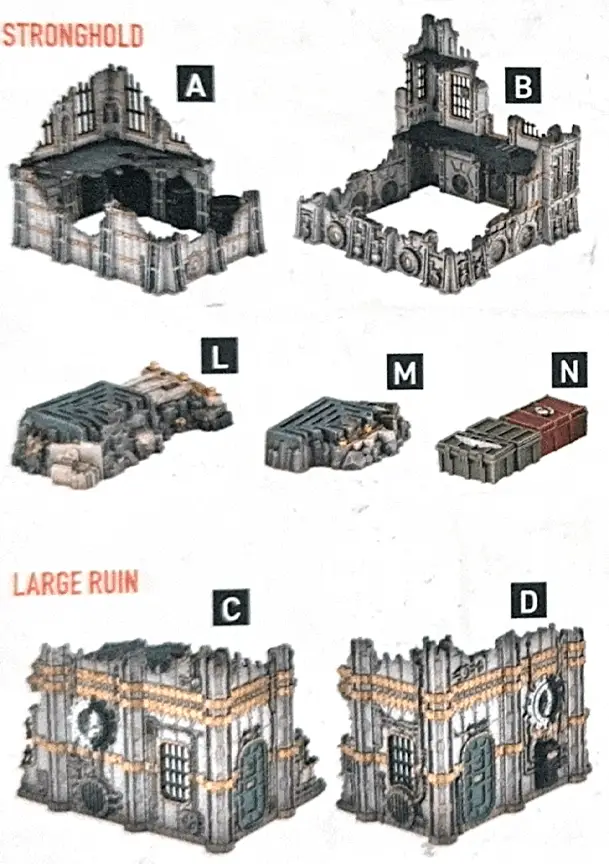
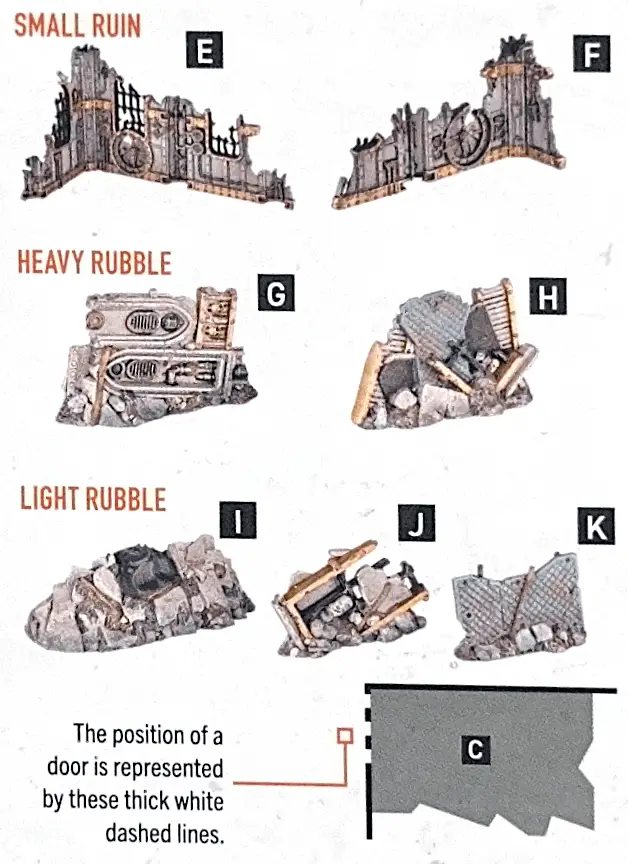
The maps in this mission pack use the terrain features found in Killzone: Volkus, and Killzone Upgrade: Tyranid Infestation. Killzone: Volkus has 2x strongholds, 2x large ruins, 2x small 2x heavy rubble and 3x light rubble; their rules can be found here.KILLZONE: VOLKUS MAP KEY
Killzone Upgrade: Tyranid Infestation
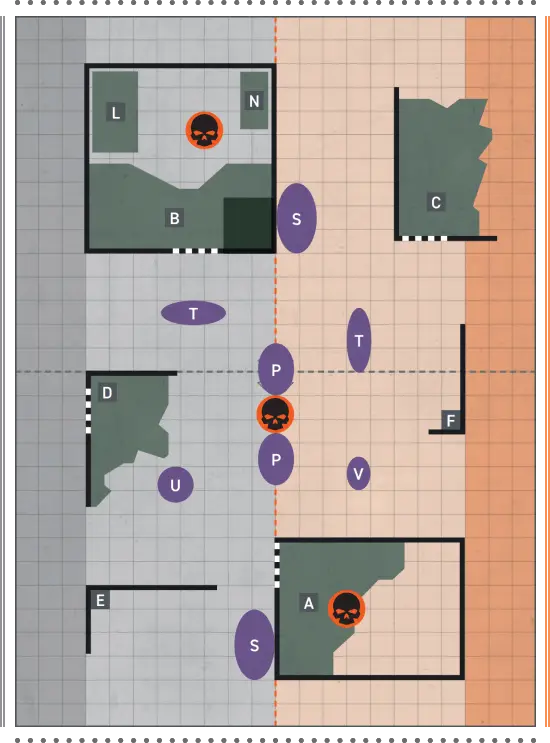
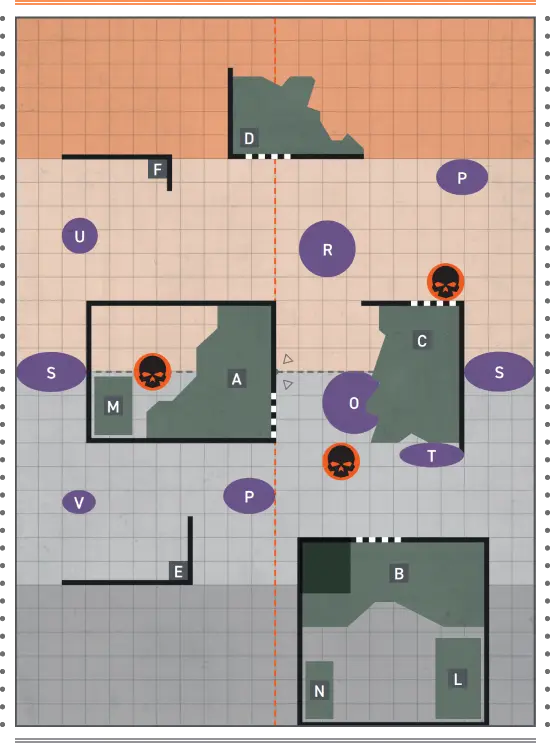
Joint Ops: Typhon Mission 01
Delve The Xenosprawl
With an initial discovery of insidious xenos growths, mission commanders have demanded a daring exploration to establish the scope of the infestation. To uncover its extent, sensitive recon drones – or disposable scouts – must be deployed into any potential route to the growths’ interior.MISSION RULES
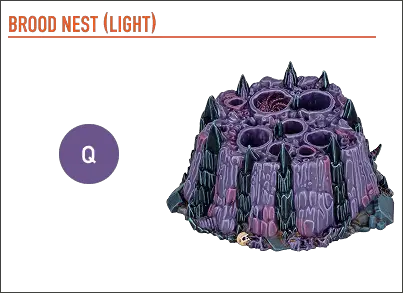
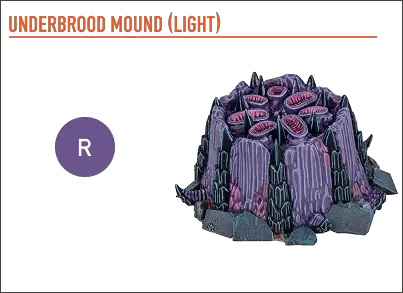
NPOs: When setting up operatives before the battle, set up one NPO wholly within each NPOs drop zone, as close as possible to a brood nest (Q) or underbrood mound (R) terrain feature.Investigate Infestation: Treat the brood nest (Q) and underbrood mound (R) terrain features as objective markers (in addition to the normal rules for those terrain features). Friendly operatives can perform the following mission action:
DEPLOY SEARCH DRONE1AP
One brood nest (Q) or underbrood mound (R) terrain feature the active operative controls has a search drone sent down it.
An operative cannot perform this action during the first turning point, while within control range of an enemy operative, or if that objective marker already has a search drone sent down it.
Dormant Tyranids: All NPOs begin the battle DORMANT. DORMANT NPOs are expended and cannot be readied. An NPO is AWOKEN if damage is inflicted on it, it’s shot at, or a player operative is within 6" of it. When an NPO is AWOKEN, it’s immediately readied and is no longer DORMANT. In the Initiative step of each Strategy phase, if all NPOs are DORMANT, the player(s) automatically have initiative (do not roll).
Alarm: If any of the alarm conditions below are met during an action, roll 2D6 at the end of that action and add the alarm score (it starts at 0) to it: if the result is 9 or less, add 1 to the alarm score; if the result is 10 or more, the alarm is raised. The alarm conditions are as follows:
- An operative performs the Fight or Shoot action.
- Damage is inflicted on an NPO.
- A player operative performs the Deploy Search Drone action.
- A player operative moves (or is set up) within control range of a Tyranid Infestation terrain feature.
Alarm Raised: When the alarm is raised:
- All NPOs are AWOKEN.
- Set up D3+3 NPOs ready with a Conceal order. Each of the first 4 must be as close as possible to a different brood nest (Q) or underbrood mound (R) terrain feature. The remaining are set up as close as possible to a randomised brood nest (Q) or underbrood mound (R) terrain feature (randomise separately for each operative).
- In the Ready step of each Strategy phase, roll one D6 for each brood nest (Q) and underbrood mound (R) terrain feature in the killzone (roll separately for each): on a 4+, set up one NPO as close as possible to that terrain feature.
VICTORY
If all brood nest (Q) and underbrood mound (R) terrain features have a search drone deployed down them, the battle ends and the player(s) win. When three full turning points have been completed after the alarm is raised (i.e. the turning point in which the alarm is raised doesn’t count), or if every player operative is incapacitated, the battle ends and the player(s) lose.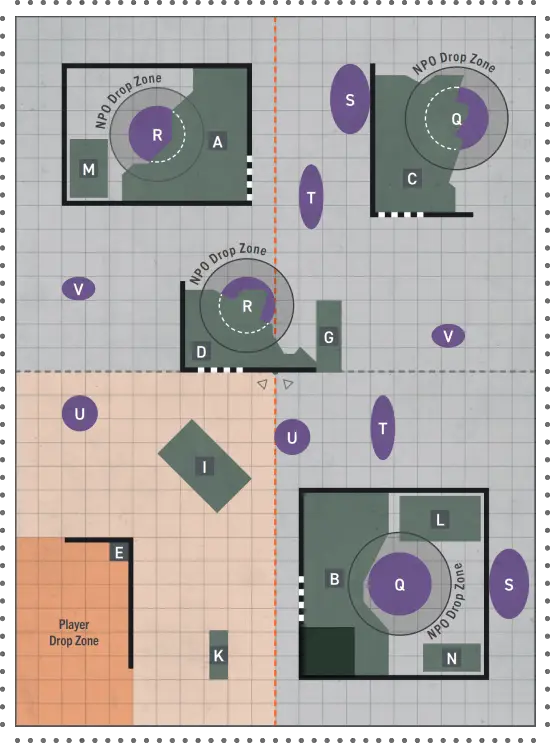
Start New Deck
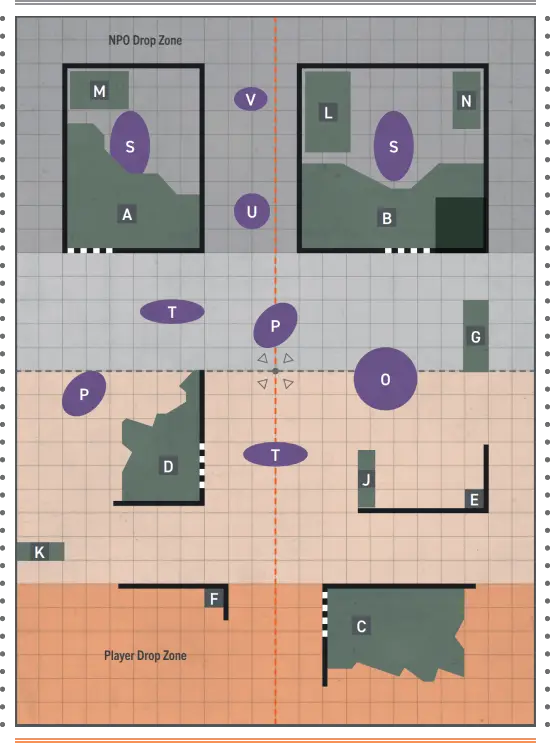
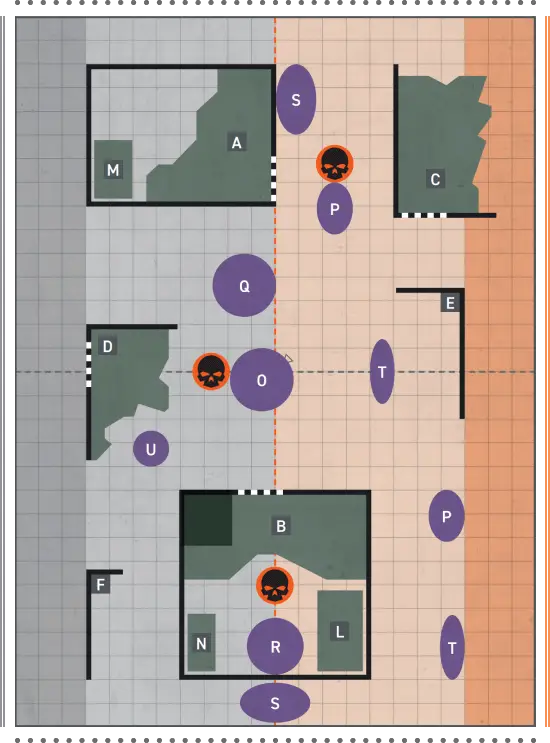
Joint Ops: Typhon Mission 02
Purge Gestation Sites
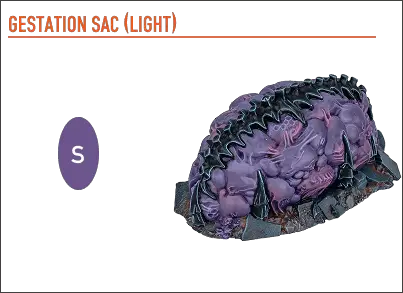
Expert intelligence retrieved during initial forays have led to a sinister discovery of numerous pulsating sacs, straining with internal movement. Numerous bioforms have already been detected throughout this region and, if these sacs are allowed to mature, the entire area could be overrun. A purge of the gravid growths is the only answer.MISSION RULES
NPOs: When setting up operatives before the battle, do not set up any NPOs. Instead, as an NPO STRATEGIC GAMBIT in each Strategy phase, set up D3+1 ready NPOs with a Conceal order as close as possible to each gestation sac (S) terrain feature (roll separately for each gestation sac).Destroy Gestation Sac: Player operatives must destroy the gestation sac (S) terrain features. These terrain features are treated as NPOs for damage purposes, have a Wounds stat of 20, and are removed from the killzone when their wounds are reduced to 0 or less. Damage cannot be inflicted on them from the Barbgaunt NPO’s barblauncher (i.e. as a secondary target from the Blast weapon rule).
Whenever a player operative is performing the Shoot action:
- You can select a gestation sac (S) as a valid target as long as it’s visible to the active operative. It’s also a valid secondary target when relevant (i.e. Blast and Torrent weapon rules).
- Gestation sacs (S) can be obscured (treat the whole thing as a base), but cannot be in cover.
- Treat the Hit stat of the active operative’s weapons as 2+ when shooting a gestation sac, then apply any other changes to these stats as normal (e.g. injured).
- Roll an additional defence dice for the gestation sac (S) (i.e. usually four, unless the weapon has Piercing).
- Each gestation sac (S) has a Save stat of 5+.
- You can select a gestation sac (S) to fight against, as long as it’s within the active operative’s control range.
- Gestation sacs (S) cannot retaliate.
- Treat the Hit stat of the active operative’s weapons as 2+ when fighting a gestation sac, then apply any other changes to these stats as normal (e.g. injured).
Aggression Instincts: In each Strategy phase, if any gestation sac (S) terrain features have lost any wounds or been removed from the killzone, use an additional Typhon event card as a STRATEGIC GAMBIT for the NPOs whenever they have initiative. In addition, if a gestation sac (S) has been removed from the killzone, when using the STRATEGIC GAMBIT as specified in the NPO mission rule opposite, roll two D3 and select the highest for the remaining gestation sac (S) terrain feature.
VICTORY
If both gestation sac (S) terrain features have been destroyed (removed from the killzone), the battle ends and the player(s) win.If every player operative is incapacitated, the battle ends and the player(s) lose.
Start New Deck
Joint Ops: Typhon Mission 03
Swarm Response
Attempts to wholly scan the infestation’s organic tunnels has failed. Explorers and recon drones have fallen silent and waves of newly gestated bioforms have been unleashed to repel the invaders. No option remains but to withdraw and attempt to salvage secondary objectives before the swarm overruns the operatives.MISSION RULES
NPOs: When setting up operatives before the battle, do not set up any NPOs. Instead, as an NPO STRATEGIC GAMBIT in each Strategy phase, roll four D6 one after the other and set them to one side in order of rolling (first to last) – these are the NPO reinforcements dice.NPO Reinforcements: Whenever it’s the NPOs’ turn to activate, if there are no ready NPOs in the killzone, discard the next NPO reinforcements dice (if any) and set up one ready NPO wholly within a distance equal to its Move stat of the point on the killzone edge equal to that dice’s result.
Activate that NPO, and it’s treated as having performed the Reposition action during that activation. It can then perform the Fight or Shoot action (if able), and will have an Engage order if it can (otherwise it will have a Conceal order). The Firefight phase cannot end while any NPO reinforcements dice remain, unless the NPO limit has been reached, in which case discard all remaining NPO reinforcements dice.
Escape: Player operatives can move over the NPO killzone edge; if any part of their base does, they are removed from the killzone and have escaped.
VICTORY
When all player operatives have been removed from the killzone, the battle ends. If half or more player operatives have escaped, the player(s) win. Otherwise, the player(s) lose.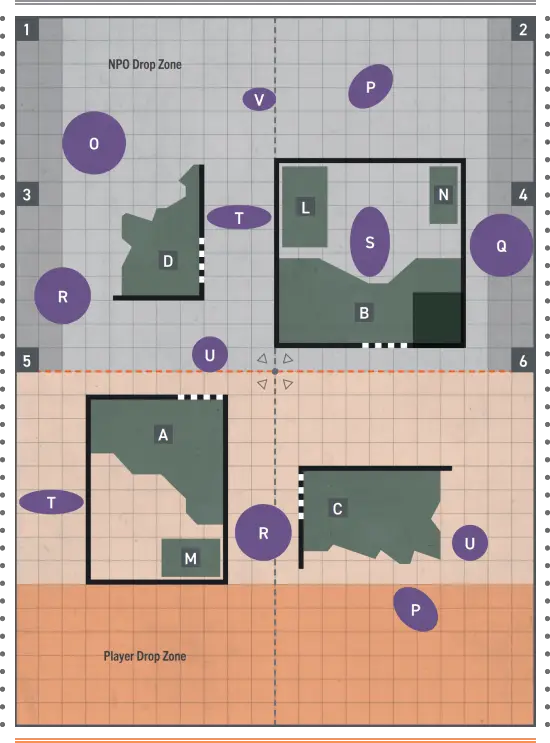
Start New Deck
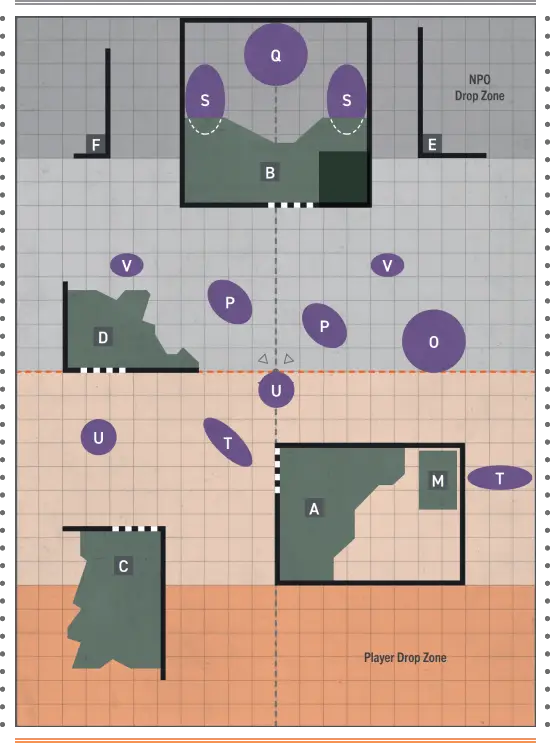
Joint Ops: Typhon Mission 04
Pierce The Node Core
Reports revealing the extent of the infestation’s tunnels enable mission commanders to designate a concentrated region of organic growth as a priority target. Scans have revealed weak points in its network, enough that ordnance could collapse the biostructure. Targeters to accurately direct the bombardment must be placed by hand, but time is running out. Bioforms are massing in defence of the tunnels and their numbers are increasing.MISSION RULES
NPOs: When setting up operatives before the battle, set up D3 NPOs behind (on the NPOs drop zone side of) each stronghold (A,B) and brood nest (Q) terrain feature (roll separately for each terrain feature). Then, as an NPO STRATEGIC GAMBIT in each Strategy phase after the first, set up one NPO as close as possible to each brood nest (Q) and underbrood mound (R) terrain feature.Auto-divinatory Targeters: Treat the brood nest (Q) and underbrood mound (R) terrain features as objective markers (in addition to the normal rules for those terrain features). Friendly operatives can perform the following mission action:
PLANT TARGETER1AP
One brood nest (Q) or underbrood mound (R) terrain feature the active operative controls has a targeter planted on it.
An operative cannot perform this action during the first turning point, while within control range of an enemy operative, or if that objective marker already has a targeter planted on it.
Guided Ordnance: Player operatives must plant targeters so brood nest (Q) and underbrood mound (R) terrain features can be destroyed. These terrain features have a Wounds stat of 10 and are removed from the killzone when their wounds are reduced to 0 or less. In the Ready step of each Strategy phase, inflict 2D6 damage on each of these terrain features that has a targeter planned on it, and inflict 2D6 damage on each operative within 2" horizontally of that terrain feature (roll separately for each). Damage cannot be inflicted on these terrain features in any other way.
Disturbed Node Core: When using the STRATEGIC GAMBIT as specified in the NPO mission rule opposite, for each brood nest (Q) and underbrood mound (R) terrain feature that’s destroyed, set up one additional NPO at each remaining one.
VICTORY
If all brood nest (Q) and underbrood mound (R) terrain features have been destroyed (removed from the killzone), the battle ends and the player(s) win. If every player operative is incapacitated, the battle ends and the player(s) lose.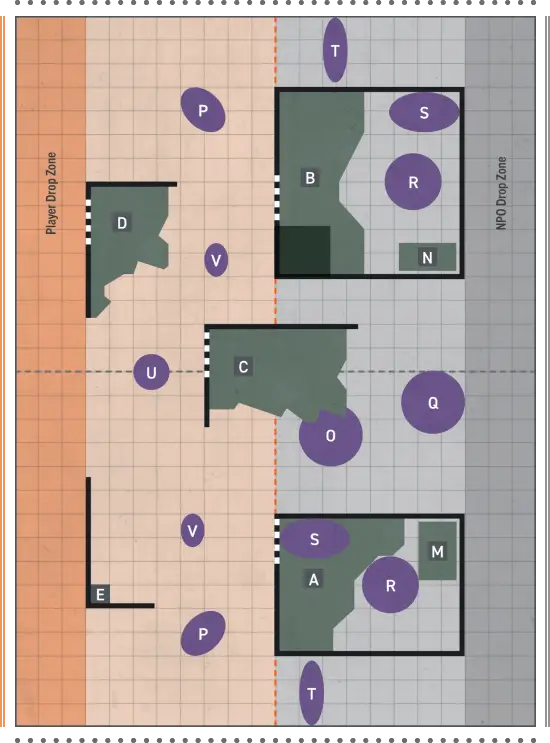
Start New Deck
Joint Ops: Typhon Mission 05
Desperate Sacrifice
Weak points in the biostructure have been discovered by advance scouts who have since fallen silent. A massing xenos presence on the surface, meanwhile, prevents larger forces from reaching them, but an isolated access point to the tunnels has been identified through which a powerful explosive device can be smuggled. If those who seek to purge the infestation have any hope of doing so, it will require sacrifice.MISSION RULES
NPOs: When setting up operatives before the battle, do not set up any NPOs. Instead, as an NPO STRATEGIC GAMBIT in each Strategy phase, set up D3+1 ready NPOs with a Conceal order as close as possible to the brood nest (Q) terrain feature.Bomb: When setting up operatives before the battle, the player(s) must select one operative to be carrying your Bomb marker. The Pick Up Marker action can be performed upon your Bomb marker by friendly operatives. While an operative is carrying that marker, worsen the Hit stat of its weapons by 1, it cannot be removed and set up again more than 6" away, and it cannot perform Charge or Dash actions.
One-way Mission: Treat the brood nest (Q) terrain feature as an objective marker (in addition to the normal rules for that terrain feature). Friendly operatives can perform the following mission action:
PRIME BOMB AND DESCEND1AP
If the active operative is carrying your Bomb marker, controls the brood nest (Q) terrain feature and that terrain feature isn’t contested by NPOs, remove that operative from the killzone – it descends into the node core to detonate the bomb.
An operative cannot perform this action during the first turning point, or while within control range of an enemy operative.
VICTORY
If the player(s)’ operative descends into the node core to detonate the bomb, the battle ends and the player(s) win.If every player operative is incapacitated, the battle ends and the player(s) lose.
Start New Deck
Joint Ops: Typhon Mission 06
Encircling Predators
Exploration of the biotunnels has failed and multiple extraction routes have been compromised. Trapped by debris and stalked by slithering bioforms, those who have braved the tunnels’ depths have retreated to a defensible position. None know if reinforcements are on their way. If the team can report their findings and devise a new strategy, there is still a chance to purge the infestation. Everything, however, hinges on their survival…MISSION RULES
NPOs: When setting up operatives before the battle, do not set up any NPOs. Instead, as an NPO STRATEGIC GAMBIT in the first four Strategy phases, roll six D6 one after the other and set them to one side in order of rolling (first to last) – these are the NPO reinforcements dice.NPO Reinforcements: Whenever it’s the NPOs’ turn to activate, if there are no ready NPOs in the killzone, discard the next NPO reinforcement dice (if any) and set up one NPO wholly within a distance equal to its Move stat of the point on the killzone edge equal to that dice’s result.
Set that NPO up with a Conceal order: if there’s a player operative within the NPOs territory closest to it (i.e. top or bottom), set it up ready; if there isn’t, set it up expended. The Firefight phase cannot end while any NPO reinforcements dice remain, unless the NPO limit has been reached, in which case discard all remaining NPO reinforcements dice.
The Swarm Awoken: In each Strategy phase after the first, use an additional Typhon event card as a STRATEGIC GAMBIT for the NPOs whenever they have initiative.
VICTORY
From the fifth turning point, if every NPO is incapacitated, the battle ends and the player(s) win. Note that NPO reinforcements are only in the first four Strategy phases.If every player operative is incapacitated, the battle ends and the player(s) lose.
Start New Deck
Adversary Ops: Typhon Mission Pack
This is a player vs player (PvP) mission pack for head-to-head gameplay. While players battle one another, they must also contend with NPOs (non-player operatives) – 3rd party adversaries that will attack either player and disrupt the battle. The players will have to adapt their game plan to manage the threats NPOs pose.Unlike the Joint Ops mission pack, NPOs are not like another player. You don’t roll initiative for them or activate them like a player does with their kill team. Instead, they respond to being threatened once they are AWOKEN (this is explained in NPO Activation). Additionally, don’t select equipment for NPOs in this mission pack.
This mission pack is designed to be used alongside other mission packs that use three objective markers, such as Preliminary Ops (Kill Team Core Book) or Approved Ops (available separately). It can be used with other mission packs (e.g. Multiplayer Ops) if you adjust the rules to accommodate it.
This mission pack also provides rules for the full Typhon experience, using Killzone Upgrade: Tyranid Infestation and the Typhon event cards. Use as much as you feel is appropriate – if you think all the extra rules would be too much, feel free to ignore certain parts of this mission pack, or ignore certain parts of the mission pack you’re using it with (e.g. tac ops and selecting a primary op in Approved Ops).
As an NPO STRATEGIC GAMBIT in each Strategy phase after the first, the player who didn’t win the initiative roll-off must set up one ready AWOKEN NPO with a Conceal order at a randomly determined objective marker. If the randomly determined objective marker is being carried, set up the NPO within control range of the location where the objective marker was at the start of the battle.
As an NPO STRATEGIC GAMBIT in each Strategy phase, randomly draw a Typhon event card. Resolve this after the NPO STRATEGIC GAMBIT above (in each Strategy phase after the first). NPOs will always pass after this NPO STRATEGIC GAMBIT.
After the final player activates, but before the first player activates again, one ready AWOKEN NPO will activate. In other words, they activate last in the alternating sequence. If multiple ready NPOs are AWOKEN, the players roll-off and the winner decides which will activate. When it activates, use its behaviour and the threat principle.
NPOs cannot counteract. The turning point ends once all the players’ operatives and the NPOs are expended (remember DORMANT NPOs are always expended).
The threat principle is also used when making decisions for Typhon event cards (setting up new NPOs, etc.). Whenever you must make such a decision, roll-off and the winner decides. If multiple decisions would be required (e.g. multiple NPOs would perform the Fight action, as per the Feed event card), alternate making the decision, starting with the player that won the roll-off.
This mission pack is designed to be used alongside other mission packs that use three objective markers, such as Preliminary Ops (Kill Team Core Book) or Approved Ops (available separately). It can be used with other mission packs (e.g. Multiplayer Ops) if you adjust the rules to accommodate it.
This mission pack also provides rules for the full Typhon experience, using Killzone Upgrade: Tyranid Infestation and the Typhon event cards. Use as much as you feel is appropriate – if you think all the extra rules would be too much, feel free to ignore certain parts of this mission pack, or ignore certain parts of the mission pack you’re using it with (e.g. tac ops and selecting a primary op in Approved Ops).
MAPS
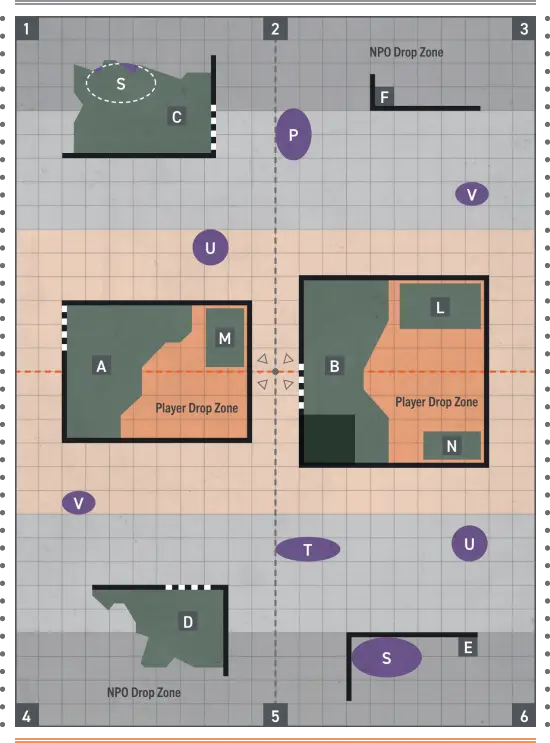
In this mission pack, you will find a selection of maps to use. Note they all contain three objective markers, so work with Preliminary Ops (Kill Team Core Book) and Approved Ops (available separately).NPOS
When setting up the battle, after setting up objective markers, the player(s) alternate setting up NPOs with a Conceal order until three have been set up, starting with the player who didn’t win the initiative roll-off. The first NPO each player sets up must be set up within control range of the objective marker wholly within their opponent’s territory. The final NPO must be set up within control range of the objective marker on the centreline.STRATEGY PHASE
NPOs don’t gain any CP. NPOs have STRATEGIC GAMBITS and NPOs are first in the alternating order.As an NPO STRATEGIC GAMBIT in each Strategy phase after the first, the player who didn’t win the initiative roll-off must set up one ready AWOKEN NPO with a Conceal order at a randomly determined objective marker. If the randomly determined objective marker is being carried, set up the NPO within control range of the location where the objective marker was at the start of the battle.
As an NPO STRATEGIC GAMBIT in each Strategy phase, randomly draw a Typhon event card. Resolve this after the NPO STRATEGIC GAMBIT above (in each Strategy phase after the first). NPOs will always pass after this NPO STRATEGIC GAMBIT.
VPS
For the purposes of incapacitating enemy operatives for VPs (e.g. the kill op, tac ops, etc.), ignore NPOs. This means you cannot score VPs for incapacitating them, but also your opponent cannot score VPs when an NPO incapacitates one of your operatives. Note this means that friendly operatives incapacitated by NPOs are not counted towards your opponent’s kill grade.NPO ACTIVATION
NPOs begin the battle DORMANT. DORMANT NPOs are expended and cannot be readied. An NPO is AWOKEN if damage is inflicted on it, it’s shot at, or a player’s operative is visible to it and within 5" of the objective marker it was set up within control range of. When an NPO is AWOKEN, it’s immediately readied and is no longer DORMANT.After the final player activates, but before the first player activates again, one ready AWOKEN NPO will activate. In other words, they activate last in the alternating sequence. If multiple ready NPOs are AWOKEN, the players roll-off and the winner decides which will activate. When it activates, use its behaviour and the threat principle.
NPOs cannot counteract. The turning point ends once all the players’ operatives and the NPOs are expended (remember DORMANT NPOs are always expended).
BEHAVIOUR
Each NPO’s datacard has a behaviour that determines what they do. Each behaviour will specify what order they have when activated. Whenever an NPO would perform an action, perform the first action it can do from its behaviour. If it cannot do any, it’s expended.THREAT PRINCIPLE
The threat principle is used when making decisions for activated NPOs (who to charge, fight, shoot etc.). However, it differs in this mission pack from the Joint Ops mission pack, as there will rarely be an option that’s equally worse for both players. Instead, whenever an AWOKEN NPO activates, the closest visible player operative it could fight/shoot/move towards (as determined by the NPO’s behaviour) is the NPO’s target (or simply the closest if none are visible). If multiple players’ operatives are equally as close, roll-off and the winner decides. The opponent of the player who controls the NPO’s target will control the NPO for that activation, and they must make every effort to fight/shoot/move the NPO so that it threatens its target (as determined by its behaviour).The threat principle is also used when making decisions for Typhon event cards (setting up new NPOs, etc.). Whenever you must make such a decision, roll-off and the winner decides. If multiple decisions would be required (e.g. multiple NPOs would perform the Fight action, as per the Feed event card), alternate making the decision, starting with the player that won the roll-off.
Adversary Ops
Map 01
Adversary Ops
Map 02
Adversary Ops
Map 03
Adversary Ops
Map 04
Adversary Ops
Map 05
Adversary Ops
Map 06
Cards
This is the mission generator, and it is intended to replace the Approved Ops 2025 card pack. Press the ‘Generate Mission’ button to pick up the mission and map as specified by the RANDOM method (see Determine Mission and Map). Use ‘Mission’ and ‘Map’ dropdown lists if you prefer other methods.
Press ‘Select’ button ( ) to add Tac Op to your Selected Tac Ops list. ‘Remove’ button (
  ) used to remove Tac Op from the list. Note that generator limits only the maximum number of Tac Ops allowed (one) - Select Tac Ops rule omitted so you are free to pick any Tac Ops.
If you accidentally close the browser or refresh the page your card selection will be safe. It is saved in cookies of the browser on the current device.
Press ‘Select’ button (
) to add Tac Op to your Selected Tac Ops list. ‘Remove’ button ( ) used to remove Tac Op from the list. Note that generator limits only the maximum number of Tac Ops allowed (one) - Select Tac Ops rule omitted so you are free to pick any Tac Ops.If you accidentally close the browser or refresh the page your card selection will be safe. It is saved in cookies of the browser on the current device.
UNIVERSAL MAP KEY
|


KILLZONE: VOLKUS MAP KEY
KILL OP
You start without a kill grade. As enemy operatives are incapacitated, your kill grade goes up until it reaches 5.
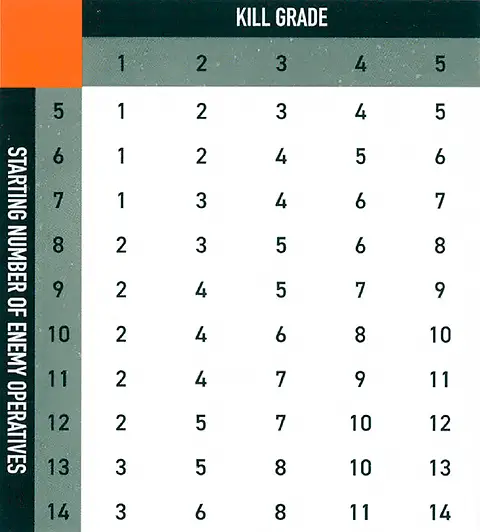
- Whenever you move to a new kill grade, you score 1 VP
- At the end of the battle, if your kill grade is higher than your opponent’s, you score 1VP.
Start New Deck
Generate Mission
Selected Tac Ops
Archetype Tac Ops
Typhon Event Card
Typhon Event Card
Spore Miasma
Whenever an operative is shooting an operative more than 8" from it, roll one additional defence dice.
Typhon Event Card
Sentient Barbs
Whenever a player operative would move within 1" of a Tyranid Infestation terrain feature, roll one D6: on a 3+, inflict 1 damage on that operative. Only roll once per terrain feature per activation.
Typhon Event Card
Birthing Sac
Set up one ready NPO with a Conceal order as close as possible to a randomly determined gestation sac (S) terrain feature.
If you can’t (e.g. NPO limit is reached), draw a different event card.
If you can’t (e.g. NPO limit is reached), draw a different event card.
Typhon Event Card
Voracious
NPOs’ weapons have the Lethal 5+ weapon rule.
Typhon Event Card
Ripper Swarm
If a Ripper Swarm NPO isn’t in the killzone, set one up ready with a Conceal order in a location it can be placed wholly within NPOs territory in Joint Ops, or within control range of a random objective marker in Adversary Ops. In addition, place it within control range of a player operative if possible.
If a wounded Ripper Swarm NPO is already in the killzone, it regains all lost wounds.
If you cannot do either of the above, draw a di erent event card.
If a wounded Ripper Swarm NPO is already in the killzone, it regains all lost wounds.
If you cannot do either of the above, draw a di erent event card.
Typhon Event Card
Feed
D3 NPOs immediately perform a free Fight action. If none can, draw a different event card.
Typhon Event Card
Overrun
Each NPO immediately performs a free Charge action up to 3" (its order can be changed to do so). Each that can’t can immediately perform a free Dash action instead.
Typhon Event Card
Lurk
Whenever a player operative is shooting an NPO, re-roll one of their defence dice if it’s appropriate for the NPO.
Whenever a player would strike an NPO, roll one D6: on a 5+, they must block instead. If this isn’t possible (e.g. it’s a normal success and the NPO only has critical successes), the strike has no effect.
Whenever a player would strike an NPO, roll one D6: on a 5+, they must block instead. If this isn’t possible (e.g. it’s a normal success and the NPO only has critical successes), the strike has no effect.
Typhon Event Card
Synaptic Backlash
Select one player operative and roll one D6:
- If the result is higher than their APL stat, subtract 1 from their APL stat.
- If the result is equal to or less than their APL stat, select a different player operative and repeat this process.
Typhon Event Card
Birthing Sac
Set up one ready NPO with a Conceal order as close as possible to a randomly determined gestation sac (S) terrain feature.
If you can’t (e.g. NPO limit is reached), draw a different event card.
If you can’t (e.g. NPO limit is reached), draw a different event card.
Equipment
Equipment are additional rules you can select before the battle, as specified in your game sequence. Universal equipment can be selected for any kill team whereas faction equipment is specific. Each player cannot select each equipment option more than once per game.
Shoot1AP
Shoot with the active operative by following the sequence below. The active operative’s player is the attacker. The selected enemy operative’s player is the defender.
An operative cannot perform this action while it has a Conceal order, or while within control range of an enemy operative.
Charge1AP
The same as the Reposition action, except the active operative can move an additional 2".
It can move, and must finish the move, within control range of an enemy operative. If it moves within control range of an enemy operative that no other friendly operatives are within control range of, it cannot leave that operative’s control range.
An operative cannot perform this action while it has a Conceal order, if it’s already within control range of an enemy operative, or during the same activation in which it performed the Reposition, Dash or Fall Back action.
Counteract
When you would activate a ready friendly operative, if all your operatives are expended but your opponent still has ready operatives, you can select an expended friendly operative with an Engage order to perform a 1AP action (excluding Guard) for free. Each operative can only counteract once per turning point. That operative cannot move more than 2", or must be set up wholly within 2" if it’s removed and set up again, while counteracting (this is not a change to its Move stat, and takes precedence over all other rules). Counteracting is optional, so you can choose not to. In either case, activation alternates back to your opponent afterwards.Counteracting isn’t an activation, it’s instead of activating. This difference is important; for instance, it means action restrictions won't apply.
|
Roll-off
lf a rule requires a roll-off, both players roll one D6 and whoever has the highest wins the roll-off. If there’s a tie, roll-off again.
Expended
- When you’ve finished with your operative’s activation, that operative is expended. While expended, an operative is not ready.
Fight1AP
Fight with the active operative by following the sequence below. The active operative’s player is the attacker. The selected enemy operative’s player is the defender.
An operative cannot perform this action unless an enemy operative is within its control range.
Damage
When damage is inflicted on an operative, reduce their wounds by that amount. An operative’s starting number of wounds is determined by its Wounds stat (see datacards). If an operative’s wounds are reduced to 0 or less, it’s incapacitated, then removed from the killzone. Some rules allow an incapacitated operative to perform a free action before being removed from the killzone. Such an operative cannot perform more than one free action (excluding Place Marker) in this instance, and that operative’s player decides the order of any of its rules that occur before it’s removed from the killzone (taking precedence over the player with initiative deciding).While an operative has fewer than its starting wounds remaining, it’s wounded. While it has fewer than half its starting wounds remaining, it’s also injured. Subtract 2" from the Move stat of injured operatives and worsen the Hit stat of their weapons by 1.
Keep track of each operative’s remaining wounds with dice, tokens or by writing it down.
‘Incapacitated’ and ‘removed from the killzone’ are separate. Some rules take effect when an operative is incapacitated, but before it’s removed.
‘Incapacitated’ and ‘removed from the killzone’ are separate. Some rules take effect when an operative is incapacitated, but before it’s removed.
Control Range
Many rules relate to control range such as moving, fighting and using cover. Something is within an operative’s control range if it’s visible to and within 1" of that operative.Control range between operatives is mutual, therefore operatives are within each other’s control range if one of them is visible to and within 1" of the other.
The terrain is within both operative B and C’s control range.
Because of the terrain, operative B is not visible to operative C, and vice versa, therefore they are not within each other’s control range.
Imagine control range as an area of interaction the operative has with things close to it.
|

Valid Target
Some rules require you to select a valid target for an operative. This is most common when an operative is shooting, but some rare rules require it too.
|
Reposition1AP
Move the active operative up to its Move stat to a location it can be placed. This must be done in one or more straight-line increments, and increments are always rounded up to the nearest inch.
It cannot move within control range of an enemy operative, unless one or more other friendly operatives are already within control range of that enemy operative, in which case it can move within control range of that enemy operative but cannot finish the move there.
An operative cannot perform this action while within control range of an enemy operative, or during the same activation in which it performed the Fall Back or Charge action.
Dash1AP
The same as the Reposition action, except don’t use the active operative’s Move stat — it can move up to 3" instead. In addition, it cannot climb during this move, but it can drop and jump.
An operative cannot perform this action while within control range of an enemy operative, or during the same activation in which it performed the Charge action.
Precedence
Some rare rules will conflict with each other, so it must be established which takes precedence. In order of priority, a rule takes precedence if:1
2
3
4
5
6
If a rule on a datacard says ‘this operative can perform two Shoot actions during its activation’, this takes precedence over the core rules for action restrictions, as per precedence priority 3.
Seek
When selecting a valid target, operatives cannot use terrain for cover. If the rule is Seek Light, operatives cannot use Light terrain for cover. Whilst this can allow such operatives to be targeted (assuming they’re visible), it doesn’t remove their cover save (if any).Blast x
The target you select is the primary target. After shooting the primary target, shoot with this weapon against each secondary target in an order of your choice (roll each sequence separately). Secondary targets are other operatives visible to and within x of the primary target, e.g. Blast 2" (they are all valid targets, regardless of a Conceal order). Secondary targets are in cover and obscured if the primary target was.Ceaseless
You can re-roll any of your attack dice results of one result (e.g. results of 2).Heavy
An operative cannot use this weapon in an activation or counteraction in which it moved, and it cannot move in an activation or counteraction in which it used this weapon. If the rule is Heavy (x only), where x is a move action, only that move is allowed, e.g. Heavy (Dash only). This weapon rule has no effect on preventing the Guard action.Fall Back2AP
The same as the Reposition action, except the active operative can move within control range of an enemy operative, but cannot finish the move there.
An operative cannot perform this action unless an enemy operative is within its control range. It cannot perform this action during the same activation in which it performed the Reposition or Charge action.
Visible
For an intended target to be Visible, the following must be true:- You can draw an imaginary, unobstructed straight line (known as a Visibility line) 1 mm wide from the head of the active operative’s miniature to any part of the miniature of the intended target (not its base).
In the rare instance that bases or parts of the active operative’s miniature prevent an intended target from being Visible to the active operative, such as when the active operative is directly below or above the intended target, treat those bases and parts as being invisible.
Some rare rules will require you to select a point that is Visible (e.g. a point on the killzone). In such circumstances, you must be able to draw an imaginary, unobstructed straight line 1mm wide from the head of the active operative’s miniature to the point you would select.
Lethal x+
Your successes equal to or greater than x are critical successes, e.g. Lethal 5+.Torrent x
Select a valid target as normal as the primary target, then select any number of other valid targets within x of the first valid target, but not within control range of friendly operatives, as secondary targets, e.g. Torrent 2". Shoot with this weapon against all of them in an order of your choice (roll each sequence separately).Piercing x
The defender collects x less defence dice, e.g. Piercing 1. If the rule is Piercing Crits x, this only comes into effect if you retain any critical successes.Pick Up Marker1AP
Remove a marker the active operative controls that the Pick Up Marker action can be performed upon. That operative is now carrying, contesting and controlling that marker.
An operative cannot perform this action while within control range of an enemy operative, or while it’s already carrying a marker.
Contents