
Raveners
Books
| Book | Kind | Edition | Version | Last update |
| | ||||
| | Faction | 3 | November ’25 | November 2025 |
FAQ
Raveners
| Q: | Are RAVENER operatives underground considered ‘in the killzone’ for the second victory points paragraph of the Implant tac op? |
| A: | Yes. Note that other tac ops (e.g. Surveillance) would still require those operatives to be in the killzone. |
| Q: | Can an expended friendly TREMORSCYTHE operative counteract to interrupt an enemy operative’s activation with the Subterranean Ambush rule if there are still other ready friendly RAVENER operatives? |
| A: | Yes. |
| Q: | When my TREMORSCYTHE operative interrupts my opponent’s activation, if the enemy operative is incapacitated (and therefore its activation cannot be continued), who activates next? Equally, if it isn’t incapacitated and then continues its activation, who activates next? |
| A: | Your opponent in both cases, as the TREMORSCYTHE operative has used your activation. |
| Q: | If a friendly RAVENER TREMORSCYTHE operative attempts to shoot or fight against the specified enemy operative in its Subterranean Ambush rule, but is prevented from doing so by an opponent’s rule (e.g. SANCTIFIER CONFESSOR Commanding Declamation, NOVITIATE Blinding Aura) is the activation/counteraction still cancelled? |
| A: | No. Continue its activation/counteraction as though the requirements of the Subterranean Ambush rule have been fulfilled. |
Raveners Kill Team
Below you will find a list of the operatives that make up a RAVENER kill team, including, where relevant, any weapons specified for that operative.
Operatives
- 1 RAVENER PRIME operative
- 4 RAVENER operatives selected from the following list:
Other than WARRIOR operatives, your kill team can only include each operative on this list once.


Faction Rules
Burrow
Raveners will emerge from their tunnels to strike at unsuspecting victims, then disappear again before their foe can properly react.
When setting up a RAVENER kill team before the battle, your first two operatives must be set up as normal. Each other friendly RAVENER operative thereafter can be set up underground: place it to one side instead of in the killzone.In the Firefight phase, friendly RAVENER operatives set up underground are activated and can counteract as normal. Whenever a friendly RAVENER operative is underground, it cannot perform any actions other than Burrow. At the end of the battle, each friendly RAVENER operative that’s underground is incapacitated.
Friendly RAVENER operatives can perform the following unique action:
BURROW1AP
Tunnel
Raveners dig extensive tunnel networks in the ground and foundations beneath their prey’s feet, enabling the Hive Mind’s elite creations to outmanoeuvre and ambush their prey.
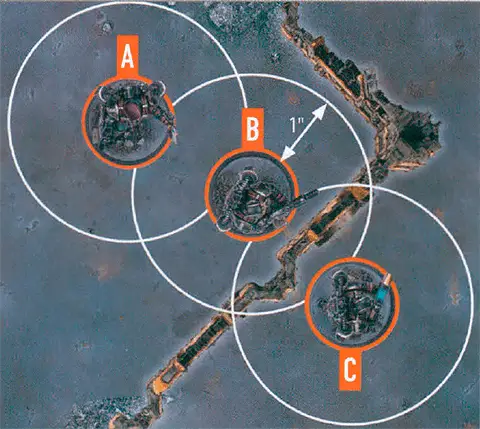
At the end of the Set Up Operatives step, place your Tunnel marker numbered ‘0’ on the killzone floor, wholly within your drop zone and touching your killzone edge. As a STRATEGIC GAMBIT in the first four turning points, you can place your next numbered Tunnel marker on the killzone floor wholly within 5" of your preceding Tunnel marker. This means that, as the battle progresses, you can have a series of sequentially numbered Tunnel markers (0, 1, 2, 3 and 4). Once you have placed five Tunnel markers, don’t place any more (i.e. if your battle lasts more than four turning points).Your Tunnel markers and the area between your sequentially numbered markers (i.e. between 0 and 1, 1 and 2, etc.), create your TUNNEL.
In a killzone that uses the close quarters rules (e.g. Killzone: Tomb World), your
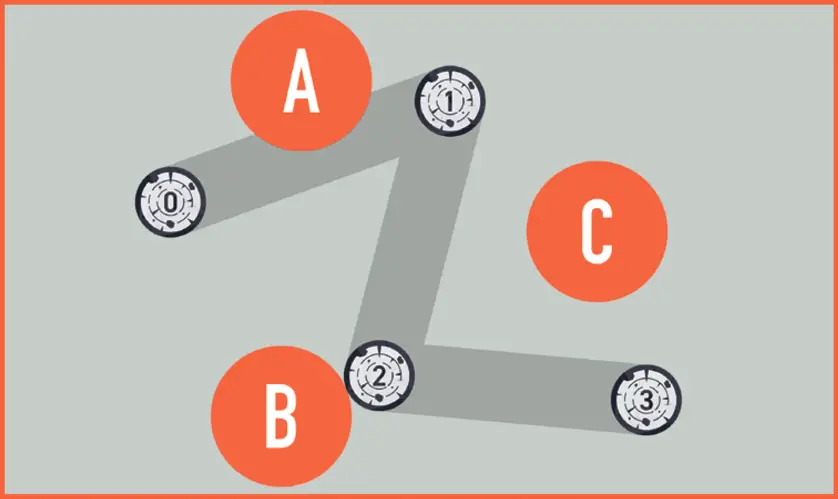
In this example, operative A is on your TUNNEL as it’s on the area between markers 0 and 1. Operative B is also on your TUNNEL as it’s touching one of your Tunnel markers. Operative C is not on your TUNNEL as markers 1 and 3 are not sequential, so the area between those markers is not part of your TUNNEL.
Predatory Instincts
Seemingly driven by an all-consuming hunger, and with hyper-adapted reflexes, Raveners are deadly blurs of muscle, talons and fangs.
During each friendly RAVENER operative’s activation, it can perform two Fight actions.Each friendly RAVENER operative can counteract regardless of its order. Whenever it does:
- You can change its order first, or change its order instead of performing an action (for the latter, still treat it as having counteracted this turning point).
- During that counteraction, if it doesn’t perform a mission action it can perform a free Burrow action.
Strategy Ploys
Spurred by an imperative from the Hive Mind, Raveners will coordinate lunges from the depths of their tunnel network to eviscerate unwary prey that have strayed too close.
- If it’s performed the Burrow action during that activation/counteraction, its melee weapons have the Balanced weapon rule.
- If it’s on your TUNNEL, its melee weapons have the Ceaseless weapon rule.
Whether lunging from a rubble-strewn entrance to their network of tunnels or bursting forth in a shower of debris to snatch at prey, Raveners can surprise even elite sentinels.
- If that friendly operative has performed the Burrow action during that turning point, you can re-roll one of your defence dice.
- If that friendly operative is on your TUNNEL, you can re-roll any of your defence dice.
Few organisms are as capable of slithering away into darkness in the blink of an eye as Raveners. The question then is, where did they go…?
Raveners are horrifically adept at remaining all but invisible, partially submerged amidst broken terrain, until the moment they lunge.
Firefight Ploys
The secretion-slick carapace and unholy speed of a Ravener enables them to avoid becoming bogged down against dangerous prey.
- Perform the Fall Back action for 1 less AP.
- Perform the Charge action while within control range of an enemy operative, and can leave that operative’s control range to do so (but then normal requirements for that move apply).
Those who think to trap a Ravener by tackling it at its brood burrow invite only their own demise, as the bioform uses hidden tunnels to encircle its prey before striking from an unexpected angle.
The last sight for many operatives fighting Raveners is a blur of their own uniform as they disappear into the depths of a xenos burrow.
Raveners can be compelled by the Hive Mind to fight in a last surge of biostimulated aggression, even as their own bodies fail.
Faction Equipment
Chameleonic adaptations enable these bioforms to virtually disappear.
Corrosive viscera and caustic fluids spray from these creatures’ wounds.
Some Raveners are reported to have recovered from injuries that should have been fatal, their flesh and chitin reknitting in rapid regeneration.
Even burrowing, Raveners can detect enemy pheromones, esoteric energies and the whirr of servos,enabling them to land sudden ambushes.
Datacards
APL 3 3 |
MOVE 7" 7" |
SAVE 5+ 5+ |
WOUNDS 21 21 |
NAME | ATK | HIT | DMG | WR | ||||
| Tail blade | ||||||||
| Tail blade | 4 | 3+ | 3/4 | Range 3", Rending, Silent | Range 3", Rending, Silent | |||
| Scything talons & rending claws | ||||||||
| Scything talons & rending claws | 5 | 3+ | 4/5 | Rending | Rending | |||
- Your opponent must spend 1 additional AP for that enemy operative to perform the Pick Up Marker and mission actions.
- Your opponent cannot re-roll their attack or defence dice for that operative.
- Twice as high or higher, you gain 1CP.
- Less, inflict damage on this operative equal to the result.
- Any other result, nothing happens.
|
RAVENER, GREAT DEVOURER, TYRANID, LEADER, PRIME
|
⌀40mm |
| APL3 |
MOVE7" |
SAVE5+ |
WOUNDS20 |
NAME | ATK | HIT | DMG | WR | ||||
| Pincer tail | ||||||||
| Pincer tail | 4 | 3+ | 3/4 | Range 3", Silent | Range 3", Silent | |||
| Toxic glands | ||||||||
| Toxic glands | 4 | 3+ | 3/4 | Range 6", Silent, Poison* | Range 6", Silent, Poison* | |||
| Toxic scythes | ||||||||
| Toxic scythes | 5 | 3+ | 4/5 | Lethal 5+, Shock, Poison* | Lethal 5+, Shock, Poison* | |||
TOXIC LUNGE1AP
|
RAVENER, GREAT DEVOURER, TYRANID, FELLTALON
|
⌀40mm |
| APL3 |
MOVE7" |
SAVE5+ |
WOUNDS20 |
NAME | ATK | HIT | DMG | WR | ||||
| Pincer tail | ||||||||
| Pincer tail | 4 | 3+ | 3/4 | Range 3", Silent | Range 3", Silent | |||
| Scything talons & rending claws | ||||||||
| Scything talons & rending claws | 5 | 3+ | 4/5 | Rending | Rending | |||
If you do, activate or counteract with this operative (as appropriate), but during its activation/counteraction it must shoot against or fight against that enemy operative, and cannot do so against any other enemy operatives until it does (if this isn’t possible, this operative’s activation/counteraction is cancelled and this rule hasn’t been used). After completing this operative’s activation/counteraction, continue that enemy operative’s activation/counteraction (if possible and relevant).
|
RAVENER, GREAT DEVOURER, TYRANID, TREMORSCYTHE
|
⌀40mm |
| APL3 |
MOVE7" |
SAVE5+ |
WOUNDS20 |
NAME | ATK | HIT | DMG | WR | ||||
| Pincer tail | ||||||||
| Pincer tail | 4 | 3+ | 3/4 | Range 3", Silent | Range 3", Silent | |||
| Venom bolt (blast) | ||||||||
| Venom bolt (blast) | 4 | 3+ | 3/5 | Range 8", Blast 2", Poison* | Range 8", Blast 2", Poison* | |||
| Venom bolt (focused) | ||||||||
| Venom bolt (focused) | 4 | 3+ | 4/5 | Range 8", Piercing 1, Poison* | Range 8", Piercing 1, Poison* | |||
| Scything talons | ||||||||
| Scything talons | 5 | 3+ | 4/5 | - | ||||
DISTEND DORSAL SAC1AP
|
RAVENER, GREAT DEVOURER, TYRANID, VENOMSPITTER
|
⌀40mm |
| APL3 |
MOVE7" |
SAVE5+ |
WOUNDS20 |
NAME | ATK | HIT | DMG | WR | ||||
| Pincer tail | ||||||||
| Pincer tail | 4 | 3+ | 3/4 | Range 3", Silent | Range 3", Silent | |||
| Scything talons | ||||||||
| Scything talons | 5 | 3+ | 4/5 | - | ||||
|
RAVENER, GREAT DEVOURER, TYRANID, WARRIOR
|
⌀40mm |
| APL3 |
MOVE7" |
SAVE4+ |
WOUNDS20 |
NAME | ATK | HIT | DMG | WR | ||||
| Bone mace | ||||||||
| Bone mace | 4 | 3+ | 3/4 | Range 3", Piercing 1, Silent | Range 3", Piercing 1, Silent | |||
| Scything talons & crushing claws | ||||||||
| Scything talons & crushing claws | 5 | 3+ | 4/5 | Crush* | Crush* | |||
|
RAVENER, GREAT DEVOURER, TYRANID, WRECKER
|
⌀40mm |
Control range between operatives is mutual, therefore operatives are within each other’s control range if one of them is visible to and within 1" of the other.
The terrain is within both operative B and C’s control range.
Because of the terrain, operative B is not visible to operative C, and vice versa, therefore they are not within each other’s control range.
Raveners will emerge from their tunnels to strike at unsuspecting victims, then disappear again before their foe can properly react.
When setting up a RAVENER kill team before the battle, your first two operatives must be set up as normal. Each other friendly RAVENER operative thereafter can be set up underground: place it to one side instead of in the killzone.In the Firefight phase, friendly RAVENER operatives set up underground are activated and can counteract as normal. Whenever a friendly RAVENER operative is underground, it cannot perform any actions other than Burrow. At the end of the battle, each friendly RAVENER operative that’s underground is incapacitated.
Friendly RAVENER operatives can perform the following unique action:
BURROW1AP
- When you’ve finished with your operative’s activation, that operative is expended. While expended, an operative is not ready.
While an operative has fewer than its starting wounds remaining, it’s wounded. While it has fewer than half its starting wounds remaining, it’s also injured. Subtract 2" from the Move stat of injured operatives and worsen the Hit stat of their weapons by 1.
‘Incapacitated’ and ‘removed from the killzone’ are separate. Some rules take effect when an operative is incapacitated, but before it’s removed.
- It cannot perform that action during that activation/counteraction (the AP spent on it isn’t refunded). If it’s a counteraction, that counteraction ends.
- You cannot use this rule again during the battle.
Shoot1AP
|

Charge1AP
|

|

Faith defies explanation. The most devout and righteous Sisters are said to manifest dazzling halos of light that blind the faithless.
Fight1AP
BURROW1AP
Raveners dig extensive tunnel networks in the ground and foundations beneath their prey’s feet, enabling the Hive Mind’s elite creations to outmanoeuvre and ambush their prey.
At the end of the Set Up Operatives step, place your Tunnel marker numbered ‘0’ on the killzone floor, wholly within your drop zone and touching your killzone edge. As a STRATEGIC GAMBIT in the first four turning points, you can place your next numbered Tunnel marker on the killzone floor wholly within 5" of your preceding Tunnel marker. This means that, as the battle progresses, you can have a series of sequentially numbered Tunnel markers (0, 1, 2, 3 and 4). Once you have placed five Tunnel markers, don’t place any more (i.e. if your battle lasts more than four turning points).Your Tunnel markers and the area between your sequentially numbered markers (i.e. between 0 and 1, 1 and 2, etc.), create your TUNNEL.
In a killzone that uses the close quarters rules (e.g. Killzone: Tomb World), your
In this example, operative A is on your TUNNEL as it’s on the area between markers 0 and 1. Operative B is also on your TUNNEL as it’s touching one of your Tunnel markers. Operative C is not on your TUNNEL as markers 1 and 3 are not sequential, so the area between those markers is not part of your TUNNEL.
Fall Back2AP
Reposition1AP
Pick Up Marker1AP
The RAVENER keyword is used in the following Raveners datacards:
The GREAT DEVOURER keyword is used in the following Raveners datacards:
The TYRANID keyword is used in the following Raveners datacards: