
Canoptek Circle
Books
| Book | Kind | Edition | Version | Last update |
| | ||||
| | Faction | 3 | January ’26 | January 2026 |
FAQ
Canoptek Circle
| Q: | In a killzone that uses the close quarters rules, is the OBELISK NODE MATRIX measured through Wall terrain? |
| A: | No. |
| Q: | If another CANOPTEK CIRCLE WARRIOR operative is set up as a result of the A Ceaseless Scuttling rule, does it count as a new operative for the purposes of other rules (e.g. Approved Ops 2025 Envoy tac op)? |
| A: | Yes. |
| Q: | How should I resolve it if I attempt to use a strategy ploy using the Nodal Response firefight ploy, but that strategy ploy is cancelled by an opponent’s rule (e.g. INQUISITORIAL AGENT Absolute Authority)? |
| A: | You can either use a different strategy ploy, or have the CP for both that strategy ploy and Nodal Response refunded. |
| Q: | When determining control from an OBELISK NODE marker using the CANOPTEK CIRCLE GEOMANCER’s Obelisk Node Control rule, do I use the GEOMANCER’s APL stat to determine control? |
| A: | No. |
| Q: | When OBELISK NODE markers are moved, are they affected by Accessible terrain, Obstructing terrain, climbing or dropping? |
| A: | No, but note that they cannot move through Wall terrain |
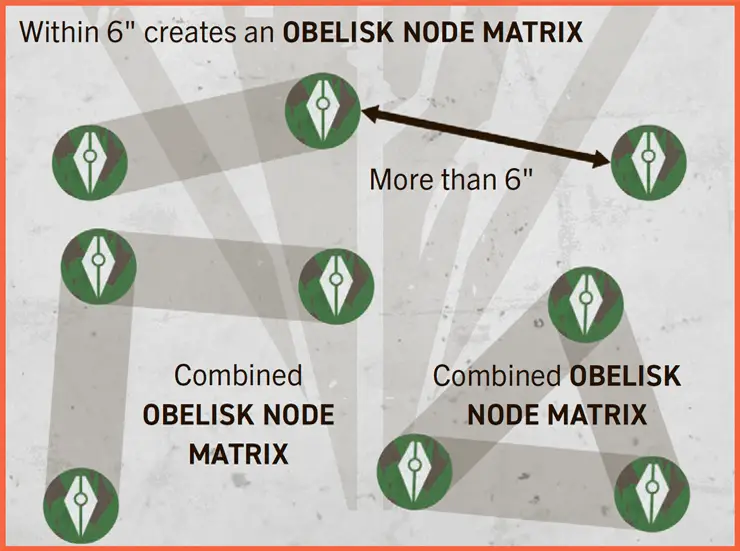
| Q: | In the example provided in this team’s rules where all three OBELISK NODE markers are within 6", is the ‘area between’ these markers the entire triangle or just the 20mm wide lines directly between the markers? |
| A: | The 20mm wide lines. |
| Q: | In killzones that use the close quarters rules, how do I measure the horizontal area between my OBELISK NODE markers to create my OBELISK NODE MATRIX if there is Wall terrain partially intervening between them? |
| A: | You cannot measure between your OBELISK NODE markers if Wall terrain is intervening. This means the OBELISK NODE MATRIX does not curve around walls, it must be a single straight line. 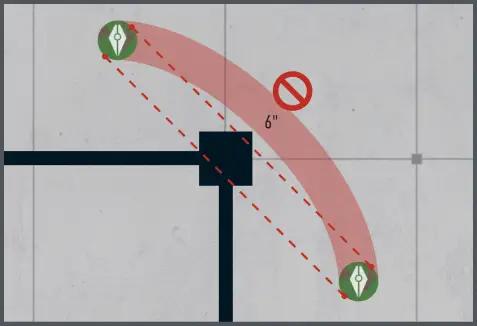 |
| Q: | When using the Matrix Manipulator faction equipment to measure my OBELISK NODE MATRIX, do I measure a 20mm wide line (as with all other markers) straight to the CANOPTEK CIRCLE GEOMANCER’s 50mm base, or do I measure a widening shape to all facing parts of its 50mm base? |
| A: | A widening shape to all facing parts of its base 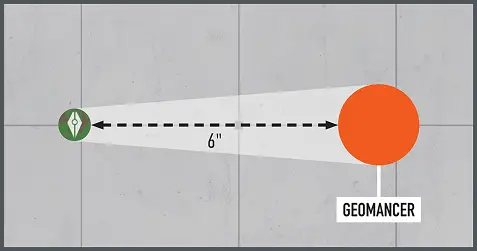 |
Canoptek Circle Kill Team
Below you will find a list of the operatives that make up a CANOPTEK CIRCLE kill team, including, where relevant, any weapons specified for that operative.
Operatives
- 1 CANOPTEK CIRCLE GEOMANCER operative
- 2 CANOPTEK CIRCLE TOMB CRAWLER operatives with one of the following options (select separately for each):
- Twin gauss reapers; claws
- Transdimensional isolator; claws *
- 1 CANOPTEK CIRCLE ACCELERATOR operative
- 1 CANOPTEK CIRCLE REANIMATOR operative
- 3 CANOPTEK CIRCLE WARRIOR operatives with one of the following options (select separately for each):
- Gauss scalpel; claws & tail
- Tesla caster; claws & tail


Faction Rules
Obelisk Node Matrix
Obelisk nodes are concentrations of Necron technology, hubs of energy and data streams. Whether raised up from their sites of ancient burial, formed from restructured local matter or phased into place from a pocket dimension, these angular nodes can empower a Cryptek and their servants. Impelled into positions where they can connect in a matrix of power, they aid the Cryptek’s ambitions whilst hampering their foes.
Your OBELISK NODE markers control other markers within 1" of them that no enemy operatives contest (treat your OBELISK NODE markers as friendly operatives for this purpose). If more than one player would use their OBELISK NODE markers to control the same marker, no OBELISK NODE markers control it.
Whenever one of your OBELISK NODE markers is within 6" horizontally of another of your OBELISK NODE markers, those markers and the area between them create an OBELISK NODE MATRIX above and below (in other words, their height in the killzone is irrelevant). If all three of your OBELISK NODE markers fulfil this, it creates a larger combined OBELISK NODE MATRIX.
Whenever a friendly CANOPTEK CIRCLE operative is within your OBELISK NODE MATRIX:
- Weapons on its datacard have the Accurate 1 weapon rule.
- Add 1 to its APL stat (to a maximum of 3).
Strategy Ploys
Quantum energies radiate from the matrix, triggered by warding protocols. The haze consumes solid shot in bursts of viridian light and refracts energy blasts, while its wavering veil confounds targeters.
The universe’s fundamental forces have long been mastered by the Necrons. As their foes advance, thudding waves and twisting eddies of gravity amongst the obelisk nodes repel potential trespassers.
Curving into arcane lenses that compress slivers of reality, the shimmering matrix magnifies the potency of the Necrons’ horrifying energistic technologies.
A lifeless chill creeps into the hearts of those who would dare to breach the Necrons’ realm – an ener vating leeching of strength and vitality that leaves them easy prey.
Firefight Ploys
With a flash, snipers bullets are swallowed in microdimensions; blades pass through suddenly phased matter; slivers of time are erased and rewritten, the strike never connecting after all. The matrix’s energies deny the Necrons’ verminous foes of the smallest victory over their betters.
Eldritch pulses of artificial thought thrum through the obelisk nodes as they adjust the flow of energies and data in response to rapidly changing situations.
Heeding some hidden command, looming obelisk nodes surge into new positions of cosmic conjunction.
Canoptek constructs are programmed to shield their master at all costs.
Faction Equipment
With a flick of their digits, a skilled Geomancer can use this enhanced geomantic manipulator as a surrogate obelisk node to extend the matrix.
These small devices appear to release wisps of spectral vapour. In truth, they are clouds of tiny repair constructs that seal rents in living metal.
Seeded into place and activated long ago, these obelisk nodes have absorbed huge stores of local data, ready to gift their controller with a superior edge when the time is right.
The bearer’s form flits between dimensions like a phantom, rendering it exceedingly difficult to land a telling blow upon them.
Datacards
Possessing aeons of cryptogeometric knowledge and esoteric technology, Geomancers are Crypteks that manipulate physical strata in a deadly fashion. They channel reverberating energy through their tremorglaives to shatter enemy fortifications, rip through sealed hatches or shiver their foes apart at an atomic level. Using devices known as geomantic manipulators, these arcane scientists can also transmute matter into obelisk nodes, and through these locuses access hidden reserves of power and information.
Possessing aeons of cryptogeometric knowledge and esoteric technology, Geomancers are Crypteks that manipulate physical strata in a deadly fashion. They channel reverberating energy through their tremorglaives to shatter enemy fortifications, rip through sealed hatches or shiver their foes apart at an atomic level. Using devices known as geomantic manipulators, these arcane scientists can also transmute matter into obelisk nodes, and through these locuses access hidden reserves of power and information. |
APL 3 3 |
MOVE 6" 6" |
SAVE 3+ 3+ |
WOUNDS 14 14 |
NAME | ATK | HIT | DMG | WR | ||||
| Tremorglaive (part matter) | ||||||||
| Tremorglaive (part matter) | 4 | 3+ | 4/5 | Piercing 1, Piercing Crits 2 | Piercing 1, Piercing Crits 2 | |||
| Tremorglaive (quake) | ||||||||
| Tremorglaive (quake) | 5 | 3+ | 1/2 | Blast 2", Seek Light, Stun | Blast 2", Seek Light, Stun | |||
| Tremorglaive (sweep) | ||||||||
| Tremorglaive (sweep) | 4 | 4+ | 4/5 | Severe, Shock, Stun | Severe, Shock, Stun | |||
GEOMANTIC DISTURBANCE1AP
CANOPTEK CONTROL1AP
MOLECULAR BREACH1AP
|
CANOPTEK CIRCLE, NECRON, LEADER, CRYPTEK, GEOMANCER
|
⌀50mm |
Fitted with an accelerator mandible, these adapted constructs support their Cryptek’s other Canopteks and ensure they serve at peak efficiency. They tap into energy reserves throughout a tomb, either transferring the sudden jolt of phasic power or data to other constructs, or using it as a dangerous surge to fry cranial nerves.
Fitted with an accelerator mandible, these adapted constructs support their Cryptek’s other Canopteks and ensure they serve at peak efficiency. They tap into energy reserves throughout a tomb, either transferring the sudden jolt of phasic power or data to other constructs, or using it as a dangerous surge to fry cranial nerves. |
APL2 |
MOVE7" |
SAVE4+ |
WOUNDS7 |
NAME | ATK | HIT | DMG | WR | ||||
| Spark | ||||||||
| Spark | 4 | 4+ | 2/3 | Range 4", Piercing 1 | Range 4", Piercing 1 | |||
| Claws & spark | ||||||||
| Claws & spark | 3 | 4+ | 3/4 | Lethal 5+, Stun | Lethal 5+, Stun | |||
OVERCHARGE1AP
CRANIAL OVERLOAD1AP
|
CANOPTEK CIRCLE, NECRON, CANOPTEK, MACROCYTE, ACCELERATOR
|
⌀28mm |
Macrocyte Reanimators are fitted with a compact nanoscarab projector. The beam they fire from it is a carrier wave delivering trillions of microscopic constructs that can repair ruptured Necron technology – whether a tomb’s passage or the living metal of its inhabitants. They unthinkingly do the same with living flesh, horrifically reforming it atom by atom.
Macrocyte Reanimators are fitted with a compact nanoscarab projector. The beam they fire from it is a carrier wave delivering trillions of microscopic constructs that can repair ruptured Necron technology – whether a tomb’s passage or the living metal of its inhabitants. They unthinkingly do the same with living flesh, horrifically reforming it atom by atom. |
APL2 |
MOVE7" |
SAVE4+ |
WOUNDS7 |
NAME | ATK | HIT | DMG | WR | ||||
| Atomiser beam | ||||||||
| Atomiser beam | 4 | 4+ | 3/4 | Range 6", Lethal 5+ | Range 6", Lethal 5+ | |||
| Claws & tail | ||||||||
| Claws & tail | 4 | 4+ | 3/4 | - | ||||
NANOSCARAB BEAM1AP
|
CANOPTEK CIRCLE, NECRON, CANOPTEK, MACROCYTE, REANIMATOR
|
⌀28mm |
| APL2 |
MOVE7" |
SAVE4+ |
WOUNDS7 |
NAME | ATK | HIT | DMG | WR | ||||
| Gauss scalpel | ||||||||
| Gauss scalpel | 4 | 4+ | 2/3 | Piercing 1 | Piercing 1 | |||
| Tesla caster (focused) | ||||||||
| Tesla caster (focused) | 4 | 4+ | 2/3 | - | ||||
| Tesla caster (living lightning) | ||||||||
| Tesla caster (living lightning) | 4 | 4+ | 2/3 | Blast 2" | Blast 2" | |||
| Claws & tail | ||||||||
| Claws & tail | 3 | 4+ | 3/4 | - | ||||
|
CANOPTEK CIRCLE, NECRON, CANOPTEK, MACROCYTE, WARRIOR
|
⌀28mm |
Tomb Crawlers are hulking Canoptek constructs that possess great strength, as capable of shifting tonnes of debris as crushing armoured intruders. Lurking in hidden alcoves for days to millennia, they can activate suddenly to ambush the foe with advanced weapons mounted on their hardened shells.
Tomb Crawlers are hulking Canoptek constructs that possess great strength, as capable of shifting tonnes of debris as crushing armoured intruders. Lurking in hidden alcoves for days to millennia, they can activate suddenly to ambush the foe with advanced weapons mounted on their hardened shells. |
APL2 |
MOVE5" |
SAVE3+ |
WOUNDS21 |
NAME | ATK | HIT | DMG | WR | ||||
| Transdimensional isolator | ||||||||
| Transdimensional isolator | 5 | 4+ | 5/6 | Dimensional Banishment* | Dimensional Banishment* | |||
| Twin gauss reapers (focused) | ||||||||
| Twin gauss reapers (focused) | 5 | 4+ | 4/5 | Piercing 1, Severe | Piercing 1, Severe | |||
| Twin gauss reapers (sweeping) | ||||||||
| Twin gauss reapers (sweeping) | 4 | 4+ | 4/5 | Piercing 1, Severe, Torrent 1" | Piercing 1, Severe, Torrent 1" | |||
| Claws | ||||||||
| Claws | 4 | 4+ | 4/4 | - | ||||
|
CANOPTEK CIRCLE, NECRON, CANOPTEK, TOMB CRAWLER
|
⌀50mm |
Obelisk nodes are concentrations of Necron technology, hubs of energy and data streams. Whether raised up from their sites of ancient burial, formed from restructured local matter or phased into place from a pocket dimension, these angular nodes can empower a Cryptek and their servants. Impelled into positions where they can connect in a matrix of power, they aid the Cryptek’s ambitions whilst hampering their foes.
Your OBELISK NODE markers control other markers within 1" of them that no enemy operatives contest (treat your OBELISK NODE markers as friendly operatives for this purpose). If more than one player would use their OBELISK NODE markers to control the same marker, no OBELISK NODE markers control it.
Whenever one of your OBELISK NODE markers is within 6" horizontally of another of your OBELISK NODE markers, those markers and the area between them create an OBELISK NODE MATRIX above and below (in other words, their height in the killzone is irrelevant). If all three of your OBELISK NODE markers fulfil this, it creates a larger combined OBELISK NODE MATRIX.
Whenever a friendly CANOPTEK CIRCLE operative is within your OBELISK NODE MATRIX:
- Weapons on its datacard have the Accurate 2 weapon rule.
- Add 1 to its APL stat (to a maximum of 3).
Eldritch pulses of artificial thought thrum through the obelisk nodes as they adjust the flow of energies and data in response to rapidly changing situations.
All who know of the Inquisition fear its limitless reach. Those unfortunate enough to draw the ire of its Agents are often stricken by fear.
Obelisk nodes are concentrations of Necron technology, hubs of energy and data streams. Whether raised up from their sites of ancient burial, formed from restructured local matter or phased into place from a pocket dimension, these angular nodes can empower a Cryptek and their servants. Impelled into positions where they can connect in a matrix of power, they aid the Cryptek’s ambitions whilst hampering their foes.
Your OBELISK NODE markers control other markers within 1" of them that no enemy operatives contest (treat your OBELISK NODE markers as friendly operatives for this purpose). If more than one player would use their OBELISK NODE markers to control the same marker, no OBELISK NODE markers control it.
Whenever one of your OBELISK NODE markers is within 6" horizontally of another of your OBELISK NODE markers, those markers and the area between them create an OBELISK NODE MATRIX above and below (in other words, their height in the killzone is irrelevant). If all three of your OBELISK NODE markers fulfil this, it creates a larger combined OBELISK NODE MATRIX.
Whenever a friendly CANOPTEK CIRCLE operative is within your OBELISK NODE MATRIX:
- Weapons on its datacard have the Accurate 1 weapon rule.
- Add 1 to its APL stat (to a maximum of 3).
With a flick of their digits, a skilled Geomancer can use this enhanced geomantic manipulator as a surrogate obelisk node to extend the matrix.
|
Shoot1AP
Charge1AP
|

|
The CANOPTEK CIRCLE and CANOPTEK keywords are used in the following Canoptek Circle datacards:
- You can draw an imaginary, unobstructed straight line (known as a Visibility line) 1 mm wide from the head of the active operative’s miniature to any part of the miniature of the intended target (not its base).
Fight1AP
Control range between operatives is mutual, therefore operatives are within each other’s control range if one of them is visible to and within 1" of the other.
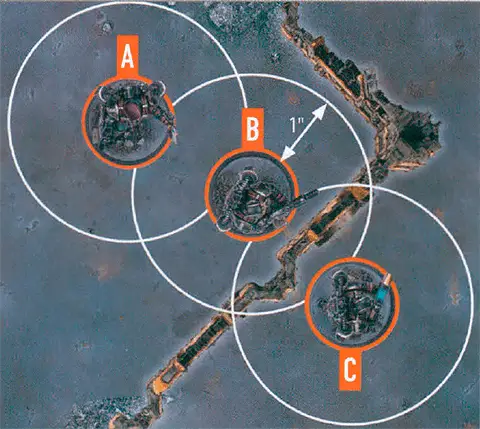
The terrain is within both operative B and C’s control range.
Because of the terrain, operative B is not visible to operative C, and vice versa, therefore they are not within each other’s control range.
Heeding some hidden command, looming obelisk nodes surge into new positions of cosmic conjunction.
Operate Hatch1AP
The CANOPTEK keyword is used in the following Canoptek Circle datacards:
Dash1AP
The CANOPTEK CIRCLE keyword is used in the following Canoptek Circle datacards:
The NECRON keyword is used in the following Canoptek Circle datacards:
The CANOPTEK keyword is used in the following Canoptek Circle datacards:
The MACROCYTE keyword is used in the following Canoptek Circle datacards:
While an operative has fewer than its starting wounds remaining, it’s wounded. While it has fewer than half its starting wounds remaining, it’s also injured. Subtract 2" from the Move stat of injured operatives and worsen the Hit stat of their weapons by 1.
‘Incapacitated’ and ‘removed from the killzone’ are separate. Some rules take effect when an operative is incapacitated, but before it’s removed.
Through arcane ritual, the most devoted among a Chaos Cult have profane symbols carved into their flesh or tattooed onto their skin. Should the correct words of invocation be uttered, these icons appear to draw empyric power, mutating the form of the devotee. This doesn’t satisfy the dark cravings and power lust of some; depraved prayers are written upon flayed skin and nailed into tormented flesh, and daemons are summoned and bound into mortal bodies.
During the battle, friendly CHAOS CULT operatives can MUTATE as follows:- As a STRATEGIC GAMBIT, you can MUTATE a number of friendly CHAOS CULT operatives based on the turning point as follows: TP1 = 2, TP2 = 2, TP3 = 3, TP4+ = 4.
- Whenever a friendly DEVOTEE operative incapacitates an enemy operative within its control range, it can MUTATE.
- Each operative cannot MUTATE more than once per turning point.
- If it’s a DEVOTEE operative, turn it into a MUTANT operative.
- If it’s a MUTANT operative, turn it into a TORMENT operative (max twice per turning point).
- It can regain up to D3+1 lost wounds.
- Swap the miniatures, ensuring the centre of the new miniature’s base is as close as possible to where the centre of the old miniature’s base was. This can put it within control range of enemy operatives, and if the old miniature was, the new miniature must be if possible.
- The new operative type loses a number of wounds equal to the lost wounds of its preceding operative type.
- It’s still the same operative for any rules it’s already been selected for. The operative is simply a new operative type and will use that new type’s miniature and datacard rules.
Fellgor Ravagers channel their pain into an animalistic frenzy, dismissing wounds and bursting with aggression.
Whenever a friendly FELLGOR RAVAGER operative that doesn’t have one of your Frenzy tokens would be incapacitated during the battle, it’s not incapacitated and it gains one of your Frenzy tokens. All remaining attack dice are discarded (including yours if this operative is fighting or retaliating). If it has a Conceal order, change it to Engage.Whenever a friendly FELLGOR RAVAGER operative has one of your Frenzy tokens:
- It’s only incapacitated as detailed overleaf.
- It cannot have a Conceal order.
- It’s injured.
- It cannot perform the Pick Up Marker, unique (excluding Sweeping Blow, see VANDAL) or mission actions (excluding Operate Hatch)
- For the purpose of determining control of markers and areas of the killzone, treat its APL stat as 1. This takes precedence over any stat changes.
- Its activation or counteraction ends.
- An enemy operative is fighting against or retaliating against it and your opponent strikes with a critical success.
- An enemy operative is fighting against or retaliating against it and your opponent strikes it for a second time with a normal success. Note this can be strikes from two different Fight actions.
- An enemy operative is shooting it and Critical Dmg is inflicted on it.
- The battle ends (resolve this before any victory conditions that resolve at the end of the battle).
The body of a slain Necron becomes wreathed in an eerie glow. Severed limbs reattach and broken bodies reform in a shower of emerald sparks. Eye-lenses flicker once more and the Necron rises again to rejoin the fight.
The first time each friendly HIEROTEK CIRCLE operative is incapacitated, before it’s removed from the killzone, place one of your Reanimation markers within its control range. Then remove it as incapacitated, also removing any tokens and rules effects it had (e.g.In the Ready step of each Strategy phase, select one of your Reanimation markers and roll one D6: on a 1-2, leave that Reanimation marker in the killzone and repeat this process with a different one of your Reanimation markers (if any); on a 3+, an operative is REANIMATED.
You can only select each of your Reanimation markers once per turning point, and once you roll a 3+, you don’t select any more for that turning point. Whenever an operative is REANIMATED:
- Set up the operative that Reanimation marker was placed for (it’s no longer incapacitated). It must be placed within 3" of that Reanimation marker and not within control range of enemy operatives (if you cannot do so, treat the roll as 1-2 instead).
- It has 1 wound remaining.
- It has an order of your choice and is ready.
- Remove that Reanimation marker.