
Blood and Zeal
Books
| Book | Kind | Edition | Version | Last update |
| | ||||
| | Expansion | 3 | 1.0 | June 2025 |
Blood and Zeal
This is a PvP (player vs player) mission pack for casual gameplay. It uses a set of cards that provide thematic and impactful rules when you need them most. Blood cards are for those with a more offensive approach, while Zeal cards are more defensive. Each player will gain cards to use as the battle progresses, but must manage them appropriately to gain extra VP.This mission pack is designed to be used alongside other mission packs. It provides a set of cards to add excitement to your battle, but the mission itself should be determined from another mission pack, such as Preliminary Ops (Kill Team: Core Book) or Approved Ops (available separately). It’s not intended to be used in a multiplayer mission pack (i.e. 3 or more players).
Due to the extra layer of rules this mission pack provides, you may feel it’s better to play a simpler mission. For example, if you use a mission from Approved Ops, you could use the kill op and crit op, but ignore the tac op. In any case, players should use the cards with any mission they feel is appropriate.
This mission pack can be used with any killzone, but the shrine statue terrain feature included in this box should be added to it. The shrine statue provides certain rules in-game, so ensure it’s set up correctly and fairly, and adjust other terrain features (including removing them, if necessary) as needed to use it. If you’re feeling particularly creative, you can use a terrain feature from your collection that’s similar to the shrine statue but that better represents your faction(s); just use your best judgement on any size difference.
MISSION RULES
When setting up the battle, after selecting drop zones, the player with initiative sets up the shrine statue terrain feature. It must be on the centreline, equally within each player’s territory and more than 1" from other terrain features. At the end of the battle, in addition to the VP scored from the mission, each player adds up the Blood and Zeal cards in their discard piles. If a player has more discarded Blood cards than their opponent has, they score 1VP. If a player has more discarded Zeal cards than their opponent has, they score 1VP.Blood and Zeal Cards
When setting up the battle, separate the cards into two decks (one deck of Blood cards, one deck of Zeal cards), shuffle each deck, then place them face down next to the killzone. Place three cards from each deck face down next to their respective decks: this is the draw section (see example below). Whilst a card’s type (Blood or Zeal) is obvious, it’s important to keep its details secret – neither player can look at the text on these cards unless otherwise specified.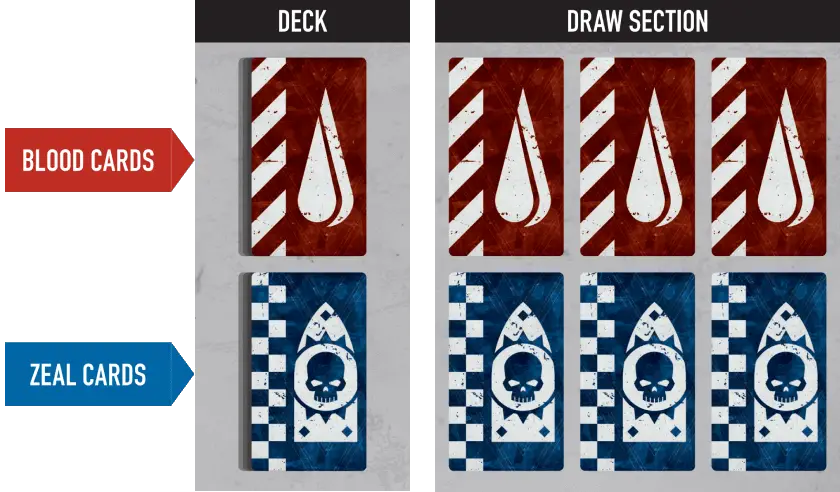
Whenever a player is instructed to draw a card, they take a card (Blood or Zeal) from the draw section and add it to their hand. Remember, players can’t look at the specifics of cards before they choose them (unless otherwise specified), but both players will know if it’s a Blood or Zeal card. In general, Blood cards are for offense and Zeal cards are for defence.
Once a player adds a card to their hand, they can look at its text, but it should be kept secret from their opponent. The player then replaces the drawn card in the draw section with another face down card from the top of the same deck (unless the deck is empty). If players would draw cards simultaneously, they alternate drawing cards (and replacing them before their opponent draws) until they’ve drawn the required amount, starting with the player who has initiative.
Players draw one card:
• In the Ready step of each Strategy phase.
• Whenever their opponent scores VPs (draw one card for each VP they score).
Each card specifies when a player can use it, providing additional rules for the opportune moment. Once you use a card, place it in its discard pile. Each player has two discard piles – one for each card type. Whenever a card is in a discard pile, it’s no longer secret. This means both players should know how many cards are in each discard pile, and what they are.
At the end of the battle, each player adds up the Blood and Zeal cards in their discard piles. If a player has more discarded Blood cards than their opponent has, they score 1VP. If a player has more discarded Zeal cards than their opponent has, they score 1VP. Note this is discarded cards; unused cards in a player’s hand don’t count, and you can’t simply discard them from your hand (you must use them to discard them, and many of them have restrictions on how and when they can be used).
Shrine Statue
Determine a killzone as normal, but it should also include a shrine statue terrain feature. After selecting drop zones, the player with initiative sets up the shrine statue on the centreline, equally within each player’s territory and more than 1" from other terrain features. In some circumstances, you may feel it’s appropriate to remove another terrain feature to use the shrine statue. This is recommended in Killzone: Volkus (Kill Team Core Book) – remove a small ruin, heavy rubble or light rubble (terrain features E-K) near where the shrine statue will be placed.
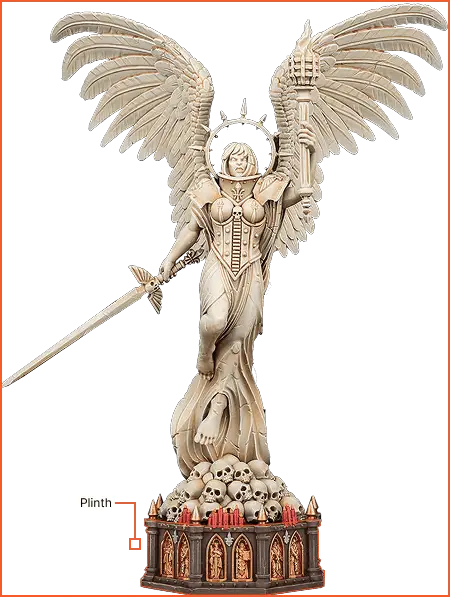
A shrine statue terrain feature is Heavy terrain. It can be contested and controlled by operatives and has a plinth. Treat the plinth as a marker for the purposes of contesting and controlling the shrine statue.
Whenever you draw a card, if friendly operatives control the shrine statue terrain feature, you can look at the text on one card before drawing it (but still keep it secret from your opponent). You can then draw that card, or draw another (but you can’t look at the other one before you draw it).
Friendly operatives can perform the following mission actions:
PRAISE/BLASPHEME1AP
Shuffle one card from your hand, or two of your discarded cards, back into their respective deck(s). Note that your discarded cards are potentially worth VPs at the end of the battle, so doing so could affect this.
Draw a card.
An operative cannot perform this action while within control range of an enemy operative, or while more than 3" from the shrine statue terrain feature’s plinth.
HALLOW/DEFILE1AP
One shrine statue terrain feature the active operative controls is hallowed/defiled. Draw a card.
An operative cannot perform this action while within control range of an enemy operative, if it doesn’t control the shrine statue terrain feature, or if the shrine statue has already been hallowed/defiled during this turning point.
Blood Cards
Blood
+D3 Damage Shot
Use this Blood card when a friendly operative is shooting, in the Resolve Attack Dice step, when one of your attack dice inflicts damage. Inflict D3 additional damage.
Blood
+D3 Damage Strike
Use this Blood card when a friendly operative is fighting, in the Resolve Attack Dice step, when one of your attack dice inflicts damage. Infl ict D3 additional damage.
Blood
+1" Move
Use this Blood card when a friendly operative performs the Charge or Reposition action. Until the end of that action, add 1" to that operative’s Move stat. This isn’t cumulative with any other positive changes to that operative’s Move stat.
Blood
Double Fight/Shoot
Use this Blood card during a friendly operative‘s activation or counteraction, after it performs the Fight or Shoot action. It immediately performs the same action again. This takes precedence over action restrictions. If the operative has the Astartes faction rule, the second action is free.
Blood
Take Initiative
Use this Blood card at the start of the Initiative step of the Strategy phase. You automatically have initiative (do not roll-off).
Blood
Free Starting Action
Use this Blood card at the start of the Firefight phase. One friendly operative immediately performs one free action, but it cannot move more than 2". You can change its order to do so.
Blood
Cancel Block (Fight)
Use this Blood card when a friendly operative is fighting, when your opponent chooses to block with a success. Discard that success (they don’t block, but they’ve still ‘resolved’ that attack dice).
Blood
Shock and Stun
Use this Blood card when a friendly operative is shooting or fighting, at the end of the Roll Attack Dice step, if you’ve retained any critical successes. Until the end of that sequence, that operative’s weapons have the Shock and Stun weapon rules.
Blood
Use or Reuse Ploy
Use this Blood card in the Firefight phase. You must immediately either use a firefight ploy for 1 less CP (to a minimum of 0CP), or use a firefight ploy for a second time during that turning point (this takes precedence over once per turning point, and you must still pay its CP cost as normal). You cannot use this card if you cannot do either of the above.
Blood
Steal Card
Use this Blood card during a friendly operative’s activation or counteraction, before or after it performs an action. Take a card from your opponent’s hand. You cannot use this card if your opponent has no cards in their hand.
Blood
Prevent Mission Action
Use this Blood card when an enemy operative performs a mission action at an objective marker friendly operatives contest. They must spend 1 additional AP to perform that action (if they don’t, their spent AP isn’t refunded). Until the start of the next turning point, while friendly operatives contest that marker, your opponent must spend 1 additional AP for enemy operatives to perform mission actions at that objective marker. This isn’t cumulative with any other rules that require your opponent to spend additional AP to perform mission actions.
Blood
Return Discarded Card
Use this Blood card during a friendly operative’s activation or counteraction, before or after it performs an action. Shue one of your opponent’s discarded cards back into its deck. You cannot use this card if your opponent has no discarded cards.
Zeal Cards
Zeal
+1 APL For Control
Use this Zeal card during a friendly operative’s activation or counteraction, or at the end of the turning point. Select one objective marker friendly operatives contest. Until the start of the next turning point, when determining control of that marker, treat the total APL stat of friendly operatives that contest it as 1 higher if at least one friendly operative contests that marker. You cannot use this card if friendly operatives do not contest an objective marker.
Zeal
-D3 Damage Shot
Use this Zeal card when an enemy operative is shooting against a friendly operative, when one of your opponent’s attack dice inflicts damage. Ignore D3 of that inflicted damage.
Zeal
-D3 Damage Strike
Use this Zeal card when an enemy operative is fighting against or retaliating against a friendly operative, when one of your opponent’s attack dice infl icts damage. Ignore D3 of that inflicted damage.
Zeal
Max Success Defence
Use this Zeal card when an enemy operative is shooting against a friendly operative, in the Roll Defence Dice step. Retain all of your defence dice as normal successes without rolling them.
Zeal
Revive Onto 1 Wound
Use this Zeal card when a friendly operative would be incapacitated. It’s not incapacitated, has 1 wound remaining and cannot be incapacitated for the remainder of the action. All remaining attack dice are discarded (including yours if this operative is fi ghting or retaliating), then this operative can perform a free Dash or Fall Back action (for the latter, it cannot move more than 3"), even if it’s performed an action that prevents it from performing the Dash or Fall Back action.
Zeal
Free Action
Use this Zeal card during a friendly operative’s activation, before or after it performs an action. It immediately performs a 1AP action for free.
Zeal
Ignore Weapon Rule
Use this Zeal card when a friendly operative is selected to shoot against or fight against and your opponent has selected their operative’s weapon to use. Select one of that weapon’s weapon rules (excluding Range x); that weapon loses that weapon rule until the end of that sequence. You cannot use this card if that weapon has no weapon rules for you to select.
Zeal
Critical Defence
Use this Zeal card when an enemy operative is shooting a friendly operative, in the Roll Defence Dice step. Retain one of your normal successes as a critical success instead. You cannot use this card if you have no normal successes.
Zeal
Heal 3D3
Use this Zeal card during a friendly operative’s activation or counteraction, before or after it performs an action. It regains 3D3 lost wounds. You cannot use this card if that operative has no lost wounds.
Zeal
Gain 1CP
Use this Zeal card at any time during the battle. You gain 1CP.
Zeal
Double Block (Fight)
Use this Zeal card when a friendly operative is fi ghting or retaliating, when you block with a success. It can be allocated to block one (as normal) or two unresolved successes. You cannot use this card if your opponent has no dice that can be blocked.
Zeal
Obscured
Use this Zeal card when an enemy operative performs the Shoot action and your opponent selects a friendly operative more than 6" from it as the target. Until the end of that action, that friendly operative is obscured. This takes precedence over all rules that says it cannot be obscured.
Zeal
Free Ending Action
Use this Zeal card at the end of the Firefight phase. One friendly operative immediately performs one free action, but it cannot move more than 2". You can change its order to do so.
Zeal
Use or Change Ploy
Use this Zeal card in the Firefight phase, before or after an operative performs an action. You must immediately either use a strategy ploy (even though it’s the Firefight phase, and you must still pay its CP cost as normal), or change a strategy ploy you’ve used this turning point to a different one (the previous ploy’s rules no longer apply, and you must pay any additional CP if the new ploy costs more than the previous one). You cannot use this card if you cannot do either of the above.
Zeal
Reveal Opponent’s Cards
Use this Zeal card during an operative’s (friendly or enemy) activation or counteraction, before or after it performs an action. Your opponent must reveal all the cards in their hand. You cannot use this card if your opponent has no cards in their hand.
Zeal
Re-Roll Defence Dice
Use this Zeal card when an enemy operative is shooting a friendly operative, after rolling your defence dice. Re-roll any of your defence dice. You cannot use this card if you cannot re-roll any defence dice.
Control Range
Many rules relate to control range such as moving, fighting and using cover. Something is within an operative’s control range if it’s visible to and within 1" of that operative.Control range between operatives is mutual, therefore operatives are within each other’s control range if one of them is visible to and within 1" of the other.
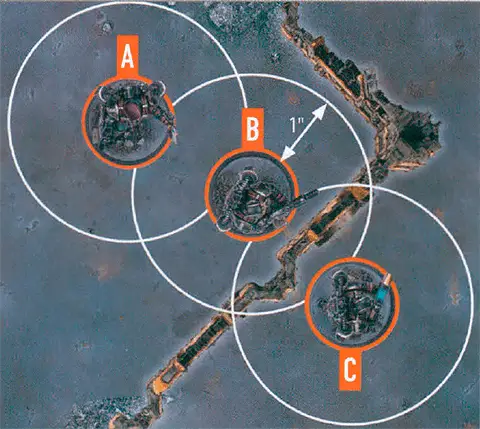
The terrain is within both operative B and C’s control range.
Because of the terrain, operative B is not visible to operative C, and vice versa, therefore they are not within each other’s control range.
Imagine control range as an area of interaction the operative has with things close to it.
Charge1AP
The same as the Reposition action, except the active operative can move an additional 2".
It can move, and must finish the move, within control range of an enemy operative. If it moves within control range of an enemy operative that no other friendly operatives are within control range of, it cannot leave that operative’s control range.
An operative cannot perform this action while it has a Conceal order, if it’s already within control range of an enemy operative, or during the same activation in which it performed the Reposition, Dash or Fall Back action.
Reposition1AP
Move the active operative up to its Move stat to a location it can be placed. This must be done in one or more straight-line increments, and increments are always rounded up to the nearest inch.
It cannot move within control range of an enemy operative, unless one or more other friendly operatives are already within control range of that enemy operative, in which case it can move within control range of that enemy operative but cannot finish the move there.
An operative cannot perform this action while within control range of an enemy operative, or during the same activation in which it performed the Fall Back or Charge action.
Damage
When damage is inflicted on an operative, reduce their wounds by that amount. An operative’s starting number of wounds is determined by its Wounds stat (see datacards). If an operative’s wounds are reduced to 0 or less, it’s incapacitated, then removed from the killzone. Some rules allow an incapacitated operative to perform a free action before being removed from the killzone. Such an operative cannot perform more than one free action (excluding Place Marker) in this instance, and that operative’s player decides the order of any of its rules that occur before it’s removed from the killzone (taking precedence over the player with initiative deciding).While an operative has fewer than its starting wounds remaining, it’s wounded. While it has fewer than half its starting wounds remaining, it’s also injured. Subtract 2" from the Move stat of injured operatives and worsen the Hit stat of their weapons by 1.
Keep track of each operative’s remaining wounds with dice, tokens or by writing it down.
‘Incapacitated’ and ‘removed from the killzone’ are separate. Some rules take effect when an operative is incapacitated, but before it’s removed.
‘Incapacitated’ and ‘removed from the killzone’ are separate. Some rules take effect when an operative is incapacitated, but before it’s removed.
Fight1AP
Fight with the active operative by following the sequence below. The active operative’s player is the attacker. The selected enemy operative’s player is the defender.
An operative cannot perform this action unless an enemy operative is within its control range.
Counteract
When you would activate a ready friendly operative, if all your operatives are expended but your opponent still has ready operatives, you can select an expended friendly operative with an Engage order to perform a 1AP action (excluding Guard) for free. Each operative can only counteract once per turning point. That operative cannot move more than 2", or must be set up wholly within 2" if it’s removed and set up again, while counteracting (this is not a change to its Move stat, and takes precedence over all other rules). Counteracting is optional, so you can choose not to. In either case, activation alternates back to your opponent afterwards.Counteracting isn’t an activation, it’s instead of activating. This difference is important; for instance, it means action restrictions won't apply.
Shoot1AP
Shoot with the active operative by following the sequence below. The active operative’s player is the attacker. The selected enemy operative’s player is the defender.
An operative cannot perform this action while it has a Conceal order, or while within control range of an enemy operative.
Precedence
Some rare rules will conflict with each other, so it must be established which takes precedence. In order of priority, a rule takes precedence if:1
2
3
4
5
6
If a rule on a datacard says ‘this operative can perform two Shoot actions during its activation’, this takes precedence over the core rules for action restrictions, as per precedence priority 3.
Roll-off
lf a rule requires a roll-off, both players roll one D6 and whoever has the highest wins the roll-off. If there’s a tie, roll-off again.
Shock
The first time you strike with a critical success in each sequence, also discard one of your opponent’s unresolved normal successes (or a critical success if there are none).Stun
If you retain any critical successes, subtract 1 from the APL stat of the operative this weapon is being used against until the end of its next activation.Dash1AP
The same as the Reposition action, except don’t use the active operative’s Move stat — it can move up to 3" instead. In addition, it cannot climb during this move, but it can drop and jump.
An operative cannot perform this action while within control range of an enemy operative, or during the same activation in which it performed the Charge action.
Fall Back2AP
The same as the Reposition action, except the active operative can move within control range of an enemy operative, but cannot finish the move there.
An operative cannot perform this action unless an enemy operative is within its control range. It cannot perform this action during the same activation in which it performed the Reposition or Charge action.
Range x
Only operatives within x of the active operative can be valid targets, e.g. Range 9".