
Airborn Assault
 1A
1A Books
| Book | Kind | Edition | Version | Last update |
| | ||||
| | Expansion | 3 | 1.0 | October 2024 |
Airborne Assault
This is a PvP mission pack for thematic and narrative gameplay. A key feature is the Airborne Assault mission rule, where by one player’s operatives are dropping into the killzone and their opponent must brace for the attack.You may find some missions or terrain feature layouts in this mission pack favour one style of kill team over another. For example, your fleeing operatives being chased down by a fast melee kill team in 3a: Hunt From Above, or your operatives besieging an organised shooting kill team in 3b: Airborne Siege, would be a tougher challenge than if those teams were being used the other way around. As theme and narrative are the primary focuses of this mission pack, we encourage players to embrace this - it’s part of the experience, offers more varied gameplay and provides a unique challenge for players. Carefully select your kill team for the mission at hand, and after you’ve played it once you can try swapping roles (Offence and Defence explained below) for a second playthrough.
These missions use the terms ‘Offence’ and ‘Defence’. Offence is the player conducting the airborne assaults, whilst Defence is the player that occupies the killzone and awaits the airborne assaulters. Players are assigned to Offence or Defence in the Set Up the Battle step of the game sequence, and the mission maps specify Offence and Defence
drop zones, territories and killzone edges. Some victory conditions and mission rules differ for Offence and Defence.
These missions can be played as a one-off, or they can be linked together in what’s known as a tree campaign. If you are doing the latter, the players should select a kill team each and establish Offence and Defence (either by choosing who would be the most appropriate for the role, or by rolling-off and the winner decides). The players then stick with this for the duration of the tree campaign, which lasts for three games.
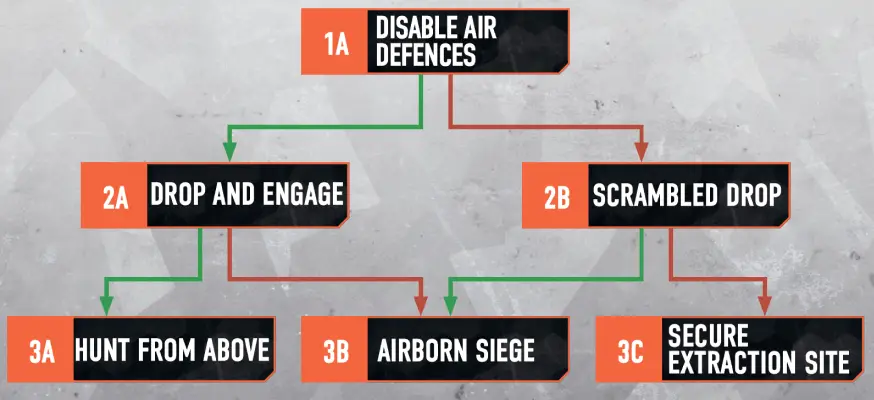
Begin with mission 1a: Disable Air Defences, then all subsequent missions are determined by the outcome of the previous one, as shown below. If Offence wins, follow the green arrow. If Defence wins, follow the red arrow.
These missions use the terms ‘Offence’ and ‘Defence’. Offence is the player conducting the airborne assaults, whilst Defence is the player that occupies the killzone and awaits the airborne assaulters. Players are assigned to Offence or Defence in the Set Up the Battle step of the game sequence, and the mission maps specify Offence and Defence
drop zones, territories and killzone edges. Some victory conditions and mission rules differ for Offence and Defence.
These missions can be played as a one-off, or they can be linked together in what’s known as a tree campaign. If you are doing the latter, the players should select a kill team each and establish Offence and Defence (either by choosing who would be the most appropriate for the role, or by rolling-off and the winner decides). The players then stick with this for the duration of the tree campaign, which lasts for three games.
Begin with mission 1a: Disable Air Defences, then all subsequent missions are determined by the outcome of the previous one, as shown below. If Offence wins, follow the green arrow. If Defence wins, follow the red arrow.
Airborne Assault
In missions that use the Airborne Assault mission rule (2a, 2b, 3a and 3b), the following rules are in effect:
Do not select and reveal operatives as normal. Instead, Offence selects and reveals theirs after Defence has done so.
Defence sets up all their operatives first. When they set up an operative, it must be wholly within their drop zone and must be given a Conceal order. Offence operatives are set up above: place them to one side instead of in the killzone.
During the Firefight phase, Offence operatives set up above are activated as normal. When activated, Offence can either expend or land that operative (it must have landed by the end of the second turning point). If it lands, they set it up in the killzone in a location it can be placed as follows (it’s no longer set up above):
- Wholly within their drop zone, or wholly within 6" of their drop zone if it’s the second turning point.
- Not within control range of an enemy operative.
- With no part of its base underneath Vantage terrain.
- With an order of their choice.
If one player is using a TEMPESTUS AQUILON out kill team, we recommend they take the role of Offence. If so, in a battle that uses the Airborne Assault mission rule, do not use their Drop Insertion faction rule. However:
- When landing, Offence operatives are treated as performing the Dash action (taking precedence over Reposition opposite).
- The Adjust Coordinates firefight ploy and the TROOPER operative’s Swift Landing rule allow the operative to set up an additional 2" or 1" away respectively from the Offence drop zone.
Game Sequence
1. SET UP THE BATTLE
- Each player selects a kill team for the battle. In a tree campaign, this is predetermined.
- Assign the players to Offence or Defence as appropriate, or roll-off and the winner decides. In a tree campaign, this is predetermined.
- Determine a mission. In a tree campaign, this is predetermined.
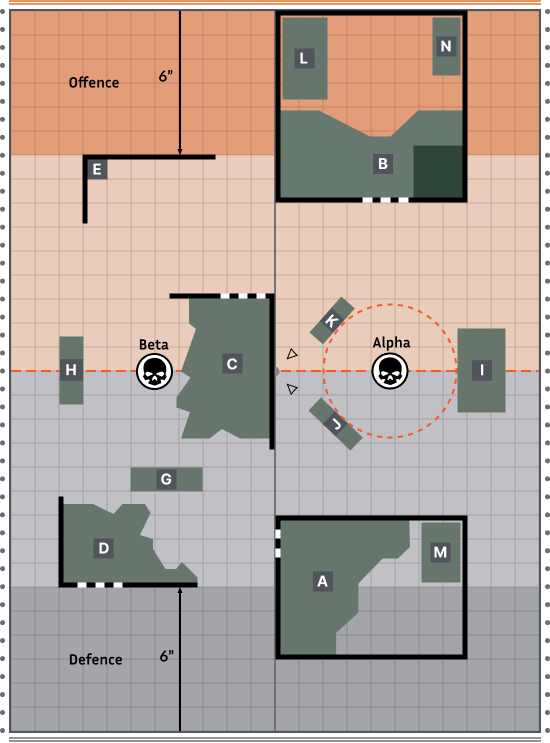
- Set up Killzone: Volkus, placing terrain features and objective markers as specified by the mission map.
- Drop zones are assigned to Offence and Defence as specified by the mission map.
2. SELECT OPERATIVES
- Each player selects their operatives for the battle, adhering to the selection requirements in their kill team’s rules. In all missions except for 1a and 3c (where selection is specified in their mission rules), Offence selects and reveals theirs after Defence has done so.
- Each player secretly selects up to four equipment options. Each option cannot be selected more than once per player. They then reveal their selections simultaneously.
- Each player gains 2CP.
3. SET UP OPERATIVES
- Each player alternates setting up an item of equipment that’s set up before the battle (ladders, etc.), starting with Defence. Note it’s item by item, not option by option.
- In missions 2a, 2b, 3a and 3b, set up operatives as specified by the Airborne Assault mission rule (pg 55).
- In missions la and 3c, set up operatives as specified by their mission rules.
4. PLAY THE BATTLE
- In the first turning point, the players roll-off and the winner decides who has initiative. If it’s a tie, Offence decides.
5. END THE BATTLE
- The battle ends when the mission specifies. If one player has no operatives remaining in the killzone but the battle hasn’t ended, the other player continues to play out each remaining turning point until the battle ends.
- The mission’s victory condition will specify how to determine the winner.
Mission Map Key
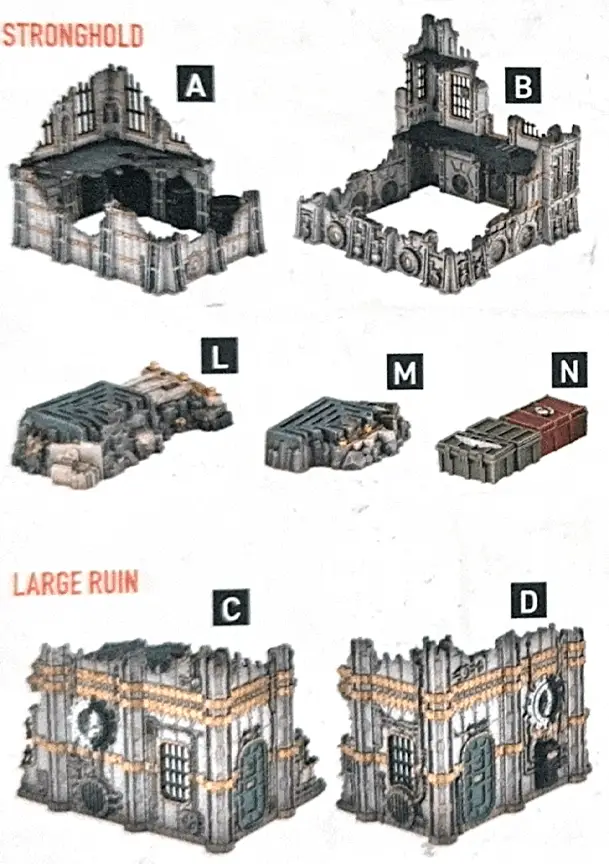
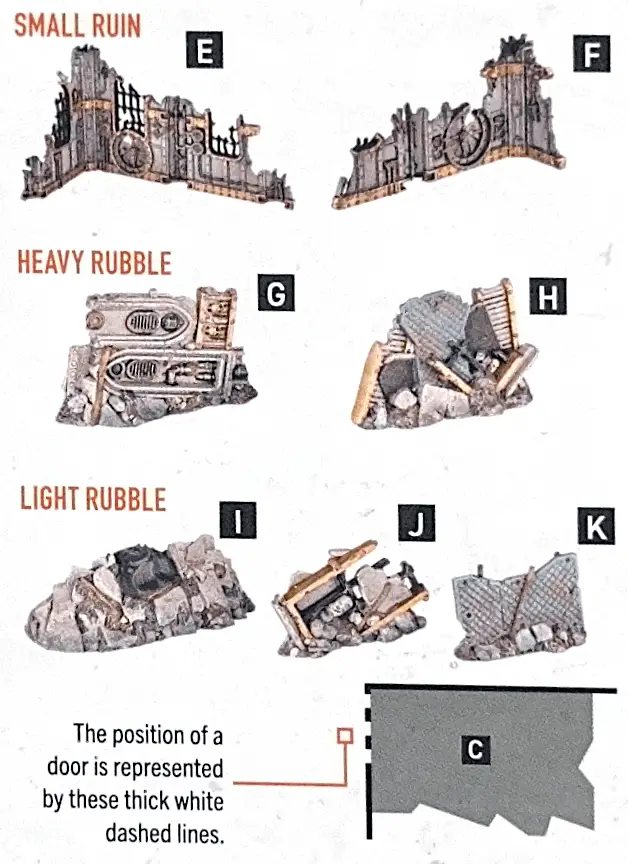
The maps in this mission pack use the terrain features found in Killzone: Volkus below. Killzone: Their rules can be found here.KILLZONE: VOLKUS MAP KEY
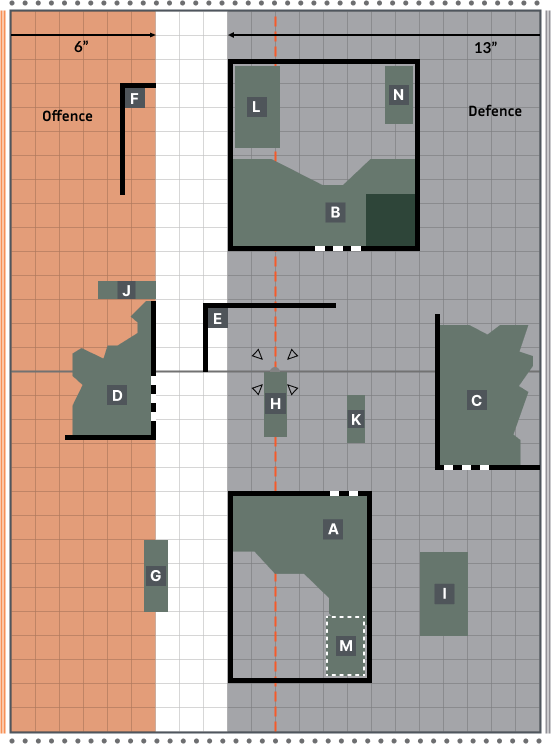
Airborn Assault Mission 1A
Disable Air Defences
Be they Imperial Icarus weaponry, Ork flakkadakka guns, twisted Tyranid bio-cannons or whatever else, anti-air defences can make short work of skyborne assault forces. Those seeking to eliminate these defences must knock out not only the weapons themselves, but also the systems that facilitate their control.MISSION RULES
Air Defence Site: If the players wish, they can substitute the objective markers for appropriate terrain features of similar size, e.g. a control panel and surface-to-air missile launcher. These terrain features are then both objective markers and Light terrain.Select Operatives: Each player secretly selects their operatives for the battle. They then reveal their selections simultaneously.
Set Up Operatives: Operatives are set up like most other mission packs - players alternate setting up one-third of their kill team (rounding up), starting with Defence. When a player sets up an operative, it must be wholly within their drop zone and must be given a Conceal order.
OFFENCE MISSION ACTION
PLANT BOMB1AP
If the active operative controls an objective marker, that objective marker gains a Bomb token.
An operative cannot perform this action during the first turning point, while within control range of an enemy operative, or if any objective marker already has a Bomb token.
DEFENCE MISSION ACTION
DEFUSE BOMB1AP
If the active operative controls an objective marker that has a Bomb token, remove that Bomb token; if it was counting down (see below), the countdown is stopped.
An operative cannot perform this action during, the first turning point, while within control range of an enemy operative, or if that objective marker doesn’t have a Bomb token.
VICTORY
Destroy Air Defence Site: In the Ready step of each Strategy phase, if an objective marker has a Bomb token and doesn’t have a countdown, roll D6+3. The result is the countdown until that objective marker explodes.- After a number of activations equal to the result have been completed, the bomb explodes and the battle ends - Offence is the winner.
- If an operative performs the Defuse Bomb action, the Bomb token and its countdown are removed - continue the battle.
Defend Site: If all Offence operatives are incapacitated, the battle ends and Defence is the winner. Otherwise, at the end of any turning point from the fourth onwards, if no objective markers have a Bomb token, the battle ends and Defence is the winner.
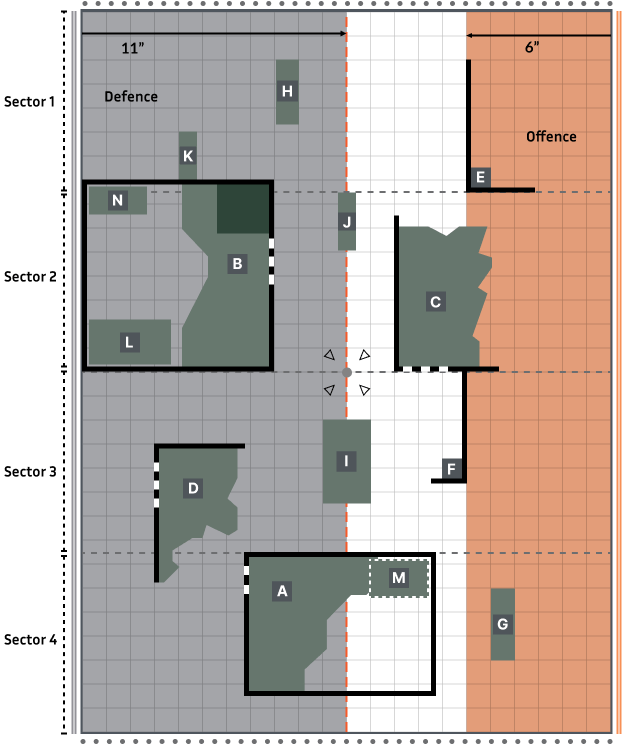
Airborn Assault Mission 2A
Drop and Engage
Having secured air superiority, the invaders must now make full use of their advantage while it lasts. The defenders dig in and look to the skies, knowing that all too soon their enemies will rain down upon them from on high.MISSION RULES
Airborne AssaultStrongholds: At the start of the battle, both strongholds are secured by Defence. At the end of each turning point, if the total APL stat of friendly operatives wholly within a stronghold is greater than that of enemy operatives, you have secured that stronghold.
Sudden Assault: Once per turning point, when rolling off to decide initiative, Offence can re-roll their D6.
VICTORY
Secure Strongholds: At the end of any turning point from the fourth onwards, if you control both strongholds, the battle ends and you are the winner.Eliminate: If all enemy operatives are incapacitated, the battle ends and you are the winner.
Airborn Assault Mission 2B
Scrambled Drop
With their drop craft blown out of the skies by the enemy’s anti-air defences, the invading forces hit the ground off-target and in disarray. The defenders must exploit this opportunity to pick apart their foes before the attackers can redress their ranks and regain their momentum.MISSION RULES
Airborne AssaultImprovised Drop Zone: The killzone is equally divided into four vertical sections (see mission map). Whenever an Offence operative would land (i.e. from the Airborne Assault mission rule), roll one D6:
- If the result is a 6, inflict D3 damage on that operative. This is cumulative with the following.
- If the result is greater than that operative’s APL stat, randomly determine which sector Offence must set up that operative wholly within (roll one D6. re-rolling results of 5 and 6). All other set up requirements still apply.
- If the result is equal to or less than that operative’s APL stat, Offence sets it up as normal.
Strongholds: At the start of the battle, both stronghold are secured by Defence. At the end of each turning point, if the total APL stat of friendly operatives wholly within a stronghold is greater than that of enemy operatives, you have secured that stronghold.
VICTORY
Secure Strongholds: At the end of any turning point from the fourth onwards, if you control both strongholds, the battle ends and you are the winner.Eliminate: If all enemy operatives are incapacitated, the battle ends and you are the winner.
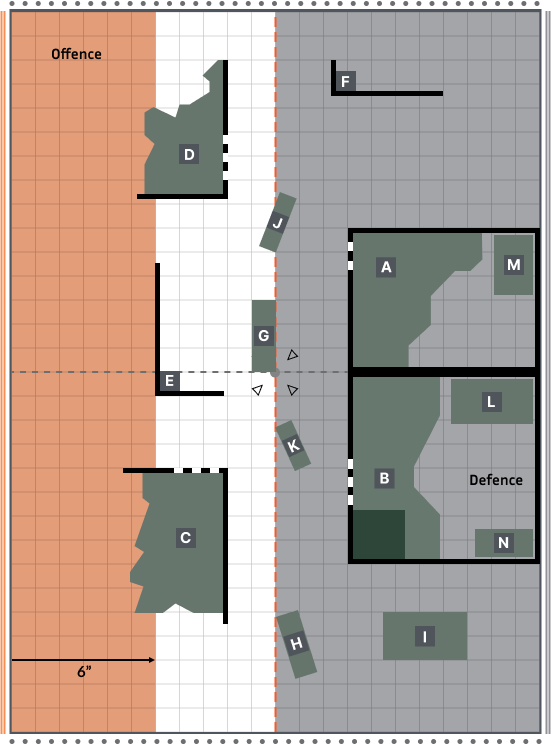
Airborn Assault Mission 3A
Hunt From Above
The invaders have swept down from the skies and shattered their enemies’ lines. Scattered and in disarray, the surviving defenders seek to fall back before they are annihilated wholesale.MISSION RULES
Airborne AssaultFighting Retreat: Offence operatives cannot be set up from the Airborne Assault mission rule within 2" of Defence operatives.
Escape: Defence operatives can move over their own killzone edge; if any part of a Defence operative’s base does, it’s removed from the killzone and has ‘escaped’.
Faltering Morale: At the start of each turning point, if the total APL stat of Offence operatives wholly across the centreline (i.e. the lower half of the mission map) is four or more, Offence decides who has initiative for that turning point (instead of rolling off).
VICTORY
Escape or Eliminate: When all Defence operatives have been removed from the killzone, the battle ends. If half or more Defence operatives have escaped, Defence is the winner. Otherwise, Offence is the winner.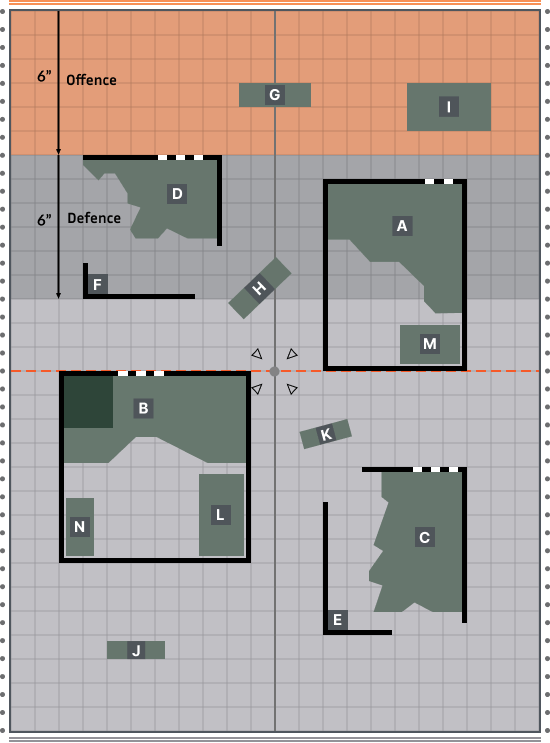
Airborn Assault Mission 3B
Airborne Siege
Despite the invaders’ best efforts, their foes have fallen back in good order to prepared defensive strongpoints. Digging them out without being blown to pieces will be no mean feat.MISSION RULES
Airborne AssaultStrongholds: At the start of the battle, both strongholds are secured by Defence. At the end of each turning point, if the total APL stat of friendly operatives wholly within a stronghold is greater than that of enemy operatives, you have secured that stronghold.
Bombardment: Once per battle STRATEGIC GAMBIT for Offence. Until the end of the turning point, each time an operative is activated within Defence territory, subtract 1 from its APL stat until the end of that activation. Then:
- If it’s wholly within a stronghold, roll one D6. On a 1-3, inflict that much damage on that operative.
- If it’s not wholly within a stronghold, inflict 2D6 damage on that operative.
VICTORY
Secure Strongholds: At the end of any turning point from the fourth onwards, if Offence controls both strongholds, the battle ends and they are the winner.Stand Ground: If all Offence operatives are incapacitated, or at the end of any turning point from the fourth onwards there are no Offence operatives wholly within Defence territory, the battle ends and Defence is the winner.
Airborn Assault Mission 3C
Secure Extraction Site
Invasion has become disaster. The surviving assault elements must now defend their extraction site long enough for gunships to swoop down and extract them from on high before they can be overrun.MISSION RULES
Select Operatives and Set Up Operatives:- Do not select and reveal operatives as normal. Instead, Defence selects and reveals theirs after Offence has done so.
- Offence sets up all their operatives first. When they set up an operative, it must be wholly within their drop zone and must be given a Conceal order.
- Defence operatives are set up encircling: place them to one side instead of in the killzone.
- If Offence is using a TEMPESTUS AQUILON kill team, do not use their Drop Insertion faction rule. If Defence is, drop markers should be set up wholly within Defence territory touching a killzone edge, their first third must be set up encircling, and the remainder can be set up above or encircling.
Encircled: During the first firefight phase, Defence operatives set up encircling are activated as normal. When activated, Defence must set it up in the killzone in a location it can be placed as follows (it’s no longer set up encircling):
- Wholly within their territory.
- Wholly within a distance equal to the operative’s Move stat from any killzone edge.
- Not within control range of an enemy operative.
- With an order of their choice.
Airborne Extraction: From the fourth turning point onwards, whenever an Offence operative drops off the highest Vantage terrain of Stronghold B, Offence can remove it from the killzone - it has ‘escaped’.
Faltering Morale: At the start of each turning point, if the total APL stat of Defence operatives wholly across the centreline (i.e. the right side of the mission map) is four or more, Defence decides who has initiative for that turning point (instead of rolling off).
VICTORY
Escape or Eliminate: When all Offence operatives have been removed from the killzone, the battle ends. If half or more Offence operatives have escaped, Offence is the winner. Otherwise, Defence is the winner.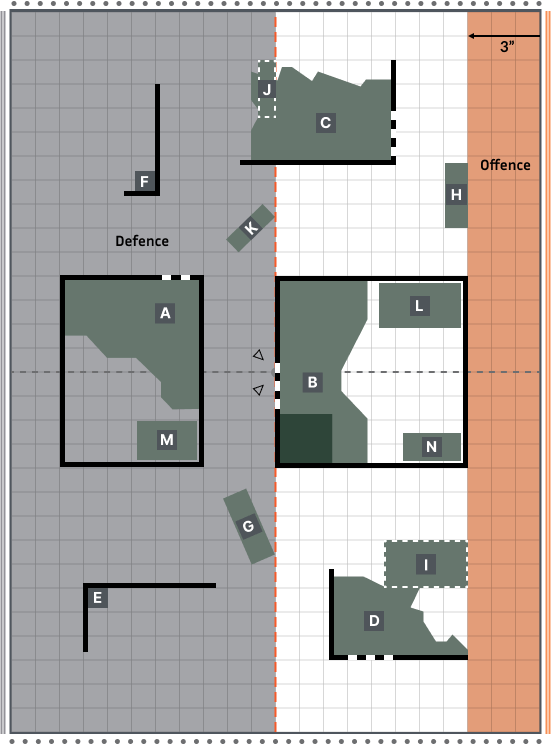
Shoot1AP
Shoot with the active operative by following the sequence below. The active operative’s player is the attacker. The selected enemy operative’s player is the defender.
An operative cannot perform this action while it has a Conceal order, or while within control range of an enemy operative.
Charge1AP
The same as the Reposition action, except the active operative can move an additional 2".
It can move, and must finish the move, within control range of an enemy operative. If it moves within control range of an enemy operative that no other friendly operatives are within control range of, it cannot leave that operative’s control range.
An operative cannot perform this action while it has a Conceal order, if it’s already within control range of an enemy operative, or during the same activation in which it performed the Reposition, Dash or Fall Back action.
Counteract
When you would activate a ready friendly operative, if all your operatives are expended but your opponent still has ready operatives, you can select an expended friendly operative with an Engage order to perform a 1AP action (excluding Guard) for free. Each operative can only counteract once per turning point. That operative cannot move more than 2", or must be set up wholly within 2" if it’s removed and set up again, while counteracting (this is not a change to its Move stat, and takes precedence over all other rules). Counteracting is optional, so you can choose not to. In either case, activation alternates back to your opponent afterwards.Counteracting isn’t an activation, it’s instead of activating. This difference is important; for instance, it means action restrictions won't apply.
|

Control Range
Many rules relate to control range such as moving, fighting and using cover. Something is within an operative’s control range if it’s visible to and within 1" of that operative.Control range between operatives is mutual, therefore operatives are within each other’s control range if one of them is visible to and within 1" of the other.
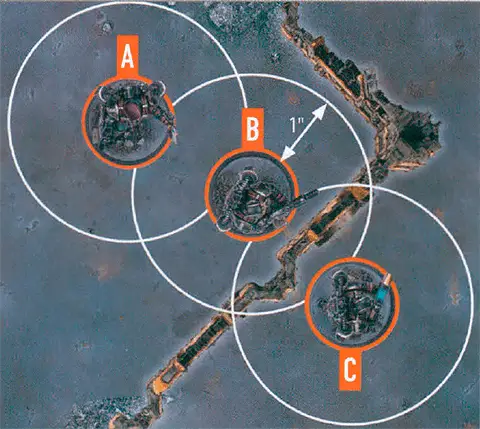
The terrain is within both operative B and C’s control range.
Because of the terrain, operative B is not visible to operative C, and vice versa, therefore they are not within each other’s control range.
Imagine control range as an area of interaction the operative has with things close to it.
Reposition1AP
Move the active operative up to its Move stat to a location it can be placed. This must be done in one or more straight-line increments, and increments are always rounded up to the nearest inch.
It cannot move within control range of an enemy operative, unless one or more other friendly operatives are already within control range of that enemy operative, in which case it can move within control range of that enemy operative but cannot finish the move there.
An operative cannot perform this action while within control range of an enemy operative, or during the same activation in which it performed the Fall Back or Charge action.
Airborne Assault
In missions that use the Airborne Assault mission rule (2a, 2b, 3a and 3b), the following rules are in effect:
Do not select and reveal operatives as normal. Instead, Offence selects and reveals theirs after Defence has done so.
Defence sets up all their operatives first. When they set up an operative, it must be wholly within their drop zone and must be given a Conceal order. Offence operatives are set up above: place them to one side instead of in the killzone.
During the Firefight phase, Offence operatives set up above are activated as normal. When activated, Offence can either expend or land that operative (it must have landed by the end of the second turning point). If it lands, they set it up in the killzone in a location it can be placed as follows (it’s no longer set up above):
Do not select and reveal operatives as normal. Instead, Offence selects and reveals theirs after Defence has done so.
Defence sets up all their operatives first. When they set up an operative, it must be wholly within their drop zone and must be given a Conceal order. Offence operatives are set up above: place them to one side instead of in the killzone.
During the Firefight phase, Offence operatives set up above are activated as normal. When activated, Offence can either expend or land that operative (it must have landed by the end of the second turning point). If it lands, they set it up in the killzone in a location it can be placed as follows (it’s no longer set up above):
- Wholly within their drop zone, or wholly within 6" of their drop zone if it’s the second turning point.
- Not within control range of an enemy operative.
- With no part of its base underneath Vantage terrain.
- With an order of their choice.
Drop Insertion
Whether descending on thrumming grav-chutes from the holds of gunships, dropping through blasted rents within cramped vessels or leaping from the ruins of towering hab-blocks, these warriors hit their enemies like thunderbolts from on high.
When setting up a TEMPESTUS AQUILON kill team before the battle, the first third of your kill team must be set up as normal. Each third thereafter can be set up above: place them to one side instead of in the killzone. For each third that’s set up above, you must set up the whole third in this way (not some of them), then place one of your Drop markers wholly within your drop zone.As a STRATEGIC GAMBIT in the first and second turning point, you can move your Drop markers up to 4" horizontally. In a killzone that uses the close quarters rules (e.g. Killzone: Gallowdark), this can be measured and moved through Wall terrain.
In the Firefight phase, friendly TEMPESTUS AQUILON operatives set up above are activated as normal. When you do, you can either expend or land that operative. If it lands, set it up in the killzone in a location it can be placed as follows (it’s no longer set up above):
- Within 3" horizontally of one of your Drop markers, or wholly within your drop zone.
- Not within control range of enemy operatives (unless you’re setting up a PRECURSOR operative, which can be set up within control range of an enemy operative).
- With no part of its base underneath Vantage terrain.
- With an order of your choice.
Less than half of your operatives can be set up above by the end of the first turning point. In other words, by the end of the first turning point, more than half of your operatives must have been set up in the killzone during the battle.
When readying your operatives during the second and third turning points, remove one of your Drop markers. This means operatives still set up above are incapacitated at the end of the second turning point.
Dash1AP
The same as the Reposition action, except don’t use the active operative’s Move stat — it can move up to 3" instead. In addition, it cannot climb during this move, but it can drop and jump.
An operative cannot perform this action while within control range of an enemy operative, or during the same activation in which it performed the Charge action.
Precedence
Some rare rules will conflict with each other, so it must be established which takes precedence. In order of priority, a rule takes precedence if:1
2
3
4
5
6
If a rule on a datacard says ‘this operative can perform two Shoot actions during its activation’, this takes precedence over the core rules for action restrictions, as per precedence priority 3.
Drop Insertion
Whether descending on thrumming grav-chutes from the holds of gunships, dropping through blasted rents within cramped vessels or leaping from the ruins of towering hab-blocks, these warriors hit their enemies like thunderbolts from on high.
When setting up a TEMPESTUS AQUILON kill team before the battle, the first third of your kill team must be set up as normal. Each third thereafter can be set up above: place them to one side instead of in the killzone. For each third that’s set up above, you must set up the whole third in this way (not some of them), then place one of your Drop markers wholly within your drop zone.As a STRATEGIC GAMBIT in the first and second turning point, you can move your Drop markers up to 4" horizontally. In a killzone that uses the close quarters rules (e.g. Killzone: Gallowdark), this can be measured and moved through Wall terrain.
In the Firefight phase, friendly TEMPESTUS AQUILON operatives set up above are activated as normal. When you do, you can either expend or land that operative. If it lands, set it up in the killzone in a location it can be placed as follows (it’s no longer set up above):
- Within 3" horizontally of one of your Drop markers, or wholly within your drop zone.
- Not within control range of enemy operatives (unless you’re setting up a PRECURSOR operative, which can be set up within control range of an enemy operative).
- With no part of its base underneath Vantage terrain.
- With an order of your choice.
Less than half of your operatives can be set up above by the end of the first turning point. In other words, by the end of the first turning point, more than half of your operatives must have been set up in the killzone during the battle.
When readying your operatives during the second and third turning points, remove one of your Drop markers. This means operatives still set up above are incapacitated at the end of the second turning point.
Shoot1AP
Shoot with the active operative by following the sequence below. The active operative’s player is the attacker. The selected enemy operative’s player is the defender.
An operative cannot perform this action while it has a Conceal order, or while within control range of an enemy operative.
Precedence
Some rare rules will conflict with each other, so it must be established which takes precedence. In order of priority, a rule takes precedence if:1
2
3
4
5
6
If a rule on a datacard says ‘this operative can perform two Shoot actions during its activation’, this takes precedence over the core rules for action restrictions, as per precedence priority 3.
Dash1AP
The same as the Reposition action, except don’t use the active operative’s Move stat — it can move up to 3" instead. In addition, it cannot climb during this move, but it can drop and jump.
An operative cannot perform this action while within control range of an enemy operative, or during the same activation in which it performed the Charge action.
Fight1AP
Fight with the active operative by following the sequence below. The active operative’s player is the attacker. The selected enemy operative’s player is the defender.
An operative cannot perform this action unless an enemy operative is within its control range.
ADJUST COORDINATES
As the firefight flows and develops, so those Aquilons still descending adjust their trajectories in response.
Use this firefight ploy when a friendly TEMPESTUS AQUILON operative lands. You can set it up within 5" horizontally of one of your Drop markers, taking precedence over the normal distance requirement. It cannot perform the Dash, Shoot or Fight actions during this turning point.
Swift Landing
When this operative lands, you can set it up within 4" horizontally of one of your Drop markers, taking precedence over the normal distance requirement.Damage
When damage is inflicted on an operative, reduce their wounds by that amount. An operative’s starting number of wounds is determined by its Wounds stat (see datacards). If an operative’s wounds are reduced to 0 or less, it’s incapacitated, then removed from the killzone. Some rules allow an incapacitated operative to perform a free action before being removed from the killzone. Such an operative cannot perform more than one free action (excluding Place Marker) in this instance, and that operative’s player decides the order of any of its rules that occur before it’s removed from the killzone (taking precedence over the player with initiative deciding).While an operative has fewer than its starting wounds remaining, it’s wounded. While it has fewer than half its starting wounds remaining, it’s also injured. Subtract 2" from the Move stat of injured operatives and worsen the Hit stat of their weapons by 1.
Keep track of each operative’s remaining wounds with dice, tokens or by writing it down.
‘Incapacitated’ and ‘removed from the killzone’ are separate. Some rules take effect when an operative is incapacitated, but before it’s removed.
‘Incapacitated’ and ‘removed from the killzone’ are separate. Some rules take effect when an operative is incapacitated, but before it’s removed.
DIG IN1AP
Until the end of the Turning Point, add 1 to this operative’s Defence characteristic.
Dropping
Operatives drop down when they move off terrain or after they’ve jumped. Ignore 2" of vertical distance that they drop during each action. This means a vertical drop of 2" or less is ignored. If they drop multiple times during an action, only 2" total is ignored, not 2" from each drop.