Deathwatch

Deathwatch kill teams combat the xenos foes of the Imperium with adaptive expertise and specialist weaponry. They wield some of Humanity’s most highly advanced weapons alongside more esoteric equipment. Besides their superhuman strength and speed, the Deathwatch bring to the battlefield their hatred of the xenos in all its forms.

Books

BookKindEditionVersionLast update
  Deathwatch
  DeathwatchFaction31.0September 2025

Deathwatch Kill Team

Below you will find a list of the operatives that make up an DEATHWATCH kill team, including, where relevant, any weapons specified for that operative.

Operatives

Your kill team can only include each operative on this list once, and can only include up to one GRAVIS operative.

Marker/Token Guide

Ammunition Reserve token

Digital Weapons token

Scrutavore Servo-Thrall token

Vigilant Marksman token

Advanced Omni-Scrambler token

Melta Bomb token

Strategic Command Strategy Ploy token

Strategic Command Firefight Ploy token

Faction Rules

Veteran Astartes

These genetically modified superhumans are made to wage unending war. Their skills have been honed over long years of battle and further refined with specialist knowledge through their Long Vigil.

During each friendly DEATHWATCH operative’s activation, it can perform either two Shoot actions or two Fight actions. If it’s two Shoot actions and an auxiliary grenade launcher, frag cannon, heavy plasma incinerator, infernus heavy bolter, plasma pistol or stalker bolt rifle is selected for both, 1 additional AP must be spent for the second action.

Each friendly DEATHWATCH operative can counteract regardless of its order. Whenever it does, it can perform an additional 1AP action for free during that counteraction, but both actions must be different.

Special Issue Ammunition

The Deathwatch utilise a range of specialised ammunition in many of their weapons. Each type is designed to eliminate specific xenos foes.

Once per turning point, when a friendly DEATHWATCH operative is performing the Shoot action, in the Select Weapon step, you can use this rule. If you do, select one of the following weapon rules for that operative’s ranged weapons to have until the end of the action. This rule cannot be used with explosive grenades (see universal equipment) or melta bombs.
  • Blast 1" (you cannot select this if the weapon profile being used has the Torrent weapon rule)
  • Devastating 1
  • Lethal 5+
  • Piercing 1
  • Rending
  • Saturate
  • Severe

Strategy Ploys

MISSION TACTICS

Through collated strategic data and hard-won combat experience, the Deathwatch possess the tactics to combat almost any foe.

Select Conceal or Engage. Whenever a friendly DEATHWATCH operative is shooting against or fighting against an enemy operative that has that order, that friendly operative’s weapons have the Balanced weapon rule.
THE SHIELD THAT SLAYS

To enter the infested holds of the xenos is to be assailed by the most inhuman of abominations and technology, a foulness that the Deathwatch are trained to resist.

Whenever a friendly DEATHWATCH operative is within your opponent’s territory, Normal and Critical Dmg of 4 or more inflicts 1 less damage on it.
THE LONG VIGIL

The Deathwatch guard some of the most dangerous stretches of the Imperium. Their vow to stand firm is at the heart of their vigil; they will see their foes dead before they abandon the Emperor’s realm.

Whenever an operative is shooting a friendly DEATHWATCH operative that’s within your territory, you can re-roll one of your defence dice.
AND THEY SHALL KNOW NO FEAR

Space Marines possess extraordinary courage and are utterly unflinching in the face of terrifying horrors and overwhelming odds.

You can ignore any changes to the stats of friendly DEATHWATCH operatives from being injured (including their weapons’ stats).

Firefight Ploys

SUFFER NOT THE ALIEN

Every tool at their disposal, every scrap of knowledge, is sharpened upon the whetstone of the Deathwatch’s hatred of the alien.

Use this firefight ploy after rolling your attack dice for a friendly DEATHWATCH operative, if it’s shooting against or fighting against an operative that doesn’t have the CHAOS or IMPERIUM keyword. You can re-roll any of your attack dice.
ADVANCED AUSPEX SCAN

Between unstinting sweeps of their bioscryer cuffs, their inbuilt auspexes warning of hostile threats and the augmented instincts of the Deathwatch themselves, no lurking threat can long evade their sights.

Use this firefight ploy when a friendly DEATHWATCH operative performs the Shoot action. Until the end of the activation/counteraction, its ranged weapons have the Saturate weapon rule and enemy operatives cannot be obscured.
AUSPICATOR TRACKING

Neurally connected to a battle-brother’s senses, auspicator lenses can improve their data prescience to almost precognitive levels.

Use this firefight ploy when a friendly DEATHWATCH operative is counteracting, before it performs any actions. You can change its order.
TRANSHUMAN PHYSIOLOGY

The genetically modified physiology of a Space Marine is capable of resisting wounds that would kill a lesser being.

Use this firefight ploy when an operative is shooting a friendly DEATHWATCH operative, in the Roll Defence Dice step. You can retain one of your normal successes as a critical success instead.

Faction Equipment

The following equipment options are available to DEATHWATCH kill teams, alongside the universal equipment online. You cannot select each option more than once per battle.

DIGITAL WEAPONS

Various high-powered lasers, toxic needlers, incineration projectors and more are concealed as bionic implants or in the knuckles of gauntlets. They lack the power to be used at range, but can be triggered up close to exploit a weakness while the enemy fends off the main attack.

Once per turning point, when a friendly DEATHWATCH operative performs the Fight action, at the start of the Roll Attack Dice step, you can use this rule. If you do, inflict 1 damage on the enemy operative in that sequence.
SANCTUS-V BIOSCRYER CUFFS

Developed by Techmarines and Apothecaries of the Castilos Nullifact watch fortress, these vambracemounted monitron relays offer unparalleled analysis and purgation of a range of bio-threats to the wearer’s augmented physiology.

Once during each friendly DEATHWATCH operative’s activation, before or after it performs an action, if it’s not within control range of enemy operatives, you can use this rule. If you do, select one of the following:
  • That friendly operative regains up to D3 lost wounds.
  • Remove any changes to that friendly operative’s APL stat.
  • Remove one of the following tokens that friendly operative has (before that token’s activation effects are resolved, if relevant): Neutron Fragment, Poison, Terrorchem.
SCRUTAVORE SERVO-THRALL

This specialised servo-skull circles a kill team’s deployment on anti-grav motors, consuming data at a voracious rate before dissecting it and feeding the resultant analyses to the battle-brothers to provide maximum strategic awareness. Many are built upon the skulls of loyal serfs, though some are constructed around the sanctified craniums of defeated xenos.

Once per turning point, during a friendly DEATHWATCH operative’s activation, you can use this rule. If you do, during that activation, that operative can perform a mission action for 1 less AP.

Having an enemy operative within its control range doesn’t prevent that friendly operative from performing that mission action. However, in such an instance, after it does so, you and your opponent roll-off. If your opponent wins, you cannot use this equipment for the rest of the battle.
AMMUNITION RESERVE

Awarded to kill teams whose marksmanship is as efficient as it is lethal, additional caches of individually crafted shells, fuel canisters and ammunition cells serve to secure victory during the most dangerous missions.

Once per battle, you can use the Special Issue Ammunition faction rule for up to two Shoot actions during one turning point, but you must select different weapon rules for both uses. This takes precedence over the normal Special Issue Ammunition rules.

Datacards


Deathwatch Watch Sergeant

Watch Sergeants lead their kill teams in deadly offensives tailored to their xenos foe. They are linchpins of leadership for their battle-brothers, directing the adaptive tactics of the team to secure the mission’s goal.

Deathwatch Watch Sergeant

Watch Sergeants lead their kill teams in deadly offensives tailored to their xenos foe. They are linchpins of leadership for their battle-brothers, directing the adaptive tactics of the team to secure the mission’s goal.

APL
3
MOVE
6"
SAVE
3+
WOUNDS
15
 
NAME
ATK
HIT
DMG
WR
Plasma pistol (standard)
4
3+
3/5
Range 8", Piercing 1Range 8", Piercing 1
Plasma pistol (supercharge)
4
3+
4/5
Range 8", Hot, Lethal 5+, Piercing 1Range 8", Hot, Lethal 5+, Piercing 1
Power weapon
Power weapon
5
3+
4/6
Lethal 5+Lethal 5+
Adaptable Armoury: You can select one additional equipment option.
Strategic Command: You can do each of the following once per battle if this operative is in the killzone:
  • Use a DEATHWATCH strategy ploy for 0CP.
  • Use a DEATHWATCH firefight ploy for 0CP.
DEATHWATCH, IMPERIUM, ADEPTUS ASTARTES, LEADER, WATCH SERGEANT
⌀32mm


Deathwatch Aegis Veteran

Aegis Veterans specialise in countering the deadliest of fighters. These duellists bleed the impetus from the enemy’s blows with crackling storm shields, deflecting strikes before countering with brutal swings of their power mauls.

Deathwatch Aegis Veteran

Aegis Veterans specialise in countering the deadliest of fighters. These duellists bleed the impetus from the enemy’s blows with crackling storm shields, deflecting strikes before countering with brutal swings of their power mauls.

APL
3
MOVE
6"
SAVE
2+
WOUNDS
15
 
NAME
ATK
HIT
DMG
WR
Bolt pistol
Bolt pistol
4
3+
3/4
Range 8"Range 8"
Power maul & storm shield
5
3+
4/6
Shock, Shield*Shock, Shield*
*Shield: Whenever this operative is fighting or retaliating with this weapon, each of your blocks can be allocated to block two unresolved successes (instead of one).
Storm Shield: Whenever an operative is shooting this operative, worsen the x of the Piercing weapon rule by 1 (if any). Note that Piercing 1 would therefore be ignored.
DEATHWATCH, IMPERIUM, ADEPTUS ASTARTES, AEGIS
⌀32mm


Deathwatch Blademaster Veteran

Champion duellists, Blademasters are swordsmen with few equals. Those of sanctified mien and pragmatic resolve are granted use of xenophase blades, which they wield with consummate skill.

Deathwatch Blademaster Veteran

Champion duellists, Blademasters are swordsmen with few equals. Those of sanctified mien and pragmatic resolve are granted use of xenophase blades, which they wield with consummate skill.

APL
3
MOVE
6"
SAVE
3+
WOUNDS
15
 
NAME
ATK
HIT
DMG
WR
Special issue bolt pistol
4
3+
3/4
Range 8", Piercing 1Range 8", Piercing 1
Xenophase blade (duel)
5
3+
4/6
Brutal, Lethal 5+Brutal, Lethal 5+
Xenophase blade (phase sweep)
4
3+
4/6
Brutal, Lethal 5+, Phase Sweep*Brutal, Lethal 5+, Phase Sweep*
Adaptive Swordsmanship: You can ignore any changes to the Hit stat of this operative’s xenophase blade. Whenever this operative is fighting or retaliating, you can resolve one of your successes before the normal order. If you do, that success must be used to block.
*Phase Sweep: Whenever this operative performs the Fight action with this weapon profile, if it isn’t incapacitated, it can immediately perform a free Fight action afterwards, but you must select this weapon profile and it can only fight against each enemy operative within its control range once per activation or counteraction using this weapon profile. This takes precedence over action restrictions, and you can continue to perform free Fight actions until this operative is incapacitated or has fought against every enemy operative within its control range.
DEATHWATCH, IMPERIUM, ADEPTUS ASTARTES, BLADEMASTER
⌀32mm


Deathwatch Bombard Veteran

Bombard Veterans are tactical artillerists, carrying enormous frag cannons to destroy the most heavily armoured opposition at long range. Their weapons are capable of firing dense shells that can blast through adamantium to cull xenos mobs.

Deathwatch Bombard Veteran

Bombard Veterans are tactical artillerists, carrying enormous frag cannons to destroy the most heavily armoured opposition at long range. Their weapons are capable of firing dense shells that can blast through adamantium to cull xenos mobs.

APL
3
MOVE
5"
SAVE
3+
WOUNDS
18
 
NAME
ATK
HIT
DMG
WR
Bolt pistol
Bolt pistol
4
3+
3/4
Range 8"Range 8"
Frag cannon (shell)
Frag cannon (shell)
4
3+
5/7
Piercing 1Piercing 1
Frag cannon (shrapnel)
5
3+
4/5
Torrent 2"Torrent 2"
Fists
Fists
4
3+
3/4
-
DEATHWATCH, IMPERIUM, ADEPTUS ASTARTES, GRAVIS, BOMBARD
⌀40mm


Deathwatch Breacher Veteran

Breachers fulfil a combination of fire support and specialist ordnance roles. Skilled in penetrating xenos holds with melta bombs, they secure their breaches by following up with an explosive grenade into the smoking ruin, alongside rapid volleys of bolt fire.

Deathwatch Breacher Veteran

Breachers fulfil a combination of fire support and specialist ordnance roles. Skilled in penetrating xenos holds with melta bombs, they secure their breaches by following up with an explosive grenade into the smoking ruin, alongside rapid volleys of bolt fire.

APL
3
MOVE
5"
SAVE
3+
WOUNDS
18
 
NAME
ATK
HIT
DMG
WR
Auxiliary grenade launcher (frag)
4
3+
2/4
Blast 2"Blast 2"
Auxiliary grenade launcher (krak)
4
3+
4/5
Piercing 1Piercing 1
Hellstorm bolt rifle
4
3+
4/5
Torrent 1"Torrent 1"
Melta bomb
Melta bomb
4
3+
5/3
Range 3", Devastating 3, Heavy (Reposition only), Limited 1, Piercing 2Range 3", Devastating 3, Heavy (Reposition only), Limited 1, Piercing 2
Fists
Fists
4
3+
3/4
-
DEATHWATCH, IMPERIUM, ADEPTUS ASTARTES, GRAVIS, BREACHER
⌀40mm


Deathwatch Demolisher Veteran

Against the largest alien monstrosities, Demolishers are an efficient and unsubtle concentration of shocking power. Their two-handed heavy thunder hammers unleash a blast of concussive and disruptive power when they hit, capable of holing voidship bulkheads.

Deathwatch Demolisher Veteran

Against the largest alien monstrosities, Demolishers are an efficient and unsubtle concentration of shocking power. Their two-handed heavy thunder hammers unleash a blast of concussive and disruptive power when they hit, capable of holing voidship bulkheads.

APL
3
MOVE
6"
SAVE
3+
WOUNDS
15
 
NAME
ATK
HIT
DMG
WR
Bolt pistol
Bolt pistol
4
3+
3/4
Range 8"Range 8"
Heavy thunder hammer
5
4+
6/7
Shock, StunShock, Stun
Brutal Assault: Whenever this operative is fighting, its heavy thunder hammer has the Brutal weapon rule. Whenever this operative performs the Charge action, its heavy thunder hammer has the Ceaseless weapon rule until the end of the activation/counteraction.
Aggressive Force: Whenever this operative is fighting or retaliating, subtract 1 from both Dmg stats of the weapons the enemy operative in that sequence has (to a minimum of 2).
DEATHWATCH, IMPERIUM, ADEPTUS ASTARTES, DEMOLISHER
⌀32mm


Deathwatch Disruptor Veteran

Disruptor Veterans savage their foe’s comms traffic and data-streams. They triangulate even subtle signals before collapsing transmissions or rupturing them into incomprehensibility, before providing the rest of their kill team with pinpointed targeting data.

Deathwatch Disruptor Veteran

Disruptor Veterans savage their foe’s comms traffic and data-streams. They triangulate even subtle signals before collapsing transmissions or rupturing them into incomprehensibility, before providing the rest of their kill team with pinpointed targeting data.

APL
3
MOVE
7"
SAVE
3+
WOUNDS
13
 
NAME
ATK
HIT
DMG
WR
Marksman bolt carbine
4
3+
3/4
Lethal 5+Lethal 5+
Fists
Fists
4
3+
3/4
-
Advanced Omni-Scrambler: STRATEGIC GAMBIT. Select one enemy operative visible to or within 6" of this operative, then roll one D6. In the following Firefight phase, that enemy operative cannot be activated or perform actions until one of the following is true:
  • Your opponent has activated a number of enemy operatives equal to the result of the D6.
  • It’s the last enemy operative to be activated.
Auspex Triangulation: The Advanced Auspex Scan firefight ploy costs you 0CP when both of the following are true:
  • This operative isn’t within control range of enemy operatives.
  • The target of that Shoot action (primary target, if relevant) is visible to this operative.
Note that it doesn’t have to be this operative performing the Shoot action.
DEATHWATCH, IMPERIUM, ADEPTUS ASTARTES, DISRUPTOR
⌀32mm


Deathwatch Gunner Veteran

Fire support specialists whose heavy plasma incinerators fire searing bolts of blazing star matter, Gunners secure optimum positions from which to unleash the fury of their powerful weapons.

Deathwatch Gunner Veteran

Fire support specialists whose heavy plasma incinerators fire searing bolts of blazing star matter, Gunners secure optimum positions from which to unleash the fury of their powerful weapons.

APL
3
MOVE
6"
SAVE
3+
WOUNDS
15
 
NAME
ATK
HIT
DMG
WR
Bolt pistol
Bolt pistol
4
3+
3/4
Range 8"Range 8"
Heavy plasma incinerator (standard)
5
3+
4/6
Piercing 1Piercing 1
Heavy plasma incinerator (supercharge)
5
3+
5/6
Hot, Lethal 5+, Piercing 1Hot, Lethal 5+, Piercing 1
Fists
Fists
4
3+
3/4
-
DEATHWATCH, IMPERIUM, ADEPTUS ASTARTES, GUNNER
⌀32mm


Deathwatch Headtaker Veteran

Armoured in the stealthier Phobos-pattern battle plate, Headtakers can approach their targets undetected to swiftly bring them in range of their razor-sharp combat knives. Equipped with a grav-chute and grapnel launcher, there is no safe place for the foe to hide.

Deathwatch Headtaker Veteran

Armoured in the stealthier Phobos-pattern battle plate, Headtakers can approach their targets undetected to swiftly bring them in range of their razor-sharp combat knives. Equipped with a grav-chute and grapnel launcher, there is no safe place for the foe to hide.

APL
3
MOVE
7"
SAVE
3+
WOUNDS
13
 
NAME
ATK
HIT
DMG
WR
Special issue bolt pistol
4
3+
3/4
Range 8", Piercing 1Range 8", Piercing 1
Combat knives
Combat knives
5
3+
4/5
-
Grav-chute and Grapnel Launcher: Whenever this operative is climbing, treat the vertical distance as 2" (regardless of how far the operative actually moves vertically). Whenever this operative is dropping, ignore the vertical distance.
Clandestine Headtaker: This operative can perform the Charge action while it has a Conceal order. Whenever this operative is fighting against an operative it wasn’t visible to at the start of the activation/counteraction, the first time you strike during that sequence, you can immediately resolve another of your successes as a strike (before your opponent).
DEATHWATCH, IMPERIUM, ADEPTUS ASTARTES, HEADTAKER
⌀32mm


Deathwatch Horde-Slayer Veteran

Wearing hulking suits of Gravis-pattern power armour, these veterans use devastating infernus heavy bolters to scythe through swarms of xenos that attempt to swamp the Deathwatch or lurk in hiding.

Deathwatch Horde-Slayer Veteran

Wearing hulking suits of Gravis-pattern power armour, these veterans use devastating infernus heavy bolters to scythe through swarms of xenos that attempt to swamp the Deathwatch or lurk in hiding.

APL
3
MOVE
5"
SAVE
3+
WOUNDS
18
 
NAME
ATK
HIT
DMG
WR
Bolt pistol
Bolt pistol
4
3+
3/4
Range 8"Range 8"
Infernus heavy bolter (flame)
5
2+
3/3
Range 8", Saturate, Torrent 2"Range 8", Saturate, Torrent 2"
Infernus heavy bolter (focused bolt)
5
3+
4/5
Piercing Crits 1Piercing Crits 1
Infernus heavy bolter (sweeping bolt)
4
3+
4/5
Piercing Crits 1, Torrent 1"Piercing Crits 1, Torrent 1"
Fists
Fists
4
3+
3/4
-
DEATHWATCH, IMPERIUM, ADEPTUS ASTARTES, GRAVIS, HORDE-SLAYER
⌀40mm


Deathwatch Marksman Veteran

Marksmen pinpoint their quarry before the prey is even aware of their peril. They wield long-range stalker bolt rifles that – in combination with master-crafted sights and data-prescient auspicators – aid these expert warriors in targeting the most elusive of threats.

Deathwatch Marksman Veteran

Marksmen pinpoint their quarry before the prey is even aware of their peril. They wield long-range stalker bolt rifles that – in combination with master-crafted sights and data-prescient auspicators – aid these expert warriors in targeting the most elusive of threats.

APL
3
MOVE
6"
SAVE
3+
WOUNDS
15
 
NAME
ATK
HIT
DMG
WR
Stalker bolt rifle (mobile)
4
3+
3/4
-
Stalker bolt rifle (heavy)
4
2+
3/5
Heavy (Dash only), Lethal 5+, Piercing Crits 1Heavy (Dash only), Lethal 5+, Piercing Crits 1
Fists
Fists
4
3+
3/4
-
Vigilant Marksman: This operative can perform the Guard action during its activation regardless of the killzone (see close quarters rules, Kill Team: Tomb World).

When using the close quarters rules, once per turning point, after this operative performs a free Shoot action on guard, it can immediately perform a free Guard action. However, if it does, it cannot counteract (nor Guard twice if it’s counteracted).
DEATHWATCH, IMPERIUM, ADEPTUS ASTARTES, MARKSMAN
⌀32mm

The GRAVIS keyword is used in the following Deathwatch datacards:

Shoot1AP

Shoot with the active operative by following the sequence below. The active operative’s player is the attacker. The selected enemy operative’s player is the defender.

An operative cannot perform this action while it has a Conceal order, or while within control range of an enemy operative.

Fight1AP

Fight with the active operative by following the sequence below. The active operative’s player is the attacker. The selected enemy operative’s player is the defender.

An operative cannot perform this action unless an enemy operative is within its control range.
Counteract
When you would activate a ready friendly operative, if all your operatives are expended but your opponent still has ready operatives, you can select an expended friendly operative with an Engage order to perform a 1AP action (excluding Guard) for free. Each operative can only counteract once per turning point. That operative cannot move more than 2", or must be set up wholly within 2" if it’s removed and set up again, while counteracting (this is not a change to its Move stat, and takes precedence over all other rules). Counteracting is optional, so you can choose not to. In either case, activation alternates back to your opponent afterwards.

Counteracting isn’t an activation, it’s instead of activating. This difference is important; for instance, it means action restrictions won't apply.
Range x
Only operatives within x of the active operative can be valid targets, e.g. Range 9".
Blast x
The target you select is the primary target. After shooting the primary target, shoot with this weapon against each secondary target in an order of your choice (roll each sequence separately). Secondary targets are other operatives visible to and within x of the primary target, e.g. Blast 2" (they are all valid targets, regardless of a Conceal order). Secondary targets are in cover and obscured if the primary target was.
Saturate
The defender cannot retain cover saves.
Piercing x
The defender collects x less defence dice, e.g. Piercing 1. If the rule is Piercing Crits x, this only comes into effect if you retain any critical successes.
EXPLOSIVE GRENADES

A variety of offensive grenades are employed by the forces of the 41st Millennium. These range from simple fragmentation grenades to plasma and gravitic concussion grenades, while even more exotic devices are used to crack open enemy armour.

When you select this equipment, select two explosive grenades (2 frag, 2 krak, or 1 frag and 1 krak). Each selection is a ranged weapon your operatives can use, but your kill team can only use that weapon a total number of times during the battle equal to your selection.

 
NAME
ATK
HIT
DMG
Frag grenade
4
4+
2/4

WR
Range 6", Blast 2", Saturate


NAME
ATK
HIT
DMG
Krak grenade
4
4+
4/5

WR
Range 6", Piercing 1, Saturate

Blast x
The target you select is the primary target. After shooting the primary target, shoot with this weapon against each secondary target in an order of your choice (roll each sequence separately). Secondary targets are other operatives visible to and within x of the primary target, e.g. Blast 2" (they are all valid targets, regardless of a Conceal order). Secondary targets are in cover and obscured if the primary target was.
Torrent x
Select a valid target as normal as the primary target, then select any number of other valid targets within x of the first valid target, but not within control range of friendly operatives, as secondary targets, e.g. Torrent 2". Shoot with this weapon against all of them in an order of your choice (roll each sequence separately).
Devastating x
Each retained critical success immediately inflicts x damage on the operative this weapon is being used against, e.g. Devastating 3. If the rule starts with a distance (e.g. 1" Devastating x), inflict x damage on that operative and each other operative visible to and within that distance of it. Note that success isn’t discarded after doing so — it can still be resolved later in the sequence.
Lethal x+
Your successes equal to or greater than x are critical successes, e.g. Lethal 5+.
Rending
If you retain any critical successes, you can retain one of your normal successes as a Critical success instead.
Saturate
The defender cannot retain cover saves.
Punishing
If you retain any critical successes, you can retain one of your fails as a normal success instead of discarding it.
Severe
If you don’t retain any critical successes, you can change one of your normal successes to a critical success. The Devastating and Piercing Crits weapon rules still take effect, but Punishing and Rending don’t..

Charge1AP

The same as the Reposition action, except the active operative can move an additional 2".

It can move, and must finish the move, within control range of an enemy operative. If it moves within control range of an enemy operative that no other friendly operatives are within control range of, it cannot leave that operative’s control range.

An operative cannot perform this action while it has a Conceal order, if it’s already within control range of an enemy operative, or during the same activation in which it performed the Reposition, Dash or Fall Back action.
Conceal: The operative cannot perform Shoot and Charge actions, and it cannot counteract. However, it’s not a valid target while in cover.
Engage: The operative can perform actions as normal and can counteract.
Balanced
You can re-roll one of your attack dice.
Damage
When damage is inflicted on an operative, reduce their wounds by that amount. An operative’s starting number of wounds is determined by its Wounds stat (see datacards). If an operative’s wounds are reduced to 0 or less, it’s incapacitated, then removed from the killzone. Some rules allow an incapacitated operative to perform a free action before being removed from the killzone. Such an operative cannot perform more than one free action (excluding Place Marker) in this instance, and that operative’s player decides the order of any of its rules that occur before it’s removed from the killzone (taking precedence over the player with initiative deciding).

While an operative has fewer than its starting wounds remaining, it’s wounded. While it has fewer than half its starting wounds remaining, it’s also injured. Subtract 2" from the Move stat of injured operatives and worsen the Hit stat of their weapons by 1.

Keep track of each operative’s remaining wounds with dice, tokens or by writing it down.

‘Incapacitated’ and ‘removed from the killzone’ are separate. Some rules take effect when an operative is incapacitated, but before it’s removed.

The datacards using IMPERIUM keyword can be found in the following Factions:

Imperium: Angel of Death, Battleclade, Death Korps, Deathwatch, Elucidian Starstrider, Exaction Squad, Hunter Clade, Imperial Navy Breacher, Inquisitorial Agent, Kasrkin, Novitiates, Phobos Strike Team, Ratlings, Sanctifiers, Scout Squad, Tempestus Aquilons.

The IMPERIUM keyword is used in the following datacards:

Control Range
Many rules relate to control range such as moving, fighting and using cover. Something is within an operative’s control range if it’s visible to and within 1" of that operative.

Control range between operatives is mutual, therefore operatives are within each other’s control range if one of them is visible to and within 1" of the other.

Operatives A and B are within each other’s control range.

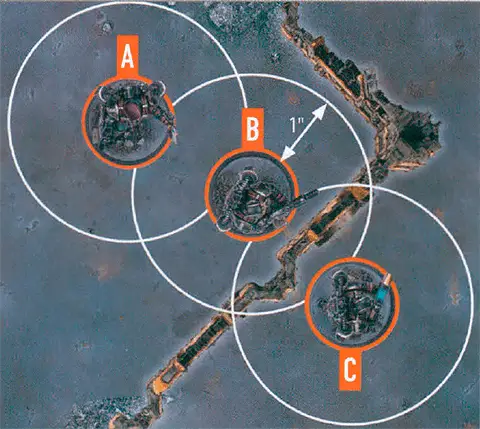
The terrain is within both operative B and C’s control range.

Because of the terrain, operative B is not visible to operative C, and vice versa, therefore they are not within each other’s control range.


Imagine control range as an area of interaction the operative has with things close to it.
Roll-off
lf a rule requires a roll-off, both players roll one D6 and whoever has the highest wins the roll-off. If there’s a tie, roll-off again.
Equipment
Equipment are additional rules you can select before the battle, as specified in your game sequence. Universal equipment can be selected for any kill team whereas faction equipment is specific. Each player cannot select each equipment option more than once per game.
Special Issue Ammunition

The Deathwatch utilise a range of specialised ammunition in many of their weapons. Each type is designed to eliminate specific xenos foes.

Once per turning point, when a friendly DEATHWATCH operative is performing the Shoot action, in the Select Weapon step, you can use this rule. If you do, select one of the following weapon rules for that operative’s ranged weapons to have until the end of the action. This rule cannot be used with explosive grenades (see universal equipment) or melta bombs.
  • Blast 1" (you cannot select this if the weapon profile being used has the Torrent weapon rule)
  • Devastating 1
  • Lethal 5+
  • Piercing 1
  • Rending
  • Saturate
  • Severe
Precedence
Some rare rules will conflict with each other, so it must be established which takes precedence. In order of priority, a rule takes precedence if:

1
It specifically says so.

2
The online designer’s commentary says so.

3
It’s not found in the core book (i.e. other rules take precedence over core book rules).

4
It says ‘cannot’.

5
The player with initiative decides.

If a rule on a datacard says ‘this operative can perform two Shoot actions during its activation’, this takes precedence over the core rules for action restrictions, as per precedence priority 3.
Range x
Only operatives within x of the active operative can be valid targets, e.g. Range 9".
Hot
After an operative uses this weapon, roll one D6. If the result is less than the weapon’s Hit stat, inflict damage on that operative equal to the result multiplied by two. If it’s used multiple times in one action (e.g. Blast), still only roll one D6.
Shock
The first time you strike with a critical success in each sequence, also discard one of your opponent’s unresolved normal successes (or a critical success if there are none).
Brutal
Your opponent can only block with critical successes.

The GRAVIS keyword is used in the following Deathwatch datacards:

Heavy
An operative cannot use this weapon in an activation or counteraction in which it moved, and it cannot move in an activation or counteraction in which it used this weapon. If the rule is Heavy (x only), where x is a move action, only that move is allowed, e.g. Heavy (Dash only). This weapon rule has no effect on preventing the Guard action.

Reposition1AP

Move the active operative up to its Move stat to a location it can be placed. This must be done in one or more straight-line increments, and increments are always rounded up to the nearest inch.

It cannot move within control range of an enemy operative, unless one or more other friendly operatives are already within control range of that enemy operative, in which case it can move within control range of that enemy operative but cannot finish the move there.

An operative cannot perform this action while within control range of an enemy operative, or during the same activation in which it performed the Fall Back or Charge action.
Limited x
After an operative uses this weapon a number of times in the battle equal to x, they no longer have it. If it’s used multiple times in one action (e.g. Blast), treat this as one use.
Stun
If you retain any critical successes, subtract 1 from the APL stat of the operative this weapon is being used against until the end of its next activation.
Ceaseless
You can re-roll any of your attack dice results of one result (e.g. results of 2).
Visible
For an intended target to be Visible, the following must be true:
  • You can draw an imaginary, unobstructed straight line (known as a Visibility line) 1 mm wide from the head of the active operative’s miniature to any part of the miniature of the intended target (not its base).
In the rare instance that bases or parts of the active operative’s miniature prevent an intended target from being Visible to the active operative, such as when the active operative is directly below or above the intended target, treat those bases and parts as being invisible.

Some rare rules will require you to select a point that is Visible (e.g. a point on the killzone). In such circumstances, you must be able to draw an imaginary, unobstructed straight line 1mm wide from the head of the active operative’s miniature to the point you would select.
ADVANCED AUSPEX SCAN

Between unstinting sweeps of their bioscryer cuffs, their inbuilt auspexes warning of hostile threats and the augmented instincts of the Deathwatch themselves, no lurking threat can long evade their sights.

Use this firefight ploy when a friendly DEATHWATCH operative performs the Shoot action. Until the end of the activation/counteraction, its ranged weapons have the Saturate weapon rule and enemy operatives cannot be obscured.
Climbing
An operative must be within 1" horizontally and 3" vertically of terrain that’s visible to them to climb it. Each climb is treated as a minimum of 2" vertically (e.g. a 1" distance is treated as 2").
Dropping
Operatives drop down when they move off terrain or after they’ve jumped. Ignore 2" of vertical distance that they drop during each action. This means a vertical drop of 2" or less is ignored. If they drop multiple times during an action, only 2" total is ignored, not 2" from each drop.

Dash1AP

The same as the Reposition action, except don’t use the active operative’s Move stat — it can move up to 3" instead. In addition, it cannot climb during this move, but it can drop and jump.

An operative cannot perform this action while within control range of an enemy operative, or during the same activation in which it performed the Charge action.

Guard1AP

The operative goes on guard until any of the following are true:
  • It performs any action, moves or is set up.
  • An enemy operative ends an action within its control range and you don’t interrupt that activation (see On Guard).
  • Its order is changed.
  • It’s the start of the next turning point.
If you do, that friendly operative cannot counteract during the turning point.

This action is treated as a Shoot action. An operative cannot perform this action while it has a Conceal order, or while it’s within control range of an enemy operative.

Disable Ads


Boosty subscribers may disable ads:
1. Enter e-mail you have used to login on Boosty.
2. Press Get new pin code button (if you don’t have it already)
3. Enter pin code.

Note that login database updated once a day. So, if you are a new booster - try tomorrow. And thank you!
© Vyacheslav Maltsev 2013-2025