
Approved Ops 2025
Books
| Book | Kind | Edition | Version | Last update |
| | ||||
| | Expansion | 3 | October 2025 | |
| | ||||
| | Expansion | 3 | January 2026 | |
Approved Ops Mission Pack
This is a PvP mission pack for head-to-head gameplay. It’s ideal for players who want the most balanced, up-to-date and in-depth version of Kill Team. Each player must score VP during the game from three different ops:
Each Approved Ops game follows the game sequence below.
Crit Op
Score VP by performing mission actions and controlling objective markers.Kill Op
Score VP as enemy operatives are incapacitated.Tac Op
Score VP from a tac op they secretly select from one of their kin team’s archetypes. Each tac op specifies when it should be revealed.Primary Op
As a STRATEGIC GAMBIT in the first turning point, each player secretly selects one of the above ops to be their primary op. At the end of the battle they reveal their selection and score additional VP from that op. When the battle ends, the player with the most VP is the winner.Each Approved Ops game follows the game sequence below.
1. Set up the Battle
- Each player selects a kill team for the battle.
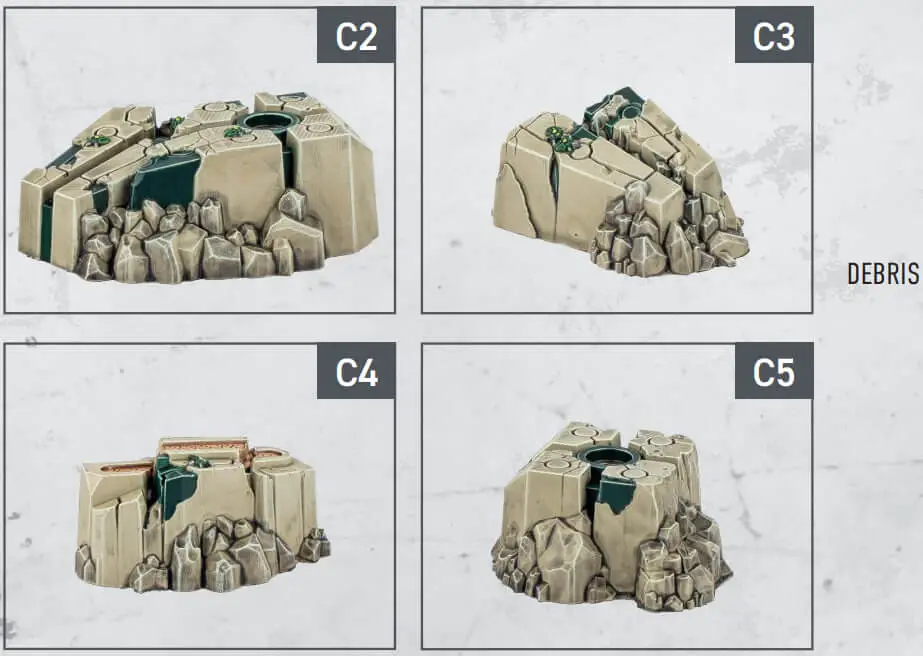
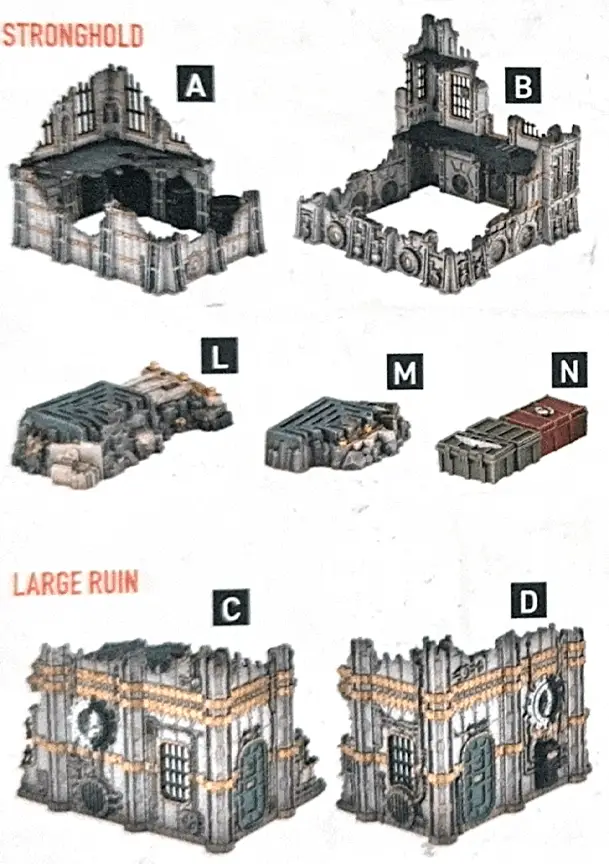
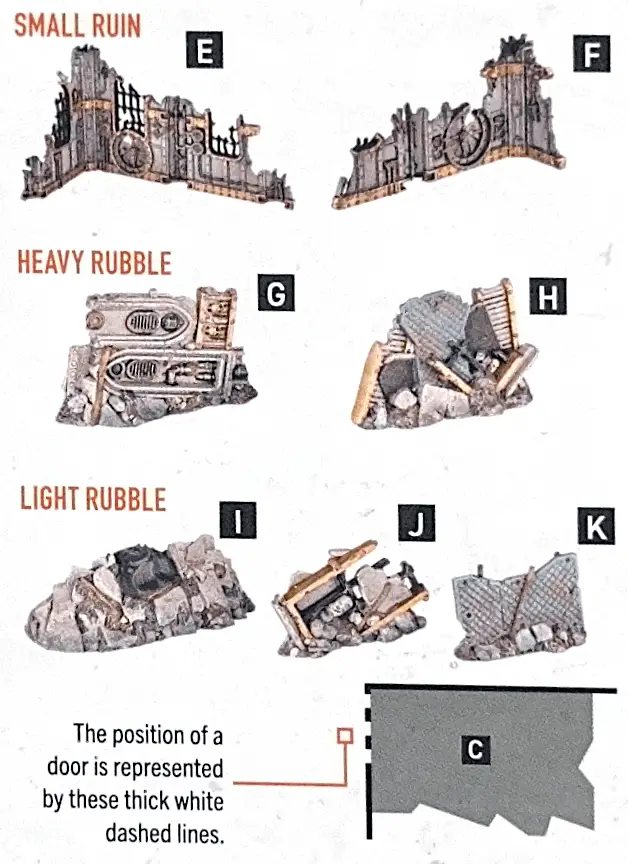
- Determine the killzone and set up terrain features. Ensure terrain types are specified.
- Determine one shared crit op and set up objective markers. Other than in Killzone: Bheta-Decima, all objective markers must be set up on the killzone floor.
- Roll-off: the winner decides who has initiative.
- The player with initiative selects one drop zone. Their opponent has the other drop zone and gains the Re-roll initiative card (explained in step 4).
2. Select Operatives
- Each player secretly selects their operatives for the battle, adhering to the selection requirements in their kill team’s rules. They then reveal their selections simultaneously.
- Each player secretly selects up to four equipment options. Each option cannot be selected more than once per player. They then reveal their selections simultaneously.
- Each player starts with 2CP.
- Each player secretly selects a tac op from one of their kill team’s archetypes (Infiltration, Recon, Security or Seek & Destroy, as specified in their kill team’s rules).
3. Set Up Operatives
- Each player alternates setting up an item of equipment that’s set up before the battle (ladders, etc.), starting with the player with initiative. Note: it’s item by item, not option by option.
- Each player alternates setting up one third of their kill team (rounding up), starting with the player with initiative. When a player sets up an operative, it must be wholly within their drop zone and must be given a Conceal order.
4. Play the battle
- To determine initiative during each turning point (including the first), the players roll off (but don’t re-roll ties). Starting with the loser of the roll-off, each player alternates either using an initiative card to alter their roll result (explained below) or passing, until they both pass in succession.
- If player(s) would use their kill team’s rules to affect the roll-off, they must do so before playing initiative cards, starting with the player that’s losing the roll off.
- The Re-roll initiative card (see step 1) allows the player to re-roll their initiative roll. The remaining initiative cards modify the player’s roll result up or down (this can take it above 6 or below 1). For example, if a player rolls a 5 and plays the +2/-2 initiative card, they can modify their roll result to 3 or 7. If a player uses the Re-roll initiative card after they’ve modified their roll result, the new result supersedes their modification(s) used so far.
- The winner of the roll-off decides who has initiative. Excluding the fourth turning point, the loser of the roll-off gains an initiative card equal to the turning point number (e.g. in the second turning point they would gain the +2/-2 initiative card). If the roll-off is a tie, the player who doesn’t currently have initiative is the winner. Note that it’s the loser of the roll-off that gains the initiative card, not the player without initiative.
- As a STRATEGIC GAMBIT in the first turning point, each player secretly selects one of their three ops (1.crit, 2.kill or 3.tac) to be their primary op. They should place a card with their selection face down, conceal a dice showing their selection under a cup, etc. as appropnate.
- Each player can score a maximum of 6VP from each op.
5. End the Battle
- The battle ends after four turning points have been completed. If one player has no operatives in the killzone but the battle hasn’t ended, the other player plays out each remaining turning point until it does.
- At the end of the battle, the players reveal their primary ops simultaneously. They score additional VP equal to half of what they scored from that op (rounding up).
- The player with the most VP is the winner. If the players are tied, it’s a draw.
Approved Ops 2025 Tournament Companion
Welcome to the Approved Ops 2025 Tournament Companion. This document has been developed for Kill Team tournament organisers to use as a framework on how to best arrange a finely-tuned event using the Approved Ops 2025 card pack. While this companion is not the only way to create such an event, it can provide a valuable resource to organisers – both newer and experienced – looking for guidance on making sure their tournament is providing the best experience for players, and will be followed at most Games Workshop events using Approved Ops 2025. Tournament organisers can adapt this companion as necessary to best fit the individual needs of their event.Recommended Terrain Layouts
Approved Ops 2025 contains 6 terrain layouts for each killzone currently in the Kill Team product range, alongside maps for Killzone: Gallowdark and non-specific killzone maps. These are all recommended for tournament play, but they are not the only terrain layouts that can be used for a balanced experience. The maps in Approved Ops 2025 may not directly correlate to an exact measurement of terrain, so it’s at your discretion as an organiser to make decisions about these placements. To encourage adaptability and generalship at the table, tournament organisers may make their own maps using their own collections of Kill Team terrain using the example killzones from Approved Ops 2025 as a guideline. We recommend tables be preset for the day with an even variety of terrain layouts, and that players be rotated through the layouts with each pairing. Note that depending on the number of layouts and rounds, this means some players may repeat a layout over the course of the event
Crit Op Selection
We recommend that all players be playing the same Crit Op in the same round to create the most consistent results for win paths (explained on the next page) in the pairings metrics. To do this, tournament organisers should select crit ops for players in each round of the tournament, either randomly or predetermined.
- 1. Secure, 2. Loot, 3. Transmission
- 4. Orb, 6. Energy Cells, 7. Download
- 5. Stake Claim, 8. Data, 9. Reboot
While organisers can select any crit ops randomly using the cards from Approved Ops 2025, we also find that some groups of crit ops feature similar play patterns. For a wider variety of mission types in each tournament, organisers can select one from each of these groupings for each round:
Pairings
We recommend that players be randomly paired into their matches for the first round. When selecting pairings for players in the following rounds, the most important aspect of pairings would be to ensure that players with a similar number of wins and losses are playing against one another (e.g. a player with 3 wins, 1 loss and 0 draws should play against another player with those same results if possible). However, it is inevitable to have many players with the same win/loss record. In those cases, we recommend pairing players with the following criteria:
Win Path: A player’s win path refers not to their number of wins and losses, but to the timing of those wins and losses. While pairing by win path has an incidental tendency to pair people by ‘strength of schedule’ (see below), its greatest impact is on the overall enjoyment experienced by all players, as it tends to pair players based upon shared experience. For example, let’s take two 3-1 players. One of them lost their first game; they likely lowered their expectations for winning the whole event after this, but are probably in a great mood after three consecutive victories. The other won their first three games then lost their fourth – a sharp disappointment after a 3-0 start. Should these players face off, their shared enjoyment may be at odds as they are in very different emotional places. Win path ensures players enter their match with recent common experiences upon which to build a friendship during their next game of Warhammer.
Draws: Draws are a perfectly valid result of a game of Kill Team. In fact, they can be some of the most exciting and competitive matches. We highly discourage the use of tiebreakers to decide the results of an individual game, and organisers should instead use the Rankings criteria below to resolve ties when determining the results of the event. We also recommend that a draw not be excessively punishing on a win record, as the relatively low score potential within Kill Team results in a higher frequency of draws. In general, we recommend that the result of two draws be an equal record result to a win and a loss.
- Firstly, by record (i.e. wins, losses, draws).
- Secondly, by win path (i.e. the timing of the rounds in which a player won or lost their games).
- Thirdly, randomly within players of the same ranking.
Win Path: A player’s win path refers not to their number of wins and losses, but to the timing of those wins and losses. While pairing by win path has an incidental tendency to pair people by ‘strength of schedule’ (see below), its greatest impact is on the overall enjoyment experienced by all players, as it tends to pair players based upon shared experience. For example, let’s take two 3-1 players. One of them lost their first game; they likely lowered their expectations for winning the whole event after this, but are probably in a great mood after three consecutive victories. The other won their first three games then lost their fourth – a sharp disappointment after a 3-0 start. Should these players face off, their shared enjoyment may be at odds as they are in very different emotional places. Win path ensures players enter their match with recent common experiences upon which to build a friendship during their next game of Warhammer.
Draws: Draws are a perfectly valid result of a game of Kill Team. In fact, they can be some of the most exciting and competitive matches. We highly discourage the use of tiebreakers to decide the results of an individual game, and organisers should instead use the Rankings criteria below to resolve ties when determining the results of the event. We also recommend that a draw not be excessively punishing on a win record, as the relatively low score potential within Kill Team results in a higher frequency of draws. In general, we recommend that the result of two draws be an equal record result to a win and a loss.
To help resolve issues with pairings and rankings, and accurately record secondary stats like strength of schedule, organisers can use apps like Best Coast Pairings, which includes preset metrics for these options.
Rankings
At the end of the tournament, it is quite common for a number of players to have an identical record. To determine ranking players within your results, we recommend the following criteria:
- Firstly, by overall record (i.e. wins, losses, draws).
- Secondly, by their opponent’s win records (i.e. those with more wins against opponents with better win records would place higher).
- Thirdly, by total VP scored in all games from the primary op (i.e. a player who scores an additional 3VP from their primary op selection would receive 3 points when determining this ranking criteria).
Rulings
The high number of games in a Warhammer event means that players are likely to discover unusual rules interactions and edge cases. When encountering these interactions, try to be as fair as possible to players and make the best judgement you are able. To support this, the Warhammer Design Studio release regular Rules Updates on Kill Team: The App to create the most up-to-date and precise wordings possible. Whenever a printed rule contradicts an online rule, the online rule will take precedence. If you are unsure of an interaction, check these living documents first to ensure you have the best chance of successfully resolving the issue. Once you have made a ruling during an event, we recommend continuing to resolve the interaction that way for the remainder of the event. Small mistakes are natural, but trying to provide the most consistent environment for games is within your control as an organiser, and keeping as many games playing with the same rules as possible is preferable to altering course for small adjustments to a ruling.
Classified Format
When planning your tournament, you must determine if it will be using the Classified format. We recommend making your tournament Classified if your prizes for winning include a ticket to the World Championships of Warhammer. In all other tournament settings, you may allow play of all kill teams with 3rd edition rules.
Classified teams can be played in Classified format tournaments. Teams that are not Classified will continue to receive regular Rules Updates – balance updates, designer’s commentaries and erratas – and will be balanced throughout the current edition of Kill Team.
Classified Rotation
The full list of Classified kill teams can be found below. Currently, all kill teams with 3rd edition rules are Classified. Teams will be added to this list as they are released, and teams from the Octarius season will no longer be Classified following the World Championships of Warhammer in November 2025
Octarius Season:
Kommando, Pathfinder, Blooded, Warpcoven, Gellerpox Infected, Death Korps, Legionaries, Phobos Strike Team, Wyrmblade, Elucidian Starstrider, Novitiate, Corsair Voidscarred, Void-dancer Troupe, Hunter CladeGallowdark Season:
Imperial Navy Breacher, Hierotek Circle, Fellgor Ravager, Farstalker Kinband, Exaction Squad, Hearthkyn Salvager, Kasrkin, Hand of the Archon.Bheta-Decima Season:
Chaos Cult, Scout Squad, Brood Brother, Inquisitorial Agent, Nemesis Claw, Hernkyn Yaegirs, Blades of Khaine, Mandrake.Volkus Season:
Tempestus Aquilons, Vespid Stingwings, Wrecka Krew, Battleclade, Ratlings, Sanctifiers, Angels of Death, Goremonger, Raveners, Plague MarinesTomb World Season:
Deathwatch, Canoptek Circle, +FUTURE KILL TEAMSMission Generator
This is the mission generator, and it is intended to replace the Approved Ops 2025 card pack. Press the ‘Generate Mission’ button to pick up the mission and map as specified by the RANDOM method (see Determine Mission and Map). Use ‘Mission’ and ‘Map’ dropdown lists if you prefer other methods.
Press ‘Select’ button ( ) to add Tac Op to your Selected Tac Ops list. ‘Remove’ button (
  ) used to remove Tac Op from the list. Note that generator limits only the maximum number of Tac Ops allowed (one) - Select Tac Ops rule omitted so you are free to pick any Tac Ops.
If you accidentally close the browser or refresh the page your card selection will be safe. It is saved in cookies of the browser on the current device.
Press ‘Select’ button (
) to add Tac Op to your Selected Tac Ops list. ‘Remove’ button ( ) used to remove Tac Op from the list. Note that generator limits only the maximum number of Tac Ops allowed (one) - Select Tac Ops rule omitted so you are free to pick any Tac Ops.If you accidentally close the browser or refresh the page your card selection will be safe. It is saved in cookies of the browser on the current device.
UNIVERSAL MAP KEY
|


KILLZONE: BHETA-DECIMA MAP KEY
|


KILLZONE: GALLOWDARK MAP KEY
KILLZONE: TOMB WORLD MAP KEY

KILLZONE: VOLKUS MAP KEY
KILL OP
You start without a kill grade. As enemy operatives are incapacitated, your kill grade goes up until it reaches 5.
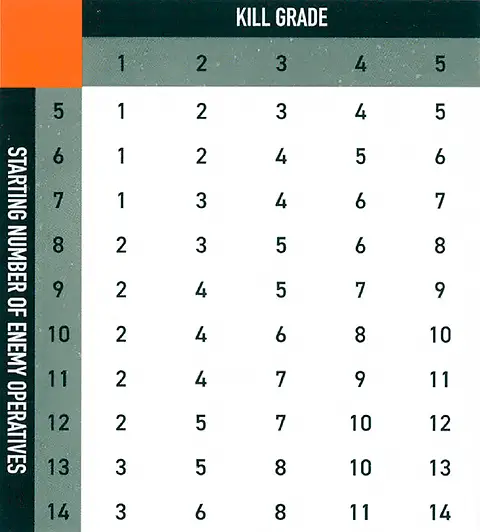
- Whenever you move to a new kill grade, you score 1 VP
- At the end of the battle, if your kill grade is higher than your opponent’s, you score 1VP.
Generate Mission
Selected Tac Ops
Archetype Tac Ops
Card Decks
Damage
When damage is inflicted on an operative, reduce their wounds by that amount. An operative’s starting number of wounds is determined by its Wounds stat (see datacards). If an operative’s wounds are reduced to 0 or less, it’s incapacitated, then removed from the killzone. Some rules allow an incapacitated operative to perform a free action before being removed from the killzone. Such an operative cannot perform more than one free action (excluding Place Marker) in this instance, and that operative’s player decides the order of any of its rules that occur before it’s removed from the killzone (taking precedence over the player with initiative deciding).While an operative has fewer than its starting wounds remaining, it’s wounded. While it has fewer than half its starting wounds remaining, it’s also injured. Subtract 2" from the Move stat of injured operatives and worsen the Hit stat of their weapons by 1.
Keep track of each operative’s remaining wounds with dice, tokens or by writing it down.
‘Incapacitated’ and ‘removed from the killzone’ are separate. Some rules take effect when an operative is incapacitated, but before it’s removed.
‘Incapacitated’ and ‘removed from the killzone’ are separate. Some rules take effect when an operative is incapacitated, but before it’s removed.
Killzone Floor
The killzone floor is the lowest level of the killzone (i.e. the game board). Anything that’s on a marker that’s on the killzone floor is also on the killzone floor.
Roll-off
lf a rule requires a roll-off, both players roll one D6 and whoever has the highest wins the roll-off. If there’s a tie, roll-off again.
Equipment
Equipment are additional rules you can select before the battle, as specified in your game sequence. Universal equipment can be selected for any kill team whereas faction equipment is specific. Each player cannot select each equipment option more than once per game.
Shoot1AP
Shoot with the active operative by following the sequence below. The active operative’s player is the attacker. The selected enemy operative’s player is the defender.
An operative cannot perform this action while it has a Conceal order, or while within control range of an enemy operative.
Charge1AP
The same as the Reposition action, except the active operative can move an additional 2".
It can move, and must finish the move, within control range of an enemy operative. If it moves within control range of an enemy operative that no other friendly operatives are within control range of, it cannot leave that operative’s control range.
An operative cannot perform this action while it has a Conceal order, if it’s already within control range of an enemy operative, or during the same activation in which it performed the Reposition, Dash or Fall Back action.
Counteract
When you would activate a ready friendly operative, if all your operatives are expended but your opponent still has ready operatives, you can select an expended friendly operative with an Engage order to perform a 1AP action (excluding Guard) for free. Each operative can only counteract once per turning point. That operative cannot move more than 2", or must be set up wholly within 2" if it’s removed and set up again, while counteracting (this is not a change to its Move stat, and takes precedence over all other rules). Counteracting is optional, so you can choose not to. In either case, activation alternates back to your opponent afterwards.Counteracting isn’t an activation, it’s instead of activating. This difference is important; for instance, it means action restrictions won't apply.
|
Control Range
Many rules relate to control range such as moving, fighting and using cover. Something is within an operative’s control range if it’s visible to and within 1" of that operative.Control range between operatives is mutual, therefore operatives are within each other’s control range if one of them is visible to and within 1" of the other.
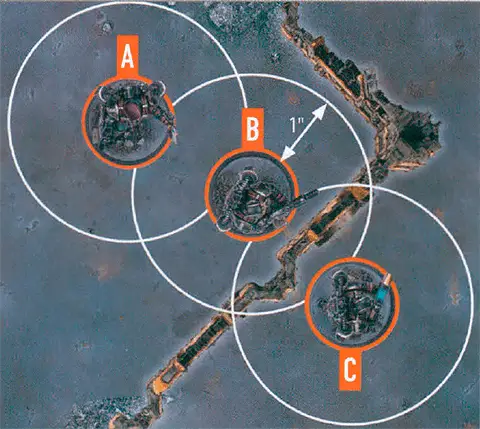
The terrain is within both operative B and C’s control range.
Because of the terrain, operative B is not visible to operative C, and vice versa, therefore they are not within each other’s control range.
Imagine control range as an area of interaction the operative has with things close to it.
Pick Up Marker1AP
Remove a marker the active operative controls that the Pick Up Marker action can be performed upon. That operative is now carrying, contesting and controlling that marker.
An operative cannot perform this action while within control range of an enemy operative, or while it’s already carrying a marker.
|
Valid Target
Some rules require you to select a valid target for an operative. This is most common when an operative is shooting, but some rare rules require it too.
|
Visible
For an intended target to be Visible, the following must be true:- You can draw an imaginary, unobstructed straight line (known as a Visibility line) 1 mm wide from the head of the active operative’s miniature to any part of the miniature of the intended target (not its base).
In the rare instance that bases or parts of the active operative’s miniature prevent an intended target from being Visible to the active operative, such as when the active operative is directly below or above the intended target, treat those bases and parts as being invisible.
Some rare rules will require you to select a point that is Visible (e.g. a point on the killzone). In such circumstances, you must be able to draw an imaginary, unobstructed straight line 1mm wide from the head of the active operative’s miniature to the point you would select.
Reanimation Protocols
The body of a slain Necron becomes wreathed in an eerie glow. Severed limbs reattach and broken bodies reform in a shower of emerald sparks. Eye-lenses flicker once more and the Necron rises again to rejoin the fight.
The first time each friendly HIEROTEK CIRCLE operative is incapacitated, before it’s removed from the killzone, place one of your Reanimation markers within its control range. Then remove it as incapacitated, also removing any tokens and rules effects it had (e.g. CHRONOMANCER operative’s Chronometron action, Poison tokens, APL stat changes, being implanted, etc.).In the Ready step of each Strategy phase, select one of your Reanimation markers and roll one D6: on a 1-2, leave that Reanimation marker in the killzone and repeat this process with a different one of your Reanimation markers (if any); on a 3+, an operative is REANIMATED.
You can only select each of your Reanimation markers once per turning point, and once you roll a 3+, you don’t select any more for that turning point. Whenever an operative is REANIMATED:
- Set up the operative that Reanimation marker was placed for (it’s no longer incapacitated). It must be placed within 3" of that Reanimation marker and not within control range of enemy operatives (if you cannot do so, treat the roll as 1-2 instead).
- It has 1 wound remaining.
- It has an order of your choice and is ready.
- Remove that Reanimation marker.