Conquest Unbound
All across the Mortal Realms, mighty armies and ambitious generals fight endless wars of conquest and destruction. In this section, you will find an array of additional rules that will allow you to fight special types of battle using the Warhammer Age of Sigmar rules.
Contents | ||


Books
| Book | Kind | Edition | Last update | |
| | ||||
| | Rulebook | 3 | February 2024 | |
Across the Mortal Realms, battles are fought in all manner of unusual environments or circumstances. Entire campaigns have been fought underground in tunnels and caverns inhabited by dangerous subterranean creatures, and some of the largest battles ever fought have been for control of the cities that stud the realms. Furthermore, while most battles pit two armies against each other, it is not uncommon for three or more sides to be involved in a single conflict.
Conquest Unbound includes rules that are designed to be used with battleplans that recreate the types of battle described above. For example, a battleplan might say that you must use the Siege Warfare rules from Conquest Unbound, in which case all of the rules on this page would apply to that battle. We have included a battleplan with each set of rules so that you can try out the rules in your own games straight away.
While the Conquest Unbound rules in this book cover the most common types of ‘non-standard’ battle - sieges, tunnel fighting and multiplayer battles - the Mortal Realms are vast, and the circumstances in which warring factions find themselves are hugely varied. To represent this, some battlepacks may include additional Conquest Unbound rules for use with the battleplans found in that battlepack.
Rules Index and Rosters
After the Conquest Unbound rules you will find a handy index and set of roster sheets. The index lists all of the important rules terms used in Age of Sigmar, with references pointing you to the rule that explains the term. You can use the rosters to record the units in your army and any other important information for your battle, such as your army’s enhancements.SIEGE WARFARE
Fortresses of all different shapes and sizes can be found throughout the Mortal Realms. Only a sizeable and highly motivated force has any chance of capturing such an objective and the spoils that lie beyond its walls, and then only at a terrible cost in blood and lives.The Fortress
All Warhammer Age of Sigmar sieges require a fortress for the defender to occupy. If the battleplan instructs the defender to set up their fortress, they must set up at least 5 terrain features (but otherwise as many terrain features as they wish) wholly within their territory.The Siege Phase
The siege phase takes place after the armies are set up but before the first battle round begins. Both the attacker and the defender must secretly pick a siege tactic. The attacker does this by hiding a dice showing 1, 2 or 3 behind their hand, while the defender does this by hiding a dice showing 4, 5 or 6 behind their hand. Each number corresponds to a different siege tactic, as shown in the table below. Once both players have chosen their numbers, the dice are revealed and the numbers are cross-referenced on the table below to determine the modifiers that will apply to the siege rolls (see below).Siege Rolls
The attacker now makes a series of rolls to determine the effects that their siege methods have had on the defenders. Make the batter rolls first, then the starve rolls, and finally the tunnel rolls. After all of the rolls have been made, the first battle round starts.Batter
The attacker rolls a dice for each terrain feature wholly within the defender’s territory, applying the modifier from the Siege table (if there is one). On a 5+, the terrain feature is demolished if it was defensible, and it no longer provides cover if it was not defensible.Starve
The attacker rolls a dice for each unit in the defender’s army, subtracting 1 from the roll if the unit is a HERO and applying the modifier from the Siege table (if there is one). On a 5+, that unit suffers D3 mortal wounds.Tunnel
The attacker and the defender each roll a dice. The attacker applies the modifier from the Siege table to their roll (if there is one). If the attacker’s roll is higher, they have completed a tunnel. They can pick 1 HERO that does not have a mount and is not a MONSTER, and 2 other units that do not have mounts and are not MONSTERS, to send into the tunnel.Units sent into the tunnel are removed from the battlefield. At the start of any of the attacker’s movement phases, all of the units sent into the tunnel can be set up on the battlefield. They must be set up more than 3" from all enemy units and within 3" of each other. This counts as their move for that movement phase.
Siege Table
| ||||||||||||||||||||
Siege Warfare battleplan The Relief ForceA defending army has been under siege for a considerable time. Can it hold out until reinforcements arrive? SIEGE WARFARE This battle uses the Siege Warfare rules. If you are using the Open War, Path to Glory or Contest of Generals battlepack, you can use this battleplan instead of using the rules in the battlepack that determine which battleplan is used for the battle.THE ARMIES Each player picks an army and then they roll off. The winner picks which player is the attacker. The other player is the defender. The defender must split their army into a garrison contingent and a relief force contingent. There must be at least one unit in the relief force contingent for each unit in the garrison contingent. The army’s general can be in either contingent.THE BATTLEFIELD First, the defender sets up a maximum of 6 terrain features. Each terrain feature must be wholly within the attacker’s territory or neutral territory, more than 3" from the battlefield edge, more than 6" from the defender’s territory and more than 9" from all other terrain features. Then the defender sets up their fortress.Then, starting with the attacker, the players alternate placing 1 objective on a terrain feature in the defender’s territory until 3 objectives have been set up. Each objective must be placed on a different terrain feature. DEPLOYMENT The defender sets up their garrison contingent first, wholly within their territory. The attacker sets up their army second, wholly within their territory and more than 6" from the defender’s territory.FIRST TURN The attacker chooses which player takes the first turn in the first battle round.THE RELIEF FORCE At the end of each of their movement phases, the defender rolls 2D6 and adds the battle round number to the score. On an 11 or more, their relief force contingent arrives. The defender then rolls a dice to see from which direction it arrives. On a 1-2, it arrives from the eastern battlefield edge. On a 3-4, it arrives from the southern battlefield edge. On a 5-6, it arrives from the western battlefield edge.All of the units in the relief force contingent must be set up wholly within 6" of the battlefield edge it arrived from and more than 9" away from all enemy units. CONTROLLING OBJECTIVES The attacker cannot gain control of an objective that is controlled by the defender if a unit from the defender’s army is within 3" of it (the objective remains under the defender’s control).BATTLE LENGTH The battle lasts for 5 battle rounds.GLORIOUS VICTORY When the battle ends:- If the attacker controls all 3 objectives, they win a major victory. - If the attacker controls just 2 objectives, they win a minor victory. - If the attacker controls no objectives, the defender wins a major victory. - If the attacker controls just 1 objective, the defender wins a minor victory. 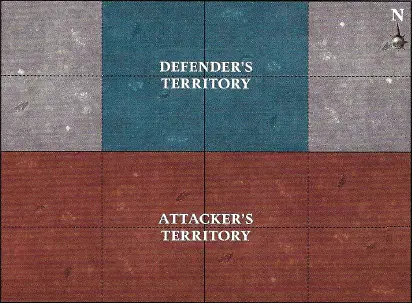 | ||
TRIUMPH & TREACHERY
The Triumph and Treachery rules allow three or more armies to take part in a multi-sided battle. Each player commands their own force and takes on all the other players involved to prove themselves the ultimate champion.If a battleplan says to use the Triumph and Treachery rules, then the following rules apply to that battle.
Designer’s Note: When it is time for a player to pick who is their enemy for a phase, you can expect for the other players to plead their case or to offer to form temporary alliances. This is allowed and is all part of the fun. Don’t be surprised if your so-called ‘ally’ turns around to stab you in the back later on!
Hero Phase: In your hero phase, neutral models cannot unbind spells or perform heroic actions. Neutral models are never affected by spells, even if they are within the area of effect of a spell. Predatory endless spells controlled by neutral WIZARDS are not moved. Wild endless spells are moved alternately by the player whose turn is taking place and the enemy player.
Movement Phase: Neutral models are treated as enemy models in your movement phase. This means that you cannot move friendly models within 3" of neutral models, you must retreat if you want to move away from them, and so on.
Shooting Phase: In your shooting phase, only enemy units may be picked as the target of a shooting attack. Attacks that affect models within a certain distance of a point do not affect neutral models.
Charge Phase: In your charge phase, the first model moved from a charging unit must finish the charge move within 1/2" of an enemy model. Neutral models cannot carry out a monstrous rampage.
Combat Phase: Only friendly units and enemy units can be picked to fight.
Battleshock Phase: All units, including neutral units, have to take battleshock tests if they suffered casualties during the turn. You must still choose an enemy at the start of your battleshock phase, however, in case any of your models have abilities that affect enemy models in this phase. Neutral players can use abilities that only affect units from their own army in this phase.
Rolling Off
To roll off in a Triumph and Treachery battle, all of the players involved in the roll-off roll a dice, and the player that rolls highest wins the roll-off. If several players are tied for the highest roll, the tied players roll off again until only one player remains with the highest dice roll.Turn Order
All the players roll off at the start of each battle round and the winner decides which player will take the first turn. The player that has been chosen takes their turn, and then all of the remaining players roll off again, and the winner decides who will have the second turn. This carries on until there is only one player that has not yet taken a turn - that player takes their turn and then the battle round ends.Neutral Models
At the start of each phase, the player whose turn it is picks one opponent to be their ‘enemy’ for that phase. A different player may be picked to be the enemy in each phase. Only the models in the army of the opponent picked to be the enemy are considered to be enemy models that phase. The models in the armies of all other opponents’ armies are instead considered to be neutral models and cannot be affected by abilities or spells, or attacked in any way for that phase. Neutral models cannot use abilities.Designer’s Note: When it is time for a player to pick who is their enemy for a phase, you can expect for the other players to plead their case or to offer to form temporary alliances. This is allowed and is all part of the fun. Don’t be surprised if your so-called ‘ally’ turns around to stab you in the back later on!
Turn Sequence
The following rules apply in the different phases of a Triumph and Treachery battle:Hero Phase: In your hero phase, neutral models cannot unbind spells or perform heroic actions. Neutral models are never affected by spells, even if they are within the area of effect of a spell. Predatory endless spells controlled by neutral WIZARDS are not moved. Wild endless spells are moved alternately by the player whose turn is taking place and the enemy player.
Movement Phase: Neutral models are treated as enemy models in your movement phase. This means that you cannot move friendly models within 3" of neutral models, you must retreat if you want to move away from them, and so on.
Shooting Phase: In your shooting phase, only enemy units may be picked as the target of a shooting attack. Attacks that affect models within a certain distance of a point do not affect neutral models.
Charge Phase: In your charge phase, the first model moved from a charging unit must finish the charge move within 1/2" of an enemy model. Neutral models cannot carry out a monstrous rampage.
Combat Phase: Only friendly units and enemy units can be picked to fight.
Battleshock Phase: All units, including neutral units, have to take battleshock tests if they suffered casualties during the turn. You must still choose an enemy at the start of your battleshock phase, however, in case any of your models have abilities that affect enemy models in this phase. Neutral players can use abilities that only affect units from their own army in this phase.
Triumph and Treachery battleplan Convergence of FateMultiple armies march upon a strange monolith, but only one can be the victor this day. TRIUMPH AND TREACHERY This battle uses the Triumph and Treachery rules. If you are using the Open War, Path to Glory or Contest of Generals battlepack, you can use this battleplan instead of using the rules in the battlepack that determine which battleplan is used for the battle.The battlefield for this battle should be at least 44" x 60" to accommodate all the armies. THE ARMIES Each player picks an army. The players cannot include faction terrain features in their armies. Each player must split their army into a vanguard contingent and a reinforcements contingent. There must be at least one unit in the vanguard contingent for each unit in the reinforcements contingent. The army’s general can be in either contingent.THE BATTLEFIELD The players roll off and the winner sets up the battlefield’s terrain features. One terrain feature must be set up in the centre of the battlefield. This terrain feature is the monolith and can be controlled by the players.DEPLOYMENT All of the players apart from the player that set up battlefield’s terrain features roll off. The winner chooses which long edge of the battlefield is the northern edge and assigns a different territory to each player.The players then alternate setting up units from their vanguard contingents, one at a time, starting with the player that assigned the territories. Each player must set up their units wholly within their territory and more than 9" from all other players’ territories. The players continue to set up units until all of the vanguard contingents have been set up. If a player finishes setting up their vanguard contingent first, the remaining players continue to alternate setting up units until all of the units in the vanguard contingents have been set up. REINFORCEMENTS Each player sets up their reinforcements contingent at the end of their second movement phase, wholly within their territory, wholly within 6" of the battlefield edge and more than 9" away from all enemy units.BATTLE LENGTH The battle lasts for 4 battle rounds.GLORIOUS VICTORY When the battle ends:- If one player controls the monolith, they win a major victory. - If no player controls the monolith, the player commanding the model closest to the monolith wins a minor victory. - If no player controls the monolith and 2 or more models in different armies are tied to be the closest to the monolith, the battle is a draw. 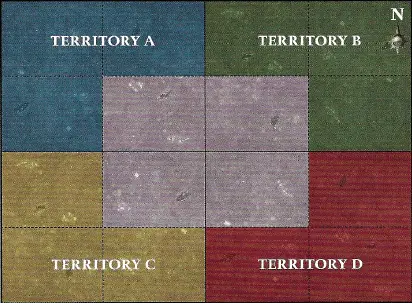 | ||
TUNNEL FIGHTING
Many of the Mortal Realms’ landscapes are riddled with subterranean tunnels and caverns. Frantic battles are often fought to control these dark passageways, turning the underground world into a battlefield that is just as bloody as any found on the surface.If a battleplan says to use the Tunnel Fighting rules, then the following rules apply to that battle.
At the start of each battle round, before determining priority, the players roll off. In that battle round, the winner of the roll-off treats the monstrous denizen as a unit in their army and their opponent treats it as an enemy unit.
The monstrous denizen’s commanding player can choose to attack it, but if they do, until the end of the battle round, they treat it as an enemy unit and their opponent treats it as a unit in their own army. The monstrous denizen cannot attack itself.
Cave-in: Pick a point anywhere on the battlefield that is more than 3" from all models and terrain features. For the rest of the battle, no models can move or be set up within 3" of that point.
Falling Stalactites: Pick up to D3 different enemy units. Roll a dice for each unit you pick. On a 2+, that unit suffers 1 mortal wound.
Cunning Traps: Sabotage is a common tactic used by those wishing to eradicate unwary opponents.
You can use this command ability at the end of the enemy movement phase. Pick an enemy unit within 12" of the unit that receives this command that is visible to them and roll 2D6. If the roll is equal to or greater than the distance between the unit that receives this command and that enemy unit, that enemy unit suffers D3 mortal wounds.
Tame the Raging Beast: Those who frequently brave the realms’ depths often earn the loyalty of the creatures that dwell there.
Pick 1 monstrous denizen within 3" of a friendly HERO. That monstrous denizen is treated as unit in your army for the rest of the battle round.
Impenetrable Gloom
The range of missile weapons and spells is limited to a maximum of 12".Low Ceilings
Models cannot fly. In addition, the path of a model’s move cannot be traced more than 4" above the battlefield.Monstrous Denizen
After the battlefield has been set up but before territories have been assigned, the players roll off. The winner can set up 1 MONSTER anywhere on the battlefield (if a suitable model that is not part of either army is available). This model is referred to as a monstrous denizen.At the start of each battle round, before determining priority, the players roll off. In that battle round, the winner of the roll-off treats the monstrous denizen as a unit in their army and their opponent treats it as an enemy unit.
The monstrous denizen’s commanding player can choose to attack it, but if they do, until the end of the battle round, they treat it as an enemy unit and their opponent treats it as a unit in their own army. The monstrous denizen cannot attack itself.
Unstable Surroundings
Roll a dice at the start of each of your hero phases. On a 6, you can choose for a cave-in to take place, or for falling stalactites to crash down from the ceiling.Cave-in: Pick a point anywhere on the battlefield that is more than 3" from all models and terrain features. For the rest of the battle, no models can move or be set up within 3" of that point.
Falling Stalactites: Pick up to D3 different enemy units. Roll a dice for each unit you pick. On a 2+, that unit suffers 1 mortal wound.
Command Abilities
You can use the following command ability in battles that use the Tunnel Fighting rules:Cunning Traps: Sabotage is a common tactic used by those wishing to eradicate unwary opponents.
You can use this command ability at the end of the enemy movement phase. Pick an enemy unit within 12" of the unit that receives this command that is visible to them and roll 2D6. If the roll is equal to or greater than the distance between the unit that receives this command and that enemy unit, that enemy unit suffers D3 mortal wounds.
Heroic Actions
HEROES can perform the following heroic action in battles that use the Tunnel Fighting rules:Tame the Raging Beast: Those who frequently brave the realms’ depths often earn the loyalty of the creatures that dwell there.
Pick 1 monstrous denizen within 3" of a friendly HERO. That monstrous denizen is treated as unit in your army for the rest of the battle round.
Darkest Depths battleplan Tunnel WarsCountless battles have been fought to control the tunnel networks that twist and turn below the surfaces of the Mortal Realms. Such conflicts are usually fought as a series of bitter encounters in near-total darkness, with no quarter asked or given. TUNNEL FIGHTING This battle uses the Tunnel Fighting rules. If you are using the Open War, Path to Glory or Contest of Generals battlepack, you can use this battleplan instead of using the rules in the battlepack that determine which battleplan is used for the battle.THE ARMIES Each player picks an army. The players cannot include faction terrain features in their armies. Each player must split their army into three contingents. No contingent can have fewer than a quarter of the units in the army or more than half of the units in the army.After the players have divided their armies into contingents, they must fight three battles using this battleplan, one after the other. Before setting up their armies for each battle, the players must secretly write down which of their three contingents they will use and then reveal their choices to each other. Each contingent can only be used in one of the three battles. Pick a general for each contingent at the start of each battle. THE BATTLEFIELD The players roll off and the winner sets up the battlefield’s terrain features. The player that lost the roll-off then chooses which player uses Territory A and which player uses Territory B, and which long edge of the battlefield is the northern edge.Designer’s Note: Do not be put off playing this scenario if you lack terrain features that have a suitably subterranean appearance. An easy way to represent the tunnel complex is to cut out black or grey card into irregular shapes. These pieces can be used to represent solid rock walls, and placed on the battlefield to create a maze-like set of tunnels and caverns. DEPLOYMENT The players alternate setting up units one at a time, starting with the player that picked their territory. Each player must set up their units wholly within their territory.The players continue to set up units until both contingents have been set up. If one player finishes setting up their contingent first, their opponent must set up the rest of the units in their contingent, one after another. BATTLE LENGTH Each battle lasts until all of the units in one contingent have been destroyed.GLORIOUS VICTORY For each battle, a player wins the battle if all of the units in their opponent’s contingent have been destroyed. If one player wins all three battles, they win a major victory. If one player wins just two of the battles, they win a minor victory.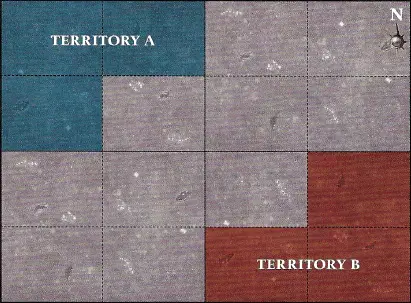 | ||
Hit Roll
Roll a dice. If the roll equals or beats the attacking weapon’s To Hit characteristic, the attack scores a hit and you must make a wound roll. If not, the attack fails and the attack sequence ends. An unmodified hit roll of 1 always fails and an unmodified hit roll of 6 always hits. A hit roll cannot be modified by more than +1 or -1 (this is an exception to the principle that abilities take precedence over core rules).Sometimes an ability will allow a single hit roll to score two or more hits. If this is the case, make all of the wound and save rolls for those hits at the same time.
Wound Roll
Roll a dice. If the roll equals or beats the attacking weapon’s To Wound characteristic, the attack wounds the target and your opponent must make a save roll. If not, the attack fails and the attack sequence ends. An unmodified wound roll of 1 always fails and an unmodified wound roll of 6 always wounds. A wound roll cannot be modified by more than +1 or -1 (this is an exception to the principle that abilities take precedence over core rules).
1.5.5 Dice Roll Modifiers
Sometimes a modifier will apply to a dice roll. Modifiers are applied after re-rolls. Rules that refer to an unmodified roll are referring to the dice roll after re-rolls have been made but before modifiers are applied. If a rule instructs you to pick or change a roll, do so after re-rolls are made but before modifiers are applied.| In most cases, modifiers are cumulative. However, some dice rolls, such as hit and wound rolls, will specify that the roll cannot be modified by more than +1 or -1. When this is the case, add up all the modifiers that apply, and if the total is more than +1 or -1, treat it as being either +1 or -1 as appropriate. | ||
17.1.1 Cover
A target unit is in cover if all of the models in the unit are wholly on a terrain feature or behind a terrain feature. Add 1 to save rolls for attacks that target a unit that is in cover. A unit that has a Wounds characteristic of 10 or more or that has made a charge move in the same turn does not receive the benefit of being in cover.
14.5 Mortal Wounds
Some attacks, spells and abilities cause mortal wounds. Do not make hit, wound or save rolls for mortal wounds. Instead, the damage inflicted on the target is equal to the number of mortal wounds that were caused.Mortal wounds caused while a unit is attacking are allocated at the same time as wounds caused by the unit’s attacks: after all of the unit’s attacks have been made. Mortal wounds caused at other times are allocated as soon as they are caused. Mortal wounds are allocated in the same way as wounds and are treated in the same manner as wounds for rules purposes.
22.3.1 Mounts, Companions and Crew
Sometimes the description on a warscroll will say whether the models in the unit have mounts, companions or a crew. When a model attacks, its mount, companions and crew attack too, and when the model is removed from play, its mount, companions and crew are removed too. For rules purposes, companions and crew are treated in the same manner as mounts.
1.5.3 Rolling Off
Sometimes a rule may require the players to roll off. To roll off, each player rolls a dice, and whoever rolls highest wins. If a roll-off is tied, roll off again. You cannot re-roll or modify the dice when you roll off.
19.1.2 Unbinding Spells
If a spell is successfully cast, your opponent can pick 1 of their WIZARDS that is within 30" of the caster to attempt to unbind the spell before its effects are applied. In order to attempt to unbind a spell, first say which WIZARD will attempt to unbind it. Then make an unbinding roll by rolling 2D6. If the unbinding roll is greater than the roll used to cast the spell, then the spell is unbound and its effects are not applied. The number of spells a WIZARD can attempt to unbind is noted on their warscroll. Only 1 unbinding attempt can be made for each spell.
8.2 Retreat
When you pick a unit to retreat, you can move each model in that unit a distance in inches equal to or less than the Move characteristic shown on the unit’s warscroll. The unit must end the move more than 3" from all enemy units. You cannot shoot or attempt a charge later in the turn with a unit that has retreated. Units cannot retreat if they are not within 3" of an enemy unit.
11.1 Charge Moves
When you attempt a charge with a unit, make a charge roll for the unit by rolling 2D6. You can then make a charge move with each model in that unit by moving the model a distance in inches that is equal to or less than the charge roll. The first model you move in a unit attempting a charge must finish the move within 1/2" of an enemy unit. If this is impossible, no models in the unit can make a charge move.| You do not have to pick a target for a charge attempt before making the charge roll. | ||
15.1 Battleshock Tests
You must make a battleshock roll for each friendly unit that has to take a battleshock test. To make a battleshock roll, roll a dice and add the number of models in the unit that were slain in that turn to the roll. If the battleshock roll is greater than the unit’s Bravery characteristic, the battleshock test has been failed. If the test is failed, for each point by which the battleshock roll exceeds the unit’s Bravery characteristic, 1 model in that unit must flee. You decide which models flee. A model that flees is removed from play.| If a slain model is returned to its unit in the same turn that it is slain, it still counts as having been slain in that battle round for the purposes of battleshock tests. | ||
9.4 Flying
If the warscroll used by a model says that it can fly, you can ignore other models and terrain features when you trace the path of its move across the battlefield (it flies over them). In addition, when a model that can fly starts or finishes a move on a terrain feature, instead of tracing its move across the battlefield, you can trace it ‘through the air’, as shown in the diagram below.A flying model cannot finish a move on top of another model or finish a normal move, run or retreat within 3" of an enemy unit.
6.1 Using Command Abilities
To use a command ability, you must spend 1 command point, pick 1 friendly model to issue the command, and pick 1 friendly unit to receive the command. Unless noted otherwise, the models that can issue commands and the units they can issue them to are as follows:- Unit champions can issue commands to their own unit (see 22.3.2).
- HEROES can issue commands to units that are wholly within 12" of them.
- Generals can issue commands to units that are wholly within 18" of them.
- TOTEMS can issue commands to units that are wholly within 18" of them.
Contents | ||