Combat Patrol
Contents

Books
| Book | Kind | Edition | Version | Last update |
| | ||||
| | Rulebook | 10 | June 2023 | |
Playing Combat Patrol
Welcome to Combat Patrol! Whether you are a new recruit to Warhammer 40,000 or a seasoned veteran, Combat Patrol is all about getting your forces into action as quickly as possible.
Combat Patrol is the quickest and simplest way to start collecting and playing Warhammer 40,000. In Combat Patrol games, each player will command a compact army of Citadel miniatures in tactical clashes that should last up to one hour.
Typically comprising the contents of a Combat Patrol box, every Combat Patrol force is a great starting point for any aspiring Warhammer 40,000 general. As well as being amazing tools for collecting, the models from each one can face off against each other in quick and exciting pickup games. There is no need to create an army list and add up points values; simply choose your favourite faction, assemble your miniatures and prepare for war.
As well as being the best way to play quick games of Warhammer 40,000, Combat Patrol is a great opportunity to try out different factions and familiarise yourself with the unique tactics and play styles of each one. Whichever you choose, you will soon learn your army’s strengths and weaknesses and gain the skills needed to claim victories on larger battlefields.
Typically comprising the contents of a Combat Patrol box, every Combat Patrol force is a great starting point for any aspiring Warhammer 40,000 general. As well as being amazing tools for collecting, the models from each one can face off against each other in quick and exciting pickup games. There is no need to create an army list and add up points values; simply choose your favourite faction, assemble your miniatures and prepare for war.
Combat Patrol games are fast-paced and action-packed; victory is determined primarily through expert tactical play, but a healthy dose of good luck never hurts! Games revolve around a set of missions you and your opponent will need in order to play. These are prefaced with a short and simple sequence that leads you through steps such as creating a battlefield prior to deploying your forces.
Each mission gives the players a different set of tactical challenges to master, as well as describing the strategic goals that they must strive to achieve in order to score Victory points. At the battle’s end, when the smoke has cleared, victory will go to the player who has scored the most Victory points, so players must keep in mind the objectives of their chosen mission at all times. Combat Patrol missions are designed to ensure that neither player can claim an advantage at the battle’s onset, meaning they are perfect for casual games and friendly competitions alike.As well as being the best way to play quick games of Warhammer 40,000, Combat Patrol is a great opportunity to try out different factions and familiarise yourself with the unique tactics and play styles of each one. Whichever you choose, you will soon learn your army’s strengths and weaknesses and gain the skills needed to claim victories on larger battlefields.
Battlefields
In addition to needing two Combat Patrols to face off against each other, players will also require a battlefield on which to play. In Combat Patrol missions, it is up to the players to create the battlefields their armies will fight on, and they can use any flat surface and terrain features they have in their collection.
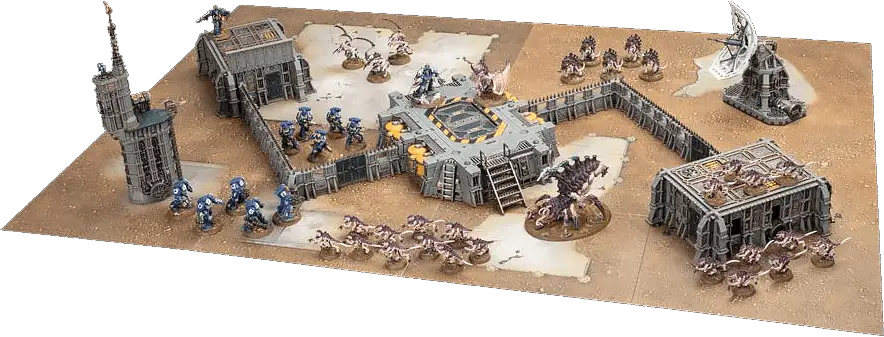
One of the easiest ways to do this is to use Battlezones, each of which contains a board and a set of terrain features for your models to navigate and fight around. The photograph below shows how a selection of Battlezone terrain, set up on two Battlezone boards, can be arranged to create a war-torn environment from the 41st Millennium. This is but one example, however; this terrain can be set up in any number of ways to ensure you never fight over the same battlefield twice.
Battle Ready
Playing games of Warhammer 40,000 is a shared experience that we all want to look and feel great. To reflect this, you will be rewarded for having a fully painted ‘Battle Ready’ army. Here we explain what that means, and where to find achievable online tutorials and painting guides to get your army ready for action.
When you play a game of Warhammer 40,000, there are 10 Victory points available if every model in your army is painted to a Battle Ready standard. Battle Ready means your models are fully painted with a detailed or textured base.
This is considered to be the minimum standard of miniature painting for Warhammer 40,000 games, as well as a guaranteed method of scoring some Victory points before the dice even start rolling.
The Citadel Colour range includes all the paints and hobby supplies you’ll need to paint your miniatures quickly and efficiently. In fact, Contrast paints were created especially to help you get your armies Battle Ready in no time – just one coat of Contrast paint lays down both a base colour and a bit of shade – while Technical paints give you a textured base with one application.
Combat Patrol Missions
A Combat Patrol game is waged by following the sequence below. Note that the first step can be completed before you even get to the gaming table.
1
Select Combat Patrol and Enhancement
Select the Combat Patrol you will be using for the battle.Your army consists of all the units listed on that Combat Patrol, and the model designated as ‘Warlord’ is its WARLORD. Each unit’s wargear is also listed within the datasheets found in that Combat Patrol. Any additional rules a Combat Patrol’s units have access to are also listed.
Your selected Combat Patrol will list two Enhancements that can be used to upgrade a unit in your Combat Patrol (typically your WARLORD). By default, you will use the Enhancement marked ‘default’, but if you wish to replace this with the one marked ‘optional’, do so now. All Enhancements make your Combat Patrol more powerful, but if you are new to using this Combat Patrol we recommend sticking with the default for now.
Each player must declare which Combat Patrol they will be using, and which Enhancement they have selected, before proceeding. Note that if a player uses a Combat Patrol painted to a Battle Ready standard, that player will receive a bonus 10 Victory points (VP) at the end of the battle.
2
Determine Mission
Players determine which mission will be used for the battle; you can choose from the Combat Patrol missions in this book, or in other publications. This will determine the deployment map to use, as well as the specific mission briefing. You can either agree which you will use with your opponent, or you can randomly select one of the missions available. If this is your first battle, we recommend playing the Clash of Patrols mission.If you are randomly selecting a mission, roll a D6 and consult the table below.
|


Each mission has a mission rule that applies for the duration of the battle and a primary objective that awards VP to the players. Read and familiarise yourself with these before proceeding.
Battlefield Key
|

|

|

|

|

|

|

3
Create the Battlefield
Players now create the battlefield by setting up terrain features and objective markers. Combat Patrol missions are played on a rectangular battlezone that is 44" x 30" in size (such as the boards found in some Battlezone products). Players should set up terrain features to create an exciting battlefield; we recommend that a sufficient number of these are distributed evenly across the battlefield so that units from both sides can benefit from cover as they battle each other.Each mission’s deployment map will also show the players how many objective markers they need to set up and where each should be placed.
4
Determine Attacker and Defender
Players agree which battlefield edge is the Attacker’s and which is the Defender’s. The players then roll off and the winner decides who will be the Attacker and who will be the Defender – this will determine which player uses which deployment zone in the coming battle.5
Declare Battle Formations
In the order stated below, both players now secretly note down:- Which of their units will form Patrol Squads. Many units in Combat Patrols have the Patrol Squads ability listed on their datasheets. This lets you split them into two or more smaller units for the duration of the battle. If a unit has this ability, it will detail exactly how the unit must be split up and which models must appear in which of those new units. If you want any of these units to use their Patrol Squads ability, do so now.
- Which of their Leader units will start the battle attached (they must specify which Leader unit is attached to which Bodyguard unit).
- Which of their units will start the battle embarked within TRANSPORT models (they must specify which units are embarked on which models).
- Which of their units will start the battle in Reserves. This typically applies to units that have the Deep Strike ability listed on their datasheet.
When both players have done so, they declare their selections to their opponent.
In a Combat Patrol game, Reserves units can never arrive on the battlefield in the first battle round. Any Reserves unit that has not arrived on the battlefield by the end of the third battle round counts as having been destroyed, as do any units embarked within them.
6
Deploy Armies
Players alternate setting up their remaining units one at a time, starting with the Defender. A player’s models must be set up wholly within their deployment zone. If one player finishes deploying all their units, their opponent then deploys the remainder of their units.7
Determine First Turn
Players roll off and the winner takes the first turn.8
Resolve Pre-battle Rules
Players alternate resolving any pre-battle rules units from their armies have (such as the Scouts ability), starting with the player who will take the first turn.9
Begin the Battle
The first battle round begins. Players continue to resolve battle rounds until the battle ends.10
End the Battle
The battle ends after five battle rounds have been completed. If one player has no models remaining in their army at the start of their turn, the other player may continue to play out their turns until the battle ends.11
Determine Victor
At the end of the battle, the player with the most VP is the winner. If players are tied, the battle is a draw.Note that in some missions, VP scoring in the final turn may differ from previous turns for the player going second. This is to ensure that the choices made by that player can still affect the outcome of the battle even up to its closing moments.
Remember, if every model in a player’s Combat Patrol is painted to a Battle Ready standard, that player is awarded a bonus 10VP.
Securing Objective Markers
In Combat Patrol missions, at the end of each Command phase, if the player whose turn it is controls an objective marker and one or more BATTLELINE units from their army (excluding Battle-shocked units) are within range of that objective marker, then that objective marker is said to be secured by that player.While an objective marker is secured by a player, it remains under the control of that player, even if they have no models within range of it. An objective marker ceases to be secured if their opponent controls it at the end of any subsequent Command phase.
Combat Patrol
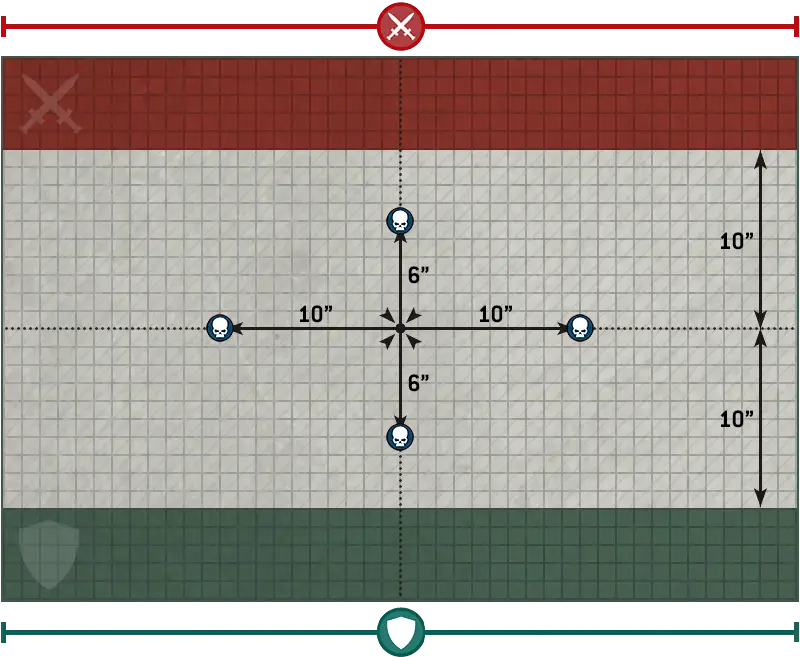
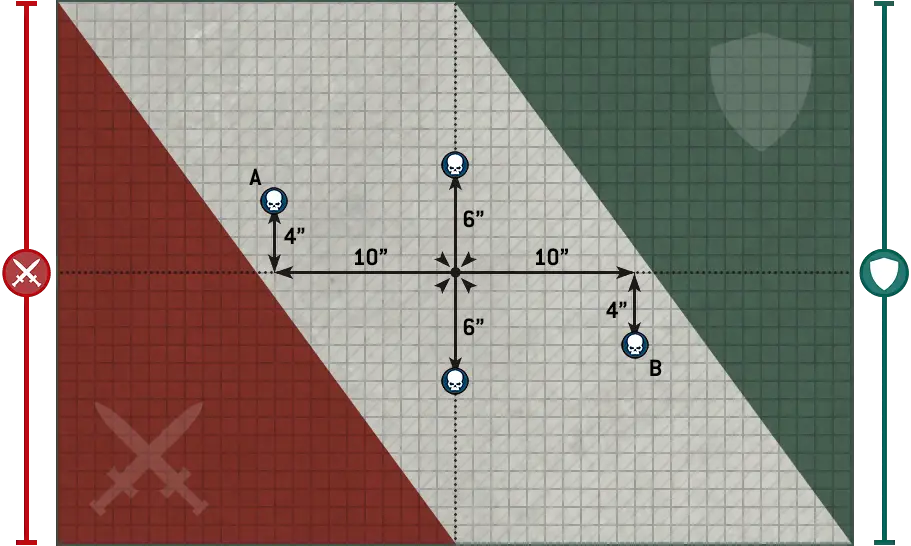
Clash of Patrols 1
1
1Your forces have been dispatched to a crash site in search of vital intelligence stored in surviving data-cores in the wreckage. High command insists you do not return empty-handed, but warns of enemies converging on the crash site. Secure the area, and the data, at all costs.
MISSION RULES
Retrieve Intelligence: In each player’s Command phase from the second battle round onwards, the player whose turn it is can select one objective marker they control and recover data from that objective marker. Each time a player recovers data from an objective marker, if their WARLORD is on the battlefield (or is embarked within a TRANSPORT that is on the battlefield), they gain 1CP. Each objective marker can only be selected for this rule once (by either player).
Retrieve Intelligence: In each player’s Command phase from the second battle round onwards, the player whose turn it is can select one objective marker they control and recover data from that objective marker. Each time a player recovers data from an objective marker, if their WARLORD is on the battlefield (or is embarked within a TRANSPORT that is on the battlefield), they gain 1CP. Each objective marker can only be selected for this rule once (by either player).
PRIMARY OBJECTIVE
TAKE AND HOLD
Several strategic locations have been identified in your vicinity. You are ordered to assault these positions, purge them of the foe and hold them at any cost.
In the second, third and fourth battle rounds:
At the end of each player’s Command phase, the player whose turn it is scores 5VP for each objective marker they control (to a maximum of 15VP per turn).In the fifth battle round:
- The player who has the first turn scores VP as described above.
- The player who has the second turn scores VP as described above, but does so at the end of their turn instead of at the end of their Command phase.
Combat Patrol
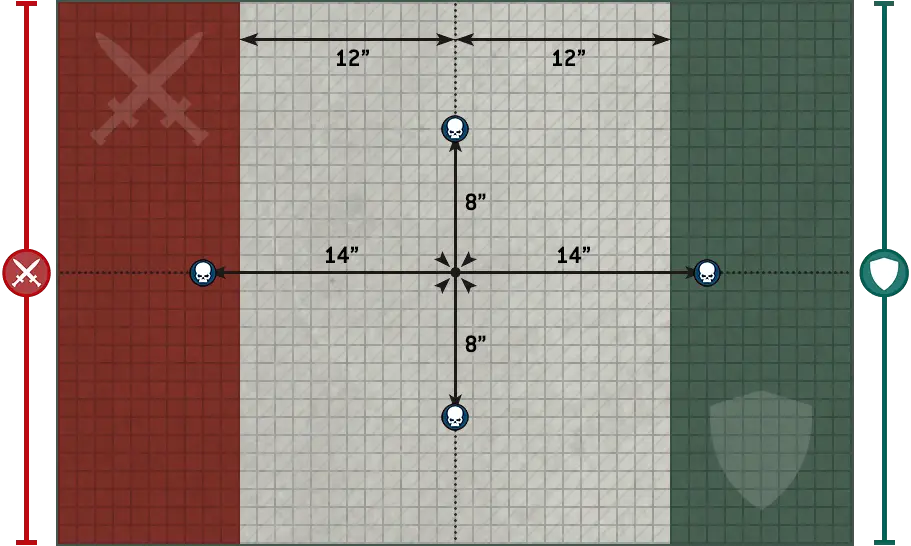
Archeotech Recovery 2
2Your forces are moving to retrieve valuable archeotech. Augur readings indicate the artefacts’ power cells are being irradiated by battlefield emissions. If they succumb, you will be left with mere shards of scrap. Secure and extract any active archeotech, before it degrades.
MISSION RULES
Irradiated Power Cells: During the battle, two objective markers will be removed from the battlefield as follows:
Irradiated Power Cells: During the battle, two objective markers will be removed from the battlefield as follows:
- At the start of the third battle round, the Defender randomly selects one objective marker that is in No Man’s Land to be the Gamma objective marker.
- At the start of the fourth battle round, the Gamma objective marker is removed from the battlefield, and the Attacker then randomly selects one of the two remaining objective markers that are in No Man’s Land to be the Beta objective marker.
- At the start of the fifth battle round, the Beta objective marker is removed from the battlefield.
PRIMARY OBJECTIVE
RECOVER ARCHEOTECH
Battle the enemy to secure the archeotech remnants before the radiation renders them worthless.
In the second, third, fourth and fifth battle rounds:
At the end of each player's Command phase, the player whose turn it is scores 5VP for each objective marker they control (to a maximum of 15VP per turn).At the end of the battle:
If a player controls the last objective marker in No Man’s Land, that player scores 10VP.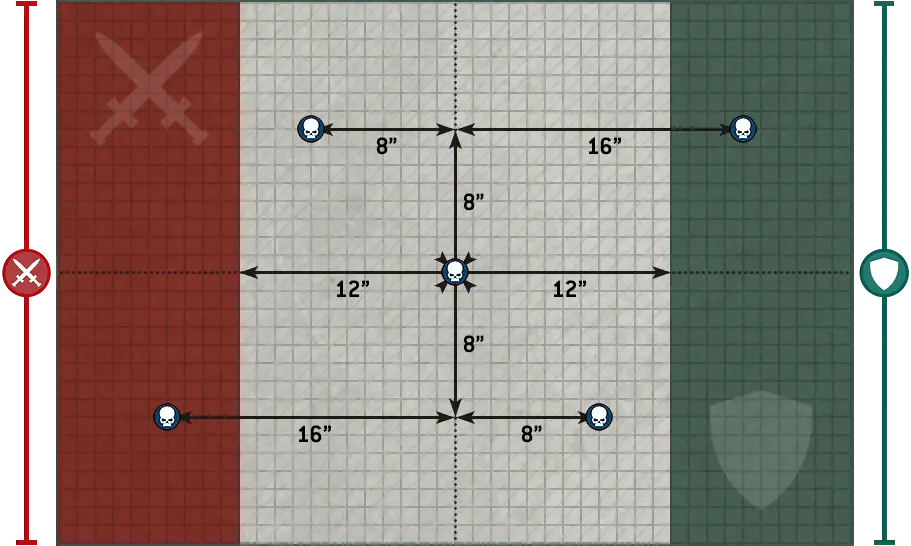
Combat Patrol
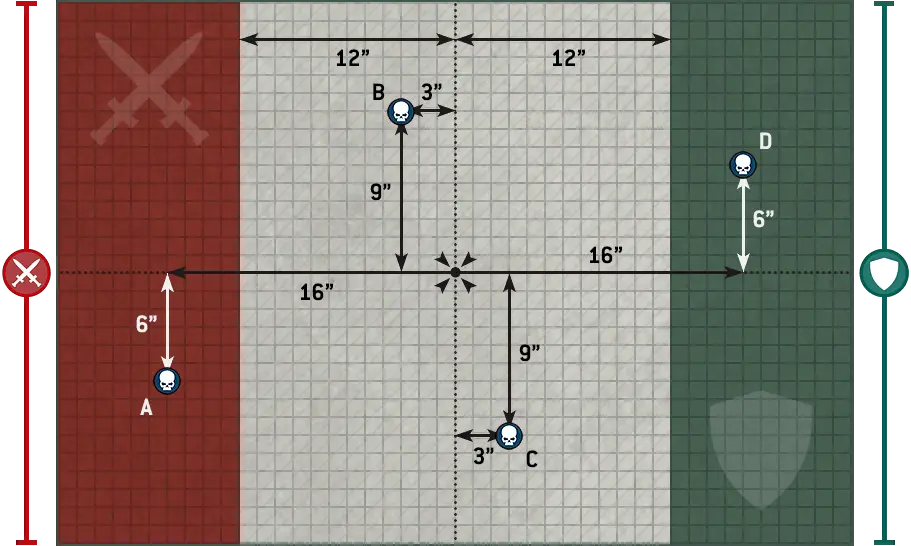
Forward Outpost 3
3Our observation post has spotted a similar enemy station within striking distance, likely filled with comms augurs that we can sabotage. Take a small force under the cover of darkness and cripple the outpost. But beware, the enemy have likely spotted us in return.
MISSION RULES
Sabotage Enemy Comms: At the end of each player’s turn, if the player whose turn it is controls the objective marker in their opponent’s deployment zone, then until the end of the battle, their opponent cannot use the Command Re-roll Stratagem.
Sabotage Enemy Comms: At the end of each player’s turn, if the player whose turn it is controls the objective marker in their opponent’s deployment zone, then until the end of the battle, their opponent cannot use the Command Re-roll Stratagem.
PRIMARY OBJECTIVE
VITAL GROUND
The most vital ground in the region is currently in the hands of the enemy. Draw your battle plans and destroy all who stand between you and your prize.
In the second, third and fourth battle rounds:
At the end of each player’s Command phase, the player whose turn it is scores VP as follows (to a maximum of 15VP):- For each objective marker that player controls that is within No Man’s Land, that player scores 5VP.
- If that player controls the objective marker in their opponent’s deployment zone, they score 10VP.
In the fifth battle round:
- The player who has the first turn scores VP as described above.
- The player who has the second turn scores VP as described above, but does so at the end of their turn instead of at the end of their Command phase.
Combat Patrol
Scorched Earth 4
4The time for a decisive strike against the foe is nigh. Key targets have been identified and their continued existence can no longer be tolerated. Spread ruination throughout the enemy’s territory and leave nothing but heaped corpses and blazing wreckage in your wake!
MISSION RULES
Raze and Ruin: At the start of each player’s Command phase from the second battle round onwards, if there are two or more objective markers on the battlefield, the player whose turn it is can select one objective marker they control, with the following restrictions:
The selected objective marker is said to have been razed by that player, and is removed from the battlefield.
Raze and Ruin: At the start of each player’s Command phase from the second battle round onwards, if there are two or more objective markers on the battlefield, the player whose turn it is can select one objective marker they control, with the following restrictions:
- An objective marker cannot be selected if there are any enemy units within 3" of it.
- The Attacker can never select objective marker A.
- The Defender can never select objective marker B.
The selected objective marker is said to have been razed by that player, and is removed from the battlefield.
PRIMARY OBJECTIVE
RAZE AND RUIN
While key assets can be valuable to seize, destroying those crucial to your enemy is more important still.
In the second, third and fourth battle rounds:
At the end of each player’s Command phase, the player whose turn it is scores VP as follows:- If that player controls one or more objective markers, they score 5VP.
- If that player controls more objective markers than their opponent controls, they score 5VP.
- If that player razed an objective marker this turn (see above), they score 10VP.
In the fifth battle round:
- The player who has the first turn scores VP as described above.
- The player who has the second turn scores VP as described above, but does so at the end of their turn instead of at the end of their Command phase.
Combat Patrol
Sweeping Raid 5
5Grinding stalemate has paralysed the battle lines, but a decisive blow can lance through the enemy defences. Drive a spearhead through this area, clearing enemy objectives of resistance as you push forwards, but do not allow the enemy to encircle us and cut off our supply lines.
MISSION RULES
Supply Lines: At the start of each player’s Command phase, if the player whose turn it is controls the objective marker in their deployment zone, they roll one D6: on a 4+, that player gains 1CP.
Supply Lines: At the start of each player’s Command phase, if the player whose turn it is controls the objective marker in their deployment zone, they roll one D6: on a 4+, that player gains 1CP.
PRIMARY OBJECTIVE
PRIORITY TARGETS
The objectives in this area are vital to our war effort and securing them is your highest priority. Spare nothing in ensuring that they do not fall into enemy hands.
In the second, third and fourth battle rounds:
At the end of each player’s Command phase, the player whose turn it is scores 5VP for each objective marker they control (to a maximum of 15VP per turn).At the end of the battle:
- The Attacker scores 5VP if they control objective marker C, and 10VP if they control objective marker D.
- The Defender scores 5VP if they control objective marker B, and 10VP if they control objective marker A.
Combat Patrol
Display of Might 6
6Glorious victory in battle is a demonstration of our superiority, and the weakness of our foes. Such an opportunity has arisen. Wrest control of the enemy’s symbolic sites of resistance and we can crush their fighting spirit – but beware the foe’s spiteful resilience on the back foot.
MISSION RULES
Break Their Spirit: Players cannot use the Insane Bravery Stratagem unless the unit targeted for that Stratagem is within 6" of their WARLORD.
Claim Sites: The objective markers in No Man’s Land are symbolic sites. At the end of each player’s Command phase, if the player whose turn it is controls a symbolic site and one or more CHARACTER models from their army are within range of it, that symbolic site is claimed by those models and remains so while any of those models remain within range of it.
PRIMARY OBJECTIVE
SYMBOLIC SITES
Claiming this battlefield’s symbolic sites will deal a crippling blow to the enemy.
In the second, third and fourth battle rounds:
At the end of each player’s Command phase, the player whose turn it is scores 5VP for each of the following conditions they satisfy:- They control one or more objective markers.
- They control two or more objective markers.
- One or more symbolic sites are claimed by a model from their army (see above).
- One or more symbolic sites have been claimed by the same model from their army for two or more consecutive turns (including the current one).
In the fifth battle round:
- The player who has the first turn scores VP as described above.
- The player who has the second turn scores VP as described above, but does so at the end of their turn instead of at the end of their Command phase.
Objective Markers
Objective markers represent objects of tactical or strategic import that both sides are attempting to secure, such as valuable artefacts, vital supplies or communications nodes. If a mission uses objective markers, it will state where they are located on the battlefield. These can be represented using any suitable marker, but we recommend using round markers that are 40mm in diameter.When setting objective markers up on the battlefield, place them so they are centred on the point specified by the mission. When measuring distances to and from objective markers, measure to and from the closest part of them. Models can move over objective markers as if they were not there, but they cannot end a move on top of an objective marker.
At the start of the battle, each objective marker on the battlefield is said to be contested, and so is not controlled by either player. To control an objective marker, a player will first need to move models within range of it. A model is within range of an objective marker if it is within 3" horizontally and 5" vertically of that objective marker.
Every model has an Objective Control (OC) characteristic listed on its datasheet. To determine a player’s Level of Control over an objective marker, add together the OC characteristics of all the models from that player’s army that are within range of that objective marker. A player will control an objective marker at the end of any phase or turn if their Level of Control over it is greater than their opponent’s. If both players have the same Level of Control over an objective marker, that objective marker is contested.
- A model is within range of an objective marker if within 3" horizontally and 5" vertically.
- Level of Control: Add together the OC characteristics of all of a player’s models within range of the objective marker.
- An objective marker is controlled by the player with the highest Level of Control over it (in a tie, it is contested).
- Models cannot end a move on top of an objective marker.
Roll-offs
Some rules instruct players to roll off. To do so, both players roll one D6, and whoever scores highest wins the roll-off. If there is a tie for the highest roll, roll off again. Neither player is allowed to re-roll or modify any of the D6 when making a roll-off.
Attached Units
Some CHARACTER units have the Leader ability, which lets them merge with other units (known as Bodyguard units) to form an Attached unit.The Starting Strength of an Attached unit is equal to the combined Starting Strengths of all of its units (i.e. the number of models in the Leader unit added to the number of models in the Bodyguard unit). If either the Leader unit or the Bodyguard unit in an Attached unit is destroyed, the Starting Strength of the remaining unit is changed to be equal to its original Starting Strength.
Example: A Primaris Captain (Starting Strength 1) is attached to a unit of Intercessors (Starting Strength 5). This Attached unit has a Starting Strength of 6. If all the Intercessors are destroyed, the remaining Primaris Captain would revert to having a Starting Strength of 1.
For the purposes of rules that are triggered when a unit is destroyed, such rules are still triggered when one of the individual units that made up an Attached unit is destroyed (the Leader or the Bodyguard unit).
Example: If a rule awards you with 1VP each time an enemy unit is destroyed, and you target an Attached unit, you would gain 1VP if the Bodyguard unit is destroyed and 1VP if the Leader unit is destroyed (for a total of 2VP).
Embark
If a unit makes a Normal, Advance or Fall Back move, and every model in that unit ends that move within 3" of a friendly TRANSPORT model, they can embark within it. A unit cannot embark if it has already disembarked from a TRANSPORT model in the same phase. Remove the unit from the battlefield and place it to one side – it is now embarked within that TRANSPORT model. Unless otherwise stated, units cannot do anything or be affected in any way while they are embarked.- A unit can embark within a friendly TRANSPORT if all of its models end a Normal, Advance or Fall Back move within 3" of that TRANSPORT.
- A unit cannot embark and disembark in the same phase.
DEEP STRIKE
Some units make their way to battle via tunnelling, teleportation, high-altitude descent or other extraordinary means that allow them to appear suddenly in the thick of the fighting.
During the Declare Battle Formations step, if every model in a unit has this ability, you can set it up in Reserves instead of setting it up on the battlefield. If you do, in the Reinforcements step of one of your Movement phases you can set up this unit anywhere on the battlefield that is more than 9" horizontally away from all enemy models. If a unit with the Deep Strike ability arrives from Strategic Reserves, the controlling player can choose for that unit to be set up either using the rules for Strategic Reserves or using the Deep Strike ability.- Unit can be set up in Reserves instead of on the battlefield.
- Unit can be set up in your Reinforcements step, more than 9" horizontally away from all enemy models.
Destroyed
Throughout a battle, models will suffer damage and be destroyed. When a model is destroyed, it is removed from the battlefield. When every model in a unit has been destroyed, that unit is destroyed.
SCOUTS
Scouts form the vanguard of many armies. Unnoticed by the enemy, they range ahead of the main force.
Some units have ‘Scouts x"’ listed in their abilities. If every model in a unit has this ability, then at the start of the first battle round, before the first turn begins, it can make a Normal move of up to x" as if it were your Movement phase – as can any DEDICATED TRANSPORT model such a unit starts the battle embarked within (provided only models with this ability are embarked within that DEDICATED TRANSPORT model). A unit that moves using this ability must end that move more than 9" horizontally away from all enemy models. If both players have units that can do this, the player who is taking the first turn moves their units first.Example: A unit has the Scouts 6" ability. At the start of the first battle round, the controlling player can make a Normal move with that unit of up to 6".
- Scouts x": Unit can make a Normal move of up to x" before the first turn begins.
- If embarked in a DEDICATED TRANSPORT, that DEDICATED TRANSPORT can make this move instead.
- Must end this move more than 9" horizontally away from all enemy models.
2. Battle-shock
In this step, you must take a Battle-shock test for each of your units on the battlefield that is Below Half-strength. To do so, roll 2D6: if the result is greater than or equal to the best Leadership characteristic in that unit, the test is passed; otherwise, the test is failed and, until the start of your next Command phase, that unit is Battle-shocked.While a unit is Battle-shocked:
- The Objective Control characteristic of all of its models is 0.
- If it Falls Back, you must take a Desperate Escape test for every model in that unit.
- Its controlling player cannot use Stratagems to affect that unit.
Once you have taken Battle-shock tests for all of your units that require them, your Command phase ends and you progress to your Movement phase.
In this step, if for any reason a unit is forced to take a Battle-shock test for being below its Starting Strength, unless otherwise stated, that unit does not also have to take a Battle-shock test for being Below Half-strength. While a unit is Battle-shocked, all models in that unit are also Battle-shocked.
- Take a Battle-shock test for each unit from your army on the battlefield that is Below Half-strength.
- Roll 2D6: if the result is greater than or equal to the unit’s Leadership, the test is passed. Otherwise, the unit is Battle-shocked until the start of your next Command phase.
- Battle-shocked units have an OC of 0 and their controlling player cannot use Stratagems to affect them.
- Battle-shocked units must take Desperate Escape tests if they Fall Back.
Advance Moves
When a unit Advances, make an Advance roll for that unit by rolling one D6. Add the result in inches to the Move characteristic of each model in that unit until the end of the phase. Each model in that unit can then make an Advance move by moving a distance in inches less than or equal to this total, but no model can be moved within Engagement Range of enemy models. A unit cannot shoot or declare a charge in the same turn that it Advanced.- Advance Move: Models move up to M+D6".
- Cannot move within Engagement Range of any enemy models.
- Units that Advance cannot shoot or charge this turn.
Charging with a Unit
Once you have selected an eligible unit to declare a charge, you must select one or more enemy units within 12" of it as the targets of that charge. The targets of a charge do not need to be visible to the charging unit.You then make a Charge roll for the charging unit by rolling 2D6. The result is the maximum number of inches each model in that unit can be moved if a Charge move is possible. For a Charge move to be possible, the Charge roll must be sufficient to enable the charging unit to end that move:
- Within Engagement Range of every unit that you selected as a target of the charge.
- Without moving within Engagement Range of any enemy units that were not a target of the charge.
- In Unit Coherency.
- Charge Roll: 2D6".
- Targets of a charge must be within 12" but do not need to be visible.
- If the distance rolled is insufficient to move within Engagement Range of all targets while maintaining Unit Coherency, the charge fails.
- Cannot move within Engagement Range of any unit that was not a target of the charge.
- If the charge is successful, each model makes a Charge move less than or equal to the Charge roll, and must move into base-to-base contact with an enemy model if possible.
Fall Back Moves
When a unit Falls Back, each model in that unit can make a Fall Back move by moving a distance in inches less than or equal to its Move characteristic, and when doing so you can move it within Engagement Range of enemy models, provided it does not end that move within Engagement Range of any enemy models – if this is not possible, that unit cannot Fall Back.
A unit cannot shoot or declare a charge in the same turn that it Fell Back.
Desperate Escape Tests
Unlike when making other types of move, models can move over enemy models when making a Fall Back move as if those enemy models were not there, but you must take a Desperate Escape test for each model that will do so (excluding models that are TITANIC or can FLY) before any models in that unit are moved. In addition, if a unit is Battle-shocked when it is selected to Fall Back, you must take a Desperate Escape test for every model in that unit before any are moved.
Each time you take a Desperate Escape test for a model, roll one D6. For each roll of 1-2, one model from the unit that is Falling Back is destroyed (selected by you). The same model can only ever trigger one Desperate Escape test per phase.A unit cannot shoot or declare a charge in the same turn that it Fell Back.
Desperate Escape Tests
Unlike when making other types of move, models can move over enemy models when making a Fall Back move as if those enemy models were not there, but you must take a Desperate Escape test for each model that will do so (excluding models that are TITANIC or can FLY) before any models in that unit are moved. In addition, if a unit is Battle-shocked when it is selected to Fall Back, you must take a Desperate Escape test for every model in that unit before any are moved.
- Fall Back Move: Models move up to M".
- Units that Fall Back cannot shoot or declare a charge in the same turn.
- Models can move over enemy models when Falling Back, but you must take Desperate Escape tests for them before they do so (excluding models that are TITANIC or can FLY).
- If a Battle-shocked unit is selected to Fall Back, take a Desperate Escape test for every model in that unit.
- Desperate Escape Test: Roll one D6. On a 1-2, one model from that unit is destroyed.
Hazardous
Weapons powered by unstable and dangerous energy sources pose a substantial risk to the wielder every time they are used.
Weapons with [HAZARDOUS] in their profile are known as Hazardous weapons. Each time a unit is selected to shoot or fight, after that unit has resolved all of its attacks, for each Hazardous weapon that targets were selected for when resolving those attacks, that unit must take one Hazardous test. To do so, roll one D6: on a 1, that test is failed. For each failed test you must resolve the following sequence (resolve each failed test one at a time):- If possible, select one model in that unit that has lost one or more wounds and is equipped with one or more Hazardous weapons.
- Otherwise, if possible, select one model in that unit (excluding CHARACTER models) equipped with one or more Hazardous weapons.
- Otherwise, select one CHARACTER model in that unit equipped with one or more Hazardous weapons.
If a unit from a player’s army is selected as the target of the Fire Overwatch Stratagem in their opponent’s Charge phase, any mortal wounds inflicted by Hazardous tests are allocated after the charging unit has ended its Charge move.
Example: A unit of five models make five attacks with ranged weapons with the [HAZARDOUS] ability. After the unit has finished shooting, its controlling player rolls five D6. One of the results is a 1, and as no models in the unit are CHARACTERS, MONSTERS or VEHICLES, one of those models is destroyed.
- After a unit shoots or fights, roll one Hazardous test (one D6) for each Hazardous weapon used. For each 1, one model equipped with a Hazardous weapon is destroyed (CHARACTERS, MONSTERS and VEHICLES suffer 3 mortal wounds instead).
Hit Roll
When a model makes an attack, make one Hit roll for that attack by rolling one D6. If the result of the Hit roll is greater than or equal to the attack’s Ballistic Skill (BS) characteristic (if the attack is being made with a ranged weapon) or its Weapon Skill (WS) characteristic (if the attack is being made with a melee weapon), then that Hit roll is successful and scores one hit against the target unit. Otherwise, the attack fails and the attack sequence ends.An unmodified Hit roll of 6 is called a Critical Hit and is always successful. An unmodified Hit roll of 1 always fails. A Hit roll can never be modified by more than -1 or +1.
- Hit Roll (Ranged Attack): A hit is scored if the D6 result equals or exceeds that attack’s BS.
- Hit Roll (Melee Attack): A hit is scored if the D6 result equals or exceeds that attack’s WS.
- Critical Hit: Unmodified Hit roll of 6. Always successful.
- An unmodified Hit roll of 1 always fails.
- A Hit roll can never be modified by more than -1 or +1.
Wound Roll
Each time an attack scores a hit against a target unit, make a Wound roll for that attack by rolling one D6 to see if that attack successfully wounds the target unit. The result required is determined by comparing the attack’s Strength (S) characteristic with the target’s Toughness (T) characteristic, as shown below.
| ||||||||||||||
If the result of the Wound roll is greater than or equal to the required number shown in the table above, then that Wound roll is successful and scores one wound against the target unit. Otherwise, the attack fails and the attack sequence ends.
An unmodified Wound roll of 6 is called a Critical Wound and is always successful. An unmodified Wound roll of 1 always fails. A Wound roll can never be modified by more than -1 or +1.
- Critical Wound: Unmodified Wound roll of 6. Always successful.
- An unmodified Wound roll of 1 always fails.
- A Wound roll can never be modified by more than -1 or +1.
Saving Throw
The player controlling the target unit then makes one saving throw. By default, this will be an armour saving throw using their model’s Save (Sv) characteristic, but some models have invulnerable saves that can be used instead (see below). To make an armour saving throw, roll one D6, then modify the result by the Armour Penetration (AP) characteristic of the attack. For example, if the attack has an AP of -1, then 1 is subtracted from the saving throw.If the result is greater than or equal to the Save characteristic of the model the attack was allocated to, then that saving throw is successful and the attack sequence ends. Otherwise, that saving throw fails and that model suffers damage.
An unmodified saving throw of 1 always fails. A saving throw can never be improved by more than +1.
- Saving Throw: Roll one D6 and modify by the attack’s AP. If the result is less than the Save of the model being rolled for, the saving throw is failed and that model suffers damage. Otherwise, that attack is saved.
- An unmodified saving throw of 1 always fails.
- A saving throw can never be improved by more than +1.
Re-rolls
Some rules allow you to re-roll a dice roll, which means you get to roll some or all of the dice again. If a rule allows you to re-roll a dice roll that was made by adding several dice together (e.g. 2D6, 3D6, etc.) then, unless otherwise stated, you must re-roll all of those dice again.You can never re-roll a dice more than once, and re-rolls happen before modifiers (if any) are applied. Rules that refer to the value of an ‘unmodified’ dice roll are referring to the dice result after any re-rolls, but before any modifiers are applied.
- Unmodified Dice: the result after re-rolls, but before any modifiers.
- A dice can never be re-rolled more than once.
- You must re-roll all dice if several need adding together (e.g. 2D6).
- Re-rolls are applied before any modifiers.
COMMAND RE-ROLL
1CP
Core – Battle Tactic Stratagem
A great commander can bend even the vagaries of fate and fortune to their will, the better to ensure victory.
WHEN: Any phase, just after you make an Advance roll, a Charge roll, a Desperate Escape test or a Hazardous test for a unit from your army, or a Hit roll, a Wound roll, a Damage roll or a saving throw for a model in that unit, or a roll to determine the number of attacks made with a weapon equipped by a model in that unit. If you are using fast dice rolling, this Stratagem can still be used after rolling multiple rolls or saving throws at once.
TARGET: That unit or model from your army.
EFFECT: You re-roll that roll, test or saving throw. If you are using fast dice rolling, select one of those rolls or saving throws to re-roll.
TARGET: That unit or model from your army.
EFFECT: You re-roll that roll, test or saving throw. If you are using fast dice rolling, select one of those rolls or saving throws to re-roll.
INSANE BRAVERY
1CP
Core – Epic Deed Stratagem
Indifferent to their own survival, these warriors hold their ground against seemingly impossible odds.
WHEN: Battle-shock step of your Command phase, just before you take a Battle-shock test for a unit from your army.
TARGET: That unit from your army.
EFFECT: Your unit automatically passes that Battle-shock test.
RESTRICTIONS: You cannot use this Stratagem more than once per battle.
TARGET: That unit from your army.
EFFECT: Your unit automatically passes that Battle-shock test.
RESTRICTIONS: You cannot use this Stratagem more than once per battle.