Unit Types
| So far, this rulebook has discussed the basic rules as they pertain to Infantry as the most common Unit Type in the Horus Heresy - Age of Darkness. Whilst the definition of Infantry is broad, it cannot cover the full breadth of war-forged terrors unleashed during the Horus Heresy. This section covers a series of Unit Types, though Vehicles are distinct enough to require their own section later on. Some Unit Types have additional special rules attached to them, while some exist to be referenced by other rules. If a Unit Type has no additional rules listed then it uses all the standard rules as normal, unless another special rule lists an exception when targeting that Unit Type. In most cases, it will be obvious which Unit Type a model falls into, but as Unit Type is an extension of the Characteristics Profile, you will find that information in the relevant Army List or Army List entry. | ||
Books
| Book | Kind | Edition | Version | Last update |
| | ||||
| | Rulebook | 2 | 1.2 | December 2023 |
INFANTRY
Infantry units include all types of foot soldiers. A typical unit of Infantry is between five and ten models strong, but they can be much larger. In rare cases, an Infantry unit may comprise only a single model. Infantry are fairly slow moving, but can cross almost any terrain and make the best use of cover to avoid enemy fire.The wider category of Infantry units contains a number of sub-types which may be referenced in other Age of Darkness books. Infantry represent the most basic element of any army and, as such, require no additional rules.
An Infantry unit may only include or be joined by models of the Infantry or Primarch Unit Type, unless a special rule states otherwise.
CAVALRY
Cavalry use their fast speed to strike deep into enemy territory and escape before their opponent is able to react. This Unit Type includes units mounted on bikes, jetbikes, land speeders and even traditional cavalry mounted on riding beasts.As with other Unit Types, the Cavalry type includes a number of sub-types which may be referenced in other Age of Darkness books. The following rules apply to all Cavalry models and any Cavalry sub-types:
- Cavalry models cannot be Pinned.
- Cavalry models are not slowed down by Difficult Terrain, even when Charging. However, Cavalry models treat all Difficult Terrain as Dangerous Terrain instead.
- Cavalry models move 3D6" when Falling Back, rather than 2D6".
- No model that is not also of the Cavalry Unit Type may join a unit that includes a Cavalry model.
AUTOMATA
The steel warriors of the Mechanicum are unlike any other force in the galaxy, unflinching automatons of logic engrams and gears. Though far more rugged than even the Emperor’s Legiones Astartes, they are bound to the unchanging dictates of their programming and lack the tactical flexibility of flesh and blood warriors.As with other Unit Types, the Automata type includes a number of sub-types which may be referenced in other Age of Darkness books. The following rules apply to all Automata models and any Automata sub-types:
- All Automata models have the Fearless special rule.
- Successful Wounds inflicted by attacks with the Poisoned or Fleshbane special rules must be re-rolled against models of the Automata Unit Type.
- A unit that includes one or more models with the Automata Unit Type may not make Reactions.
- No model that is not also of the Automata Unit Type may join a unit that includes an Automata model.
DREADNOUGHT
These massive engines of war are unlike the soulless warriors of the Mechanicum, for at their heart rests a mortal warrior whose instincts and experience guides their steel body on the field of battle. Employed by both the Legiones Astartes and some regiments of the Imperial Army, these towering behemoths excel as line-breakers and siege engines.As with other Unit Types, the Dreadnought type includes a number of sub-types which may be referenced in other Age of Darkness books. The following rules apply to all Dreadnought models and any Dreadnought sub-types:
- Successful Wounds scored by attacks with the Poisoned or Fleshbane special rules must be re-rolled against models of the Dreadnought Unit Type.
- All Dreadnought models have the Fearless special rule.
- A model with the Dreadnought Unit Type may fire all weapons they are equipped with in each Shooting Attack they make, including as part of a Reaction.
- A model of the Dreadnought type may fire Heavy and Ordnance weapons and counts as Stationary even if it moved in the preceding Movement phase, and may declare Charges as normal regardless of any Shooting Attacks made in the same turn.
- No model that is not also of the Dreadnought Unit Type may join a unit that includes a Dreadnought model.
DAEMON
The unknown terror of the dark ages of the Horus Heresy, these aetheric horrors defy all logic. Unbound by the normal laws of reality, they mass and attack in defiance of any sound military doctrine and fight without need for the technologies that sustain Mankind on the battlefield.As with other Unit Types, the Daemon type includes a number of sub-types which may be referenced in other Age of Darkness books. The following rules apply to all Daemon models and any Daemon sub-types:
- All Daemon models have their Strength and Toughness modified by a value determined by the current Game Turn: +1 on Game Turns 1 & 2, +/-0 on Game Turns 3 & 4, -1 on Game Turns 5 & 6, and -2 on Game Turns 7+.
- All Daemon models have the Fear (1) special rule.
- Any Hits inflicted on a model of the Daemon Unit Type by a weapon with the Force special rule gain the Instant Death special rule as well.
- All Daemon models are immune to the effects of the Fear special rule, automatically pass Pinning and Regroup tests and cannot choose to fail a Morale check due to the Our Weapons Are Useless special rule. When a Daemon unit fails a Morale check it does not Fall Back as per the standard rules, but instead suffers D3 automatic Wounds with no Saves of any kind allowed.
- No model that is not also of the Daemon Unit Type may join a unit that includes a Daemon model.
PRIMARCH
Mightiest of all the Emperor’s creations and the greatest warriors and generals of their age, the Primarchs of the Space Marine Legions epitomise the dark ages of the Horus Heresy. These colossi of war were powerful beyond the capabilities of any mortal warrior or steel-forged automata – for their only equal was another of their own kind.The following rules apply to all Primarchs:
- All Primarchs have the following special rules: Independent Character, Eternal Warrior, Fearless, It Will Not Die (5+), Bulky (4), and Relentless. In addition, all models with the Primarch unit type always count as Character models.
- Primarchs are not affected by special rules that negatively modify their Characteristics (other than Wounds) and, in addition, Primarchs always resolve Snap Shots at their normal BS.
- Any Hits inflicted by a Primarch, as part of either Shooting Attacks or in close combat, are allocated by the Primarch’s controlling player and not the controlling player of the target unit. These Hits should form a separate Wound Pool.
- If an army includes any Primarch models, then one of those models must be chosen as the army’s Warlord.
UNIT SUB-TYPES
In addition to the base Unit Types (Infantry, Cavalry, Automata, Dreadnought, Primarch and Daemon), some models might be listed as belonging to one or more sub-types. Some sub-types may grant a model or unit additional special rules, an example of which is the Character sub-type which is covered in its own section of this rulebook. Other sub-types do not grant any special rules to models or units that possess them, but are instead used by other special rules to differentiate between otherwise similar units. In all cases, sub-types are presented after the base Unit Types in brackets. For example, a Legion Cataphract Sergeant has the following base Unit Type and sub-types: Infantry (Heavy, Character).A number of key unit sub-types are presented here – more may be referenced in other Age of Darkness books.
Line Sub-type
Line units are those sections of any army whose dedicated task is the capture and defence of key objectives and vital choke-points on the battlefield. Though often seen as lacking in glory, it is only by the efforts of these key units that victory can be firmly grasped, and without them any onslaught is doomed to failure.The following rules apply to all models with the Line sub-type:
- A unit that includes at least one model with the Line sub-type counts as both a Scoring and Denial unit.
Antigrav Sub-type
Whether equipped with antigrav repulsors or empowered by some esoteric, psychic art, this unit is able to skim above the ground. While incapable of true flight, this does allow it to avoid any of the hampering effects of the prevailing terrain, gliding over obstacles that would ensnare or entangle more conventional troops.The following rules apply to all models with the Antigrav sub-type:
- A unit that includes only models with the Antigrav sub-type may ignore the effects of any and all terrain it passes over during movement, including passing over vertical terrain and Impassable Terrain without penalty or restriction. However, such units may not begin or end their movement in Impassable Terrain, and if beginning or ending their movement in Dangerous Terrain must take Dangerous Terrain tests as normal.
- Models with the Antigrav sub-type may never benefit from Cover Saves of any kind.
Artillery Sub-type
Some weapons are so large and cumbersome that they are usually mounted on vehicles, but are sometimes utilised by artillery teams on foot, particularly if the battlefield’s terrain is not suitable for vehicles. These weapons are typically mounted on wheeled supports, as they are too heavy to be carried across the battlefield.The following rules apply to all models with the Artillery sub-type:
- If a unit that includes any models with the Artillery sub-type has no models without the Artillery sub-type, then all models in the unit are removed from play as casualties immediately.
- A unit that includes one or more models with the Artillery sub-type may not Run, declare or otherwise make Charge moves, or make Reactions.
- A unit that includes one or more models with the Artillery sub-type may never hold or deny Objectives.
- A unit that includes one or more models with the Artillery sub-type may not make Sweeping Advances and, if targeted by a Sweeping Advance, automatically fails any Sweeping Advance rolls made without rolling any dice and is destroyed.
Monstrous Sub-type
Some of the warriors and weapons deployed to the battlefield are huge and hulking, more than capable of crushing lesser foes with a single blow or carrying the largest and bulkiest of weapons onto the field. These creatures are unwieldy and often slow, but terrifyingly effective on the front lines.The following rules apply to models with the Monstrous sub-type:
- A unit that includes any models with the Monstrous sub-type cannot be Pinned.
- A model with the Monstrous sub-type may fire all weapons they are equipped with in each Shooting Attack they make, including as part of a Reaction.
- A model with the Monstrous sub-type may fire Heavy and Ordnance weapons and counts as Stationary even if it moved in the preceding Movement phase, and may declare Charges as normal regardless of any Shooting Attacks made in the same turn.
- No model that is not also Monstrous may join a unit that includes a Monstrous model.
Heavy Sub-type
Intended to break the lines of the foe or to hold the most dangerous of positions, heavy troops trade speed and manoeuvrability for indomitable toughness and stubborn tenacity. They stand at the heart of battle and dare death to come forth and claim them.The following rules apply to all models with the Heavy sub-type:
- A unit that includes only models with the Heavy sub- type may re-roll failed Armour Saves against Template and Blast weapons.
- A unit that includes any models with the Heavy sub-type may not Run and when making a Movement during a Reaction based on its Initiative Characteristic, reduces the distance moved by -1.
Light Sub-type
Light troops are equipped and trained to fight on the move, pausing only briefly and trusting to speed over cover or heavy armour. Many armies will make use of such warriors as scouts, but they also serve as admirable harassers and pursuit troops, easily capable of disrupting enemy attacks and advances or hounding a retreat.The following rules apply to all models with the Light sub-type:
- A unit that includes only models with the Light sub-type gains a +1 modifier to its Initiative when determining how far that unit may Run (this bonus stacks with other bonuses to Run distance, such as the Fleet (X) special rule) and when moving as part of a Reaction.
- A unit that includes only models with the Light sub-type may make Shooting Attacks after having Run, but makes all such attacks as Snap Shots. Models or weapons that cannot attack as Snap Shots may not attack.
- Models with the Light sub-type may never claim a Cover Save in the same turn that it makes a Run move.
CHARACTERS
Veteran warriors, exemplary officers and ferocious war leaders can all inspire their troops to great feats of heroism and bravery. Often, these individuals are quicker, stronger and more skilled in combat than those they lead. In The Horus Heresy – Age of Darkness, these kinds of powerful individuals are called Characters.Character Types
Most Characters are fielded in units from the start of the game, and represent squad leaders, such as a Legion Tactical Sergeant. They have their own profile, but do not have a separate entry. They are effectively just another trooper in their unit, with enhanced Characteristics and perhaps a wider selection of weapons and Wargear choices. Other Characters, such as Horus, Primarch of the Sons of Horus, fight as units on their own. They are mighty enough that they don’t need to take to the battlefield with other warriors. Regardless of their status within their army, all Characters use the same rules.Independent Characters
Some Characters have the Independent Character special rule, which allows them to join other units.Characters as Leaders
As Characters normally have better Leadership than other warriors, they make good leaders for units in your army, given that units use the highest Leadership in the unit when determining Leadership tests.Characters and Moving
Characters follow the Movement rules for models of their type, whether Infantry, Cavalry, etc. Note that they must remain in unit coherency with any unit they are part of.Characters and Assaults
Remember that a Character that has joined a unit follows all the normal rules for being part of a unit. If a Character is in a unit that Charges into close combat, the Character Charges too, as it is part of the unit. If the Character’s unit is locked in combat, they fight as part of the unit.Characters and Shooting
Characters make Shooting Attacks as normal for models of their type.Characters and Wound Allocation
When allocating Wounds, a player may always choose not to allocate Wounds to a model with the Character Sub-type, regardless of how many Wounds that model has lost or any other factors that would normally require it to have Wounds allocated to it, as long as there is at least one other valid target model in the same unit to which Wounds may be allocated instead.Challenges
Characters, no matter their type, can issue Challenges during combat – seeking to call out the enemy’s own leaders and confront them on an equal footing.Issuing a Challenge
Challenges are issued at the start of the Fight sub-phase, before any attacks are made. Only one Challenge can be issued per combat – the Active player has the opportunity to issue a Challenge first. If that side chooses not to, then the Reactive player can issue a Challenge. Once a Challenge has been declared and accepted, there can be no further Challenges made until the existing Challenge in that combat has been fully resolved.To issue a Challenge, nominate a Character in one of your units locked in the combat to be the challenger. Once one Challenge has been made, no further Challenges can be issued in that combat that turn. If the Challenge is accepted, no further Challenges can be issued until that Challenge has been resolved. If there are no Characters in the enemy units, then a Challenge cannot be issued. Characters that cannot fight or make Melee Attacks, including those that are not engaged with an enemy model, cannot issue Challenges.
Accepting a Challenge
If your opponent has issued a Challenge, you can now accept it – nominate any Character in one of your units locked in the combat to accept the Challenge. Characters that cannot fight or make Melee Attacks, including those that are not engaged with an enemy model, cannot accept Challenges.Refusing a Challenge
Alternatively, you can refuse the Challenge. If you refuse, your opponent gets to nominate one of your Characters from those who could have accepted. The chosen model cannot attack in close combat at all this turn. Furthermore, their Leadership Characteristic cannot be used by the rest of the unit for the remainder of the Phase. Once a Challenge has been refused, the model that issued it fights normally.Fighting a Challenge
If a Challenge has been accepted, move the two combatants into base contact with each other. Note that these moves cannot be used to move a Character out of unit coherency. If possible, swap the Challenger for a friendly model in base contact with the Challenged model. If this cannot be done, swap the Challenged model for a friendly model in base contact with the Challenger. If neither of these moves would result in the two models being in base contact, ‘swap’ the Challenger as close as possible to the Challenged model and assume the two to be in base contact for the purposes of the ensuing fight.Models that are moved to satisfy a Challenge are not subject to Difficult Terrain tests or Dangerous Terrain tests.
For the duration of the Challenge, these two models are considered to be in base contact with each other and, when rolling To Hit and To Wound, they always use the Weapon Skill and Toughness of their opponent. When allocating Wounds caused by either of these two models, they must be allocated to their opponent first.
Combatant Slain
If a Character involved in a Challenge is removed as a casualty, each excess Wound inflicted by the victor is counted toward the Assault result, but is not allocated to any other model. If the winning Character model has any remaining Attacks in the same or later Initiative steps, then these are resolved against the slain Character’s WS and Toughness, but are only counted for the purposes of winning combat and are not Allocated to any other models. When one of the combatants in a Challenge is slain, regardless of which Initiative step it is, the Challenge is still considered to be ongoing until the end of the Phase for the purposes of Outside Forces.Outside Forces
Whilst the Challenge is ongoing, other models locked in the combat can only Allocate Wounds to the models involved in the Challenge if all other enemy models (if any) that are locked in that combat have been removed as casualties.Assault Result
Unsaved Wounds caused in a Challenge count towards the Assault result, including any excess Wounds caused by the winner of a Challenge as noted above, alongside any unsaved Wounds caused by the rest of the Character’s units.Round Two
If both competitors survive a Challenge, and neither side fled from the combat, then they both continue the Challenge in the next round of combat. Note that if a Character is caught by a Sweeping Advance, but is not removed as a casualty due to a special rule, the Challenge does not continue.PSYCHIC POWERS
On the battlefields of the Horus Heresy, it is not just by bolt and blade that war is prosecuted, but also with the forbidden powers of the battle psyker. Once banned from the Legiones Astartes order of battle, the chaos of the Horus Heresy has seen such self-destructive weapons return to the forefront of the fighting. Blasts of witch-fire can cut through even the most formidable armour, and by the eldritch wiles of a trained Librarian, the most fearsome shells can be turned aside and the very thoughts of the enemy turned against them.In all cases, to use a Psychic Attack, Weapon or Power, a model must possess the Psyker unit sub-type.
Psyker
Much like Character, Psyker is a unit sub-type that can be applied to a model of any other Unit Type. This is used to indicate models that are capable of using Psychic Powers and weapons. On its own this sub-type grants no abilities or rules, but many other rules, weapons and abilities will target or require a model with this sub-type in order to be used. Often, a rule will reference or target a ‘Psyker’, this means any model with the Psyker sub-type. Models that are or can become Psykers are also often given the option to acquire other abilities or attacks that require that unit sub-type. If such options exist, they will be noted on that unit’s profile or Army List entry.The following examples show some common units or models that also have the Psyker sub-type:
- Legion Centurion with the Librarian Consul upgrade: Infantry (Character, Psyker)
- Ruinstorm Daemon Lord: Daemon (Character, Monstrous, Psyker)
- Imperialis Militia Rogue Psyker: Infantry (Character, Psyker)
Throughout the rules for Psykers, there are references to Psychic checks. A Psychic check is a kind of Leadership test and is taken in exactly the same manner as any other Leadership test – however, special rules that allow a model to modify or automatically pass Leadership tests have no effect on Psychic checks.
Psychic Weapons
The most common forms of Psychic Power encountered on the battlefield are those that act in a manner akin to more conventional weapons. Whether bolts of eldritch lightning or projectiles ripped from the very earth, these attacks are presented and function in exactly the same manner as any other weapon. They use exactly the same rules, Characteristics and resolution methods as any other attack, and can be both ranged and melee.A Psyker that gains a Psychic Weapon is ‘equipped’ with it in the same manner as any other model is equipped with the Wargear that is part of its profile. A model that has the Psyker sub-type may make Shooting Attacks using any ranged Psychic Weapon available to it (or more than one if that model has a rule that allows more than one weapon to be used during a Shooting Attack), or during the Assault phase a Psyker may attack using a Psychic Weapon with the Melee type. In close combat, a Psychic Weapon with the Melee type does count for deciding if a model has more than one weapon, but obeys all the usual restrictions. However, a Psychic Weapon can never be destroyed or otherwise removed from a model unless a rule specifically targets a Psychic Weapon (this does not apply to Force Weapons).
In most cases, the Psychic Disciplines available to a Psyker will provide one or more Psychic Weapons as part of their portfolio of abilities.
Psychic Powers
The next type of Psychic ability falls under the more common heading of Psychic Powers. These abilities can achieve many diverse ends, from simple destruction to the subtle subversion of the enemy, and are represented in a form more akin to special rules in order to represent the many effects a trained battle psyker can produce. Not all Psykers have access to the same suite of powers, and those available to any given model will be detailed in that model’s profile or Army List. The key difference between a Psychic Power and a Psychic Weapon is that a Power is not resolved as a standard attack and has its own rules for resolving any effects it may cause, much like other special rules.In most cases, the Psychic Disciplines available to a Psyker will provide one or more Psychic Powers as part of their portfolio of abilities.
Psychic Disciplines
Both Psychic Weapons and Psychic Powers are often gathered into categories known as Disciplines. Many Psykers’ Army List entries will indicate that a model or unit has access to one or more Disciplines rather than listing all the rules included as part of that Discipline. When a model or unit is granted a Discipline or is asked to select one, they gain all powers, attacks and other rules included as part of that Discipline.A set of Core Psychic Disciplines is presented as part of this rulebook, but other publications may present additional Disciplines.
Perils of the Warp
Common to all forms of psychic ability is the possibility of the Warp’s power rebelling and wreaking havoc on the Psyker and their allies. This is represented by the Perils of the Warp special rule. Most Psychic Powers and Weapons dictate under what conditions a Psyker must suffer Perils of the Warp, but in most cases this will be as the result of a failed Leadership test while using a Psychic Power or attack.Whenever a Psyker or other model/unit suffers Perils of the Warp, apply the rule below:
Perils of the Warp: When a model or unit suffers Perils of the Warp, it receives D3 Wounds against which only Invulnerable Saves may be taken (no Damage Mitigation rolls may be made to negate these Wounds). These Wounds may be allocated to any model in the unit, including models without the Psyker Sub-type, in the same manner as those received during a Shooting Attack. If the Psyker is a Vehicle, it suffers D3 Hull Points of damage against which only Invulnerable Saves may be taken.
These Hull Points of damage may be allocated to other Vehicle models in the same Squadron, in the same manner as a Shooting Attack.
VEHICLES
The battles of the Horus Heresy saw the use of massed formations of immense armoured vehicles and other towering engines of destruction. Vehicles are a Unit Type that does not operate in the same manner as other models, thus warranting their own section. This section details the rules and Characteristics common to the Vehicle Unit Type, before going into more detail as to the various sub-types unique to Vehicles.Vehicle Characteristics
Vehicles have Characteristics that define how powerful they are in a similar way to Infantry. However, their Characteristics are different. Below is one example of a Vehicle’s profile:
| |||||||||||||||||||||||
| |||||||||||||||||||||||||||||||
Movement (M)
Vehicles have a Movement Characteristic just like other units and it represents the maximum possible speed for that Vehicle. Most Vehicles can choose to move less than their maximum speed in order to fire more weapons with greater accuracy.Ballistic Skill (BS)
Vehicles have a Ballistic Skill Characteristic just like other Unit Types and it represents the accuracy of the crew as they attack their enemy with the Vehicle’s weapons.Armour Value (AV)
The Armour Value, sometimes referred to simply as Armour, of a Vehicle represents how hard it is to damage. Vehicles have separate Armour Values to represent the protection on their Front (F), Sides (S) and Rear (R). Armour Values typically range from 10-14, depending on which Facing of the Vehicle is being attacked, with the lightest armour usually on the Rear.Sub-types
Just as other units can have different Unit Types, Vehicles have a number of different types. Each of these grants additional rules that only apply to that type of Vehicle. Unlike other units, these types can be combined, with one Vehicle having multiple types, in which case the Vehicle has all of the rules for all of its types.Hull Points (HP)
Every Vehicle has a number of Hull Points, indicating how much damage it can take before it is destroyed. This will normally be shown in the Vehicle’s Characteristics profile.Vehicles and Measuring Distances
As Vehicle models do not usually have bases, the normal rule of measuring distances to or from a base cannot be used. Instead, measure to and from their hull, ignoring gun barrels, dozer blades, banners and other decorative elements.There is, however, the notable exception of a Vehicle’s weaponry. When firing a Vehicle’s weapons, ranges are measured from the firing end of the weapon being used to attack, whilst line of sight is determined from the weapon’s Firing Arc, as will be explained later in this section.
Vehicles in the Movement Phase
As with all other models in the Horus Heresy – Age of Darkness rules, Vehicles have a Movement Characteristic which defines the maximum number of inches they may move on the battlefield. This Movement Characteristic is often much greater than any Infantry model, but the distance a Vehicle moves dictates how accurate its weapons fire will be, and so Vehicles that take full advantage of their powerful engines will be less capable of laying down support fire later in the turn.Stationary – A Vehicle that remains Stationary will be able to attack with all of its weapons, regardless of type, with no modification to their accuracy.
Combat Speed – A Vehicle that travels equal to or less, than half of its Movement Characteristic is said to be moving at Combat Speed. This represents the Vehicle advancing slowly to keep firing. A Vehicle moving at Combat Speed may attack with all non-Ordnance or non-Destroyer weapons with no modification to their accuracy. A Vehicle moving at Combat Speed may only fire a single Ordnance or Destroyer weapon, and if it does so then all other weapons must be fired as Snap Shots.
Vehicles can turn any number of times as they move, just like any other model. Vehicles turn by pivoting on the spot about their centre point, rather than wheeling round. Pivoting on the spot alone does not count as moving, so a Vehicle that only pivots in the Movement phase counts as Stationary (however, Immobilised Vehicles cannot even pivot on the spot). Pivoting is always done from the centre of a Vehicle to prevent it from accidentally moving further than intended or allowed. Just like other units, Vehicles cannot move over friendly models. A Vehicle may only pivot during the Movement phase, unless another rule specifically allows it to do so at another point. Unlike other models, Vehicles may not move vertically in terrain or on Terrain Pieces in order to ascend levels.
Some Vehicle types, from combat aircraft to lumbering artillery vehicles, as detailed later in this section, can affect both the manner in which a Vehicle moves and the distances it may move.
Difficult Terrain and Dangerous Terrain
Vehicles moving through areas of terrain are not slowed like other units, but still risk becoming stuck or damaged. Vehicles treat all Difficult Terrain as Dangerous Terrain instead. A Vehicle that fails a Dangerous Terrain test immediately loses 1 Hull Point and suffers an Immobilised result on the Vehicle Damage table.Ramming
When moving a Vehicle, the controlling player may declare that the Vehicle will attempt to Ram instead of moving normally. A Ram Attack allows a Vehicle to use its sheer bulk as a weapon, crushing infantry and battering even the most heavily-armoured war machines. The Vehicle attempting a Ram Attack, and any Embarked troops, may only fire Snap Shots in that turn’s Shooting phase.To perform a Ram Attack, first turn the Vehicle on the spot to face the direction you intend to move it in, and, after measuring, declare how many inches the Vehicle is going to move, up to a maximum of its Movement Characteristic. If, due to the size of the Vehicle model making the Ram, pivoting the model brings it into contact with an enemy unit then move the Ramming Vehicle the minimum distance required to keep it 1" away from any other model before beginning the Ram. Once the Vehicle has been ‘aimed’ and the intended distance declared, move the Vehicle straight forwards until it comes into contact with a unit, enemy or friendly, or it reaches the distance declared – no other changes of direction are allowed during a Ram.
Note that a Vehicle conducting a Ram may not contact a unit that is locked in combat. If its movement would bring it into contact with a unit that is locked in combat then it must halt its movement 1" away from that unit, ending the Ram.
If a non-Vehicle unit is reached then that unit suffers D6 automatic Hits. These hits are resolved at a Strength equal to half the Front Armour Value of the Ramming Vehicle, rounding up, and with an AP of -. If the Ramming Vehicle is a Super-heavy Vehicle then the Strength of the attack is always 10, and the number of Hits is increased to 2D6. Once all Hits sustained from the Ram have been resolved, the unit that has been rammed must take a Morale check and immediately Fall Back if it fails. Regardless of the result of the check, the Vehicle stops moving 1" away from any other models and does not move any further this turn.
If the Ramming Vehicle comes into contact with an enemy Vehicle or Building, then all Vehicles or Buildings immediately inflict a Hit against any Armour Facing that is in contact with another Vehicle. The Strength of Hits inflicted on all Vehicles will be equal to half the Armour Value, rounding up, on the facing that is in contact with an enemy Vehicle or Building.
If the Ramming Vehicle has more starting Hull Points than any Vehicle or Building it is in contact with, add +1 to the Strength of the Hit, and if the Ramming Vehicle has the Slow or Super-heavy type, or is a Building, add +4 Strength, to a maximum value of 10. Both players roll for armour penetration against any of their opponent’s Vehicles or Building involved in the Ramming Attack, and any results are immediately applied. Regardless of the damage dealt to any Vehicles or Buildings involved in the Ram Attack, once the Ram Attack is resolved the Ramming Vehicle halts 1" away from any other models and does not move further this turn.
If, at any point in its move, the Vehicle would enter into contact with Impassable Terrain or a battlefield edge, or if it passes within 1" of units in combat or friendly units, it immediately stops moving 1" away from any other model.
Units already Falling Back
If a unit that is Falling Back is Rammed, the unit that is Falling Back automatically fails its Morale check. This also applies if a unit Falls Back from a Ramming Attack and the Vehicle’s remaining move brings it into contact with them a second time.Ramming from Reserve
A Vehicle that moves onto the battlefield from Reserve may attempt a Ram. This must be declared before the Vehicle moves onto the battlefield.Ramming Restrictions
Units cannot Embark onto or Disembark from a Transport Vehicle in the same Movement phase in which it has already performed a Ram. Likewise, a Transport Vehicle from which a unit has Embarked or Disembarked that Phase cannot perform a Ram in that Movement phase.A Vehicle that has performed a Ram during the Movement phase may still make Shooting Attacks in the following Shooting phase, but may only make Snap Shots.
Advanced Reaction: Death or GloryAdvanced Reactions are available to specific players as noted in their description. Unlike Core Reactions they are activated in unique and specific circumstances, as noted in their descriptions, and can often have game changing effects. Advanced Reactions use up points from a Reactive player’s Reaction Allotment as normal and obey all other restrictions placed upon Reactions, unless it is specifically noted otherwise in their description.Death or Glory - This Advanced Reaction may be made whenever the Active player declares a Ram Attack. After any Hits from a successful Ram have been resolved, and the target unit has passed its Morale check, this Reaction must be resolved. The Reactive player may nominate any one model in the unit that was Rammed. That model may make a single attack with either a Melee or Ranged weapon. Whatever form the attack takes, it automatically Hits and any damage is resolved against the target Vehicle’s Front armour. If the attack destroys the Vehicle or inflicts a Crew Stunned, Immobilised or Explodes (see Vehicle Damage table) result then the attacking model remains in play – otherwise it is immediately removed as a casualty with no Saves or Damage Mitigation rolls of any kind allowed. Vehicles may not be nominated to make a Death or Glory Reaction. | ||
Vehicles in the Shooting Phase
When a Vehicle makes a Shooting Attack, it uses its own Ballistic Skill Characteristic and makes any attacks with the same basic rules as any other units, but with a few unique adjustments as follows. Unless a special rule states otherwise, all weapons on a single Vehicle must be fired at the same enemy unit.Defensive Weapons and Battle WeaponsAs part of the Vehicle rules, certain types of weapon are defined as Defensive, which, by inference, makes any non-Defensive weapon a Battle weapon. Throughout these rules, when a rule refers to ‘all weapons’ or simply ‘weapons’ without any further qualifiers, then this means that both Battle and Defensive weapons may be used. When a Shooting Attack is limited to only Defensive weapons or non-Defensive weapons, it will specifically state this. | ||
Moving and Shooting with Vehicles
Vehicles may shoot with Heavy or Ordnance weapons, counting as Stationary, even if they moved in the Movement phase.Stationary – A Vehicle that remains Stationary will be able to attack with all weapons regardless of type with no modification to their accuracy.
Combat Speed – A Vehicle that travels no more than half of its Movement Characteristic is said to be moving at Combat Speed. This represents the Vehicle advancing slowly to keep firing. A Vehicle moving at Combat Speed may attack with all non-Ordnance or non-Destroyer weapons with no modification to their accuracy. A Vehicle moving at Combat Speed may only fire a single Ordnance or Destroyer weapon, and if it does so then all other weapons must be fired as Snap Shots.
Cruising Speed – A Vehicle that travels more than half of its Movement Characteristic is said to be moving at Cruising Speed. This represents the Vehicle diverting power to keep it moving as fast as possible, making all of its firepower wildly inaccurate. A Vehicle moving at Cruising Speed may firea single weapon without modificationto its BS and any other weapons as Snap Shots. However, a Vehicle moving at Cruising Speed may not fire Ordnance or Destroyer weapons.
Vehicle Firing Arcs and Weapon Mounts
Unlike most models, which can fire at any target to which they can draw line of sight, Vehicles are more restricted in how they can target an enemy. Each of a Vehicle’s weapons is mounted in a way that allows it to fire at targets in one or more Firing Arcs – specific zones from which targets may be selected if they are within line of sight. The various Arcs of Fire available to Vehicles in Horus Heresy – Age of Darkness games are detailed below:Firing Arcs
Hull (Arc) – The Hull Firing Arc is divided into four sections: Front, Rear, Left and Right – with most weapons capable of firing into only one of those divisions, as shown on a given Vehicle’s profile. To determine the Hull arcs of any Vehicle, draw two imaginary lines through the corners of the Vehicle as shown in the diagram below.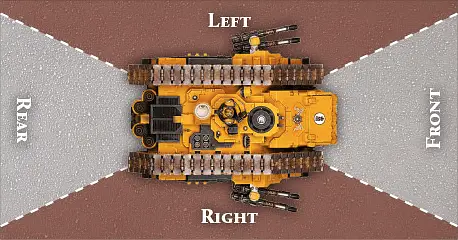
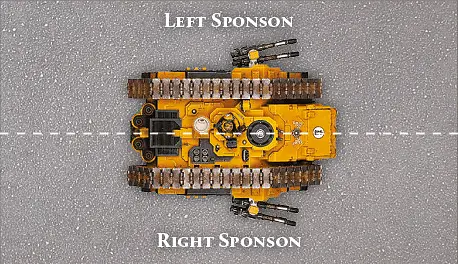
Sponson – The Sponson Firing Arc is determined by drawing an imaginary line along the centre of the Vehicle, from front to rear, as shown in the diagram below. The left hand side is the Left Sponson arc and the right hand side is the Right Sponson arc, with Sponson weapons only capable of firing into the arc in which they are mounted.
As such, any Vehicle profile will note how its weapons are mounted, with each type of mount allowing a Vehicle to fire those weapons into one or more Firing Arcs as shown:
Weapon Mounts
Hull (Arc) Mounted – Hull (Arc) Mounted weapons will always specify a single Firing Arc and may only fire at targets in that Firing Arc. The different Hull arcs are: Front, Rear, Left and Right. Some units may specify Side as an arc – this means both Left and Right arcs.For example, a Legion Land Raider Proteus has a Hull (Front) Mounted Heavy Bolter – this weapon may only fire at targets in the Front Firing Arc.
Turret Mounted – Turret Mounted weapons may fire at targets in any Hull arc (Front, Side or Rear) without restriction.
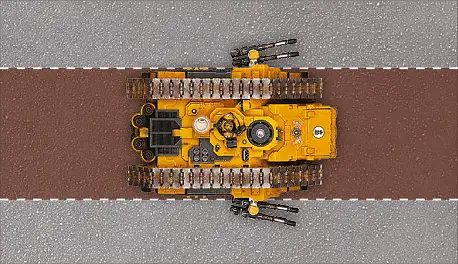
Centreline Mounted – Centreline Mounted weapons may only fire at targets in the Centreline Firing Arc.
Sponson Mounted – Sponson Mounted weapons are usually mounted in pairs, one on each side of a Vehicle (the Vehicle’s profile will note if this is not the case) and fire into the appropriate Sponson Firing Arc (either left or right). If the target of a Vehicle’s Shooting Attack is within the Firing Arc for only one of a pair of Sponson weapons, then the out of arc weapon may be fired at another enemy unit of the controlling player’s choice. This Secondary Target must be in the weapon’s line of sight and Firing Arc, but may be from a different unit than the original target.
Pintle Mounted – Pintle Mounted weapons may fire at targets in any Firing Arc without restriction, but are always counted as Defensive weapons regardless of the weapon type or its statistics.
Vehicle Weapon TypesIn addition to the more common mounting types, there are also several other types of weapon only found on Vehicle units that bear special mention in this section.Co-axial Mounted Weapons – Co-axial Mounted weapons follow all the rules for Turret Mounted weapons and must be mounted alongside another Turret Mounted weapon. In addition, when Turret Mounted weapons are fired, if the Co-axial Mounted weapon scores at least one Hit on the target unit then all further attacks by weapons mounted on the same Turret, directed at the same target, may re-roll any failed rolls To Hit. Defensive Weapons – All weapons mounted on a Vehicle that have a Strength Characteristic of 6 or less are Defensive weapons. Other weapons may also be specifically designated as Defensive weapons on their profile. The controlling player may always choose to fire Defensive weapons at the closest enemy Infantry unit within line of sight and the Firing Arc of applicable weapons, even if the Vehicle’s other weapons have targeted a different unit during a Shooting Attack. Any weapon that has a Strength greater than 6 and is not Pintle Mounted or otherwise designated specifically as a Defensive weapon is a Battle weapon. | ||
Shooting at Vehicles
When a unit fires at a Vehicle, it must be able to see its hull or turret (ignoring the Vehicle’s gun barrels, antennas, decorative banner poles, etc). Note that, unlike for other models, a Vehicle’s wings are not ornamental and are a part of its hull. As the whole unit must fire at the same target, even if some of their weapons can’t damage the target Vehicle, in order to speed up play, only make rolls for those weapons capable of damaging the target. If the target Vehicle is in range, roll To Hit as normal. If any Hits are scored, roll for each to see if they penetrate the Vehicle’s Armour Value.Vehicle Facing and Armour Values
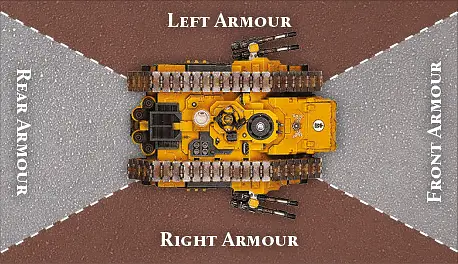
Not all vehicles are equally armoured. Countless layers of adamantium and ceramite plates protect some tanks, while lighter vehicles rely more on their speed to avoid incoming fire.As such, Vehicles have different Armour Values, representing the thickness of their armour. Armour Values for individual Vehicles often vary between its Front, Side and Rear Facings. Attacks are resolved against the Facing of the Vehicle that the attack comes from. To see what Facing an attack is coming from, draw two imaginary lines through the corners of the Vehicle (see diagram below). If a unit has firing models in two or more different Facings of a target Vehicle (some models in the Front and some in the Side, for example), attacks are resolved separately for each Facing. Each individual model may only direct its attacks at a Facing it can draw line of sight to and, in situations where a model can draw line of sight to more than one Facing, the controlling player may choose which Facing will be the target of any attacks.
This may require attacks targeting a Vehicle to be divided into separate pools, each resolved against the appropriate Facing and the Armour Value attached to that Facing. In any situation where a model is hit by a weapon or attack which fires Indirectly or does not otherwise require line of sight to its target, Hits are always resolved against the Side Armour Value. The direction a turret is facing has no bearing on what arc of a Vehicle you are firing at.
Template and Blast Weapons
If a Vehicle, or its base, is even partially under a Template or Blast marker, it is hit on the Armour Value facing the attacking model. If the direction of the attack is unclear or the final position of the Template or Blast marker is divided between multiple Facings, then the Hit is resolved against the Side Armour.Armour Penetration Rolls
Once a hit has been scored on a Vehicle, roll a D6 and add the weapon’s Strength, comparing this total with the Armour Value of the appropriate facing of the Vehicle.- If the total is less than the Vehicle’s Armour Value, the attack has no effect.
- If the total is equal to the Vehicle’s Armour Value, the attack inflicts a Glancing Hit.
- If the total is greater than the Vehicle’s Armour Value, the attack inflicts a Penetrating Hit.
Resolving Damage
A Hit on a Vehicle can have a variety of results. Its armour could be completely pierced, yet result only in shocking the crew, or it could detonate the ammunition cases or fuel tanks.Glancing Hits – If a Glancing Hit was scored, the Vehicle loses 1 Hull Point.
Penetrating Hits – If a Penetrating Hit was scored, the Vehicle not only loses 1 Hull Point, but also suffers additional damage.
After deducting any Hull Points, roll a D6 for each Penetrating Hit and look up the result using the Vehicle Damage table, applying any appropriate modifiers. All modifiers on the Vehicle Damage table are cumulative. If you inflict a Penetrating Hit, you must roll on the Vehicle Damage table even if the Vehicle loses sufficient Hull Points to be Wrecked, as there is still a chance it might suffer an Explodes result on the Vehicle Damage table.
Vehicle Damage Table
| |||||||||||||||||||||||
Vehicle Damage Results and Hull Points
Occasionally, a rule will state that a Vehicle will suffer the effects of a Crew Shaken, Crew Stunned, Weapon Destroyed or Immobilised result. Unless that rule also specifies that the Vehicle suffers a Glancing Hit, a Penetrating Hit, or otherwise states that the Vehicle loses a Hull Point, only the relevant result on the Vehicle Damage chart is applied to the Vehicle and no Hull Points are lost.Wrecked Vehicles
A Vehicle that is reduced to 0 Hull Points is Wrecked. A Wrecked Vehicle is counted as being destroyed and is not removed from the battlefield. If the Vehicle was a Flyer in Zoom mode, it suffers a Crash and Burn result (see the Vehicle Damage table). In any other circumstance, a Wrecked Vehicle is left in place and is treated as a Terrain Piece.Vehicles and Cover – Obscured Targets
Vehicles do not benefit from cover in the same way as Infantry due to their sheer size and bulk, but they can position themselves in such a way as to make it harder for the enemy to hit them in a vulnerable location. The difference from the way cover works for other models is represented by the following exceptions to the normal rules for cover:- At least 25% of the Facing of the Vehicle that is being targeted (its Front, Side or Rear) needs to be hidden by intervening terrain or models from the point of view of the firer for the Vehicle to be in cover. If this is the case, the Vehicle is obscured (or ‘hull down’). If a unit is firing at a Vehicle, the Vehicle is obscured only if it is 25% hidden from the majority of the firing models that are able to damage the Vehicle. If a unit has firing models in two or more Facings of a target Vehicle, work out whether or not the Vehicle is obscured separately for each Facing, using only models firing at that Facing.
- Vehicles are not obscured simply for being inside terrain such as Woods or Ruins. The 25% rule given above takes precedence.
- Vehicles cannot be Pinned, voluntarily or otherwise.
- If the target is obscured and suffers a Glancing Hit, a Penetrating Hit, or is otherwise hit by an enemy’s Shooting Attack that inflicts damage upon it, it must take a Cover Save against it, exactly like a non-Vehicle model would do against a Wound. This Cover Save is always a 6+, regardless of the type of terrain involved, unless another special rule specifically states otherwise. If the Save is passed, the Hit is discarded, no Hull Points are lost and no roll is made on the Vehicle Damage table. If a special rule or a piece of Wargear makes a Vehicle obscured even if in the open, this confers a 6+ Cover Save, unless specified otherwise in the Army List or Army List entry. It may rarely happen that the firing unit cannot see any part of the Facing they are in (Front, Side or Rear), but they can still see another Facing of the target Vehicle. In this case they may take the shot against the Facing they can see, but to represent such an extremely angled shot, the Vehicle receives a 5+ Cover Save instead of the standard 6+.
Obscured Vehicles
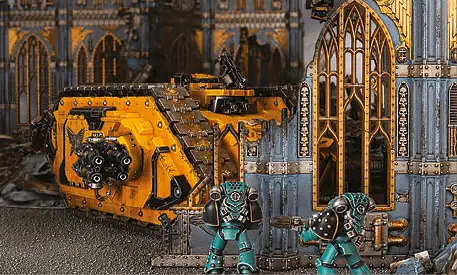
In these examples, a Sons of Horus Legion Tactical Support Squad is making a Shooting Attack targeting the Imperial Fists Legion Land Raider Spartan. In all cases, they are targeting the Vehicle’s Front Armour Facing.Example One: Less than 25% of the Spartan’s Front Armour Facing is concealed by terrain – the Spartan is not Obscured and gains no benefits from cover.
Example Two: More than 25% of the Spartan’s Front Armour Facing is concealed by terrain – the Spartan is obscured and will receive a 6+ Cover Save.

Example Three: The Sons of Horus models cannot draw a line of sight to the Spartan’s Front Armour Facing through the terrain, but can draw line of sight to its Side Armour Facing (despite being in its Front arc). The Spartan is counted as Obscured and receives a 5+ Cover Save.
Vehicles in the Assault Phase
Vehicles can be both very dangerous and very vulnerable at close quarters. On the one hand, massively armoured vehicles can scatter infantry before them, however, a stationary vehicle can often be very easily destroyed as individuals clamber over it, hacking at or shooting into vulnerable spots.Assaulting with a Vehicle
Most Vehicles cannot Charge. Those exceptions to this rule, such as Knights and Titans, will specifically note this in their rules.Assaulting a Vehicle
Infantry can pose a grave threat to vehicles if they get close enough. They can wreck a vehicle by shooting through vision slits, planting explosives on fuel tanks or tearing open hatches to attack the crew.A unit can Charge a Vehicle in their Charge sub-phase. The Charge Move is conducted in the same way as for Charging other enemy units. All Vehicles are treated as being Weapon Skill 1, unless they are Immobilised, in which case they are treated as Weapon Skill 0. Any Hits scored against a Vehicle in close combat are resolved against the Vehicle’s Rear Armour using the same procedure as resolving Hits inflicted by a Shooting Attack.
Assault Results
Combats against Vehicles are different from those among other Unit Types. For instance, whilst Vehicles can be assaulted, they do not Pile-in and cannot be locked in combat. At the end of a round of close combat against a Vehicle, calculate the Assault result as normal, counting each Glancing Hit as 1 Wound, and each Penetrating Hit as 2 Wounds.If the Vehicle loses the combat or is destroyed, nothing happens. There are no Sweeping Advances, no Pile-ins and no Consolidation Moves. The Vehicle and the enemy remain where they are and are free to simply move away in future turns.
If the Vehicle wins the combat, the enemy must make a Morale check as normal, and Fall Back if they fail, though the Vehicle cannot Consolidate or make a Sweeping Advance.
If a Vehicle that has been assaulted (and survived) does not move in its successive Movement phase, enemy models will still be in base contact with it during its Shooting phase and Assault phase. Enemy models that are in base contact with a Vehicle are not locked in combat and can therefore be attacked during the Shooting phase. If the Vehicle pivots on the spot (to shoot at its attackers, for example), move these models out of the way as you shift the Vehicle and then place them back into base contact with the Vehicle – or as close as possible if there is no room.
Units that still have models in base contact with a Vehicle during its Assault phase may attack it again, just as in a normal ongoing combat (including all models that would count as engaged in a normal Assault).
Vehicles, Leadership and Morale
Vehicles never take Morale checks or Leadership tests.Vehicle Squadrons
Most Vehicles fight as individual units and are represented by a single model. However, some Vehicles operate together in Squadrons. These are treated like normal units, with a few exceptions and clarifications as follows.Squadrons in the Movement Phase
The Vehicles in a Squadron must maintain coherency, just like models in ordinary units, but Vehicles in a Squadron need only remain within 4" horizontally of each other, rather than within 2" horizontally. They can move at different speeds, provided they maintain unit coherency.Squadrons in the Shooting Phase
All of the weapons fired by a Squadron of Vehicles in each Phase must target a single enemy unit. Like other units, Vehicles in Squadrons can see and shoot through members of their own Squadron as if they were not there. Sponson Mounted weapons that cannot draw a line of sight to the Squadron’s target unit may instead choose a secondary target that is a valid target for that Sponson weapon. Sponson weapons on different vehicles in the same Squadron may select different secondary targets, as long as that secondary target is within the weapon’s Firing Arc.Shooting at Squadrons
When a Squadron of Vehicles is shot at, roll To Hit as normal. Once you have determined the number of Hits, these Hits must be resolved, one at a time, against a model in the Squadron selected by the Squadron’s controlling player, as long as the selected model is within line of sight and range of the firing unit. Once the chosen model in the Squadron is destroyed (i.e., is Wrecked or Explodes) or otherwise removed as a Casualty, the controlling player selects another model in the Squadron that is within line of sight and range, continuing until either all Hits have been resolved or all Vehicles in the Squadron have been destroyed.If a Vehicle Squadron targeted by an attack includes one or more models that have already lost Hull Points, then if such a model is in line of sight and range of the attacking unit, then Hits must be allocated to a damaged model of the controlling player’s choice before any other model in the Squadron.
Abandoning Squadron-mates
Over the course of the battle, it is likely that one or more members of a Squadron will suffer an Immobilised result, preventing it from moving. If a member of a Squadron is Immobilised, the rest of the Squadron are permitted to ‘abandon it’. To do so, the rest of the Squadron must move out of unit coherency with it; treat the Immobilised model(s) as a separate unit from then on for all rules and victory conditions. This cannot be done if a member of a Squadron has only been Crew Stunned.Vehicle Types
The basic Vehicle rules apply to all models of the Vehicle type. However, the Vehicle type includes a number of sub-types which allows these rules to properly portray the vast panoply of war machines that took part in the wars of the Horus Heresy. Any Vehicle model may also have one or more sub-types, each of which modify how it interacts with the basic Vehicle rules and adds additional special rules to represent that particular role on the battlefield. A Vehicle’s profile will always list which sub-types that Vehicle has, listing them in brackets as part of its Unit Type. The various Vehicle sub-types listed here cover the more common Vehicle variants found on the battlefields of the Horus Heresy, but other books may present new ones.Transports
Some Vehicles can carry infantry across the battlefield, providing speed and protection. However, if the Transport is destroyed, the passengers risk being killed as well. Transports have several additional Characteristics:Transport Capacity
Each Transport Vehicle has a maximum passenger capacity that can never be exceeded. A Transport can carry a single Infantry unit and/or any number of Independent Characters with the Infantry or Primarch Unit Types, up to a total number of models equal to the Vehicle’s Transport Capacity. The entire unit must be Embarked on the Transport if any part of it is – a unit cannot be partially Embarked or be spread across multiple Transports.Only Infantry models can Embark upon Transports unless specifically stated otherwise. Certain special rules, notably the Bulky (X) special rule, may modify the Transport Capacity required for a given model to Embark upon a Transport, and this will be specified in the model’s rules. Sometimes, there will be constraints on which types of models can Embark upon a particular Vehicle, and this will be specified in the unit’s entry. Whilst Embarked upon a Transport, units gain the Fearless special rule and cannot be made to Fall Back or become Pinned while Embarked upon the Transport.
Shooting Attacks while Embarked
Unless a special rule states otherwise, units Embarked upon a Transport Vehicle may not make Shooting Attacks of any kind. If a Transport Vehicle has a special rule that allows such attacks, that rule will define how such attacks are made.Access Points
Each Vehicle capable of carrying passengers will have a number of Access Points defined in its entry. These are the doors, ramps and hatches that passengers use to get in and out of the Vehicle. Transports on flying bases also count the base as an Access Point.Embarking and Disembarking
Models can only voluntarily Embark or Disembark in the Movement phase. They cannot voluntarily Embark and Disembark in the same turn. However, they can Embark and then be forced to Disembark if their Transport is destroyed.Embarking
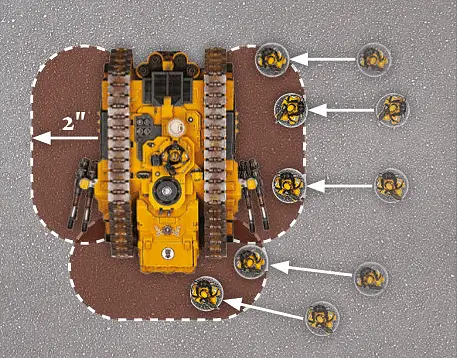
A unit can Embark onto a Vehicle by moving each model to within 2" of its Access Points in the Movement phase – Dangerous Terrain tests should be taken as normal. The whole unit must be able to Embark – if some models are out of range, the entire unit must stay outside. When the unit Embarks, remove it from the table and place it aside, making a note that the unit is being transported. If the players need to measure a range involving the Embarked unit (except for its shooting), this range is measured to or from the Vehicle’s hull.If the Vehicle moved before its passengers got aboard, it cannot move further that turn (including pivoting on the spot). If the Vehicle did not move before its passengers got aboard, it can move as normal after they have Embarked. In either case, a Vehicle cannot Ram in a turn that a unit Embarks upon it.
Disembarking
A unit that begins its Movement phase Embarked upon a Vehicle can Disembark either before or after the Vehicle has moved (including pivoting on the spot) so long as the Vehicle has not moved more than half its Movement Characteristic.If the Vehicle had not moved before the unit Disembarked, the Vehicle can then move normally. If the Vehicle had already moved before the unit Disembarked, the Vehicle cannot move further that turn (including pivoting on the spot). In addition, a Vehicle cannot Ram on a turn that a unit Disembarks from it.
Placing Disembarked Models
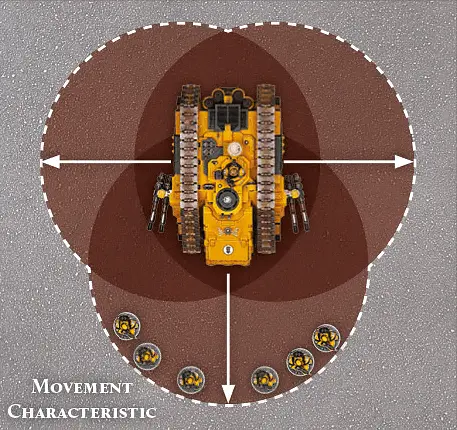
When a unit Disembarks, place the models one at a time, using the following method: place the first model in base contact with one of the Vehicle’s Access Points (including its flying base, if it has one). A Disembarking model’s base cannot be placed within 1" of an enemy model or within Impassable Terrain.The model can then make a normal move – Dangerous Terrain tests should be taken as normal, but it must end its move wholly within a number of inches equal to its Movement Characteristic of the Access Point it Disembarked from. Repeat this process for each model in the unit. At the end of the unit’s move, all models must be in unit coherency.
Disembarkation Restrictions
After Disembarking, models can make Shooting Attacks in their subsequent Shooting phase, counting as having moved that turn, but they cannot declare a Charge in their subsequent Assault phase unless the Vehicle had the Assault Vehicle special rule. If a unit Disembarks from a destroyed Vehicle during the enemy turn, it cannot Charge in the Assault phase of its own turn unless the destroyed Vehicle had the Assault Vehicle special rule.Emergency Disembarkation
If any models cannot Disembark, because of enemies or because they would end up in Impassable Terrain, the unit can perform an Emergency Disembarkation. In this case, a model can be placed anywhere in contact with the Vehicle’s hull, though it must also be in contact with the battlefield and may not be placed on top of the Vehicle itself, and then can move as for a normal Disembarkation. The unit cannot then perform any voluntary actions for the rest of the turn. If even this Disembarkation is impossible, because it is impossible to place one or more models, then the unit can’t Disembark.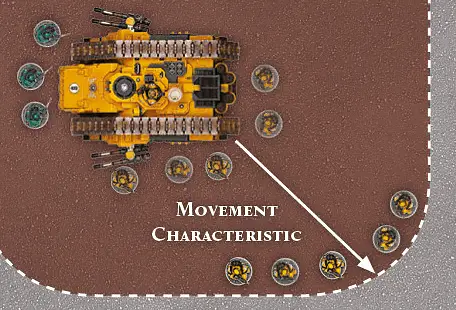
Independent Characters and Transports
If an Independent Character (or even more than one) and a unit are both Embarked upon the same Vehicle, they are automatically joined, just as if the Independent Character was within 2" of the unit. If either an Independent Character or a unit is already in a Vehicle, then the other may Embark, assuming there is enough space. The unit and the Independent Character(s) can, in a later Movement phase, Disembark together as a single unit. Alternatively, they can separate by either the unit or the Independent Character(s) Disembarking while the others remain on board. They can even separate by Disembarking at the same time, so long as they end their moves more than 2" away from each other.Transport and Assaults
If a Transport Vehicle is assaulted and the Transport Vehicle is Wrecked, Explodes or Crashes and Burns, any Wounds caused to its passengers do not count towards Assault results, and any surviving passengers are not locked in combat with the units assaulting their Vehicle.Dedicated Transports
Sometimes a unit entry will include a Transport Option, allowing a Vehicle to be selected together with the unit. These Dedicated Transports do not use up a choice on the Force Organisation chart, but count as having the same role as the unit they were bought for in regards to all other rules purposes.Other Vehicles may also have a Transport Capacity, but they are chosen separately as normal, have a role and occupy a Force Organisation chart choice of their own.
The only limitation of a Dedicated Transport is that, when it is deployed, the unit it was selected with (plus any Independent Characters that have joined it) must be Embarked upon it. After the game begins, that unit may choose to Disembark as per the normal rules and the Transport Vehicle can then transport any friendly Infantry unit, subject to Transport Capacity and other special exclusions, as explained in the Vehicle’s Army List entry.
Effect of Damage on Passengers
When a Transport sustains damage, it can also have an effect on its passengers – even if they Disembark – as follows:Crew Shaken, Crew Stunned, Weapon Destroyed and Immobilised – At the end of a Phase in which a Vehicle sustains one or more of these damage results, the passengers must take a Leadership test. If the test is passed, the unit is unaffected. If the test is failed, the unit can only make Snap Shots in their next Shooting phase, but are otherwise unaffected.
Wrecked (other than Zooming Flyers) – The passengers must immediately Disembark in the usual manner, save that they must end their move wholly within a number of inches equal to half or less of their Movement Characteristic from the Vehicle, rather than their full Movement. If, even by performing an Emergency Disembarkation, some models are unable to Disembark, then any models that cannot Disembark are removed as casualties. This does not prevent the rest of the unit from Disembarking. The unit must then take a Pinning test. After this, the Vehicle becomes Wrecked.
Explodes – The unit suffers a number of Strength 8 AP- Hits equal to the number of models Embarked. These wounds are allocated by the Embarked unit’s controlling player. Surviving passengers are placed where the Vehicle used to be, more than 1" from any enemy models and in unit coherency. Any models that cannot be placed are removed as casualties. The unit then takes a Pinning test.
Wrecked (Zooming Flyers) and Crash and Burn – The unit suffers a number of Strength 10 AP 2 Hits equal to the number of models Embarked. These Wounds are allocated by the Embarked unit’s controlling player. Surviving passengers are placed where the Flyer used to be and in unit coherency. Any models that cannot be placed are removed as casualties. The unit then takes a Pinning test.
If a Transport is destroyed by a Shooting Attack, any unit which made a Shooting Attack targeting that Transport can, if allowed, Charge the now Disembarked passengers.
Slow Vehicles
Slow Vehicles are less war machines than mobile fortresses – slow but very durable.When rolling on the Vehicle Damage table to resolve Hits against a Slow Vehicle, roll an additional D6 and before determining the result discard the highest single dice rolled. In addition, when a Slow Vehicle moves, other than to pivot in place, it is always considered to have moved at Cruising Speed regardless of how many inches it moves.
Fast Vehicles
Fast Vehicles are swift-moving and often fragile, pushing their powerful engines to the limit in order to evade enemy fire. They are commonly employed as initial strike elements or reconnaissance units.When a Fast Vehicle moves, other than to pivot in place, it is always considered to have moved at Combat Speed regardless of how many inches it moves, unless it chooses to move Flat-out.
In addition, when a Fast Vehicle moves, it may choose to move at Flat-out:
Flat-out - A Vehicle choosing to move Flat-out may move up to twice its Movement Characteristic, but at the end of its move must roll a single D6. If the result of this roll is a ‘1’ then the Vehicle suffers a Glancing Hit and all the effects of the Crew Stunned result on the Vehicle Damage table. Vehicles moving at Flat-out speed may only fire Snap Shots.
Skimmers
Some highly-advanced vehicles are fitted with anti-gravity drives that allow them to skim swiftly over tough terrain and intervening troops, making them perfect for surprise flanking attacks.Unlike most other Vehicles, Skimmers have flying bases under their hull. However, distances are still measured to and from the Skimmer’s hull, with the exception of the Vehicle’s weapons, which all work as normal. The base of a Skimmer is effectively ignored, except for when the Skimmer is being Charged or Rammed, in which case, models may move into contact with the Vehicle’s hull, its base or both.
Skimmers can move over friendly and enemy models, but they cannot end their move on top of either. Skimmers can move over all terrain, ignoring all penalties for Difficult Terrain and Dangerous Terrain tests. However, if a moving Skimmer starts or ends its move in Difficult Terrain or Dangerous Terrain, it must take a Dangerous Terrain test. A Skimmer can even end its move over Impassable Terrain if it is possible to actually place the model on top of it, but if it does so it must take a Dangerous Terrain test. If a Skimmer is forced to end its move over friendly or enemy models, move the Skimmer the minimum distance so that no models are left underneath it.
If a Skimmer is Immobilised or Wrecked, its base is removed, if possible. If this is not possible (the base might have been glued in place, for example), then leave the base in place. Note that it is not otherwise permitted to remove the flying base, as Skimmers cannot land in battle conditions.
Super-heavy Vehicles
From the lumbering Baneblade tanks of the Imperial Army to the destructive power of the Legiones Astartes Falchion, all of the war engines that fall into this category are huge armour-clad constructions that each wield enough firepower to destroy an entire army.Moving
Super-heavy Vehicles are not affected in any way by Difficult Terrain or Dangerous Terrain, but may still neither pass through nor end their move in Impassable Terrain.Shooting
When a Super-heavy Vehicle makes a Shooting Attack, it is always treated as if it had remained Stationary in the Movement phase (even if it actually moved), and it may fire each of its weapons at different targets if desired, as long as those targets are within both line of sight and Firing Arc for the weapon in question.Super-heavy Vehicles and Reactions
The proud crews of these mighty engines of war care little for the antics of mere infantry and lesser vehicles. As such they may only make Reactions in response to actions undertaken by other Super-heavy Vehicles, Lumbering Flyers, Knights and Titans or any model with 8 or more Wounds.Vehicle Damage
Furthermore, a Super-heavy Vehicle is so large and has so many crew members that the effects of Crew Shaken, Crew Stunned, Immobilised or Weapon Destroyed results are ignored. However, Super-heavy Vehicles are still subject to losing Hull Points from Glancing Hits and Penetrating Hits as usual, just not the extra damage effects from the Vehicle Damage table.
Catastrophic Damage
Immediately after a Super-heavy Vehicle loses its last Hull Point, it suffers Catastrophic Damage and Explodes. Instead of the usual procedure for an Explodes result on the Vehicle Damage table targeting a Super-heavy Vehicle, remove the model and resolve a Strength 7+D3 Hit with an AP of 4 against every model, friendly or enemy, within 6+D6", measured from the Vehicle’s hull before the model is removed as destroyed. Any unit that suffers one or more Hits from a Catastrophic Damage attack must also take an immediate Pinning test (no unit may take more than a single Pinning test from a single Catastrophic Damage attack).Super-heavy Transports
If a Super-heavy Vehicle has a Transport Capacity, then it may transport any number of Infantry units (plus any Characters that have joined the units), so long as the number of models in the transported units do not exceed the Vehicle’s Transport Capacity. Some Super-heavy Transports may be able to transport other units in addition to Infantry. Where this is true, the Vehicle’s profile will note exactly which units may Embark on the Transport.Each unit Embarked within a Super-heavy Vehicle that suffers Catastrophic Damage takes a number of Strength 10 AP 3 Hits equal to the number of models in that unit. These Wounds are allocated by the Transported unit’s controlling player. Surviving passengers are placed where the Vehicle used to be; any models that cannot be placed are removed as casualties. The units then each take Pinning tests.
Knights and Titans
Knights and Titans such as Warlord class Titans or the Cerastus pattern Knight Lancer are towering behemoths, clad in incredibly thick armour and armed with devastating weaponry. They loom above the battlefield, striking down anything in their path.Additional Characteristics
Unlike other Vehicles, Knights and Titans have Weapon Skill, Strength, Initiative and Attacks Characteristics.Knights and Titans and Reactions
These towering war machines care little for the antics of mere infantry and lesser engines of war. As such they may only make Reactions in response to actions undertaken by other Knights and Titans, Super-heavy Vehicles, Lumbering Flyers or any model with 8 or more Wounds.Knights and Titans and Measuring
If a Knight or Titan has a base, measure ranges and distances to and from its base, as for an Infantry model. If a Knight or Titan does not have a base (such as the Warhound Titan), measure to and from its hull (including any legs or other limbs), as normal for Vehicles.Moving Knights and Titans
Knights and Titans move using the Movement rules for Infantry. They can move a number of inches in the Movement phase equal to their Movement Characteristic, but may not Run. They may Charge in the Assault phase, just as Infantry can. Knights and Titans may Declare Charges regardless of the type of any weapons that unit has used to make Shooting Attacks in the Shooting phase.Knights and Titans ignore all terrain effects, they are not slowed by terrain and do not take Dangerous Terrain tests – but may not pass through or end their move in Impassable Terrain. Knights and Titans may also move over units composed entirely of models of the Infantry or Cavalry types, whether friendly or enemy, but may not finish their movement within 1" of any model.
Unlike Infantry, Knights and Titans have a Facing, which influences where they can make a Shooting Attack and their Armour Value when fired at.
Shooting with Knights and Titans
A Knight or Titan that moved can still fire all of its weapons in the subsequent Shooting phase, and always counts as having remained Stationary for the purposes of which weapons can fire, regardless of any distance actually moved. In addition, a Knight or Titan may fire each of its weapons at different targets if the controlling player chooses.To reflect the unique capabilities of these towering machines, Knights and Titans use two additional types of weapon mount:
Arm Mounted – Arm Mounted weapons may fire at targets in any Firing Arc, except the Hull (Rear) arc. All Arm Mounted weapons count as Defensive weapons (but note the additional restrictions on Knight and Titan Reactions).
Carapace Mounted - Carapace Mounted weapons may fire at targets in any Firing Arc without restriction. However, they may not target any unit within 12" of the firing model.
Knights and Titans and Damage
Each time a Knight or Titan suffers an Explodes result on the Vehicle Damage table, instead of suffering the effects listed, it loses D3 additional Hull Points as well as the Hull Point it loses for the Penetrating Hit.Furthermore, Knights and Titans are so large and have so many crew members that the effects of Crew Shaken, Crew Stunned, Immobilised or Weapon Destroyed results are ignored. However, Knights and Titans are still subject to losing Hull Points from Glancing Hits and Penetrating Hits as usual, just not the extra damage effects from the Vehicle Damage table.
In addition, Knights and Titans are so large and strongly built that weapons which degrade the armour of smaller vehicles will not affect them. Due to this, any attack which says that the target model is destroyed, Wrecked, Explodes or is otherwise removed from play inflicts D3 Hull Points of damage on a Knight or Titan instead. Any attacks or special abilities which permanently lower the Armour Values of a target Vehicle do not affect a Knight or Titan. Note that attacks or abilities that count the Armour Value as being lower, but do not actually change it, work normally.
Catastrophic Damage
Immediately after a Knight or Titan loses its last Hull Point, it suffers Catastrophic Damage and Explodes. Instead of the usual procedure for an Explodes result on the Vehicle Damage table targeting a Knight or Titan, remove the model and resolve a Strength 7+D3 Hit with an AP of 4 against every model, friendly or enemy, within 6+D6", measured from the Vehicle’s hull before it is removed as destroyed. Any unit that suffers one or more Hits from a Catastrophic Damage attack must also take an immediate Pinning test (no unit may take more than a single Pinning test from a single Catastrophic Damage attack).Knights and Titans and Assaults
Knights and Titans assault, and are assaulted, like Infantry models, meaning that Knights and Titans make Charge Moves. However, they cannot be locked in combat. Those Vehicles or other units in contact with them outside of the Fight sub-phase may freely move or declare Charges, and may target the Knight or Titan as part of a Shooting Attack. Likewise, a Knight or Titan is never locked in combat and may simply move away from models it is in base contact with during the Movement phase, make Shooting Attacks in the Shooting phase freely and declare Charges without regard for models in base contact, save where they restrict line of sight.If a Knight or Titan is armed with two or more Melee weapons, it gains +1 bonus Attack for each additional weapon after the first. Unlike other models, this is not limited to a single bonus Attack, so a Knight or Titan with three Melee weapons would have 2 bonus Attacks.
In addition, Knights or Titans engaged in combat may make a special type of attack called a Stomp attack. The Stomp attacks are made in addition to the model’s normal attacks. Stomp attacks are resolved during the Fight sub-phase at the Initiative 1 step. A Knight or Titan makes a number of Stomp attacks equal to the roll of a D3 + the model’s unmodified Attacks Characteristic. All Stomp attacks are made at the Vehicle’s unmodified WS and resolved at the model’s unmodified Strength with an AP value of 2. Stomp attacks cannot be made against other Knights and Titans, Flyers, Super-heavy Vehicles or any model with 8 or more Wounds.
Knights and Titans may not make Sweeping Advances, Pile-in Moves or Consolidations. Any unit that is forced to Fall Back from a Knight or Titan automatically succeeds without needing to roll.
Ramming a Knight or Titan
Knights and Titans may not make Ram Attacks. If a Knight or Titan is Rammed by a Vehicle, the collision is resolved as normal for a Vehicle, except that the Strength of any Hits inflicted on the Ramming Vehicle is always 10, regardless of the Vehicle’s Armour Value, and inflicts D3 Hull Points of damage. If it survives, the Knight or Titan can then attack the Vehicle in the ensuing Assault phase without needing to conduct a Charge. It should be noted that, as Vehicles, Knights or Titans cannot be nominated to perform Death or Glory Reactions.Flyers
The airspace above a battle is just as frantic as on the ground. Fighters and bomber craft hurtle through the skies, duelling with one another and providing fire support for the troops on the ground.Aerial Support
Flyers must begin the game as Reserve. Special rules that allow an owning player to move one or more of their units out of Reserve after deployment, but before the game begins, cannot be used to move a Flyer out of Reserve, unless they specifically state that Flyers can start the game deployed on the battlefield.Flyers and Measuring
Flyers have flying bases that suspend them above the battlefield. However, distances are still measured to and from the Flyer’s hull, with the exception of the Vehicle’s weapons, which all work as normal. The base of a Flyer is effectively ignored, except for when:- The Flyer is in close combat, in which case models may move into contact with the Vehicle’s hull, its base or both.
- Models are Embarking or Disembarking from the Flyer, in which case the base of the Flyer is used as an Access Point.
Flyers and other Models
Models that physically fit under a Flyer model can move beneath it. Likewise, a Flyer can end its move over such models. However, when moving this way, enemy models must still remain 1" away from the base of the Flyer, and the Flyer cannot end its move with its base within 1" of enemy models.Flyers and Reactions
The pilots that keep the sophisticated aircraft that stalk the battlefields of the Horus Heresy aloft have little time for the scurrying of their prey. As such, Flyers may only use the Evade Reaction and may not React to any unit in any other fashion. Moves made by Zooming Flyers may not trigger Reactions, but Shooting Attacks made by Zooming Flyers may trigger Reactions as normal.Zoom
Flyers can usually only make a special kind of move called a Zoom. Some can also Hover. Zooming allows the Flyer to move at extreme speeds, making it very difficult to shoot down, but limits its manoeuvrability.If a Flyer Zooms, then it may move up to twice its Movement Characteristic. However, a Zooming Flyer can never voluntarily move less than its Movement Characteristic in its own Movement phase. If a Zooming Flyer is forced to move less than its Movement Characteristic in its own Movement phase, it is automatically Wrecked.
To represent its limited manoeuvrability, a Zooming Flyer can only make a single pivot on the spot of up to 90° before it moves. Thereafter, it must move directly forwards in a straight line. In a turn in which a Flyer enters the battlefield from Reserves, it can do so facing any direction you wish, providing that the resulting move will not carry it off the battlefield again.
A Zooming Flyer can move over intervening units and Impassable Terrain exactly as a Skimmer. In addition, a Zooming Flyer does not have to take Dangerous Terrain tests even if it starts or stops over Difficult Terrain, Dangerous Terrain or Impassable Terrain. Finally, unless otherwise stated, models cannot Embark upon, or voluntarily Disembark from, a Zooming Flyer.
Zoom and Ramming
Zooming Flyers cannot Ram, nor can they be Rammed. If a Ramming Vehicle would end up beneath a Zooming Flyer, move the Ramming Vehicle by the shortest distance so that it is 1" away from the base of the Flyer.Zooming and Shooting
Zooming Flyers can fire up to four of their weapons using their full Ballistic Skill regardless of the distance moved that turn. Zooming Flyers can choose whether or not to use the Skyfire special rule at the start of each Shooting phase. If they do, all weapons they fire that Phase are treated as having the Skyfire special rule.Shooting Attacks targeting a Zooming Flyer can only be resolved as Snap Shots (unless the model or weapon has the Skyfire special rule). Template and Blast weapons, and any other attacks that do not roll To Hit, cannot hit Zooming Flyers.
Charging Zooming Flyers
Zooming Flyers cannot be Charged.Repairing Zooming Flyers
Some models have the ability to repair Hull Points, Immobilised or Weapon Destroyed results on Vehicles. Such models can only use such abilities on a Zooming Flyer if that Flyer is a Transport and the model attempting to repair it is Embarked inside it.Leaving Combat Airspace
It is likely that a Flyer making a Zoom Move will leave the battlefield, either deliberately or by accident. If this happens, the Flyer is said to have left combat airspace – it then enters Reserves. A Flyer that leaves combat airspace must Zoom back on when it returns from Reserves, even if it has the Hover sub-type.A Flyer cannot leave combat airspace on the same turn that it entered play from Reserves – the owning player must deploy their model in such a way that it will not leave the battlefield on the same turn.
Flyers and Immobilised Results
If a Zooming Flyer suffers an Immobilised result, roll a D6. On a 1 or 2, the Flyer will immediately Crash and Burn. On a 3+, the Immobilised result counts as a Crew Stunned result instead.The Hover Sub-type
A Flyer that has the Hover sub-type can choose to Hover instead of Zooming. Hovering makes the Flyer slower, but considerably more agile, and in the case of Transports, it allows passengers to Embark or Disembark.A Flyer with the Hover sub-type must declare whether it is going to Zoom or Hover before it moves, and before any Embarked models Disembark, each Movement phase. This means that if the Flyer arrives from Reserves, you must declare which type of Movement it is using before placing it on the board. If a Flyer is in a Squadron, all Vehicles in the Squadron must choose the same type of Movement. A Flyer in Hover mode cannot switch to Zoom mode if it is Immobilised.
If a Flyer is Hovering, it is treated exactly as a Skimmer.
The Lumbering Sub-type
Flyers that have the Lumbering sub-type are much larger and heavier than the average aircraft – they are capable of absorbing terrible punishment, but are slower and less manoeuvrable.Lumbering Flyers have additional rules and exceptions as follows:
Each time a Lumbering Flyer suffers an Explodes result on the Vehicle Damage table, instead of suffering the effects listed, it loses D3 additional Hull Points as well as the Hull Point it loses for the Penetrating Hit.
Furthermore, a Lumbering Flyer is so large and has so many crew members that the effects of Crew Shaken, Crew Stunned, Immobilised or Weapon Destroyed results are ignored. However, Lumbering Flyers are still subject to losing Hull Points from Glancing Hits and Penetrating Hits as usual, just not the extra damage effects from the Vehicle Damage table.
In addition, a Lumbering Flyer is so large and strongly built that weapons which degrade the armour of smaller Vehicles will not affect it. Due to this, any attack which says that the target model is destroyed, Wrecked, Explodes or is otherwise removed from play inflicts D3 Hull Points of damage on a Lumbering Flyer instead. Any attacks or special abilities which permanently lower the Armour Values of a target Vehicle do not affect a Lumbering Flyer. Note that attacks or abilities that count the Armour Value as being lower, but do not actually change it, work normally.
Lumbering Flyers and Catastrophic Damage
Immediately after a Lumbering Flyer loses its last Hull Point, it suffers Catastrophic Damage and Explodes. Instead of the usual procedure for an Explodes result on the Vehicle Damage table targeting a Lumbering Flyer, remove the model and resolve a Strength 10, AP3 Hit against every model, friendly or enemy, within 6+D6", measured from the Vehicle’s hull before the model is removed as destroyed.Lumbering Flyers and the Transport Sub-type
If a Lumbering Flyer also has the Transport sub-type then it may transport any number of Infantry units (plus any characters that have joined the units), so long as the number of models in the transported units do not exceed the Vehicle’s Transport Capacity. Some Lumbering Flyers may be able to transport other units in addition to Infantry; where this is true, the Vehicle’s profile will note exactly which units may Embark on the Transport.Each unit embarked within a Lumbering Flyer that suffers Catastrophic Damage takes a number of Strength 10 AP 3 Hits equal to the number of models in that unit. These Wounds are allocated by the Transported unit’s controlling player. Surviving passengers are placed where the Vehicle used to be; any models that cannot be placed are removed as casualties. The units then each take Pinning tests.
A number of key unit sub-types are presented here – more may be referenced in other Age of Darkness books.
Fall Back Moves are 2D6", unless a rule specifies otherwise. Fall Back Moves are not slowed by Difficult Terrain, but incur Dangerous Terrain tests as normal. Units with models that Fall Back at different speeds always Fall Back at the speed of the slowest model in the unit.
Each model in the unit moves directly towards their own battlefield edge by the shortest possible route.
If playing a mission where there is no ‘own’ battlefield edge, models move towards the closest battlefield edge instead.
If any model from a unit that is Falling Back moves into contact with a battlefield edge, the entire unit is removed from the game as casualties as it scatters and flees the battle.
Fearless troops never give up and seldom make full use of cover – even if it would be wiser to do so.
Units with one or more models with the Fearless special rule automatically pass Pinning tests, Regroup tests and Morale checks. In addition, models with the Fearless special rule ignore the effects of the Fear special rule.However, units containing one or more models with the Fearless special rule cannot use any Reactions that grant a Cover Save, Armour Save or Invulnerable Save, and cannot choose to fail a Morale check due to the Our Weapons Are Useless special rule. If a unit has become Pinned and then gains the Fearless special rule, all the effects of being Pinned are immediately cancelled.
There are many virulent and lethal poisons in the Age of Darkness. It is simplicity itself to adapt such toxins for battlefield use. It does not matter whether they coat blades or bullets, or are secreted by alien monstrosities – all are lethal.
If a model has the Poisoned special rule, or is attacking with a Melee weapon that has the Poisoned special rule, it always Wounds on a fixed number (generally shown in brackets), unless a lower result would be required, when attacking in close combat. In addition, if the Strength of the wielder (or the Poisoned weapon) is higher than the Toughness of the victim, the wielder must re-roll failed rolls To Wound in close combat.Similarly, if a model makes a Shooting Attack with a weapon that has the Poisoned special rule, it always Wounds on a fixed number (generally shown in brackets), unless a lower result would be required. If no number is shown in brackets, the rule is Poisoned (4+).
Unless otherwise stated, Poisoned weapons are treated as having a Strength of 1. The Poisoned special rule has no effect against Vehicles.
Many are the weapons and creatures whose merest caress is fatal.
If a model has this special rule, or is attacking with a Melee weapon that has this special rule, they always Wound on a 2+ in close combat.Similarly, if a model makes a Shooting Attack with a weapon that has this special rule, they always Wound on a 2+.
In either case, this special rule has no effect against Vehicles or Buildings.
If you re-roll a 2D6 or 3D6 roll, you must re-roll all of the dice, not just some of them, unless the rules specify otherwise. Any modifiers that applied to the first roll also apply to the re-roll.
If two or more special rules combine to the effect that all failed and all successful dice results would have to be re-rolled, do not re-roll any dice; simply use the original result(s) instead.
Some weapons can inflict critical strikes against which no armour can protect.
If a model has the Rending special rule, or is attacking with a Melee weapon that has the Rending special rule, there is a chance that their close combat attacks will strike a critical blow. For each To Wound roll equal to or higher than the value listed, the target automatically suffers a Wound, regardless of its Toughness. The controlling player may choose to resolve these Wounds at AP 2 instead of the weapon’s normal AP value.Similarly, if a model makes a Shooting Attack with a weapon that has the Rending special rule, a To Wound roll of equal to or greater than the listed value wounds automatically, regardless of Toughness, and is resolved at AP 2.
In either case, against Vehicles each Armour Penetration roll of equal to or greater than the listed value allows a further D3 to be rolled, with the result added to the total Strength of the attack. These Hits are not resolved at AP 2, but are instead resolved using the weapon’s AP value.
For example, a model with the Rending (5+) special rule that rolls To Wound against a non-Vehicle model will wound automatically on the roll of a 5+, and the attacking player has the choice of using an AP value of 2 instead of the AP value of their weapon.
These weapons are grafted to the same targeting system for greater accuracy.
When attacking with a weapon that has this special rule, the controlling player may re-roll all failed To Hit rolls.These are heavy, man-portable weapons that typically require reloading between each shot or bracing to counter their recoil.
When making a Shooting Attack, a model with a Heavy weapon attacks the number of times indicated. If a model equipped with a Heavy weapon moved in the preceding Movement phase, they can only make Snap Shots with that Heavy weapon during the Shooting phase. Note that weapons with the Blast special rule cannot fire Snap Shots. Models that make Shooting Attacks with Heavy weapons in the Shooting phase cannot Charge in the ensuing Assault phase.
|
Barrage weapons lob shells high into the air, landing them in the midst of the foe.
All Barrage weapons use Blast markers and consequently use the rules for Blast weapons, as indicated by their profile, with the following exceptions:Barrage weapons can fire indirectly. This means they can fire at a target that they do not have line of sight to, as long as the target is beyond their Minimum Range (if applicable). When firing indirectly, the Ballistic Skill of the firer is not subtracted from the scatter distance; unless a Hit is rolled on the Scatter dice, the Blast marker always scatters a full 2D6". If a Barrage weapon has line of sight to its target it can fire directly, even if the target is within its Minimum Range.
Note that any Hits inflicted upon Vehicles by an Attack using the Barrage special rule are always resolved against the Vehicle’s Side Armour Value.
Coming under fire without knowing where the shots are coming from, or having ordnance rain down from the skies, can shake the resolve of even the bravest warriors, making them dive flat and cling to whatever cover presents itself.
If a non-Vehicle unit suffers one or more unsaved Wounds from a weapon with the Pinning special rule, it must take a Leadership test once the firing unit has finished its Shooting Attacks for that Phase. This is called a Pinning test. If the unit fails the Test, it is Pinned. As long as the Test is passed, a unit can be called upon to take multiple Pinning tests in a single turn, but only once for each unit shooting at them.A unit that is affected by any of the following conditions does not take Pinning tests, and if called upon to do so is considered to automatically pass them:
- The unit is locked in combat.
- The unit is already Pinned (the unit remains Pinned, but takes no further Tests).
- The unit is composed entirely of Vehicle models.
- The unit is Embarked on a Transport Vehicle.
- The target unit is affected by the Fearless special rule.
Ordnance weapons are cannon so vast, they are typically mounted on tanks and artillery.
When making Shooting Attacks, a model equipped with an Ordnance weapon fires the number of times indicated in its profile after its Type. A non-Vehicle model carrying an Ordnance weapon cannot attack with it in the Shooting phase if they moved in the preceding Movement phase. Ordnance weapons cannot make Snap Shots. Furthermore, if a non-Vehicle model attacks with an Ordnance weapon, that model may not make any further Shooting Attacks with any other weapon in the Phase nor will it be able to Charge in the ensuing Assault phase. Vehicle models that fire Ordnance weapons may also suffer some restrictions based upon the distance they have moved that turn.Ordnance weapons hit with such force that when you roll to penetrate a Vehicle’s armour with an Ordnance weapon, roll two dice instead of one and pick the highest result.
|
Stationary – A Vehicle that remains Stationary will be able to attack with all of its weapons, regardless of type, with no modification to their accuracy.
Combat Speed – A Vehicle that travels equal to or less, than half of its Movement Characteristic is said to be moving at Combat Speed. This represents the Vehicle advancing slowly to keep firing. A Vehicle moving at Combat Speed may attack with all non-Ordnance or non-Destroyer weapons with no modification to their accuracy. A Vehicle moving at Combat Speed may only fire a single Ordnance or Destroyer weapon, and if it does so then all other weapons must be fired as Snap Shots.
Vehicles can turn any number of times as they move, just like any other model. Vehicles turn by pivoting on the spot about their centre point, rather than wheeling round. Pivoting on the spot alone does not count as moving, so a Vehicle that only pivots in the Movement phase counts as Stationary (however, Immobilised Vehicles cannot even pivot on the spot). Pivoting is always done from the centre of a Vehicle to prevent it from accidentally moving further than intended or allowed. Just like other units, Vehicles cannot move over friendly models. A Vehicle may only pivot during the Movement phase, unless another rule specifically allows it to do so at another point. Unlike other models, Vehicles may not move vertically in terrain or on Terrain Pieces in order to ascend levels.
Some Vehicle types, from combat aircraft to lumbering artillery vehicles, as detailed later in this section, can affect both the manner in which a Vehicle moves and the distances it may move.
Some beings are so monstrous or alien that they can force their foes to recoil in horror.
All enemy models within 12" of a model with this special rule must reduce their Leadership by the value in brackets after the special rule when taking any Morale checks, Regroup or Pinning tests. For example, a unit with the special rule Fear (2) would reduce the Leadership of all enemy models within 12" by 2.Enemy units that are locked in combat are only affected by this modifier if they are locked in combat with the unit that causes Fear. This modifier is not cumulative, and any given unit can only be affected by a single instance of the Fear special rule at a time. This will always be the highest single modifier among those applicable.
A model that causes Fear is not itself immune to Fear, and will still suffer a penalty to its Leadership if within range of an enemy unit that has the Fear special rule.
Force weapons are charged by the psychic might of the wielder, turning them from mere physical tools to mystical weapons of incredible potency.
Any Psyker with a weapon or ability with this special rule may choose to make a Psychic check before making any attacks with that weapon or resolving the ability. If the Check is successful then the Strength value of any attacks made is doubled. If the Check is failed then Perils of the Warp is resolved targeting the unit containing the model that failed its Check. If the Psyker survives Perils of the Warp then it may attack as normal.Some blows can slay an enemy outright, no matter how hardy they may be.
If a model suffers an unsaved Wound from an attack with this special rule, it is reduced to 0 Wounds and is removed as a casualty.If the unit fails this test, then it must immediately continue to Fall Back.
If the unit successfully passes the test, it stops Falling Back and can immediately move a number of inches equal to its Initiative. This move is unaffected by Difficult Terrain, but Dangerous Terrain tests must be taken as normal. If the unit is out of coherency when the Regroup test is made, then the move must be used to restore coherency, or as near as possible.
Once a unit has Regrouped, until the end of that player turn it cannot otherwise Move, Run or Charge in the Assault phase. However, it can make Shooting Attacks but until the end of that player turn counts as having moved and can only fire Snap Shots. A unit that has Regrouped may make Reactions as normal in subsequent player turns, including those that allow it to move.
Similar to other Leadership-based tests, Morale checks (also sometimes referred to as Morale tests) are taken by rolling 2D6 and comparing the total to the unit’s Leadership value.
If the total is equal to or less than the unit’s Leadership Characteristic, the test is passed and the unit does not suffer any ill effects.
If the total is higher than their Leadership Characteristic, the test is failed and the unit will immediately Fall Back.
Some units have special rules pertaining to Morale checks that are detailed in their Army List or Army List entry. For example, some units might always pass Morale checks, while others might always pass all Leadership tests. This difference is subtle, yet important. A unit that always passes Morale checks still has to test when hit by an attack with the Pinning special rule, while a unit that always passes all Leadership tests wouldn’t.
Mighty heroes go where they are needed, being at the forefront of the most vital charges and leading their troops to victory.
Independent Characters can join other units. They cannot, however, join units that contain Vehicles, Dreadnoughts, Automata or any model with the Monstrous sub-type (unless the Independent Character also has that Unit Type or sub-type). They can join other Independent Characters though to form a powerful multi-character unit.Some heroes refuse to be laid low, even by what would be mortal wounds to lesser warriors.
If a model with this special rule suffers an unsaved Wound from an attack that inflicts Instant Death, it only reduces its Wounds by 1, instead of automatically reducing its Wounds to 0.In the dark corners of the galaxy, there are creatures that heal at a terrifying speed.
At the end of each of your turns, roll a D6 for each of your models with this special rule that has less than its starting number of Wounds or Hull Points, but that has not been removed as a casualty or destroyed. On a roll equal to or greater than the number in brackets associated with the special rule, that model regains a Wound, or Hull Point, lost earlier in the game. For example, a model with It Will Not Die (5+) would regain a lost Wound on the roll of a 5 or more.This creature is so massive, it takes up an inordinate amount of space in any vehicle or building it enters.
Bulky models count as a number of models equal to the value X in brackets after the rule’s name for the purposes of Transport Capacity and whether a given unit outnumbers another in combat.For example, a unit comprised of five models all of which have the Bulky (3) special rule, would count as 15 models when attempting to Embark on a Transport Vehicle or when deciding if they outnumber an enemy unit (see, for example, Rampage (X)).
Relentless warriors are strong of arm – nothing can slow their implacable advance.
Relentless models can shoot with Heavy or Ordnance weapons, counting as Stationary, even if they moved in the previous Movement phase. They are also allowed to Charge in the same turn they fire Heavy, Ordnance, or Rapid Fire weapons.The Ballistic Skill of a model making a Snap Shot can only be modified by special rules that specifically state that they affect Snap Shots, along with any other restrictions. If a special rule doesn’t specifically state that it affects Snap Shots, then the Snap Shot is resolved at Ballistic Skill 1.
Some weapon types, such as Ordnance, or those that have certain special rules, such as Blast, cannot be used to make Snap Shots. In addition, any Shooting Attack that does not use Ballistic Skill cannot be made as a Snap Shot. These exceptions aside, Snap Shots are treated in the same manner as any other Shooting Attack made with a Ballistic Skill of 1.
Sometimes an attack will gain a bonus or special rule depending on the results rolled To Hit or To Wound (for example, due to the Rending special rule). If any such Wounds are caused, split them into separate Wound Pools. All Wounds with exactly the same Strength, AP value and special rules must go into the same pool. If all the Wounds are the same, there will only be one Wound Pool.

- It is Embarked upon a Transport Vehicle of any kind (once Disembarked it may count as a Scoring unit as normal).
- It is a Zooming Flyer.
- It has a special rule specifying that it never counts as a Scoring unit.
- It is currently Falling Back or Pinned (if the unit Regroups or recovers from Pinning, it immediately reverts to being a Scoring unit again).
- It is a Building or Fortification.
- It is Embarked upon a Transport Vehicle of any kind (once Disembarked it may count as a Denial unit as normal).
- It is a Vehicle of any type.
- It has a special rule specifying that it never counts as a Denial unit.
- It is currently Falling Back or Pinned (if the unit Regroups or recovers from Pinning, it immediately reverts to being a Denial unit again).
- It is a Building or Fortification.
A model is only required to make a maximum of one Dangerous Terrain test during a Phase. Any subsequent Dangerous Terrain tests it would be required to make during that Phase are assumed to have automatically been passed.
However, a unit that Runs may not make Shooting Attacks of any kind during the following Shooting phase, or declare Charges during the Assault phase of the same player turn. If any models in a unit Run, then all models in that unit are counted as having Run, regardless of the distance moved by any individual model.
Units making a Reaction during their opponent’s turn may never choose to Run as part of that Reaction.
When a Sweeping Advance is performed, both the unit Falling Back and the winning unit roll a D6 and add their unmodified Initiative to the result. In a unit with mixed Initiative Characteristics, use the highest Characteristic. The units then compare their totals.
If the winner’s total (Initiative + dice roll) is greater than their opponents’, the Falling Back unit is caught by the Sweeping Advance and destroyed. All models in the destroyed unit are immediately removed as casualties. Unless otherwise specified, no Save or other special rule can prevent the unit from being destroyed.
If the Falling Back unit’s total is higher, or the final result is a tie, they break off from the combat successfully. Make a Falls Back move for the losing unit. The winners can then Consolidate.
To take an Armour Save, roll a D6 and compare the result to the Armour Save Characteristic of the model that has been allocated the Wound. If the dice result is equal to or higher than the model’s Armour Save Characteristic, the Wound is negated. If the result is lower than the Armour Save Characteristic, the model suffers a Wound. This means that, unlike most Characteristics, an Armour Save is better if it is a lower number.
Template weapons shoot clouds of fire, gas or other lethal substances, rather than shells or bullets. They are excellent for killing enemy troops in cover, as the payload simply flows over intervening obstacles to assail the foe behind.
Template weapons are indicated by having the word ‘Template’ for their range instead of a number. Instead of rolling To Hit, simply place the template so that its narrow end is touching the base of the firing model, or the end of the firing weapon’s barrel for Vehicle models without bases, and the rest of the template covers as many models in the target unit as possible, without touching any other friendly models (including other models from the firing model’s unit). Any models fully or partially under the template are hit. Against Vehicles, the template must be placed to cover as much of the Vehicle as possible without touching a friendly model. The position of the firer is used to determine which armour Facing is hit. A Template weapon never hits the model firing it.Template weapons have the Ignores Cover and Wall of Death special rules. Wounds inflicted by Template weapons are allocated following the normal rules.
Blast weapons fire shells, missiles or packets of energy that explode on impact.
When firing a Blast weapon, models do not roll To Hit. Instead, pick one enemy model visible to the firer and place the Blast (3") marker with its hole entirely over the base of the target model, or its hull if the target is a Vehicle. The hole at the centre of the marker must be within the weapon’s Maximum Range. You cannot place the Blast marker so that the base or hull of any friendly model is even partially under it.The large area affected by the blast means it is going to be very hard to miss completely. Nonetheless, the shot might not land exactly where intended. Roll for the Blast marker to scatter and subtract the firer’s Ballistic Skill from the distance (if any) that it scatters, to a minimum of 0". Note that it is possible, and absolutely fine,for a shot to scatter beyond the weapon’s Maximum or Minimum Range and line of sight. This represents the chance of ricochets, the missile blasting through cover and other random events. In these cases, Hits are worked out as normal and can hit and Wound units out of range and line of sight (or even your own units, or models locked in combat). If the shot scatters so that the hole in the centre of the marker is beyond the battlefield’s edge, the shot is a complete miss and is discarded.
Once the final position of the Blast marker has been determined, take a good look at it from above – each unit suffers one Hit for each of the models included in that unit that is fully or partially beneath the Blast marker, even if those models are not within the firer’s line of sight.
Once the number of Hits inflicted on the unit has been worked out, roll To Wound and Save as normal. Note that, unlike other attacks, Wounds inflicted by an attack with the Blast special rule can be allocated to any models in the target unit, even if they are out of sight of any models from the attacking unit.
Preternaturally agile, these warriors can cover ground more quickly than their plodding foes.
A unit composed entirely of models with this special rule gains a bonus to all Run moves, any distance moved as part of a Reaction and as a modifier to all rolls made to determine Charge Distances equal to the value in brackets listed after the special rule. For example, a unit composed entirely of models with the Fleet (2) special rule would add +2 to all Run moves it makes, +2 to all distances moved as part of a Reaction and add a +2 modifier to any Charge Moves made.If a unit is composed entirely of models with this special rule, but the models have different versions of this special rule, then the unit must use the lowest Fleet value included in the unit (for example, a unit of ten models in which nine models have Fleet (2) and one model has Fleet (4) would use the Fleet (2) special rule).
To take a Leadership test, use the following procedure:
- Roll 2D6 and compare the result to the model’s Leadership Characteristic.
- If the result is equal to or less than the model’s Leadership Characteristic, then the test has been passed.
- If the result is greater than the model’s Leadership Characteristic, the test has been failed and the model faces the consequences as detailed in the rule that prompted the test.
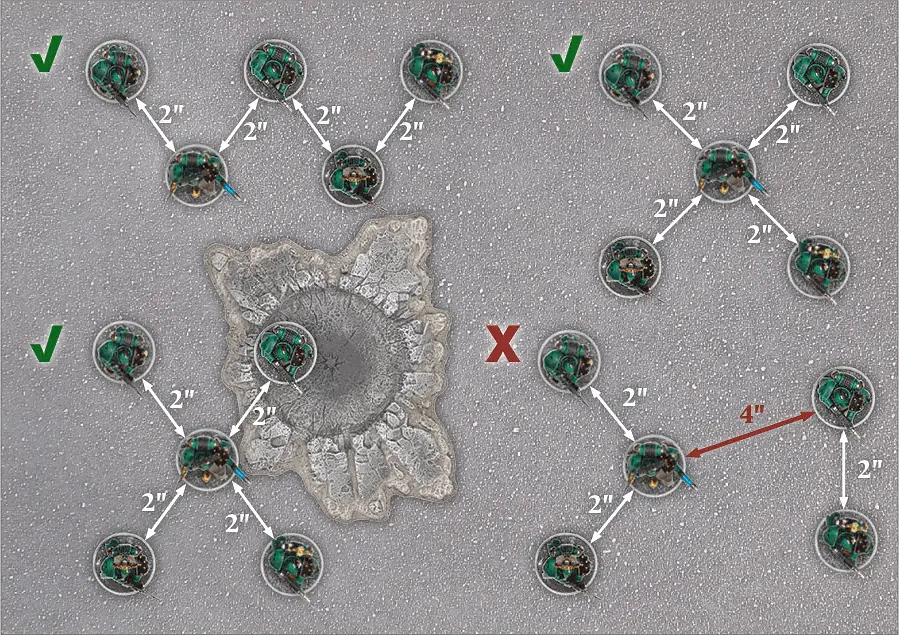
During the course of a game, a unit can get broken up and lose unit coherency, usually because it has sustained casualties from enemy fire. If this happens, in their next Movement phase, the models in the unit must be moved in such a way that they restore unit coherency, or as close to unit coherency as possible. If the unit cannot move in its next turn, or is unable to restore unit coherency in a single turn, then the models must move to restore unit coherency as soon as they have the opportunity, including by Running if they have that option.
Units that are locked in combat cannot move in any other Phase or make Shooting Attacks for any reason. Similarly, models cannot choose to target units locked in combat with Shooting Attacks for any reason. Blast markers and templates cannot be deliberately placed such that they cover any models locked in combat, but they may end up there after scattering and will then cause Hits on any units or models they contact as normal.
Units that are locked in combat do not take Morale checks or Pinning tests caused by Shooting Attacks, and cannot be Pinned.
If any model in the target unit has already lost one or more Wounds, but has not been removed as a casualty then the Wound must be allocated to such a model, unless that model is out of line of sight of all models in the attacking unit or has the Character sub-type.
To make a To Hit roll, roll a D6 for each attack a model gets to make and compare the WS of the attacking model to the WS of the target unit. Then, consult the To Hit chart below to find the minimum result needed on a D6 To Hit.
As the chart below shows, if the target’s WS is half or less than that of the attacker’s, they are hit on a 2+; lower than the attacker’s but more than half, they are hit on 3+; if the target’s WS is equal to the attacker’s, they are hit on 4+; if it is higher but not twice the attacker’s, they are hit on 5+; and if it is twice or more than the attacker’s, then they are hit only on a 6+.
UNITS WITH MULTIPLE WEAPON SKILLS
Some units contain models with different Weapon Skills. Whilst each model in such a unit rolls To Hit using its own Weapon Skill, Attacks made against such a unit are resolved using the Weapon Skill of the majority of the engaged enemy models. If two or more Weapon Skill values are tied for majority, use the highest of those tied values.

Consult the chart below, cross-referencing the attacker’s Strength Characteristic with the defender’s Toughness Characteristic. The chart indicates the minimum result on a D6 roll required to inflict a Wound, and is the same chart as is used during the Shooting phase. A ‘-’ indicates that the target cannot be wounded by the attack. In most cases, when rolling To Wound in close combat, you use the Strength on the attacker’s profile regardless of what weapon they are using. However, there are some Melee weapons that give the attacker a Strength bonus, and this is explained previously in the Weapons section.
MULTIPLE TOUGHNESS VALUES
Rarely, a unit will contain models that have different Toughness Characteristics. When this occurs, roll To Wound using the Toughness value of the majority of the engaged unit. If two or more Toughness values are tied for majority, use the highest of those tied values.
Do not include Wounds caused in the Charge sub-phase,such as those from Reactions, failed Dangerous Terrain tests, etc.
The side that inflicted the most unsaved Wounds is the winner. The losing unit must make a Morale check and must Fall Back if it fails. If both sides suffer the same number of Wounds, the combat is drawn and continues next turn. If one side destroys the enemy completely, it wins the combat automatically, even if it sustained more casualties than the other unit.
Wounds that have been negated by Saving Throws or special rules do not count towards determining who won the combat. Neither do Wounds in excess of a model’s Wounds Characteristic; only the Wounds actually suffered by enemy models count (including all of the Wounds lost by models that have suffered Instant Death). In rare cases, certain models can cause Wounds on themselves or their allies – these Wounds are added to the other side’s total for working out who has won.
If any model in the target unit has already lost one or more Wounds, but has not been removed as a casualty then the Wound must always be allocated to such a model, unless that model also has the Character sub-type.
If, when allocating Wounds to a unit they control, a player has a number of multi-Wound models that have all lost one or more Wounds and could potentially be allocated more Wounds, then any Wounds must be allocated first to the model with the fewest Wounds remaining. If all models have an equal number of Wounds remaining then the controlling player may freely select which eligible model is allocated any further Wounds.
Invulnerable Saves are different to Armour Saves in that they may always be taken whenever the model suffers a Wound, or, in the case of Vehicles, suffers a Penetrating Hit or Glancing Hit – the Armour Piercing value of attacking weapons has no effect on an Invulnerable Save. Even if a Wound, Penetrating Hit or Glancing Hit ignores all Armour Saves, an Invulnerable Saving Throw can still be taken.
For one model to have line of sight to another, you must be able to trace a straight, unblocked line from its body (the head, torso, arms or legs) to any part of the target’s body.
Sometimes, all that will be visible of a model is a weapon, banner, or other ornament they are carrying. In these cases, the model is not visible. Similarly, mechanical appendages such as cables, probes and ammo feeds are ignored, even though they may be part of a model’s body. These rules are intended to ensure that models don’t get penalised for having impressive banners, weaponry, and so on.
In many cases, what a model can ‘see’ will be obvious – if there’s a hill, building or mechanical construct in the way, the enemy might be blatantly out of sight. In other cases, two units will be clearly in view of each other as there is nothing at all in the way.
On those other occasions, where it’s not entirely obvious whether or not one unit can see another, the player will have to stoop over the battlefield and look from behind the model’s head for a ‘model’s eye view’. This means getting down to the level of your models and checking the battlefield from their perspective to ‘see what they can see’. You will find that you can spot lurking enemies through the windows of ruined buildings, catch a glimpse of a model’s legs under tree branches and see that high vantage points become very useful for the increased line of sight that they offer.
Mounted only on the largest and most fearsome of war machines, Destroyer class weapons are capable of annihilating smaller targets and tearing through even the thickest armour with ease.
A model making a Shooting Attack with a Destroyer weapon attacks the number of times indicated on the weapon’s profile whether or not the bearer has moved. A model carrying a Destroyer weapon can attack with it in the Shooting phase and still Charge in the Assault phase. In addition, when you roll for armour penetration with Hits caused by a Destroyer weapon, roll three dice instead of one and discard the single lowest dice rolled, or any one of the lowest dice in the case of tied results. Use the total of the remaining dice to determine the result.In addition, when a Destroyer weapon inflicts a Glancing Hit or a Penetrating Hit, it inflicts D3 Hull Points of Damage instead of a single Hull Point. When a Destroyer weapon inflicts a Wound on a non-Vehicle model, it inflicts D3 Wounds instead of a single Wound.
|
To perform a Ram Attack, first turn the Vehicle on the spot to face the direction you intend to move it in, and, after measuring, declare how many inches the Vehicle is going to move, up to a maximum of its Movement Characteristic. If, due to the size of the Vehicle model making the Ram, pivoting the model brings it into contact with an enemy unit then move the Ramming Vehicle the minimum distance required to keep it 1" away from any other model before beginning the Ram. Once the Vehicle has been ‘aimed’ and the intended distance declared, move the Vehicle straight forwards until it comes into contact with a unit, enemy or friendly, or it reaches the distance declared – no other changes of direction are allowed during a Ram.
Note that a Vehicle conducting a Ram may not contact a unit that is locked in combat. If its movement would bring it into contact with a unit that is locked in combat then it must halt its movement 1" away from that unit, ending the Ram.
If a non-Vehicle unit is reached then that unit suffers D6 automatic Hits. These hits are resolved at a Strength equal to half the Front Armour Value of the Ramming Vehicle, rounding up, and with an AP of -. If the Ramming Vehicle is a Super-heavy Vehicle then the Strength of the attack is always 10, and the number of Hits is increased to 2D6. Once all Hits sustained from the Ram have been resolved, the unit that has been rammed must take a Morale check and immediately Fall Back if it fails. Regardless of the result of the check, the Vehicle stops moving 1" away from any other models and does not move any further this turn.
If the Ramming Vehicle comes into contact with an enemy Vehicle or Building, then all Vehicles or Buildings immediately inflict a Hit against any Armour Facing that is in contact with another Vehicle. The Strength of Hits inflicted on all Vehicles will be equal to half the Armour Value, rounding up, on the facing that is in contact with an enemy Vehicle or Building.
If the Ramming Vehicle has more starting Hull Points than any Vehicle or Building it is in contact with, add +1 to the Strength of the Hit, and if the Ramming Vehicle has the Slow or Super-heavy type, or is a Building, add +4 Strength, to a maximum value of 10. Both players roll for armour penetration against any of their opponent’s Vehicles or Building involved in the Ramming Attack, and any results are immediately applied. Regardless of the damage dealt to any Vehicles or Buildings involved in the Ram Attack, once the Ram Attack is resolved the Ramming Vehicle halts 1" away from any other models and does not move further this turn.
If, at any point in its move, the Vehicle would enter into contact with Impassable Terrain or a battlefield edge, or if it passes within 1" of units in combat or friendly units, it immediately stops moving 1" away from any other model.
If the Vehicle moved before its passengers got aboard, it cannot move further that turn (including pivoting on the spot). If the Vehicle did not move before its passengers got aboard, it can move as normal after they have Embarked. In either case, a Vehicle cannot Ram in a turn that a unit Embarks upon it.
If the Vehicle had not moved before the unit Disembarked, the Vehicle can then move normally. If the Vehicle had already moved before the unit Disembarked, the Vehicle cannot move further that turn (including pivoting on the spot). In addition, a Vehicle cannot Ram on a turn that a unit Disembarks from it.
| Any player, unless a special rule or other effect specifies otherwise, may make one Reaction in each Phase of their opponent’s turn. | ||
The Reaction Allotment of any player may be modified by special rules or other effects, granting that player additional Reactions either in every Phase (an increase of the Reaction Allotment) or in specific Phases. This may either increase the base Reaction Allotment, that is the number of Reactions allowed in every Phase, or only grant a bonus to the Reaction Allotment in specific Phases.
For example, a player might have a special rule that states ‘This special rule increases the Reaction Allotment to two’, which would indicate that the player could make two Reactions in every Phase of their opponent’s turn. However, a special rule that states ‘This special rule increases the number of Reactions that may be made during the Assault phase by +1’ would allow a player with a Reaction Allotment of one to make a single Reaction in the Shooting and Movement phases, but two in the Assault phase.
Regardless of any special rules or other effects, no player may ever increase their base Reaction Allotment above three, nor may any player ever make more than three Reactions in a given Phase unless a special rule specifically allows for a number of Reactions above the normal limit of three.
A Reaction may be made with any unit controlled by the Reactive player, though in a number of situations a special rule or condition may deny a unit the opportunity to react. The most common such conditions where a unit may not make a Reaction are:
- It is Pinned.
- It is Falling Back.
- It is locked in combat.
- It has already made a Reaction in the current Phase.
- The controlling player has exhausted their Reaction Allotment for the current Phase.
- Another special rule, effect or condition specifically states they may not (for example, the Fearless special rule and certain effects caused by weapons and Psychic Powers).
Co-axial Mounted Weapons – Co-axial Mounted weapons follow all the rules for Turret Mounted weapons and must be mounted alongside another Turret Mounted weapon. In addition, when Turret Mounted weapons are fired, if the Co-axial Mounted weapon scores at least one Hit on the target unit then all further attacks by weapons mounted on the same Turret, directed at the same target, may re-roll any failed rolls To Hit.
Defensive Weapons – All weapons mounted on a Vehicle that have a Strength Characteristic of 6 or less are Defensive weapons. Other weapons may also be specifically designated as Defensive weapons on their profile. The controlling player may always choose to fire Defensive weapons at the closest enemy Infantry unit within line of sight and the Firing Arc of applicable weapons, even if the Vehicle’s other weapons have targeted a different unit during a Shooting Attack.
Any weapon that has a Strength greater than 6 and is not Pintle Mounted or otherwise designated specifically as a Defensive weapon is a Battle weapon.
For example, a Legion Land Raider Proteus has a Hull (Front) Mounted Heavy Bolter – this weapon may only fire at targets in the Front Firing Arc.
Turret Mounted – Turret Mounted weapons may fire at targets in any Hull arc (Front, Side or Rear) without restriction.
Centreline Mounted – Centreline Mounted weapons may only fire at targets in the Centreline Firing Arc.
Sponson Mounted – Sponson Mounted weapons are usually mounted in pairs, one on each side of a Vehicle (the Vehicle’s profile will note if this is not the case) and fire into the appropriate Sponson Firing Arc (either left or right). If the target of a Vehicle’s Shooting Attack is within the Firing Arc for only one of a pair of Sponson weapons, then the out of arc weapon may be fired at another enemy unit of the controlling player’s choice. This Secondary Target must be in the weapon’s line of sight and Firing Arc, but may be from a different unit than the original target.
Pintle Mounted – Pintle Mounted weapons may fire at targets in any Firing Arc without restriction, but are always counted as Defensive weapons regardless of the weapon type or its statistics.
|
To Hit rolls are easy to remember if you subtract the Ballistic Skill of the attacking model from 7. For example, a model with BS 2 needs to roll a 5 or more (7-2=5).
Note that the minimum roll needed To Hit is always at least 2. When rolling To Hit, there is no such thing as an automatic Hit and a roll of a 1 always misses.
|
When checking range, simply measure from the attacking model to the nearest model in the target unit that is within Line of Sight of the attacking model. Any weapon that is found to be out of range of all models in the target unit to which line of sight can be drawn may not be used to make attacks.
- A ‘Small’ Blast marker (3" in diameter).
- A ‘Large’ Blast marker (5" in diameter).
- A ‘Template’ (a teardrop-shaped template roughly 8" long).
- A ‘Massive’ Blast marker (7" in diameter).
- An ‘Apocalyptic’ Blast marker (10" in diameter).
- An ‘Apocalyptic Barrage’ marker (a clover-shaped set of five overlapping markers, each 5" in diameter).
- A ‘Hellstorm’ (a teardrop-shaped template roughly 16" long).
The templates and Blast markers are used as a way of determining how many models have been hit by an attack that has an area of effect or a blast radius. When an attack uses a template or Blast marker, it will explain how the template is positioned, including any kind of scatter that might occur (scatter is discussed further later in this section). To work out the number of Hits, you normally need to hold the template or Blast marker with its central hole over an enemy model or a particular point on the battlefield, and then look underneath (or through, if using a transparent template) to see how many models lie partially or completely underneath. Various special rules and weapon effects will provide additional details on the specific use of templates when making attacks with those special rules or weapons.
A unit takes a Hit for each model that is fully, or even partially, underneath the template or Blast marker. Remember that a model’s base is counted as being part of the model itself, so all a template or Blast marker has to do to cause a Hit is to cover any part of the target’s base.
Glancing Hits – If a Glancing Hit was scored, the Vehicle loses 1 Hull Point.
Penetrating Hits – If a Penetrating Hit was scored, the Vehicle not only loses 1 Hull Point, but also suffers additional damage.
After deducting any Hull Points, roll a D6 for each Penetrating Hit and look up the result using the Vehicle Damage table, applying any appropriate modifiers. All modifiers on the Vehicle Damage table are cumulative. If you inflict a Penetrating Hit, you must roll on the Vehicle Damage table even if the Vehicle loses sufficient Hull Points to be Wrecked, as there is still a chance it might suffer an Explodes result on the Vehicle Damage table.
Certain items can only be used once, so a general must choose wisely when to do so.
A weapon or ability with this special rule can only be used once during the course of a battle. Once a weapon with the One Use or One Shot special rule has been used to attack, it is no longer counted as a weapon and may not be destroyed (for example, by rolls on the Vehicle Damage table) or repaired by any other rule or effect.- Place the object on the battlefield as instructed by the rule.
- Roll a Scatter dice and 2D6 to determine the direction and distance of scatter in inches.
- If a Hit is rolled on the Scatter dice, the object does not move – leave it in place and resolve the remainder of the rule.
- If an arrow is rolled, move the object the distance shown on the 2D6 in the direction of the arrow. Ignore intervening terrain, units, etc, unless the rule states otherwise.
- Once the object has scattered to its final position, resolve its effects.
Scatter dice and other dice and accessories that you can use in your games of Horus Heresy – Age of Darkness can be purchased from the Games Workshop website.
The dense shrouds of alien trees provide shelter for those brave enough to enter their confines, hiding them from sight and shielding them from the battle’s fury.
Areas of terrain designated as Jungles or Woods confer a 6+ Cover Save on models within their bounds and are always counted as Difficult Terrain.The shattered and useless shells of buildings and fortresses, strewn with the remains of those who once defended them.
Areas of terrain designated as Ruins confer a 5+ Cover Save on models within their bounds – this includes models on upper levels of Ruins that are within the Area Terrain. Ruins are always counted as Difficult Terrain.Pile-in Moves follow the same rules as Charge Moves, except that they are not slowed by Difficult Terrain (though Dangerous Terrain will still trigger Dangerous Terrain tests).
In addition, a Pile-in Move cannot be used to move into base contact with any units that are not already involved in the combat.
When making Pile-in Moves, the Active player moves their unit(s) first. If both players’ Pile-in Moves combined would be insufficient to bring any combatants into base contact, the combat is considered to have ended.
Units making a Consolidation move are not slowed by Difficult Terrain but do trigger Dangerous Terrain tests where appropriate. A Consolidation move cannot be used to move into base contact with any enemy models.
Consolidating models must stop at least 1" away from all enemy models, including any that have just Fallen Back from the combat that the Consolidating unit has fought in.
This vehicle is specifically designed to disgorge troops into the thick of the action.
Passengers Disembarking from Access Points on a Vehicle with this special rule can Charge on the turn they do so (including when forced to make an Emergency Disembarkation) unless the Vehicle arrived from Reserves that turn.Only Infantry models can Embark upon Transports unless specifically stated otherwise. Certain special rules, notably the Bulky (X) special rule, may modify the Transport Capacity required for a given model to Embark upon a Transport, and this will be specified in the model’s rules. Sometimes, there will be constraints on which types of models can Embark upon a particular Vehicle, and this will be specified in the unit’s entry. Whilst Embarked upon a Transport, units gain the Fearless special rule and cannot be made to Fall Back or become Pinned while Embarked upon the Transport.
As such, Vehicles have different Armour Values, representing the thickness of their armour. Armour Values for individual Vehicles often vary between its Front, Side and Rear Facings. Attacks are resolved against the Facing of the Vehicle that the attack comes from. To see what Facing an attack is coming from, draw two imaginary lines through the corners of the Vehicle (see diagram below). If a unit has firing models in two or more different Facings of a target Vehicle (some models in the Front and some in the Side, for example), attacks are resolved separately for each Facing. Each individual model may only direct its attacks at a Facing it can draw line of sight to and, in situations where a model can draw line of sight to more than one Facing, the controlling player may choose which Facing will be the target of any attacks.
This may require attacks targeting a Vehicle to be divided into separate pools, each resolved against the appropriate Facing and the Armour Value attached to that Facing. In any situation where a model is hit by a weapon or attack which fires Indirectly or does not otherwise require line of sight to its target, Hits are always resolved against the Side Armour Value. The direction a turret is facing has no bearing on what arc of a Vehicle you are firing at.
+1 Charge Bonus: Engaged models that Charged this turn get +1 Attack this turn. Models in units that made a Disordered Charge do not get this bonus.
+1 Two Weapons: Engaged models with two single-handed weapons (often a Melee weapon and/or Pistol in each hand) get +1 Attack. Models with more than two weapons gain no additional benefit; you only get one extra attack.
Other Bonuses: Models may have other special rules and Wargear that confer extra attacks.
Skyfire weapons excel at shooting down enemy aircraft.
A model which has this special rule, or that is firing a weapon with this special rule, fires using its normal Ballistic Skill when shooting at Flyers and Skimmers, but it can only fire Snap Shots against other targets.