Battlefield Terrain
| The battlefields of the Horus Heresy range from the broken cities of those worlds reconquered by the Great Crusade to the hellscapes of worlds too inhospitable for the servants of the Emperor to build upon. The followers of the Warmaster and the Emperor clashed over every type of terrain imaginable, from scorching deserts and rivers of fire to frigid plains of ice and the airless vaults of forgotten worlds, bringing battle to the foe wherever they might be. This section contains the rules you’ll need to represent this terrain on the battlefield. | ||
Books
| Book | Kind | Edition | Version | Last update |
| | ||||
| | Rulebook | 2 | 1.2 | December 2023 |
Terrain Types
The Horus Heresy – Age of Darkness rules feature several main types of battlefield terrain: Open Terrain, Terrain Pieces and Area Terrain.Open Terrain
Open Terrain covers everything from dusty plains to rolling hills. Models in Open Terrain are often said to be ‘out in the open’. No additional rules are needed for Open Terrain and, unless otherwise specified, special rules and abilities that affect terrain do not affect Open Terrain.Terrain Pieces
Individual items of terrain, such as barricades, statues and buildings, are all examples of Terrain Pieces. These items of terrain serve to shelter troops on the field of battle by means of their own bulk and design.When drawing line of sight to a model that is the target of a Shooting Attack, if it is at least 25% obscured by a Terrain Piece it is eligible for a Cover Save. By default, most terrain pieces are termed Battlefield debris and unless otherwise stated, a model in cover behind battlefield debris has a 6+ cover save. Terrain pieces that are mounted on a base count the area of their base as Difficult Terrain.
In addition, some Battlefield Debris has additional rules, which are either detailed as follows or can be found on its terrain profile. Some examples of additional types of Terrain Pieces are noted below:
Barricades, Walls and Defence Lines
Barricades and walls can be hastily assembled obstacles, or the remains of once-proud structures.
A model in cover behind a Barricade or Wall has a 5+ Cover Save. For the purposes of Charge Moves, models that are both in base contact with a Barricade and within 2" of each other are treated as being in base contact. Despite the models on either side not literally being in base contact, they may fight in the Fight subphase as normal. Units Charging an enemy that is behind a Barricade or Wall count as Charging through Difficult Terrain.Buildings
The rules for Buildings are extensive, and are covered in more detail in their own rules section.Imposing Statuary
Both those pieces of triumphal Great Crusade statuary and newer monuments to the dark glory of the Warmaster are common features found upon battlefields across the galaxy, inspiring those who fight beneath them to new heights of devotion.
At the start of the game, all Terrain Pieces designated as Imposing Statuary must be noted as being dedicated to either the Loyalist or Traitor cause. Models of the same Allegiance as the Terrain Piece gain the Fearless special rule whilst within 2" of Imposing Statuary. A model of any Allegiance in cover behind Imposing Statuary has a 4+ Cover Save.Area Terrain
A zone of closely packed terrain, be it dense jungle, tangled ruins or the rocky walls of craters and shell holes, is considered Area Terrain. Any Area Terrain on the battlefield must have a clearly delineated zone which it covers, whether defined by a base upon which the terrain is modelled or some other boundary agreed by and visible to all players.Any model that is within the boundary of a zone of Area Terrain is eligible for a Cover Save. By default most Area Terrain confers a 6+ Cover Save, unless stated otherwise in the rules for a specific terrain type, either shown here or in other Age of Darkness publications. All zones of Area Terrain are also considered Difficult Terrain unless stated otherwise elsewhere.
In addition, some Area Terrain has additional rules, which are either detailed as follows or can be found on its terrain profile. Some examples of additional types of Area Terrain are noted below:
Ruins
The shattered and useless shells of buildings and fortresses, strewn with the remains of those who once defended them.
Areas of terrain designated as Ruins confer a 5+ Cover Save on models within their bounds – this includes models on upper levels of Ruins that are within the Area Terrain. Ruins are always counted as Difficult Terrain.Craters
The aftermath of heavy shelling and orbital bombardments, impact craters provide protection for those sensible enough to seek it.
Areas of terrain designated as Craters confer a 6+ Cover Save on models within their bounds. If a unit is Pinned while within a Crater then that area of terrain instead confers a 4+ Cover Save on all models in the Pinned unit that are within its bounds. Craters are always counted as Difficult Terrain.Jungles and Woods
The dense shrouds of alien trees provide shelter for those brave enough to enter their confines, hiding them from sight and shielding them from the battle’s fury.
Areas of terrain designated as Jungles or Woods confer a 6+ Cover Save on models within their bounds and are always counted as Difficult Terrain.Fortification NetworksSome Terrain Pieces comprise several different Fortifications chosen as a single slot on the Force Organisation chart. When multiple Fortifications can be purchased in this manner, the profile entry will clearly list the components that can be taken, the points cost for each and any other options and restrictions that apply. The component Fortifications use all the normal rules for their type (refer to each Building’s individual profile for details of its special rules) and use all the normal rules for Fortifications, with the following exceptions:When you deploy Fortifications on the battlefield, Fortifications chosen as part of a Fortification Network can be placed in contact with each other. Furthermore, if one of the Fortifications in the network has an instruction saying that ‘each section must be placed in contact with at least one other section’, that section satisfies the instruction if it is placed in contact with any section or building from the same Fortification Network. | ||
Difficult Terrain
Difficult Terrain slows down models wishing to move through it. This includes areas of rubble, woods, ruins, rocky outcrops, boggy ground, low walls, tanglewire, barricades, steep hills, streams and other shallow water, as well as Terrain Pieces and Area Terrain that specifies it counts as Difficult Terrain. Note that an area of Difficult Terrain does not grant a Cover Save unless it is also either a Terrain Piece or within a zone of Area Terrain.Moving into Difficult Terrain
If a unit starts its move outside Difficult Terrain, but has a high enough Movement Characteristic to enter Difficult Terrain during the current Movement phase, the player must declare if they want their unit to try to enter it as part of their move. If the controlling player chooses not to enter any area of Difficult Terrain the unit moves as normal, but may not enter any area of Difficult Terrain. If the controlling player chooses for a unit to enter any area of Difficult Terrain, the unit applies a modifier of -2 to its movement during that Phase.This modifier is applied to the unit’s Movement Characteristic before it begins its move and continues to apply as long as the unit remains in Difficult Terrain, or until the end of the current Movement phase if it leaves Difficult Terrain as part of its move. If the application of this modifier would leave the unit unable to reach an area of Difficult Terrain it is still applied, even if the controlling player alters the unit’s movement and no longer intends it to enter Difficult Terrain.
Moving within Difficult Terrain
If any models in a unit start their move in Difficult Terrain, they are affected by the terrain and reduce their Movement by -2" during that Movement phase.Charging through Difficult Terrain
Models are slowed when charging through Difficult Terrain. If, when charging, one or more models have to move through Difficult Terrain in order to reach the enemy by the shortest possible route, the entire unit applies a modifier of -2 to its Charge Distance. This modifier is applied in addition to any other modifiers that might apply to the unit’s Charge Distance. If at least one model in the Charging unit moved through Difficult Terrain as part of its Charge Move, all of the unit’s models must attack at Initiative step 1, regardless of other Initiative modifiers, even if the Charging unit is not slowed by Difficult Terrain. Note that Charging models must engage as many enemies in the target unit as possible, even when charging through terrain.Dangerous Terrain
Dangerous Terrain poses a very real risk to the lives of those fighting in and around it; ruins littered with unexploded munitions, rivers of boiling water or alien flora that hungers for flesh. Dangerous Terrain follows all the rules for Difficult Terrain. In addition, each model must make a Dangerous Terrain test as soon as it enters, leaves or moves within Dangerous Terrain.Dangerous Terrain Tests
To take Dangerous Terrain tests, roll a D6. On a 1, that model suffers a Wound. No Armour Save, Cover Save or Damage Mitigation roll may be made against this Wound, but Invulnerable Saves may still be made.A model is only required to make a maximum of one Dangerous Terrain test during a Phase. Any subsequent Dangerous Terrain tests it would be required to make during that Phase are assumed to have automatically been passed.
Impassable Terrain
Some terrain is simply so inhospitable, so dangerous that it cannot be traversed at all. Unless noted otherwise in their special rules, models cannot enter, cross, move into or move through Impassable Terrain – they must go around. The exceptions to this rule are typically units equipped with Jump Packs, or of the Skimmer or Flyer types which may move over, but not end their move, in Impassable Terrain.FortificationsUnlike simple terrain features, Fortifications are Buildings or other Terrain Pieces that start the game under the control of one player, having been selected as a part of their army, and can both attack enemy units and be attacked by them in turn. In many respects, these terrain features function like any other unit in that player’s army; the major difference is that they can be captured by the enemy, and even swap hands several times over the course of the battle.To keep track of which side currently controls a Building, we use the concept of ‘Claiming’ Buildings. At the start of the game, all Fortifications that were bought as part of a player’s army are ‘Claimed’ by the owning player, whilst all other Buildings are ‘Unclaimed’. A Claimed Fortification is part of the controlling player’s side and will remain so, even if it later becomes unoccupied, until the Building is either destroyed or Claimed by an enemy unit. If a unit Embarks within an unoccupied Building, they immediately capture and Claim that Building, and it becomes part of that unit’s side until the Building is either destroyed, or an enemy unit re-occupies it, thereby reclaiming it. Fortifications that are not Buildings may also be Claimed – in this case a model that is in base contact with the Fortification Claims it. If more than one side has models in contact with a non-Building Fortification then no side may Claim it. If a unit moves onto the battlements of an unoccupied, Unclaimed Building, they immediately Claim that Building and it becomes part of that unit’s side until the Building is either destroyed, or an enemy unit occupies it, thereby Claiming it. Fortifications that are selected as part of an army’s Force Organisation chart must be deployed onto the Battlefield in the same manner as any other unit, but may not be placed into Reserve or use the Deep Strike, Scout or Outflank special rules under any circumstances. Claimed FortificationsClaimed Fortification is counted for all purposes as a unit in the army that has Claimed it. It may fire any weapons on its profile, as long as at least a single friendly unit is Embarked within or another special rule allows it. In addition, enemy units can shoot at and Charge a Building with this special rule, even if it is unoccupied.Fortifications that are not Buildings may also be attacked if they have an Armour Value or Toughness Characteristic. However, Fortifications that do not have an Armour Value or Toughness Characteristic may not be Charged or targeted by Shooting Attacks. Unclaimed FortificationsAn Unclaimed Fortification follows all the normal rules for a Terrain Piece of its type and so cannot fire any weapons or be targeted by any player’s attacks. | ||
Buildings
The bloody battles of the 31st Millennium often envelop cities, towns, defence lines, army barracks, mining colonies, space ports, tribal outposts and countless other types of built-up structure.Buildings of all types use aspects of the Transport Vehicle rules. The main difference between Buildings and actual Vehicles is that they cannot move, they can be controlled by either side and units from either side can Embark upon them.
Building Armour Values
All buildings have an Armour Value listed on their profile. If only a single Armour Value is listed, then it is used against all attacks, no matter which Facing is hit.Building Size and Hull Points
In the same manner as a Transport Vehicle, Buildings have a Transport Capacity and a number of Hull Points. A Building’s or Fortification’s Hull Points and Transport Capacity will be listed on its profile. For those Buildings that are not bought as part of an army, the following table can be used to determine Hull Points and Transport Capacity based on size:
|
Entering and Exiting Buildings
Models can enter or exit a Building through a doorway, or other opening that is listed on the Building’s profile as being an Access Point. Moving into, or out of, a Building works the same as Embarking or Disembarking from a Vehicle, including Emergency Disembarkations. Infantry equipped with Jump Packs or Jet Packs can Embark inside Fortifications that are Buildings.All of the normal rules apply, so only one Infantry unit, plus any Independent Characters that have joined them, may occupy a Building at any one time. Models entering a Building are removed from the battlefield – in exactly the same manner as models Embarking upon a Transport Vehicle.
Repel the Enemy
Buildings are constructed to allow their garrisons easy access to exit and engage enemy siege teams before they can breach their walls. Models Disembarking from Access Points on a Building can Charge on the turn they do so, even on a turn the Building was destroyed.Firing from Buildings
Weapons listed on a Fortification or Building’s profile are used to attack in the same manner as other ranged weapons. A side that has Claimed the Building or Fortification may attack with any weapons listed on its profile as long as the Building has at least one friendly unit Embarked within the Building or in base contact with it if it does not have a Transport Capacity. Weapons on Fortifications use the same Firing Arcs and mounts that Vehicle weapons do, as well as certain Fortification specific mounts, which have their own rules detailed below:Fire Points (Arc, X)
A Fire Point is unique in that it is a mount that does not include any weapons, instead it allows models Embarked upon the Fortification to fire the weapons they are equipped with from the Building. A Fire Point will note both the arc into which it can fire as well as the number of embarked models that can fire from it. Embarked models firing from a Fire Point measure their range and line of sight from the openings on the model that denote the Fire Point and may fire any Ranged weapons they are equipped with as per the normal rules for Shooting. If not otherwise stated, two models may fire from a Fire Point.Emplacement Mounted
An Emplacement Mounted weapon may fire into any arc, but may only be fired if at least one model from the unit that currently Claims the Fortification is either in base contact with the weapon or Embarked in the building upon which it is mounted. When being used to make attacks, the BS of the model is used rather than the BS of the Fortification.Buildings and Force Organisation Charts
When using Force Organisation charts, Buildings selected as part of a player’s army (instead of as neutral Terrain Pieces) are classed as a Fortification choice as will be noted on their profiles. Some especially large Fortifications may instead be classed as Lords of War choices – these do not also use up a Fortification choice.Massive & Multi-part FortificationsMassive Fortifications follow all the rules for Buildings as defined in this section, and reduce all rolls made for them on the Building Damage table by -1. The profile entry for the Fortification will list the actual Armour Values it has.Some particularly large Fortifications or units of Fortifications are composed of multiple Buildings in base contact with each other to form a larger complex. These multi-part Buildings will specify on their profiles the exact breakdown of their component parts and how they are linked. You can move a unit in one part of a multi-part Building into an adjacent and unoccupied part of the Building by declaring you are doing so. This will take up all of the unit’s Movement, and is still subject to all the rules for Transport Capacity. In all other regards, the Buildings that make up a multi-part Building are treated as separate models. | ||
Attacking Buildings
When determining if a Building can be targeted by a Shooting Attack or Charged and fought in close combat, or affected by a special rule, treat the Building as a Vehicle unless it is specifically stated otherwise. When attacking a Building, roll To Hit and for armour penetration as if it were a Vehicle. In close combat, Buildings are hit automatically. For example, melta bombs can only be used to attack Vehicles in close combat – they can therefore also be used to attack Buildings in close combat. Similarly, a weapon with special rules that specifically affect Vehicles can also be used to attack Buildings. Note that this does not mean that a weapon or special rule which specifies that it can only be used against Buildings can also be used against Vehicles.If a Building suffers a Glancing Hit or Penetrating Hit, that Building immediately loses a single Hull Point. To resolve the effects of Penetrating Hits inflicted on a Building, roll on the Building Damage table instead of the Vehicle Damage table. If the Building’s Hull Points are reduced to 0, it immediately suffers a Total Collapse result.
Battlements
The roof spaces of many Buildings are identified as battlements. Whilst all battlements are built on top of another Building, battlements are not themselves treated as Buildings. Battlements are treated as the upper levels of a Ruin and follow all the rules for Ruins as previously noted, with the following exceptions:Battlements are treated as an Access Point for their Building, meaning a unit inside the Building can disembark onto the battlements, or vice versa. Note that Buildings without Transport Capacity that have battlements may still not be entered, although units can use their battlements.
Units equipped with Jump Packs or Jet Packs, Cavalry units and Skimmers do not need to take Dangerous Terrain tests for starting or ending their move on battlements.
If a Template or Blast weapon hits a unit on top of a battlement, that battlement’s Building also suffers a single Hit.
If a unit moves onto the battlements of an Unclaimed, non-destroyed Building, they immediately Claim that Building and it becomes part of that unit’s side until the Building is either destroyed or an enemy unit Claims it.
Building Damage Table
| |||||||||||||||||||||||||||

FORTIFICATION Kilometre upon kilometre of fortified walls encircle the many redoubts and fastnesses Lord Dorn and others have constructed upon hundreds of Imperial worlds, each studded with formidable strongpoints manned by stalwart defenders. Military theory states that one warrior ensconced in such a fortified position is the equal of many times more attackers, who must launch desperate assaults in order to breach the line. | ||
- Fortified Wall (Strongpoint) 55 pts
| Armour | Transport Capacity | |||||||
| M | BS | Front | Side | Rear | HP | Base | ||
| Fortified Wall (base: Use model) | ||||||||
| Fortified Wall | - | - | 13 | 13 | 13 | 4 | 6 | Use model |
- 1 Strongpoint
- Fire Point (Front, 4)
- Fire Point (Front, 4)
- Battlements
- Multi-part Fortification (if additional Strongpoints are selected only)
- A Fortified Wall may include up to two additional Strongpoints for +55 points each.
FORTIFICATION Imperial bunkers are to be found across the length and breadth of the galaxy, often built to secure worlds brought to Compliance during the Great Crusade, or more recently in an attempt to hold at bay the inexorable advance of the Warmaster’s hosts. | ||
- Imperial Bunker 85 pts
| Armour | Transport Capacity | |||||||
| M | BS | Front | Side | Rear | HP | Base | ||
| Imperial Bunker (base: Use model) | ||||||||
| Imperial Bunker | - | 3 | 14 | 14 | 14 | 4 | 12 | Use model |
- 1 Imperial Bunker
- Fire Point (One per hull arc, 2)
- Hull Mounted (Front) Heavy Bolter
- Hull Mounted (Left) Heavy Bolter
- Hull Mounted (Right) Heavy Bolter
- Hull Mounted (Rear) Heavy Bolter
- An Imperial Bunker may take a single Emplacement Mounted Icarus Lascannon on its battlements for +25 points.
FORTIFICATION Defence lines are barricades built from crenellated armoured sections that link together into a solid shield wall. Their simple design means that they can be built and deployed at great speed. | ||
- Defence Line 35 pts
| Armour | Transport Capacity | |||||||
| M | BS | Front | Side | Rear | HP | Base | ||
| Defence Line (base: Use model) | ||||||||
| Defence Line | - | - | - | - | - | - | - | Use model |
- None
- A Defence Line may take a single Emplacement Mounted Skyreaper battery for +25 points.
For one model to have line of sight to another, you must be able to trace a straight, unblocked line from its body (the head, torso, arms or legs) to any part of the target’s body.
Sometimes, all that will be visible of a model is a weapon, banner, or other ornament they are carrying. In these cases, the model is not visible. Similarly, mechanical appendages such as cables, probes and ammo feeds are ignored, even though they may be part of a model’s body. These rules are intended to ensure that models don’t get penalised for having impressive banners, weaponry, and so on.
In many cases, what a model can ‘see’ will be obvious – if there’s a hill, building or mechanical construct in the way, the enemy might be blatantly out of sight. In other cases, two units will be clearly in view of each other as there is nothing at all in the way.
On those other occasions, where it’s not entirely obvious whether or not one unit can see another, the player will have to stoop over the battlefield and look from behind the model’s head for a ‘model’s eye view’. This means getting down to the level of your models and checking the battlefield from their perspective to ‘see what they can see’. You will find that you can spot lurking enemies through the windows of ruined buildings, catch a glimpse of a model’s legs under tree branches and see that high vantage points become very useful for the increased line of sight that they offer.
Fearless troops never give up and seldom make full use of cover – even if it would be wiser to do so.
Units with one or more models with the Fearless special rule automatically pass Pinning tests, Regroup tests and Morale checks. In addition, models with the Fearless special rule ignore the effects of the Fear special rule.However, units containing one or more models with the Fearless special rule cannot use any Reactions that grant a Cover Save, Armour Save or Invulnerable Save, and cannot choose to fail a Morale check due to the Our Weapons Are Useless special rule. If a unit has become Pinned and then gains the Fearless special rule, all the effects of being Pinned are immediately cancelled.
A model is only required to make a maximum of one Dangerous Terrain test during a Phase. Any subsequent Dangerous Terrain tests it would be required to make during that Phase are assumed to have automatically been passed.
To take an Armour Save, roll a D6 and compare the result to the Armour Save Characteristic of the model that has been allocated the Wound. If the dice result is equal to or higher than the model’s Armour Save Characteristic, the Wound is negated. If the result is lower than the Armour Save Characteristic, the model suffers a Wound. This means that, unlike most Characteristics, an Armour Save is better if it is a lower number.
Invulnerable Saves are different to Armour Saves in that they may always be taken whenever the model suffers a Wound, or, in the case of Vehicles, suffers a Penetrating Hit or Glancing Hit – the Armour Piercing value of attacking weapons has no effect on an Invulnerable Save. Even if a Wound, Penetrating Hit or Glancing Hit ignores all Armour Saves, an Invulnerable Saving Throw can still be taken.
If the Vehicle moved before its passengers got aboard, it cannot move further that turn (including pivoting on the spot). If the Vehicle did not move before its passengers got aboard, it can move as normal after they have Embarked. In either case, a Vehicle cannot Ram in a turn that a unit Embarks upon it.
Battlements are treated as an Access Point for their Building, meaning a unit inside the Building can disembark onto the battlements, or vice versa. Note that Buildings without Transport Capacity that have battlements may still not be entered, although units can use their battlements.
Units equipped with Jump Packs or Jet Packs, Cavalry units and Skimmers do not need to take Dangerous Terrain tests for starting or ending their move on battlements.
If a Template or Blast weapon hits a unit on top of a battlement, that battlement’s Building also suffers a single Hit.
If a unit moves onto the battlements of an Unclaimed, non-destroyed Building, they immediately Claim that Building and it becomes part of that unit’s side until the Building is either destroyed or an enemy unit Claims it.
Some units make their way to battle via tunnelling, teleportation, flying, or some other extraordinary means which allows them to appear in the thick of the fighting.
A unit made up entirely of models with this special rule may perform a Deep Strike Assault. Certain Faction or unit special rules may present other options for the deployment of units with the Deep Strike special rule.Scouts are always in the vanguard of the army. Unnoticed by the enemy, they range ahead of the main force.
After both sides have deployed (including Infiltrators), but before the first player begins their first turn, a unit containing at least one model with this special rule can choose to redeploy. If the unit is Infantry, Artillery, Dreadnought or Automata, each model can redeploy anywhere entirely within 6" of its current position. If it is any other Unit Type, each model can instead redeploy anywhere entirely within 12" of its current position. During this redeployment, Scouts can move outside the owning player’s Deployment Zone, but must remain more than 9" away from any enemy unit. A unit that makes a Scout redeployment cannot Charge in the first Game Turn. A unit cannot Embark or Disembark as part of a Scout redeployment.If both sides have Scouts, roll off; the winner decides who redeploys first. Then alternate redeploying Scout units one at a time. If a unit with this special rule is deployed inside a Dedicated Transport, it confers the Scout special rule to the Transport (though a Disembarkation cannot be performed as part of the redeployment). Note that a Transport with this special rule does not lose it if a unit without this special rule is Embarked upon it. Having Scout also confers the Outflank special rule to units of Scouts that are kept as Reserves.
Some units make use of their inherent speed, stealth or other capabilities to launch a surprise assault on the foe from an unexpected direction.
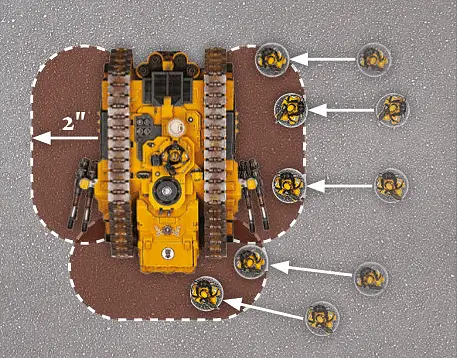
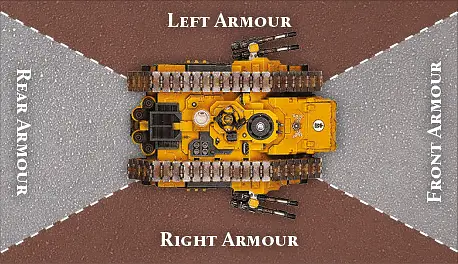
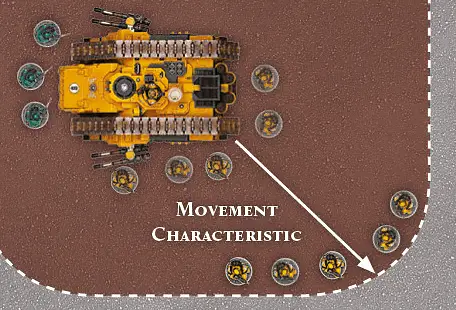
A unit made up entirely of models with this special rule may perform a Flanking Assault. Certain Faction or unit special rules may present other options for the deployment of units with the Outflank special rule.As such, Vehicles have different Armour Values, representing the thickness of their armour. Armour Values for individual Vehicles often vary between its Front, Side and Rear Facings. Attacks are resolved against the Facing of the Vehicle that the attack comes from. To see what Facing an attack is coming from, draw two imaginary lines through the corners of the Vehicle (see diagram below). If a unit has firing models in two or more different Facings of a target Vehicle (some models in the Front and some in the Side, for example), attacks are resolved separately for each Facing. Each individual model may only direct its attacks at a Facing it can draw line of sight to and, in situations where a model can draw line of sight to more than one Facing, the controlling player may choose which Facing will be the target of any attacks.
This may require attacks targeting a Vehicle to be divided into separate pools, each resolved against the appropriate Facing and the Armour Value attached to that Facing. In any situation where a model is hit by a weapon or attack which fires Indirectly or does not otherwise require line of sight to its target, Hits are always resolved against the Side Armour Value. The direction a turret is facing has no bearing on what arc of a Vehicle you are firing at.
Only Infantry models can Embark upon Transports unless specifically stated otherwise. Certain special rules, notably the Bulky (X) special rule, may modify the Transport Capacity required for a given model to Embark upon a Transport, and this will be specified in the model’s rules. Sometimes, there will be constraints on which types of models can Embark upon a particular Vehicle, and this will be specified in the unit’s entry. Whilst Embarked upon a Transport, units gain the Fearless special rule and cannot be made to Fall Back or become Pinned while Embarked upon the Transport.
If the Vehicle had not moved before the unit Disembarked, the Vehicle can then move normally. If the Vehicle had already moved before the unit Disembarked, the Vehicle cannot move further that turn (including pivoting on the spot). In addition, a Vehicle cannot Ram on a turn that a unit Disembarks from it.
For example, a Legion Land Raider Proteus has a Hull (Front) Mounted Heavy Bolter – this weapon may only fire at targets in the Front Firing Arc.
Turret Mounted – Turret Mounted weapons may fire at targets in any Hull arc (Front, Side or Rear) without restriction.
Centreline Mounted – Centreline Mounted weapons may only fire at targets in the Centreline Firing Arc.
Sponson Mounted – Sponson Mounted weapons are usually mounted in pairs, one on each side of a Vehicle (the Vehicle’s profile will note if this is not the case) and fire into the appropriate Sponson Firing Arc (either left or right). If the target of a Vehicle’s Shooting Attack is within the Firing Arc for only one of a pair of Sponson weapons, then the out of arc weapon may be fired at another enemy unit of the controlling player’s choice. This Secondary Target must be in the weapon’s line of sight and Firing Arc, but may be from a different unit than the original target.
Pintle Mounted – Pintle Mounted weapons may fire at targets in any Firing Arc without restriction, but are always counted as Defensive weapons regardless of the weapon type or its statistics.
|
To Hit rolls are easy to remember if you subtract the Ballistic Skill of the attacking model from 7. For example, a model with BS 2 needs to roll a 5 or more (7-2=5).
Note that the minimum roll needed To Hit is always at least 2. When rolling To Hit, there is no such thing as an automatic Hit and a roll of a 1 always misses.
Glancing Hits – If a Glancing Hit was scored, the Vehicle loses 1 Hull Point.
Penetrating Hits – If a Penetrating Hit was scored, the Vehicle not only loses 1 Hull Point, but also suffers additional damage.
After deducting any Hull Points, roll a D6 for each Penetrating Hit and look up the result using the Vehicle Damage table, applying any appropriate modifiers. All modifiers on the Vehicle Damage table are cumulative. If you inflict a Penetrating Hit, you must roll on the Vehicle Damage table even if the Vehicle loses sufficient Hull Points to be Wrecked, as there is still a chance it might suffer an Explodes result on the Vehicle Damage table.
The shattered and useless shells of buildings and fortresses, strewn with the remains of those who once defended them.
Areas of terrain designated as Ruins confer a 5+ Cover Save on models within their bounds – this includes models on upper levels of Ruins that are within the Area Terrain. Ruins are always counted as Difficult Terrain.Template weapons shoot clouds of fire, gas or other lethal substances, rather than shells or bullets. They are excellent for killing enemy troops in cover, as the payload simply flows over intervening obstacles to assail the foe behind.
Template weapons are indicated by having the word ‘Template’ for their range instead of a number. Instead of rolling To Hit, simply place the template so that its narrow end is touching the base of the firing model, or the end of the firing weapon’s barrel for Vehicle models without bases, and the rest of the template covers as many models in the target unit as possible, without touching any other friendly models (including other models from the firing model’s unit). Any models fully or partially under the template are hit. Against Vehicles, the template must be placed to cover as much of the Vehicle as possible without touching a friendly model. The position of the firer is used to determine which armour Facing is hit. A Template weapon never hits the model firing it.Template weapons have the Ignores Cover and Wall of Death special rules. Wounds inflicted by Template weapons are allocated following the normal rules.
Blast weapons fire shells, missiles or packets of energy that explode on impact.
When firing a Blast weapon, models do not roll To Hit. Instead, pick one enemy model visible to the firer and place the Blast (3") marker with its hole entirely over the base of the target model, or its hull if the target is a Vehicle. The hole at the centre of the marker must be within the weapon’s Maximum Range. You cannot place the Blast marker so that the base or hull of any friendly model is even partially under it.The large area affected by the blast means it is going to be very hard to miss completely. Nonetheless, the shot might not land exactly where intended. Roll for the Blast marker to scatter and subtract the firer’s Ballistic Skill from the distance (if any) that it scatters, to a minimum of 0". Note that it is possible, and absolutely fine,for a shot to scatter beyond the weapon’s Maximum or Minimum Range and line of sight. This represents the chance of ricochets, the missile blasting through cover and other random events. In these cases, Hits are worked out as normal and can hit and Wound units out of range and line of sight (or even your own units, or models locked in combat). If the shot scatters so that the hole in the centre of the marker is beyond the battlefield’s edge, the shot is a complete miss and is discarded.
Once the final position of the Blast marker has been determined, take a good look at it from above – each unit suffers one Hit for each of the models included in that unit that is fully or partially beneath the Blast marker, even if those models are not within the firer’s line of sight.
Once the number of Hits inflicted on the unit has been worked out, roll To Wound and Save as normal. Note that, unlike other attacks, Wounds inflicted by an attack with the Blast special rule can be allocated to any models in the target unit, even if they are out of sight of any models from the attacking unit.
The Ballistic Skill of a model making a Snap Shot can only be modified by special rules that specifically state that they affect Snap Shots, along with any other restrictions. If a special rule doesn’t specifically state that it affects Snap Shots, then the Snap Shot is resolved at Ballistic Skill 1.
Some weapon types, such as Ordnance, or those that have certain special rules, such as Blast, cannot be used to make Snap Shots. In addition, any Shooting Attack that does not use Ballistic Skill cannot be made as a Snap Shot. These exceptions aside, Snap Shots are treated in the same manner as any other Shooting Attack made with a Ballistic Skill of 1.
This weapon fires ammunition that cheats an enemy of their shelter.
Cover Saves and Damage Mitigation rolls granted by the Shrouded special rule cannot be taken against Wounds or Hull Point damage caused by weapons with the Ignores Cover special rule. This includes Cover Saves granted by Reactions and other special rules as well as Cover Saves conferred by terrain.Some weapons can inflict critical strikes against which no armour can protect.
If a model has the Rending special rule, or is attacking with a Melee weapon that has the Rending special rule, there is a chance that their close combat attacks will strike a critical blow. For each To Wound roll equal to or higher than the value listed, the target automatically suffers a Wound, regardless of its Toughness. The controlling player may choose to resolve these Wounds at AP 2 instead of the weapon’s normal AP value.Similarly, if a model makes a Shooting Attack with a weapon that has the Rending special rule, a To Wound roll of equal to or greater than the listed value wounds automatically, regardless of Toughness, and is resolved at AP 2.
In either case, against Vehicles each Armour Penetration roll of equal to or greater than the listed value allows a further D3 to be rolled, with the result added to the total Strength of the attack. These Hits are not resolved at AP 2, but are instead resolved using the weapon’s AP value.
For example, a model with the Rending (5+) special rule that rolls To Wound against a non-Vehicle model will wound automatically on the roll of a 5+, and the attacking player has the choice of using an AP value of 2 instead of the AP value of their weapon.
These weapons are grafted to the same targeting system for greater accuracy.
When attacking with a weapon that has this special rule, the controlling player may re-roll all failed To Hit rolls.These are heavy, man-portable weapons that typically require reloading between each shot or bracing to counter their recoil.
When making a Shooting Attack, a model with a Heavy weapon attacks the number of times indicated. If a model equipped with a Heavy weapon moved in the preceding Movement phase, they can only make Snap Shots with that Heavy weapon during the Shooting phase. Note that weapons with the Blast special rule cannot fire Snap Shots. Models that make Shooting Attacks with Heavy weapons in the Shooting phase cannot Charge in the ensuing Assault phase.
|
Range | Str | AP | ||
| Heavy Bolter | 36" | 5 | 4 | Heavy 4 |
Skyfire weapons excel at shooting down enemy aircraft.
A model which has this special rule, or that is firing a weapon with this special rule, fires using its normal Ballistic Skill when shooting at Flyers and Skimmers, but it can only fire Snap Shots against other targets.Range | Str | AP | Type | |
| Heavy Bolter | 36" | 5 | 4 | Heavy 4 |
| Icarus Lascannon | 48" | 9 | 2 | Heavy 1, Skyfire |
Range | Str | AP | ||
| Icarus Lascannon | 48" | 9 | 2 | Heavy 1, Skyfire |
Range | Str | AP | Type | |
| Skyreaper battery | 48" | 7 | 4 | Heavy 5, Skyfire, Twin-linked |
Range | Str | AP | ||
| Skyreaper battery | 48" | 7 | 4 | Heavy 5, Skyfire, Twin-linked |