The Siege of Cthonia
Contents | ||
 1-2
1-2 | The following rules present a campaign system that allows players to play a short sequence of linked games. The Onslaught Campaign rules are intended to be used to represent any engagement during the Horus Heresy – but this section also presents a set of additional rules and missions to allow players to replicate the key events of the Siege of Cthonia and re-fight the campaign with their own armies. | ||
Books
| Book | Kind | Edition | Version | Last update |
| | ||||
| | Campaign | 2 | 1.0 | August 2023 |
The Onslaught Campaign System
The Onslaught Campaign system allows for a short series of linked battles of Warhammer: The Horus Heresy – sometimes known as ‘Campaigns’. Each battle contributes to a player’s chances of overall success, with a final climactic battle deciding the course of the campaign as a whole. In this context, the Onslaught Campaign system represents two hostile armies manoeuvring and seeking to gain advantage over their enemy, each hoping to force the foe to commit to a final confrontation while they themselves hold the advantage.An Onslaught Campaign can be used to represent any engagement between the various armies of the Horus Heresy with only the basic rules provided here, or it can be used to represent specific campaigns and historical engagements. When representing a specific campaign, supplementary rules will provide additional rules and options to help theme the battles played as part of that campaign and add further tactical options to battles.
Each Onslaught Campaign requires a minimum of two players and is played over the course of a minimum of two battles and a maximum of six. The armies used by players as part of an Onslaught Campaign can be of any points limit decided by the players involved, but the standard army size of 3,000 points is recommended. In between battles, the players will only need to record the number of battles each has won, though when playing specific campaigns or with certain optional rules other record– keeping may be required between battles.
Onslaught Campaign Overview
The basic sequence of play for an Onslaught Campaign revolves around forcing a Decisive Battle. After each battle that is played as part of an Onslaught Campaign, the player that won the battle must make a Seize the Moment roll, with the chance of success dependent on how many battles in the campaign that player has won. If this Seize the Moment roll is successful then the next battle fought must be the Decisive Battle – and whichever player wins that battle wins the entire campaign, regardless of how many other battles they have won or lost.Setting up an Onslaught Campaign
To set up an Onslaught Campaign, players should undertake the following steps:- Select a Campaign
- Arrange Teams
- Select Campaign Stratagems
Select Campaign
Before beginning any battles, the players involved must decide if they are playing a generic Horus Heresy campaign, which is a series of battles not thematically linked to one of the known historical events of the Horus Heresy, or a campaign based upon a specific historical event. Which specific additional rules that will apply to the campaign and all battles played should be decided at this point, with all players being made aware of which rules will be used. Many Warhammer: The Horus Heresy publications will include rules to allow players to theme their Onslaught Campaigns around specific historical events, and will offer advice on which optional rules would best suit such battles.
Arrange Teams
An Onslaught Campaign is intended to be played by two players, with each player taking one side of the conflict. At this stage, the players should decide which Allegiance they will represent during the campaign. When playing a generic Onslaught Campaign, one player should represent the Traitors and the other the Loyalists, while specific campaigns will offer more detailed rules on defining the two sides of the campaign.
However, if desired, an Onslaught Campaign can also be played using two teams of players, with each team representing one side of the conflict. If playing with teams, then those teams should be set at this point of the campaign – with one taking the Loyalist side and the other the Traitor. If possible, teams should be of an equal number of players, and while players may change their army or Faction during the campaign, they should not change team or Allegiance.
Select Campaign Stratagems
Once a campaign has been selected and all teams and Allegiances have been decided, each player must pick four Campaign Stratagems.
These Campaign Stratagems must be selected from either the Core Stratagem list, or from an optional list that is included as part of the specific campaign being played.
A player may select from any available Campaign Stratagem lists, but may not select the same Campaign Stratagem more than once.
Stratagems may be used in any battle played as part of the Onslaught Campaign, and the use of a Campaign Stratagem must be declared before either player has selected an army or scenario to play, with both the number of Campaign Stratagems, but not the name of the specific Campaign Stratagem, being declared to the opposing player.
Each Campaign Stratagem may be used only once per campaign – and once used in any given battle may not be used again. In the Decisive Battle, only the Decisive Player (the player that won the previous battle and succeeded at the Seize the Moment roll) may choose to play Campaign Stratagems, the opposing player may not and any Campaign Stratagems they have left are discarded before the final battle begins and may not be used.
Optional Rules
Some optional Onslaught Campaign rules may require additional setting up before beginning a campaign. If this is the case, then that optional rule will explain how and when to go about this.
Playing an Onslaught Campaign
Once all set-up tasks have been completed, an Onslaught Campaign is played by following these steps, in the sequence shown: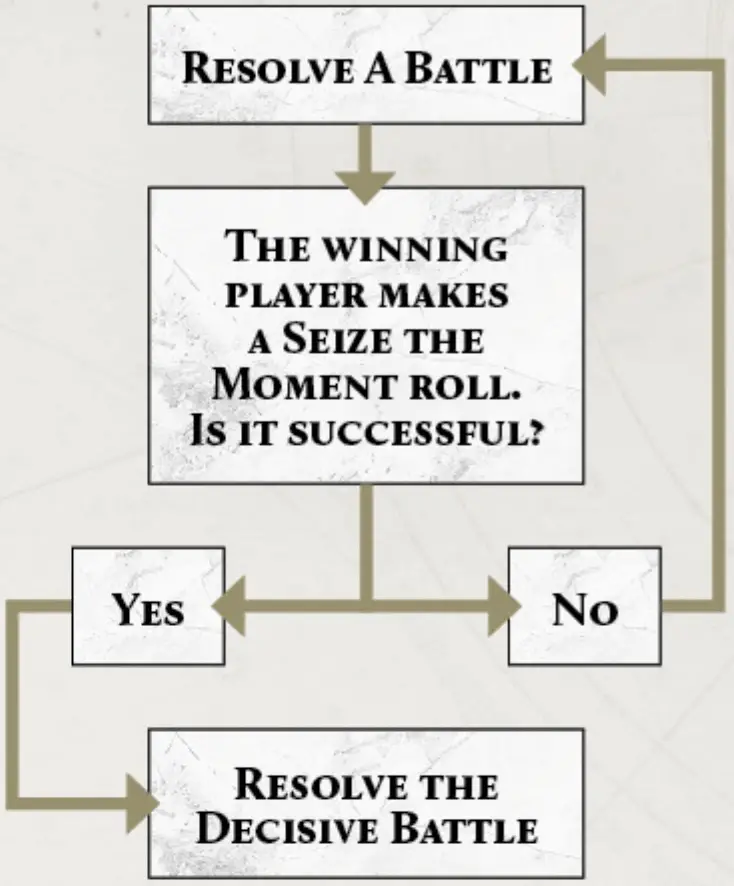
An Onslaught Campaign ends when the Decisive Battle has been resolved – the winner of the Decisive Battle wins the campaign.
Resolving Battles
Each individual battle played as part of an Onslaught Campaign is played as per the standard rules for Warhammer: The Horus Heresy, as agreed by the players. In a standard campaign the following rules apply:
- All battles are played with armies of the same points total as agreed at the start of the campaign.
- Players may change their army list in between battles, but must adhere to the agreed points limit.
- Players may change the Faction of Detachments within their army between battles, but may not change the Allegiance of the army.
- All battles must be played using the Core Missions list, the exact mission either randomly determined or agreed upon by both players.
Victory is determined as per the standard rules for Core Missions (see Decide Victor), and once the victor is determined a Seize the Moment roll must be made.
When playing an Onslaught Campaign as part of a team, all members of each team must play a single battle against a member of the opposing team. Once all players have played one battle, then the team that won the most battles must nominate one player to make the Seize the Moment roll. If both sides have won the same number of battles, then the team that scored the highest combined total of Victory points in those battles is the winner. If this still results in a tie, then the two teams must roll off to see which team will nominate a player to make the Seize the Moment roll.
Any player may declare the use of any number of Campaign Stratagems in a battle – though each Campaign Stratagem a player has access to can only be used once per campaign. Campaign Stratagem use is declared before the Mission or Army Lists for a battle have been decided, with either player declaring how many Campaign Stratagems they will commit to the battle at this stage. When the players decide upon their Army Lists, the Campaign Stratagems they intend to use must be noted on those Army Rosters. Once a player has declared the use of a Campaign Stratagem it is considered used, and may not be used again, even if during the course of the battle its effects do not come into play or it is not activated (if the Campaign Stratagem requires activation).
After each battle has been resolved, the winning player must make a Seize the Moment roll. If the battle ended in a draw, then the players must roll-off, with the winner making the Seize the Moment roll. If that Seize the Moment roll is successful, then the next battle played must be the Decisive Battle and the player that succeeded at the Seize the Moment roll is the Decisive player for that battle.
A Seize the Moment roll is made with a single D6, and the score required to succeed is based on the number of battles won by both players up until that point of the campaign, as shown on the table below:
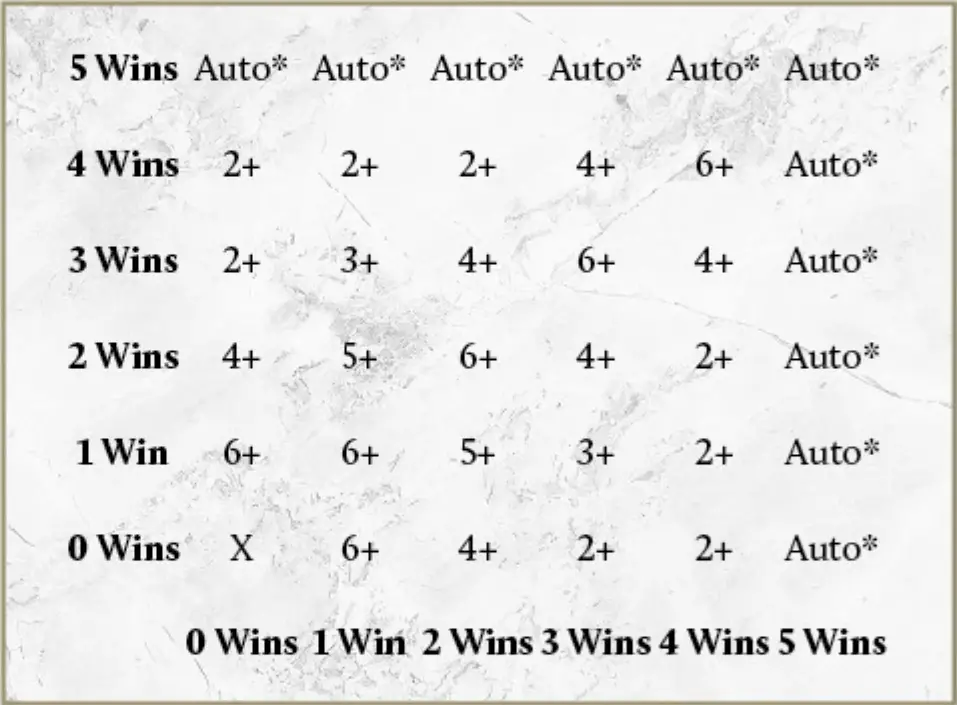
*The winner of the fifth battle in an Onslaught Campaign automatically succeeds at the Seize the Moment roll and no dice are rolled.
When counting the number of battles ‘won’, battles that ended in a draw but for which that player made the Seize the Moment roll are counted as having been ‘won’. In an Onslaught Campaign played with teams composed of multiple players, the number of battles ‘won’ by that team is treated as the number of times that team has been eligible to make the Seize the Moment roll and not the total number of battles the team has won.
Resolving Decisive Battles
A Decisive Battle played as part of an Onslaught Campaign is played as per the standard rules for Warhammer: The Horus Heresy, as agreed by the players.
However, in a standard campaign the following additional rules apply to a Decisive Battle:
- All battles are played with armies of the same points total as agreed at the start of the campaign.
- Players may change their army list for the Decisive Battle, but must adhere to the agreed points limit.
- Players may change the Faction of Detachments within their army for the Decisive Battle, but may not change the Allegiance of the army.
- A Decisive Battle may be played using a Mission from an Apex Mission, chosen by the Decisive player. If not using an Apex Mission then any other mission may be chosen by the Decisive player.
- When resolving a Decisive Battle, only the Decisive player (the player that succeeded at the Seize the Moment roll) may declare and make use of Stratagems. Any Campaign Stratagems remaining to the other player are discarded before the Decisive battle begins and may not be declared or used.
- The player that wins the Decisive Battle wins the campaign, regardless of how many other battles have been won or lost by either player.
Victory in the Decisive Battle is determined as per the standard rules for the Mission being played, and once the victor is determined the Onslaught Campaign ends, with the winner of the Decisive Battle winning the entire campaign. If the Decisive Battle ends in a draw, then the player that has won the most battles over the course of the Onslaught Campaign is declared the winner.
When playing an Onslaught Campaign as part of a team, the Decisive Battle can be handled in a number of ways. The most simple is for the two teams to nominate or randomly select two players to resolve a single Decisive Battle to decide the campaign, in which case all the noted rules for Decisive Battles apply as stated above.
Instead, the two teams can have each player play one opposing player in a Decisive Battle, with the team whose players win the most Decisive Battles claiming victory in the campaign, or the two teams can play a single multi-player battle as the Decisive Battle. In both of these cases, all players on the same team as the player that succeeded at the Seize the Moment roll are treated as Decisive players and can declare and use Campaign Stratagems if they play in a Decisive Battle, while their opponents may not.
Campaign Stratagems
Campaign Stratagems are additional special rules that add beneficial effects to a single game for the player that chooses to use them. They represent the strategic acumen and skill of the commanders directing the campaign and allow the players to tip key battles in their favour – at the cost of losing a potential advantage in a future battle.At the start of any Onslaught Campaign, each player may select up to four different Campaign Stratagems from either the Core Stratagem list and/or any Campaign Stratagem lists that have been chosen for the campaign they are playing. Each Campaign Stratagem may only be selected once by each player and may only be used once per campaign – and as such its use should be carefully considered, for once expended that advantage is gone.
Before the start of any battle played during the campaign, any player may declare the use of any number of Campaign Stratagems. This must be done before the mission has been selected and before any Army Rosters are finalised, and uses the following procedure:
Both players should secretly record which Campaign Stratagems they wish to declare for the next battle, without showing the opposing player, and then reveal them simultaneously to their opponent. Once both players have seen which Campaign Stratagems have been declared by all players, then armies are selected and a Mission chosen using the standard rules. Note that for the Decisive Battle, only the Decisive Player may declare Campaign Stratagems and as such can simply state to their opponent which will be in use.
The declared Stratagems are then in play for that battle – each individual Campaign Stratagem will detail how and when it is used during a battle. The effects of any given Campaign Stratagem are in play only for the battle for which it was declared, and do not affect any other battle. Note that during the campaign’s Decisive Battle, only the Decisive player (the player that succeeded at the Seize the Moment roll) may declare and use Campaign Stratagems – a key advantage for seizing victory.
Once a Campaign Stratagem has been declared, it will no longer be available in any future battles that take place during that Onslaught Campaign. In order to make best use of their limited pool of Campaign Stratagems, players will have to balance using them to win earlier battles against saving them for the Decisive Battle.
The following list comprises the Core Campaign Stratagems, these are suitable for use in any Onslaught Campaign and are always available for players to select:
Core Campaign Stratagems
Big Guns Never Tire For this battle the commander has released all reserves of artillery and heavy tanks for one great The player that declared this Stratagem may include an additional Heavy Support choice in each Detachment of their army (these must be paid for from the army’s points limit as normal). |
Forced March Pushing their warriors to the limits of their endurance allows a general to claim the greater portion of the battlefield. The player that has declared this Stratagem may shift the boundary of one edge of their Deployment Zone up to 6" in one direction (this does not allow a player to expand their Deployment Zone off of the battlefield or into another player’s Deployment Zone, and may only be used to have the Deployment Zone cover more of the available battlefield). If both players have declared this Stratagem, then they must roll off to see which player will apply its effects first – this may limit or stop the opposing player from making use of the Stratagem. |
Lightning Strike Warriors ready to pounce, the canny general plans for their reserves to be unleashed as a hammer The player that declared this Stratagem passes all Reserves rolls they are called upon to make on the roll of a 2+ instead of a 3+. Additionally, if the player that declared this Stratagem has any units in Reserves at the beginning of Turn 3, they may choose to have them enter play automatically without any dice being rolled. |
No Surrender One last assault is often enough to turn the battle around and wear down the enemy’s defences. The player that declared this Stratagem may, at the end of the last Game Turn of the battle, choose for one additional Game Turn to be played. During this additional Game Turn, all units under the control of the player that declared this Stratagem gain the Fearless special rule for the remainder of the battle (units that were Falling Back stop Falling Back and act normally, while units that were Pinned recover and may also act normally). If both players have declared this Stratagem, then one additional Game Turn must be played (the players may not choose to not play it) and both players gain the benefits of this Stratagem during that Game Turn. |
Masters of the Crusade The Primarchs were masters of entire Legions, but would sometimes take command of smaller forces where the need was dire. The player that declared this Stratagem may ignore the points limitation placed on models with the Primarch Unit Type for that battle – which means that any amount of the army’s Points Limit may be spent on a Primarch choice, allowing their use in smaller battles than would normally be allowed. |
Renewed Zeal The best generals fight not only on the battlefield, but also in the spirit of their warriors, seeking to exult them to heroism. During the battle for which this Stratagem has been declared, none of the units under the control of the player that declared this Stratagem may be Pinned. If they would normally be Pinned, then instead that unit moves D6+1" towards the nearest enemy unit it can draw line of sight to (if there are no enemy units in line of sight then it does not move). |
The Perfect Ground It is not only warriors that win battles, a battlefield well chosen and prepared can prove as deadly as any blade or cannon. The player that declared this Stratagem decides what terrain will be used in the battle and also places it onto the battlefield – the opposing player may not place any terrain (other than Fortifications that are part of their army). If both players have declared this Stratagem, then they must roll-off to see which player will apply its effects, the loser of the roll-off gains no benefit and the Stratagem is still expended. |
Remembrancer Corps Sometimes how a battle is remembered is more important than how well it was fought or how cunning was the general’s strategy. Whenever the player that declared this Stratagem scores Victory points, roll one D6 for each Victory point scored. For each D6 that results in a 4+, the player that declared this Stratagem scores an additional Victory point. |
Into Hel’s Heart Warriors that are prepared to die serve best when given the chance to prove their convictions. Any units controlled by the player that declared this Stratagem, that are deployed using the Deep Strike special rule or as part of a Deep Strike Assault, do not scatter when deployed, and whenever a rule would require any model from such a unit to be scattered it is ignored. |
The First Cut Often, it is not strength or cannon that decide victory, but which side strikes first. The player that declared this Stratagem chooses which player will take the first player turn and which player will deploy first, no dice are rolled to determine this. If both players have declared this Stratagem, then they must roll off to see which player will apply its effects, the loser of the roll-off gains no benefit and the Stratagem is still expended. |
Onslaught Campaign Optional Rules
This section presents a number of optional rules that players may choose to add to their Onslaught Campaigns to add an extra challenge at the cost of some additional complexity. These optional rules are not linked to any specific historical campaign and may be used in any Onslaught Campaign.As with all optional rules, the players involved in any Onslaught Campaign should agree which, if any, of these rules are in effect before the start of the campaign.
Character Casualties
The fate of heroic warlords, as well as famed and infamous characters, is a key part of the struggle and epic scale of the Horus Heresy, and such influential figures cannot simply be expended as resources – for no force can expect to succeed in battle without their greatest warriors.
If a player’s Warlord and/or any model with the Unique Unit Sub-type are removed as a casualty during a campaign battle (including when due to falling back off the battlefield, etc.), the controlling player must roll a D6 for each such model at the end of the battle – after the victor has been decided, but before the victor makes any Seize the Moment rolls. The result of this D6 roll should be referenced on the Character Fatality table (as follows), and apply to the remainder of the model’s controlling player’s battles in the campaign. If the controlling player was victorious in the battle in which the model was removed as a casualty, they may add +1 to the result of the D6 roll on the Character Fatality table.
Note that if a Warlord that does not have the Unique Subtype suffers a negative effect from a roll on the Character Fatality table, then the controlling player may elect to simply not use that model in future battles during that campaign. If they choose to do so then they may not field a model selected from the same unit entry in the next battle of the Onslaught Campaign.
For example, if a player selects a Legion Praetor as part of their army and uses it as the army’s Warlord, but that model is removed as a casualty in play and suffers a negative effect and the controlling player elects not to use that Warlord in following battles, then that player would not be able to select any models using the Legion Praetor Army List entry in their next battle.
Character Fatality Table
| |||||||||||||||
Battlefield Achievements
Victory offers those with the courage to seize it numerous benefits, but to those with the elan to grasp it in the most spectacular or beneficial manner it can be so much greater. When a battle is more than a simple fight, but a tool to force the enemy into the ideal position for the final blow, the ability to make the most of victory is key to controlling the flow of a campaign.Once a battle has ended and a victor decided, the winning player may apply modifiers to their Seize the Moment roll based on the manner in which they won and the composition of their army – for a greater victory or more manoeuvrable army will allow victory to be more easily followed up on.
If this optional rule is in use, then the following modifiers may be claimed by a victorious player when making their Seize the Moment roll as long as they fulfil one or more of the criteria required, referred to as Battlefield Achievements (future publications or specific campaign rules may provide additional Battlefield Achievements):
Overwhelming Victory If the winning player has fulfilled the following Battlefield Achievement, then they may roll an additional dice when making a Seize the Moment roll and select a single dice from among those rolled to determine the result of the roll:
|
Undaunted If the winning player has fulfilled the following Battlefield Achievement, then they may add +1 to the result of the Seize the Moment roll (to a maximum result of 6):
|
Battlefield Superiority If the winning player has fulfilled the following Battlefield Achievement, then they may re-roll any one dice rolled to determine the result of the Seize the Moment roll:
|
Pyrrhic Victory If the winning player has fulfilled the following Battlefield Achievement, then they must roll an additional dice when making a Seize the Moment roll and select the single dice that scored the lowest result from among those rolled to determine the final result of the roll:
|
THE CTHONIA CAMPAIGN
This section presents a series of additional rules to allow players to tailor their Onslaught Campaign to represent the Siege of Cthonia. A full Siege of Cthonia Onslaught Campaign will use all of the optional rules presented here, and will allow players to select from the additional Campaign Stratagems provided. Additionally, when playing a full Siege of Cthonia Onslaught Campaign, the Decisive Battle should be played using one of the Apex Missions.While historically, the Siege of Cthonia was fought primarily between forces of the Imperial Fists and Sons of Horus, with aid from the Word Bearers, Raven Guard, Alpha Legion, Iron Hands, Thousand Sons and Dark Angels, players may choose to use any combination of armies and Factions when playing the campaign. Whether it is considered to be an alternative history – a ‘what-if’ situation, or simply a focus on lesser known forces that were present on the sidelines of history, it is completely acceptable to tailor the setting and rules to suit the preferences of the players involved.
Siege Of Cthonia Optional Rules
The following rules are intended as optional rules for the Onslaught Campaign system, allowing players to fight the Siege of Cthonia themselves. These rules are divided into two sections: first are a number of optional rules that are applied to every game played as part of a Siege of Cthonia Onslaught Campaign, and secondly a list of Siege of Cthonia Campaign Stratagems is provided.As with any Onslaught Campaign, players should agree which of the optional rules presented here are in play before beginning a campaign.
Ancient Domain Many of the Sons of Horus began their lives in the deep underworld or empty wastelands of Cthonia, and even those recruited from other worlds had long heard tales of that benighted planet. As a result they were intimately familiar with its terrain and secrets, granting them an advantage that few other warriors could match. If this optional rule is in play during a campaign representing the Siege of Cthonia, then an army whose Primary Detachment has the Legiones Astartes (Sons of Horus) special rule may re-roll any dice rolls made to Seize the Initiative and succeeds at Reserves rolls on the score of 2+ rather than 3+. |
A Claim Marked in Stone The Imperial Fists have always been known for marking their conquests with new fortresses, raised to show the dominion of the Imperium and the rule of the Emperor’s law. If this optional rule is in play during a campaign representing the Siege of Cthonia, then an army whose Primary Detachment has the Legiones Astartes (Imperial Fists) special rule may choose to deploy a Fortified Wall composed of three Strongpoints anywhere within their Deployment Zone at no additional cost in points. If the Imperial Fists player chooses to deploy these Fortifications, and at least one Strongpoint has a friendly unit with the Legiones Astartes (Imperial Fists) special rule Embarked upon it or occupying its battlements, at the end of the final Game Turn, then the Imperial Fists player scores 1 Victory point. |
A Seal of Blood If this optional rule is in play during a campaign representing the Siege of Cthonia, then all Psychic tests made gain a penalty, and all Psychic Weapons and models with the Daemon Unit Type or Corrupted Unit Sub-type gain bonuses based on the number of battles played so far in the campaign – shown on the Blood Seal modifier table below as the ‘Blood Seal modifier’. |
BLOOD SEAL MODIFIER TABLE
*All models with the Daemon Unit Type or Corrupted Unit Sub-type gain the Battle Hardened (2) special rule and all Psychic Weapons gain the Murderous Strike (6+) special rule in addition to all other benefits, while all instances of Perils of the Warp suffered by any model or unit inflict the maximum number of Wounds. | |||||||||||||
Siege of Cthonia Campaign Stratagems
The following list comprises the Siege of Cthonia Campaign Stratagems. These are suitable for use in an Onslaught Campaign intended to represent the Siege of Cthonia campaign and are only available for players to select if all players in the campaign agree on their use:Underworld Nexus Cthonia’s underworld criss-crossed the planet in a network of tunnels and sinkholes, many of which were dangerously close to the surface. While few of these sinkholes were large enough for entire armies to transition between the surface wastelands and the depths of the underworld, many were capable of allowing small units to mount ambushes and surprise attacks on an unsuspecting foe. When this Campaign Stratagem is declared, the player that declared it may deploy a Sinkhole marker on the battlefield at the start of the battle – before any models are deployed by either player, but after all terrain has been placed. This Sinkhole marker is represented by a Blast (3") marker that may be placed anywhere on the battlefield where the marker is not over terrain of any kind. Once per Game Turn, a single unit composed entirely of models with the Infantry Unit Type controlled by the player that declared this Stratagem that does not include any models with the Bulky (X) special rule may enter play from Reserves using the edge of the Sinkhole marker as the edge of the battlefield. |
Inductii Reserves The armies that came to Cthonia at the end of the Horus Heresy relied heavily on Inductii warriors to form their reserves. These Space Marines were the equal of their veteran brothers in skill at arms, but not their battle record, and when committed to the fray fought that much harder to prove their worth to their commanders. When this Campaign Stratagem is declared, any units that include one or more models with the Inductii Unit Sub-type that are included in the army of the player that declared this Campaign Stratagem must be placed into Reserves at the start of the battle. When a unit that includes one or more models with the Inductii Unit Sub-type that is controlled by the player that declared this Campaign Stratagem enters play from Reserves, all models in that unit gain the Fearless and Furious Charge (1) special rules until the start of their controlling player’s next player turn. |
Titan Support On the wide plains of Cthonia, the titan battle groups that accompanied the armies were true terrors, vulnerable but dominating. Where they walked, lesser combatants trembled and the commanders committed them only to the most critical battles – for should they be destroyed then the battle for Cthonia would be in grave peril. When this Campaign Stratagem is declared, the player that declared it may ignore the points limitation placed on models with the Titan Unit Sub-type for that battle – which means that any amount of the army’s points limit may be spent on Titans (but all Compulsory slots on the Force Organisation chart must be filled as normal and models with the Titan Unit Sub-type still use up a Lords of War choice). |
Memories of the Crusade The warriors that fought on Cthonia had seen the worst of the Horus Heresy and the decline of the once-great Legiones Astartes. Many veterans saw the conflict as a chance to re-assert the old ways, the renowned art of battle that had won so many wars in the Great Crusade, heavy infantry in deep formation marching onwards to glory or death. When this Campaign Stratagem is declared, all Legion Tactical Squads controlled by the player that declared this stratagem that, at the start of the controlling player’s turn, are composed of 10 or more models gain the Inexorable special rule, if composed of more than 10 models they also gain the Feel No Pain (6+) special rule or, if the unit already has a variant of the Feel No Pain special rule adds +1 to the value in brackets of that variant (this stacks with the benefits of the Heart of the Legion special rule to a maximum of Feel No Pain (2+), until the start of the controlling player’s next turn). |
Core Missions
| The Core Missions are intended to be used as both part of a linked set of campaign games using the campaign rules, and as the standard Matched Play experience. These missions are balanced for both competitive and casual play alike and allow players to make full use of the tactical options presented in the Warhammer: The Horus Heresy rules. | ||
How to Use Core Missions
The following rules will allow players to make use of the Core Missions when playing battles, from selecting armies through to resolving the end result of the mission.Playing Games Using the Core Missions
Regardless of whether using the Core Missions for standalone battles or as part of a campaign, all players must prepare for the battle using the following preparatory steps. Each of these steps should be completed in the sequence they are presented in, with each step being fully completed before moving on to the next.
| Core Mission Sequence | ||
Selecting Armies for Core Missions
The first step in preparing to play a Core Mission is for all players to create an Army Roster, a list of all models, units and options to be included in their army.All armies for use in a Core Mission must use a points limit of 3,000 points, or as dictated by the campaign rules or the choice of all players involved in the battles, selected using the Crusade Force Organisation chart. Furthermore, all armies for use in a Core Mission must be selected before the mission is selected or any other stage of battle preparation is taken – this includes selecting any Warlord Traits, Rites of War, Psychic Disciplines or other such options, which must all be noted on the controlling player’s Army Roster.

Select Core Mission to Play
Once all Army Rosters are completed, and all players have had the opportunity to review those of their opponents, a Core Mission must be selected for play.The players may either select one of the Core Missions that both players agree on; roll off and have the winner select a Core Mission to play; or roll a single D6 on the table below to decide which Core Mission will be played. The default method is for the players to roll off and the winning player to roll once on the table below, with that D6 roll determining which mission will be played.
| CORE MISSIONS | ||
Select Deployment Map
Once all terrain has been placed onto the battlefield, a deployment map must be chosen for the deployment of armies.The players may either select one of the core deployment maps that both players agree on; roll off and have the winner select a core deployment map to use; or roll a single dice on the table below to decide which core deployment map will be used. The default method is for the players to roll off and the winning player to roll once on the table below, with that dice roll determining which deployment map will be used.
CORE DEPLOYMENT MAPS
| |||||||||||
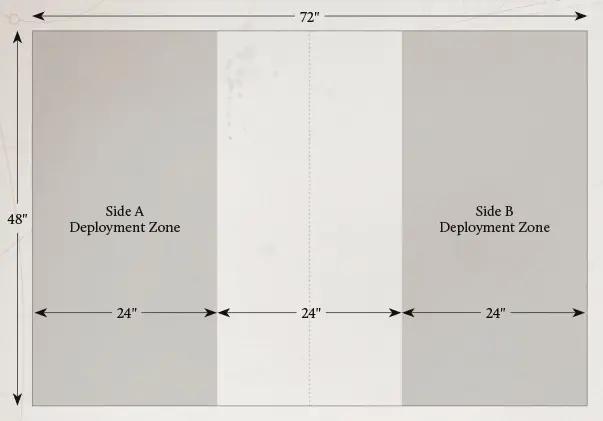
1. Hammer and Anvil
If players are using the Hammer and Anvil deployment map, the battlefield is divided into two equal halves across its width.For Hammer and Anvil battles, a player’s battlefield edge is the short battlefield edge touching their own Deployment Zone.
2. Dawn of War
If players are using the Dawn of War deployment map, the battlefield is divided into two equal halves across its length.For Dawn of War battles, a player’s battlefield edge is the long battlefield edge touching their own Deployment Zone.

3. Search and Destroy
The Search and Destroy deployment map divides the battlefield into four equal quarters. Each quarter constitutes a Deployment Zone. Units may not be deployed into the circular 18" diameter area at the centre of the battlefield.A player’s battlefield edges are any that form part of their Deployment Zone.

Placing Terrain
Once a Core Mission has been chosen and all Army Rosters have been completed, the players place terrain on the battlefield. All Core Missions must be played on a battlefield measuring 6’ x 4’ – this must be a flat area whose edges are clearly defined for all players.Before placing terrain, the players must decide what terrain will be available to be placed for this battle. When playing a Core Mission, the following is suggested as an appropriate amount of terrain for use, though players may instead choose to use an amount of terrain appropriate to their collection and reference:
Area Terrain Two large zones of generic Area Terrain (i.e. rubble or other difficult ground that provides a 6+ Cover Save, counts as Difficult Terrain and does not block line of sight) of up to an approximate footprint of 10" x 10" and two smaller zones of specific Area Terrain (Ruins, Woods or Craters) with a footprint of approximately 6" x 6". |
Terrain Features Six Terrain Features, none that occupies an area larger than 4" x 4". These may be either Impassable Terrain that blocks line of sight, or Buildings of a small or medium size that begin the battle controlled by neither player. If desired, Buildings may be replaced with Ruin Area Terrain with the same footprint. |
Fortifications No Fortifications should be placed, unless the Core Mission being played specifically calls for such a piece of terrain. Any Fortifications selected as part of a player’s army are deployed during the deployment stage of a Mission alongside other units and not during this stage. |
Once terrain has been assembled, the players should roll off. The player that wins the roll-off then chooses a piece of terrain and places it anywhere on the battlefield, after which the opposing player chooses a piece of undeployed terrain and places it anywhere on the battlefield. The players continue to alternate placing terrain until all available terrain has been placed onto the battlefield.
When placing terrain onto the battlefield, no piece of terrain may be placed so that it overlaps with the base or footprint of another piece, nor in any position that would cause any part of the terrain piece to be outside the boundary of the battlefield. If there are pieces of terrain that cannot be placed due to these restrictions, then those pieces of terrain must be discarded and are not used as part of the battle – if possible, the player attempting to place that piece of terrain may choose a different terrain piece to place.
Once all pieces of terrain have been placed onto the battlefield, each player, starting with the player that placed the first piece of terrain, may choose any one piece of terrain and redeploy or remove that piece of terrain – following the rules listed above. Note that both players may not select and redeploy the same piece of terrain.
Declare Mission Reserves
Once all terrain has been placed, both players should roll off. The player that loses the roll-off must then declare if they intend to make a Deep Strike Assault, Flanking Assault, Subterranean Assault, Drop Pod Assault or other similar special deployment from Reserves, and which units from their Army Roster will be committed to those actions. Once these units have been noted on that player’s Army Roster, the player that won the roll off must declare if they intend to make a Deep Strike Assault, Flanking Assault, Subterranean Assault, Drop Pod Assault or other similar special deployment from Reserves, and which units from their Army Roster will be committed to those actions.| RESERVES ACTIONS A Reserves Action is any special rule that requires a player to assign units to a specific alternative type of deployment that forces units assigned to the action to begin the battle in Reserves. The most common examples of Reserves Actions are Deep Strike Assaults and Flanking Assaults. | ||
Once both players have declared all appropriate Reserves actions, they may choose to place any other units from their armies into Reserves. These units may not be added to an already declared Reserves Action, nor may further Reserves Actions be cleared at this point.
Note that all players must deploy at least one unit onto the battlefield at the start of play, unless another special rule states otherwise.
During deployment, further units may only be added to Reserves if there is no position where the controlling player can legitimately deploy them according to the deployment rules of the Core Mission being played. Where this is the case, those units that cannot be deployed are placed immediately into Reserves – but cannot be assigned to any previously declared Reserves Action.
Play Core Mission
Once all prior steps have been completed, the players should begin the battle as instructed in the mission rules.All Core Missions are played for four Game Turns. At the end of the fourth Game Turn, the battle ends and the players move to the final step to decide the battle’s victor.
Some special rules or missions may allow for additional turns to be played in certain circumstances. In all cases these rules will explain how and when these additional turns come into effect.
| Sudden Death If, at the end of any Game Turn, any player has no models on the battlefield, the battle immediately ends regardless of the number of turns that have been played. Models that are in Reserves do not count as being ‘on the battlefield’, however models in a unit that is Falling Back, or Embarked in a model with the Transport Sub-type or in a Building or Fortification, do. If a battle is ended due to the Sudden Death rule then the victor is still decided by Victory points scored up to that point in the battle, but the player that still has models on the battlefield scores an additional Victory point. | ||
Decide Victor
Once all turns have been completed in a battle played using the Core Missions, the victor is decided by the number of Victory points the players have scored.Victory points are scored either by the Primary objective, which is unique to the Core Mission being played and detailed as part of that Core Mission, or by Secondary Objectives, which are common to all Core Missions.
In any Core Mission, the following Secondary Objectives will always be in play:
Slay the Warlord If a player causes the enemy Warlord to be removed as a Casualty for any reason before the end of the battle, that player scores 1 Victory point. If the enemy player’s Warlord also had the Primarch Unit Type then the player that caused it to be removed as a casualty scores an additional Victory point. |
Giant Killer If a player causes an enemy model with the Super-heavy, Knight, Titan or Lumbering Sub-type to be removed as a casualty, then that player scores 2 Victory points (this may only be scored once per battle, regardless of the number of qualifying units removed as casualties). |
Last Man Standing If, at the end of the battle, a player has more units that are not Falling Back on the battlefield than all enemy players combined, then that player scores 1 Victory point. If that player has twice as many units that are not Falling Back on the battlefield than all enemy players combined, then that player scores an additional Victory point. |
Break Their Ranks If a player causes one or more enemy units to have all of their remaining models removed as casualties (units that Fall Back off the battlefield count for this purpose) in their first Player Turn as the Active player, then that player scores 1 Victory point. If at least one of the units whose models were removed as casualties was an Elites or HQ choice then that player scores an additional Victory point. |
The player with the most Victory points is the victor. If both players have scored the same number of Victory points then the game is a draw.
The Crucible Of War
In order to claim victory in the Crucible of War, players must capture and hold three Objective markers to accumulate Victory points each turn.
- At the end of each of their player turns, the Active player scores 1 Victory point for each Objective marker they control.
- Players may also score Victory points from the Core Mission Secondary Objectives.
- At the end of Game Turn Four, the player with the highest total of Victory points is the winner.
STRATEGIC ADVANTAGE
Before beginning set-up, the players should roll off. The winner of this roll-off gains Strategic Advantage.
OBJECTIVES
Before any models are deployed onto the battlefield, and starting with the player with Strategic Advantage, the players must alternate placing Objective markers anywhere on the battlefield that is not within any player’s Deployment Zone, is at least 6" from any battlefield edge, is at least 12" from any other Objective marker and not within any area of Impassable Terrain.
A total of three Objective markers must be placed for this Core Mission.
- Once all Objectives have been placed, the player with Strategic Advantage must select a Deployment Zone from the map determined during set-up and deploy their entire army. Once the player with Strategic Advantage has deployed all of their units, the player without Strategic Advantage must set up all of their own units in the Deployment Zone that was not chosen by the opposing player.
- If there is no position where the controlling player can legitimately deploy one or more of their units according to the deployment rules of the Core Mission being played, those units may be placed into Reserves instead. Where this is the case, those units that cannot be deployed are placed immediately into Reserves – but cannot be assigned to any previously declared Reserves Action.
- Once both players have deployed all of their units, the first turn is begun.
THE FIRST TURN
The player with Strategic Advantage takes the first turn, unless the opposing player can Seize the Initiative.
MISSION SPECIAL RULES
Core Missions all have the Reserves Mission special rule. Additionally, the player with Strategic Advantage may choose to begin the battle with the Night Fighting special rule in effect.
The Heart Of Battle
In order to claim victory in the Heart of Battle, players must capture a single central Objective marker to accumulate Victory points each turn.
- At the end of each of their player turns, the Active Player scores 3 Victory points if they control the Objective marker.
- Players may also score Victory points from the Core Mission Secondary Objectives.
- At the end of Game Turn Four the player with the highest total of Victory points is the winner.
STRATEGIC ADVANTAGE
Before beginning set-up, the players should roll off. The winner of this roll-off gains Strategic Advantage.
OBJECTIVES
Before any models are deployed onto the battlefield, a single Objective marker is placed at the centre point of the battlefield. If the Objective marker cannot be placed at the centre of the battlefield, due to the presence of Impassable Terrain or another obstacle, then the player with Strategic Advantage must select a point on the battlefield as close to the centre of the battlefield as possible, whilst also being outside of any area of Impassable Terrain and clear of any obstacles, to place the Objective.
A single Objective marker must be placed for this Core Mission.
- Once all Objectives have been placed, the player with Strategic Advantage must select a Deployment Zone from the map determined during set-up and deploy their entire army. Once the player with Strategic Advantage has deployed all of their units, the player without Strategic Advantage must set up all of their own units in the Deployment Zone that was not chosen by the opposing player.
- If there is no position where the controlling player can legitimately deploy one or more of their units according to the deployment rules of the Core Mission being played, those units may be placed into Reserves instead. Where this is the case, those units that cannot be deployed are placed immediately into Reserves – but cannot be assigned to any previously declared Reserves Action.
- Once both players have deployed all of their units, the first turn is begun.
THE FIRST TURN
The player with Strategic Advantage takes the first turn, unless the opposing player can Seize the Initiative.
MISSION SPECIAL RULES
Core Missions all have the Reserves Mission special rule. Additionally, the player with Strategic Advantage may choose to begin the battle with the Night Fighting special rule in effect.
Sudden Strike
In order to claim victory in Sudden Strike, players must capture six Objective markers to accumulate Victory points – but beware, as each Objective can be captured only once.
- At the end of each of their player turns after the first, the Active Player may select a number of Objective markers from among those that they control based on the current Game Turn (as shown below). The Active Player scores 1 Victory point for each Objective marker selected, but those Objective markers must then be immediately removed and may not be scored again by either player.
- On Game Turn One, no Objectives may be chosen or scored.
- On Game Turn Two, a single Objective may be chosen and scored.
- On Game Turn 3 and all further Game Turns, two - Objectives may be chosen and scored.
- Players may also score Victory points from the Core Mission Secondary Objectives.
- At the end of Game Turn Four, the player with the highest total of Victory points is the winner.
STRATEGIC ADVANTAGE
Before beginning set-up, the players should roll off. The winner of this roll-off gains Strategic Advantage.
OBJECTIVES
Before any models are deployed onto the battlefield, and starting with the player with Strategic Advantage, the players must alternate placing Objective markers anywhere on the battlefield that is not within any player’s Deployment Zone, is at least 6" from any battlefield edge, is at least 12" from any other Objective marker and not within any area of Impassable Terrain.
A total of six Objective markers must be placed for this Core Mission.
- Once all Objectives have been placed, the player with Strategic Advantage must select a Deployment Zone from the map determined during set-up and deploy their entire army. Once the player with Strategic Advantage has deployed all of their units, the player without Strategic Advantage must set up all of their own units in the Deployment Zone that was not chosen by the opposing player.
- If there is no position where the controlling player can legitimately deploy one or more of their units according to the deployment rules of the Core Mission being played, those units may be placed into Reserves instead. Where this is the case, those units that cannot be deployed are placed immediately into Reserves – but cannot be assigned to any previously declared Reserves Action.
- Once both players have deployed all of their units, the first turn is begun.
THE FIRST TURN
The player with Strategic Advantage takes the first turn, unless the opposing player can Seize the Initiative.
MISSION SPECIAL RULES
Core Missions all have the Reserves Mission special rule. Additionally, the player with Strategic Advantage may choose to begin the battle with the Night Fighting special rule in effect.
Take And Hold
In order to claim victory in Take and Hold, players must hold an Objective marker in their own territory and capture one in enemy territory to accumulate Victory points.
- At the end of each of their player turns, the Active player scores 1 Victory point if they control a single Objective marker, or 3 Victory points if they control two Objective markers.
- Players may also score Victory points from the Core Mission Secondary Objectives.
- At the end of Game Turn Four, the player with the highest total of Victory points is the winner.
STRATEGIC ADVANTAGE
Before beginning set-up, the players should roll off. The winner of this roll-off gains Strategic Advantage.
OBJECTIVES
Before any models are deployed onto the battlefield, each player must place a single Objective marker anywhere in the opposing player’s Deployment Zone that is at least 6" from any battlefield edge and not within any area of Impassable Terrain.
A total of two Objective markers must be placed for this Core Mission.
- Once all Objectives have been placed, the player with Strategic Advantage must select a Deployment Zone from the map determined during set-up and deploy their entire army. Once the player with Strategic Advantage has deployed all of their units, the player without Strategic Advantage must set up all of their own units in the Deployment Zone that was not chosen by the opposing player.
- If there is no position where the controlling player can legitimately deploy one or more of their units according to the deployment rules of the Core Mission being played, those units may be placed into Reserves instead. Where this is the case, those units that cannot be deployed are placed immediately into Reserves – but cannot be assigned to any previously declared Reserves Action.
- Once both players have deployed all of their units, the first turn is begun.
THE FIRST TURN
The player with Strategic Advantage takes the first turn, unless the opposing player can Seize the Initiative.
MISSION SPECIAL RULES
Core Missions all have the Reserves Mission special rule. Additionally, the player with Strategic Advantage may choose to begin the battle with the Night Fighting special rule in effect.
Strike And Fade
In order to claim victory in Strike and Fade, players must capture an Objective marker that shifts each turn in order to accumulate Victory points.
- At the end of each of their player turns, the Active Player scores a number of Victory points equal to the current Game Turn number if they control the Objective marker. Once any player has scored Victory points from the Objective, it must be immediately scattered D6+6" as described in the rules for Objectives.
- Players may also score Victory points from the Core Mission Secondary Objectives.
- At the end of Game Turn Four, the player with the highest total of Victory points is the winner.
STRATEGIC ADVANTAGE
Before beginning set-up, the players should roll off. The winner of this roll-off gains Strategic Advantage.
OBJECTIVES
Before any models are deployed onto the battlefield, a single Objective marker must be placed at the centre of the battlefield, or as close as is possible without the Objective being placed within Impassable Terrain. Once the Objective marker has been placed it should be scattered D6+2" – if this would place the Objective marker off the edge of the battlefield or on Impassable Terrain, then the player with Strategic Advantage must move the Objective marker the minimum possible distance in a direction of their choosing so that it is on the battlefield and not on an area of Impassable Terrain. If a ‘Hit’ symbol is rolled while scattering the Objective marker, then the Scatter dice must be re-rolled until a result that is not a ‘Hit’ is rolled.
A single Objective marker must be placed for this Core Mission.
- Once all Objectives have been placed, the player with Strategic Advantage must select a Deployment Zone from the map determined during set-up and deploy their entire army. Once the player with Strategic Advantage has deployed all of their units, the player without Strategic Advantage must set up all of their own units in the Deployment Zone that was not chosen by the opposing player.
- If there is no position where the controlling player can legitimately deploy one or more of their units according to the deployment rules of the Core Mission being played, those units may be placed into Reserves instead. Where this is the case, those units that cannot be deployed are placed immediately into Reserves – but cannot be assigned to any previously declared Reserves Action.
- Once both players have deployed all of their units, the first turn is begun.
THE FIRST TURN
The player with Strategic Advantage takes the first turn, unless the opposing player can Seize the Initiative.
MISSION SPECIAL RULES
Core Missions all have the Reserves Mission special rule. Additionally, the player with Strategic Advantage may choose to begin the battle with the Night Fighting special rule in effect.
Apex Missions
HOW TO USE APEX MISSIONS
Apex Missions are intended to be used as both part of a linked set of campaign games using the Onslaught Campaign rules, or as one-off gaming events for players interested in a more narrative gaming experience. They are not intended for Matched Play events and will often present asymmetrical or unbalanced situations intended to represent specific background events. As part of an Onslaught Campaign, they are intended for use when players play a Decisive Battle – but may be substituted for a Core Mission during play whenever both players agree to their use.In all cases, Apex Missions should only be used when all players agree to their use, and are given the opportunity to select an army tailored to the mission – in many cases these missions will prove more difficult or awkward if players do not adjust their forces to meet the unique challenge of each Apex Mission.
The Apex Missions presented here are intended to represent the Siege of Cthonia, and present a series of battles allowing players to refight key parts of the narrative.
Playing Games Using the Apex Missions
Regardless of whether using an Apex Mission for standalone battles or as part of a campaign, all players must prepare for the battle using the following preparatory steps. Each of these steps should be completed in the sequence they are presented in, with each step being fully completed before moving on to the next. Most of the steps are identical to those used when preparing to play a Core Mission and players should consult those rules for further details.Apex Mission Sequence
| ||
The Pyre Of Ambition
In order to claim victory in the Pyre of Ambition, the defending player must consolidate their scattered forces at the evacuation zones and then hold out for as long as possible – while the attacking player must seek to keep their opponent disordered and use the mission’s unique rules to eliminate a superior foe.
- At the end of each of their player turns, the Defending player scores 1 Victory point for each Objective marker they control – the objectives representing the evacuation zones. The attacking player scores 1 Victory point for each enemy unit that is entirely removed from play as casualties – including any units that Fall Back off the battlefield and are counted as destroyed.
- No Secondary Objectives are used in this mission, but any special rules or Warlord Traits that allow players to score Victory points may be used.
- At the end of Game Turn Four, the defending player must roll a D6. On the score of a 4+ the battle ends, if the score is less than 4 then another full turn is played. At the end of Game Turn Five (if Game Turn Five is played), the defending player must roll a dice, on the score of a 3+ the battle ends, if the score is less than 3 then another full turn is played. If a sixth Game Turn is played then the battle automatically ends once that turn is completely resolved.
- Once the battle has ended, the player with the highest total number of Victory points is declared the victor.
Before beginning the Pyre of Ambition mission, the players must determine which player will take the role of the Attacker and which the role of the Defender. This can be done either by player choice or by a roll-off, with the winner assigning roles.
In the narrative of the Siege of Cthonia, the Defenders were the Sons of Horus under the command of Chieftain Ryaeve, while the Attackers were a mixed force of Raven Guard and Imperial Fists. However, players may choose to assign the roles as suits their available forces and players.
ARMY SELECTION
For the Pyre of Ambition mission, the Defender must select an army using 25% more points than the Attacker – for example, if a Points Limit of 3,000 points is used then the Defender may select up to 3,750 points worth of units, while the Attacker must use only 3,000 points to select their army.
Both players must use the Crusade Force Organisation chart to select their army, but neither army may include a Lords of War Detachment or any Primarch choices.
Deployment Maps & Deployment Zones
The Ashes of Victory mission uses the deployment map shown to the right, with the only Deployment Zone used by the Defender, with the Attacker’s units being deployed by an alternative means.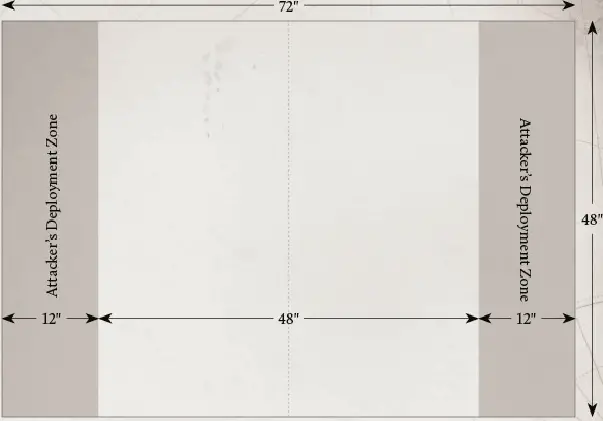
For the Pyre of Ambition mission, both the Attacker and Defender must each divide their army into two sections – a Vanguard and a Rearguard – before any models are deployed onto the battlefield.
Each player’s Vanguard must include no more than a third of the total number of units in that player’s army. For example, if a player’s army included 6 units in total, then the Vanguard could include no more than 2 units (for the purposes of this rule Dedicated Transports and Retinue units are not counted as separate units and are counted as part of the unit they were selected for). The Rearguard is composed of all units that are not part of the Vanguard – and all units in the Rearguard must begin the battle in Reserves.
When bringing units into play from Reserves, the Attacking player may bring units into play from any point on the battlefield’s edge within either Deployment Zone, while the Defending player may bring units into play from any point on the battlefield’s edge that is not in any Deployment Zone.
Note that as the Defending player has no Deployment Zone, when a unit under the Defending player’s control Falls Back it must do so towards the nearest Objective marker. If a unit under the Defending player’s control Falls Back into contact with an Objective marker then it is not destroyed, but stops Falling Back and becomes Pinned instead.
Neither player may declare a Drop Pod Assault, Deep Strike Assault or Subterranean Assault in this mission.
Before any models are deployed onto the battlefield, the defending player must place three Objective markers anywhere on the battlefield that is not within any player’s Deployment Zone, is at least 6" from any battlefield edge, is at least 12" from any other Objective marker and not within any area of Impassable Terrain.
DEPLOYMENT
- Once all Objectives have been placed, the Attacking player must set up all of the units in their Vanguard in any of the Deployment Zones. If the Attacking player has two or more units in their Vanguard then at least one unit must be deployed in each of the Deployment Zones.
- The Defending player must set up all of the units in their Vanguard using the following rules. Place one model from each unit anywhere on the battlefield that is not in either of the two Deployment Zones. That model is then scattered D6", and once its final position is determined, the other models in that unit are placed anywhere the controlling player wishes as long as once all models in the unit have been placed the unit is in coherency. If the initial model scatters off the battlefield or into Impassable Terrain, then the Attacking player may instead determine its final position, placing it anywhere on the battlefield within 12" of its original position that is not in Impassable Terrain, not off the battlefield or within 6" of an enemy model.
- Once both players have deployed all of their units the first turn is begun.
THE FIRST TURN
The Attacking player takes the first turn, unless the defending player can Seize the Initiative.
Mission Special Rules
This mission uses the Reserves, Grav-mines and Dropship Hulks mission special rules. Additionally, the Sudden Death rule does not apply in this mission – as long as a player has units in Reserves the battle continues, even if all of a player’s units that are on the battlefield are removed as casualties.Grav-Mines
The Attacking player may choose to deploy up to D6+1 Grav-mine markers anywhere on the battlefield at the beginning of the battle, before any models are deployed or the Defender deploys any Dropship Hulks. A Grav-mine marker may be deployed in Difficult Terrain or Dangerous Terrain, but not in Impassable Terrain or on top of an Objective marker.The area within 9" of the Grav-mine is treated as Difficult Terrain (this has no effect if the area is already Difficult Terrain), and at the end of each player turn, the Attacking player must roll a D3 and add one to the result. Any models within 9" of a Grav-mine marker are moved that many inches towards the marker (ignoring the effects of any terrain). If any model comes into base contact with a Grav-mine then it explodes, and all models (friendly and enemy) within 9" suffer a Strength 8 AP4 Hit (any Wounds inflicted do not cause Morale checks). Once all Hits have been resolved, the Grav-mine marker is removed from play.
Dropship Hulks
The Defending player may choose to deploy D3+2 Dropship Hulks anywhere on the battlefield at the beginning of the battle, before any models are deployed but after the Attacker deploys any Grav-mines. A Dropship Hulk may not be deployed in Difficult Terrain, Dangerous Terrain or Impassable Terrain or on top of an Objective marker or Grav-mine.Each Dropship Hulk is counted as Area Terrain, and counts as Difficult Terrain and confers a 4+ Cover Save on models within its bounds. However, at the end of each Game Turn, roll a dice for each Dropship Hulk that has models within its bounds and apply the result from the Dropship Hulk table:
| |||||||||||||||
If a Dropship Hulk is removed from play while there are models within its bounds, then those models remain in play in the same position and suffer no additional ill-effects.
The Ashes Of Victory
In order to claim victory in the Ashes of Victory, the defending player must weather the enemy’s assault and await the arrival of their own reinforcements – while the attacking player must seek to make the most of a temporary advantage to reduce their opponent’s forces before they find the tables turned.
- At the end of each of their player turns, the defending player scores 3 Victory points if they control the Objective, and both players score 1 Victory point for each enemy unit that is entirely removed from play as casualties – including any units that Fall Back off the battlefield and are counted as destroyed.
- No Secondary Objectives are used in this mission, but any special rules or Warlord Traits that allow players to score Victory points may be used.
- At the end of Game Turn Four, the defending player must roll a dice. On the score of a 4+ the battle ends, if the score is less than 4 then another full turn is played. At the end of Game Turn Five (if Game Turn Five is played), the defending player must roll a D6, on the score of a 3+ the battle ends, if the score is less than 3 then another full turn is played. If Game Turn Six is played then the battle automatically ends once that turn is completely resolved.
- Once the battle has ended, the player with the highest total of Victory points is declared the victor.
Before beginning the Ashes of Victory mission, the players must determine which player will take the role of the Attacker and which the role of the Defender. This can be done either by player choice or by a roll-off, with the winner assigning roles.
In the narrative of the Siege of Cthonia, the Defenders were a mixed force of Sons of Horus and Word Bearers, while the Attackers were the Imperial Fists. However, players may choose to assign the roles as suits their available forces and players.
ARMY SELECTION
For the Ashes of Victory mission, both players should select an army using the same points total. A Points Limit of 4,000 points is recommended for this mission.
Both players must use the Crusade Force Organisation chart to select their army.
Deployment Maps & Deployment Zones
The Ashes of Victory mission uses the deployment map shown to the right, with the only Deployment Zone used by the Defender, with the Attacker’s units being deployed by an alternative means.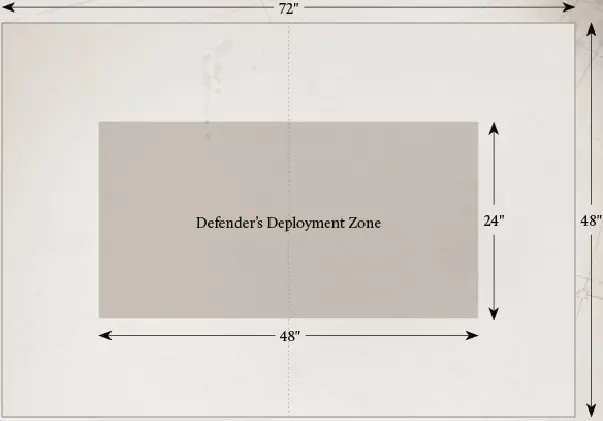
For the Ashes of Victory mission, the Defender must divide their army into two sections – a Vanguard and a Rearguard – before any models are deployed onto the battlefield.
The Defender’s Vanguard must include no more than half of the total number of units in that player’s army and at least one unit. For example, if a player’s army included 6 units in total, then the Vanguard could include no more than 3 units (for the purposes of this rule Dedicated Transports and Retinue units are not counted as separate units and are counted as part of the unit they were selected for).
The Rearguard is composed of all units that are not part of the Vanguard – and all units in the Rearguard must begin the battle in Reserves.
The Attacking player places all of their units into Reserves.
When bringing units into play from Reserves, both players may bring units into play from any point on the battlefield’s edge that does not have an enemy model within 12". If that restriction would mean there was no possible point by which a unit could enter play, then it may enter from any point on the battlefield edge ignoring the restriction.
When a unit Falls Back in this mission, it must do so towards the nearest point on the edge of the battlefield.
Neither player may declare a Drop Pod Assault, Deep Strike Assault or Subterranean Assault in this mission.
Before any models are deployed onto the battlefield, a single Objective marker is placed as close to the centre of the battlefield as possible.
DEPLOYMENT
Once the Objective has been placed, the Defending player must set up all of the units in their Vanguard in the marked Deployment Zone. The Attacking player places all of their units into Reserves.
Once both players have deployed all of their units, the first turn is begun.
THE FIRST TURN
The Attacking player takes the first turn.
Mission Special Rules
This mission has the Sunken Bastions and Rewards of Valour mission special rules. Additionally, the Sudden Death rule does not apply in this mission – as long as a player has units in Reserves the battle continues, even if all of a player’s units that are on the battlefield are removed as casualties.Sunken Bastions
At the start of their first player turn, the Attacker must place D3+2 Blast (3") markers anywhere on the battlefield – these markers may not be placed within Dangerous Terrain, Impassable Terrain, on top of any Terrain Feature or within 6" of any enemy model.These markers represent hidden underground bunkers, and any unit under the Attacker’s control that is composed entirely of models with the Infantry, Dreadnought or Automata Unit Type may enter play counting the edge of one of these Blast markers as the edge of the battlefield (units under the Attacker’s control do not Fall Back to the edge of these Blast markers).
The Defending player may target these Blast markers with Shooting Attacks, counting them as a model with the Vehicle Unit Type and an Armour Value of 13 on every facing and 3 Hull Points – but on a Penetrating Hit automatically apply the effect of the Explodes result on the Vehicle Damage table (the markers do not have a Transport Capacity and no unit may Embark upon them and they may not be targeted by Charges or attacks in the Assault phase).
Rewards of Valour
The Defender’s units placed in Reserves may only enter play using this special rule. From the beginning of the Defender’s second turn, that player may discard one Victory point at the start of their player turn as the Active Player to bring a single unit into play from Reserves – if that unit has the Primarch Unit Type or Superheavy Unit Sub-type or is a Heavy Support choice then the cost is increased to 2 Victory points.Zone Mortalis
Zone Mortalis Core Rules
The Age of Darkness Zone Mortalis additional rules allow players to recreate iconic battles of the Horus Heresy fought in such locations as fortress tunnels and defence networks, inside the crumbling remains of towering hive cities or through spaceport hangars and manufactorum sectors, packed with void craft and industrial machinery. Rarely during these frenetic actions could conventional lines of battle be drawn and the support of artillery and aircraft be relied upon. Instead, victory would rely on the gallant actions of individuals, fighting hand-to-hand after their ammunition had expired and refusing to yield even when their blades were dulled and broken. The confines of these war zones present unique dangers to combatants when compared to an open field of battle, with the possibility of enemies lurking close by, around the blind corners of tight corridors and each high gantry or platform offering a deadly vantage point for marksmen.The rules presented here detail the use of specific Zone Mortalis terrain to create the cramped and confined environments in which many battles of the Age of Darkness were fought. The use of Reinforcement Points allow players to place units from the army onto the board from Reinforcements and perform daring flanking attacks or strike from behind enemy lines resulting in an exciting, ever-changing dynamic. These rules are a supplemental addition to the Warhammer: The Horus Heresy – Age of Darkness Rulebook, which is required to use the Zone Mortalis rules.
Zone Mortalis Terrain
Terrain is an integral part of Zone Mortalis battles and helps provide players with a unique tactical challenge by limiting lines of sight across the battlefield and funnelling troops into deadly kill zones. Battlefields designated as having Ceilings limit the use of Wargear such as jump packs and weapons with the Barrage special rule which causes players to consider which units they include in their armies from a different perspective.Due to the importance of terrain, the following rules detail the effects of each category of terrain specific to Zone Mortalis battles.
Terrain Types
Zone Mortalis battlefields do not use the categories of Terrain Types detailed on the Warhammer: The Horus Heresy – Age of Darkness Rulebook. Instead, Zone Mortalis games use the following categories: Corridors & Chambers, Zone Mortalis Terrain Pieces, and Hazardous Debris Terrain.Corridors & Chambers
No additional rules are used for Corridors & Chambers and, unless otherwise specified, special rules and abilities that affect terrain do not affect Corridors & Chambers.Moving Through Terrain
In Zone Mortalis battles, models may not move vertically using the rule Moving Vertically. Ladders, Stairways & Hatches offer an alternative method for vertical movement in Zone Mortalis battles.Zone Mortalis Terrain Pieces
General terrain features such as platforms, pipes and railings are all examples of Terrain Pieces. When drawing line of sight to a model that is the target of a Shooting Attack, a model that is at least 25% obscured by Zone Mortalis Terrain Pieces has a 6+ Cover Save. In addition, some terrain can be designated as Zone Mortalis Terrain Pieces which have additional rules, as follows:Walls
The sturdy and impenetrable walls of a ship’s interior or an underhive tunnel network define the fighting spaces of a Zone Mortalis battlefield.
When drawing line of sight to a model that is the target of a Shooting Attack, a model that is at least 25% obscured by Wall Terrain has a 5+ Cover Save. Unless noted otherwise in their special rules, models cannot move or draw line of sight through Wall Terrain in a Zone Mortalis battle. In addition special rules, Wargear, or other effects that affect models within a specified distance cannot affect a model if no straight line can be drawn between the source of the effect and the affected model without passing through Wall Terrain (see Measuring Ranges in Zone Mortalis).Doors
Chambers and corridors may be sealed off by the use of armoured bulkhead doors, airlocks, or similar apparatus.
When drawing line of sight to a model that is the target of a Shooting Attack, a model that is at least 25% obscured by Door Terrain, including any frame or mounting, has a 5+ Cover Save. Unless noted otherwise in their special rules, models cannot move or draw line of sight through Door Terrain in the Closed state in a Zone Mortalis battle. In addition special rules, Wargear, or other effects that affect models within a specified distance cannot affect a model if no straight line between the source of the effect and the affected model can be drawn without passing through Door Terrain in the Closed state (see Measuring Ranges in Zone Mortalis).There are two types of Door Terrain in a Zone Mortalis battle – standard doors and wide doors:
- Standard doors are roughly human-sized openings such as access hatches and airlocks up to 2" wide.
- Wide doors are larger openings such as loading docks or bay doors more than 2" wide. All Door Terrain is defined by two conditions: State and Control.
State A door can either be Closed or Open. Unless stated otherwise in the mission rules, all Door Terrain begins the battle in the Closed state.
|
Control Depending on the mission, a piece of Door Terrain may be Accessible, Locked, or Controlled. Unless stated otherwise in the mission rules, all Door Terrain begins the battle as Accessible.
|
Destroying Doors Any pieces of Door Terrain may be targeted by any model when in the Open or Closed state and are treated as Buildings with no Fire Points or Battlements, a Transport Capacity of 0, and a single facing with Armour Value 10. Door Terrain, regardless of its size, has 3 Hull Points, however, when a Penetrating Hit is inflicted on a piece of Door Terrain, it loses D3 Hull Points and no roll is made on the Building Damage table. In addition, when a piece of Door Terrain is reduced to 0 Hull Points, it does not suffer a Total Collapse result. Instead, a piece of Door Terrain with 0 Hull Points is destroyed and removed from the battlefield, if possible. |
| Crushed The sudden closing of bulkheads and airlock doors poses a threat in itself to those caught unaware, trapping and crushing limbs with their weight, as the door’s servos repeatedly cycle until they burn out. Despite the risks, many attempt to haul stricken comrades clear of the mechanisms before they close upon them, often risking injury or death themselves. If any model is on a piece of Door Terrain when it is changed from the Open state to the Closed state, or this results in one or more models from any unit being no longer positioned in Unit Coherency, the unit the model is part of suffers an immediate S8, AP-Wound, with no Armour Saves, Invulnerable Saves or Damage Mitigation rolls allowed. The Door Terrain is then destroyed and removed from the battlefield, if possible. | ||
System Override
Once per Movement phase, before any models are moved, the Active player may choose to expend one Reinforcement Point to attempt a System Override. To do so, roll a D6 and add +1 to the result if any friendly model on the battlefield has a cortex controller or an auspectre. If the result is 3+, all pieces of Door Terrain are now Controlled by the Active player and the Active player may immediately change the State of any pieces of Door Terrain that are not Destroyed.Barricades
Makeshift barricades consisting of wall panels, doors, tyres or containers are commonly erected to give defenders a position of advantage from which to fire their weapons, or to hinder the advance of attackers.
When drawing line of sight to a model that is the target of a Shooting Attack, a model that is at least 25% obscured by Barricades Terrain has a 6+ Cover Save. Models may move over Barricades Terrain, counting each vertical inch moved against the total distance moved. Models may not end their movement on top of Barricades Terrain.Debris
Zones Mortalis are commonly littered with fallen beams, masonry and the detritus of ages of industry or habitation. Although these heaps of crumbling scrap may provide a modicum of protection from enemy fire, they hinder free movement of even the most agile infantry as care must be taken when traversing them.
When drawing line of sight to a model that is the target of a Shooting Attack, a model that is in or at least 25% obscured by Debris Terrain has a 6+ Cover Save.Note that Debris Terrain is neither Difficult Terrain nor Dangerous Terrain and its effects are not mitigated by special rules or Wargear that interact with those terrain types.
Moving Within Debris Terrain If a model starts their movement in Debris Terrain, their Movement Characteristic is reduced by -2" during that Movement phase. |
Charging Through Debris Terrain Models are slowed when charging through Debris Terrain. If, when charging, one or more models have to move through Debris Terrain in order to reach the enemy by the shortest possible route, the unit that the model is part of applies a modifier of -2" to its Charge Distance. This modifier is applied in addition to any other modifiers that might apply to the unit’s Charge Distance. |
Hazardous Debris Terrain
Fighting within a Zone Mortalis is a dangerous and treacherous affair, and one in which even armoured combatants can flounder or damage themselves, unexpectedly crashing through buckled deck plating, getting crushed beneath falling rubble, or contacting exposed power conduits with deadly results.
When drawing line of sight to a model that is the target of a Shooting Attack, a model that is in or at least 25% obscured by Hazardous Debris Terrain has a 6+ Cover Save. Note that Hazardous Debris Terrain is neither Difficult Terrain nor Dangerous Terrain and its effects are not mitigated by special rules or Wargear that interact with those terrain types.Moving and Charging Within Hazardous Debris Terrain In addition to the rules that apply to models moving or Charging through Debris Terrain, when moving or Charging through Hazardous Debris Terrain, each model must make a Hazardous Debris Terrain test (as follows) as soon as it enters, leaves, or moves within Hazardous Debris Terrain. |
Hazardous Debris Terrain Tests To take Hazardous Debris Terrain tests, roll a D6. On a 1, that model suffers a Wound. No Armour Save, Cover Save or Damage Mitigation roll may be made against this Wound, but Invulnerable Saves may still be made. Once a model has taken a Hazardous Debris Terrain test for a particular area of Hazardous Debris Terrain, it does not test for that area of Hazardous Debris Terrain again in the same Phase. However, if the model moves into a different area of Hazardous Debris Terrain, this must be tested for as normal. |
Shooting While Within Hazardous Debris Terrain While within an area of Hazardous Debris Terrain, models suffer a -1 penalty to all To Hit rolls made as part of Shooting Attacks. Models with the Primarch Unit Type or the Night Vision special rule do not suffer this penalty. |
Ladders, Stairways &Hatches
Whether narrow access ladders or grand staircases, moving up and down within a Zone Mortalis is a difficult affair.
In a Zone Mortalis battle, models may only move vertically when in base contact with a piece of terrain designated as Ladders, Stairways & Hatches. When climbing between levels vertically via Ladders, Stairways & Hatches, models use the rules for vertical movement.Measuring Ranges in Zone Mortalis
When measuring ranges in Zone Mortalis battles, measure the shortest distance between the bases of the models involved or between the points being measured. If the battlefield has a Ceiling, ranges cannot be measured through Wall Terrain and Door Terrain in the Closed state – instead, the range of the closest path around these terrain types must be measured. If a path cannot be traced between two models due to intervening Wall Terrain and Door Terrain in the Closed state, the effects of any rule that affects models within a defined range that does not require line of sight do not apply and no attack can be made using a weapon with the Barrage, Guided Fire or any other rule that allows attacks to be made without line of sight.Reactions in Zone Mortalis
When making Reactions during a Zone Mortalis battle, an army may not choose to use any of the Core Reactions presented in the Warhammer: The Horus Heresy – Age of Darkness Rulebook. Instead, all armies may only choose to use any or all of the Zone Mortalis Reactions as presented in this supplement during a Zone Mortalis battle, any of the Advanced Reactions in the Warhammer: The Horus Heresy – Age of Darkness Rulebook and any Army List specific Advanced Reactions.Reactions in the Movement Phase
During the Movement phase, the Reactive player may declare a Reaction if an enemy unit ends a move within 12" and in line of sight of a friendly unit. Once the Active player has completely resolved the movement of their unit, the Reactive player may choose to expend one of their Reactions in that Phase in order to have the unit they control that is within 12" and line of sight perform a Suppress Reaction.Suppress – The Reacting unit may make a Shooting Attack, targeting the unit that triggered this Reaction and following all the usual rules for Shooting Attacks. A unit that makes a Shooting Attack as part of a Suppress Reaction may not make any attacks indirectly (without line of sight). All Shooting Attacks made as part of a Suppress Reaction are Snap Shots and gain the Pinning special rule if they do not already have it.
Reactions in the Shooting Phase
During the Shooting phase, the Reactive player may react when any enemy unit declares a Shooting Attack targeting a unit they control. Before the Active player resolves the Shooting Attack, the Reactive player may choose to expend one of their Reactions for that Phase to have the unit targeted by the Shooting Attack perform a Displace Reaction.Displace – Each model in the reacting unit may move a number of inches up to the highest unmodified Initiative Characteristic of any model in the unit. When resolving the Shooting Attack that triggered this Reaction, all range and line of sight is measured to the reacting unit’s new position. If, as a result of this movement, no models in the reacting unit are within line of sight of any models in the triggering unit, the active player cannot choose a new target for their Shooting Attack.
Reactions in the Assault Phase
During the Assault phase, the Reactive player may react when any enemy unit declares a Charge targeting a unit they control. Before the Active player has resolved any Charge rolls, the Reactive player may choose to expend one of their Reactions for that Phase to have the unit targeted by the Charge perform a Brace reaction.Brace – The Reacting unit must make a Morale check. If the Check is failed, the Reacting unit immediately Falls Back D6" and automatically regroups when this Fall Back Move is completed 1" from the battlefield edge. If the Check is successful, the Reacting unit automatically passes any Morale checks they are required to make as a result of losing an assault during the following Fight sub-phase.
Deployment and Reinforcements
At the start of each game, players place models onto the battlefield during the Deployment phase and may also choose to place models into Reinforcements to be placed on the battlefield later in the battle. Each player has a starting total of Reinforcement Points which they must expend to place models onto the battlefield during Deployment. According to the mission special rules that are being used, players accumulate additional Reinforcement Points during the battle, allowing them to place models from Reinforcements onto the battlefield. A given unit will cost an amount of Reinforcement Points to place onto the battlefield during Deployment based on which Force Organisation slot it has been chosen as and may cost an additional amount to place onto the battlefield from Reinforcements on either Flank edge or the Opposing Player’s edge using the Counter Assault rule. This allows players to deploy units in flanking positions to capture or contest objectives and encircle the enemy’s army. Careful consideration of how these Reinforcement Points are used and where and when units are brought into play presents a unique tactical challenge in Zone Mortalis games.GAME LENGTH
Unless the Zone Mortalis mission rules specify otherwise, at the end of Game Turn 4, one of the players must roll a D6. On a 2+ the battle continues, otherwise the battle is over. If another turn is played, another D6 must be rolled at the end of Game Turn 5, and this time, the battle only continues on a roll of 4+. The battle automatically ends at the close of Game Turn 6.
BARRAGE WEAPONS IN ZONE MORTALIS
Weapons with the Barrage special rule cannot be used to make Shooting Attacks targeting models to which they do not have line of sight, but may make Shooting Attacks as normal targeting models to which they do have line of sight.
Firestorm & Shrapnel
Attacks made with weapons with the Blast (X) or Template Weapon special rule gain a +1 bonus to any To Wound rolls made for them in Zone Mortalis battles. In addition, if the battlefield has a Ceiling, Blast markers cannot scatter through Wall Terrain or Door Terrain in the Closed state. If a Scatter roll takes a Blast marker’s centre point into contact with Wall Terrain or Door Terrain in the Closed state, the Blast marker scatters only as far as the point where its centre contacts the edge of the Wall Terrain or Door Terrain in the Closed state. Resolve the weapon’s effect from this spot.If a line cannot be drawn between any point of the base of a model hit by a Blast marker or template and the centre of the Blast marker (or base of the model making the attack in the case of Template weapons), that does not pass through a piece of Wall Terrain or Door Terrain in the Closed state, that model is not hit by the attack.
In the above example, Model A targets Model B with a Shooting Attack, using a frag missile. The frag missile scatters towards the Wall Terrain. Model B and the Door Terrain are both hit, but Model C is not because a line cannot be drawn between its base and the centre of the Blast marker without passing through Door Terrain in the Closed state.
Nowhere to Hide
In Zone Mortalis battles, when determining assault results, the winner adds +1 to Sweeping Advance rolls until the end of that Phase. Contrary to the usual rules for Falling Back, immediately upon failing a Morale check, a unit’s first Fall Back move is directly away from the enemy, and subsequent moves are towards the nearest Access Point.Blind Panic
If any model from a unit that is Falling Back ends its move or passes within 1" of any model from another friendly unit that is not Falling Back or Pinned, then that unit must immediately take a Morale check. Fearless units are not subject to this effect.Objective Markers
Some Zone Mortalis missions require the use of one or more Objectives. Objectives can represent a location of importance for one or both armies on the battlefield, which in Zone Mortalis battles will often be particular rooms or corridor junctions. The use of 1"-2" circular markers, such as counters or spare bases, can be used to indicate the specific location of an Objective.Controlling Objective Markers
An Objective marker is considered under a player’s control if there is at least one model from one of that player’s Scoring units in base to base contact with it, and no models from enemy Scoring or Denial units, within 3" of the centre of the Objective marker.A unit can only control one Objective marker at a time. If a unit moves into a position where it could control two Objective markers, the controlling player must make it clear to their opponent which Objective marker the unit is controlling.
For some missions, an Objective is defined as a certain area of the battlefield rather than an Objective marker – this is an Objective zone. In these situations, the Objective is considered to be controlled by a player if there is at least one of that player’s Scoring units wholly within the defined Objective zone, and no models from enemy Scoring units wholly within the defined Objective zone. Note that, for controlling Objective zones, enemy Denial units are not counted – only Scoring units can control or contest an enemy’s control of an Objective zone.
Terrain as Objectives
Citadel Zone Mortalis Terrain kits are highly detailed and feature numerous elements, such as consoles, control panels and hatches that can be nominated as Objectives, in place of using markers, to create an engaging and immersive gaming experience for players. Players must agree which terrain elements are nominated as Objective points and specify their centre for the purposes of measuring distances when Controlling Objectives and other relevant rules.
Critical Objective
At the start of each turn, the player with Strategic Advantage must roll a D6. The numbered Objective marker that corresponds to the result of the roll is the Critical Objective for the remainder of that turn. The player that controls this Objective marker gains an additional two Reinforcement Points at the end of that turn in addition to the Victory points they gain from controlling an Objective.
Zone Mortalis Secondary Objectives
In addition to the Primary Objectives of a given mission, players may score additional Victory points for achieving a number of additional Secondary Objectives used in Zone Mortalis battles. The conditions for achieving Secondary Objectives are listed below and the Secondary Objectives that are used in a mission will be detailed as part of the mission rules.COUNTER STRIKE
The player without Strategic Advantage gains 1 Victory point if the first unit, of any kind, to be completely destroyed during the battle belongs to the player w ith Strategic Advantage.
If two or more units from opposing forces are destroyed simultaneously (for example, at the same Initiative step in an Assault phase) then no player scores Victory points for this Secondary Objective.
CHAMPIONS OF RENOWN
For each enemy model with the Character Unit Subtype that is removed as a casualty whilst fighting in a Challenge, the Controlling player scores 1 Victory point.
BLOOD TOLL
For each unit in an army selected as either an HQ or Elites choice that is removed as a casualty, the opposing player scores 1 Victory point.
Preparing for Battle in Zone Mortalis
Regardless of whether using the Zone Mortalis Missions for standalone battles or as part of a campaign, players must prepare for the battle using the following preparatory steps. Each of these steps should be completed in the sequence they are presented in, with each step being fully completed before moving on to the next.| Zone Mortalis Mission Sequence | ||
Selecting Armies for Zone Mortalis
All armies in a Zone Mortalis mission use an agreed points limit; it is suggested that this limit is between 1,500 to 2,500 points, selected using the Zone Mortalis Engagement Force Organisation chart. Furthermore, all armies for use in a Zone Mortalis mission must be selected before the mission is chosen or any other stage of battle preparation is taken, unless otherwise specified, this includes selecting any Warlord Traits, Rites of War, Psychic Disciplines or other such options, which must all be noted on the controlling player’s Army Roster.Designating Ceilings
Due to the effect that designating the battlefield as having Ceilings has on many units, players may wish to decide if their battle will take place on a battlefield with or without a Ceiling prior to the selection of their army to ensure that battles are enjoyable and engaging for all participants.Zone Mortalis Engagement Force Organisation Chart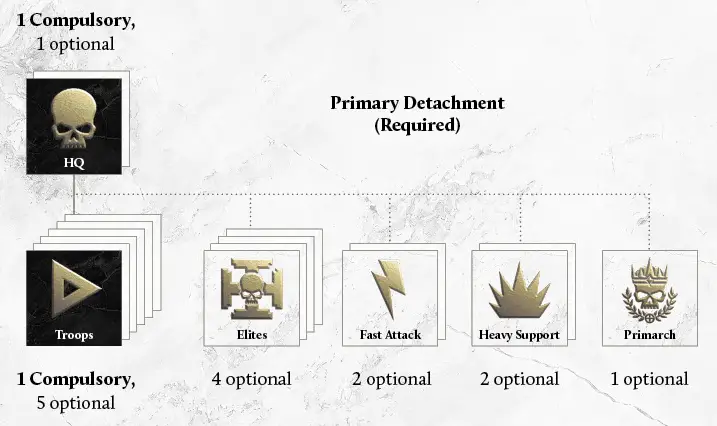 The Zone Mortalis Engagement Force Organisation chart does not include any optional Detachments and as such may not take Allied Detachments or a Lords of War Detachment. Any Primarch choice may only be included in an army of at least 2,000 points and may not exceed 25% of the army’s total points cost, unless specified otherwise by the mission or Force Organisation chart being used. In addition, additional optional Detachments from other sources may not be included as part of a Zone Mortalis Force. | ||
- No unit may include more than 15 models. If a unit’s minimum size is greater than 15 models, that unit may not be chosen. Note that this restriction only applies to individual units during army selection. Models with special rules such as the Legion Apothecarion Detachment that are assigned to units before the first turn, or with the Independent Character special rule that join units during the battle may increase the number of models in a unit to greater than 15.
- No models with the Fortification Unit Type, Armiger Unit Type, Vehicle Unit Type or Cavalry Unit Type may be chosen.
- No models with the Antigrav Unit Sub-type may be chosen.
- No unit may select a Dedicated Transport.
- No models with the Dreadnought Unit Type or Automata Unit Type, or the Monstrous Unit Sub-type, may be chosen if they have a Wounds Characteristic of 8 or more.
- No units may be placed in Reserves, and any models that must be deployed as Reserves may not be deployed in a Zone Mortalis mission, and are counted as Destroyed for the purposes of the mission.
Behemoths of Destruction
Impervious to many of the weapons able to be brought to bear against them in the confines of Zones Mortalis, and nigh-unstoppable in close assault, engines of destruction such as the Contemptor Dreadnought and the even larger Leviathan Dreadnought, were recognised by strategists as highly advantageous in these environments. The only major drawback suffered by such war machines was the difficulty associated with deploying them in such environs, which limited their availability on the front lines.Regardless of any Rite of War (or similar army composition rules, such as Cohort Doctrines) used, an army may only include a maximum of one model with the Dreadnought Unit Type per 1,000 points and any unit with the Dreadnought Talon special rule may only consist of a single model. For example, an army that totals at least 1,000 points may include only a single model with the Dreadnought Unit Type, and an army that totals at least 2,000 points may include up to two models with the Dreadnought Unit Type, each selected as a separate Force Organisation choice.
| WARLORDS When choosing your army, you must nominate one model to be your Warlord, following the guidelines in the Warhammer: The Horus Heresy – Age of Darkness Rulebook. Warlord Traits are not used in battles with a maximum points limit of 500 points or less. In battles with a points limit of 501 points or more, each Warlord has one Warlord Trait, chosen during army selection from the list of Core Warlord Traits of the Warhammer: The Horus Heresy – Age of Darkness Rulebook (or another list of traits made available as part of that model’s Allegiance or Army List) and noted on the player’s Army List or Army Roster. Some special rules attached to certain Army Lists or models may allow a Warlord to select Warlord Traits other than those presented in the Core list – such rules will specifically note which other Traits may be selected. | ||
Once Army Rosters have been completed by all players taking part in the battle, those Army Rosters are then available for any player to review, excepting any options where a special rule specifically requires a choice to be kept secret from another player. A player may not choose to amend their own Army Roster after having reviewed that of any of their opponents.
Select Zone Mortalis Mission
Once all Army Rosters are completed, and all players have had the opportunity to review those of their opponents, a Zone Mortalis mission must be selected for play.The players may either select one of the Zone Mortalis missions that both players agree on, or roll on the table below to determine the mission.
| |||||||||||||
Place Zone Mortalis Terrain
Before placing terrain, the players must decide what terrain will be available to be placed for this battle. Citadel’s Zone Mortalis Floor Tile Set terrain is the perfect basis for Zone Mortalis battlefields, as it allows players to place individual 12" x 12" fixed configuration tiles to cover the battlefield. If such tiles are used, players treat each tile as terrain pieces that fit together to form the desired battlefield surface. To add variety to battlefields, players may find it useful to use additional separate Door Terrain, Barricades Terrain and Debris Terrain alongside fixed configuration tiles.
| Designer’s Note – Terrain Tiles The designation ‘Zone Mortalis’ can apply to a great variety of battlefield environments and varied terrain can be used to reflect this, ranging from tightly packed vertical rock faces to dense concentrations of buildings and containers or even thick vegetation covered by a tree canopy. If alternative terrain is used, the battlefield area must be divided into a 12" grid to facilitate the placement of terrain pieces. Below is a guide to the amount of terrain that is used to populate a Zone Mortalis battlefield: Walls – For three out of every four 12" x 12" grid sectors the battlefield comprises, use at least one piece of Walls Terrain. Each Wall Terrain piece is at least 2" x 2" and does not exceed 12" in length and approximately 2" in width. Doors – For each 12" x 12" grid sector the battlefield comprises, there is up to one piece of Door Terrain. Half of the Door Terrain used are standard doors, up to 2" in width, and half are wide doors, over 2" in width. Players may find it useful to allow Door Terrain to be positioned to indicate Opened or Closed states during the battle. Door Terrain is positioned to fill gaps between two Wall Terrain pieces. Barricades – For each 12" x 12" grid sector the battlefield comprises, use up to two Barricades Terrain pieces. Barricades Terrain may vary in size, representing shipping containers, industrial machinery and makeshift barriers. Debris – Up to two pieces of Debris Terrain, areas of rubble, pools of noxious chemicals or broken ground no larger than 6" x 6" per battlefield. Each piece of Debris Terrain may optionally be designated as Hazardous Debris Terrain. | ||
When placing terrain onto the battlefield, no piece of terrain may be placed so that it overlaps with the base or footprint of another piece, nor in any position that would cause any part of the terrain piece to be outside any edge of the battlefield. If there are pieces of terrain that cannot be placed due to these restrictions, then those pieces of terrain must not be used as part of the battle – if possible the player attempting to place that piece of terrain may choose a different terrain piece to place.
Once all pieces of terrain have been placed onto the battlefield, each player, starting with the player that placed the first piece of terrain, may choose any one piece of terrain and redeploy or remove that piece of terrain – following the rules listed above. Note that both players may not select and redeploy the same piece of terrain.
Designating Zone Mortalis Terrain
Certain terrain features must be designated before players deploy their armies. In most cases, the features of the terrain will be easily identified by the models used, but where there is any confusion or ambiguity, the players should come to an agreement on how the specific features will be designated. In addition to all other terrain features, there are several key features that must be determined when designating terrain during every Zone Mortalis mission.Designating Ceilings When designating the terrain features of a Zone Mortalis mission, the players must also decide if the entire battlefield or none of it has a Ceiling. If the battlefield has a Ceiling, Wall Terrain and Door Terrain in the Closed state are treated as Impassable Terrain. In effect, the height of the Wall Terrain and Door Terrain in the Closed state are considered to exceed the height of the tallest model on the battlefield. Additionally, if the battlefield has a Ceiling, models may not activate any Wargear and/or rules, such as Legion Warhawk jump packs, that allows them to set their Movement Characteristic to any value and/or move over intervening models and terrain. |
Designating Access Points Any point where a model can be placed in contact with the battlefield edge is considered to be an Access Point. If, due to terrain placement, there are no spaces on any battlefield edge that models can be placed in contact with the battlefield edge, players must designate at least one Access Point on each battlefield edge and mark it with an appropriate counter. Models can be placed on the battlefield from Reinforcements as close as possible to the battlefield edge within 6" in either direction of any Access Point. |
Designating Ladders, Stairways & Hatches When designating the terrain features of a Zone Mortalis mission, the players must decide if Ladders, Stairways & Hatches are to be used, which pieces of the terrain represent Ladders, Stairways & Hatches, and which models may use them to move vertically. Each Ladder, Stairway & Hatch should be represented by an appropriate terrain feature. |
Determine Strategic Advantage
First, players must roll off to see who has Strategic Advantage. The winner of the roll-off has Strategic Advantage and selects a battlefield edge that then becomes their battlefield edge. The battlefield edge directly opposite this then becomes the opposing player’s battlefield edge.Place Objectives
Missions that use Objective markers will contain details of how many need to be placed and any special instructions for how to place them on the battlefield. Unless instructed otherwise in the mission, take it in turns to set up Objective markers according to the following rules:- Roll off to see who places the first Objective marker.
- No Objective marker can be placed within 6" of any battlefield edge or within 12" of another Objective marker.
- No Objective marker can be placed on Impassable Terrain.
Determine Starting Reinforcement Points
Before beginning deployment, each player must calculate how many Reinforcement Points they have as a starting total. Unless otherwise noted this will be six per player, however, some mission rules may mean each player has more or less than this. In these instances, the amount of Reinforcement Points each player has as a starting total will be indicated in the mission rules.At the end of each turn, each player will gain a number of Reinforcement Points; unless otherwise noted this is 2 per player, but certain mission special rules may affect this amount, for example, for controlling or denying Objectives or destroying enemy units. In these instances, the amount of Reinforcement Points each player gains at the end of each turn will be indicated in the mission rules. Players may find it useful to keep track of how many Reinforcement Points they have by keeping a tally or alternatively using tokens or spare dice.
Reinforcement Points Costs
Depending on which Force Organisation chart slot a given unit is selected as alters how many Reinforcement Points it costs to place in the Deployment Zone during Deployment or place on the battlefield from Reinforcements. Some missions may present an alternative chart of costs, but for Zone Mortalis missions that do not, the following chart should be used.
|
| Designer’s Note – Larger Armies When fighting battles using armies of around 2,000 points or more, the Zone Mortalis rules and missions presented here (specifically the Reinforcement Points Cost and Reinforcements rules) may mean that even over the course of an extended battle it may not be possible to place every unit on the battlefield. This is a deliberate consequence, intended to cause players to make tactical choices during the course of a dynamic battle, where considered deployment of specific units at the right time and position can have a significant impact on the outcome. | ||
Deploy Armies
The player that does not have Strategic Advantage must place a single unit from their army in their Deployment Zone subtracting the amount of Reinforcement Points that unit costs from their starting total, according to the values on the chart on the previous page. The player with Strategic Advantage must then place a single unit from their army in their Deployment Zone subtracting the amount of Reinforcement Points that unit costs from their starting total, according to the values on the chart on the previous page.If a model with the Independent Character special rule joins another unit, the Reinforcement Points cost of both the model with the Independent Character special rule and the unit that they have joined must be subtracted from the starting total. Models that must be attached to another unit before deployment, such as those with the Apothecarion Detachment or Techmarine Covenant special rules, may be deployed alongside the unit they are attached to without expending additional Reinforcement Points.
Players then continue to take turns deploying a single unit from their army in their Deployment Zones until either player declares they no longer wish to deploy another unit when it is their turn to do so, or has insufficient Reinforcement Points when it is their turn to do so. When this occurs, the opposing player may place one more unit from their army in their Deployment Zone providing they have sufficient Reinforcement Points to do so.
Players must place any units not deployed on the battlefield into Reinforcements.
| Warlords and Retinues When placing a unit that has been selected using any variation of the Retinue special rule on the battlefield during Deployment or from Reinforcements, the Controlling player subtracts only the amount of Reinforcement Points required to place the model that is the Leader of the Retinue unit on the battlefield from their total. Additionally, the Reinforcement Points cost to deploy an army’s Warlord is halved if the Controlling player chooses to place them on the battlefield during Deployment. Note that this only applies during Deployment before the start of the battle, not if the Warlord moves on from Reinforcements after the start of the battle. | ||
Infiltrate
If either player wishes to place a unit with the Infiltrate special rule on the battlefield during Deployment, they must expend the appropriate amount of Reinforcement Points it costs to do so during Deployment. The unit with the Infiltrate special rule is then set aside and only placed on the battlefield following the normal rules for Infiltrate after all other units, both friendly and enemy, have been placed on the battlefield during Deployment.First Strike
The player with Strategic Advantage may choose to take the first turn, unless the opposing player can attempt a First Strike.First Strike: After both players have deployed their army but before the start of the first turn, the player without Strategic Advantage may attempt a First Strike, they must declare they will expend any number of their starting total of Reinforcement Points not spent placing units in their Deployment Zone during Deployment and roll a D6. If the result shown on the D6, plus the amount of Reinforcement Points declared, is 7+, the First Strike is successful and they go first instead. Note that a D6 roll of 1 always results in a failed First Strike attempt.
Play Zone Mortalis Mission
Once all prior steps have been completed, the players should begin the battle as instructed in the Zone Mortalis mission rules.Reinforcements
Starting with their second player turn and at the start of their subsequent player turns, the Active player may choose to place any of their units that are held in Reinforcements onto the battlefield, providing they have enough Reinforcement Points to do so. The player first selects the unit they wish to deploy from their units in Reinforcements and then selects the battlefield edge that the unit will move on from, subtracting the amount of Reinforcement Points to move on from the selected battlefield edge, as detailed in the Zone Mortalis mission special rules. If an Independent Character joins another unit, the Reinforcement Points cost of both the Independent Character and the unit that they have joined must be subtracted from the total. This process is followed for each unit that is being placed on the battlefield from Reinforcements that turn until the player has expended their current total of Reinforcement Points or no longer has any units in Reinforcements or the battle ends. Any unit that is placed in Reinforcements and has not been placed on the battlefield by the end of the battle does not count as Destroyed for the purposes of Victory points, Primary Objectives or Secondary Objectives.Moving on from Reinforcements
When a unit is placed on the battlefield from Reinforcements, the controlling player places the unit within a distance equal to the model’s Movement Characteristic from any Access Point on the controlling player’s battlefield edge, as if they had been positioned just off the battlefield. The controlling player may choose to increase the Movement Characteristic of a model by choosing to Run but the unit cannot Charge, or use any abilities or special rules that must be used at the start of the turn, in the turn it arrives from Reinforcements. If the Reactive player chooses to declare a Reaction in response to the movement of a unit that has entered play from Reinforcements that turn, then they may only use the Interceptor Advanced Reaction.If, for some reason, a model’s maximum Movement Characteristic is insufficient to fit the entire model onto the battlefield place the model as far onto the battlefield as you can. If this leaves the model in a position where it may fall off the battlefield, then mark the position the model is meant to be occupying in some manner, and then position it more safely.
Counter Assault: Some Zone Mortalis missions allow players to place units on the battlefield from Reinforcements as a Counter Assault. When a unit is moved into the battlefield from Reinforcements, the controlling player may choose to expend Reinforcement Points, in addition to those expended to deploy the unit itself, in order to place the unit on the battlefield using the Counter Assault rule. Instead of moving on from an Access Point on the controlling player’s battlefield edge, the unit may instead be moved onto the battlefield from an Access Point on either of the Flank edges for the additional Reinforcement Points cost indicated, or in some cases an Access Point on the opposing player’s battlefield edge for the additional Reinforcement Points cost indicated. The Counter Assault table for each mission will indicate the Reinforcement Points costs and will show ‘Unavailable’ in positions that cannot be used by that player.
Deep Strike
Many commanders use advanced teleportation technology or specialist vehicles to insert their troops into the thick of Zone Mortalis battles. Even when such bold strategies are employed, the final few yards of advance upon the enemy must invariably be made on foot.A unit with the Deep Strike special rule reduces the amount of additional Reinforcement Points it costs to be placed on the battlefield from Reinforcements as part of a Counter Assault by -1, to a minimum of 0. Note that the base amount of Reinforcement Points it costs to place the unit on the battlefield in any situation, based on the Force Organisation chart slot the unit was selected as, is unaffected by this special rule.
Decide Victor
Once all turns have been completed in a battle played using the Zone Mortalis missions, the victor is decided by the number of Victory points the players have scored.Victory points are scored either by the Primary Objective, which is unique to the Zone Mortalis mission being played and detailed as part of that Zone Mortalis mission, or by Secondary Objectives.
| Sudden Death If, at the end of any Game Turn, any player has no models on the battlefield, the battle immediately ends regardless of the number of turns that have been played. Models that are in Reserves do not count as being ‘on the battlefield’, however models in a unit that is Falling Back, or Embarked in a model with the Transport Sub-type, do. If a battle is ended due to the Sudden Death rule, then the victor is still decided by Victory points scored up to that point in the battle, but the player that still has models on the battlefield scores an additional Victory point. | ||
Zone Mortalis Core Missions
Sector Control
- Before any models are deployed, a single Objective marker is placed as close to the centre of the battlefield as possible. Starting with the player without Strategic Advantage, each player takes turns placing a single Objective marker elsewhere on the battlefield no closer than 12" from another Objective marker and no closer than 6" from any battlefield edge, until there are a total of six Objective markers on the battlefield. Once placed, players must assign each Objective a unique number between 1 and 6.
SECONDARY OBJECTIVES
This mission uses the following Zone Mortalis Secondary Objectives:
- Counter Strike
- Champion of Renown
- Blood Toll
VICTORY CONDITIONS
At the end of each Game Turn, each player gains 1 Victory point for each Objective they control. These Victory points are kept even if that Objective is lost later in the battle, and contribute to the player’s Victory points total at the end of the battle.
The player with the most Victory points at the end of the battle is the winner. If the players have the same number of Victory points, the battle ends in a draw.
Before setting up the battle, players must determine Strategic Advantage. The player with Strategic Advantage selects which player is the Attacker and which player is the Defender.
REINFORCEMENT POINTS
- Both players start with 6 Reinforcement Points to place units in their own Deployment Zones.
- Any Reinforcement Points not used to place units in a player’s Deployment Zone during deployment are retained.
- Both players gain 2 Reinforcement Points at the end of each Game Turn, in addition to any gained through mission special rules.
DEPLOYMENT
- Players must deploy units from their army up to the amount of Reinforcement Points they start with, using the deployment map that follows, placing any remaining units into Reinforcements.
FIRST TURN
The player with Strategic Advantage takes the first turn, unless their opponent successfully rolls for First Strike.
- Critical Objective
- System Override
- Counter Assault: When deploying units from Reinforcements, the controlling player may choose to expend additional Reinforcement Points to deploy units as a Counter Assault, as per the table that follows:
|
DEPLOYMENT MAP

Sweep And Clear
- At the end of each turn, each player gains 1 Victory point for each battlefield quarter they control. A battlefield quarter is controlled if a player has more Scoring units within it than the opposing player. If a Scoring unit has models within two or more battlefield quarters, the controlling player must select which one battlefield quarter they are within that they are controlling.
- The player with the most Victory points at the end of the battle is the winner. If the players have the same number of Victory points, the battle ends in a draw.
SECONDARY OBJECTIVES
This mission uses the following Zone Mortalis Secondary Objectives:
- Counter Strike
- Champion of Renown
- Blood Toll
STRATEGIC ADVANTAGE
Before setting up the battle, players must determine Strategic Advantage. The player with Strategic Advantage selects which player is the Attacker and which player is the Defender.
- Both players start with 6 Reinforcement Points to place units in their own Deployment Zones.
- Any Reinforcement Points not used to place units in a player’s Deployment Zone during deployment are retained.
- Both players gain 2 Reinforcement Points at the end of each Game Turn, in addition to any gained through mission special rules.
- Players must deploy units from their army up to the amount of Reinforcement Points they start with, using the deployment map that follows, placing any remaining units into Reinforcements.
FIRST TURN
The player with Strategic Advantage takes the first turn, unless their opponent successfully rolls for First Strike.
- System Override
- Counter Assault: When deploying units from Reinforcements, the controlling player may choose to expend additional Reinforcement Points to deploy units as a Counter Assault, as per the table that follows:
|
DEPLOYMENT MAP
Strategium Assault
- The Attackers win if, at the end of the battle, they have at least one unit within the Defender’s Deployment Zone, and the Defender has no units within the Defender’s Deployment Zone. The Defenders win if, at the end of the battle, they have at least one unit within the Defender’s Deployment Zone, and the Attacker has no units within the Defender’s Deployment Zone.
- If, at the end of the battle, both players have at least one unit within the Defender’s Deployment Zone, or neither player has a unit within the Defender’s Deployment Zone, the player who has scored the most Victory points from Secondary Objectives is the winner.
SECONDARY OBJECTIVES
This mission uses the following Zone Mortalis Secondary Objectives:
- Counter Strike
- Champion of Renown
- Blood Toll
STRATEGIC ADVANTAGE
Before setting up the battle, players must determine Strategic Advantage. The player with Strategic Advantage selects which player is the Attacker and which player is the Defender.
- The Attacker starts with 6 Reinforcement Points to place units in their own Deployment Zone.
- The Defender starts with 8 Reinforcement Points to place units in their own Deployment Zone.
- Any Reinforcement Points not used to place units in a player’s Deployment Zone during deployment are retained.
- Both players gain 2 Reinforcement Points at the end of each Game Turn, in addition to any gained through mission special rules.
- Players must deploy units from their army up to the amount of Reinforcement Points they start with, using the deployment map as follows, placing any remaining units into Reinforcements.
FIRST TURN
The Attacker takes the first turn, unless their opponent successfully rolls for First Strike.
- System Override
- Lockdown Protocol: At the start of the first turn, before any models are moved, the Defender may select any three pieces of Door Terrain to be Locked.
- Counter Assault: When deploying units from Reinforcements, the controlling player may choose to expend additional Reinforcement Points to deploy units as a Counter Assault, as per the table that follows:
|
DEPLOYMENT MAP
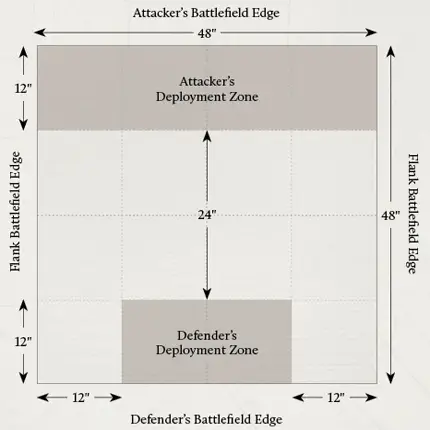
That Which Waits Below
In this mission, the Mechanicum (Traitor) player is the Attacker and the Legiones Astartes (Loyalist) player is the Defender.
- The Attacker gains 1 Victory point for each enemy unit that is destroyed or removed as a casualty and 2 Victory points if they have more friendly units within the Defender’s Deployment Zone than the Defender at the end of the battle.
- The Defender gains 2 Victory points for each Access Point that is Sealed and 2 Victory points if they have more friendly units within the Defender’s Deployment Zone than the Attacker at the end of the battle.
- The player with the most Victory points at the end of the battle is the winner. If the players have the same number of Victory points, the battle ends in a draw.
SECONDARY OBJECTIVES
This mission uses the following Zone Mortalis Secondary Objectives:
- Counter Strike
STRATEGIC ADVANTAGE
In this mission the Attacker has Strategic Advantage.
- The Attacker starts with 6 Reinforcement Points to place units during deployment.
- The Defender starts with 6 Reinforcement Points to place units during deployment.
- Any Reinforcement Points not used to place units in a player’s Deployment Zone during deployment are retained.
- The Attacker gains D3 Reinforcement Points at the end of each turn for each Access Point that has not been Sealed, but loses any Reinforcement Points not expended after placing models on the battlefield from Reinforcements each turn.
- The Defender gains 2 Reinforcement Points at the end of each Game Turn.
- Players must deploy units from their army up to the amount of Reinforcement Points they start with, using the deployment map bellow, placing any remaining units into Reinforcements.
- The Attacker places units within either 6" of an Access Point on their battlefield edge or 6" of an Access Point on either Flank edge.
- The Defender places units within their Deployment Zone.
FIRST TURN
The player with Strategic Advantage takes the first turn and their opponent cannot roll for First Strike.
- System Override
- Lockdown Protocol: At the start of the first turn, before any models are moved, the Attacker may select any three pieces of Door Terrain to be Locked.
- Seal the Bulkhead: At the end of the controlling player’s Assault phase, if any model from a unit that is not engaged in close combat, Pinned or Falling Back is within 3" of an Access Point, it may attempt to Seal the Bulkhead. The controlling player must roll 2D6, if the result is less than the lowest Leadership Characteristic of a model in the unit that the model that is attempting to Seal the Bulkhead is part of, the Access Point is Sealed and may not be used to deploy any models from Reinforcements for the remainder of the battle.
- Counter Assault: When deploying units from Reinforcements, the controlling player may choose to expend additional Reinforcement Points to deploy units as a Counter Assault, as per the table that follows:
|
DEPLOYMENT MAP
- One Access Point must be designated as close as possible to the centre of each battlefield edge and players may only place models on the battlefield from Reinforcements using these Access Points. The Access Points should be marked with a token or counter, or alternatively an appropriately modelled large blast door or bulkhead terrain positioned on the battlefield edge.
- The Defender’s Deployment Zone should be open with no Wall Terrain pieces and no Door Terrain pieces and instead should be populated with Barricades Terrain pieces, representing supply crates and makeshift defensive points erected by the Defenders.
The Rewards Of Corruption
In this mission the Thousand Sons (Loyalist) player is the Attacker and the Word Bearers (Traitor) player is the Defender.
- The Attacker wins if, at the end of the battle, the Primary Nexus is Destroyed and they have at least one friendly unit on the battlefield that is not Pinned or Falling Back.
- The Defender wins if, at the end of the battle, the Primary Nexus has not been Destroyed or the Attacker has no units on the battlefield that are not Pinned or Falling Back.
OBJECTIVES
- Instead of Placing Objectives the Attacker places a Warp Nexus as close to the centre of the battlefield as possible. The Attacker must then place a further two Warp Nexuses within their half of the battlefield. Each Warp Nexus should be represented by a Blast (3") marker or similar sized piece of terrain. Warp Nexuses must be placed no closer than 12" from another Warp Nexus and no closer than 6" from any battlefield edge. The Attacker should select one Warp Nexus as the Primary Nexus and make note of this secretly.
STRATEGIC ADVANTAGE
In this mission the Attacker has Strategic Advantage.
- The Attacker starts with 6 Reinforcement Points to place units during deployment.
- The Defender starts with 6 Reinforcement Points to place units during deployment.
- Any Reinforcement Points not used to place units in a player’s Deployment Zone during deployment are retained.
- Both players gain 2 Reinforcement Points at the end of each Game Turn.
Players must deploy units from their army up to the amount of Reinforcement Points they start with, using the deployment map bellow, placing any remaining units into Reinforcements.
- The Attacker may deploy units within 6" of their battlefield edge.
- The Defender may deploy units within 12" of their battlefield edge.
FIRST TURN
The player with Strategic Advantage takes the first turn if their opponent does not successfully roll for First Strike.
- System Override
- Warp Nexus: The Defender may deploy any unit with the Infantry Unit Type and Corrupted Unit Sub-type from Reinforcements within 6" of any Warp Nexus by expending 1 Reinforcement Point, regardless of which Force Organisation chart slot the unit was selected as. The controlling player of any model with the Psyker Unit Sub-type, that is part of a unit that is not engaged in close combat and is in base to base contact with a Warp Nexus at the end of the Movement phase, may attempt to destroy it. To do so, they must roll 2D6, adding +1 for every additional friendly model with the Psyker Unit Sub-type in base to base contact with the Warp Nexus. The Warp Nexus is successfully destroyed on a result of 10+. If the Warp Nexus is not successfully destroyed, the unit suffers an amount of Wounds equal to the amount of models in base to base contact with the Warp Nexus.
- Counter Assault: When deploying units from Reinforcements, the controlling player may choose to expend additional Reinforcement Points to deploy units as a Counter Assault, as per the table that follows:
|
DEPLOYMENT MAP
Cthonian Underworld Zone Mortalis Terrain Features
When playing Zone Mortalis: Siege of Cthonia Apex Missions, each player may select one applicable Terrain Feature from the following list, after Placing Terrain but before Designating Access Points.0-2 Hardened Barricades
In anticipation of a sustained attack on a particular position, the construction of improvised barricades, made from thick plasteel panels torn up from the floors and walls, affixed to armoured shipping containers or an equally suitable frame, became common practice. These barricades would provide defenders with cover from incoming fire and an advantageous position from which to cover the attacker’s primary routes of ingress with their own weapons.0-2 pieces of Barricade terrain within the Defender’s Deployment Zone, each measuring no more than 6" in length, may be designated as Hardened Barricades Terrain. When drawing line of sight to a model that is the target of a Shooting Attack, a model that is at least 25% obscured by Hardened Barricades Terrain has a 5+ Cover Save.
0-1 Subterranean Tunnel
Forgotten mineshafts, drainage pipes and elevator shafts provide a means by which attackers that are familiar with the local environment can infiltrate behind enemy lines and spring ambushes on their enemies.After both players have finished placing units on the battlefield during Deployment but before the first Game Turn, the Attacker may place a marker or token measuring up to 2" across on the battlefield or nominate a suitable terrain feature such as a elevator or vent outside of either player’s Deployment Zone to be the Tunnel Opening. The Attacker must then select one unit from their Reinforcements. Starting with their second turn and at the start of the Attacker’s subsequent turns in which the selected unit remains in Reinforcements, before placing any units on the battlefield from Reinforcements, the Attacker must roll a D6. On a 4+, the Attacker must place the selected unit on the battlefield within 6" of the Tunnel Opening without expending any Reinforcement Points. Once placed, the unit may act as if it had been placed on the battlefield from Reinforcements that turn. Any enemy units that have a model within 12" and with line of sight to the Tunnel Opening must immediately take a Pinning test. If, for any reason, it is not possible to place any of the models from the selected unit on the battlefield, those models are counted as destroyed.
Unstable Environment
The subsurface caverns and tunnels of the Cthonian underworld, formed by millennia of mining and excavation, are particularly prone to collapses and cave-ins that open up abyssal pits beneath the feet of combatants.When a Shooting Attack with a weapon that uses a Blast (3"), Large Blast (5"), Massive Blast (7"), Apocalyptic Blast (10") or Apocalyptic Barrage marker and has Strength 6 or higher is made, after the attack is resolved, leave the Blast marker in position and roll on the following table:
|
Promethium Condenser Tanks
Promethium is the combustible lifeblood of the Imperium and in many environments it is stored in a liquid state inside heavy-duty industrial compression tanks. This allows it to be piped through manufactorums and hive towers to provide light, heat and motive power to numberless machines and devices.Although rugged and made to withstand heavy use over many thousands of production cycles, most promethium condenser tanks are not armoured to withstand the rigours of combat and can be damaged by stray small arms fire, or even directly targeted. When ruptured, liquid promethium will decompress explosively into the surrounding atmosphere and can be ignited by even a minuscule spark, usually resulting in a violent and destructive fireball.
0-3 terrain pieces such as storage silos or containers may be designated as Promethium Condenser Tank Terrain. When drawing line of sight to a model that is the target of a Shooting Attack, a model that is at least 25% obscured by Promethium Condenser Tank Terrain has a 5+ Cover Save. Any pieces of Promethium Condenser Tank Terrain may be targeted by any model and are treated as Buildings with no Fire Points or Battlements, a Transport Capacity of 0, and a single facing with Armour Value 8 and 2 Hull points. However, when a Penetrating Hit is inflicted on a piece of Promethium Condenser Tank Terrain, no roll is made on the Building Damage table. When a piece of Promethium Condenser Tank Terrain is reduced to 0 Hull Points, it does not suffer a Total Collapse result and instead players roll on the Volatile Container table.
Watch Your Fire
Promethium condenser tanks are prone to accidental damage and can be ruptured by stray bullets or shrapnel.If any model from a unit that is the target of a Shooting Attack is within 2" of a piece of Promethium Condenser Tank Terrain, To Hit rolls of 1 are counted as having hit the Promethium Condenser Tank Terrain. Armour Penetration rolls for these hits should be resolved immediately after the resolution of the successful To Hit rolls on the targeted unit.
| ||||||||||
Zone Mortalis Campaign Conditions
Players may decide to incorporate Campaign Conditions into a series of Zone Mortalis battles played as a basic campaign, each condition having an effect on the following battle in the campaign. After determining the victor of a Zone Mortalis mission, both players should roll on the following table to determine the effect on the following battle.The victor of the mission adds +1 to the result.
|
How to Use These Rules
All Army List Profiles for the Warhammer: The Horus Heresy – Age of Darkness range are divided into two categories: Core units and Expanded units. All of the units presented in this publication are ‘Core’ units. Both ‘Core’ and ‘Expanded’ types of unit may be freely used in any Horus Heresy battle, and this category does not affect their availability as part of an army or Detachment or the rules for their use during a battle.The units included in these addenda are all part of the Legiones Astartes Army List presented in Warhammer: The Horus Heresy – Liber Hereticus and Warhammer: The Horus Heresy – Liber Astartes. Any rules that affect units or models selected or chosen from the Legiones Astartes Army List affect these units, and Detachments selected from those Army Lists may include these units (as long as they are of the correct Faction).
In addition, the units presented in this section are all intended for use as part of a specific Faction of the Legiones Astartes, as shown by the version of the Legiones Astartes (X) special rule that the unit has. All the rules presented in the Liber Astartes and Liber Hereticus books regarding the use of Factions and the Legiones Astartes (X) special rule apply to these new units, which means that units may only be selected as part of a Detachment that has the same Faction or Sub-faction – for example a unit composed of models with the Legiones Astartes (Sons of Horus) special rule may only be selected for a Detachment that has the Faction Legiones Astartes (Sons of Horus) unless another special rule states otherwise.
In the name of the Warmaster Horus, a vast host took up arms against those they had once called brothers – some driven by a lust for power and others by a misguided desire for justice. Regardless of the cause they held dear, there could be no turning back for these warriors, only victory or damnation.
A model with this special rule may only be included in an army that has the Traitor Allegiance.Whether pledged to the Emperor himself as the rightful leader of Mankind or to the dream of the Imperium that he intended to create, some warriors swore to fight and die for the Loyalist cause and no other.
A model with this special rule may only be included in an army that has the Loyalist Allegiance.If a successful Reserve roll is made for a unit, that unit must be moved onto the battlefield this turn. From the start of Game Turn 4 all Reserve rolls are considered to automatically succeed, unless another special rule states otherwise, and all of the Active player’s units that are in Reserve must be moved onto the battlefield or they are considered destroyed.
Some special rules can modify the roll required for a unit to arrive from Reserve. Regardless of the modifier(s), a natural roll of a 1 always means that the unit in question remains in Reserve, and a natural roll of a 6 always means that the unit in question arrives from Reserve.
Any unit for which a successful Reserve roll has been made must move onto the Battlefield at the start of the Controlling player’s Movement phase, before any other models are moved. Select one of the Active player’s arriving units and deploy it, moving it onto the table in the manner described as follows. Then pick another arriving unit and deploy it, and so on until all arriving units are on the table. The Active player can then proceed to move their other units as normal.
Fearless troops never give up and seldom make full use of cover – even if it would be wiser to do so.
Units with one or more models with the Fearless special rule automatically pass Pinning tests, Regroup tests and Morale checks. In addition, models with the Fearless special rule ignore the effects of the Fear special rule.However, units containing one or more models with the Fearless special rule cannot use any Reactions that grant a Cover Save, Armour Save or Invulnerable Save, and cannot choose to fail a Morale check due to the Our Weapons Are Useless special rule. If a unit has become Pinned and then gains the Fearless special rule, all the effects of being Pinned are immediately cancelled.
Fall Back Moves are 2D6", unless a rule specifies otherwise. Fall Back Moves are not slowed by Difficult Terrain, but incur Dangerous Terrain tests as normal. Units with models that Fall Back at different speeds always Fall Back at the speed of the slowest model in the unit.
Each model in the unit moves directly towards their own battlefield edge by the shortest possible route.
If playing a mission where there is no ‘own’ battlefield edge, models move towards the closest battlefield edge instead.
If any model from a unit that is Falling Back moves into contact with a battlefield edge, the entire unit is removed from the game as casualties as it scatters and flees the battle.
For one model to have line of sight to another, you must be able to trace a straight, unblocked line from its body (the head, torso, arms or legs) to any part of the target’s body.
Sometimes, all that will be visible of a model is a weapon, banner, or other ornament they are carrying. In these cases, the model is not visible. Similarly, mechanical appendages such as cables, probes and ammo feeds are ignored, even though they may be part of a model’s body. These rules are intended to ensure that models don’t get penalised for having impressive banners, weaponry, and so on.
In many cases, what a model can ‘see’ will be obvious – if there’s a hill, building or mechanical construct in the way, the enemy might be blatantly out of sight. In other cases, two units will be clearly in view of each other as there is nothing at all in the way.
On those other occasions, where it’s not entirely obvious whether or not one unit can see another, the player will have to stoop over the battlefield and look from behind the model’s head for a ‘model’s eye view’. This means getting down to the level of your models and checking the battlefield from their perspective to ‘see what they can see’. You will find that you can spot lurking enemies through the windows of ruined buildings, catch a glimpse of a model’s legs under tree branches and see that high vantage points become very useful for the increased line of sight that they offer.
Some units make their way to battle via tunnelling, teleportation, flying, or some other extraordinary means which allows them to appear in the thick of the fighting.
A unit made up entirely of models with this special rule may perform a Deep Strike Assault. Certain Faction or unit special rules may present other options for the deployment of units with the Deep Strike special rule.- Place the object on the battlefield as instructed by the rule.
- Roll a Scatter dice and 2D6 to determine the direction and distance of scatter in inches.
- If a Hit is rolled on the Scatter dice, the object does not move – leave it in place and resolve the remainder of the rule.
- If an arrow is rolled, move the object the distance shown on the 2D6 in the direction of the arrow. Ignore intervening terrain, units, etc, unless the rule states otherwise.
- Once the object has scattered to its final position, resolve its effects.
Scatter dice and other dice and accessories that you can use in your games of Horus Heresy – Age of Darkness can be purchased from the Games Workshop website.
Big Guns Never Tire For this battle the commander has released all reserves of artillery and heavy tanks for one great The player that declared this Stratagem may include an additional Heavy Support choice in each Detachment of their army (these must be paid for from the army’s points limit as normal). |
Forced March Pushing their warriors to the limits of their endurance allows a general to claim the greater portion of the battlefield. The player that has declared this Stratagem may shift the boundary of one edge of their Deployment Zone up to 6" in one direction (this does not allow a player to expand their Deployment Zone off of the battlefield or into another player’s Deployment Zone, and may only be used to have the Deployment Zone cover more of the available battlefield). If both players have declared this Stratagem, then they must roll off to see which player will apply its effects first – this may limit or stop the opposing player from making use of the Stratagem. |
Lightning Strike Warriors ready to pounce, the canny general plans for their reserves to be unleashed as a hammer The player that declared this Stratagem passes all Reserves rolls they are called upon to make on the roll of a 2+ instead of a 3+. Additionally, if the player that declared this Stratagem has any units in Reserves at the beginning of Turn 3, they may choose to have them enter play automatically without any dice being rolled. |
No Surrender One last assault is often enough to turn the battle around and wear down the enemy’s defences. The player that declared this Stratagem may, at the end of the last Game Turn of the battle, choose for one additional Game Turn to be played. During this additional Game Turn, all units under the control of the player that declared this Stratagem gain the Fearless special rule for the remainder of the battle (units that were Falling Back stop Falling Back and act normally, while units that were Pinned recover and may also act normally). If both players have declared this Stratagem, then one additional Game Turn must be played (the players may not choose to not play it) and both players gain the benefits of this Stratagem during that Game Turn. |
Masters of the Crusade The Primarchs were masters of entire Legions, but would sometimes take command of smaller forces where the need was dire. The player that declared this Stratagem may ignore the points limitation placed on models with the Primarch Unit Type for that battle – which means that any amount of the army’s Points Limit may be spent on a Primarch choice, allowing their use in smaller battles than would normally be allowed. |
Renewed Zeal The best generals fight not only on the battlefield, but also in the spirit of their warriors, seeking to exult them to heroism. During the battle for which this Stratagem has been declared, none of the units under the control of the player that declared this Stratagem may be Pinned. If they would normally be Pinned, then instead that unit moves D6+1" towards the nearest enemy unit it can draw line of sight to (if there are no enemy units in line of sight then it does not move). |
The Perfect Ground It is not only warriors that win battles, a battlefield well chosen and prepared can prove as deadly as any blade or cannon. The player that declared this Stratagem decides what terrain will be used in the battle and also places it onto the battlefield – the opposing player may not place any terrain (other than Fortifications that are part of their army). If both players have declared this Stratagem, then they must roll-off to see which player will apply its effects, the loser of the roll-off gains no benefit and the Stratagem is still expended. |
Remembrancer Corps Sometimes how a battle is remembered is more important than how well it was fought or how cunning was the general’s strategy. Whenever the player that declared this Stratagem scores Victory points, roll one D6 for each Victory point scored. For each D6 that results in a 4+, the player that declared this Stratagem scores an additional Victory point. |
Into Hel’s Heart Warriors that are prepared to die serve best when given the chance to prove their convictions. Any units controlled by the player that declared this Stratagem, that are deployed using the Deep Strike special rule or as part of a Deep Strike Assault, do not scatter when deployed, and whenever a rule would require any model from such a unit to be scattered it is ignored. |
The First Cut Often, it is not strength or cannon that decide victory, but which side strikes first. The player that declared this Stratagem chooses which player will take the first player turn and which player will deploy first, no dice are rolled to determine this. If both players have declared this Stratagem, then they must roll off to see which player will apply its effects, the loser of the roll-off gains no benefit and the Stratagem is still expended. |
If you re-roll a 2D6 or 3D6 roll, you must re-roll all of the dice, not just some of them, unless the rules specify otherwise. Any modifiers that applied to the first roll also apply to the re-roll.
If two or more special rules combine to the effect that all failed and all successful dice results would have to be re-rolled, do not re-roll any dice; simply use the original result(s) instead.
MERCILESS FIGHTERS
During a turn in which a unit made up entirely of models with the Legiones Astartes (Sons of Horus) special rule successfully Charges, or are successfully Charged, the Strength of all Melee attacks made against any model in that unit that does not have the Vehicle Unit Type suffers a modifier of -1. Models with the Vehicle Unit Type and this special rule instead inflict an additional 3 Hits (for a total of 1D6+3 Hits, or 2D6+3 if the Vehicle has the Super-heavy Sub-type) on units composed of models that do not have the Vehicle Unit Type when conducting a Ramming attack.
Models with this special rule gain access to unique Wargear options (see The Armoury of the Sons of Horus).
A Sons of Horus Allied Detachment may use the Dark Emissary Legiones Consularis upgrade as detailed in The Armoury of the Sons of Horus section.
A Warlord with this special rule may select a Warlord Trait from the Sons of Horus Warlord Trait list.
Some weapons can inflict critical strikes against which no armour can protect.
If a model has the Rending special rule, or is attacking with a Melee weapon that has the Rending special rule, there is a chance that their close combat attacks will strike a critical blow. For each To Wound roll equal to or higher than the value listed, the target automatically suffers a Wound, regardless of its Toughness. The controlling player may choose to resolve these Wounds at AP 2 instead of the weapon’s normal AP value.Similarly, if a model makes a Shooting Attack with a weapon that has the Rending special rule, a To Wound roll of equal to or greater than the listed value wounds automatically, regardless of Toughness, and is resolved at AP 2.
In either case, against Vehicles each Armour Penetration roll of equal to or greater than the listed value allows a further D3 to be rolled, with the result added to the total Strength of the attack. These Hits are not resolved at AP 2, but are instead resolved using the weapon’s AP value.
For example, a model with the Rending (5+) special rule that rolls To Wound against a non-Vehicle model will wound automatically on the roll of a 5+, and the attacking player has the choice of using an AP value of 2 instead of the AP value of their weapon.
Some weapons are fuelled by unstable power sources and risk overheating with each shot – often to the detriment of their wielder.
When firing a weapon that Gets Hot, roll To Hit as normal. For each unmodified To Hit roll of 1, the firing model immediately suffers a single Wound with an AP value equal to that of the weapon that was used to attack (Armour Saves, Invulnerable Saves and Feel No Pain rolls can be taken, but not Cover Saves or Shrouded rolls) – this Wound cannot be allocated to any other model in the unit. A Vehicle instead rolls a D6 for each roll of a 1 To Hit. If this roll results in a 1 or 2, the Vehicle suffers a Glancing Hit.Assault weapons either fire so rapidly or indiscriminately that they can be fired while a warrior is moving.
A model attacking with an Assault weapon makes the number of Attacks indicated on its profile regardless of whether the bearer has moved or not. A model carrying an Assault weapon can make a Shooting Attack with it in the Shooting phase and still Charge in the Assault phase.
|
Some weapons are designed to leave any foe that manages to survive their strike disoriented and easy to slay.
A unit that suffers one or more Wounds, regardless of whether those Wounds are Saved or otherwise discounted, from a weapon with this special rule must take a Leadership test at the end of the Shooting phase (if the attacks were inflicted as part of a Shooting Attack), or the current combat (if the attacks were inflicted as part of a Melee attack). If the test is failed then that unit’s WS is reduced by the value in brackets listed as part of the special rule until the end of the following Assault phase (if no value is listed then reduce the target unit’s WS by -1).No matter how many times a unit has taken saved or unsaved Wounds from an attack with the Concussive special rule, it may only be forced to take one Leadership test because of it. If a single unit has been the target of several Concussive attacks with different values and fails the Leadership test, then it suffers the effects of the highest single modifier among those attacks – the effects do not stack or otherwise become cumulative.
Coming under fire without knowing where the shots are coming from, or having ordnance rain down from the skies, can shake the resolve of even the bravest warriors, making them dive flat and cling to whatever cover presents itself.
If a non-Vehicle unit suffers one or more unsaved Wounds from a weapon with the Pinning special rule, it must take a Leadership test once the firing unit has finished its Shooting Attacks for that Phase. This is called a Pinning test. If the unit fails the Test, it is Pinned. As long as the Test is passed, a unit can be called upon to take multiple Pinning tests in a single turn, but only once for each unit shooting at them.A unit that is affected by any of the following conditions does not take Pinning tests, and if called upon to do so is considered to automatically pass them:
- The unit is locked in combat.
- The unit is already Pinned (the unit remains Pinned, but takes no further Tests).
- The unit is composed entirely of Vehicle models.
- The unit is Embarked on a Transport Vehicle.
- The target unit is affected by the Fearless special rule.
Some weapons produce such a weight of fire that any target pummelled by their attack is left dazed and stunned.
Pinning tests taken due to an attack or weapon with this special rule are made with a penalty to Leadership Characteristic equal to the value listed as part of the special rule.For example, a unit that is forced to take a Pinning test by an attack made using a weapon with the Shell Shock (2) special rule, suffers a penalty of -2 to their Leadership Characteristic when resolving that Test.
These weapons are grafted to the same targeting system for greater accuracy.
When attacking with a weapon that has this special rule, the controlling player may re-roll all failed To Hit rolls.These are heavy, man-portable weapons that typically require reloading between each shot or bracing to counter their recoil.
When making a Shooting Attack, a model with a Heavy weapon attacks the number of times indicated. If a model equipped with a Heavy weapon moved in the preceding Movement phase, they can only make Snap Shots with that Heavy weapon during the Shooting phase. Note that weapons with the Blast special rule cannot fire Snap Shots. Models that make Shooting Attacks with Heavy weapons in the Shooting phase cannot Charge in the ensuing Assault phase.
|
Each blast from this weapon that pierces its target’s armour sets off a chain reaction of secondary explosions.
If this weapon successfully scores a Penetrating Hit on a target, roll a D6. If the result of that roll is equal to or higher than the value in brackets after the rule, a second automatic Penetrating Hit is inflicted on the same target against which Cover Saves may not be taken. For example, a weapon with the Exoshock (4+) special rule would inflict a second Penetrating Hit on the score of a 4+. This second Penetrating Hit does not gain the effects of any other special rules, and cannot trigger additional Hits.If, for any reason, a given instance of this rule does not have a value in brackets after the special rule, assume the value is 6+.
Barrage weapons lob shells high into the air, landing them in the midst of the foe.
All Barrage weapons use Blast markers and consequently use the rules for Blast weapons, as indicated by their profile, with the following exceptions:Barrage weapons can fire indirectly. This means they can fire at a target that they do not have line of sight to, as long as the target is beyond their Minimum Range (if applicable). When firing indirectly, the Ballistic Skill of the firer is not subtracted from the scatter distance; unless a Hit is rolled on the Scatter dice, the Blast marker always scatters a full 2D6". If a Barrage weapon has line of sight to its target it can fire directly, even if the target is within its Minimum Range.
Note that any Hits inflicted upon Vehicles by an Attack using the Barrage special rule are always resolved against the Vehicle’s Side Armour Value.
Ordnance weapons are cannon so vast, they are typically mounted on tanks and artillery.
When making Shooting Attacks, a model equipped with an Ordnance weapon fires the number of times indicated in its profile after its Type. A non-Vehicle model carrying an Ordnance weapon cannot attack with it in the Shooting phase if they moved in the preceding Movement phase. Ordnance weapons cannot make Snap Shots. Furthermore, if a non-Vehicle model attacks with an Ordnance weapon, that model may not make any further Shooting Attacks with any other weapon in the Phase nor will it be able to Charge in the ensuing Assault phase. Vehicle models that fire Ordnance weapons may also suffer some restrictions based upon the distance they have moved that turn.Ordnance weapons hit with such force that when you roll to penetrate a Vehicle’s armour with an Ordnance weapon, roll two dice instead of one and pick the highest result.
|
This weapon has been crafted with one aim in mind – to pierce the hides of armoured vehicles.
If a model or weapon has this special rule, it rolls an additional D6 for armour penetration when targeting a Vehicle model, or, when targeting a model with the Automata or Dreadnought Unit Type, re-rolls all failed rolls To Wound instead. These effects apply to both Shooting Attacks and close combat attacks.Some instances of the Armourbane special rule may include a qualifier after the rule in brackets, for example Armourbane (Melta) or Armourbane (Melee). These variant rules are described below:
Armourbane (Melta): A model or weapon with this Armourbane special rule only gains the benefits of the Armourbane special rule when at half range or less. If the attack is more than half its Maximum Range away, it gains no benefit from the Armourbane special rule. If a weapon with this version of Armourbane also has the Blast special rule, measure the distance to the centre of the Blast marker after it has scattered. If this is half the weapon’s range or less, then all Hits are counted as having the Armourbane special rule, otherwise the Hits are resolved as if they did not have the Armourbane special rule.
Armourbane (Melee): A weapon or model with this version of the Armourbane special rule only gains the benefits of the Armourbane special rule when attacking in close combat.
Armourbane (Ranged): A weapon or model with this version of the Armourbane special rule only gains the benefits of the Armourbane special rule when making Shooting Attacks.
Skyfire weapons excel at shooting down enemy aircraft.
A model which has this special rule, or that is firing a weapon with this special rule, fires using its normal Ballistic Skill when shooting at Flyers and Skimmers, but it can only fire Snap Shots against other targets.Some weapons strike with enough force to make a mockery of anything except the most reinforced of armoured shells.
Attacks with this special rule may re-roll failed Armour Penetration rolls against Vehicles and Buildings (both with Shooting Attacks and in close combat) and re-roll Glancing Hits, in an attempt to instead get a Penetrating Hit, but the second result must be kept.An auto weapon is an ancient form of firearm that propels a solid slug by means of a chemical explosion, both ancient ‘bullets’ of lead or other base metals and more advanced armour-piercing sabot rounds. Among the ranks of the Legiones Astartes there are few examples of the older autoguns that once formed the main armament of the Emperor’s armies, but a number of larger autocannon remain in use due to the reliability of such simple weapons. Such weapons are most often used as anti-armour weapons, delivering volleys of large armour piercing shells to defeat armour that is proof against the mass reactive fire of the more advanced bolter weaponry. This category of weaponry also plays host to more advanced weapons, such as the first generations of assault cannon and magnetic charge accelerator cannon.
All weapons listed here are counted as ‘Auto’ weapons for those rules that affect such weapons.Range | Str | AP | Type | |
| Astartes shotgun | 12" | 4 | - | Assault 2, Concussive (1) |
| Rotor cannon | 30" | 3 | - | Assault 4, Pinning, Shell Shock (1) |
| Autocannon | 48" | 7 | 4 | Heavy 2, Rending (6+) |
| Reaper autocannon | 36" | 7 | 4 | Heavy 2, Rending (6+), Twin-linked |
| Kheres assault cannon | 24" | 6 | 4 | Heavy 6, Rending (6+) |
| Gravis autocannon | 48" | 7 | 4 | Heavy 3, Rending (6+), Twin-linked |
| Gravis autocannon battery | 48" | 7 | 4 | Heavy 4, Rending (6+), Twin-linked |
| Predator cannon | 48" | 8 | 4 | Heavy 4, Rending (6+) |
| Punisher rotary cannon | 36" | 6 | 4 | Heavy 18, Pinning, Shell Shock (1) |
| Accelerator autocannon | 48" | 7 | 4 | Heavy 8, Rending (6+), Exoshock (6+) |
| Fellblade accelerator cannon | ||||
| - HE shell | 100" | 8 | 3 | Ordnance 1, Massive Blast (7") |
| - AE shell | 100" | 10 | 2 | Ordnance 1, Armourbane (Ranged) |
| Skyreaper battery | 48" | 7 | 4 | Heavy 5, Skyfire, Twin-linked |
| Anvilus autocannon battery | 48" | 7 | 4 | Heavy 4, Rending (5+), Sunder, Twin-linked |
| Anvilus snub autocannon | 24" | 7 | 4 | Heavy 2, Sunder, Rending (5+), Twin-linked |
| Leviathan storm cannon | 24" | 7 | 4 | Heavy 6, Rending (5+), Sunder |
| Kratos battlecannon | ||||
| - HE shells | 36" | 8 | 4 | Heavy 1, Large Blast (5"), Pinning |
| - AP shells | 36" | 8 | 2 | Heavy 2, Sunder |
| - Flashburn shells | 24" | 10 | 1 | Heavy 1, Armourbane (Ranged), Gets Hot |
The ancient volkite weaponry employed by the armies of Terra in the earliest years of the Great Crusade fired arcing blasts of energy rather than solid projectiles.
After normal attacks by this weapon have been resolved, count the number of unsaved Wounds caused on the target unit. Immediately resolve a number of additional automatic Hits on the same unit using the weapon’s profile equal to the number of unsaved Wounds – these can then be saved normally. Models in the targeted unit must still be in range in order for these additional Hits to take effect. These additional Hits do not themselves inflict more Hits and do not benefit from any other special rules possessed by the attacking model, such as Preferred Enemy (X) or Precision Strikes (X).Pistols are light enough to be carried and fired one-handed.
A model attacking with a Pistol weapon makes the number of Attacks indicated on its profile regardless of whether the bearer has moved or not. A model carrying a Pistol weapon can make a Shooting Attack with it in the Shooting phase and still Charge in the Assault phase. A Pistol weapon also counts as a close combat weapon in the Assault phase. In addition, all models with two Pistol type weapons can attack with both in the same Shooting phase. This follows the normal rules for shooting.
|
Rapid Fire weapons are very common and usually come in the form of semi-automatic rifles. Their versatility means they can be fired as effectively when a squad is advancing as when taking single, long-ranged shots.
A model armed with a Rapid Fire weapon can make two attacks at a target up to half the weapon’s Maximum Range away. Alternatively, it can instead make one attack at a target over half the weapon’s range away, up to the weapon’s Maximum Range.If a unit attacking with Rapid Fire weapons is found to be partially within half range of the target, the firing models within half range make two attacks, while those further away make one attack.
Models that attack with Rapid Fire weapons in the Shooting phase cannot Charge in the ensuing Assault phase.
|
This weapon fires ammunition that cheats an enemy of their shelter.
Cover Saves and Damage Mitigation rolls granted by the Shrouded special rule cannot be taken against Wounds or Hull Point damage caused by weapons with the Ignores Cover special rule. This includes Cover Saves granted by Reactions and other special rules as well as Cover Saves conferred by terrain.Some weapons are capable of breaching armour with a terrifying ease, whether by specially designed munitions, careful targeting or sheer brute power.
When rolling To Wound for a model that has the Breaching (X) special rule, or is attacking with a weapon that has the Breaching (X) special rule, for each To Wound roll equal to or higher than the value listed in brackets, the controlling player must resolve these wounds at AP 2 instead of the weapon’s normal AP value. This rule has no effect on models that do not have Wounds, such as models with the Vehicle Unit Type.For example, a model with the Breaching (5+) special rule that rolls To Wound and rolls a result of ‘5’ or higher, the Wound inflicted gains an AP of ‘2’ regardless of the AP value listed on the weapon’s profile. Note that a weapon that has both the Breaching (X) and the Gets Hot special rules always uses the base AP of the weapon when rolls of ‘1’ To Hit inflict Wounds on the attacking model.
Sniper weapons are precision instruments, used to pick out a target’s weak points.
If a weapon has the Sniper special rule, or is fired by a model with the Sniper special rule, all Wounds inflicted by its attacks are ‘Precision Shots’. Wounds from Precision Shots are allocated against a model (or models) of the attacking player’s choice in the target unit, as long as it is in range and line of sight of the firer, rather than following the normal rules for Wound allocation. Note that Snap Shots can never be Precision Shots and attacks with the Blast or Template rules may never benefit from the effects of the Sniper special rule.A branch of weaponry now commonplace among the ranks of the Legiones Astartes, bolt weapons are based on a robust Terran design, refined from the weapons used during the Emperor’s battles to conquer Old Earth. These brutally efficient weapons fire a caseless, self-propelled and mass reactive munition, more akin to a miniature rocket than a simple bullet and easily capable of eviscerating most foes against which the Space Marines of the Imperium find themselves matched. Such was the success of these weapons that they would eventually come to replace the more complex Martian weapons that had once dominated the arsenals of the Legiones Astartes.
All weapons listed here are counted as ‘Bolt’ weapons for those rules that affect such weapons.Range | Str | AP | Type | |
| Bolt pistol | 12" | 4 | 5 | Pistol 1 |
| Bolter | 24" | 4 | 5 | Rapid Fire |
| Combi-bolter | 24" | 4 | 5 | Rapid Fire, Twin-linked |
| Kraken bolter | 30" | 4 | 4 | Rapid Fire |
| - Tempest rounds | 18" | 3 | 6 | Assault 3, Ignores Cover |
| - Scorpius rounds | 24" | 5 | 4 | Assault 1, Breaching (4+) |
| Nemesis bolter | 72" | 5 | 5 | Heavy 1, Rending (5+), Sniper, Pinning |
| Heavy bolter | 36" | 5 | 4 | Heavy 4 |
| Gravis bolt cannon | 48" | 5 | 4 | Heavy 6, Twin-linked |
| Gravis heavy bolter battery | 48" | 5 | 4 | Heavy 8, Twin-linked |
| Avenger bolt cannon | 36" | 6 | 3 | Heavy 7 |
DISCIPLINE AND RESOLVE
Models with this special rule gain a bonus of +1 to all To Hit rolls with any Auto weapon or Bolt weapon as part of any Shooting Attack (including as part of any Reaction).
Models with this special rule gain access to unique Wargear options (see Armoury of the Imperial Fists).
Any Legion Centurion with this special rule may select the Castellan Consul upgrade.
A Warlord with this special rule may select a Warlord Trait from the Imperial Fists Warlord Trait list.
If the Vehicle moved before its passengers got aboard, it cannot move further that turn (including pivoting on the spot). If the Vehicle did not move before its passengers got aboard, it can move as normal after they have Embarked. In either case, a Vehicle cannot Ram in a turn that a unit Embarks upon it.
Range | Str | AP | Type | |
| Heavy Bolter | 36" | 5 | 4 | Heavy 4 |
| Icarus Lascannon | 48" | 9 | 2 | Heavy 1, Skyfire |
Some warriors, by dint of raw talent, genetic manipulation or long experience of the battlefield’s terrors, are hardened against the rigours of war. Such warriors prove much harder for the foe to bring low.
For the purposes of whether or not attacks of a Strength twice this model’s Toughness value inflict Instant Death, this model’s Toughness is increased by X, where X is the value in brackets after the name of this special rule. If, for any reason, this special rule does not provide a value, then consider the value of X to be 1. This special rule does not alter the scores needed by To Wound rolls or any other Test or Check.Some weapons are so cruel of form or powerful in aspect that a well-placed strike can slay even the toughest opponent.
Attacks with this special rule cause Instant Death on a To Wound roll equal to or greater than the number listed in brackets associated with the specific rule. Roll any viable Saves against this Instant Death-causing Wound separately and before any other Wounds the attack inflicts.Whenever a Psyker or other model/unit suffers Perils of the Warp, apply the rule below:
Perils of the Warp: When a model or unit suffers Perils of the Warp, it receives D3 Wounds against which only Invulnerable Saves may be taken (no Damage Mitigation rolls may be made to negate these Wounds). These Wounds may be allocated to any model in the unit, including models without the Psyker Sub-type, in the same manner as those received during a Shooting Attack. If the Psyker is a Vehicle, it suffers D3 Hull Points of damage against which only Invulnerable Saves may be taken.
These Hull Points of damage may be allocated to other Vehicle models in the same Squadron, in the same manner as a Shooting Attack.
- A ‘Small’ Blast marker (3" in diameter).
- A ‘Large’ Blast marker (5" in diameter).
- A ‘Template’ (a teardrop-shaped template roughly 8" long).
- A ‘Massive’ Blast marker (7" in diameter).
- An ‘Apocalyptic’ Blast marker (10" in diameter).
- An ‘Apocalyptic Barrage’ marker (a clover-shaped set of five overlapping markers, each 5" in diameter).
- A ‘Hellstorm’ (a teardrop-shaped template roughly 16" long).
The templates and Blast markers are used as a way of determining how many models have been hit by an attack that has an area of effect or a blast radius. When an attack uses a template or Blast marker, it will explain how the template is positioned, including any kind of scatter that might occur (scatter is discussed further later in this section). To work out the number of Hits, you normally need to hold the template or Blast marker with its central hole over an enemy model or a particular point on the battlefield, and then look underneath (or through, if using a transparent template) to see how many models lie partially or completely underneath. Various special rules and weapon effects will provide additional details on the specific use of templates when making attacks with those special rules or weapons.
A unit takes a Hit for each model that is fully, or even partially, underneath the template or Blast marker. Remember that a model’s base is counted as being part of the model itself, so all a template or Blast marker has to do to cause a Hit is to cover any part of the target’s base.
This creature is so massive, it takes up an inordinate amount of space in any vehicle or building it enters.
Bulky models count as a number of models equal to the value X in brackets after the rule’s name for the purposes of Transport Capacity and whether a given unit outnumbers another in combat.For example, a unit comprised of five models all of which have the Bulky (3) special rule, would count as 15 models when attempting to Embark on a Transport Vehicle or when deciding if they outnumber an enemy unit (see, for example, Rampage (X)).
Whether due to intense training, indomitable armour or blind madness, some warriors will keep advancing no matter the firepower directed at them.
A unit that contains only models with this special rule ignores modifiers to Leadership when making a Morale check or Pinning test – except those caused by the Fear (X) special rule or the Corrupted and Anathema Sub-types. If a unit has both the Fearless and Inexorable special rules, it uses the rules for Fearless instead of Inexorable.Whether through force of will, bionic augmentation or foul sorcery, this warrior can still fight despite fearsome wounds.
When a model with this special rule suffers an unsaved Wound, it can make a special Feel No Pain roll to avoid being Wounded (this is a special Saving Throw which is made after unsaved Wounds are suffered).Feel No Pain rolls may not be taken against unsaved Wounds that have the Instant Death special rule.
Roll a D6 each time an unsaved Wound is suffered. On a result that is equal to or greater than the value in brackets, the unsaved Wound is discounted – treat it as having been saved. On any other result the Wound is taken as normal.
For example, a unit with the special rule Feel No Pain (5+) would need to score a 5 or 6 in order to discount a Wound inflicted upon it.
This is a Damage Mitigation roll – any model may make only a single Damage Mitigation roll of any type for any given Wound.
Though often overshadowed in the annals of history by other more prestigious warriors, it is the courage and tenacity of the humble tactical Legionary that carried the Legions to victory after victory. It would be by the blood of these warriors that the course of the Horus Heresy would be decided, and by their sacrifice that the fate of the Imperium determined.
When a unit that includes at least one model with this special rule has at least half of its models within 6" of an Objective then all models in the unit gain the Feel No Pain (6+) and Stubborn special rules. If any model in the unit already has a variant of the Feel No Pain special rule then instead increase the value in brackets of one of those rules by +1 while the unit has at least half of its models within 6" of an Objective (for example, a model that already had Feel No Pain (5+) could choose to increase this to Feel No Pain (4+) while it fulfils the conditions of this special rule).The shattered and useless shells of buildings and fortresses, strewn with the remains of those who once defended them.
Areas of terrain designated as Ruins confer a 5+ Cover Save on models within their bounds – this includes models on upper levels of Ruins that are within the Area Terrain. Ruins are always counted as Difficult Terrain.The dense shrouds of alien trees provide shelter for those brave enough to enter their confines, hiding them from sight and shielding them from the battle’s fury.
Areas of terrain designated as Jungles or Woods confer a 6+ Cover Save on models within their bounds and are always counted as Difficult Terrain.The aftermath of heavy shelling and orbital bombardments, impact craters provide protection for those sensible enough to seek it.
Areas of terrain designated as Craters confer a 6+ Cover Save on models within their bounds. If a unit is Pinned while within a Crater then that area of terrain instead confers a 4+ Cover Save on all models in the Pinned unit that are within its bounds. Craters are always counted as Difficult Terrain.- Roll off to see who places the first marker.
- No Objective marker can be placed within 6" of any battlefield edge or within 12" of another Objective marker.
- No Objective marker can be placed on Impassable Terrain.
- No Objective marker may be placed inside a Building, though it can be placed upon it – should a Building with an Objective upon it be removed, place the Objective marker on the ground below the point it occupied.
Slay the Warlord If a player causes the enemy Warlord to be removed as a Casualty for any reason before the end of the battle, that player scores 1 Victory point. If the enemy player’s Warlord also had the Primarch Unit Type then the player that caused it to be removed as a casualty scores an additional Victory point. |
Giant Killer If a player causes an enemy model with the Super-heavy, Knight, Titan or Lumbering Sub-type to be removed as a casualty, then that player scores 2 Victory points (this may only be scored once per battle, regardless of the number of qualifying units removed as casualties). |
Last Man Standing If, at the end of the battle, a player has more units that are not Falling Back on the battlefield than all enemy players combined, then that player scores 1 Victory point. If that player has twice as many units that are not Falling Back on the battlefield than all enemy players combined, then that player scores an additional Victory point. |
Break Their Ranks If a player causes one or more enemy units to have all of their remaining models removed as casualties (units that Fall Back off the battlefield count for this purpose) in their first Player Turn as the Active player, then that player scores 1 Victory point. If at least one of the units whose models were removed as casualties was an Elites or HQ choice then that player scores an additional Victory point. |
If one player concedes the battle, the game ends and a crushing victory goes to their opponent.
If, at the end of any Game Turn, one player has no models left on the battlefield, their opponent automatically wins. Units occupying a Building or Embarked on a Vehicle still count as being on the battlefield, but units that are in Reserve do not.
Similar to other Leadership-based tests, Morale checks (also sometimes referred to as Morale tests) are taken by rolling 2D6 and comparing the total to the unit’s Leadership value.
If the total is equal to or less than the unit’s Leadership Characteristic, the test is passed and the unit does not suffer any ill effects.
If the total is higher than their Leadership Characteristic, the test is failed and the unit will immediately Fall Back.
Some units have special rules pertaining to Morale checks that are detailed in their Army List or Army List entry. For example, some units might always pass Morale checks, while others might always pass all Leadership tests. This difference is subtle, yet important. A unit that always passes Morale checks still has to test when hit by an attack with the Pinning special rule, while a unit that always passes all Leadership tests wouldn’t.
|
To Hit rolls are easy to remember if you subtract the Ballistic Skill of the attacking model from 7. For example, a model with BS 2 needs to roll a 5 or more (7-2=5).
Note that the minimum roll needed To Hit is always at least 2. When rolling To Hit, there is no such thing as an automatic Hit and a roll of a 1 always misses.
Invulnerable Saves are different to Armour Saves in that they may always be taken whenever the model suffers a Wound, or, in the case of Vehicles, suffers a Penetrating Hit or Glancing Hit – the Armour Piercing value of attacking weapons has no effect on an Invulnerable Save. Even if a Wound, Penetrating Hit or Glancing Hit ignores all Armour Saves, an Invulnerable Saving Throw can still be taken.
As such, Vehicles have different Armour Values, representing the thickness of their armour. Armour Values for individual Vehicles often vary between its Front, Side and Rear Facings. Attacks are resolved against the Facing of the Vehicle that the attack comes from. To see what Facing an attack is coming from, draw two imaginary lines through the corners of the Vehicle (see diagram below). If a unit has firing models in two or more different Facings of a target Vehicle (some models in the Front and some in the Side, for example), attacks are resolved separately for each Facing. Each individual model may only direct its attacks at a Facing it can draw line of sight to and, in situations where a model can draw line of sight to more than one Facing, the controlling player may choose which Facing will be the target of any attacks.
This may require attacks targeting a Vehicle to be divided into separate pools, each resolved against the appropriate Facing and the Armour Value attached to that Facing. In any situation where a model is hit by a weapon or attack which fires Indirectly or does not otherwise require line of sight to its target, Hits are always resolved against the Side Armour Value. The direction a turret is facing has no bearing on what arc of a Vehicle you are firing at.
Glancing Hits – If a Glancing Hit was scored, the Vehicle loses 1 Hull Point.
Penetrating Hits – If a Penetrating Hit was scored, the Vehicle not only loses 1 Hull Point, but also suffers additional damage.
After deducting any Hull Points, roll a D6 for each Penetrating Hit and look up the result using the Vehicle Damage table, applying any appropriate modifiers. All modifiers on the Vehicle Damage table are cumulative. If you inflict a Penetrating Hit, you must roll on the Vehicle Damage table even if the Vehicle loses sufficient Hull Points to be Wrecked, as there is still a chance it might suffer an Explodes result on the Vehicle Damage table.
Only Infantry models can Embark upon Transports unless specifically stated otherwise. Certain special rules, notably the Bulky (X) special rule, may modify the Transport Capacity required for a given model to Embark upon a Transport, and this will be specified in the model’s rules. Sometimes, there will be constraints on which types of models can Embark upon a particular Vehicle, and this will be specified in the unit’s entry. Whilst Embarked upon a Transport, units gain the Fearless special rule and cannot be made to Fall Back or become Pinned while Embarked upon the Transport.
Whether narrow access ladders or grand staircases, moving up and down within a Zone Mortalis is a difficult affair.
In a Zone Mortalis battle, models may only move vertically when in base contact with a piece of terrain designated as Ladders, Stairways & Hatches. When climbing between levels vertically via Ladders, Stairways & Hatches, models use the rules for vertical movement.However, a unit that Runs may not make Shooting Attacks of any kind during the following Shooting phase, or declare Charges during the Assault phase of the same player turn. If any models in a unit Run, then all models in that unit are counted as having Run, regardless of the distance moved by any individual model.
Units making a Reaction during their opponent’s turn may never choose to Run as part of that Reaction.
Battlements are treated as an Access Point for their Building, meaning a unit inside the Building can disembark onto the battlements, or vice versa. Note that Buildings without Transport Capacity that have battlements may still not be entered, although units can use their battlements.
Units equipped with Jump Packs or Jet Packs, Cavalry units and Skimmers do not need to take Dangerous Terrain tests for starting or ending their move on battlements.
If a Template or Blast weapon hits a unit on top of a battlement, that battlement’s Building also suffers a single Hit.
If a unit moves onto the battlements of an Unclaimed, non-destroyed Building, they immediately Claim that Building and it becomes part of that unit’s side until the Building is either destroyed or an enemy unit Claims it.
Chambers and corridors may be sealed off by the use of armoured bulkhead doors, airlocks, or similar apparatus.
When drawing line of sight to a model that is the target of a Shooting Attack, a model that is at least 25% obscured by Door Terrain, including any frame or mounting, has a 5+ Cover Save. Unless noted otherwise in their special rules, models cannot move or draw line of sight through Door Terrain in the Closed state in a Zone Mortalis battle. In addition special rules, Wargear, or other effects that affect models within a specified distance cannot affect a model if no straight line between the source of the effect and the affected model can be drawn without passing through Door Terrain in the Closed state (see Measuring Ranges in Zone Mortalis).There are two types of Door Terrain in a Zone Mortalis battle – standard doors and wide doors:
- Standard doors are roughly human-sized openings such as access hatches and airlocks up to 2" wide.
- Wide doors are larger openings such as loading docks or bay doors more than 2" wide. All Door Terrain is defined by two conditions: State and Control.
State A door can either be Closed or Open. Unless stated otherwise in the mission rules, all Door Terrain begins the battle in the Closed state.
|
Control Depending on the mission, a piece of Door Terrain may be Accessible, Locked, or Controlled. Unless stated otherwise in the mission rules, all Door Terrain begins the battle as Accessible.
|
Destroying Doors Any pieces of Door Terrain may be targeted by any model when in the Open or Closed state and are treated as Buildings with no Fire Points or Battlements, a Transport Capacity of 0, and a single facing with Armour Value 10. Door Terrain, regardless of its size, has 3 Hull Points, however, when a Penetrating Hit is inflicted on a piece of Door Terrain, it loses D3 Hull Points and no roll is made on the Building Damage table. In addition, when a piece of Door Terrain is reduced to 0 Hull Points, it does not suffer a Total Collapse result. Instead, a piece of Door Terrain with 0 Hull Points is destroyed and removed from the battlefield, if possible. |
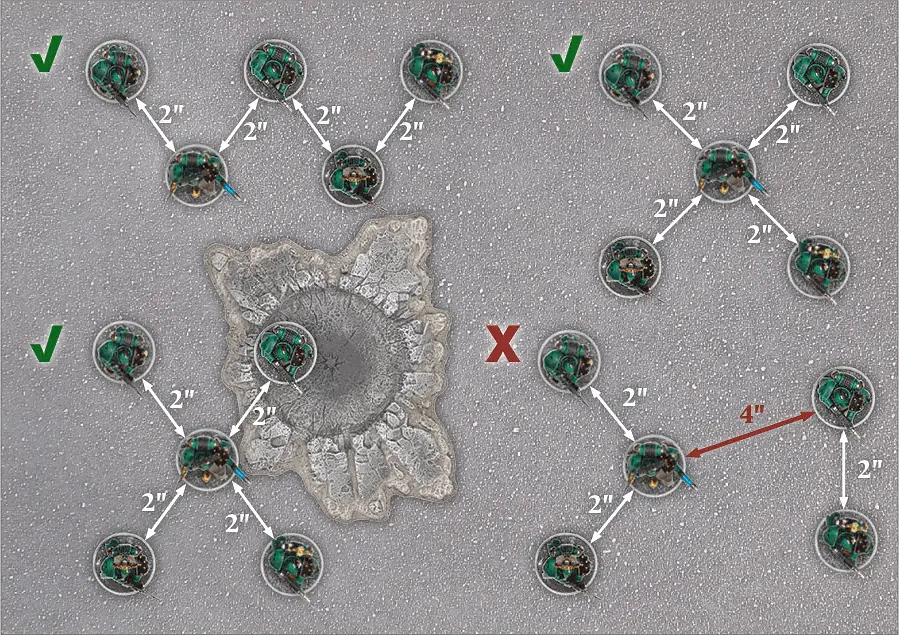
During the course of a game, a unit can get broken up and lose unit coherency, usually because it has sustained casualties from enemy fire. If this happens, in their next Movement phase, the models in the unit must be moved in such a way that they restore unit coherency, or as close to unit coherency as possible. If the unit cannot move in its next turn, or is unable to restore unit coherency in a single turn, then the models must move to restore unit coherency as soon as they have the opportunity, including by Running if they have that option.
To take an Armour Save, roll a D6 and compare the result to the Armour Save Characteristic of the model that has been allocated the Wound. If the dice result is equal to or higher than the model’s Armour Save Characteristic, the Wound is negated. If the result is lower than the Armour Save Characteristic, the model suffers a Wound. This means that, unlike most Characteristics, an Armour Save is better if it is a lower number.
This control and signalling device uses data-djinn to command Battle-automata fitted with Cybernetica cortex systems, allowing the wielder to witness the battlefield through the automata’s own senses as well as monitor their status and exact precise control over their actions. Only the most highly experienced and specifically augmented adepts of the Mechanicum and the Forge Lords of the Legiones Astartes can hope to fathom the use of these fractious devices and successfully interpret the storm of data streaming from their un-living minions.
Any unit that includes one or more models with the Cybernetica Unit Sub-type may ignore the Programmed Behaviour provision described as part of that Sub-type while within 12" of a friendly model with a cortex controller.Many armies employ reconnaissance troops who sit concealed for days, just waiting for the right moment in which to strike.
You may choose to deploy units that contain at least one model with this special rule last, after all other units (friend and foe) have been deployed. If both players have such units and choose to do so, the players roll off and the winner decides who goes first,then alternate deploying these units.Units that Infiltrate in this way can be set up anywhere on the battlefield that is more than 9" from any enemy unit, as long as no deployed enemy unit can draw line of sight to them. This includes in a Building, as long as the Building is more than 9" from any enemy unit. Alternatively, they can be set up anywhere on the battlefield more than 12" from any enemy unit, even in plain sight.
If a unit with Infiltrate deploys inside a Dedicated Transport, the same rules apply when deploying their Transport.
A unit that deploys using these rules cannot Charge in their first turn.
Having Infiltrate also confers the Outflank special rule to units of Infiltrators that are kept as Reserves.
Interceptor - This Advanced Reaction may be made whenever an enemy unit enters play from Reserve within line of sight of a friendly unit, and within the maximum range of at least one weapon in that unit. The Reacting unit may make a Shooting Attack, targeting a unit deployed onto the battlefield in this Phase and following all the usual rules for Shooting Attacks. Vehicles may only fire Defensive weapons, unless another rule specifically states otherwise. Shooting Attacks made as part of the Interceptor Reaction do not cause Morale checks, regardless of the number of casualties inflicted.
Unless otherwise specified by another rule, making this Reaction expends a point from the Reactive player’s Reaction Allotment for the Phase in which the Reaction is made.
| Any player, unless a special rule or other effect specifies otherwise, may make one Reaction in each Phase of their opponent’s turn. | ||
The Reaction Allotment of any player may be modified by special rules or other effects, granting that player additional Reactions either in every Phase (an increase of the Reaction Allotment) or in specific Phases. This may either increase the base Reaction Allotment, that is the number of Reactions allowed in every Phase, or only grant a bonus to the Reaction Allotment in specific Phases.
For example, a player might have a special rule that states ‘This special rule increases the Reaction Allotment to two’, which would indicate that the player could make two Reactions in every Phase of their opponent’s turn. However, a special rule that states ‘This special rule increases the number of Reactions that may be made during the Assault phase by +1’ would allow a player with a Reaction Allotment of one to make a single Reaction in the Shooting and Movement phases, but two in the Assault phase.
Regardless of any special rules or other effects, no player may ever increase their base Reaction Allotment above three, nor may any player ever make more than three Reactions in a given Phase unless a special rule specifically allows for a number of Reactions above the normal limit of three.
A Reaction may be made with any unit controlled by the Reactive player, though in a number of situations a special rule or condition may deny a unit the opportunity to react. The most common such conditions where a unit may not make a Reaction are:
- It is Pinned.
- It is Falling Back.
- It is locked in combat.
- It has already made a Reaction in the current Phase.
- The controlling player has exhausted their Reaction Allotment for the current Phase.
- Another special rule, effect or condition specifically states they may not (for example, the Fearless special rule and certain effects caused by weapons and Psychic Powers).
To take a Leadership test, use the following procedure:
- Roll 2D6 and compare the result to the model’s Leadership Characteristic.
- If the result is equal to or less than the model’s Leadership Characteristic, then the test has been passed.
- If the result is greater than the model’s Leadership Characteristic, the test has been failed and the model faces the consequences as detailed in the rule that prompted the test.
Auspectre
Thanks to their advanced mental training and heightened cognisance, Clade Vanus Infocytes are able to process a bewildering amount of battlefield data in real-time, detecting the arrival and location of enemy troops and even temporarily over-riding their hard-wired systems to take control of weapon targeting and control systems.
Enemy models cannot be deployed using the Infiltrate special rule within 18" of a model with an auspectre. In addition, when any enemy unit is deployed to the battlefield from Reserves, a model with an auspectre may make the Interceptor Advanced Reaction without expending a point of the Reactive player’s Reaction Allotment. This does not allow the unit to make more than one Reaction per Phase, but does allow the controlling player to exceed the normal three Reaction limit in a given Phase. Instead of using the profile of a weapon the model has, a model with an auspectre may instead make a Leadership test. If the Leadership test is passed, the controlling player may instead make a Shooting Attack with any Defensive weapon available to any model with the Vehicle Unit Type (both friendly or enemy) within 12", that is in range and line of sight of the targeted model. If the Leadership test is failed, the model may not make an Interceptor Advanced Reaction.Models are slowed when charging through Debris Terrain. If, when charging, one or more models have to move through Debris Terrain in order to reach the enemy by the shortest possible route, the unit that the model is part of applies a modifier of -2" to its Charge Distance. This modifier is applied in addition to any other modifiers that might apply to the unit’s Charge Distance.
If at least one model in the Charging unit moved through Debris Terrain as part of its Charge Move, all of the unit’s models must attack at Initiative step 1, regardless of other Initiative modifiers, even if the Charging unit is not slowed by Debris Terrain. Note that charging models must engage as many enemies in the target unit as possible, even when Charging through Debris Terrain.
Some warriors can see almost as clearly in the darkness as they can in daylight.
A unit that contains at least one model with this special rule ignores the effects of Night Fighting and no model may make Shrouded rolls to negate Wounds inflicted by their attacks.Whether by advanced technology or arcane influence, some attacks are able to reach their target no matter what obstacles obscure them.
Any attacks made using a weapon with this special rule do not require line of sight, but must still be within range.The Ballistic Skill of a model making a Snap Shot can only be modified by special rules that specifically state that they affect Snap Shots, along with any other restrictions. If a special rule doesn’t specifically state that it affects Snap Shots, then the Snap Shot is resolved at Ballistic Skill 1.
Some weapon types, such as Ordnance, or those that have certain special rules, such as Blast, cannot be used to make Snap Shots. In addition, any Shooting Attack that does not use Ballistic Skill cannot be made as a Snap Shot. These exceptions aside, Snap Shots are treated in the same manner as any other Shooting Attack made with a Ballistic Skill of 1.
If the unit fails this test, then it must immediately continue to Fall Back.
If the unit successfully passes the test, it stops Falling Back and can immediately move a number of inches equal to its Initiative. This move is unaffected by Difficult Terrain, but Dangerous Terrain tests must be taken as normal. If the unit is out of coherency when the Regroup test is made, then the move must be used to restore coherency, or as near as possible.
Once a unit has Regrouped, until the end of that player turn it cannot otherwise Move, Run or Charge in the Assault phase. However, it can make Shooting Attacks but until the end of that player turn counts as having moved and can only fire Snap Shots. A unit that has Regrouped may make Reactions as normal in subsequent player turns, including those that allow it to move.
Blast weapons fire shells, missiles or packets of energy that explode on impact.
When firing a Blast weapon, models do not roll To Hit. Instead, pick one enemy model visible to the firer and place the Blast (3") marker with its hole entirely over the base of the target model, or its hull if the target is a Vehicle. The hole at the centre of the marker must be within the weapon’s Maximum Range. You cannot place the Blast marker so that the base or hull of any friendly model is even partially under it.The large area affected by the blast means it is going to be very hard to miss completely. Nonetheless, the shot might not land exactly where intended. Roll for the Blast marker to scatter and subtract the firer’s Ballistic Skill from the distance (if any) that it scatters, to a minimum of 0". Note that it is possible, and absolutely fine,for a shot to scatter beyond the weapon’s Maximum or Minimum Range and line of sight. This represents the chance of ricochets, the missile blasting through cover and other random events. In these cases, Hits are worked out as normal and can hit and Wound units out of range and line of sight (or even your own units, or models locked in combat). If the shot scatters so that the hole in the centre of the marker is beyond the battlefield’s edge, the shot is a complete miss and is discarded.
Once the final position of the Blast marker has been determined, take a good look at it from above – each unit suffers one Hit for each of the models included in that unit that is fully or partially beneath the Blast marker, even if those models are not within the firer’s line of sight.
Once the number of Hits inflicted on the unit has been worked out, roll To Wound and Save as normal. Note that, unlike other attacks, Wounds inflicted by an attack with the Blast special rule can be allocated to any models in the target unit, even if they are out of sight of any models from the attacking unit.
Note that the minimum roll needed To Wound is always at least 2. When rolling To Wound, there is no such thing as an automatic Wound and a roll of 1 always fails.
Each weapon has its own Strength Characteristic, which is given in its profile or in the description of the weapon. The following are examples of weapons and their Strength Characteristics:
|
Do not include Wounds caused in the Charge sub-phase,such as those from Reactions, failed Dangerous Terrain tests, etc.
The side that inflicted the most unsaved Wounds is the winner. The losing unit must make a Morale check and must Fall Back if it fails. If both sides suffer the same number of Wounds, the combat is drawn and continues next turn. If one side destroys the enemy completely, it wins the combat automatically, even if it sustained more casualties than the other unit.
Wounds that have been negated by Saving Throws or special rules do not count towards determining who won the combat. Neither do Wounds in excess of a model’s Wounds Characteristic; only the Wounds actually suffered by enemy models count (including all of the Wounds lost by models that have suffered Instant Death). In rare cases, certain models can cause Wounds on themselves or their allies – these Wounds are added to the other side’s total for working out who has won.
When a Sweeping Advance is performed, both the unit Falling Back and the winning unit roll a D6 and add their unmodified Initiative to the result. In a unit with mixed Initiative Characteristics, use the highest Characteristic. The units then compare their totals.
If the winner’s total (Initiative + dice roll) is greater than their opponents’, the Falling Back unit is caught by the Sweeping Advance and destroyed. All models in the destroyed unit are immediately removed as casualties. Unless otherwise specified, no Save or other special rule can prevent the unit from being destroyed.
If the Falling Back unit’s total is higher, or the final result is a tie, they break off from the combat successfully. Make a Falls Back move for the losing unit. The winners can then Consolidate.
Depending on the mission, a piece of Door Terrain may be Accessible, Locked, or Controlled. Unless stated otherwise in the mission rules, all Door Terrain begins the battle as Accessible.
- Accessible: An Accessible piece of Door Terrain may be activated once per turn during the Movement phase by a model controlled by the Active player that moves into base contact with the piece of Door Terrain during a normal movement. The Active player may choose to change the state of the piece of Door Terrain (from Closed to Open, or Open to Closed) at the moment the model moves into base contact with that piece of Door Terrain. A model that has Run during that Movement phase or is using a piece of Wargear that allows them to set their Movement Characteristic may not change the state of any piece of Door Terrain. If the models in the unit have not yet moved their full movement distance for the turn, the Active player may continue to move models in that unit. In effect, a unit may open a door in the middle of their movement and continue moving after it has been opened.
- Locked: Mission special rules may state that any or all pieces of Door Terrain are Locked. A piece of Door Terrain that is Locked begins the battle in the Closed state and cannot be opened by any means other than destroying it (see below).
- Controlled: In some missions, some or all pieces of Door Terrain are controlled by one or more players. Which players control any Controlled Door Terrain will be stated in the rules for the mission. Controlled Door Terrain pieces are Accessible to all models in the controlling player’s army. Controlled Door Terrain pieces are Locked to all models in all other player’s armies.
- It is Embarked upon a Transport Vehicle of any kind (once Disembarked it may count as a Scoring unit as normal).
- It is a Zooming Flyer.
- It has a special rule specifying that it never counts as a Scoring unit.
- It is currently Falling Back or Pinned (if the unit Regroups or recovers from Pinning, it immediately reverts to being a Scoring unit again).
- It is a Building or Fortification.
- It is Embarked upon a Transport Vehicle of any kind (once Disembarked it may count as a Denial unit as normal).
- It is a Vehicle of any type.
- It has a special rule specifying that it never counts as a Denial unit.
- It is currently Falling Back or Pinned (if the unit Regroups or recovers from Pinning, it immediately reverts to being a Denial unit again).
- It is a Building or Fortification.
Mighty heroes go where they are needed, being at the forefront of the most vital charges and leading their troops to victory.
Independent Characters can join other units. They cannot, however, join units that contain Vehicles, Dreadnoughts, Automata or any model with the Monstrous sub-type (unless the Independent Character also has that Unit Type or sub-type). They can join other Independent Characters though to form a powerful multi-character unit.The towering Dreadnoughts of the Legiones Astartes were often organised into informal warbands, waiting only for the start of battle to advance and bring death to the foe.
When deployed onto the battlefield (either at the start of the battle or when arriving from Reserves), all models with this special rule in a unit must be placed within unit coherency, but afterwards operate independently and are not treated as a unit.Makeshift barricades consisting of wall panels, doors, tyres or containers are commonly erected to give defenders a position of advantage from which to fire their weapons, or to hinder the advance of attackers.
When drawing line of sight to a model that is the target of a Shooting Attack, a model that is at least 25% obscured by Barricades Terrain has a 6+ Cover Save. Models may move over Barricades Terrain, counting each vertical inch moved against the total distance moved. Models may not end their movement on top of Barricades Terrain.Zones Mortalis are commonly littered with fallen beams, masonry and the detritus of ages of industry or habitation. Although these heaps of crumbling scrap may provide a modicum of protection from enemy fire, they hinder free movement of even the most agile infantry as care must be taken when traversing them.
When drawing line of sight to a model that is the target of a Shooting Attack, a model that is in or at least 25% obscured by Debris Terrain has a 6+ Cover Save.Note that Debris Terrain is neither Difficult Terrain nor Dangerous Terrain and its effects are not mitigated by special rules or Wargear that interact with those terrain types.
Moving Within Debris Terrain If a model starts their movement in Debris Terrain, their Movement Characteristic is reduced by -2" during that Movement phase. |
Charging Through Debris Terrain Models are slowed when charging through Debris Terrain. If, when charging, one or more models have to move through Debris Terrain in order to reach the enemy by the shortest possible route, the unit that the model is part of applies a modifier of -2" to its Charge Distance. This modifier is applied in addition to any other modifiers that might apply to the unit’s Charge Distance. |
The sturdy and impenetrable walls of a ship’s interior or an underhive tunnel network define the fighting spaces of a Zone Mortalis battlefield.
When drawing line of sight to a model that is the target of a Shooting Attack, a model that is at least 25% obscured by Wall Terrain has a 5+ Cover Save. Unless noted otherwise in their special rules, models cannot move or draw line of sight through Wall Terrain in a Zone Mortalis battle. In addition special rules, Wargear, or other effects that affect models within a specified distance cannot affect a model if no straight line can be drawn between the source of the effect and the affected model without passing through Wall Terrain (see Measuring Ranges in Zone Mortalis).Fighting within a Zone Mortalis is a dangerous and treacherous affair, and one in which even armoured combatants can flounder or damage themselves, unexpectedly crashing through buckled deck plating, getting crushed beneath falling rubble, or contacting exposed power conduits with deadly results.
When drawing line of sight to a model that is the target of a Shooting Attack, a model that is in or at least 25% obscured by Hazardous Debris Terrain has a 6+ Cover Save. Note that Hazardous Debris Terrain is neither Difficult Terrain nor Dangerous Terrain and its effects are not mitigated by special rules or Wargear that interact with those terrain types.Moving and Charging Within Hazardous Debris Terrain In addition to the rules that apply to models moving or Charging through Debris Terrain, when moving or Charging through Hazardous Debris Terrain, each model must make a Hazardous Debris Terrain test (as follows) as soon as it enters, leaves, or moves within Hazardous Debris Terrain. |
Hazardous Debris Terrain Tests To take Hazardous Debris Terrain tests, roll a D6. On a 1, that model suffers a Wound. No Armour Save, Cover Save or Damage Mitigation roll may be made against this Wound, but Invulnerable Saves may still be made. Once a model has taken a Hazardous Debris Terrain test for a particular area of Hazardous Debris Terrain, it does not test for that area of Hazardous Debris Terrain again in the same Phase. However, if the model moves into a different area of Hazardous Debris Terrain, this must be tested for as normal. |
Shooting While Within Hazardous Debris Terrain While within an area of Hazardous Debris Terrain, models suffer a -1 penalty to all To Hit rolls made as part of Shooting Attacks. Models with the Primarch Unit Type or the Night Vision special rule do not suffer this penalty. |
Six Terrain Features, none that occupies an area larger than 4" x 4". These may be either Impassable Terrain that blocks line of sight, or Buildings of a small or medium size that begin the battle controlled by neither player. If desired, Buildings may be replaced with Ruin Area Terrain with the same footprint.
The Warhawk is the standard pattern of jump pack unit employed by the Space Marine Legions. Its ability to function in almost any atmosphere and its robust systems have proven better than many of the more advanced devices in use by the Mechanicum and xenos forces.
At the start of the controlling player’s Movement phase, or when deployed as part of a Deep Strike Assault, a model with a Legion Warhawk jump pack may set its Move Characteristic to a value of 12 for the duration of the controlling player’s turn (sometimes referred to as ‘activating’ the jump pack). This allows a model with a Warhawk jump pack to move up to 12", regardless of the Movement Characteristic shown on its profile and gain any other benefits of a Movement Characteristic of 12 (including the bonus to Charge distance). In addition, all models with a Warhawk jump pack that have been activated ignore terrain while Moving and Charging, but must take Dangerous Terrain tests as normal when beginning or ending their Movement in Dangerous Terrain. A model with an activated Legion Warhawk jump pack treats all Difficult Terrain as Dangerous Terrain and may move over both friendly and enemy models or units without penalty – but must end its Movement at least 1" away from any model from another unit.A model with a Legion Warhawk jump pack may still Run if it would normally be able to Run (this does not allow units that include any models with the Heavy Sub-type to Run). When making a Run move for a model with an activated Legion Warhawk jump pack, add the Initiative Characteristic of that model to 12 to determine how far it may move – the model ignores terrain and models from other units while making a Run move with a Legion Warhawk jump pack as previously noted, but may not make Shooting Attacks or declare a Charge in the same turn in which it has Run as per the normal rules for Running.
Any model with a Legion Warhawk jump pack also gains the Bulky (2), Hammer of Wrath (1) and Deep Strike special rules – if it already has the Bulky (2) special rule, it gains the Bulky (3) special rule instead.
During a Reaction made in any Phase, a player may not choose to activate a model’s Legion Warhawk jump pack to gain any bonus to its Movement Characteristic. Any models with a Legion Warhawk jump pack deployed as part of a Deep Strike Assault are considered to have activated their jump packs in the turn that they enter play.
Note the exception that, in the same way as they can trace line of sight through members of their own unit, models can always shoot through members of their own unit without conferring or receiving a Cover Save.
To some greater or lesser extent, each Space Marine Legion deploys bike squadrons as battlefield scouts and pursuit troops. Some of these bikes are based on venerable patterns predating the Dark Age of Technology, such as the Iron Shadow, while others, such as the Wyvern, were developed on the far flung worlds of humanity in response to local conditions. The most common pattern in use by the Legiones Astartes is the Spatha, a more heavily armoured version of the Wyvern, intended for light combat and harassment of the foe.
A Legion Spatha combat bike has one twin-linked bolter. In addition, a model with a Legion Spatha combat bike that chooses to Run gains the Shrouded (5+) special rule until the start of the controlling player’s next turn.A model with the Infantry Unit Type that selects a Legion Spatha combat bike as an upgrade must change its Unit Type to Cavalry, keeping any Unit Sub-types it previously had, and may choose to gain the Skirmish Unit Sub-type. In addition the model must change its Movement Characteristic to 14 and gains the Firing Protocols (2) and Hammer of Wrath (1) special rules.
Rare and deadly machines, whose compact and extremely powerful grav-repellor motors are limited in production to only a handful of sources in the galaxy-spanning Imperium, Space Marine Scimitar jetbikes are a glorious sight in battle, and often the last one an enemy sees.
A Legion Scimitar jetbike has one heavy bolter. In addition, a model with a Legion Scimitar jetbike that chooses to Run gains the Shrouded (5+) special rule until the start of the controlling player’s next turn.A model with the Infantry Unit Type that selects a Legion Scimitar jetbike as an upgrade must change its Unit Type to Cavalry (Antigrav), keeping any other Unit Sub-types it previously had, changes its Movement Characteristic to 16 and gains the Firing Protocols (2), Hammer of Wrath (1) and Deep Strike special rules.
Other Detachments in the army, such as Allied Detachments or Lords of War Detachments, may have a different version of the Legiones Astartes (X) special rule. In which case no models in the same Detachment may have a different version of the Legiones Astartes (X) special rule to the one chosen for that Detachment. Models within a non-Primary Detachment are affected by all the special rules for the version of the Legiones Astartes (X) special rule chosen for them, as well as access to any Wargear options and special units.
Terminator armour features a powerful support exoskeleton and internal energy supply, but pays for its unparalleled protection with bulk.
Some warriors are marked by the dire weaponry they bear or the grim tactics in which they are trained. These dour cohorts are shunned by their brethren, whether out of respect for their burden or from fear of their rage.
A unit that includes any models with this special rule may not be joined by any model that does not also have this special rule (this includes Legion Techmarines and Legion Apothecaries, which may not be assigned to a unit with this special rule unless they also have this special rule).The apothecarion of the Space Marine Legions stands outside the organisation of chapter and company, with small detachments of its warriors assigned to an army as necessity demands. Only on the longest campaigns would an apothecary find themselves going to war amongst the same warriors time and time again.
An Apothecarion Detachment is selected as any other unit, using up a single Force Organisation slot and bought in the same manner. However, before the first turn begins and any models are deployed to the battlefield, all models in an Apothecarion Detachment must be assigned to another unit from the same Detachment of the army they were selected as part of. Legion Apothecaries that have not selected a Legion Spatha combat bike or Legion Scimitar jetbike may only be assigned to units composed entirely of models with the Infantry Unit Type and the same Legiones Astartes (X) special rule as the Legion Apothecary, and may not join units that have Terminator armour of any kind. Legion Apothecaries that have selected a Legion Spatha combat bike may only be assigned to units composed entirely of models with Legion Spatha combat bikes and the same Legiones Astartes (X) special rule as the Legion Apothecary, and any Legion Apothecaries that have selected a Legion Scimitar jetbike may only be assigned to units composed entirely of models with Legion Scimitar jetbikes and the same Legiones Astartes (X) special rule as the Legion Apothecary. No Apothecary may be assigned to any unit that includes one or more models with the Independent Character special rule or Unique Sub-type (but such models may join a unit that includes an Apothecary as normal during either deployment or any following turn). No more than one Apothecary may be assigned to any given unit.Once assigned to a unit, the Legion Apothecary is considered part of that unit and may not leave it under any circumstances – if that unit is removed as a casualty then the Legion Apothecary is removed as well. In battles using Victory points, no Victory points are ever scored for removing an Legion Apothecary as a casualty. When assigned to a unit, a Legion Apothecary gains all of the special rules (with the exception of those that specifically forbid it, such as the Bitter Duty special rule) and Unit Sub-types listed for the unit to which it is attached, but does not gain access to any additional Wargear options available to the unit to which it is assigned.
With most Legions boasting only a small cadre of Techmarines, those that are available are a vital resource for any Legion task force. These warriors are assigned only as is necessary, placed in the units and formations that can best benefit from their unique skills.
A Techmarine Covenant is selected as any other unit, using up a single Force Organisation slot and bought in the same manner. However, before the first turn begins and any models are deployed to the battlefield, all models in a Techmarine Covenant must be assigned to another unit from the same Detachment of the army they were selected as part of. Legion Techmarines that have not selected a Legion Spatha combat bike or Legion Scimitar jetbike may only be assigned to units composed entirely of models with the Infantry Unit Type and the same Legiones Astartes (X) special rule as the Legion Techmarine, and may not join units with Terminator armour of any kind. Legion Techmarines that have selected a Legion Spatha combat bike may only be assigned to units composed entirely of models with Legion Spatha combat bikes and the same Legiones Astartes (X) special rule as the Legion Techmarine, and any Legion Techmarines that have selected a Legion Scimitar jetbike may only be assigned to units composed entirely of models with Legion Scimitar jetbikes and the same Legiones Astartes (X) special rule as the Legion Techmarine. No Legion Techmarine may be assigned to any unit that includes one or more models with the Independent Character special rule or Unique Sub-type (but such models may join a unit that includes a Legion Techmarine as normal during either deployment or any following turn). No more than one Legion Techmarine may be assigned to any given unit.Once assigned to a unit, the Legion Techmarine is considered part of that unit and may not leave it under any circumstances – if that unit is removed as a casualty then the Legion Techmarine is removed as well. In battles using Victory points, no Victory points are ever scored for removing a Legion Techmarine as a casualty. When assigned to a unit, a Legion Techmarine gains all of the special rules (with the exception of those that specifically forbid it, such as the Bitter Duty special rule) and Unit Sub-types listed for the unit to which it is attached, but does not gain access to any additional Wargear options available to the unit to which it is assigned.
The greatest commanders of the Space Marine Legions are all but peerless in their strategic and tactical abilities. The genecraft of the Emperor that created them, honed by individual talent and the experience of countless battles, has sharpened their acumen to a preternatural degree.
The Master of the Legion special rule grants the following benefits:- Rites of War: If a Detachment with the Legiones Astartes Faction includes at least one model with the Master of the Legion special rule then that Detachment may select a single Rite of War. Rites of War are presented in the Legiones Astartes Rites of War section.
- The Few and the Proud: An army may only include a maximum of one model with this special rule per 1,000 points. This counts across all Detachments of an army. Thus, an army that totals at least 1,000 points may include only a single model with the Master of the Legion special rule, and an army that totals at least 2,000 points may include up to two models with the Master of the Legion special rule, etc.
- Retinue: A model with this special rule may also include a Legion Command Squad, Legion Cataphractii Command Squad or Legion Tartaros Command Squad as part of the same Force Organisation slot as the model with the Master of the Legion special rule.
Many of the most famous and powerful commanders went to war with a dedicated cadre of bodyguards and adjutants. These guardians served both to protect their master in the heat of battle, preserving his life against all threats, and as a vital reserve of skilled warriors to press the attack at the most crucial moment.
A Legion Command Squad, Legion Cataphractii Terminator Command Squad or Legion Tartaros Command Squad may only be selected as part of a Detachment that includes at least one model with the Master of the Legion special rule. A unit selected in this manner is considered a ‘Retinue Squad’ and the model with the Master of the Legion special rule is referred to as the Retinue Squad’s Leader for the purposes of this special rule (if the Detachment includes more than one model with the Master of the Legion special rule then the controlling player selects one as the unit’s Leader). The Retinue Squad does not use up a Force Organisation slot and is considered part of the same unit as the model selected as its Leader. The Retinue Squad must be deployed with the model selected as its Leader deployed as part of the unit and the Leader may not voluntarily leave the Retinue Squad during play. A Legion Command Squad, Legion Cataphractii Terminator Command Squad or Legion Tartaros Command Squad may not be selected as part of an army without a Leader.COUNTER STRIKE
The player without Strategic Advantage gains 1 Victory point if the first unit, of any kind, to be completely destroyed during the battle belongs to the player w ith Strategic Advantage.
If two or more units from opposing forces are destroyed simultaneously (for example, at the same Initiative step in an Assault phase) then no player scores Victory points for this Secondary Objective.
CHAMPIONS OF RENOWN
For each enemy model with the Character Unit Subtype that is removed as a casualty whilst fighting in a Challenge, the Controlling player scores 1 Victory point.
BLOOD TOLL
For each unit in an army selected as either an HQ or Elites choice that is removed as a casualty, the opposing player scores 1 Victory point.
In the name of the Warmaster Horus, a vast host took up arms against those they had once called brothers – some driven by a lust for power and others by a misguided desire for justice. Regardless of the cause they held dear, there could be no turning back for these warriors, only victory or damnation.
A model with this special rule may only be included in an army that has the Traitor Allegiance.Any point where a model can be placed in contact with the battlefield edge is considered to be an Access Point. If, due to terrain placement, there are no spaces on any battlefield edge that models can be placed in contact with the battlefield edge, players must designate at least one Access Point on each battlefield edge and mark it with an appropriate counter. Models can be placed on the battlefield from Reinforcements as close as possible to the battlefield edge within 6" in either direction of any Access Point.
- If the total is less than the Vehicle’s Armour Value, the attack has no effect.
- If the total is equal to the Vehicle’s Armour Value, the attack inflicts a Glancing Hit.
- If the total is greater than the Vehicle’s Armour Value, the attack inflicts a Penetrating Hit.
Contents | ||