Gaming in the Age of Darkness
 1
1 | The core Age of Darkness rules deal with the basic mechanics of how to play a tabletop game. However, they only touch on the many different ways to play and experience battles set during the galaxy-spanning civil war of the Horus Heresy. On this page, you will find an array of additional rules and guidelines to suit all hobbyists. In this section, we take a broader look at gaming in the Age of Darkness and show how you can add exciting elements to your games as you become more involved in the hobby. The following is an introduction to ways for players to expand their gaming horizon, try new modes of play and more fully engage with the Horus Heresy. | ||
Books
| Book | Kind | Edition | Version | Last update |
| | ||||
| | Rulebook | 2 | 1.2 | December 2023 |
Collecting an Army
The Imperium of Mankind is being torn apart by brutal civil war. The Space Marine Legions and their Primarchs, once paragons of humanity, have turned upon one another; and Warmaster Horus, first amongst Primarchs, seeks his father’s title of Emperor over all Mankind. Allied to the Traitor Warmaster’s cause are foul Daemons, brought forth by heretics worshipping dark powers, which surge from the darkness between the stars intent upon the Emperor’s death for their own unknowable reasons. Standing resolute in the face of such horrors are the Emperor’s own Talons, though they are few; the golden and undaunted forces of the Legio Custodes and the soulless maidens of the Sisters of Silence. Every other faction at large in the Imperium, be it the innumerable ranks of the Imperial Army, the towering war machines of the Questoris Households, the disciplined and highly elite Solar Auxilia, or the byzantine organisation of the Mechanicum, is also at war, divided by factionalism, ambition and ancient hatred. Some side with Horus and his promise of freedom from tyranny and oppression, while those most dutiful cleave to their oaths of loyalty to the Emperor. Others still cast off loyalties to all masters and seek independence and personal glories. An entire galaxy burns with the fires of war, and Horus, responsible for it all, leads his forces against the Throneworld of Terra to meet the Emperor in a final confrontation which will determine the fate of millennia of humanity’s history.This incredible setting, filled with tragedy and heroism, provides endless opportunities for collecting, building, painting and gaming. Perhaps you’re inspired to collect vast armies and fight out the epic battles described in the background. Maybe you find yourself drawn to the idea of painting beautiful display figures and building scenic snapshots of apocalyptic war zones within which to display them. Maybe it’s all about collecting and assembling the most amazing war machines you can conceive of, creating and painting incredible battlefields, the innards of void ships, or finding a good excuse to spend an afternoon with like-minded friends, painting or gaming together. In truth, there is no right or wrong way to go about engaging with the hobby – it’s best to find what you most enjoy and go for it. From playing in your local club or Warhammer store, or attending competitive and narrative events to world-class painting competitions, there are endless possibilities to have fun.
Modes of Play
Below, you’ll find an array of different rules and guidelines to suit all hobbyists, from collectors who play occasional games, enthusiastic newcomers playing games with unknown opponents, groups of hobbyists who regularly meet up with their friends, to veteran gamers who’ve spent years honing their forces for competitive matches.The core rules are everybody’s starting point but, as everyone enjoys the Warhammer hobby in different ways, this section of the book introduces a variety of ways to approach your games such as Narrative Play and Campaign Play, as well as the various themes and narrative campaigns that are presented in other Horus Heresy publications. Each offers an alternative experience, but it’s important to note that elements of each can be mixed and matched to create whatever kind of gaming experience you want – they are a toolbox, providing inspiration and options to get the dice rolling and allow you to play with your collection of Citadel and Forge World miniatures on the tabletop.
You will also find a guide to building battlefields, the rules for creating your army, and the core missions which make up Narrative Play. So, whether you are looking to wage war in one of the myriad deadly environments of the galaxy, play a team game, or fight battles as part of an escalating narrative campaign, there are numerous ways of playing to enable you to do so. A galaxy of war awaits you!
The CommunityTabletop wargaming is, by its very nature, a social hobby, and the community extends way beyond your immediate group of gaming friends to include Warhammer stores, events such as Warhammer Fest or any of the Horus Heresy events hosted at Warhammer World, and of course there’s a thriving Horus Heresy community on the internet. You should be able to find like-minded gamers by visiting your local gaming club or attending a narrative event, and if no such organisation exists near you, you can always create your own and encourage others to join in – if you build it, they will hopefully come! We also recommend engaging with the community on the Games Workshop and Forge World social media streams, through the Warhammer Community website, and the many fan-hosted podcasts and video series which enjoy discussing the rich lore of the setting and the wide variety of battles enabled by the rules. | ||
Age of Darkness Modes of Play
Narrative Play
At its heart, the Horus Heresy – Age of Darkness is a narrative game intended to recreate the myriad conflicts of a galaxy-spanning civil war. The aim of Narrative Play is to create a sense of verisimilitude of the Age of Darkness and give players an authentic Horus Heresy experience, even when playing a game which has no pre-defined or player-created story. With this in mind, the core missions described later in this rulebook provide context and different objectives for players to pursue to add a narrative dimension to games which amounts to more than simply killing the enemy.The core rules as laid out in this book and those described in the next section, Preparing for Battle, make up the Narrative Play mode. Narrative Play is in many ways the default way of playing games which are set in the Age of Darkness, and exists to facilitate all standard one-off battles with a story inspired by the events set forth in the background and the Black Library novels. Such games can range from friendly matches between members of an existing gaming community to ‘pickup’ games in your local games store or gaming club, played between people who have never enjoyed a game against one another before. Making use of the rules as presented allows both players to begin their game on an even footing and to have a relatively balanced and fairly matched battle. With Narrative Play, remember to play to the spirit of the game – the Horus Heresy – Age of Darkness is about creating great stories and ensuring that everyone enjoys their gaming experience. To aid all players to experience the grandeur of the Age of Darkness as it is intended, players are encouraged to use Games Workshop’s and Forge World’s Horus Heresy models bedecked in era-appropriate armour and heraldry. These models should be clearly recognisable as the unit they are intended to represent in the rules and be fully painted whenever possible.
Campaign Play
The story of the Age of Darkness is told through campaign books, supplements and other publications which present exciting battle narratives and the epic deeds of legendary characters. Such publications present rules for recreating the battles of the Horus Heresy, translating them from the page to the tabletop. Campaign Play is a variant of Narrative Play concerned primarily with playing famous battles, and presents additional rules for an interconnected series of games with persistent characters and a driving narrative. Players are encouraged to use terrain which evokes the battles they are playing, as well as make use of the characters and armies which took part in those battles. Campaign Play uses missions in the same way as Narrative Play, however, each one is based around a key battle from the background of the Horus Heresy, and provides an interesting twist on the core mechanics of the game. It might tell the story of a desperate redoubt, for example, in which one side faces utterly overwhelming odds but must try to hold out for a time. Or maybe it will describe an ambush or a thrilling game of cat and mouse between two forces. Campaign Play is a fantastic way to add character to your armies and the battles they fight.The specific campaign missions included in Horus Heresy – Age of Darkness publications are, of course, only a small sample of what Campaign Play can achieve. Further inspiration for designing original missions can be found in Black Library novels and other Games Workshop publications, plus the background section of this book. Campaign Play rules also provide a framework of interesting alternative systems and scenarios with additional rules to adapt to your own games, allowing you to decide if you wish to play a different version of the events described while using different armies, or play in a completely different setting. You may also find it adds to your Campaign Play experience to create your own characters and objectives, using the campaign rules only as guidelines while allowing your own story to develop as your games unfold. While this may take more work, it will make the campaign unique to your gaming group and will ultimately be worth the extra effort put in by those involved.
Expanding the Age of DarknessThere are plenty of variations on the Narrative Play and Campaign Play modes. Further supplements will present a subset of rules which modify the core Horus Heresy – Age of Darkness game rules in unique ways to represent specific combat environments and circumstances, as well as escalations of hostility which are beyond those encompassed even by a standard Age of Darkness battle. Theatres of war, such as Zone Mortalis (desperate close-in tunnel fighting in the depths of hive cities or the guts of warships) and City Fight (warfare in the battle-torn ruins of once-great cities) for example, represent very different modes of warfare to the standard game, each with its own challenges and often calling for unique stratagems and army compositions. The rules for playing such games will be presented in future Horus Heresy – Age of Darkness publications. | ||
Open Play
Open Play is a mode of gaming that places the emphasis on the models in your collection and your own imagination. While other modes place restrictions on which units to include in your army, either defined by a specific story or by the need to play a precisely balanced game, Open Play allows you to field any Horus Heresy models as you wish. All you need to do is set up a battlefield, decide on a mission (which could be as simple as ‘deploy within 12" each other and then fight until you destroy your opponent completely’) and start the first turn. If you’re just starting out and only have a handful of models, Open Play is a great way to start playing straight away. It allows you to experiment with tactics and combinations, and get a taste for what models you might add to your collection next. Open Play can also be useful for when an experienced player is considering a new force and wants to get a taste for how it works, substituting in their existing models to represent a new army.Of course, there’s nothing stopping you from modifying the rules as you see fit – this is where Open Play shines. You can add or remove rules, or create entirely new ‘house rules’ agreed between the members of your gaming group. These ‘house rules’ may add additional complexity to the standard Narrative Play rules and caution is advised if you add these to standard Narrative Play or Campaign Play missions. Open Play also allows you to field much greater army sizes by modifying the standard Crusade Force Organisation chart to include more choices, or even create bespoke game modes by limiting certain unit types (such as a game emphasising foot soldiers by excluding the use of units with the Vehicle type). With Open Play, the only restriction is your own imagination.
With no formal restrictions on army composition or which rules are in use in Open Play, it is recommended that players take the time to agree what they both want from an upcoming battle before committing to a game. Therefore, a brief conversation beforehand will not only save disappointment, but can lead to a more memorable and satisfactory gaming experience.
Matched Play
Matched Play is ideal for those who wish to play in a competitive spirit, and is also more useful for those who wish to play against multiple opponents in succession that they do not regularly play, ensuring a fair fight using pre-agreed rules. This makes it ideal for leagues and tournaments and also for battles fought at gaming clubs. A battle fought using the Matched Play rules pits two players against each other, each taking command of an army using the core Age of Darkness rules which is constructed to the same points value. While this is similar to Narrative Play, Matched Play incorporates elements of Open Play to allow a gaming group or event organiser to modify rules to add or remove restrictions as they see fit. They can then ‘fix’ their customised ruleset and any players who wish to play as part of their tournament, ladder or campaign must use these rules. Matched Play is at its best when the organisers record the results of each one-off battle between competitors in order to determine an eventual winning player (or faction, if keeping to the standard Loyalist and Traitor divide). This mode is, perhaps, best suited for use by gaming tournaments in which players gather in one place to play a number of games in a single day or weekend.Team PlayWhile the Age of Darkness rules are designed primarily to have two opponents match their skill and wits in the grand battles of the 31st Millennium, using the Open Play mode allows the game to be easily adapted to team battles, allowing a larger number of players to share in a single apocalyptic battle. This can be achieved in a variety of ways; from having players share units within a single army; fielding multiple armies each controlled by their own player in larger games; or even having one player act as a general ordering another to move an army and execute their commands for them – a great inclusivity option for players unable to physically play themselves. In such games it may be helpful to assign a team leader (or Primarch!) who can determine an overall strategy for the team to avoid a disjointed battle experience with multiple players pursuing their own objectives, and it may also facilitate play to set a time limit per team or per player to avoid games becoming too long! | ||
Preparing for Battle
The great battles of the Horus Heresy were not fought between disorganised mobs of warriors, but between the marshalled strength of the Space Marine Legions, the Imperial Army and other forces loyal either to the Emperor or his treacherous son, Horus. Likewise, the collection of Forge World and Citadel miniatures you use to play games of the Horus Heresy – Age of Darkness will need to be organised into a cohesive force in order to properly represent the engagements of this devastating conflict.Army Selection
In a game of the Horus Heresy – Age of Darkness, each player will control a single force, usually referred to as an ‘army’. The first step in assembling an army is to decide on its Allegiance, of which there are two to choose from: Loyalist or Traitor. This choice is mostly thematic and serves to help place the game within the confines of the Horus Heresy, although some special rules do target models based on their Allegiance and most of the campaigns presented as part of the Horus Heresy campaign books will have rules that affect armies of specific Allegiances.Any army must consist entirely of models with the same Allegiance. Most units available to the various Factions of the Age of Darkness do not have an Allegiance stated in their Army List entry, in these cases the Allegiance chosen for the army determines the Allegiance of these units. Some units’ Army List entries will specify an Allegiance for that unit, these units may only be used in armies of the appropriate Allegiance. The choice of Allegiance is not determined by a Detachment’s Faction, but instead is a thematic choice. It is perfectly acceptable to have an army of Loyalist Sons of Horus or Traitor Ultramarines; the chaos of the Horus Heresy saw all manner of strange alliances and base betrayals during the destructive years of its reign.
In situations where two players have both selected the same Allegiance, one army is still considered to be fighting for the opposing Allegiance for that game. Incidents of friendly fire, purposefully false intelligence and sabotaged communications were far from uncommon during the Horus Heresy, and tipped the balance of several campaigns. Both players should agree which one of them will represent the opposing force for that game. Similarly, an army representing a force that remains neutral in the grander scheme of Horus’ treachery must still select an Allegiance.
Before beginning the army selection process, both players will need to agree on a points limit. The ideal range for a game of the Horus Heresy – Age of Darkness is around 2,000-3,000 points, with the rules written for games between forces of 3,000 points. For normal play, both players will use the same points limit, but this does not need to be the case if all players agree to the use of asymmetric (uneven) points values. Additionally, some missions and specific subsets of the Horus Heresy – Age of Darkness rules may specify a range of points values that must be used for games played using those rules.
Army List Entries
The rules for your Forge World and Citadel miniatures are found either in the relevant Liber Army List books, campaign books or as a download from the Games Workshop website. In any case where multiple versions of a unit’s rules are available, always use the most recently published version.Regardless of where this information is found, it is known as an ‘Army List entry’ or ‘Profile’. Each Army List entry describes a unit of Forge World or Citadel miniatures, and includes everything you will need to know in order to use that unit in a game of the Horus Heresy – Age of Darkness.
Age of Darkness Force Organisation
Once they have agreed on a points limit, the players can choose their forces. To do so, they will select a number of units from a single Age of Darkness Army List, counting the points cost of each unit as stated on its Army List entry until the agreed upon total is reached. The total points value of the army’s units must not exceed the agreed upon limit. As detailed in each of the Age of Darkness Army Lists, all of the units available to players are organised into broad categories which will inform you in regards to the role they play in an army – these categories are known as ‘Battlefield Roles’. These Battlefield Roles are: HQ, Elites, Troops, Fast Attack, Heavy Support, Lords of War, Primarch and Fortifications. Some Army Lists, Rites of War or other special rules may introduce new categories, assign alternative names to existing categories or switch the categories of certain units, but such exceptions will be clearly explained in the given Army List.HQ
HQ stands for Headquarters unit. A Headquarters unit might be a determined Solar Auxilia lord marshal thrust into the heart of the Horus Heresy or a mighty Space Marine praetor at the head of a Legion task force. These models are amongst the most powerful in the game and, as leaders, they have access to more special equipment than anyone else. They are not invincible, but can provide a powerful spearhead for an attacking army and a strong core for a defensive one.Troops
These represent the most commonly available soldiers in an army. This does not necessarily mean that they are poor fighters – the category includes warriors ranging from the post-human warriors of the Space Marine Legions to the humble auxiliary levies of the Imperialis Militia. Typically, these are the warriors who make up the bulk of an army. Their main tactical role is that of consolidating the gains of the army and defending the objectives that have been taken by more specialised units.Elites
Elites units are, as the name suggests, the best soldiers an army has to offer, but there are rarely ever as many of them as a commander would like. In some cases, they will be specialists, while, at other times, they will be more experienced versions of regular soldiers.Fast Attack
Fast Attack units are generally more mobile than their comrades, and are masters of manoeuvrability. Often, they are used for reconnaissance and scouting, while, at other times, they are ferocious assault troops who rely on speed to get their bloody work done.Heavy Support
Heavy Support units are the big guns of the army and comprise the heaviest items of equipment and the toughest creatures. Assigned to the heaviest fighting, and to destroy the most dangerous foes, these units are vital for any army to claim victory.Fortifications
Fortifications are battlefield defences, and include everything from barricades to towering fortresses. They are typically Buildings and/or battlefield debris that your army has either constructed or captured just before the start of the battle.Lords of War
Lords of War are among the most destructive weapons deployed during the wars of the Horus Heresy, outmatched only by the awe-inspiring firepower of an orbital bombardment. They include towering battle Titans, Super-heavy Vehicles and the largest and most imposing Fortifications.Primarch
The Primarchs are the sons of the Emperor; the most powerful warriors and cunning generals of their age, there were only a handful of other warriors that could compare to these icons.Other Battlefield Roles
Some Horus Heresy supplements may introduce other types of Battlefield Role and they will include all of the rules you need to include them as part of your army.Lords of War and Primarch RestrictionsThe dominating presence of Lords of War and Primarch units can unbalance even the largest games, and so additional restrictions are applied to these Unit Types in order to ensure the most enjoyable game experience for all players. Lords of War and Primarch choices may only be included in an army whose total points value is at least 2,000 points, as long as the Force Organisation chart in use has the appropriate slots. In addition, the combined points value of all Lords of War and Primarch choices present in an army may not exceed 25% of the army’s total points cost, unless specified otherwise by the mission or Force Organisation chart being used. This means that the maximum combined points value for any Lords of War and Primarch choices included in the more common army sizes in the Horus Heresy – Age of Darkness is as follows:
| |||||||||||||||||||
Force Organisation Charts
The maximum and minimum number of units from each Battlefield Role required for a given army is defined by a Force Organisation chart, of which there is one basic chart available for an army fighting in the Age of Darkness. Where additional Force Organisation charts are available, each army should select a single Force Organisation chart to use as the basis of their force.The standard Force Organisation chart for games set in the Age of Darkness is the Crusade Force Organisation chart. Other Force Organisation charts are available for players to use in other supplements, and some Army Lists may present specific variants for use with that list. In all cases, these charts will adhere to the same set of basic principles.
One box on a Force Organisation chart allows you to make one selection from that part of your army list. Dark boxes indicate compulsory selections, which must be included as part of the army, while the lighter boxes indicate optional choices, which are only included as part of the army if the player in question chooses to do so. If constructing an army using the Crusade Force Organisation chart, this would mean that an army would be required to take at least one HQ choice and two Troops choices. These compulsory choices are intended to ensure that the core of each army is illustrative of the force represented by the Army List in use, and that all armies are capable of properly participating in the varied missions available to players in the Horus Heresy – Age of Darkness.
Sometimes, a single choice in a Force Organisation chart may allow you to select more than one unit, or to vary the Battlefield Role of the unit selected. In all cases, such deviations from the normal procedure will be fully explained in the Army List or publication that presents such a Force Organisation chart.
Dedicated TransportsDedicated Transport Vehicles sit outside of the normal Force Organisation structure and do not use up any choices on the Force Organisation chart, as they are attached to the unit whose Army List entry allows them to be selected. Where the distinction becomes important (for example, as part of a mission objective or deployment rules), Dedicated Transport Vehicles are considered to be of the same Battlefield Role as the unit that they are attached to. For example, a Rhino chosen as a Dedicated Transport for a Legion Tactical squad (Troops) counts as a unit of Troops, while a Rhino selected as a Dedicated Transport for a Legion Veteran squad (Elites) would count as a unit of Elites. | ||
Detachments
Most Force Organisation charts, including the Crusade chart illustrated below, comprise several Detachments. Each Detachment within a Force Organisation chart is a discrete set of units, effectively a sub-Force Organisation chart, that allows players to customise their army further or to include additional forces when playing larger games. All Force Organisation charts in the Age of Darkness rules include a Primary Detachment – this Detachment is compulsory and must be taken as part of the army. The army’s Warlord must also be selected from the Primary Detachment of its Force Organisation chart and all compulsory slots must be filled before other optional Detachments may be taken. Any other Detachments listed as part of a Force Organisation chart are considered optional – a player may choose to incorporate them into their army or not, at their own discretion. However, if a player decides to include an optional Detachment then all compulsory slots from that optional Detachment must also be filled. Regardless of its type, either Primary or optional, all models in a single Detachment must be of the same Faction and all models in the army must be of the same Allegiance.As an example, the Crusade Force Organisation chart consists of three separate Detachments: the Primary Detachment, a Lords of War Detachment and an optional Allied Detachment. A player using this Force Organisation chart to build an army would be required to fill all compulsory slots in the Primary Detachment, in this case, one HQ slot and two Troops slots, before selecting any other units, and all of the units selected would have to be of the same Faction. Once these compulsory slots are filled, the player is free to select additional optional units for the Primary Detachment as allowed by the agreed points total, or to select units from the optional Allied or Lords of War Detachments. If any units from the Allied Detachment are selected then any compulsory slots present in that optional Detachment would have to be filled as well.
Allied DetachmentsAllied Detachments are the most common type of optional Detachment, representing small contingents of allied forces attached to the core of the player’s chosen force. Unlike other Detachments, an Allied Detachment must always be of a different Faction than the player’s Primary Detachment. | ||

Allies in the Age of Darkness
During the Age of Darkness, the forces of the Imperium and the Traitors alike were torn apart by war and suspicion. Any Force Organisation chart which includes more than just a Primary Detachment may be composed of units of two or more of the Factions that make up the various armies fighting in the Horus Heresy, as long as each individual Detachment is entirely comprised of models of a single Faction. When your army incorporates units from more than one Faction, this section tells you how those models will interact with each other.Factions in the Age of Darkness
The wars of the Horus Heresy were fought between a number of Factions, most of which were present to some degree among both the Loyalist and Traitor armies. Each of the eighteen Space Marine Legions forms a single Faction, each differentiated by the version of the Legiones Astartes special rule that units of that Faction possess, with examples of other Factions being the Mechanicum and the Imperial Army. In all cases, units of these Factions may be from either the Traitor or Loyalist Allegiance. There also exists an Agents of the Emperor and Agents of the Warmaster Faction – models of these Factions are always either Loyalist (Agents of the Emperor) or Traitor (Agents of the Warmaster) and may not be selected in an army of the opposing Allegiance.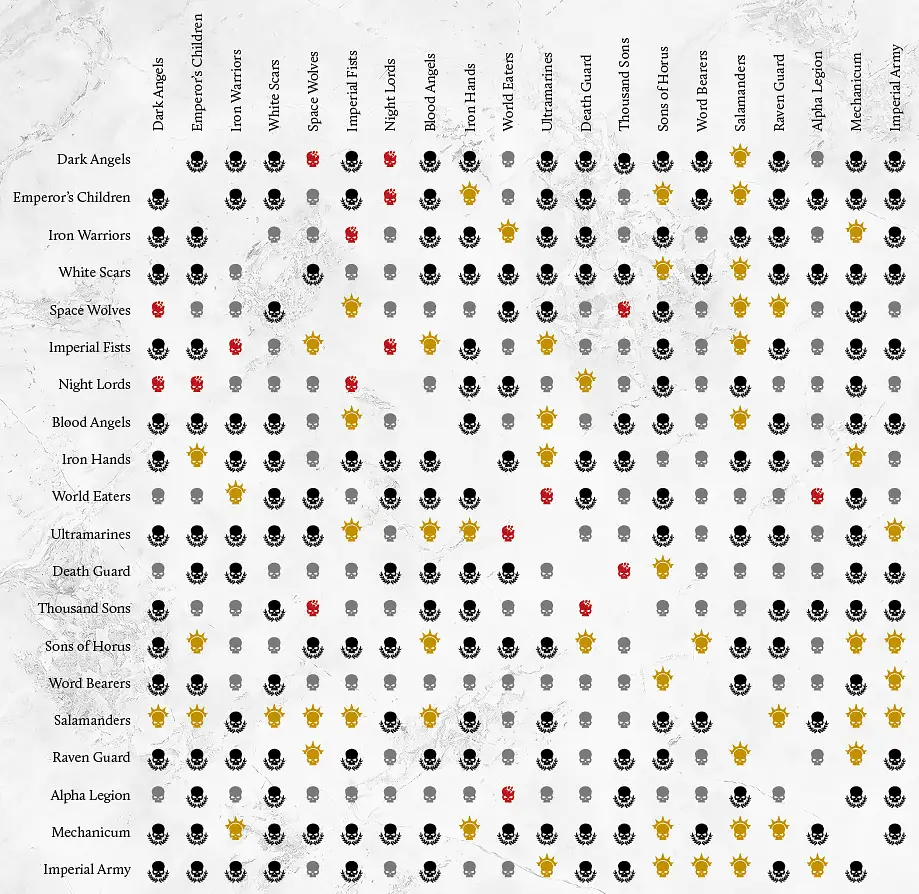 | ||
Factions and Army Lists
The Age of Darkness Allies chart shows the relationship between these various Factions which, in turn, dictates how units of those Factions behave in battle when included as part of the same army.
Age of Darkness Levels of AllianceTo represent the long history of grudges, sworn compacts and battle-tested oaths that exist between the various Factions of the early Imperium, the Age of Darkness Allies chart is used. When an army features two or more Factions amongst its Detachments then the controlling player should check the chart to establish the level of alliance that exists between them, and how that will affect the various units of those Factions in play. Each of the various levels of alliance is described here, as well as the rules associated with them. Some entries may refer to ‘allied’ units, in these cases all units not part of the same Faction as the Primary Detachment are considered ‘allied’ units. The closest of allies who have fought beside each other many times. The two forces are considered ‘friendly units’ in all regards. This means, for example, that Sworn Brothers may be joined by allied Independent Characters, are treated as friendly units for the targeting of special abilities, Warlord Traits and so on. Note: Not even Sworn Brothers can embark in allied Transport Vehicles, and rules that affect a particular force owing to its Legiones Astartes special rule do not carry over to Sworn Brother allied units.  The two forces are willing to fight together for common cause against their foes. Units in your army treat other units at the Fellow Warriors level of Alliance as not being part of the army with the exception that they may not be deliberately targeted, attacked, targeted with special abilities, etc, (note that Blasts and the like may still scatter over allied forces and adversely affect them). Fellow Warriors cannot benefit from the effects of allied Warlord Traits or be joined by allied Independent Characters, and are not counted as friendly units for the purposes of special abilities. In essence, the two forces fight alongside each other without any additional positive or negative effect.  The two forces can make common cause against an enemy, but never fully trust each other due to a long-standing feud or inherent antipathy. Models in the allied detachment are treated exactly like Fellow Warriors except that units in this allied detachment are never counted as Scoring units and may not hold Objectives.  The two forces will only ever fight beside each other in the direst of circumstances or by the direct command of their overlord, be they the Emperor or the Warmaster. The two forces are dealt with as Distrusted Allies but, in addition, whenever a unit is within 6" of a unit that is part of a Faction that falls under this level of alliance then both units reduce their Leadership by -1 until they are no longer within 6" of any unit from that Faction that is part of the same army. Agents of the Emperor (or Warmaster)Some units are described as Agents of the Emperor (notably the Talons of the Emperor – the Legio Custodes and the Silent Sisterhood), or Agents of the Warmaster. These are always treated as Sworn Brothers to either all Loyalist or all Traitor forces respectively. | ||
Warlord Traits
The Warlord
When choosing your army, you must nominate one model to be your Warlord. Unless specified otherwise, this must be a Character model and a HQ choice from the Primary Detachment of the army. If you do not have any appropriate Character models in your army, then select any other model in your army to be the Warlord. The model you choose as your Warlord must be from the Primary Detachment of the Force Organisation chart in use, unless another rule specifically states otherwise. In some cases, a model will have a special rule that dictates that the model in question must be selected as the Warlord, such as a Primarch. When this is the case, that model is always the Warlord regardless of any other factors. An army may not include more than one model that must be selected as the Warlord, unless another special rule contains an exception to this rule.Warlord Traits
Your Warlord is a potent force upon the battlefield. Not only are they a mighty hero, with all the skills and renown you might expect from the leader of a great army, but over the course of a long career they will also have picked up specialised abilities, which we refer to as ‘Warlord Traits’. Each Warlord has one Warlord Trait, chosen during army selection, from the list of Core Warlord Traits (or another list of Traits made available as part of that model’s Allegiance or Faction) and noted on the player’s Army List or roster. Some special rules attached to certain Factions or models may allow a Warlord to select Warlord Traits other than those presented in the Core list – such rules will specifically note which other Traits may be selected.Armies without CharactersIf, for any reason, a player selects a valid army that does not include any HQ choices in its Primary Detachment, then a Character model from any other choice in the Primary Detachment may be selected as the Warlord. If, for any reason, the Primary Detachment includes no Character models, then any non-Vehicle model in the Primary Detachment may be selected as the Warlord. If any player has been required to select a non-Character model as their Warlord, or a model that is not part of a HQ choice, then that model does not receive a Warlord Trait, but counts as a Warlord for all other rules purposes. | ||
Characters with Set Warlord Traits
Some Character models will have a special rule that specifies a Warlord Trait that must be used if that model is selected as the army’s Warlord. If such a unit is your Warlord, do not select a Warlord Trait – instead, that unit automatically has the listed Warlord Trait. Note that the unit will only gain that Warlord Trait if it is your Warlord. If another model is selected as your Warlord, then that Character will not have any Warlord Trait, even if there is a Trait listed in its entry.Death of the Warlord
If your Warlord is removed as a casualty during a game, any abilities or special rules granted by their Warlord Trait are immediately lost. If the Warlord Trait in question conferred a special rule that allows an unusual method of deployment from Reserves (such as conferring the Outflank ability on certain units), that special rule is immediately lost and the affected units must instead deploy from Reserves in the normal fashion.Core Warlord Traits
These traits are available to any Character model selected as an army’s Warlord, regardless of Faction or Allegiance.Bloody-handed Some warlords are only satisfied by the clash of blades and the screams of the enemy as they fall before them. For such warriors, strategy is but a means to an end, a tool by which they can bring their forces into the brutal crucible of the melee as soon as possible. There, in the heart of the battlefield, they seek victory at any cost. Any combat with at least one friendly model within 12" of this Warlord, or a combat which includes this Warlord, gains a bonus of +1 to the number of Wounds caused for the purposes of combat resolution. In addition, an army whose Warlord has this Trait may make an additional Reaction during their opponent’s Assault phase as long as the Warlord has not been removed as a casualty. |
Stoic Defender This warlord is a rock, the hard place against which their foes are dashed and broken. When the enemy surges forth, they do not foolishly go to meet them, but dig in so that the foe may exhaust themselves against the defences prepared for them. When this Warlord or any friendly unit joined by a Warlord with this Trait makes a Shooting attack, the target unit must make a Pinning test if it suffers any unsaved Wounds. In addition, an army whose Warlord has this Trait may make an additional Reaction during their opponent’s Shooting phase as long as the Warlord has not been removed as a casualty. |
Ever-vigilant Always ready to take advantage of the foe’s weakness, this warlord is a master of predicting and exploiting the flow of battle. Where the foe advances, this warlord falls back to better ground, where the foe retreats, this warlord advances, for victory is fickle and only falls into the grasp of those prepared for any eventuality. When this Warlord, and any unit it has joined, Runs during the Movement phase, it adds the value of the Warlord’s Initiative Characteristic, increased by 1, to the distance moved, rather than the lowest Initiative Characteristic in the unit. In addition, an army whose Warlord has this Trait may make an additional Reaction during their opponent’s Movement phase as long as the Warlord has not been removed as a casualty. |
Battles in the Age of Darkness
This section will guide you through the process of selecting, preparing for and playing an Age of Darkness mission – a specific format of game intended to replicate the savage battles of the Horus Heresy. These missions are for games with two players, using armies of between 1,750 and 3,500 points in size selected using the Crusade Force Organisation chart. These missions are the standard format for games of Horus Heresy – Age of Darkness, and are perfect for use as one-off games as well as part of a longer campaign. Other publications will present both additional missions (following this same format), as well as variant styles of play that incorporate additional rules. Players may also choose to modify these missions to accommodate more players, larger armies or other conditions of their choice, but if any modifications are made, they should be agreed by all players involved before beginning play.Age of Darkness Mission Format
All Horus Heresy – Age of Darkness missions follow a standard format and are divided into the following sections. If a given mission does not offer any advice in one or more of these sections, simply use the standard rules presented in this rulebook.The Armies: Any restrictions on the selection of the armies involved, be they limits on total points values, Factions allowed or other restrictions will be described here.
Setting up the Game: Any restrictions or requirements regarding the arrangement of the playing surface or the scenery to be used in the game will be described here.
Deployment: Any variations in the manner in which armies are placed on the table, or in the deployment maps to be used, will be described here.
First Turn: This section describes how to select which of the players will take the first turn of the game.
Game Length: The number of turns of which the game will be composed is described here.
Victory Conditions: The manner in which the game is won is described here. If any of the standard Primary or Secondary Objectives are used, they will be listed here.
Mission Special Rules: Any special rules to be used in the mission will be listed here – those that are unique to that mission will also be fully detailed.
The Age of Darkness Missions
To begin with, an Age of Darkness mission will need to be selected for the game. Players can either select a mission from the list of those available that is agreeable to all involved or roll randomly on the table. In the case of some campaigns or variant forms of play, the list of available missions may be different, or set missions may be specified by the campaign. In these cases, the publication in which the campaign or game variant is found will explain how to select a mission.Age of Darkness Mission Table
Placing Terrain
After you have determined what mission you are playing and arranged a space in which to play, you must then place terrain from your collection to set up the battlefield.Terrain may be placed by the simple expedient of each player taking turns to place an individual piece or so that they form an attractive battlefield, and can be themed in ‘sets’ (a power generator and industrial buildings, etc) or simply placed roughly evenly across the table and then randomised via the use of a Scatter dice and 2D6. For ease of play, try to leave a gap of at least 2" between each discreet area of terrain to allow for the clear passage of Infantry models.
Depending on which mission you are fighting, it may also have specific instructions on the terrain and its set-up. In addition, if you are playing through a particular campaign, you may have a particular style of terrain or special rules that you can use to further theme your battlefield.
The Battlefield
For most games of Horus Heresy – Age of Darkness, the battlefield will take the form of a flat, stable surface of any size or shape acceptable to the players; although a rectangular area measuring 6’ x 4’ is considered the standard size. The battlefield is considered to be Open Terrain for all rules purposes. A unit cannot voluntarily move or be placed beyond the edge of the established playing area, unless that unit or the mission being played has a special rule that specifically allows the unit to leave the battlefield.The Horus Heresy-era BattlefieldRemember that, for an enjoyable game, where neither close combat nor ranged units will dominate, it is recommended that a mixture of terrain is used. For example, some Terrain Pieces able to block line of sight for large Vehicles (such as rocky crags, industrial machinery, and buildings, etc) and some Area Terrain providing cover for infantry (such as craters, woods, jungle, swamps, debris fields, hills and ruins, etc).When put together, this terrain should have a sufficient footprint to cover between a quarter and a third of the surface of the playing area. A good rule of thumb here is five or six larger pieces of scenery (roughly 12" x 12" each) as well as three to six pieces of smaller ‘scatter terrain’, which can comprise a mixture of pieces roughly 6" x 6" or of larger miniatures bases made up as terrain, such as stacks of barrels, containers, sinkholes, small craters, small vehicles, scrap piles, etc. | ||
Fortifications
Some pieces of scenery, referred to as Fortifications, are selected as part of a player’s army rather than as ‘neutral’ pieces of terrain controlled by neither player. If a Fortification is taken as part of an army, its cost in points is paid by the controlling player, then it is set up with the rest of the army using the same rules as other models (as set by the rules found in this section and in the mission in use). Any Buildings set up as ‘neutral’ pieces of terrain are part of neither players’ army.Determine Deployment Map
After the terrain has been set up, you must determine each player’s Deployment Zone. This will define the area in which a player may set up their army, before the first turn of the game. The use of a deployment map stops armies from starting too close to each other, stops the granting of advantages to either of the players, and allows for a certain amount of manoeuvring before the chaos of battle sets in. Each of the deployment maps presented here as part of Horus Heresy – Age of Darkness missions divides the battlefield into two distinct Deployment Zones, one for each player. At the start of the game, each player will deploy their entire army, save where the mission’s rules or a unit’s special rules dictate otherwise. Units that cannot fit into a player’s Deployment Zone are placed into Reserve, unless the mission’s rules or deployment instructions state otherwise.Some missions may specify which Deployment Zone to use, or provide a custom deployment map. For those missions that do not, or where players wish to utilise a different deployment map, one of the following can be used. In order to determine which map to use, when the mission does not dictate one, players can select one either by mutual agreement or by randomly rolling on the Deployment Map table that follows.
Once the deployment map has been decided on, the players should roll off. The winner of the roll-off selects one of the Deployment Zones to be theirs, and their opponent then takes the remaining Deployment Zone.
Player’s Battlefield Edge
In addition to defining a Deployment Zone for each player, a battlefield edge will need to be assigned to each player. When models Fall Back, they will head towards a player’s battlefield edge and it is also where Reserve units will enter play. Most deployment maps will specify a battlefield edge for each player. If the mission being used does not, then the players can either agree between them which battlefield edges they will use or randomly select one for each player. When selecting battlefield edges, it is generally most effective to have each player’s battlefield edge on opposite sides of the battlefield.Age of Darkness Deployment Map Table
|
Deployment Maps
1. Clash of the Line
Clash of the Line has two opposing arrowhead-shaped Deployment Zones. When deploying in either of these zones, no unit can be deployed within 12" of the centre of the battlefield during standard deployment.The player’s own battlefield edge is the narrow edge that forms the rear of their ‘arrowhead’.

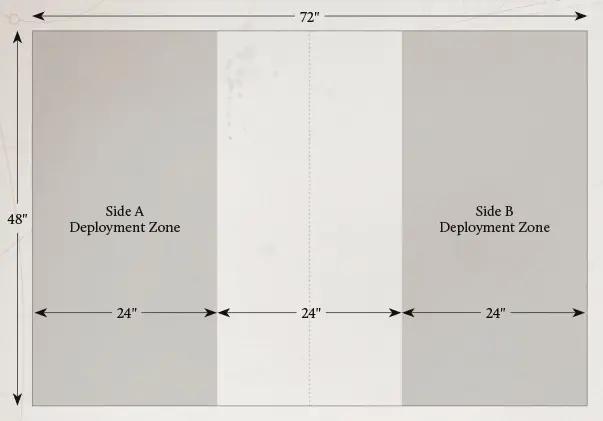
2. Dawn of War
If players are using the Dawn of War deployment map, the battlefield is divided into two equal halves across its length.For Dawn of War battles, a player’s battlefield edge is the long battlefield edge touching their own Deployment Zone.

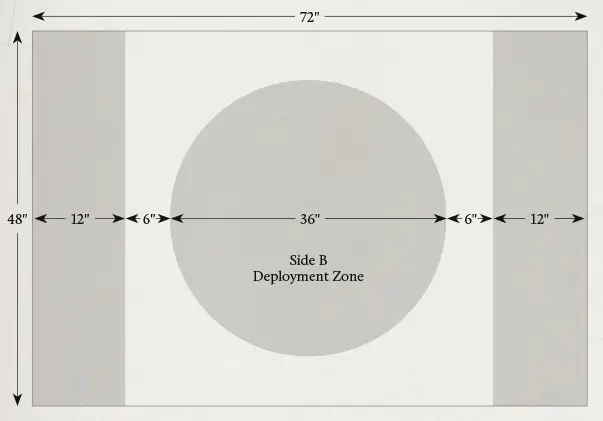
3. Search and Destroy
The Search and Destroy deployment map divides the battlefield into four equal quarters. Each quarter constitutes a Deployment Zone. Units may not be deployed into the circular 18" diameter area at the centre of the battlefield.A player’s battlefield edges are any that form part of their Deployment Zone.

4. Hammer and Anvil
If players are using the Hammer and Anvil deployment map, the battlefield is divided into two equal halves across its width.For Hammer and Anvil battles, a player’s battlefield edge is the short battlefield edge touching their own Deployment Zone.
5. Ambush
The Ambush deployment map divides the battlefield into three areas: a central Defender’s area (representing the force being ambushed) and two deployment areas on the narrow battlefield edges which are both available to the opposing player, representing the Attacking forces that have set up the ambush.The player winning the roll-off may opt to take the part of the Attacker or the Defender, and their opponent then takes the opposing deployment type. The narrow battlefield edges are the Attacking player’s, while the long battlefield edges are the Defending player’s (with any of the Defender’s Reserves entering by the long edges, representing reinforcements rushing to relieve the ambushed force).
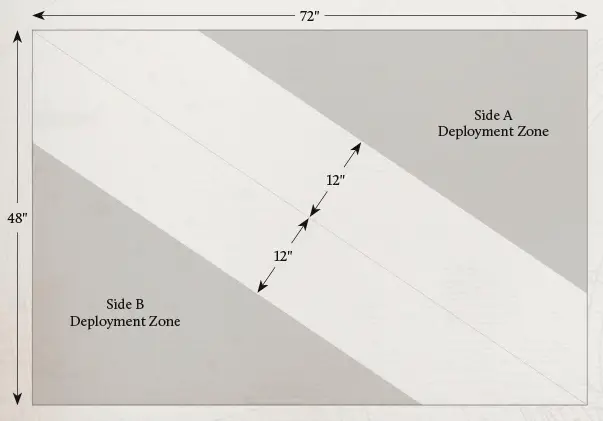
6. Vanguard Strike
If using the Vanguard Strike deployment map, the battlefield is divided into two equal halves across its diagonal. The players then agree which diagonal Deployment Zone each will play or can instead randomise to decide.For Vanguard Strike battles, a player’s battlefield edge is the long battlefield edge that touches their own Deployment Zone.
Deployment
The last step of pre-game preparation is to deploy the two armies onto the battlefield. If you are using a Horus Heresy – Age of Darkness mission, it will tell you how to deploy the armies taking part in the battle. For missions of the players’ own devising, or where no other method of deployment is provided, a standard deployment procedure is given as follows. You should feel free to devise other methods for your own games if you prefer. For example, some players like to place a screen across the centre of the battlefield so that their armies can deploy in secret; others draw a map showing where they plan to deploy their units, and so on.Whichever method you use, models must either deploy within their Deployment Zone, or be held back in Reserve. Models can be deployed ‘inside’ Buildings, Fortifications, or Transport Vehicles in their Deployment Zone, subject to their Transport Capacity. Units may not be deployed in Impassable Terrain. Note that models must be deployed fully within their Deployment Zone.
Standard Deployment Method
The following sequence is used in most Horus Heresy – Age of Darkness missions where another method is not provided:- The players roll off. The winner of the roll-off decides who will deploy first and who will deploy second.
- The side deploying first must set up all the units in their army.
- Then the other side sets up all the units in their army.
- The player who deployed first can choose to take the first or second turn. If they decide to take the first turn, their opponent can attempt to Seize the Initiative.
Not enough RoomSometimes when deploying, some of the models in a player’s army will not fit within the bounds of their Deployment Zone. When this happens, any units that can’t fit into the Deployment Zone must be held back as Reserve. It may also be useful to reduce the amount of scenery in a Deployment Zone, or shuffle it around slightly in order to give models the space they need to deploy. | ||
The First Turn
Once both armies have been set up on the battlefield, the players must determine which of them will take the first turn. If using a Horus Heresy – Age of Darkness mission, then this information will be included with it, otherwise the players must decide the starting player for themselves.In most games, it will be the player who deployed their army first who takes the first turn, however, some missions may specify otherwise. If, for any reason, there is no obvious way to decide which player will take the first turn, the players should either agree on which of them will do so or roll off, with the winner choosing to go first or second.
Most Horus Heresy – Age of Darkness missions also make use of the following rule, allowing the player designated to take the second turn a chance to seize the initiative and add a sense of unpredictability to the Turn sequence. Unless a mission specifies otherwise, or both players agree not to, the Seize the Initiative rule should be used.
Seize the Initiative: If the player who is due to go second wishes to Seize the Initiative, that player can roll a D6 before beginning the first game turn. On a roll of 6, they successfully Seize the Initiative and go first instead.
Game Length
For most games, the length of the game will be measured as a number of Game Turns. When using a Horus Heresy – Age of Darkness mission, it will indicate the total number of Game Turns that should be played. If, for whatever reason, a maximum number of turns is not indicated, the players will need to decide on a length for the game. If using a turn limit, then five or six turns should be considered a standard game length – remember that the larger the game is, the more time you’ll need. Alternatively, you can play to a time limit, in which case an hour or two is long enough for a small game with a few dozen models, and two or three hours is long enough for a larger game with a hundred or so models.Some Horus Heresy – Age of Darkness missions use the following rule for Variable Game Length to determine how long a battle lasts:
Variable Game Length: At the end of Game Turn 5, one of the players must roll a D6. On a 3+ the game continues, otherwise the game is over. If another turn is played, another D6 must be rolled at the end of Game Turn 6, and this time, the game only continues on a roll of 4+. The battle automatically ends at the close of Game Turn 7.
Victory Conditions
Although fighting until one player concedes or their army is destroyed is a perfectly viable method of determining who has won a battle, more commonly ‘Victory points’ (as follows) are used to decide the winner. Alternatively, the players might wish to say that one side or the other must achieve a specific objective; if they have achieved this when the game ends, they win the battle, and if not then the other side wins. Victory conditions like this are most appropriate when you are refighting a battle based on the background for the Horus Heresy, where each side will have certain very specific goals.Victory Points
Most of the Horus Heresy – Age of Darkness missions published in this and other supplements use Victory points. Such games are referred to as ‘Victory Point games’. Victory points are acquired by securing Primary and Secondary Objectives, and the winner is the army with the most Victory points at the end of the game. If the winner has twice the number of Victory points as their opponent, it can be considered a crushing victory! If both armies have the same number of Victory points, the game is a tactical draw.Sudden Death Victory
Generally, a Victory Point game will not finish before the agreed turn limit. However, it is possible to achieve a ‘sudden death victory’ in a Victory Point game in the following circumstances:If one player concedes the battle, the game ends and a crushing victory goes to their opponent.
If, at the end of any Game Turn, one player has no models left on the battlefield, their opponent automatically wins. Units occupying a Building or Embarked on a Vehicle still count as being on the battlefield, but units that are in Reserve do not.
Primary Objectives
Primary Objectives define an army’s main goal on the battlefield. This goal usually involves achieving the objectives in question – by controlling one or more vital sites or simply destroying parts of the enemy’s force. Unless otherwise stated, both sides share a mission’s Primary Objectives. If you are playing one of the Age of Darkness missions presented in this book, it will tell you how to determine your game’s Primary Objective. Other mission types may use different methods, which will be explained as part of those missions.Secondary Objectives
Secondary Objectives are less important than Primary Objectives, but can still mean the difference between victory and defeat. Most Victory Point games will have several Secondary Objectives, as specified by the mission, and some of the most common are detailed below:Slay the Warlord
If the enemy army has a Warlord, and at the end of the game their Warlord has been removed as a casualty, you score 1 Victory point. If that Warlord was also a Primarch choice then an additional 1 Victory point is scored.First Blood
The first unit, of any kind, to be completely destroyed during the game is worth 1 Victory point to the opposing player at the end of the game.If two or more units from opposing forces are destroyed simultaneously (for example, at the same Initiative step in an Assault phase) then both players get 1 Victory point (in addition to any Victory points from the mission).
Last Man Standing
The side with the greatest number of surviving units at the end of the game gains an extra Victory point.Attrition
The army which has destroyed the highest number of enemy units at the end of the game gains an additional Victory point.Linebreaker
If, at the end of the game, a player has at least one model from one or more Scoring units completely within 12" of the enemy’s table edge, they score 1 Victory point.The Price of Failure
If one army has a Lords of War unit and at the end of the game all models in that unit have been removed as Casualties, the opposing player scores 1 Victory point.Terrain & Victory Conditions
Do not include any scenery models that were not purchased as part of an army when awarding Victory points or determining if a player has any units ‘on the battlefield’.Objective Markers
Some Horus Heresy – Age of Darkness missions require the use of Objective markers. An Objective marker is usually a point on the battlefield of particular importance to one or both of the armies. These points are designated by using specially modelled markers, coins or counters around 1"-2" in diameter.Placing Objective Markers
Missions that use Objective markers will contain details of how many need to be placed and any special instructions for how to place them on the battlefield. Unless instructed otherwise in the mission, take it in turns to set up Objective markers according to the following rules:- Roll off to see who places the first marker.
- No Objective marker can be placed within 6" of any battlefield edge or within 12" of another Objective marker.
- No Objective marker can be placed on Impassable Terrain.
- No Objective marker may be placed inside a Building, though it can be placed upon it – should a Building with an Objective upon it be removed, place the Objective marker on the ground below the point it occupied.
Controlling Objective Markers
An Objective marker is considered under a player’s control if there is at least one model from one of that player’s Scoring units, and no models from enemy Scoring or Denial units, within 3" of it. As different Objective markers vary in shape and size, it is important to agree at the beginning of the game exactly from where this distance will be measured. Any unit that is in a Building or Fortification is considered to be within 3" of any Objective markers that are on or within 3" of the Building or Fortification.A unit can only control one Objective marker at a time. If a unit moves into a position where it could control two Objective markers, the controlling player must make it clear to their opponent which Objective the unit is controlling.
For some missions, an Objective is defined as a certain area of the battlefield rather than an Objective marker. In these situations, the Objective is considered to be controlled by a player if there is at least one of that player’s Scoring units wholly within the defined zone, and no models from enemy Scoring units wholly within the defined zone. Any unit that is in a Building or Fortification is considered to be wholly within an Objective zone if the Fortification or Building they are embarked in is wholly within that zone. Note that, for controlling Objective zones, enemy Denial units are not counted, only Scoring units can control or contest an enemy’s control of a scoring zone.
Scoring Units
Any unit with the Line sub-type, and other units whose Army List entries specifically note it, are a Scoring unit, unless:- It is Embarked upon a Transport Vehicle of any kind (once Disembarked it may count as a Scoring unit as normal).
- It is a Zooming Flyer.
- It has a special rule specifying that it never counts as a Scoring unit.
- It is currently Falling Back or Pinned (if the unit Regroups or recovers from Pinning, it immediately reverts to being a Scoring unit again).
- It is a Building or Fortification.
Denial Units
Any other units in the game are considered Denial units, unless:- It is Embarked upon a Transport Vehicle of any kind (once Disembarked it may count as a Denial unit as normal).
- It is a Vehicle of any type.
- It has a special rule specifying that it never counts as a Denial unit.
- It is currently Falling Back or Pinned (if the unit Regroups or recovers from Pinning, it immediately reverts to being a Denial unit again).
- It is a Building or Fortification.
Mission Special Rules
Special rules can be added to a game to cover unique situations, tactics or abilities that you feel need to be represented in your battle. For example, if you were fighting a battle set on a frozen ice world, you might include special rules for snow drifts or the occasional blizzard sweeping across the table. It is for you and your opponent to decide if any special rules apply in your games. One of the strengths of Horus Heresy – Age of Darkness is that it is both easy and fun to devise your own special rules. They are especially useful when fighting a battle based on a story from the Horus Heresy background, or which has a strong theme for another reason. Just take care not to get carried away – a couple of mission special rules can add much to a game, but having too many special rules may bog the game down.Some of the Horus Heresy – Age of Darkness missions available use unique special rules which confer extra abilities, restrictions or effects onto your games. The Age of Darkness missions included in this book make use of the more common mission special rules presented here; many other missions will use these alongside their own special rules and these will be detailed as a part of that mission.
Night Fighting
If a mission has the Night Fighting special rule, either player can declare that they wish to fight the battle at night. If either player does so, roll a D6 before deployment: on a 2+, the Night Fighting special rule is in effect during Game Turn 1. At the beginning of Game Turn 2, roll a D6, on the score of a 4+ the Night Fighting special rule is in effect during Game Turn 2 as well. At the end of Game Turn 2, all effects of the Night Fighting special rule cease, and the special rule no longer has any effect, unless another special rule states otherwise.While the Night Fighting special rule is in effect, all units on the battlefield are affected by the following conditions:
- All units suffer a -1 penalty to their Leadership and Ballistic Skill.
- No unit may draw line of sight to any unit that is more than 24" away. Barrage weapons targeting units more than 24" away must re-roll all results of ‘Hit’ on the Scatter dice.
Reserve
Reserves are forces that can be called upon to reinforce a battle at short notice, or to conceal an army’s true strength from the foe.Preparing Reserves
When deploying their armies, players can choose not to deploy some of their units, keeping them in Reserve to arrive later. In addition, if it is impossible to deploy a unit for any reason, it must be placed in Reserve. The only exceptions to this are units that cannot move after they have been deployed, such as Fortifications or any model with a Movement Characteristic of 0. Such units are removed as casualties if it is impossible to deploy them during the Deployment step of Preparing for Battle.Combined Reserve Units
During deployment, when deciding which units are kept in Reserve, the controlling player must specify if any of the Independent Characters in Reserve are joining a unit, in which case they must arrive together. Similarly, the controlling player must specify if any units in Reserve are embarked upon any Transport Vehicles in Reserve, in which case they will arrive together. In either case, when making a Reserve roll (as follows) for a combined unit, roll a single D6 for the unit and/or its Independent Character/Transport Vehicle.Arriving from Reserve
At the start of the Active player’s second turn, roll a D6 for each unit in that player’s army that is being held in Reserve – these are known as ‘Reserve rolls’. If the roll is a 3 or more, that unit arrives this turn. If the roll is less than 3, it remains in Reserve and is rolled for again next turn.If a successful Reserve roll is made for a unit, that unit must be moved onto the battlefield this turn. From the start of Game Turn 4 all Reserve rolls are considered to automatically succeed, unless another special rule states otherwise, and all of the Active player’s units that are in Reserve must be moved onto the battlefield or they are considered destroyed.
Some special rules can modify the roll required for a unit to arrive from Reserve. Regardless of the modifier(s), a natural roll of a 1 always means that the unit in question remains in Reserve, and a natural roll of a 6 always means that the unit in question arrives from Reserve.
Any unit for which a successful Reserve roll has been made must move onto the Battlefield at the start of the Controlling player’s Movement phase, before any other models are moved. Select one of the Active player’s arriving units and deploy it, moving it onto the table in the manner described as follows. Then pick another arriving unit and deploy it, and so on until all arriving units are on the table. The Active player can then proceed to move their other units as normal.
Moving on from Reserve
When a Reserve unit arrives, it must move onto the battlefield from the controlling player’s battlefield edge. Measure the model’s move from the edge of the battlefield, as if they had been positioned just off the battlefield in the previous turn. A unit cannot Charge, or use any abilities or special rules that must be used at the start of the turn, in the turn it arrives from Reserve. If the Reactive player chooses to declare a Reaction in response to the movement of a unit that has entered play from Reserve that turn, then they may only use the Interceptor Reaction (see below).If, for some reason, a model’s maximum Move is insufficient to fit the entire model onto the battlefield, or it becomes Immobilised whilst moving onto the battlefield, place the model as far onto the battlefield as you can. If this leaves the model in a position where it may fall off the battlefield, then mark the position the model is meant to be occupying in some manner, and then position it more safely.
Advanced Reaction: InterceptorAdvanced Reactions are available to specific players as noted in their description. Unlike Core Reactions, they are activated in unique and specific circumstances, as noted in their descriptions, and can often have game changing effects. Advanced Reactions use up points of a Reactive player’s Reaction Allotment as normal and obey all other restrictions placed upon Reactions, unless it is specifically noted otherwise in their description.Interceptor - This Advanced Reaction may be made whenever an enemy unit enters play from Reserve within line of sight of a friendly unit, and within the maximum range of at least one weapon in that unit. The Reacting unit may make a Shooting Attack, targeting a unit deployed onto the battlefield in this Phase and following all the usual rules for Shooting Attacks. Vehicles may only fire Defensive weapons, unless another rule specifically states otherwise. Shooting Attacks made as part of the Interceptor Reaction do not cause Morale checks, regardless of the number of casualties inflicted. Unless otherwise specified by another rule, making this Reaction expends a point from the Reactive player’s Reaction Allotment for the Phase in which the Reaction is made. | ||
Leaving the Battlefield
If a unit goes into Reserve part of the way through the game, such as a Flyer leaving the battlefield, then it reenters Reserve. Units that re-enter Reserve are treated exactly like any other unit in Reserve, and must roll to see if they may re-enter play as per the normal rules. Any unit that re-enters Reserve on Turn 3 or later must re-enter play at the start of the Controlling player’s next turn; if it does not then it is considered destroyed.Note that only models with a special rule that indicates they may leave play and re-enter Reserve may do so; if a unit without such a special rule leaves the battlefield, for any reason, then it is considered destroyed and does not re-enter Reserve.
Reserves: Deep Strike Assault
A Deep Strike is a coordinated drop from high altitude, or, in some cases, from low orbit voidcraft. Only the most elite armies can hope to undertake such a risky strategy, for should the troops assigned to the drop waver, then it is likely the entire strike will fail. However, a successful Deep Strike can see the enemy’s formation broken apart and their troops scattered.Before the start of Game Turn 1, when placing units into Reserve, a player may choose to assign one or more of their units in Reserve to perform a Deep Strike Assault. All models in a unit assigned to Deep Strike Assault must have the Deep Strike special rule, unless Embarked on a Transport Vehicle that has the Deep Strike special rule itself.
Unless stated otherwise by a specific rule, a player may only make a single Deep Strike Assault, and any units with the Deep Strike special rule not assigned to the Deep Strike Assault (or another Reserve action) must either deploy normally or enter play from Reserve as normal. However, this does not limit the player’s ability to undertake any other Reserve action, such as a Flanking Assault or other actions described in specific army lists or special rules.
When rolling for Reserve, roll a single D6 for all of the units assigned to the Deep Strike Assault rather than rolling separately for each unit. If the roll is successful, and the controlling player chooses to bring them into play, then all of the Deep Striking units must enter play in that turn and follow the Deep Strike Assault procedure described below:
Performing a Deep Strike Assault
Once a Reserve roll for the units assigned to the Deep Strike Assault has succeeded and the units are to be brought into play, the controlling player selects one of the available units to deploy first. Place a single model from that unit anywhere on the battlefield that is at least 1" from any enemy model, table edge or piece of Impassable Terrain and then scatter that model.If the model’s final position is within 1" of an enemy model, any battlefield edge or a piece of Impassable Terrain, then the controlling player’s opponent may move that model to any position within 18" that is more than 1" from any enemy model, battlefield edge or piece of Impassable Terrain. If there is no suitable position within 18" then the model may be repositioned anywhere on the battlefield that is more than 1" from any enemy model, battlefield edge or piece of Impassable Terrain. If possible, the model must be placed in a position that will allow the remainder of the squad to deploy (as follows), and may only be placed in a position that denies the remainder of the squad a place within unit coherency if no other position is available.
Once the model’s final position has been decided, the remainder of the unit may be deployed anywhere that is within unit coherency and more than 1" from any enemy model or piece of Impassable Terrain. Any models that cannot be placed are removed as casualties.
Once this first unit has been deployed, roll a D6. On the roll of a ‘1’, the Deep Strike Assault is Disordered, and the opposing player may deploy each other unit in the Deep Strike Assault anywhere within 24" of the first unit without scattering, though no model may be within 1" of an enemy model or within Impassable Terrain. If the roll is a ‘2’ or higher, then the controlling player deploys each other unit anywhere within 12" of the first, though no model may be within 1" of an enemy model or within Impassable Terrain.
Once all units are deployed, any enemy units that have one or more models within 6" of any unit deployed as part of the Deep Strike Assault must make an immediate Pinning test. Once all Pinning tests are resolved, any enemy units that are neither Pinned or Falling Back and are within line of sight and range may choose to make the Interceptor Reaction targeting any one of the units deployed as part of the Deep Strike Assault. Note that no Reaction other than Interceptor may be made against the deployment of a unit as part of a Deep Strike Assault.
Once all units from the Deep Strike Assault have been deployed and any Interceptor Reactions have been resolved, the turn proceeds as normal. Units that have been deployed as part of a Deep Strike Assault may not Move or Run in the same Movement phase as they are deployed, but may Shoot and Assault as normal.
Reserves: Flanking Assault
A flanking assault commits a portion of the army’s strength to a hidden attack on the enemy’s rear. While the flanking elements seek a path to the enemy’s weakest point, the main elements must stand their ground alone and unsupported. It is a risky strategy, but one likely to bring about the defeat of even the strongest foe.Before the start of Game Turn 1, when placing units into Reserve, a player may choose to assign one or more of their units in Reserve to perform a Flanking Assault. All models in a unit assigned to Flanking Assault must have the Outflank special rule, unless embarked on a Transport Vehicle that has the Outflank special rule itself.
Unless stated otherwise by a specific rule, a player may only make a single Flanking Assault. However, this does not limit the player’s ability to undertake any other Reserve action, such as a Deep Strike Assault or other actions described in specific army lists or special rules.
Once all units have been assigned to the Flanking Assault, and all units in both armies have been deployed, but before any Infiltrators deploy or Scout moves are made, place a Flanking marker at any point along the edge of the battlefield (including within the enemy player’s Deployment Zone). This marker represents the intended arrival point of the Flanking Assault.
When rolling for Reserve, roll a single D6 for all of the units assigned to the Flanking Assault rather than rolling separately for each unit. If the roll is successful, and the controlling player chooses to bring them into play, then all of the Flanking Assault units must enter play in that turn and follow the Flanking Assault procedure described below.
Performing a Flanking Assault
Once a Reserve roll for the units assigned to the Flanking Assault has succeeded and the units are to be brought into play, the controlling player must roll a D6. On the roll of a ‘1’, the Flanking Assault is Disordered and the enemy player may move the Flanking marker up to 24" in either direction along the edge of the battlefield. If the roll is a ‘2’ or higher then the player making the Flanking Assault may move the Flanking marker up to 6" in either direction along the edge of the battlefield. Once the Flanking marker’s final position has been determined, the Flanking Assault unit’s controlling player may move the Flanking Assault units onto the battlefield, measuring from the point marked by the Flanking marker, one at a time in an order of their choice. These units may move up to their Movement Characteristic, follow all the normal rules for Movement and may choose to Run. If there is not enough room for all the units taking part in the Flanking Assault to move onto the battlefield, then those that cannot fit must remain in Reserve and move onto the battlefield in their controlling player’s next turn.Once all Flanking Assault units have moved onto the battlefield, any enemy units that have one or more models within 6" of any unit deployed as part of the Flanking Assault must make an immediate Pinning test. Once all Pinning tests are resolved, any enemy units that are neither Pinned nor Falling Back and are within line of sight may choose to make the Interceptor Reaction targeting any one of the units deployed as part of the Flanking Assault. Units that were unable to deploy in the initial Flanking deployment and were forced to remain in Reserve do not generate Pinning tests when they move onto the battlefield, but may be targeted by Interceptor Reactions.
Once all units from the Flanking Assault have moved onto the battlefield and any Interceptor Reactions have been resolved, the turn proceeds as normal. Units that have moved onto the battlefield as part of a Flanking Assault may not move or Run again in the current Movement phase, but may Shoot and Assault as normal.
Blood Feud
For this mission, all players select armies using the standard Horus Heresy – Age of Darkness rules and any one Force Organisation chart of each player’s choice, to an agreed points limit.
SETTING UP THE GAME
Before any models are deployed, deployment maps must be determined and all scenery set up, except Fortifications included as part of any army.
DEPLOYMENT
To determine deployment order, the players roll off. The winner may choose to deploy first or second.
The player who deploys first selects their Deployment Zone and then deploys their entire force, including any Fortifications they possess, except for any units held in Reserve, into their Deployment Zone.
The player who is deploying second then deploys their entire force, including any Fortifications they possess, except for any units placed in Reserve, into their Deployment Zone.
Each player should determine their Blood Feud target (see the Victory Conditions section).
FIRST TURN
The player who deploys first also has the first turn, unless their opponent can Seize the Initiative.
GAME LENGTH
This mission lasts for six turns.
VICTORY CONDITIONS
This mission’s victory conditions are achieved by the destruction of the enemy’s fighting strength, with a particular strategic target in mind whose loss will cripple their foe. At the end of the game, the player who has scored the most Victory points has won the game. If the players have the same number of Victory points, the game ends in a draw.
Blood Feud: After setting up and deploying the armies, but before play begins, each player should secretly note down a particular Blood Feud from the list below. At the end of the game, the player’s chosen Blood Feud is revealed. Each player gains additional Victory points for each enemy unit which has either been destroyed or is Falling Back at the end of the game, and is of the type(s) listed for their selected Blood Feud.
Blood Feud
- Infantry: +1 Victory point per unit
- Daemon: +1 Victory point per unit
- Dreadnought & Automata: +2 Victory points per unit
- Cavalry & Flyers: +2 Victory points per unit
- Non-flyer Vehicles: +2 Victory points per unit
- Primarch: +6 Victory Points per unit
Secondary Objectives
Slay the Warlord: If a side destroyed the enemy Warlord, that side gains 1 Victory point. If that Warlord was also a Primarch choice, then an additional Victory point is scored. Note that this is in addition to any points gained via Blood Feud, etc.
Last Man Standing: The side with the greatest number of surviving units at the end of the game gains +1 Victory point.
The Price of Failure (If Lords of War units are used): If one army has a Lords of War unit and at the end of the game all models in that unit have been removed as Casualties, the opposing player scores 1 Victory point.
MISSION SPECIAL RULES
Onslaught
For this mission, all players select armies using the standard Horus Heresy – Age of Darkness rules and any one Force Organisation chart of each player’s choice, to an agreed points limit.
SETTING UP THE GAME
Before any models are deployed, deployment maps must be determined and all scenery set up, except Fortifications included as part of any army.
DEPLOYMENT
To determine deployment order, the players roll off. The winner may choose to deploy first or second.
The player who deploys first selects their deployment zone and then deploys first using the Staged Deployment special rule (see Mission Special Rules), followed by the second player.
After both sides have deployed, including Infiltrators and after Scout redeployments have been made, each player places a single Onslaught Objective marker in their opponent’s Deployment Zone and further than 6" away from any battlefield edge, with the player that deployed first placing the first Objective.
FIRST TURN
The player who deploys first also has the first turn, unless their opponent can Seize the Initiative.
GAME LENGTH
This mission lasts for six turns.
VICTORY CONDITIONS
The Onslaught mission represents an attempt to break the enemy line through shock and brute force. At the end of the game, the player who has scored the most Victory points has won the game. If the players have the same number of Victory points, the game ends in a draw.
Primary Objectives
Onslaught Attack: Any enemy unit destroyed in the first Game Turn is worth 1 Victory point.
Seize the Onslaught Objectives: If a player has control of the Onslaught Objective in their opponent’s Deployment Zone at the end of the game, that player gains 5 Victory points.
Slay the Warlord: If a side destroyed the enemy Warlord, that side gains 1 Victory point. If that Warlord was also a Primarch choice, then an additional Victory point is scored.
Attrition: The army which has destroyed the highest number of enemy units at the end of the game gains +1 Victory point.
The Price of Failure (If Lords of War units are used): If one army has a Lords of War unit and at the end of the game all models in that unit have been removed as Casualties, the opposing player scores 1 Victory point.
MISSION SPECIAL RULES
- Reserves
- Night Fighting
- Staged Deployment
| STAGED DEPLOYMENT Rather than deploy their entire army at once, the player who deploys first deploys a single unit on to the table, then their opponent deploys a unit, in the Staged Deployment order shown below. After this has been done, the two players continue to alternate deployment of their units until they have both fully deployed (except any units held in Reserve, etc). It is entirely possible that one side will run out of units to deploy before the other. If this is the case, then the player with the larger number of units may deploy their remainder as they wish after their opponent has run out. Staged Deployment Order
| ||
Shatter Strike
For this mission, all players select armies using the standard Horus Heresy – Age of Darkness rules and any one Force Organisation chart of each player’s choice, to an agreed points limit.
SETTING UP THE GAME
Before any models are deployed, deployment maps must be determined and all scenery set up, except Fortifications included as part of any army.
DEPLOYMENT
To determine deployment order, the players roll off. The winner may choose to deploy first or second.
The player who deploys first selects their Deployment Zone and then deploys their entire force, including any Fortifications they possess, except for any units held in Reserve, into their Deployment Zone.
The player who is deploying second then deploys their entire force, including any Fortifications they possess, except for any units placed in Reserve, into their Deployment Zone.
FIRST TURN
The player who deploys first also has the first turn, unless their opponent can Seize the Initiative.
GAME LENGTH
After five turns, roll a D6. On the roll of a 4+, a sixth and final turn is played.
VICTORY CONDITIONS
The victory conditions of this mission are tied to taking ground from the enemy. At the end of the game, the player who has scored the most Victory points has won the game. If the players have the same number of Victory points, the game ends in a draw.
Shatter Strike: At the end of the game, each player scores 2 Victory points for every friendly Scoring unit in their opponent’s Deployment Zone, and 1 Victory point for every friendly Denial unit in their opponent’s Deployment Zone.
Secondary Objectives
Slay the Warlord: If a side destroyed the enemy Warlord, that side gains 1 Victory point. If that Warlord was also a Primarch choice, then an additional Victory point is scored.
Attrition: The army which has destroyed the highest number of enemy units at the end of the game gains +1 Victory point.
The Price of Failure (If Lords of War units are used): If one army has a Lords of War unit and at the end of the game all models in that unit have been removed as Casualties, the opposing player scores 1 Victory point.
MISSION SPECIAL RULES
Dominion
For this mission, all players select armies using the standard Horus Heresy – Age of Darkness rules and any one Force Organisation chart of each player’s choice, to an agreed points limit.
SETTING UP THE GAME
Before any models are deployed, deployment maps must be determined and all scenery set up, except Fortifications included as part of any army. Finally, place mission Objectives in accordance with the Mission Special Rules section.
DEPLOYMENT
To determine deployment order, the players roll off. The winner may choose to deploy first or second.
The player who deploys first selects their Deployment Zone and then deploys their entire force, including any Fortifications they possess, except for any units held in Reserve, into their Deployment Zone.
The player who is deploying second then deploys their entire force, including any Fortifications they possess, except for any units placed in Reserve, into their Deployment Zone.
FIRST TURN
The player who deployed first also has the first turn, unless their opponent can Seize the Initiative.
GAME LENGTH
After five turns, roll a D6. On a 4+, a sixth and final turn is played.
VICTORY CONDITIONS
The victory conditions of this mission are achieved by first taking objectives in the heart of the war zone and then retaining control of them through the course of the battle. At the end of the game, the player who has scored the most Victory points has won the game. If the players have the same number of Victory points, the game ends in a draw.
Primary Objectives
Dominion Objectives: At the start of each Active player’s turn, the current Active player gains 1 Victory point for each Objective marker they control. These Victory points are kept even if that Objective is lost later in the game, and contribute to the player’s Victory points total at the end of the game.
Slay the Warlord*: If a side destroyed the enemy Warlord, they gain D3 extra Victory points. If that Warlord was also a Primarch choice, then an additional +3 Victory points are scored.
Attrition*: The army which has destroyed the highest number of enemy units at the end of the game gains D3 additional Victory points.
The Price of Failure (If Lords of War units are used): If one army has a Lords of War unit and at the end of the game all models in that unit have been removed as Casualties, the opposing player scores 1 Victory point.
*Note that the rewards for these Secondary Objectives are intentionally greater than normal.
MISSION SPECIAL RULES
- Reserves
- Night Fighting
- Dominion Objectives
| DOMINION OBJECTIVES This mission uses five Objective markers. During the game’s set-up, but before deployment has been determined, the players take turns in placing one Objective each in the area of the table outside of the players’ Deployment Zones until all of the Objectives have been placed. These markers may not be placed within 6" of each other or a battlefield edge. Alternative – Objective Terrain Rather than use Objective markers, if both sides agree, individual pieces of terrain may instead be specified as the mission’s Objectives. It is suggested in this case that three terrain pieces be used, which must be fully located outside of either players’ Deployment Zones and suitably marked to identify them. Each should be distinct and easily identifiable, and have a suggested total size of no less than 6" on each side and no more than 12" on each side, and be substantial enough to provide cover to Infantry models inside them. Suitable types of terrain include ruins, large shell craters, redoubts, derelict buildings, vehicle wrecks, etc. In order to claim or deny a piece of Objective Terrain, a valid Scoring or Denial unit (as appropriate) must have at least one model within 6" of the centre of the terrain’s ground level. A unit may never claim or deny more than a single piece of Objective Terrain at once. | ||
Tide of Carnage
For this mission, all players select armies using the standard Horus Heresy – Age of Darkness rules and any one Force Organisation chart of each player’s choice, to an agreed points limit.
SETTING UP THE GAME
Before any models are deployed, deployment maps must be determined and all scenery set up, except Fortifications included as part of any army.
DEPLOYMENT
To determine deployment order, the players roll off. The winner may choose to deploy first or second.
The player who deploys first selects their Deployment Zone and then deploys their entire force, including any Fortifications they possess, except for any units held in Reserve, into their Deployment Zone.
The player who is deploying second then deploys their entire force, including any Fortifications they possess, except for any units placed in Reserve, into their Deployment Zone.
FIRST TURN
The player who deploys first also has the first turn, unless their opponent can Seize the Initiative.
GAME LENGTH
This mission lasts for five turns.
VICTORY CONDITIONS
The victory conditions of this mission are achieved by forcing the enemy back from the battlefield. At the end of the game, the player who has scored the most Victory points has won the game. If the players have the same number of Victory points, the game ends in a draw.
Tide of Carnage: Each sector of the battlefield is worth a certain amount of Victory points for the side who controls it at the end of the game. In order to claim a sector, a side must have one or more Scoring units in the sector and the enemy must have no Scoring units left in that sector.
The sectors of the battlefield are defined as follows:
- Player’s own Deployment Zone: 3 Victory points
- No Man’s Land (the area of the battlefield which is not covered by either Deployment Zone): 5 Victory points
- Opposing player’s Deployment Zone: 7 Victory points
Secondary Objectives
Slay the Warlord: If a side destroyed the enemy Warlord, that side gains 1 Victory point. If that Warlord was also a Primarch choice, then an additional Victory point is scored.
Last Man Standing: The side with the greatest number of surviving units at the end of the game gains +1 Victory point.
The Price of Failure (If Lords of War units are used): If one army has a Lords of War unit and at the end of the game all models in that unit have been removed as Casualties, the opposing player scores 1 Victory point.
MISSION SPECIAL RULES
- Reserves
- Night Fighting
- Heavy Armour
War of Lies
For this mission, all players select armies using the standard Horus Heresy – Age of Darkness rules and any one Force Organisation chart of each player’s choice, to an agreed points limit.
SETTING UP THE GAME
Before any models are deployed, deployment maps must be determined and all scenery set up, except Fortifications included as part of any army.
A single Objective marker is placed as close to the centre of the battlefield as possible. Each player then takes turns placing two Objective markers each, elsewhere on the battlefield, no closer than 12" from another Objective marker, and no closer than 6" from any battlefield edge.
DEPLOYMENT
To determine deployment order, the players roll off. The winner may choose to deploy first or second.
The player who deploys first selects their Deployment Zone and then deploys their entire force, including any Fortifications they possess, except for any units held in Reserve, into their Deployment Zone.
The player who is deploying second then deploys their entire force, including any Fortifications they possess, except for any units placed in Reserve, into their Deployment Zone.
FIRST TURN
The player who deploys first also has the first turn, unless their opponent can Seize the Initiative.
GAME LENGTH
This mission lasts for six turns.
VICTORY CONDITIONS
The victory conditions of this mission reflect the anarchy and uncertainty of civil war, where goals desperately fought over and bled for may ultimately prove worthless. At the end of the game, the player who has scored the most Victory points has won the game. If the players have the same number of Victory points, the game ends in a draw.
Death Toll: At the end of the game, each side gains 1 Victory point for each unit they have destroyed or that is Falling Back at the end of the game.
War of Lies: At the end of the game, roll a D6 on the following table to determine the worth, if any, of each Objective controlled by the player at the end of the game. Roll once for each Objective.
|
Secondary Objectives
Slay the Warlord: If a side destroyed the enemy Warlord, that side gains 1 Victory point. If that Warlord was also a Primarch choice, then an additional Victory point is scored.
The Price of Failure (If Lords of War units are used): If one army has a Lords of War unit and at the end of the game all models in that unit have been removed as Casualties, the opposing player scores 1 Victory point.
MISSION SPECIAL RULES
Psychic Disciplines
Models with the Psyker sub-type gain a number of special rules and abilities to represent their esoteric and dangerous arts. These collections of abilities are known as Disciplines, and represent one of a myriad of possible focuses for a battle Psyker. Each Discipline will be composed of a set of special rules, Psychic Weapons and Psychic Powers themed to represent the specific talents of a certain strain of battle Psyker, and those Disciplines available to a given Psyker will be listed on their Army List entry. Some models may be able to choose from several different Disciplines, however, they only gain abilities from one that is selected or set as part of their basic abilities. When a model or unit is granted a Discipline or is asked to select one, they gain all powers, attacks and other rules included as part of that Discipline. Some models may be able to take more than one Discipline, if so, they gain all abilities from all Disciplines selected.If, for any reason, a model has, or gains, the Psyker sub-type but does not gain access to any Psychic Disciplines as part of either its Army List entry or Faction rules, then it gains access to one of the Core Disciplines described below – if this option is used then that model may not gain or use any other Psychic Powers or Psychic Weapons from any other source.
Core Psychic Discipline List
The following is a list of Core Psychic Disciplines, representing the most common and well known spheres of psychic study and power in the Imperium during the age of the Horus Heresy. Other publications may detail other Disciplines to represent the powers available to other Factions or specific warriors, but these remain available only to models specifically noted as having access to them, and are not considered part of the Core Disciplines presented here.Any Psyker that selects one of the Core Psychic Disciplines also gains the Aetheric Lightning Psychic Weapon.
Aetheric Lightning (Psychic Weapon)
Aetheric lightning is the fury of the Warp itself, coalesced and given form by the will of the psyker and directed at their foes like a storm of eldritch power.
Range | Str | AP | ||
| Aetheric Lightning | 18" | 3 | 4 | Assault 4, Force |
Force: Any Psyker with a weapon or ability with this special rule may choose to make a Psychic check before making any attacks with that weapon or resolving the ability. If the test is successful then the Strength value of any attacks made is doubled. If the test is failed then a Perils of the Warp attack is resolved targeting the unit containing the model that failed its test. If the Psyker survives Perils of the Warp then it may attack as normal.
Psychic Discipline: Biomancy
A Psyker with this Discipline gains all the listed Powers, weapons and other special rules, as well as the Aetheric Lightning Psychic Weapon.Biomantic Augmentation (Psychic Power) Biomancers specialise in manipulating biological energy and processes with the power of their minds. They are masters of the flesh, learning to shape and influence the physical forms of themselves, their allies or their enemies, according to their will. Instead of making a Shooting Attack, a Psyker with this Psychic Power may select a single friendly unit within 6", that unit increases its Strength by +1 for the duration of the current player turn. When using this power, the controlling player may choose to have the Psyker take a Psychic check. If the Check is passed then both Strength and Toughness are increased by +1 for the duration of the current player turn. If the Check is failed, then the target unit gains no benefit and the Psyker suffers Perils of the Warp. |
Biomancer’s Rage (Psychic Weapon) A true biomancer eschews the use of weapons in melee, instead relying on their psychically enhanced strength to tear apart flesh and steel with terrifying ease.
Psychic Focus: Before making any To Hit rolls with this weapon, the Psyker must make a Psychic check. If the Check is passed, then the Psyker may attack as normal using the profile shown for this weapon. If the Check is failed, then the Psyker suffers Perils of the Warp, and if the model is not removed as a casualty then it may attack as normal but may not use this weapon. |
Psychic Discipline: Divination
A Psyker with this Discipline gains all the listed Powers, weapons and other special rules, as well as the Aetheric Lightning Psychic Weapon.Divinatory Aegis (Psychic Power) Diviners can effortlessly predict the paths of bullets and swords. By focusing their warp-sight even more closely, they can guide their allies’ aim, bringing a swift and merciless death to their foes. Instead of making a Shooting Attack, a Psyker with this Psychic Power may select a single friendly unit within 12". The target unit gains the Precision Strikes (6+) and Precision Shots (6+) special rules for the duration of the current player turn. When using this power, the controlling player may choose to have the Psyker take a Psychic check. If the Check is passed then the target unit instead gains the Precision Strikes (5+) and Precision Shots (5+) special rules for the duration of the current player turn. If the Check is failed then no additional benefit is gained and the Psyker suffers Perils of the Warp. |
Diviner’s Dart (Psychic Weapon) The diviner can manifest their fury as a bolt of psychic energy, a dart that twists and spirals through the carnage of battle to unerringly strike the target’s weakest point.
Psychic Focus: Before making any To Hit rolls with this weapon, the Psyker must make a Psychic check. If the Check is passed, then the Psyker may attack as normal using the profile shown for this weapon. If the Check is failed, then the Psyker suffers Perils of the Warp, and if the model is not removed as a casualty then it may attack as normal but may not use this weapon. |
Psychic Discipline: Pyromancy
A Psyker with this Discipline gains all the listed Powers, weapons and other special rules, as well as the Aetheric Lightning Psychic Weapon.Pyromantic Combustion (Psychic Power) Focusing their anger, the pyromancer can melt or incinerate anything that stands in their path in a heartbeat. Yet when their rage boils over, the blast of ash and roaring flame consumes vast swathes of the battlefield and leaves only destruction in its wake. Instead of making a Shooting Attack, a Psyker with this Psychic Power can place a Large Blast (5") marker anywhere on the battlefield that is entirely within 18" and within line of sight of the Psyker. Once placed, scatter the marker D6" to determine its final position and then leave it in place until the beginning of the controlling player’s next Shooting phase. The area under the marker counts as Difficult Terrain and any model, friendly or enemy, under the marker’s final position, or that moves onto or through the marker, suffers a Strength 6, AP 4 Hit. When using this Psychic Power, the controlling player may choose to have the Psyker take a Psychic check. If the Check is passed then the Psyker’s controlling player may place and scatter up to three Large Blast (5") markers instead of just one. Any model under more than one Blast marker placed using this Psychic Power suffers 1 Hit for each Blast marker it is under. If the Check is failed then the power fails completely, no markers are placed and the Psyker suffers Perils of the Warp. |
Pyromantic Desolation (Psychic Weapon) In battle, the pyromancer’s art is a wanton and indiscriminate killer, it cares not for friend or foe and consumes all save the one that wields its power.
Pyromantic Desolation: In addition to attacking normally in the Assault Phase, at the beginning of the Initiative Step at which the model using this Psychic Weapon would normally attack, but before any Pile-in moves or attacks are made, place a Blast (3") marker centred on the attacking model. All other models wholly or partially under the marker, friendly or enemy, suffer an automatic Hit with the profile shown. These Hits are resolved immediately and do not count for the purpose of resolving the winner of an assault. Once they are resolved, the attacking model may Pile-in and make any other attacks as normal. Psychic Focus: Before making any To Hit rolls with this weapon, the Psyker must make a Psychic check. If the Check is passed, then the Psyker may attack as normal using the profile shown for this weapon. If the Check is failed, then the Psyker suffers Perils of the Warp, and if the model is not removed as a casualty then it may attack as normal but may not use this weapon. |
Psychic Discipline: Telekinesis
A Psyker with this Discipline gains all the listed Powers, weapons and other special rules, as well as the Aetheric Lightning Psychic Weapon.Telekine Dome (Psychic Power) The telekine’s art allows them to effortlessly deflect the enemy’s onslaught, bullets bouncing off of thin air and deflected harmlessly away as the psyker erects a barrier of shimmering energy about themself. Instead of moving during the Movement phase, a Psyker with this Psychic Power may instead activate this Psychic Power. All models, friendly and enemy, that are within 8" of the Psyker gain a 6+ Invulnerable Save when targeted by any model that is not also within 8" of the Psyker. If the Psyker moves, makes a Shooting Attack, Charges or is successfully Charged by an enemy unit, then the Psychic Power ends, otherwise it remains in effect indefinitely. When initially using the Psychic Power, or at the start of any of the controlling player’s subsequent Movement phase while it is in effect, the controlling player may choose to have the Psyker take a Psychic check. If the Check is passed then models affected by this Psychic Power gain a 4+ Invulnerable Save instead of a 6+ Invulnerable Save. If the Check is failed then the Psyker suffers Perils of the Warp and the Psychic Power immediately ends. |
Telekine’s Focus (Psychic Weapon) The crushing grip of a telekine’s focus can break even the strongest warriors and render the strongest war engines into little more than scrap metal.
Psychic Focus: Before making any To Hit rolls with this weapon, the Psyker must make a Psychic check. If the Check is passed, then the Psyker may attack as normal using the profile shown for this weapon. If the Check is failed, then the Psyker suffers Perils of the Warp, and if the model is not removed as a casualty then it may attack as normal but may not use this weapon. |
Psychic Discipline: Telepathy
A Psyker with this Discipline gains all the listed Powers, weapon and other special rules, as well as the Aetheric Lightning Psychic Weapon.Telepathic Fugue (Psychic Power) Paranoia, confusion and panic are heightened to a debilitating degree as the telepath alters their foes’ perceptions, denying them a chance to react to the reality around them. Once per turn, at the start of any Phase, the Psyker with this Psychic Power’s controlling player may select a single enemy unit within 24" and line of sight of the Psyker and take a Psychic check. If that Check is passed then the target unit may not make any Reactions for the duration of that Phase. If the Check is failed then the Psyker suffers Perils of the Warp. |
Telepathic Hallucinations (Psychic Weapon) The armour of the foe cannot protect them from the telepath’s cruel assault, infiltrating the minds of their victims and turning brother against brother.
Hallucinations: A unit that suffers one or more Hits from a Weapon with this special rule must make an immediate Pinning test, adding one to the result of the roll for each Hit scored by this attack before the result is decided. For example, if a Psyker attacks an enemy unit that has a Leadership of 8, scoring 3 Hits with Telepathic Hallucinations, then that unit must make an immediate Pinning test and add 3 to the result rolled before determining the result. Psychic Focus: Before making any To Hit rolls with this weapon, the Psyker must make a Psychic check. If the Check is passed, then the Psyker may attack as normal using the profile shown for this weapon. If the Check is failed, then the Psyker suffers Perils of the Warp, and if the model is not removed as a casualty then it may attack as normal but may not use this weapon. |
Psychic Discipline: Thaumaturgy
A Psyker with this Discipline gains all the listed Powers, weapon and other special rules, as well as the Aetheric Lightning Psychic Weapon.Thaumaturgic Succour (Psychic Power) Thaumaturges are possessed of an unbending belief that the Warp is a font of power that can be shaped for good as well as ill. They are careful scholars of the Immaterium, intent on wielding their power to protect rather than to destroy. Instead of making a Shooting Attack, a Psyker with this Psychic Power may select a single friendly unit with at least one model within 12" and make a Psychic check. If the Psychic check is passed then all non-Vehicle models in the target unit may roll a D6. On a roll of a 5+, that model regains a single lost Wound. This ability cannot be used to increase a model’s Wounds beyond its starting Wounds Characteristic. |
Thaumaturge’s Cleansing (Psychic Weapon) Dedicated as they are to the use of the æther for the benefit of Mankind, the Daemon is the eternal foe of the thaumaturge, and many of their arts focus on the banishment of such terrors.
Sanctic: A weapon with this special rule always Wounds Daemons on a 2+ and any successful Invulnerable Saves made by Daemon models against any Wounds it inflicts must be re-rolled. Psychic Focus: Before making any To Hit rolls with this weapon, the Psyker must make a Psychic check. If the Check is passed, then the Psyker may attack as normal using the profile shown for this weapon. If the Check is failed, then the Psyker suffers Perils of the Warp, and if the model is not removed as a casualty then it may attack as normal but may not use this weapon. |
Reference
Turn Summary
| ||
|
Perils of the WarpCommon to all forms of psychic ability is the possibility of the Warp’s power rebelling and wreaking havoc on the Psyker and their allies. This is represented by the Perils of the Warp special rule. Most Psychic Powers and Weapons dictate under what conditions a Psyker must suffer Perils of the Warp, but in most cases this will be as the result of a failed Leadership test while using a Psychic Power or attack.Whenever a Psyker or other model/unit suffers Perils of the Warp, apply the rule below: Perils of the Warp: When a model or unit suffers Perils of the Warp, it receives D3 Wounds against which only Invulnerable Saves may be taken (no Damage Mitigation rolls may be made to negate these Wounds). These Wounds may be allocated to any model in the unit, including models without the Psyker Sub-type, in the same manner as those received during a Shooting Attack. If the Psyker is a Vehicle, it suffers D3 Hull Points of damage against which only Invulnerable Saves may be taken. These Hull Points of damage may be allocated to other Vehicle models in the same Squadron, in the same manner as a Shooting Attack. | ||
Vehicle Weapon TypesIn addition to the more common mounting types, there are also several other types of weapon only found on Vehicle units that bear special mention in this section.Co-axial Mounted Weapons – Co-axial Mounted weapons follow all the rules for Turret Mounted weapons and must be mounted alongside another Turret Mounted weapon. In addition, when Turret Mounted weapons are fired, if the Co-axial Mounted weapon scores at least one Hit on the target unit then all further attacks by weapons mounted on the same Turret, directed at the same target, may re-roll any failed rolls To Hit. Defensive Weapons – All weapons mounted on a Vehicle that have a Strength Characteristic of 6 or less are Defensive weapons. Other weapons may also be specifically designated as Defensive weapons on their profile. The controlling player may always choose to fire Defensive weapons at the closest enemy Infantry unit within line of sight and the Firing Arc of applicable weapons, even if the Vehicle’s other weapons have targeted a different unit during a Shooting Attack. Any weapon that has a Strength greater than 6 and is not Pintle Mounted or otherwise designated specifically as a Defensive weapon is a Battle weapon. | ||
Roll To HitTo determine whether hits are scored, roll a D6 for each attack a model gets to make and compare the WS of the attacking model to the WS of the target unit. Then, consult the To Hit chart on this page to find the minimum result needed on a D6 To Hit. As the chart below shows, if the target’s WS is half or less than that of the attacker’s, they are hit on a 2+; lower than the attacker’s but more than half, they are hit on 3+; if the target’s WS is equal to the attacker’s, they are hit on 4+; if it is higher but not twice the attacker’s, they are hit on 5+; and if it is twice or more than the attacker’s, then they are hit only on a 6+. Where the same roll To Hit is needed, the dice should be rolled together to speed up the game. If the same roll To Hit is needed across different weapons with varying Strengths, AP values, etc, dice of varying colours should be used to differentiate the results from the rest of the pool. UNITS WITH MULTIPLE WEAPON SKILLS Some units contain models with different Weapon Skills. Whilst each model in such a unit rolls To Hit using its own Weapon Skill, Attacks made against such a unit are resolved using the Weapon Skill of the majority of the engaged enemy models. If two or more Weapon Skill values are tied for majority, use the highest of those tied values.  | ||
Roll To WoundNot all of the attacks that hit will harm the enemy. As with shooting, once you have scored a hit with an attack, you must roll a D6 for each successful hit to see if the attack causes a Wound. Consult the chart below, cross-referencing the attacker’s Strength Characteristic with the defender’s Toughness Characteristic. The chart indicates the minimum result on a D6 roll required to inflict a Wound, and is the same chart as is used during the Shooting phase. A ‘-’ indicates that the target cannot be wounded by the attack. In most cases, when rolling To Wound in close combat, you use the Strength on the attacker’s profile regardless of what weapon they are using. However, there are some Melee weapons that give the attacker a Strength bonus, and this is explained previously in the Weapons section. MULTIPLE TOUGHNESS VALUES Rarely, a unit will contain models that have different Toughness Characteristics. When this occurs, roll To Wound using the Toughness value of the majority of the engaged unit. If two or more Toughness values are tied for majority, use the highest of those tied values.  | ||
BUILDING DAMAGE TABLE
| |||||||||||||||||||||||||||
VEHICLE DAMAGE TABLE
| |||||||||||||||||||||||
Core ReactionsThe following Reactions are available to all armies regardless of size or Faction.
REACTIONS IN THE MOVEMENT PHASE During the Movement phase, the Reactive player may declare a Reaction if an enemy unit ends a move within 12" and in line of sight of a friendly unit. Once the Active player has completely resolved their unit’s movement, the Reactive player may choose to expend one of their Reactions in that Phase in order to have a unit they control that is within 12" and line of sight of the final position of the moving unit either Advance or Withdraw. Advance – The Reacting unit may move a number of inches up to its unmodified Initiative Characteristic directly towards the enemy unit that triggered this Reaction, moving each model in the unit directly towards the enemy unit by the shortest available path. In a unit with mixed Initiative Characteristics, use the highest unmodified Characteristic. Vehicles may pivot once up to 90° and then move up to 6" directly forwards. Withdraw – The Reacting unit may move a number of inches up to its unmodified Initiative Characteristic directly away from the enemy unit that triggered this Reaction, moving each model in the unit directly away from the enemy unit by the shortest available path. In a unit with mixed Initiative Characteristics, use the highest unmodified Characteristic. Vehicles may pivot once up to 90° and then move up to 6" directly backwards. REACTIONS IN THE SHOOTING PHASE During the Shooting phase, the Reactive player may react when any enemy unit makes a Shooting Attack targeting a unit they control. Before any To Hit rolls are made, the Reactive player may choose to expend one of their Reactions for that Phase to have the unit targeted by the Shooting Attack either Return Fire or Evade. Return Fire – Wounds, Glancing Hits or Penetrating Hits as a result of Shooting Attacks made by the unit that triggered this Reaction are allocated as normal, however any models in the Reacting unit that are reduced to 0 Wounds or 0 Hull Points are not immediately removed from the battlefield, Wrecked or affected by the result of any rolls on the Vehicle Damage table. However, Wounds or Hull Point damage cannot be allocated to a model that has been reduced to 0 Wounds or 0 Hull Points or has suffered an Explodes result on the Vehicle Damage table. After the Active player has resolved all Shooting Attacks made by all of the weapons the unit making the Shooting Attack has, the Reactive player makes a Shooting Attack with the Reacting unit (including with any models that have been reduced to 0 Wounds and before any Pinning tests or Morale checks are taken) targeting only the unit that triggered this Reaction, following all the usual rules for Shooting Attacks and removing casualties from the Active unit as normal. A unit that makes a Shooting Attack as part of a Return Fire Reaction may not make any attacks indirectly (without line of sight) including weapons with the Barrage special rule or other weapons or special rules that otherwise ignore line of sight, and models with the Vehicle Unit Type may only fire Defensive weapons. Template weapons used as part of a Return Fire Reaction must use the Wall of Death rule instead of firing normally. The Reacting unit is considered to be Stationary, and may fire weapons of any type as though models in that unit had not moved. Once the Reactive player’s Shooting Attack has been resolved, any models from the Reacting unit which were reduced to 0 Wounds are removed as casualties, models that were reduced to 0 Hull Points are Wrecked and all results on the Vehicle Damage table are applied. Any Pinning tests or Morale checks for the Reacting unit are then taken as normal. Evade – All models in the Reacting unit gain the Shrouded (5+) special rule against all Wounds, Glancing Hits or Penetrating Hits inflicted as part of the Shooting Attack that triggered this Reaction – if the Reacting unit already has a version of the Shrouded special rule then this does not stack or increase that rule, and the Reacting player may choose to use any one of the Shrouded rules available to them. A Vehicle that has suffered an Immobilised result on the Vehicle Damage table, any unit that includes one or more models with a Movement Characteristic of 0 or any unit that is not allowed to move in this turn for any reason may not make an Evade Reaction. REACTIONS IN THE ASSAULT PHASE During the Assault phase, the Reactive player may react when any enemy unit declares a Charge targeting a unit they control. Once the Active player has resolved all Charge rolls for that unit, whether successful or not, but before any models are moved as part of either a Charge Move or Surge Move, the Reactive player may choose to expend one of their Reactions for that Phase to have the unit targeted by the Charge either Overwatch or Hold the Line. Overwatch – The Reacting unit may make a Shooting Attack, targeting only the unit that triggered this Reaction and following all the usual rules for Shooting Attacks. A unit that makes a Shooting Attack as part of an Overwatch Reaction may not make any attacks indirectly (without line of sight) including Barrage weapons or other weapons or special rules that otherwise ignore line of sight, and Vehicles may only fire Defensive weapons. Template weapons used as part of an Overwatch Reaction use the Wall of Death rule instead of firing normally. The unit targeted by the Overwatch attack may not take Cover Saves against Wounds inflicted as part of an Overwatch Reaction. Units making a Shooting Attack as part of this Reaction are considered to be Stationary, and may fire weapons of any type as though they had not moved. Hold the Line – The Reacting unit must make a Morale check, if that check is successful and the enemy unit’s Charge was also successful then that Charge counts as Disordered. If the Morale check is successful, but the enemy unit’s Charge was a failure then any other Charges resolved against that unit by other enemy units in the same Charge sub-phase must be counted as Disordered. | ||
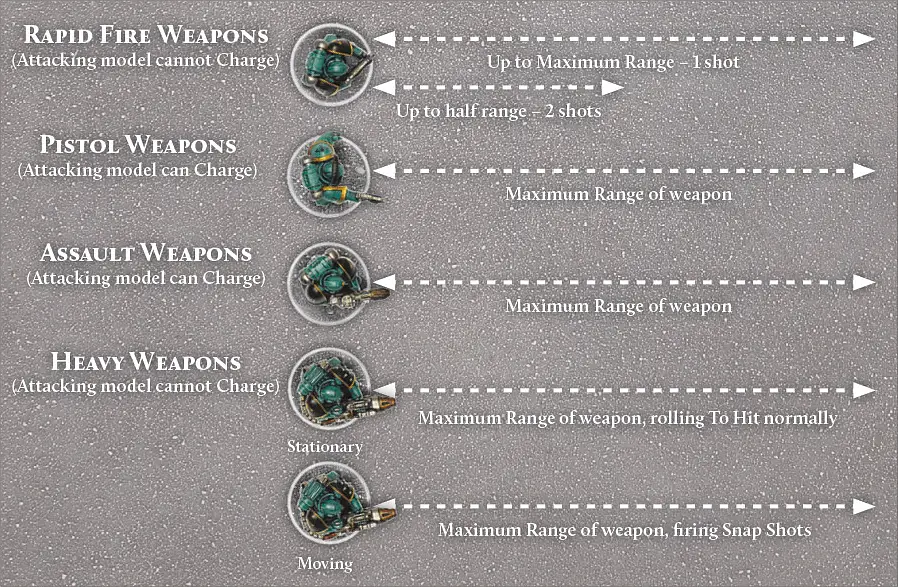  A model using a Rapid Fire weapon can shoot once at Maximum Range. Alternatively, if the target is within half the Maximum Range, it can fire twice.
A Pistol weapon can always shoot the number of times indicated and up to its Maximum Range, regardless of whether the firer moved or not. An Assault weapon can always shoot the number of times indicated and up to its Maximum Range, regardless of whether the firer moved or not. If a model with a Heavy weapon remains Stationary, it can fire the number of times indicated (at its normal Ballistic Skill) up to the Maximum Range of the weapon. If the firer moved, it can only fire Snap Shots with its Heavy weapon. If a model with an Ordnance weapon remains stationary, it can make the full number of attacks listed on the weapon profile, up to the maximum range of the weapon. If the attacking model moved, it may not attack with an Ordnance weapon (Models with the Vehicle Unit Type are an exception to this rule). A model making a Shooting Attack with a Destroyer weapon attacks the number of times indicated on the weapon’s profile whether or not the bearer has moved, up to the Maximum Range of the weapon. | ||
Other Detachments in the army, such as Allied Detachments or Lords of War Detachments, may have a different version of the Legiones Astartes (X) special rule. In which case no models in the same Detachment may have a different version of the Legiones Astartes (X) special rule to the one chosen for that Detachment. Models within a non-Primary Detachment are affected by all the special rules for the version of the Legiones Astartes (X) special rule chosen for them, as well as access to any Wargear options and special units.
If the Vehicle moved before its passengers got aboard, it cannot move further that turn (including pivoting on the spot). If the Vehicle did not move before its passengers got aboard, it can move as normal after they have Embarked. In either case, a Vehicle cannot Ram in a turn that a unit Embarks upon it.
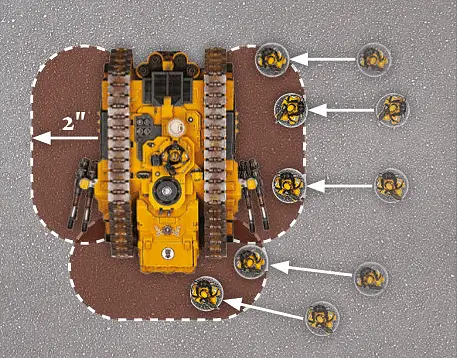
Blast weapons fire shells, missiles or packets of energy that explode on impact.
When firing a Blast weapon, models do not roll To Hit. Instead, pick one enemy model visible to the firer and place the Blast (3") marker with its hole entirely over the base of the target model, or its hull if the target is a Vehicle. The hole at the centre of the marker must be within the weapon’s Maximum Range. You cannot place the Blast marker so that the base or hull of any friendly model is even partially under it.The large area affected by the blast means it is going to be very hard to miss completely. Nonetheless, the shot might not land exactly where intended. Roll for the Blast marker to scatter and subtract the firer’s Ballistic Skill from the distance (if any) that it scatters, to a minimum of 0". Note that it is possible, and absolutely fine,for a shot to scatter beyond the weapon’s Maximum or Minimum Range and line of sight. This represents the chance of ricochets, the missile blasting through cover and other random events. In these cases, Hits are worked out as normal and can hit and Wound units out of range and line of sight (or even your own units, or models locked in combat). If the shot scatters so that the hole in the centre of the marker is beyond the battlefield’s edge, the shot is a complete miss and is discarded.
Once the final position of the Blast marker has been determined, take a good look at it from above – each unit suffers one Hit for each of the models included in that unit that is fully or partially beneath the Blast marker, even if those models are not within the firer’s line of sight.
Once the number of Hits inflicted on the unit has been worked out, roll To Wound and Save as normal. Note that, unlike other attacks, Wounds inflicted by an attack with the Blast special rule can be allocated to any models in the target unit, even if they are out of sight of any models from the attacking unit.
- It is Embarked upon a Transport Vehicle of any kind (once Disembarked it may count as a Scoring unit as normal).
- It is a Zooming Flyer.
- It has a special rule specifying that it never counts as a Scoring unit.
- It is currently Falling Back or Pinned (if the unit Regroups or recovers from Pinning, it immediately reverts to being a Scoring unit again).
- It is a Building or Fortification.
A unit can only control one Objective marker at a time. If a unit moves into a position where it could control two Objective markers, the controlling player must make it clear to their opponent which Objective the unit is controlling.
For some missions, an Objective is defined as a certain area of the battlefield rather than an Objective marker. In these situations, the Objective is considered to be controlled by a player if there is at least one of that player’s Scoring units wholly within the defined zone, and no models from enemy Scoring units wholly within the defined zone. Any unit that is in a Building or Fortification is considered to be wholly within an Objective zone if the Fortification or Building they are embarked in is wholly within that zone. Note that, for controlling Objective zones, enemy Denial units are not counted, only Scoring units can control or contest an enemy’s control of a scoring zone.
Some units make use of their inherent speed, stealth or other capabilities to launch a surprise assault on the foe from an unexpected direction.
A unit made up entirely of models with this special rule may perform a Flanking Assault. Certain Faction or unit special rules may present other options for the deployment of units with the Outflank special rule.Coming under fire without knowing where the shots are coming from, or having ordnance rain down from the skies, can shake the resolve of even the bravest warriors, making them dive flat and cling to whatever cover presents itself.
If a non-Vehicle unit suffers one or more unsaved Wounds from a weapon with the Pinning special rule, it must take a Leadership test once the firing unit has finished its Shooting Attacks for that Phase. This is called a Pinning test. If the unit fails the Test, it is Pinned. As long as the Test is passed, a unit can be called upon to take multiple Pinning tests in a single turn, but only once for each unit shooting at them.A unit that is affected by any of the following conditions does not take Pinning tests, and if called upon to do so is considered to automatically pass them:
- The unit is locked in combat.
- The unit is already Pinned (the unit remains Pinned, but takes no further Tests).
- The unit is composed entirely of Vehicle models.
- The unit is Embarked on a Transport Vehicle.
- The target unit is affected by the Fearless special rule.
For one model to have line of sight to another, you must be able to trace a straight, unblocked line from its body (the head, torso, arms or legs) to any part of the target’s body.
Sometimes, all that will be visible of a model is a weapon, banner, or other ornament they are carrying. In these cases, the model is not visible. Similarly, mechanical appendages such as cables, probes and ammo feeds are ignored, even though they may be part of a model’s body. These rules are intended to ensure that models don’t get penalised for having impressive banners, weaponry, and so on.
In many cases, what a model can ‘see’ will be obvious – if there’s a hill, building or mechanical construct in the way, the enemy might be blatantly out of sight. In other cases, two units will be clearly in view of each other as there is nothing at all in the way.
On those other occasions, where it’s not entirely obvious whether or not one unit can see another, the player will have to stoop over the battlefield and look from behind the model’s head for a ‘model’s eye view’. This means getting down to the level of your models and checking the battlefield from their perspective to ‘see what they can see’. You will find that you can spot lurking enemies through the windows of ruined buildings, catch a glimpse of a model’s legs under tree branches and see that high vantage points become very useful for the increased line of sight that they offer.
Fall Back Moves are 2D6", unless a rule specifies otherwise. Fall Back Moves are not slowed by Difficult Terrain, but incur Dangerous Terrain tests as normal. Units with models that Fall Back at different speeds always Fall Back at the speed of the slowest model in the unit.
Each model in the unit moves directly towards their own battlefield edge by the shortest possible route.
If playing a mission where there is no ‘own’ battlefield edge, models move towards the closest battlefield edge instead.
If any model from a unit that is Falling Back moves into contact with a battlefield edge, the entire unit is removed from the game as casualties as it scatters and flees the battle.
Only Infantry models can Embark upon Transports unless specifically stated otherwise. Certain special rules, notably the Bulky (X) special rule, may modify the Transport Capacity required for a given model to Embark upon a Transport, and this will be specified in the model’s rules. Sometimes, there will be constraints on which types of models can Embark upon a particular Vehicle, and this will be specified in the unit’s entry. Whilst Embarked upon a Transport, units gain the Fearless special rule and cannot be made to Fall Back or become Pinned while Embarked upon the Transport.
- It is Embarked upon a Transport Vehicle of any kind (once Disembarked it may count as a Denial unit as normal).
- It is a Vehicle of any type.
- It has a special rule specifying that it never counts as a Denial unit.
- It is currently Falling Back or Pinned (if the unit Regroups or recovers from Pinning, it immediately reverts to being a Denial unit again).
- It is a Building or Fortification.
If the Vehicle had not moved before the unit Disembarked, the Vehicle can then move normally. If the Vehicle had already moved before the unit Disembarked, the Vehicle cannot move further that turn (including pivoting on the spot). In addition, a Vehicle cannot Ram on a turn that a unit Disembarks from it.
If the unit fails this test, then it must immediately continue to Fall Back.
If the unit successfully passes the test, it stops Falling Back and can immediately move a number of inches equal to its Initiative. This move is unaffected by Difficult Terrain, but Dangerous Terrain tests must be taken as normal. If the unit is out of coherency when the Regroup test is made, then the move must be used to restore coherency, or as near as possible.
Once a unit has Regrouped, until the end of that player turn it cannot otherwise Move, Run or Charge in the Assault phase. However, it can make Shooting Attacks but until the end of that player turn counts as having moved and can only fire Snap Shots. A unit that has Regrouped may make Reactions as normal in subsequent player turns, including those that allow it to move.
Barrage weapons lob shells high into the air, landing them in the midst of the foe.
All Barrage weapons use Blast markers and consequently use the rules for Blast weapons, as indicated by their profile, with the following exceptions:Barrage weapons can fire indirectly. This means they can fire at a target that they do not have line of sight to, as long as the target is beyond their Minimum Range (if applicable). When firing indirectly, the Ballistic Skill of the firer is not subtracted from the scatter distance; unless a Hit is rolled on the Scatter dice, the Blast marker always scatters a full 2D6". If a Barrage weapon has line of sight to its target it can fire directly, even if the target is within its Minimum Range.
Note that any Hits inflicted upon Vehicles by an Attack using the Barrage special rule are always resolved against the Vehicle’s Side Armour Value.
If you re-roll a 2D6 or 3D6 roll, you must re-roll all of the dice, not just some of them, unless the rules specify otherwise. Any modifiers that applied to the first roll also apply to the re-roll.
If two or more special rules combine to the effect that all failed and all successful dice results would have to be re-rolled, do not re-roll any dice; simply use the original result(s) instead.
Fearless troops never give up and seldom make full use of cover – even if it would be wiser to do so.
Units with one or more models with the Fearless special rule automatically pass Pinning tests, Regroup tests and Morale checks. In addition, models with the Fearless special rule ignore the effects of the Fear special rule.However, units containing one or more models with the Fearless special rule cannot use any Reactions that grant a Cover Save, Armour Save or Invulnerable Save, and cannot choose to fail a Morale check due to the Our Weapons Are Useless special rule. If a unit has become Pinned and then gains the Fearless special rule, all the effects of being Pinned are immediately cancelled.
Many warriors live and die according to the principle of ‘death before dishonour’. Seldom do such warriors take a backward step in the face of danger.
When a unit that contains at least one model with this special rule takes Morale checks or Pinning tests, the unit ignore any negative Leadership modifiers. If a unit is both Fearless and Stubborn, the unit uses the rules for Fearless instead.Some warriors can see almost as clearly in the darkness as they can in daylight.
A unit that contains at least one model with this special rule ignores the effects of Night Fighting and no model may make Shrouded rolls to negate Wounds inflicted by their attacks.If a successful Reserve roll is made for a unit, that unit must be moved onto the battlefield this turn. From the start of Game Turn 4 all Reserve rolls are considered to automatically succeed, unless another special rule states otherwise, and all of the Active player’s units that are in Reserve must be moved onto the battlefield or they are considered destroyed.
Some special rules can modify the roll required for a unit to arrive from Reserve. Regardless of the modifier(s), a natural roll of a 1 always means that the unit in question remains in Reserve, and a natural roll of a 6 always means that the unit in question arrives from Reserve.
Any unit for which a successful Reserve roll has been made must move onto the Battlefield at the start of the Controlling player’s Movement phase, before any other models are moved. Select one of the Active player’s arriving units and deploy it, moving it onto the table in the manner described as follows. Then pick another arriving unit and deploy it, and so on until all arriving units are on the table. The Active player can then proceed to move their other units as normal.
Interceptor - This Advanced Reaction may be made whenever an enemy unit enters play from Reserve within line of sight of a friendly unit, and within the maximum range of at least one weapon in that unit. The Reacting unit may make a Shooting Attack, targeting a unit deployed onto the battlefield in this Phase and following all the usual rules for Shooting Attacks. Vehicles may only fire Defensive weapons, unless another rule specifically states otherwise. Shooting Attacks made as part of the Interceptor Reaction do not cause Morale checks, regardless of the number of casualties inflicted.
Unless otherwise specified by another rule, making this Reaction expends a point from the Reactive player’s Reaction Allotment for the Phase in which the Reaction is made.
| Any player, unless a special rule or other effect specifies otherwise, may make one Reaction in each Phase of their opponent’s turn. | ||
The Reaction Allotment of any player may be modified by special rules or other effects, granting that player additional Reactions either in every Phase (an increase of the Reaction Allotment) or in specific Phases. This may either increase the base Reaction Allotment, that is the number of Reactions allowed in every Phase, or only grant a bonus to the Reaction Allotment in specific Phases.
For example, a player might have a special rule that states ‘This special rule increases the Reaction Allotment to two’, which would indicate that the player could make two Reactions in every Phase of their opponent’s turn. However, a special rule that states ‘This special rule increases the number of Reactions that may be made during the Assault phase by +1’ would allow a player with a Reaction Allotment of one to make a single Reaction in the Shooting and Movement phases, but two in the Assault phase.
Regardless of any special rules or other effects, no player may ever increase their base Reaction Allotment above three, nor may any player ever make more than three Reactions in a given Phase unless a special rule specifically allows for a number of Reactions above the normal limit of three.
A Reaction may be made with any unit controlled by the Reactive player, though in a number of situations a special rule or condition may deny a unit the opportunity to react. The most common such conditions where a unit may not make a Reaction are:
- It is Pinned.
- It is Falling Back.
- It is locked in combat.
- It has already made a Reaction in the current Phase.
- The controlling player has exhausted their Reaction Allotment for the current Phase.
- Another special rule, effect or condition specifically states they may not (for example, the Fearless special rule and certain effects caused by weapons and Psychic Powers).
|
When checking range, simply measure from the attacking model to the nearest model in the target unit that is within Line of Sight of the attacking model. Any weapon that is found to be out of range of all models in the target unit to which line of sight can be drawn may not be used to make attacks.
Similar to other Leadership-based tests, Morale checks (also sometimes referred to as Morale tests) are taken by rolling 2D6 and comparing the total to the unit’s Leadership value.
If the total is equal to or less than the unit’s Leadership Characteristic, the test is passed and the unit does not suffer any ill effects.
If the total is higher than their Leadership Characteristic, the test is failed and the unit will immediately Fall Back.
Some units have special rules pertaining to Morale checks that are detailed in their Army List or Army List entry. For example, some units might always pass Morale checks, while others might always pass all Leadership tests. This difference is subtle, yet important. A unit that always passes Morale checks still has to test when hit by an attack with the Pinning special rule, while a unit that always passes all Leadership tests wouldn’t.
Some units make their way to battle via tunnelling, teleportation, flying, or some other extraordinary means which allows them to appear in the thick of the fighting.
A unit made up entirely of models with this special rule may perform a Deep Strike Assault. Certain Faction or unit special rules may present other options for the deployment of units with the Deep Strike special rule.- Place the object on the battlefield as instructed by the rule.
- Roll a Scatter dice and 2D6 to determine the direction and distance of scatter in inches.
- If a Hit is rolled on the Scatter dice, the object does not move – leave it in place and resolve the remainder of the rule.
- If an arrow is rolled, move the object the distance shown on the 2D6 in the direction of the arrow. Ignore intervening terrain, units, etc, unless the rule states otherwise.
- Once the object has scattered to its final position, resolve its effects.
Scatter dice and other dice and accessories that you can use in your games of Horus Heresy – Age of Darkness can be purchased from the Games Workshop website.
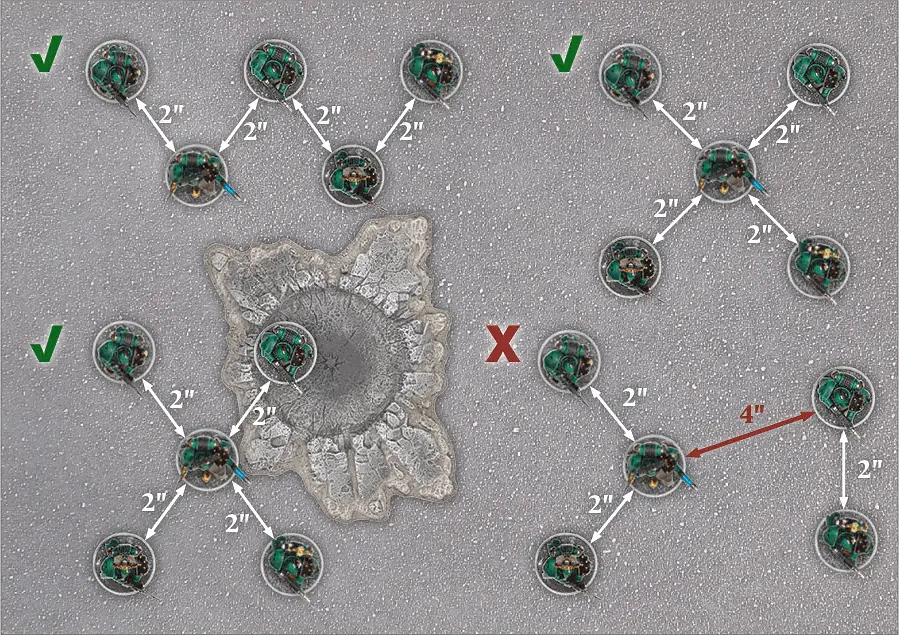
During the course of a game, a unit can get broken up and lose unit coherency, usually because it has sustained casualties from enemy fire. If this happens, in their next Movement phase, the models in the unit must be moved in such a way that they restore unit coherency, or as close to unit coherency as possible. If the unit cannot move in its next turn, or is unable to restore unit coherency in a single turn, then the models must move to restore unit coherency as soon as they have the opportunity, including by Running if they have that option.
However, a unit that Runs may not make Shooting Attacks of any kind during the following Shooting phase, or declare Charges during the Assault phase of the same player turn. If any models in a unit Run, then all models in that unit are counted as having Run, regardless of the distance moved by any individual model.
Units making a Reaction during their opponent’s turn may never choose to Run as part of that Reaction.
Many armies employ reconnaissance troops who sit concealed for days, just waiting for the right moment in which to strike.
You may choose to deploy units that contain at least one model with this special rule last, after all other units (friend and foe) have been deployed. If both players have such units and choose to do so, the players roll off and the winner decides who goes first,then alternate deploying these units.Units that Infiltrate in this way can be set up anywhere on the battlefield that is more than 9" from any enemy unit, as long as no deployed enemy unit can draw line of sight to them. This includes in a Building, as long as the Building is more than 9" from any enemy unit. Alternatively, they can be set up anywhere on the battlefield more than 12" from any enemy unit, even in plain sight.
If a unit with Infiltrate deploys inside a Dedicated Transport, the same rules apply when deploying their Transport.
A unit that deploys using these rules cannot Charge in their first turn.
Having Infiltrate also confers the Outflank special rule to units of Infiltrators that are kept as Reserves.
Scouts are always in the vanguard of the army. Unnoticed by the enemy, they range ahead of the main force.
After both sides have deployed (including Infiltrators), but before the first player begins their first turn, a unit containing at least one model with this special rule can choose to redeploy. If the unit is Infantry, Artillery, Dreadnought or Automata, each model can redeploy anywhere entirely within 6" of its current position. If it is any other Unit Type, each model can instead redeploy anywhere entirely within 12" of its current position. During this redeployment, Scouts can move outside the owning player’s Deployment Zone, but must remain more than 9" away from any enemy unit. A unit that makes a Scout redeployment cannot Charge in the first Game Turn. A unit cannot Embark or Disembark as part of a Scout redeployment.If both sides have Scouts, roll off; the winner decides who redeploys first. Then alternate redeploying Scout units one at a time. If a unit with this special rule is deployed inside a Dedicated Transport, it confers the Scout special rule to the Transport (though a Disembarkation cannot be performed as part of the redeployment). Note that a Transport with this special rule does not lose it if a unit without this special rule is Embarked upon it. Having Scout also confers the Outflank special rule to units of Scouts that are kept as Reserves.
Whenever a Psyker or other model/unit suffers Perils of the Warp, apply the rule below:
Perils of the Warp: When a model or unit suffers Perils of the Warp, it receives D3 Wounds against which only Invulnerable Saves may be taken (no Damage Mitigation rolls may be made to negate these Wounds). These Wounds may be allocated to any model in the unit, including models without the Psyker Sub-type, in the same manner as those received during a Shooting Attack. If the Psyker is a Vehicle, it suffers D3 Hull Points of damage against which only Invulnerable Saves may be taken.
These Hull Points of damage may be allocated to other Vehicle models in the same Squadron, in the same manner as a Shooting Attack.
Some weapons can inflict critical strikes against which no armour can protect.
If a model has the Rending special rule, or is attacking with a Melee weapon that has the Rending special rule, there is a chance that their close combat attacks will strike a critical blow. For each To Wound roll equal to or higher than the value listed, the target automatically suffers a Wound, regardless of its Toughness. The controlling player may choose to resolve these Wounds at AP 2 instead of the weapon’s normal AP value.Similarly, if a model makes a Shooting Attack with a weapon that has the Rending special rule, a To Wound roll of equal to or greater than the listed value wounds automatically, regardless of Toughness, and is resolved at AP 2.
In either case, against Vehicles each Armour Penetration roll of equal to or greater than the listed value allows a further D3 to be rolled, with the result added to the total Strength of the attack. These Hits are not resolved at AP 2, but are instead resolved using the weapon’s AP value.
For example, a model with the Rending (5+) special rule that rolls To Wound against a non-Vehicle model will wound automatically on the roll of a 5+, and the attacking player has the choice of using an AP value of 2 instead of the AP value of their weapon.
Some weapons are fuelled by unstable power sources and risk overheating with each shot – often to the detriment of their wielder.
When firing a weapon that Gets Hot, roll To Hit as normal. For each unmodified To Hit roll of 1, the firing model immediately suffers a single Wound with an AP value equal to that of the weapon that was used to attack (Armour Saves, Invulnerable Saves and Feel No Pain rolls can be taken, but not Cover Saves or Shrouded rolls) – this Wound cannot be allocated to any other model in the unit. A Vehicle instead rolls a D6 for each roll of a 1 To Hit. If this roll results in a 1 or 2, the Vehicle suffers a Glancing Hit.Assault weapons either fire so rapidly or indiscriminately that they can be fired while a warrior is moving.
A model attacking with an Assault weapon makes the number of Attacks indicated on its profile regardless of whether the bearer has moved or not. A model carrying an Assault weapon can make a Shooting Attack with it in the Shooting phase and still Charge in the Assault phase.
|
Aetheric lightning is the fury of the Warp itself, coalesced and given form by the will of the psyker and directed at their foes like a storm of eldritch power.
Range | Str | AP | ||
| Aetheric Lightning | 18" | 3 | 4 | Assault 4, Force |
Force: Any Psyker with a weapon or ability with this special rule may choose to make a Psychic check before making any attacks with that weapon or resolving the ability. If the test is successful then the Strength value of any attacks made is doubled. If the test is failed then a Perils of the Warp attack is resolved targeting the unit containing the model that failed its test. If the Psyker survives Perils of the Warp then it may attack as normal.
To make a To Hit roll, roll a D6 for each attack a model gets to make and compare the WS of the attacking model to the WS of the target unit. Then, consult the To Hit chart below to find the minimum result needed on a D6 To Hit.
As the chart below shows, if the target’s WS is half or less than that of the attacker’s, they are hit on a 2+; lower than the attacker’s but more than half, they are hit on 3+; if the target’s WS is equal to the attacker’s, they are hit on 4+; if it is higher but not twice the attacker’s, they are hit on 5+; and if it is twice or more than the attacker’s, then they are hit only on a 6+.
UNITS WITH MULTIPLE WEAPON SKILLS
Some units contain models with different Weapon Skills. Whilst each model in such a unit rolls To Hit using its own Weapon Skill, Attacks made against such a unit are resolved using the Weapon Skill of the majority of the engaged enemy models. If two or more Weapon Skill values are tied for majority, use the highest of those tied values.
The galaxy is replete with swordsmen and blade-masters who can pick out an enemy from a crowd and land a blow on them, even amidst the swirling chaos of hand-to-hand combat.
If a model with this special rule, or attacking with a weapon with this special rule, rolls equal to or higher than the value in brackets when making a To Hit roll as part of a melee attack, that hit is a ‘Precision Strike’. For example, if a model with the Precision Strikes (4+) special rule rolls a 4 or higher when making a To Hit roll, then that attack is a Precision Strike.Wounds from Precision Strikes are allocated against a model (or models) of the attacking player’s choice in the target unit, as long as that model is engaged in combat with the attacking model’s unit, rather than following the normal rules for Wound allocation.
Many of the galaxy’s marksmen are able to single out enemy leaders or soldiers with particularly powerful weapons and snipe them with unerring accuracy.
If a model with this special rule, or attacking with a weapon with this special rule, rolls equal to or higher than the value in brackets when making a To Hit roll as part of a Shooting Attack, that shot is a ‘Precision Shot’. For example, if a model with the Precision Shots (4+) special rule rolls a 4 or higher when making a To Hit roll, then that attack is a Precision Shot.Wounds from Precision Shots are allocated against a model (or models) of the attacking player’s choice in the target unit, as long as the target model is in range and line of sight of the attacking model, rather than following the normal rules for Wound allocation.
Note that Snap Shots and shots from weapons that scatter, or do not roll To Hit, can never be Precision Shots.
|
To Hit rolls are easy to remember if you subtract the Ballistic Skill of the attacking model from 7. For example, a model with BS 2 needs to roll a 5 or more (7-2=5).
Note that the minimum roll needed To Hit is always at least 2. When rolling To Hit, there is no such thing as an automatic Hit and a roll of a 1 always misses.
Sniper weapons are precision instruments, used to pick out a target’s weak points.
If a weapon has the Sniper special rule, or is fired by a model with the Sniper special rule, all Wounds inflicted by its attacks are ‘Precision Shots’. Wounds from Precision Shots are allocated against a model (or models) of the attacking player’s choice in the target unit, as long as it is in range and line of sight of the firer, rather than following the normal rules for Wound allocation. Note that Snap Shots can never be Precision Shots and attacks with the Blast or Template rules may never benefit from the effects of the Sniper special rule.Whether by advanced technology or arcane influence, some attacks are able to reach their target no matter what obstacles obscure them.
Any attacks made using a weapon with this special rule do not require line of sight, but must still be within range.- A ‘Small’ Blast marker (3" in diameter).
- A ‘Large’ Blast marker (5" in diameter).
- A ‘Template’ (a teardrop-shaped template roughly 8" long).
- A ‘Massive’ Blast marker (7" in diameter).
- An ‘Apocalyptic’ Blast marker (10" in diameter).
- An ‘Apocalyptic Barrage’ marker (a clover-shaped set of five overlapping markers, each 5" in diameter).
- A ‘Hellstorm’ (a teardrop-shaped template roughly 16" long).
The templates and Blast markers are used as a way of determining how many models have been hit by an attack that has an area of effect or a blast radius. When an attack uses a template or Blast marker, it will explain how the template is positioned, including any kind of scatter that might occur (scatter is discussed further later in this section). To work out the number of Hits, you normally need to hold the template or Blast marker with its central hole over an enemy model or a particular point on the battlefield, and then look underneath (or through, if using a transparent template) to see how many models lie partially or completely underneath. Various special rules and weapon effects will provide additional details on the specific use of templates when making attacks with those special rules or weapons.
A unit takes a Hit for each model that is fully, or even partially, underneath the template or Blast marker. Remember that a model’s base is counted as being part of the model itself, so all a template or Blast marker has to do to cause a Hit is to cover any part of the target’s base.
Pile-in Moves follow the same rules as Charge Moves, except that they are not slowed by Difficult Terrain (though Dangerous Terrain will still trigger Dangerous Terrain tests).
In addition, a Pile-in Move cannot be used to move into base contact with any units that are not already involved in the combat.
When making Pile-in Moves, the Active player moves their unit(s) first. If both players’ Pile-in Moves combined would be insufficient to bring any combatants into base contact, the combat is considered to have ended.
This weapon is very large, and more than a little clumsy, making swift blows all but impossible to achieve.
A model attacking with this weapon Piles-in and fights at Initiative step 1, unless it has the Dreadnought Unit Type or Monstrous sub-type.Invulnerable Saves are different to Armour Saves in that they may always be taken whenever the model suffers a Wound, or, in the case of Vehicles, suffers a Penetrating Hit or Glancing Hit – the Armour Piercing value of attacking weapons has no effect on an Invulnerable Save. Even if a Wound, Penetrating Hit or Glancing Hit ignores all Armour Saves, an Invulnerable Saving Throw can still be taken.
These weapons are grafted to the same targeting system for greater accuracy.
When attacking with a weapon that has this special rule, the controlling player may re-roll all failed To Hit rolls.These are heavy, man-portable weapons that typically require reloading between each shot or bracing to counter their recoil.
When making a Shooting Attack, a model with a Heavy weapon attacks the number of times indicated. If a model equipped with a Heavy weapon moved in the preceding Movement phase, they can only make Snap Shots with that Heavy weapon during the Shooting phase. Note that weapons with the Blast special rule cannot fire Snap Shots. Models that make Shooting Attacks with Heavy weapons in the Shooting phase cannot Charge in the ensuing Assault phase.
|
Some weapons strike with enough force to make a mockery of anything except the most reinforced of armoured shells.
Attacks with this special rule may re-roll failed Armour Penetration rolls against Vehicles and Buildings (both with Shooting Attacks and in close combat) and re-roll Glancing Hits, in an attempt to instead get a Penetrating Hit, but the second result must be kept.To take a Leadership test, use the following procedure:
- Roll 2D6 and compare the result to the model’s Leadership Characteristic.
- If the result is equal to or less than the model’s Leadership Characteristic, then the test has been passed.
- If the result is greater than the model’s Leadership Characteristic, the test has been failed and the model faces the consequences as detailed in the rule that prompted the test.
For example, a Legion Land Raider Proteus has a Hull (Front) Mounted Heavy Bolter – this weapon may only fire at targets in the Front Firing Arc.
Turret Mounted – Turret Mounted weapons may fire at targets in any Hull arc (Front, Side or Rear) without restriction.
Centreline Mounted – Centreline Mounted weapons may only fire at targets in the Centreline Firing Arc.
Sponson Mounted – Sponson Mounted weapons are usually mounted in pairs, one on each side of a Vehicle (the Vehicle’s profile will note if this is not the case) and fire into the appropriate Sponson Firing Arc (either left or right). If the target of a Vehicle’s Shooting Attack is within the Firing Arc for only one of a pair of Sponson weapons, then the out of arc weapon may be fired at another enemy unit of the controlling player’s choice. This Secondary Target must be in the weapon’s line of sight and Firing Arc, but may be from a different unit than the original target.
Pintle Mounted – Pintle Mounted weapons may fire at targets in any Firing Arc without restriction, but are always counted as Defensive weapons regardless of the weapon type or its statistics.
Battlements are treated as an Access Point for their Building, meaning a unit inside the Building can disembark onto the battlements, or vice versa. Note that Buildings without Transport Capacity that have battlements may still not be entered, although units can use their battlements.
Units equipped with Jump Packs or Jet Packs, Cavalry units and Skimmers do not need to take Dangerous Terrain tests for starting or ending their move on battlements.
If a Template or Blast weapon hits a unit on top of a battlement, that battlement’s Building also suffers a single Hit.
If a unit moves onto the battlements of an Unclaimed, non-destroyed Building, they immediately Claim that Building and it becomes part of that unit’s side until the Building is either destroyed or an enemy unit Claims it.
The Ballistic Skill of a model making a Snap Shot can only be modified by special rules that specifically state that they affect Snap Shots, along with any other restrictions. If a special rule doesn’t specifically state that it affects Snap Shots, then the Snap Shot is resolved at Ballistic Skill 1.
Some weapon types, such as Ordnance, or those that have certain special rules, such as Blast, cannot be used to make Snap Shots. In addition, any Shooting Attack that does not use Ballistic Skill cannot be made as a Snap Shot. These exceptions aside, Snap Shots are treated in the same manner as any other Shooting Attack made with a Ballistic Skill of 1.
This weapon fires ammunition that cheats an enemy of their shelter.
Cover Saves and Damage Mitigation rolls granted by the Shrouded special rule cannot be taken against Wounds or Hull Point damage caused by weapons with the Ignores Cover special rule. This includes Cover Saves granted by Reactions and other special rules as well as Cover Saves conferred by terrain.Glancing Hits – If a Glancing Hit was scored, the Vehicle loses 1 Hull Point.
Penetrating Hits – If a Penetrating Hit was scored, the Vehicle not only loses 1 Hull Point, but also suffers additional damage.
After deducting any Hull Points, roll a D6 for each Penetrating Hit and look up the result using the Vehicle Damage table, applying any appropriate modifiers. All modifiers on the Vehicle Damage table are cumulative. If you inflict a Penetrating Hit, you must roll on the Vehicle Damage table even if the Vehicle loses sufficient Hull Points to be Wrecked, as there is still a chance it might suffer an Explodes result on the Vehicle Damage table.
Certain items can only be used once, so a general must choose wisely when to do so.
A weapon or ability with this special rule can only be used once during the course of a battle. Once a weapon with the One Use or One Shot special rule has been used to attack, it is no longer counted as a weapon and may not be destroyed (for example, by rolls on the Vehicle Damage table) or repaired by any other rule or effect.Template weapons shoot clouds of fire, gas or other lethal substances, rather than shells or bullets. They are excellent for killing enemy troops in cover, as the payload simply flows over intervening obstacles to assail the foe behind.
Template weapons are indicated by having the word ‘Template’ for their range instead of a number. Instead of rolling To Hit, simply place the template so that its narrow end is touching the base of the firing model, or the end of the firing weapon’s barrel for Vehicle models without bases, and the rest of the template covers as many models in the target unit as possible, without touching any other friendly models (including other models from the firing model’s unit). Any models fully or partially under the template are hit. Against Vehicles, the template must be placed to cover as much of the Vehicle as possible without touching a friendly model. The position of the firer is used to determine which armour Facing is hit. A Template weapon never hits the model firing it.Template weapons have the Ignores Cover and Wall of Death special rules. Wounds inflicted by Template weapons are allocated following the normal rules.
Stationary – A Vehicle that remains Stationary will be able to attack with all of its weapons, regardless of type, with no modification to their accuracy.
Combat Speed – A Vehicle that travels equal to or less, than half of its Movement Characteristic is said to be moving at Combat Speed. This represents the Vehicle advancing slowly to keep firing. A Vehicle moving at Combat Speed may attack with all non-Ordnance or non-Destroyer weapons with no modification to their accuracy. A Vehicle moving at Combat Speed may only fire a single Ordnance or Destroyer weapon, and if it does so then all other weapons must be fired as Snap Shots.
Vehicles can turn any number of times as they move, just like any other model. Vehicles turn by pivoting on the spot about their centre point, rather than wheeling round. Pivoting on the spot alone does not count as moving, so a Vehicle that only pivots in the Movement phase counts as Stationary (however, Immobilised Vehicles cannot even pivot on the spot). Pivoting is always done from the centre of a Vehicle to prevent it from accidentally moving further than intended or allowed. Just like other units, Vehicles cannot move over friendly models. A Vehicle may only pivot during the Movement phase, unless another rule specifically allows it to do so at another point. Unlike other models, Vehicles may not move vertically in terrain or on Terrain Pieces in order to ascend levels.
Some Vehicle types, from combat aircraft to lumbering artillery vehicles, as detailed later in this section, can affect both the manner in which a Vehicle moves and the distances it may move.
The source of the darkness around these warriors matters not – only a lucky shot has any chance of piercing the shroud that hides them from view.
When a model with this special rule suffers an unsaved Wound, Glancing Hit or Penetrating Hit, it can make a special Shrouded roll to ignore it (this is not a Saving Throw and so can be used against attacks that state that ‘no Saves of any kind are allowed’). Shrouded rolls may not be taken against Melee Attacks, against attacks with the Ignores Cover special rule or for models (excluding models with the Primarch Unit Type) with the Fearless special rule.Roll a D6 each time an unsaved Wound, Glancing Hit or Penetrating Hit is suffered by a model with this special rule. On a result that is equal to or greater than the value in brackets, that unsaved Wound, Glancing Hit or Penetrating Hit is ignored. On any other result, the Wound, Glancing Hit or Penetrating Hit is applied as normal. For example, a unit with the special rule Shrouded (6+) would need to score a 6 in order to ignore a Wound, Glancing Hit or Penetrating Hit inflicted upon it.
If on any unit this rule is presented simply as Shrouded, without a value in brackets, then count it as Shrouded (6+).
This is a Damage Mitigation roll – any model may make only a single Damage Mitigation roll of any type for any given Wound, Glancing Hit or Penetrating Hit.
Rapid Fire weapons are very common and usually come in the form of semi-automatic rifles. Their versatility means they can be fired as effectively when a squad is advancing as when taking single, long-ranged shots.
A model armed with a Rapid Fire weapon can make two attacks at a target up to half the weapon’s Maximum Range away. Alternatively, it can instead make one attack at a target over half the weapon’s range away, up to the weapon’s Maximum Range.If a unit attacking with Rapid Fire weapons is found to be partially within half range of the target, the firing models within half range make two attacks, while those further away make one attack.
Models that attack with Rapid Fire weapons in the Shooting phase cannot Charge in the ensuing Assault phase.
|
The ancient volkite weaponry employed by the armies of Terra in the earliest years of the Great Crusade fired arcing blasts of energy rather than solid projectiles.
After normal attacks by this weapon have been resolved, count the number of unsaved Wounds caused on the target unit. Immediately resolve a number of additional automatic Hits on the same unit using the weapon’s profile equal to the number of unsaved Wounds – these can then be saved normally. Models in the targeted unit must still be in range in order for these additional Hits to take effect. These additional Hits do not themselves inflict more Hits and do not benefit from any other special rules possessed by the attacking model, such as Preferred Enemy (X) or Precision Strikes (X).Pistols are light enough to be carried and fired one-handed.
A model attacking with a Pistol weapon makes the number of Attacks indicated on its profile regardless of whether the bearer has moved or not. A model carrying a Pistol weapon can make a Shooting Attack with it in the Shooting phase and still Charge in the Assault phase. A Pistol weapon also counts as a close combat weapon in the Assault phase. In addition, all models with two Pistol type weapons can attack with both in the same Shooting phase. This follows the normal rules for shooting.
|
Ordnance weapons are cannon so vast, they are typically mounted on tanks and artillery.
When making Shooting Attacks, a model equipped with an Ordnance weapon fires the number of times indicated in its profile after its Type. A non-Vehicle model carrying an Ordnance weapon cannot attack with it in the Shooting phase if they moved in the preceding Movement phase. Ordnance weapons cannot make Snap Shots. Furthermore, if a non-Vehicle model attacks with an Ordnance weapon, that model may not make any further Shooting Attacks with any other weapon in the Phase nor will it be able to Charge in the ensuing Assault phase. Vehicle models that fire Ordnance weapons may also suffer some restrictions based upon the distance they have moved that turn.Ordnance weapons hit with such force that when you roll to penetrate a Vehicle’s armour with an Ordnance weapon, roll two dice instead of one and pick the highest result.
|
Stationary – A Vehicle that remains Stationary will be able to attack with all weapons regardless of type with no modification to their accuracy.
Combat Speed – A Vehicle that travels no more than half of its Movement Characteristic is said to be moving at Combat Speed. This represents the Vehicle advancing slowly to keep firing. A Vehicle moving at Combat Speed may attack with all non-Ordnance or non-Destroyer weapons with no modification to their accuracy. A Vehicle moving at Combat Speed may only fire a single Ordnance or Destroyer weapon, and if it does so then all other weapons must be fired as Snap Shots.
Cruising Speed – A Vehicle that travels more than half of its Movement Characteristic is said to be moving at Cruising Speed. This represents the Vehicle diverting power to keep it moving as fast as possible, making all of its firepower wildly inaccurate. A Vehicle moving at Cruising Speed may firea single weapon without modificationto its BS and any other weapons as Snap Shots. However, a Vehicle moving at Cruising Speed may not fire Ordnance or Destroyer weapons.
Mounted only on the largest and most fearsome of war machines, Destroyer class weapons are capable of annihilating smaller targets and tearing through even the thickest armour with ease.
A model making a Shooting Attack with a Destroyer weapon attacks the number of times indicated on the weapon’s profile whether or not the bearer has moved. A model carrying a Destroyer weapon can attack with it in the Shooting phase and still Charge in the Assault phase. In addition, when you roll for armour penetration with Hits caused by a Destroyer weapon, roll three dice instead of one and discard the single lowest dice rolled, or any one of the lowest dice in the case of tied results. Use the total of the remaining dice to determine the result.In addition, when a Destroyer weapon inflicts a Glancing Hit or a Penetrating Hit, it inflicts D3 Hull Points of Damage instead of a single Hull Point. When a Destroyer weapon inflicts a Wound on a non-Vehicle model, it inflicts D3 Wounds instead of a single Wound.
|