Core Rules


Books
| Book | Kind | Edition | Version | Last update |
 Warhammer 40,000 Core Rules Warhammer 40,000 Core Rules | ||||
| Warhammer 40,000 Core Rules | Rulebook | 11 | June 2026 | |
Introduction
Welcome to the Warhammer 40,000 Core Rules. This page contain everything you need to know in order to wage battle across the war-torn galaxy of the 41st millennium.
A battle usually lasts for five battle rounds, at the end of which, through a combination of skill, tactics and a little luck, one of the players will be crowned the victor.
Each Warhammer 40,000 game is played using a mission, which you must generate before you begin. You can do so by using a Warhammer 40,000 mission deck. Each mission will tell you how to prepare for the battle and deploy your forces, as well as any additional rules that will be in effect. Crucially, it will also state what the players need to do to win!
Missions will instruct players to muster an army from their collection of Citadel miniatures, and will state the total size those armies should be. Doing so is a rewarding hobby in itself, with near limitless narrative themes and unit combinations to explore for over two-dozen factions.
Finally, before playing a game of Warhammer 40,000, you will need to create a battlefield with some terrain. You can use any surface you can place your models and terrain upon; a table is ideal. Your mission will tell you the size of battlefield you should use, and guide you on the volume and placement of terrain. In doing so, players can recreate many of the 41st millennium’s nightmarish war zones, from carnivorous death worlds to war-ravaged cityscapes.
Following contain the Core Rules that every Warhammer 40,000 player will need to know. This page is your indispensable guide to playing exciting war games that bring the grim and desperate conflicts of the 41st millennium to life. So grab your dice and tape measure, steel your resolve, and may your victories go down in legend!
BASIC RULES
Core Concepts 01
Before you learn how to move your warriors across the battlefield and attack the enemy in deadly firefights and bloody close combat, this section introduces some core concepts that underpin every Warhammer 40,000 battle.
Armies 01.01
Each player in a game of Warhammer 40,000 commands an army made up of units of models. You control all of the models in your army. If a rule refers to the ‘controlling player’, it is referring to the player who controls the models being affected by that rule.- You 01.01.01
Units and Models 01.02
A unit can contain one or more models. These models move and fight together as a single group. Most models have a base, which is also part of that model for all rules purposes.Rules sometimes affect ‘friendly’ or ‘enemy’ models or units, which are defined as follows:
- Friendly units and models are those in your army.
- Enemy units and models are those in your opponent’s army.
- Starting Strength and Half-Strength 01.02.01
- Persisting Rules Effects 01.02.02
- Revived and Adding Models to a Unit 01.02.03
- Not On The Battlefield 01.02.04
- Other Model / Unit 01.02.05
- Splitting Units 01.02.06
- Describing Units 01.02.07
- A (Unit/Model/Object) 01.02.08
- Tokens 01.02.09
- Adding a new unit to your army 01.02.10
- All Types of Model 01.02.11
- Replacing One Model with Another 01.02.12
- Frame 17.02
FAQ
| Q: | If a rule’s effect lasts until the end of a specific part of the battle (e.g. until the end of the phase, until the end of the turn), is that rule still in effect at the end of that part of the battle? |
| A: | Yes. For example, if an ability gave a unit +1 OC until the end of the turn, at the end of the turn, that unit would still have +1 OC. That unit would not have +1 OC at the start of the next turn. |
Active Player and Opposing Player 01.03
At any given time, one player is the ‘active player’ and their opponent is the ‘opposing player’. Which player is which changes throughout the battle, but both players are always one or the other; whenever a player becomes the active player, their opponent becomes the opposing player, and vice versa.While it is neither player’s turn (e.g. at the start or end of the battle round), the player who takes the first turn in each battle round is the active player.
While it is a player’s turn, that player is the active player, with the following exceptions:
- Each time a unit is selected to move, that unit’s controlling player is the active player until that move ends.
- Each time a unit is selected to shoot or selected to fight, that unit’s controlling player is the active player until those attacks are resolved.
- Player’s Rules 01.03.01
- Rules Sequencing 01.03.02
Measuring Distances 01.04
Distances in Warhammer 40,000 are measured in inches ("). You can measure distances whenever you want to.When a rule refers to a model’s position in relation to anything else on the battlefield, unless otherwise stated, measure to or from the closest part of that model’s base.
- Within / Wholly Within 01.04.01
- Closest Or Nearest Model/Unit 01.04.02
- As Close As Possible 01.04.03
- Base Contact or Base to Base Contact 01.04.04
- Table Quarter 01.04.05
- Drawing a Line 01.04.06
Dice 01.05
You will require some six-sided dice (often abbreviated to D6). There are many ways dice rolls are referred to, including:- 2+, 3+, and so on: 2+ means a result of 2 or more, 3+ means a result of 3 or more, and so on.
- 1-3, 4-6, and so on: Any result within the specified range will interact with the rule stated.
- 2D6, 3D6, and so on: Roll the stated number of D6 and add the individual values together (e.g. to roll 2D6, roll two D6 and add the values together).
- D3: Roll one D6 and halve the result (rounding up).
- D6+1, 2D6+3, and so on: Roll the stated number of dice and add the stated value to the result.
- Automatically Successful/Passes/Hits/Wounds 01.05.01
- Re-rolls 01.05.02
- Modifying Dice Rolls 01.05.03
- Ignoring Roll Modifiers 01.05.04
- Roll Off 01.05.05
- Doubles Or Triples 01.05.06
- Highest or Lowest Dice Result 01.05.07
- Treated As, Set To (Dice Roll) 01.05.08
Leadership Rolls 01.06
To make a leadership roll for a unit, its controlling player rolls 2D6: if the result is equal to or greater than one or more of the Ld characteristics in that unit, that roll succeeds. Otherwise, that roll fails. The rule that instructed you to make that leadership roll will describe the effects of that roll succeeding or failing.Leadership Test 01.06.01
Some rules may use the term Leadership test, this is the same as leadership roll.Battle-shock Rolls 01.07
To make a battle-shock roll for a unit, its controlling player makes a leadership roll for it (see above).- If that roll succeeds, that unit does not become battle-shocked.
- If that roll fails, that unit, and each model in it, is battle-shocked.
While a unit is battle-shocked:
- The Objective Control (OC) characteristic of all of its models is modified to ‘-’ (02.02).
- Its controlling player cannot target that unit with stratagems (15).
- It is not eligible to start an action (16), and any action it has started cannot be completed.
- Battlefield Morale 01.07.01
- Battle-shock Test 01.07.02
FAQ
| Q: | If a unit has a rule that allows it to start an action when it is battle-shocked can it also continue doing that action if it becomes battle-shocked after starting an action? |
| A: | Yes |
| Q: | If a unit becomes battle-shocked after starting an action does it stop performing that action? |
| A: | Yes |
Datasheets 02
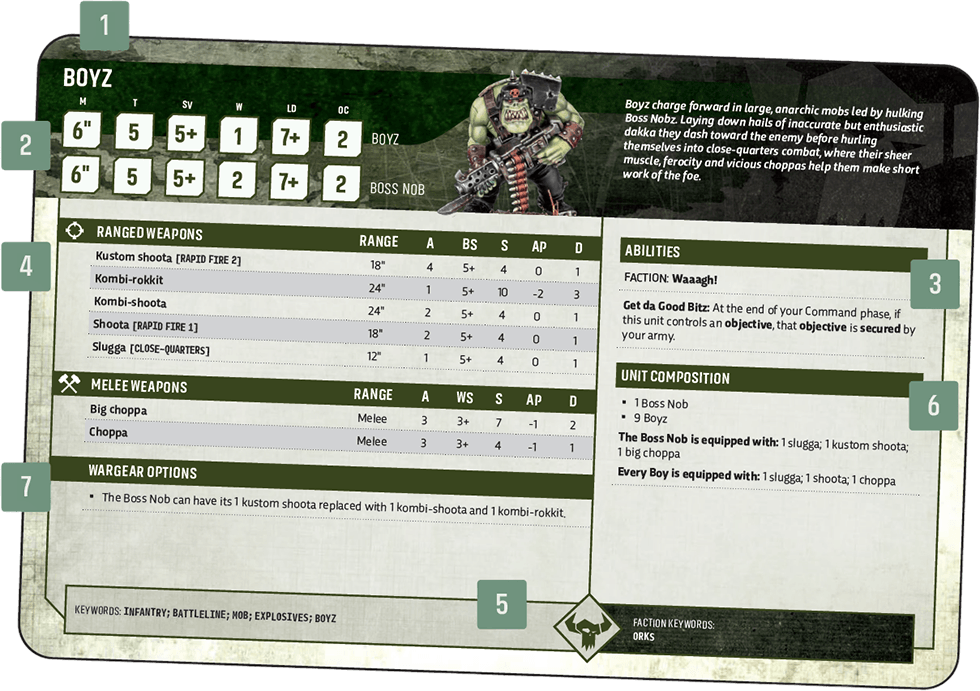
Each unit has a datasheet that explains how it functions in battle. Here you will learn how to use datasheets when preparing your army and playing games.
1. Datasheet Name 02.01
Here you will find the name of the unit.- Datasheet Name and Keywords 02.01.01
2. Profiles 02.02
These contain the following characteristics that tell you how mighty the models in the unit are:Move (M): The speed at which a model traverses the battlefield. If a model has an M characteristic of ‘-’, it can be set up on the battlefield but otherwise cannot be moved.
Toughness (T): The model’s resilience against harm.
Save (Sv): Presented as a dice result (e.g. 4+), this indicates the protection a model’s armour gives it.
Invulnerable Save (InSv): Presented as a dice result (e.g. 4+). Some models are protected by esoteric means in addition to physical armour, such as force fields or preternatural reflexes. Not all models have an InSv characteristic, but if they do, it will be listed here.
Wounds (W): Wounds represent how much damage a model can sustain before it is destroyed. If a model’s wounds are reduced to 0 or fewer, that model is destroyed.
Leadership (Ld): Presented as a dice result (e.g. 7+), this reveals how courageous, determined or self-controlled a model is.
Objective Control (OC): How effectively a model can control an objective on the battlefield. If a model has an OC characteristic of ‘-’ it is unable to control objectives at all.
PROFILES AND WEAPONS
- Modifiers 02.02.01
- Ignore Modifiers 02.02.02
- Random Characteristics 02.02.03
- Healing Or Regaining Lost Wounds 02.02.04
- Full Wounds Remaining 02.02.05
- Characteristic Modifiers & Modified Characteristics 02.02.06
- Destroyed 05.04.04
FAQ
| Q: | My unit has access to a rule that changes the Damage characteristic of an incoming attack to 0. When such an attack is allocated to a model in that unit, is the Damage changed before or after save rolls? |
| A: | After. |
| Q: | How do modifiers to the charge roll (or to the maximum distance of the charge move, such as Take to the Skies) affect the selection of charge targets? |
| A: | A charging unit may only select charge targets that are within the maximum distance of their charge roll, including any modifiers. If such a modifier occurs after selecting a charge target and causes that charge target to no longer be within the maximum distance, the charging unit would then select new targets (Target No Longer Eligible Or Viable, 04.03.03). Example: A unit’s charge roll is 7", and that unit has a datasheet ability which adds 1 to charge rolls: that charge’s maximum distance is 8", so you can select charge targets within 8". Example: A FLYING unit chooses to take to the skies and rolls a charge roll of 9"; that charge’s maximum distance is 7" (9" minus the 2" from taking to the skies), so you can select charge targets within 7". |
3. Abilities 02.03
Many units have abilities that may apply during the game. These will be described here.- Aura Abilities 22.01
- Faction Abilities 22.02
- Psychic Abilities 22.03
- Wargear Abilities 22.04
- Rules With Multiple Conditions And Effects 02.03.01
4. Weapons 02.04
Weapons have the following characteristics:Range (R): How far ranged weapons can shoot. Weapons with an R characteristic of ‘Melee’ are melee weapons.
Attacks (A): How many attack dice are used each time that weapon is used.
Ballistic Skill (BS): Presented as a dice result (e.g. 4+), this shows how accurate the bearer is when shooting with the relevant ranged weapon.
Weapon Skill (WS): Presented as a dice result (e.g. 4+), this reflects the bearer’s skill in wielding the relevant melee weapon.
Strength (S): The higher a weapon’s S characteristic, the more likely it is to wound a foe.
Armour Penetration (AP): Presented as a modifier to a dice roll (e.g. -1). The larger the modifier, the better the weapon is at cutting through the target’s defences.
Damage (D): The amount of damage inflicted by an attack.
- Weapons With No Strength 02.04.01
FAQ
| Q: | My rule says that "this units ranged attacks have +1 A", do each of my attacks get an extra attack dice? |
| A: | No, it increases the A characteristics of the unit's ranged weapons by 1. |
5. Keywords 02.05
Datasheets have a list of keywords, separated into faction keywords and other keywords. The former are used when deciding which models to include in your army, but otherwise both are functionally the same. Keywords appear in full capitals, in KEYWORD BOLD.Some rules are linked to one or more keywords. For example, a rule might say that it applies to INFANTRY units. This means it only applies to units that have the INFANTRY keyword. Singular and plural instances of the same keyword function in the same way.
- Using Keywords & Mixed Keywords in Units 02.05.01
FAQ
| Q: | Do rules that affect a keyword include multi-word keywords that contain that keyword? For example, would rules that affect COMMISSAR units affect a unit that has the COMMISSAR GRAVES keyword? |
| A: | No. |
6. Unit Composition and Other Rules 02.06
This section details the number and types of models in the unit. Each of those models will have one set of default wargear, which will be listed here. It may also list other rules, such as which units a leader unit can join or which units can embark within a TRANSPORT.- Bearer 02.06.01
- Unit’s Equipment 02.06.02
FAQ
| Q: | The Munitorium Field Manual shows my unit can attach to different units then are on it's datasheet, which do I use? |
| A: | Use the Munitorium Field Manual. |
Moving 03
During a battle, you will move your models by picking them up and changing their position on the battlefield. The principles of movement are explained here.
Moving Units 03.01
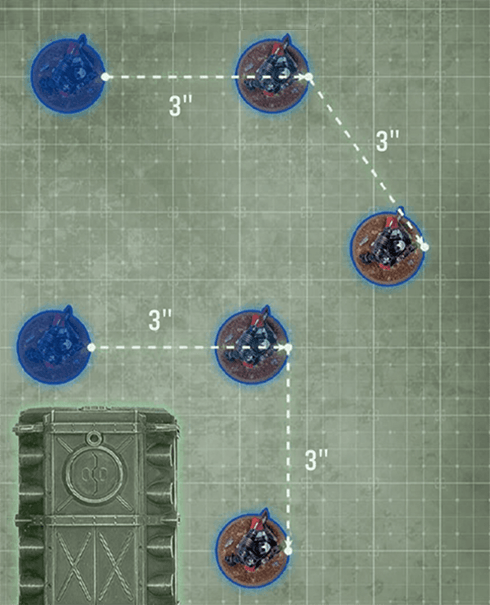
There are several types of move a unit can make. Each one defines which units are eligible to make it, what its maximum distance or set-up distance is, and any conditions that must be met.Each time you move a unit, you can move one or more of its models, one at a time, by moving it in a straight line and/or rotating it, as many times as you want to.
Each time you move a model, unless otherwise stated:
- It can be moved through friendly models.
- It can be moved through any space its base can fit through.
- Its base cannot be moved through enemy models.
- Its base cannot cross the edge of the battlefield.
- All stated ‘While Moving’ conditions must be met.
- Different Move Characteristics 03.01.01
- Moving Over Or Through Models 03.01.02
- Random Movement 03.01.03
- When Moving Up To 03.01.04
Moving a Model in a Straight Line
Each time you move a model in a straight line, move it horizontally across the battlefield. Measure from the same point on its base at the start and end of that move, and add that distance to any other distance it has moved since its unit began that move. The distance moved cannot be greater than the maximum distance of that move type.Rotating a Model
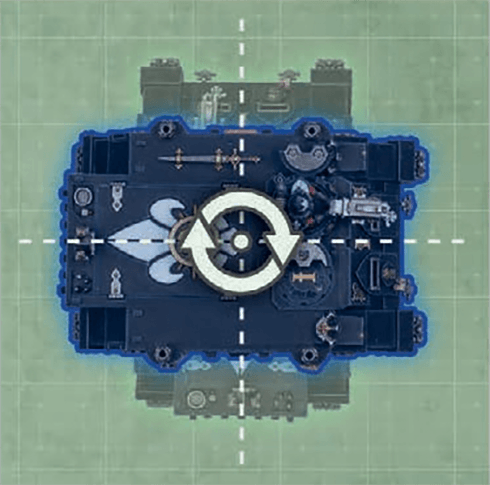
Each time you rotate a model, turn it any amount around the centre of its base, while keeping it upright. Note that rotating a model does not count towards the distance it has moved.Ending a Move
After you have finished setting up all of the models in a unit and/or moving all of the models in a unit that you want to move, check that all of the following apply:- If that unit is on the battlefield, it is in coherency (03.03).
- No models in that unit are on another model or partway through a surface of a terrain feature (e.g. a wall or ceiling).
- All stated ‘After Moving’ conditions are met.
- Frame 17.02
- Monsters and Vehicles 17.00
- Moving Vertically 13.06
- Random Movement
- Strategic Reserves 20.00
- Terrain 13.00
- Transports 18.00
- Advance Move 09.06
- Charge Move 11.04
- Consolidation Move 12.08
- Disembark Move 18.04
- Emergency Disembark Move 18.05
- Fall-back Move 09.07
- Ingress Move 20.04
- Normal Move 09.05
- Pile-in Move 12.03
- Scout Move 24.32
- Surge Move 21.02
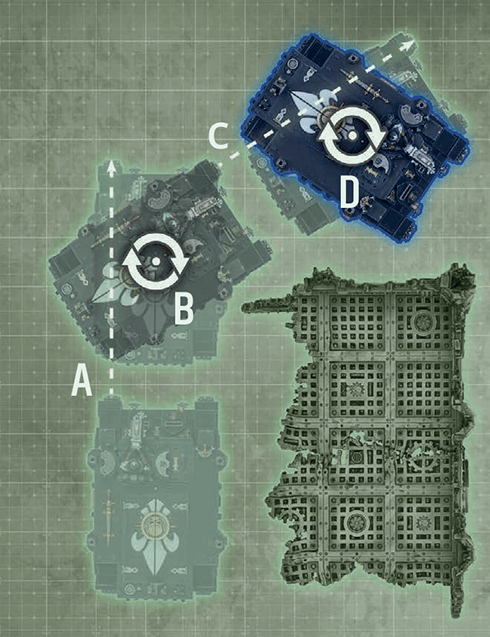
A) Moves 6" in a straight line
B) Rotates
C) Moves 6" in a straight line
D) Rotates This model has moved a total of 12".
Set Up 03.02
Whenever a rule instructs you to set up a unit, place its models on the battlefield so that:
- That unit is in coherency (see below).
- That unit is unengaged (see below).
- All other requirements and restrictions are met.
If you cannot set up all of the models in a unit, remove that unit from the battlefield and return it to its original position (e.g. in strategic reserves or embarked within a TRANSPORT).
- If You Cannot Set Up a Unit 03.02.01
- Setting Up Large Models 03.02.02
- Redeployments 03.02.03
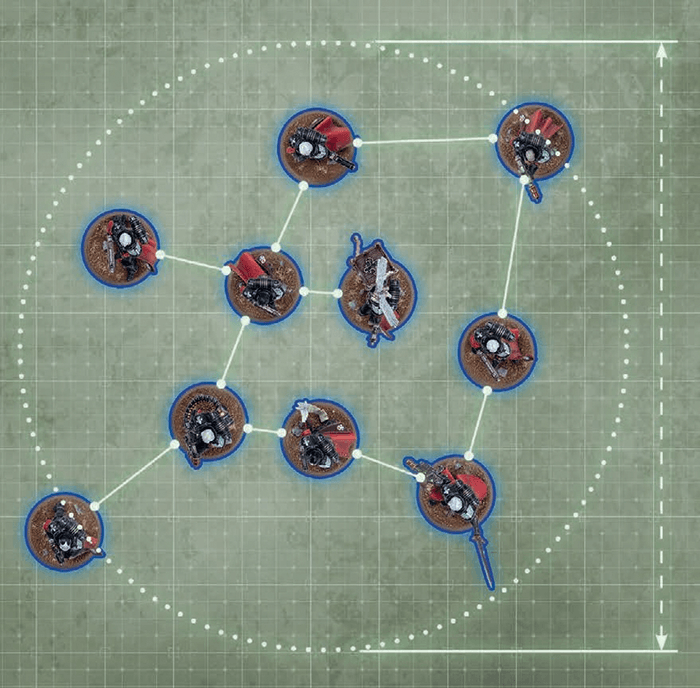
Coherency 03.03
- Within 2" horizontally and 5" vertically of at least one other model in that unit.
- Within 9" horizontally and 5" vertically of every other model in that unit.
REGAINING COHERENCY
In the End of Turn step of each player’s turn, if one or more units on the battlefield are not in coherency, those units’ controlling players must remove models from them, one at a time, until they are in coherency again. Models removed in this way are destroyed, but they do not trigger rules that apply when a model is destroyed.
FAQ
| Q: | Do models destroyed when a unit is out of coherency count for mission objectives? |
| A: | Yes. |
| Q: | When checking coherency for my unit can my unit be in multiple groups? |
| A: | No, it must be in a single contiguous group as per Units and Models (01.02) and What is Coherency in the core rules. |
| Q: | When a move says that a model or unit must move in a way if it is able, can that requirement force the unit to end their move not in coherency? |
| A: | No, when a model or unit is making a move it must follow requirements while ending that move in coherency. |
What Is Coherency 03.03.01
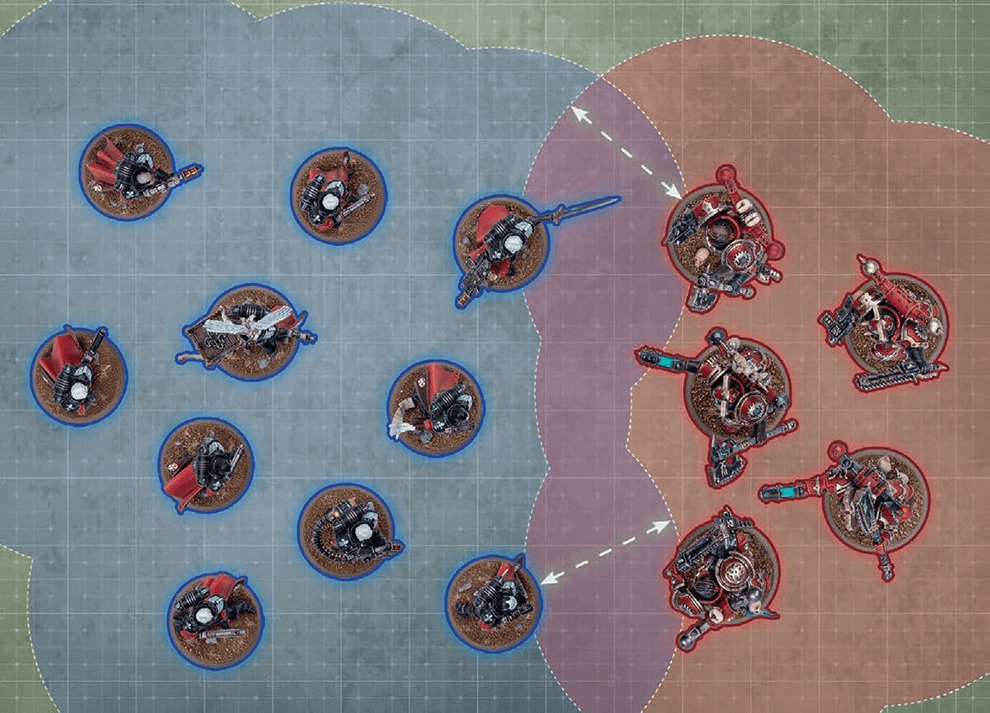
Coherency prevents models in the same unit from becoming too separated from each other while on the battlefield, ensuring they are set up and end every kind of move as a single group.Engagement 03.04
- While a friendly model is within engagement range of one or more enemy models, those models – and the units they belong to – are engaged with each other.
- While a unit contains no engaged models, that unit is unengaged.
FAQ
| Q: | Does my model or unit become engaged while moving through a enemy units engagement range during a move? |
| A: | No |
Making Attacks 04
During the battle, your units will shoot at and fight the enemy, making attacks with their weapons each time they do so. This section explains how to make attacks with your models.
1. SELECT WEAPONS
2. SELECT TARGETS
3. RESOLVE ATTACKS
1. Select Weapons 04.01
For each model in the attacking unit, select which weapons that model will make attacks with. Models make ranged attacks with ranged weapons, and make melee attacks with melee weapons.WHILE SHOOTING
You can select one or more ranged weapons that model has.
WHILE FIGHTING
You must select one melee weapon that model has.
- [CLOSE-QUARTERS] 24.07
- [EXTRA ATTACKS] 24.11
- Models Without Ranged/Melee Weapons 04.01.01
- Sidearms 04.01.02
- Multiple Weapon Profiles 04.01.03
- Attack Characteristics and Abilities 04.01.04
- Selected to Attack 04.01.05
2. Select Targets 04.02
For each weapon selected:WHILE SHOOTING
Select one enemy unit to be the target of that weapon. Unless otherwise stated, each target must be:
- Visible to the model that has that weapon (06.01).
- Within range of that weapon.
- Unengaged.
WHILE FIGHTING
Select one or more enemy units to be the targets of that weapon:
- Each target must be engaged with the model that has that weapon.
- You cannot select more targets than that weapon’s A characteristic.
- Frame 17.02
- Shooting at Engaged Monsters and Vehicles 17.03
- Selecting Targets 04.02.01
- Against An Attack 04.02.02
- Single Target 04.02.03
FAQ
| Q: | When selecting a target unit can the enemy model that is visible to my model and the enemy model that is in range of my model’s weapon be different enemy models in the same unit? |
| A: | Yes |
| Q: | Can a model be within range of a weapon if it is not visible? |
| A: | Yes |
3. Resolve Attacks 04.03
Resolve attacks using the following sequence:- Select Enemy Unit: Select one of the enemy units targeted by one or more weapons.
- Gather Attack Dice: Select one weapon targeting that unit that has not yet been used to make attacks against it, and gather a number of D6 equal to that weapon’s A characteristic. These are attack dice – each one represents one attack being made by an attacking model with that weapon.
If one or more other weapons targeting that unit make identical attacks to the selected weapon (see below) and those weapons have not yet been used to make attacks against that target, they do so now and you gather those weapons’ attack dice as well (e.g. for three weapons making identical attacks, each with an A characteristic of 2, gather a total of six D6). - Resolve Attack Dice: Resolve the attack sequence (05) for all of the attack dice you just gathered.
- Other Attacks: Follow the first of the instructions below that applies:
|
- Random Characteristics 02.02.03
- Identical Attacks 04.03.01
- Splitting Melee Attacks 04.03.02
- Target No Longer Eligible Or Viable 04.03.03
- Shot 04.03.04
- Fought 04.03.05
- Finished Making Its Attacks 04.03.06
FAQ
| Q: | My rule says that "this units ranged attacks have +1 A", do each of my attacks get an extra attack dice? |
| A: | No, it increases the A characteristics of the unit's ranged weapons by 1. |
| Q: | When my unit shoots at another unit, how does it work if some models in the target unit are fully visible to some models in my unit, while others are within a terrain area/not fully visible? |
| A: | For each attacking model in your unit, determine whether the target unit has the benefit of cover, as described in Terrain and Visibility. In this scenario, the target unit will likely have the benefit of cover against some of the attacking models, but not all. This means that, in an example unit where all attacking models are using the same weapon, when you get to the Resolve Attacks step of the Attack Sequence, you will collect dice for attacks made by models against which the target unit has the benefit of cover separately from the dice for attacks made by models against which the target unit does not have the benefit of cover. |
| Q: | If my unit has weapons that are identical in characteristics, but some of those weapons have [PRECISION] and those weapons targeted a unit without the CHARACTER keyword, do I roll all of those weapons together? |
| A: | Yes, the [PRECISION] ability is not an applicable ability for those attacks as there is no CHARACTER in the target unit for the ability to trigger its rule. |
Identical Attacks
Identical attacks are those that have the same BS/WS, S, AP and D characteristics, and which are affected by the same applicable abilities and rules.Splitting Melee Attacks
While selecting targets, if you select more than one unit as the target of a melee weapon, you must split that weapon’s attacks between those target units. To do so, declare how many of that weapon’s attacks will be made against each unit (you must declare at least one attack per unit targeted).In the Gather Attack Dice step, for each weapon that is splitting its attacks, only gather a number of attack dice for that weapon equal to the number of attacks you declared would be made against that target with that weapon.
Attack Sequence 05
Whenever models make attacks, you will follow the sequence detailed in this section to find out if they inflict damage.
1. HIT ROLLS
2. WOUND ROLLS
3. SAVE ROLLS
4. INFLICT DAMAGE
1. Hit Roll 05.01
Make one hit roll for each attack dice by rolling one D6. For each result, check if it fails or is a hit by matching the first condition below that applies:
|
FAQ
| Q: | My attack has a rule that means it results in a critical hit on a hit roll of 4+. Does this work when snap shooting? |
| A: | Unless otherwise stated, no: when snap shooting, each attack only hits on a roll of 6. |
| Q: | My attack has a rule that means it results in a critical hit on a hit roll of 4+, and I would otherwise need a 5+ to hit. Does a 4+ hit? |
| A: | Yes, except when snap shooting: when snap shooting, each attack only hits on a roll of 6. |
Critical Hits and Critical Wounds 05.01.01
Critical hits are still hits, and critical wounds are still wounds. In addition, other rules can be triggered by a critical hit or a critical wound, such as [LETHAL HITS] and [DEVASTATING WOUNDS] (24).2. Wound Roll 05.02
Make one wound roll for each hit by rolling one D6. For each result, check if it fails or is a wound by matching the first condition below that applies:
| ||||||||||||||||||||||||||||||
- Multiple Toughness Characteristics 05.02.01
3. Save Rolls 05.03
The opposing player resolves the following sequence:- Create Groups: Divide all models in the target unit into the following groups, as many times as required:
- One group for each CHARACTER model.
- One group for all other models with the same W, Sv and InSv characteristics.
- Allocation Order: Declare the order in which those groups will have attacks allocated to them, applying all of the following:
- If a non-CHARACTER group contains a model that has lost one or more wounds, that group must be first in the allocation order.
- No CHARACTER group can be earlier in the allocation order than a non-CHARACTER group.
- CHARACTER groups containing a model that has lost one or more wounds must be earlier in the allocation order than CHARACTER groups containing no wounded models.
- Make Save Rolls: The opposing player makes one save roll for each attack that wounded the target by rolling one D6.
FAQ
| Q: | When declaring the allocation order of groups in my unit I have more than one non-CHARACTER groups that contain a model with a missing wound, how must I select the order? |
| A: | Those groups can be selected in an order of your choosing but must be in an order that makes them come before any non-CHARACTER groups that do not contain a model with a missing wound. |
| Q: | I have a unit being attacked with weapons that will modify some of their save rolls to be worse then 6 should I make those save rolls? |
| A: | Yes, because other models in your unit may have Sv’s that are better those models you’ve mentioned, this means that enough save rolls could be allocated to the those models that the rest of the results are not greater then the Sv’s of the other models in your unit. |
| Q: | Can I group or allocate a wound to a destroyed model? |
| A: | No. |
Attacks Modified during Hit and Wound rolls 05.03.02
Some attacks may be modified as a result of the values of hit/wound rolls made for those attacks. When this happens, split those attacks into attack pools based on their new identical attack profiles. The active player can decide which attack pool to resolve first for steps 05.03 and 05.04 Once those steps have been completed for that attack pool, the active player can decide the next pool to resolve and repeat until all new attack pools are resolved.4. Inflict Damage 05.04
The opposing player resolves the following sequence for each save roll, working from lowest result(s) to highest result(s), until all attacks are resolved or all models in the target unit are destroyed – in the latter case, any excess attacks are lost.- Select Model: Select one model in the current allocation group (see below); this must be a model that has lost one or more wounds if possible.
- Check Save Roll: For each result, check if that attack inflicts damage or fails by matching the first condition below that applies:

Unmodified INFLICTS DAMAGE Invulnerable Save: The models in the current allocation group have an InSv characteristic, and the result is equal to or greater than that characteristic. FAILS Save and AP: After modifying the result by the attacking weapon’s AP characteristic, it is equal to or greater than the Sv characteristic of models in the current allocation group.
Example: An AP characteristic of -1 would modify a save roll of 3 to a 2. For models with a Sv characteristic of 2+ or better, that attack would fail.FAILS Any other result INFLICTS DAMAGE - Resolve Damage: If that attack inflicts damage, the selected model loses a number of wounds equal to that attack’s D characteristic. If this reduces that model’s remaining wounds to 0 or fewer, it is destroyed.
FAQ
| Q: | Fight On Death (05.04.05) requires models awaiting such an ability to stay on the battlefield until their unit has attacked (or until the end of the phase). How do these models function while this is the case? |
| A: | Models awaiting a Fight On Death ability are still present on the battlefield for all rules purposes. This includes (but is not limited to) the following regarding such models:
|
| Q: | In what step during the attack sequence do I roll for Feel No Pain? |
| A: | In the Resolve Damage step of the Inflict Damage step (05.04). |
Suffers Damage 05.04.03
If an attack reaches the Resolve Damage step of the attack sequence (05.04), the model that attack was allocated to has suffered damage, even if that model subsequently uses a rule to ignore the wounds inflicted or it uses a rule that means those wounds are not lost.See Also
- Modifying Dice Rolls 01.05.03
- Modified Characteristics 02.02.01
- Random Characteristics 02.02.03
- Current Allocation Group 05.04.01
- Modifying Damage 05.04.02
- Suffers Damage 05.04.03
- Destroyed 05.04.04
- Fight On Death 05.04.05
- Measuring To A Destroyed Model Or Unit 05.04.06
Attack Sequence Examples
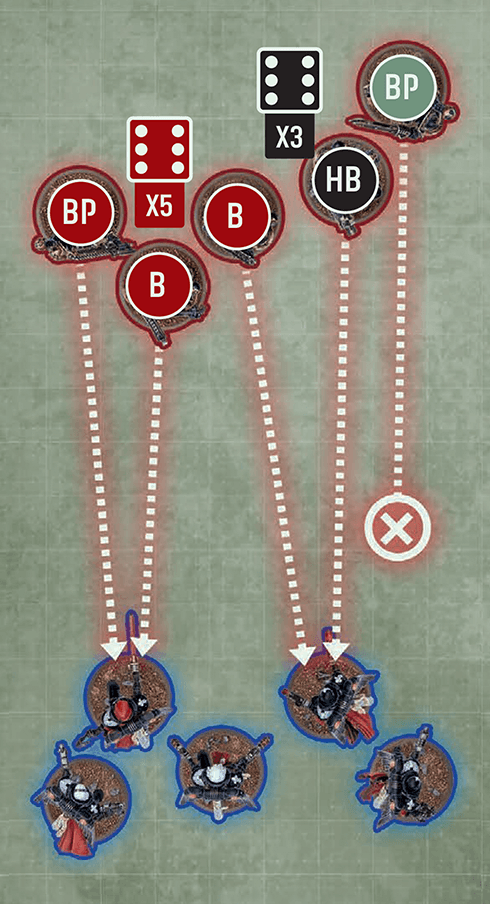
The RED unit is attacking. The following weapons are selected to make attacks with:
- 2 boltguns (B)
- 2 bolt pistols (BP)
- 1 heavy bolter (HB)
2. SELECT TARGETS
The BLUE unit is selected as the target. The unit is visible to all models in the attacking unit. All of the selected weapons are in range, with the exception of one bolt pistol. As a result, that weapon will not make any attacks.
3. RESOLVE ATTACKS
There is only one enemy unit being targeted, so the controlling player now gathers attack dice:
- Five attack dice are gathered for the boltguns and bolt pistol, which have A characteristics of 2 and 1 respectively and all make identical attacks.
- Three attack dice are gathered for the heavy bolter, which has an A characteristic of 3 but does not make identical attacks.
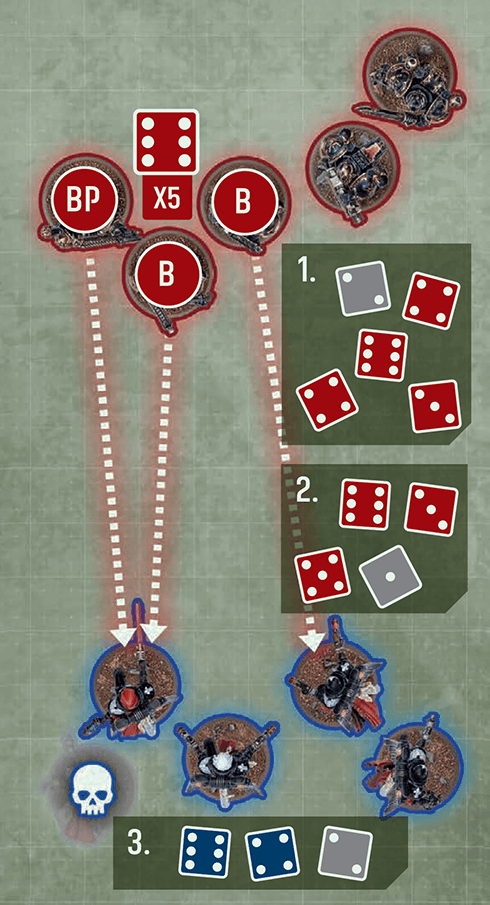
The controlling player chooses to make the five hit rolls for the boltguns and bolt pistol first. The BS characteristic of the weapons is 3+. Four of the attacks hit the target.
2. WOUND ROLLS
The controlling player makes four wound rolls. The weapons have an S characteristic of 4 and the target unit has a T characteristic of 3, so rolls of 3+ are required to wound. Three of the attacks wound the target.
3. SAVE ROLLS
The target unit’s controlling player makes three save rolls.
4. INFLICT DAMAGE
- The lowest result is less than both the InSv and Sv characteristics of the target, so that attack inflicts damage. This reduces the model to which that attack was allocated to 0 wounds, which destroys it.
- The next lowest result is less than the target’s InSv characteristic, but greater than its Sv characteristic of 3+; that attack fails.
- The other result is greater than the target’s InSv characteristic of 5+; that attack also fails.
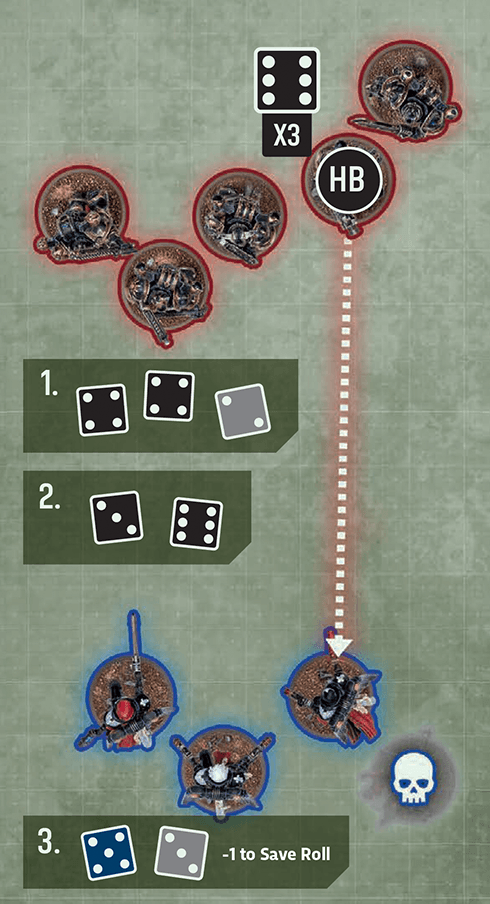
The controlling player then makes three hit rolls for the heavy bolter. The BS characteristic of the weapon is 4+. Two of the attacks hit the target.
2. WOUND ROLLS
The controlling player makes two wound rolls. The weapon has an S characteristic of 5, so rolls of 3+ are required to wound. Both attacks wound the target.
3. SAVE ROLLS
The target unit’s controlling player makes two save rolls.
4. INFLICT DAMAGE
- The lowest result, when modified by the attacking weapon’s AP characteristic of -1, is less than the target’s Sv characteristic of 3+, so that attack inflicts damage. This reduces the model to which that attack was allocated to 0 wounds, which destroys it.
- The other result is equal to the target’s InSv characteristic of 5+; that attack fails.
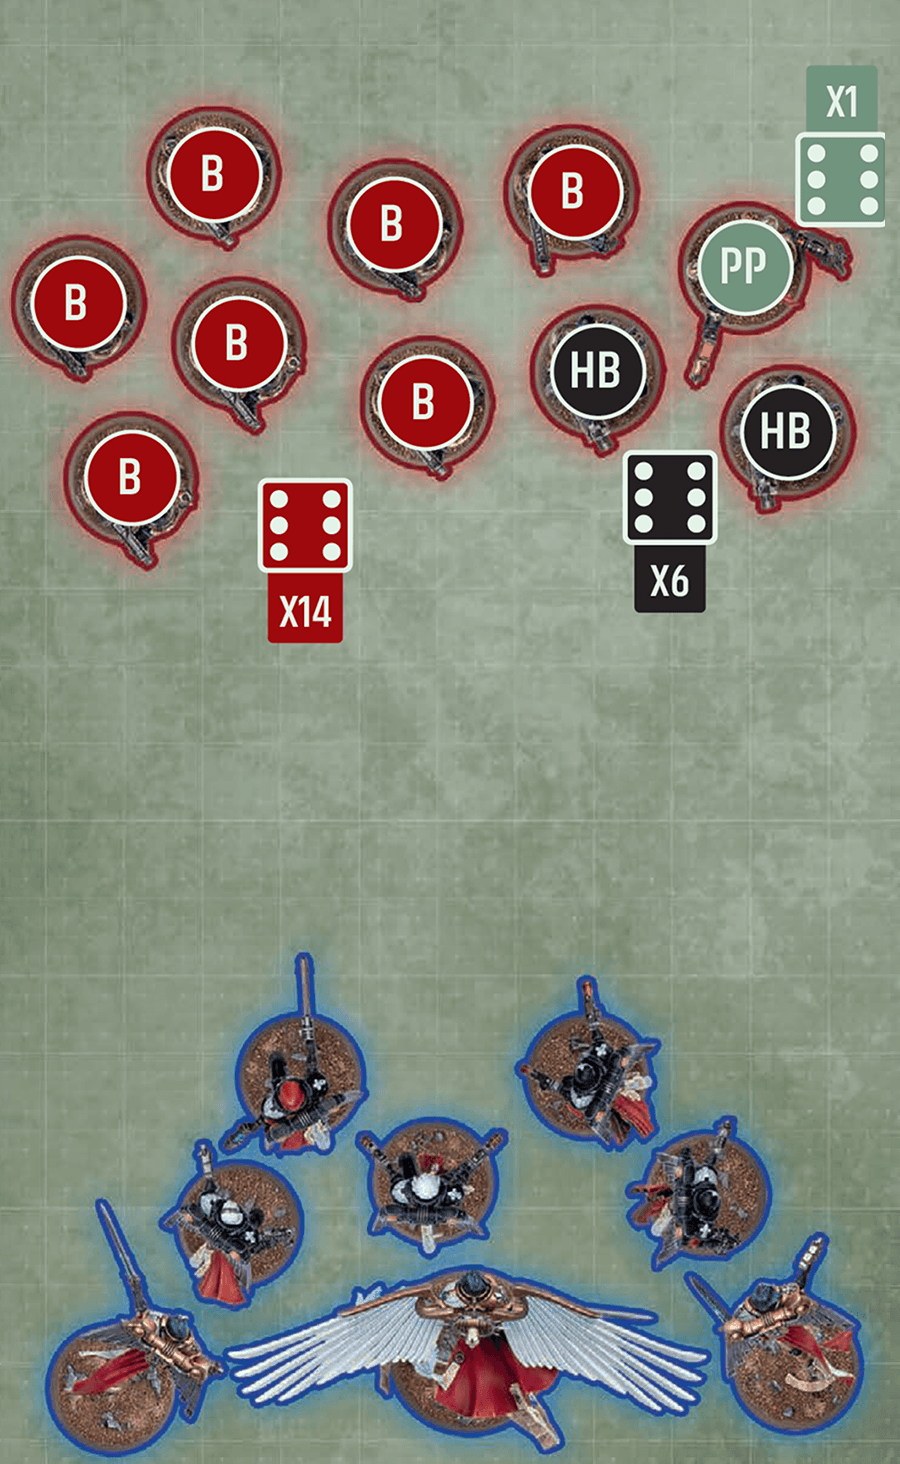
The RED unit is attacking. The following weapons are selected to make attacks with:
- 7 boltguns (B)
- 1 plasma pistol (PP)
- 2 heavy bolters (HB)
2. SELECT TARGETS
The BLUE unit is selected as the target. It is an attached unit (19) formed from a Seraphim unit and Saint Celestine (with her two Geminae Superia). The unit is visible to all models in the attacking unit, and all of the selected weapons are in range.
There is only one enemy unit being targeted, so the controlling player now gathers attack dice. They decide to resolve the heavy bolter attacks first, which each have an A characteristic of 3, so six attack dice are gathered.
The attack dice for the remaining weapons will be gathered once the heavy bolter attacks are resolved (see above), as follows:
- 14 attack dice for the boltguns, which each have an A characteristic of 2.
- One attack dice for the plasma pistol, which has an A characteristic of 1.
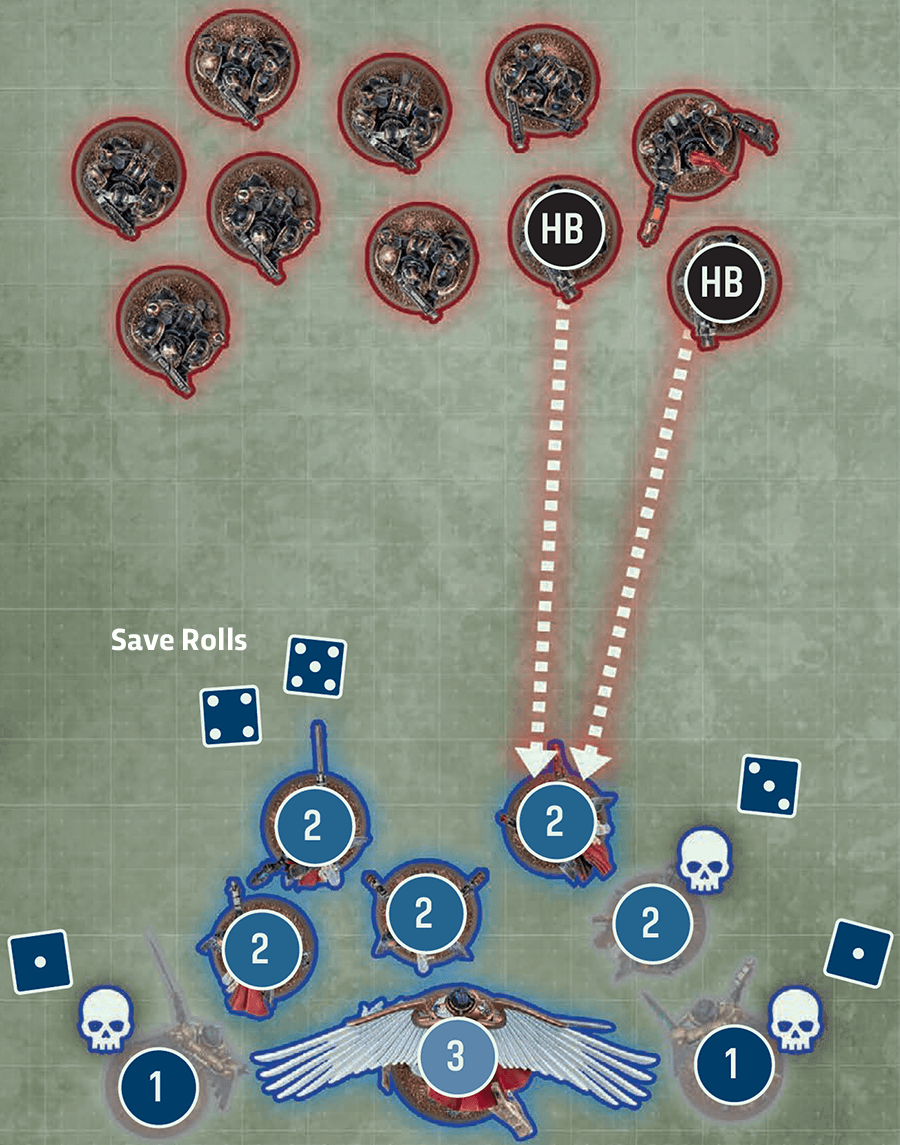
The target unit’s controlling player divides it into groups: one containing Saint Celestine, one containing the Geminae Superia, and one containing the Seraphim. They then declare the allocation order, choosing the Geminae Superia first (1), hoping their better Sv and InSv characteristics will weather the attacks. The Seraphim must be chosen second (2), as Saint Celestine is a CHARACTER model so must be last in the order (3).
2. RESOLVE ATTACK DICE
The heavy bolters’ attacks wound the target five times, so the target unit’s controlling player makes five save rolls.
- The two results of 1 are allocated first, to the current allocation group (the Geminae Superia). They both inflict damage, and both Geminae Superia are destroyed.
- The result of 3 is now allocated to the Seraphim, who have become the current allocation group. When modified by the attacking weapon’s AP characteristic of -1, this also inflicts damage, destroying one Seraphim model.
- The remaining attacks fail, so no further damage is inflicted.
3. SELECT NEXT GROUP OF ATTACK DICE AND REPEAT
Other Concepts 06
This section contains some additional rules concepts that are most frequently used while making attacks.
Visibility 06.01
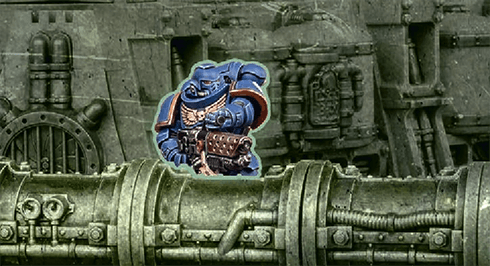
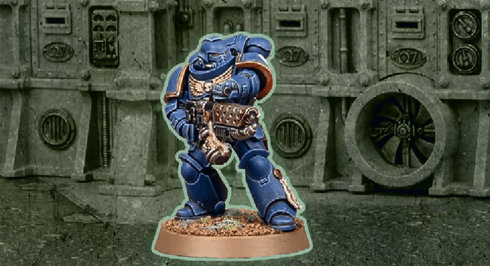
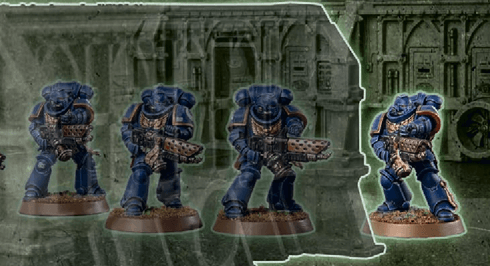
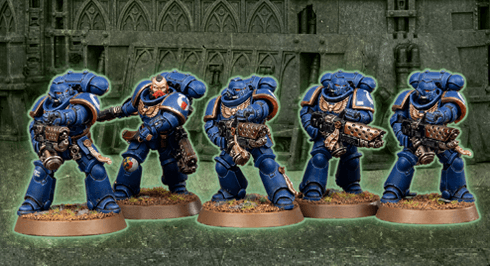
Line of sight is used to determine visibility between models. For an observing model to have line of sight, it must be possible to draw an imaginary straight line, 1 mm wide, from any part of that model to any part of the model being observed. This line is the line of sight. While doing so, other models in the observing model’s unit and in the observed model’s unit are ignored.Other models and units can be either visible or fully visible to the observing model, as shown below. Note that terrain applies additional rules to visibility (13.07).
FAQ
| Q: | When checking line of sight from one model to another, is this drawn between the bases of those models, or between any part of them? |
| A: | Line of sight is drawn from any part of the observing model to any part of the model being observed. |
| Q: | When a model overhangs the edge of the battlefield, how does that affect its visibility? |
| A: | That model’s controlling player can draw line of sight from any part of that model that is not overhanging the edge of the battlefield. Their opponent can draw line of sight to any part of that model. |
Describing Visible Units 06.01.01
When a rule references a visible unit but does not state which units that unit must be visible to, it must be visible to the unit that is using that rule.Mortal Wounds 06.02
Some attacks or rules inflict mortal wounds on units. Each time a unit suffers one or more mortal wounds, its controlling player must resolve the following sequence for each of those mortal wounds, until either all of them have been inflicted or that unit is destroyed:- Select Model: Select one model in that unit by following the first instruction below that applies:
If a non-CHARACTER model in that unit has lost one or more wounds, you must select that model. Otherwise, if that unit contains one or more non-CHARACTER models, you must select one of those models. Otherwise, if one or more CHARACTER models in that unit have lost one or more wounds, you must select one of those models. Otherwise, you must select one CHARACTER model in that unit. - Resolve Damage: The selected model loses 1 wound. If this reduces that model’s remaining wounds to 0, it is destroyed.
MORTAL WOUNDS AND NORMAL DAMAGE
When resolving attack dice, if those attacks inflict a mixture of both mortal wounds and normal damage, resolve all of the normal damage first, then resolve all of the mortal wounds.
- Normal Damage 06.02.01
FAQ
| Q: | I have a rule that triggers when a mortal wound is allocated to a model, when does this happen? |
| A: | When you select a model in the Select Model step of Mortal Wounds (06.02). |
Hazard Rolls 06.03
To make a hazard roll for a unit, roll one D6: on a 1-2, that roll fails and that unit suffers 1 mortal wound, or 3 mortal wounds instead if each model in that unit is a MONSTER/VEHICLE model. If more than one hazard roll is required for a unit, make all of those rolls simultaneously.FAQ
| Q: | I failed hazard rolls from [Hazardous] weapons, do those mortal wounds have to be allocated to the models with the [HAZARDOUS] weapons? |
| A: | No, you allocate the mortal wounds to the unit as per Mortal Wounds (06.02). (This represents Bob the guardsmen picking up his fallen squad mates plasma gun or that the twisting power of James the Chaos Sorcerer pulling his followers into the warp.) |
| Q: | If a rule says my unit must make a hazard roll does every model in the unit make a hazard roll? |
| A: | No, the unit would make 1 single hazard roll. |
Hazardous Test 06.03.01
The term ‘Hazardous test’ is the same as hazard roll.THE BATTLE ROUND
The Battle Round 07
Games of Warhammer 40,000 are played in a series of battle rounds. This section describes the structure of the battle round, defining the order in which players take turns to move their units and make attacks with them.
1. START OF BATTLE ROUND
2. PLAYER TURNS
3. END OF BATTLE ROUND
1. Start of Battle Round 07.01
At the start of the battle round, players resolve rules that are triggered at the start of the battle round, before progressing to player turns.Errata
2. Player Turns 07.02
Both players now take one turn each. The same player always takes the first turn in each battle round – the mission you are playing will tell you which player this is. Once that player’s turn has ended, their opponent takes their turn.Each turn consists of seven parts: first the Start of Turn step, then a series of five phases resolved in the order shown opposite, then the End of Turn step.
- Out Of Phase Rules 07.02.01
- Battle Round/Turn/Phase Definitions 07.02.02
3. End of Battle Round 07.03
Rules that are triggered at the end of the battle round are resolved now, in the following order:- First resolve rules triggered at this point other than mission rules.
- Both players then consult their mission; if one or both players have achieved any aspects of their mission that are triggered at this point, resolve them now.
The battle round then ends and, unless the battle ends, the next battle round starts. The mission you are playing will tell you how many battle rounds to resolve before the battle ends.
Rules that are triggered at the start of a turn are resolved now.
Rules that are triggered at the end of a turn are resolved now, in the following order:
- First resolve rules triggered at this point other than mission rules.
- Both players then consult their mission; if one or both players have achieved any aspects of their mission that are triggered at this point, resolve them now.
Command Phase 08
In the Command phase, both players gain Core CP, then you check the combat readiness of your forces and use any strategic-level abilities you may have.
1. START OF COMMAND PHASE
2. GAIN CORE CP
3. BATTLE-SHOCK
4. COMMAND ABILITIES
5. END OF COMMAND PHASE
1. Start of Command Phase 08.01
Rules that are triggered at the start of the Command phase are resolved now.2. Gain Core CP 08.02
Both players gain 1 Command Point (CP).- Command Points 08.02.01
3. Battle-shock Step 08.03
The active player must now make one battle-shock roll (01.07) for each unit in their army that fulfils one or both of the following conditions:- That unit is currently battle-shocked.
- That unit is at, or below, half-strength.
- Starting Strength and Half-strength 01.02.01
- Not on the Battlefield 01.02.04
- Battle-shock Rolls 01.07
- Modified Characteristics
02.02.01 - Multiple Battle-shock Rolls 08.03.01
4. Command Abilities 08.04
Rules that are triggered in the Command phase (excluding those that are triggered at the start or end of this phase, when gaining Core CP, or by battle-shock rolls) are resolved now.5. End of Command Phase 08.05
Rules that are triggered at the end of the Command phase are resolved now, in the following order:- First resolve rules triggered at this point other than mission rules.
- Both players then consult their mission; if one or both players have achieved any aspects of their mission that are triggered at this point, resolve them now.
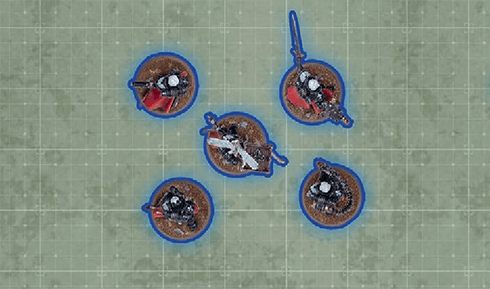
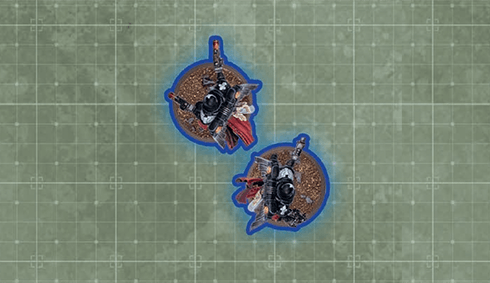
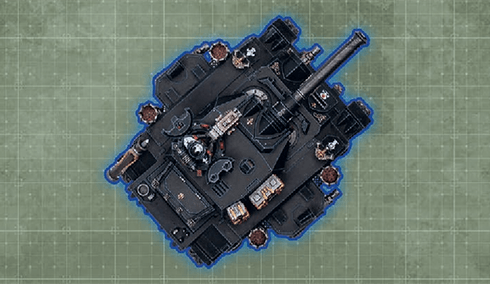
Movement Phase 09
In the Movement phase, you will be able to move each of your units across the battlefield. Reinforcements can also arrive in this phase to bolster your forces.
1. START OF MOVEMENT PHASE
2. MOVE UNITS
3. END OF MOVEMENT PHASE
1. Start of Movement Phase 09.01
Rules that are triggered at the start of the Movement phase are resolved now.2. Move Units Step 09.02
The active player moves their units one at a time, using the sequence below, until all of their units have been selected to move and those moves have ended.- Select Unit: Select one friendly unit that has not been selected to move this phase. You can select a unit on the battlefield, in strategic reserves, or embarked within a TRANSPORT. That unit is selected to move.
- Select Move Type: Select one move type that unit is eligible to make, and resolve it with that unit. This can be one listed below, or one presented elsewhere:
- Remain stationary
- Normal move
- Advance move
- Fall-back move
- Disembark move
- Ingress move

3. End of Movement Phase 09.03
Rules that are triggered at the end of the Movement phase are resolved now.EFFECT: No models are moved (either in straight lines or rotated). Units that remain stationary do not trigger any rules that are triggered when a unit starts or ends a move.
EFFECT: Your unit moves as described in Moving (03).
AFTER MOVING: Your unit must be unengaged.
09.05.01 More Than One Normal Move in a Phase
A unit cannot make more than one Normal Move in a phase.EFFECT: Your unit moves as described in Moving (03).
BEFORE MOVING: Make an advance roll by rolling one D6.
AFTER MOVING:
- Your unit must be unengaged.
- Until the end of the turn, unless otherwise stated, your unit is not eligible to declare a charge or start an action.
EFFECT: Your unit moves as described in Moving (03).
BEFORE MOVING: Select fall-back mode:
- Ordered Retreat: If your unit is not battle-shocked, you can select this mode.
- Desperate Escape: Otherwise, you must select this mode. Make a hazard roll for each model in your unit (06.03).
- Desperate Escape: Each model that is moved can be moved through enemy models.
- Your unit must be unengaged.
- Until the end of the turn, unless otherwise stated, your unit is not eligible to shoot, declare a charge or start an action.
- Desperate Escape: If your unit is not battle-shocked, you must make a battle-shock roll for your unit (01.07).
Desperate Escape 09.07.01
If a stratagem or ability forces a unit to make a Desperate Escape test, that unit:- Must make one hazard roll for each model in that unit.
- Must make a battle-shock roll.
Desperate Escape Test
Some rules may reference the term ‘Desperate Escape test’. In all instances this means the hazard rolls made for the desperate escape mode of a fall-back move.Abilities that subtract from a unit’s Desperate Escape test instead subtract from those hazard rolls.
If a stratagem or ability instructs a unit to make a Desperate Escape test, that unit:
- Must use the desperate escape mode when it is selected to make a fall-back move.
- Must make one hazard roll for each model in that unit.
- Must make a battle-shock roll.
Selecting Modes
Some rules instruct you to select a mode, such as fall-back moves. Modes are mutually exclusive, and you must assess each one in the order presented. When making a move, if your unit does not meet the conditions of any of the modes, it cannot make that move.Sometimes a mode will be mandatory if applicable (e.g. consolidation modes, 12.08), but in the case of fall-back moves, ordered retreat is not mandatory, so you could select desperate escape instead.
Many move types state conditions you must meet while/after moving. Those that are labelled with a mode name only apply if you selected that mode; those not labelled with a mode name always apply.
Shooting Phase 10
In the Shooting phase, your units will take aim and use their ranged weapons to fire at their chosen targets.
1. START OF SHOOTING PHASE
2. SHOOT
3. END OF SHOOTING PHASE
1. Start of Shooting Phase 10.01
Rules that are triggered at the start of the Shooting phase are resolved now.2. Shoot 10.02
The active player shoots with their eligible units one at a time, using the sequence below, until all the units they choose to shoot with have been selected to shoot and their attacks have been resolved.A unit is eligible to shoot if it is on the battlefield and has not already been selected to shoot this phase.
- Select Unit: Select one friendly unit that is eligible to shoot; that unit is selected to shoot.
- Select Shooting Type: Select one shooting type that unit is eligible to make, and resolve it with that unit. This can be one listed below, or one presented elsewhere:
- Normal shooting
- Assault shooting
- Close-quarters shooting
- Indirect shooting

FAQ
| Q: | Can I select a unit to shoot or fight if it doesn’t have melee or ranged weapons? |
| A: | Yes, it just makes no attacks and then the fight type or shoot type is resolved. |
3. End of Shooting Phase 10.03
Rules that are triggered at the end of the Shooting phase are resolved now.EFFECT: Your unit shoots as described in Making Attacks (04).
AFTER SHOOTING: Until the end of the phase, your unit is not eligible to start an action.
- Unengaged and made an advance move this turn.
- Has one or more [ASSAULT] weapons.
WHILE SHOOTING: You can only select [ASSAULT] weapons to make attacks with.
AFTER SHOOTING: Until the end of the phase, your unit is not eligible to start an action.
- Engaged and did not make an advance move this turn.
- Has one or more [CLOSE-QUARTERS] weapons or is a MONSTER/VEHICLE unit.
WHILE SHOOTING: Models in your unit can target enemy units your unit is engaged with.
- MONSTER/VEHICLE Models: Each time a MONSTER/VEHICLE model in your unit makes an attack:
- Unless that attack is made with a [CLOSE-QUARTERS] weapon and targets a unit your unit is engaged with, subtract 1 from the hit roll.
- If that attack is made with a [BLAST] weapon, it still cannot target a unit your unit is engaged with.
- Non-MONSTER/Non-VEHICLE Models: You can only select [CLOSE-QUARTERS] weapons to make attacks with and you can only select enemy units that are engaged with your unit as targets.
- Unengaged and did not make an advance move this turn.
- Has one or more [INDIRECT FIRE] weapons.
WHILE SHOOTING:
- [INDIRECT FIRE] weapons in your unit can target units that are not visible to the attacking model.
- Each time an [INDIRECT FIRE] weapon makes an attack:
- The target has the benefit of cover against that attack (13.08).
- You cannot re-roll hit rolls.
- An unmodified hit roll of 1-5 fails, unless your unit remained stationary this turn and the target is visible to one or more friendly units, in which case an unmodified hit roll of 1-3 fails instead.
Charge Phase 11
In the Charge phase, you will be able to make charge moves with your units. This represents your forces closing the distance with their foes in order to engage them in bloody close combat.
1. START OF CHARGE PHASE
2. CHARGE
3. END OF CHARGE PHASE
1. Start of Charge Phase 11.01
Rules that are triggered at the start of the Charge phase are resolved now.2. Charge Step 11.02
The active player resolves charges with their eligible units one at a time, using the sequence below, until all of their units they choose to charge with have declared a charge and those charges have been resolved.- Declare Charge: Select one friendly unit that has not declared a charge this phase and is eligible to declare a charge (see below). That unit declares a charge.
A unit is eligible to declare a charge if it is on the battlefield, unless otherwise stated. Here are some rules that prevent a unit from being eligible to declare a charge:- It is not within 12" of one or more enemy units.
- It is engaged.
- It made an advance or fall-back move this turn.
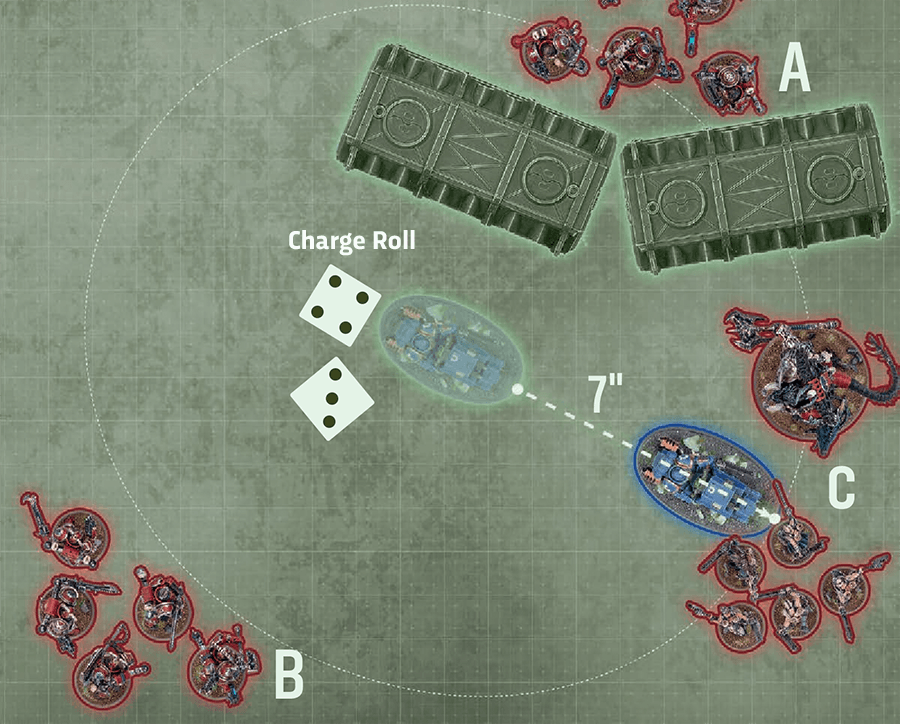
- Make Charge Roll: Make a charge roll by rolling 2D6: the result is the maximum distance for the charge move.
- Attempt Charge: If it is possible to make a charge move, and if you still want to, make a charge move with that unit (see below). Otherwise, your unit does not make a charge move. In either case, the charge is then resolved.
- Target No Longer Eligible or Viable 04.03.03
- Failed Charges 11.02.01
FAQ
| Q: | When a rule instructs you to perform a charge outside of the charge phase, do I resolve step 2 and 3 of the Charge step (11.02)? |
| A: | Yes |
3. End of Charge Phase 11.03
Rules that are triggered at the end of the Charge phase are resolved now.EFFECT: Your unit moves as described in Moving (03).
BEFORE MOVING: Select one or more enemy units that are within 12" of your unit and within the maximum distance of your unit; until the end of this move, each of those enemy units is a charge target.
WHILE MOVING:
- Each model must end its move closer to one or more charge targets.
- Each model that can end its move within 1" of one or more charge targets must do so.
- Each model that can end its move engaged with one or more charge targets must do so.
- Your unit must be engaged with all of the charge targets.
- Your unit cannot be engaged with one or more enemy units that are not charge targets.
- Until the end of the turn, each model in your unit has the Fights First ability (24.13).
Fight Phase 12
In the Fight phase, both players get to act. First, units will pile in to maximise the number of models that are engaged, then all the combatants will make melee attacks, before units consolidate their position.
FAQ / Errata
| Q: | If a rule modifies how far a unit or model can move during a pile-in move or consolidation move does it also change the distance of the target units? |
| A: | No |
| Q: | If a rule allows my unit to pile-in or consolidate an extra distance in the Fight phase, when can I use that rule? |
| A: |
| Q: | If I have a rule that says my unit can move up to 6" when it makes a pile-in move or consolidation move, does this also mean it changes the maximum distance of those moves to 6"? |
| A: | Yes |
Each model that started this move engaged with an enemy unit must still be engaged with that enemy unit. If one or more enemy units engaged with your unit have not been selected to fight this phase, your opponent must select each of those units, one at a time; when each is selected, it becomes eligible to fight and is selected to fight
1. START OF FIGHT PHASE
2. PILE IN
3. FIGHT
4. CONSOLIDATE
5. END OF FIGHT PHASE
1. Start of Fight Phase 12.01
Rules that are triggered at the start of the Fight phase are resolved now.2. Pile In 12.02
Both players make pile-in moves (see below) with all of their eligible units they choose to move. The ‘Eligible If’ section describes which units are eligible to make such moves. The player whose turn it is resolves all of their moves first, followed by their opponent. Each unit cannot make more than one pile-in move during this step.- It is engaged.
- It made a charge move this turn.
- It was selected to make an overrun fight this phase (12.06).
BEFORE MOVING: Select pile-in targets:
- If your unit is engaged, select every enemy unit it is engaged with.
- Otherwise, select one or more enemy units within 5" of your unit.
- Models in base-contact with one or more enemy models cannot be moved.
- Each model that is moved must end its move closer to the closest pile-in target, and engaged with it if possible.
- Your unit must be engaged.
- Each model that started this move engaged with an enemy unit must still be engaged with that enemy unit.
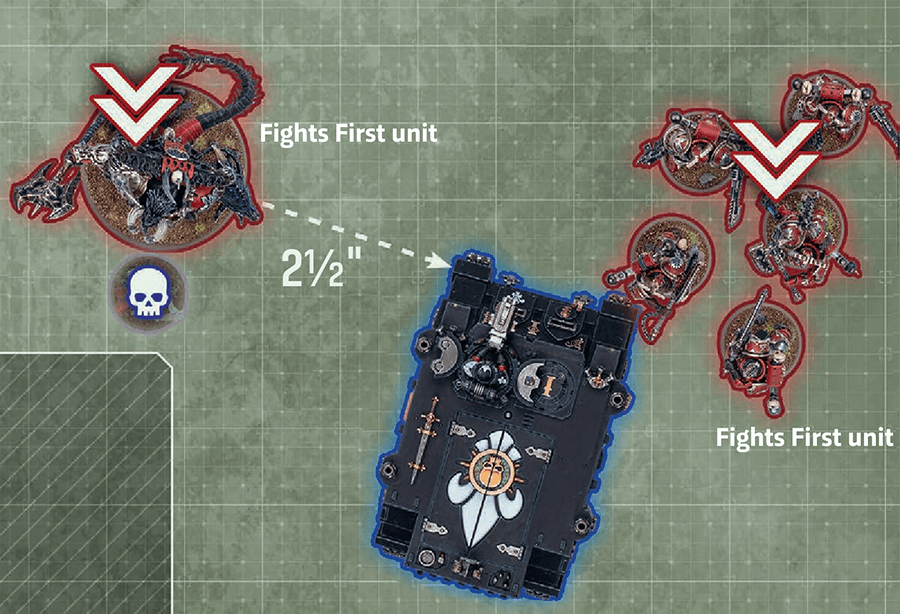
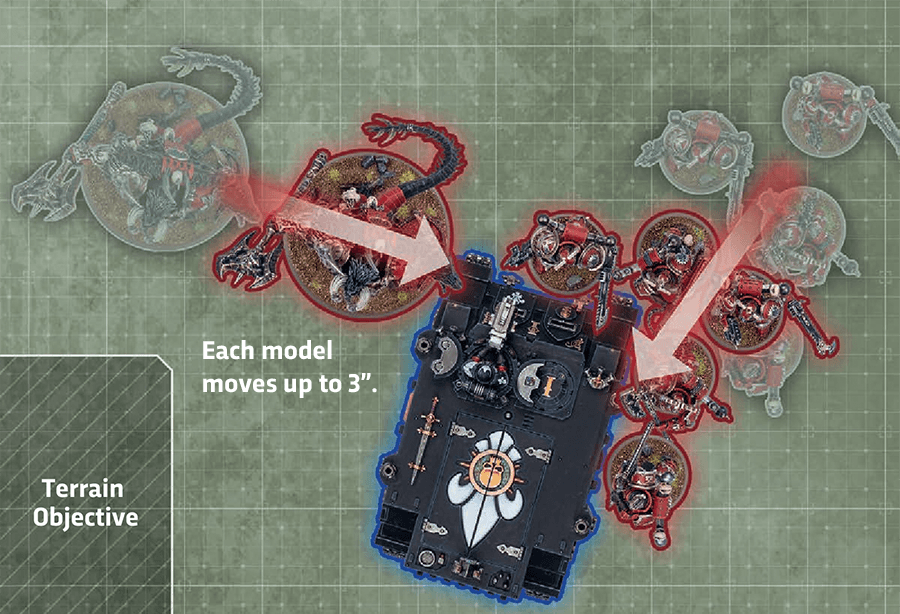
- The RED player makes pile-in moves first.
- The BLUE player makes pile-in moves next, but as their model is in base-contact with enemy models, it is not moved.
3. Fight Step 12.04
A unit is eligible to fight if it has not already been selected to fight this phase and one or more of the following apply to it:- It is engaged, or it was engaged at the start of this step.
- It made a charge move this turn.
Players resolve the following sequence until all eligible units have been selected to fight and their attacks have been resolved:
- Resolve Fights First Combats: Starting with the player whose turn it is, players alternate selecting one friendly Fights First unit that is eligible to fight; that unit is selected to fight (see below). If this is not possible:
- If there are no Fights First units that are eligible to fight, move to the Resolve Remaining Combats step where this player will select their next unit.
- Otherwise, the other player selects their next unit.
- Resolve Remaining Combats: Starting with the player who just moved this sequence onto this step, players alternate selecting one friendly unit that is eligible to fight; that unit is selected to fight. If this is not possible:
- If there are no units that are eligible to fight, the Fight step ends.
- Otherwise, the other player selects their next unit.

- Eligible to fight, but unable to fight 12.04.01
FAQ
| Q: | Can I select a unit to shoot or fight if it doesn’t have melee or ranged weapons? |
| A: | Yes, it just makes no attacks and then the fight type or shoot type is resolved. |
When a Unit is Selected to Fight
Each time a unit is selected to fight, select one fight type that unit is eligible to make, and resolve it with that unit. This can be one listed below, or one presented elsewhere:EFFECT: Your unit can make one additional pile-in move, then fights as described in Making Attacks (04).
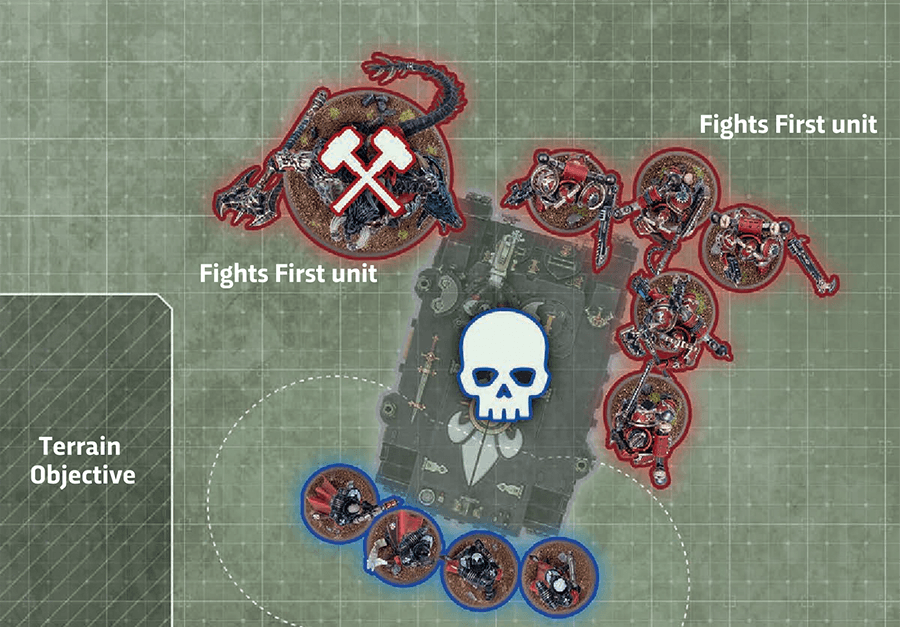
- The RED player selects their MONSTER to fight. It makes a normal fight, destroying the TRANSPORT.
- The embarked unit makes an emergency disembark move. After doing so, it is unengaged.
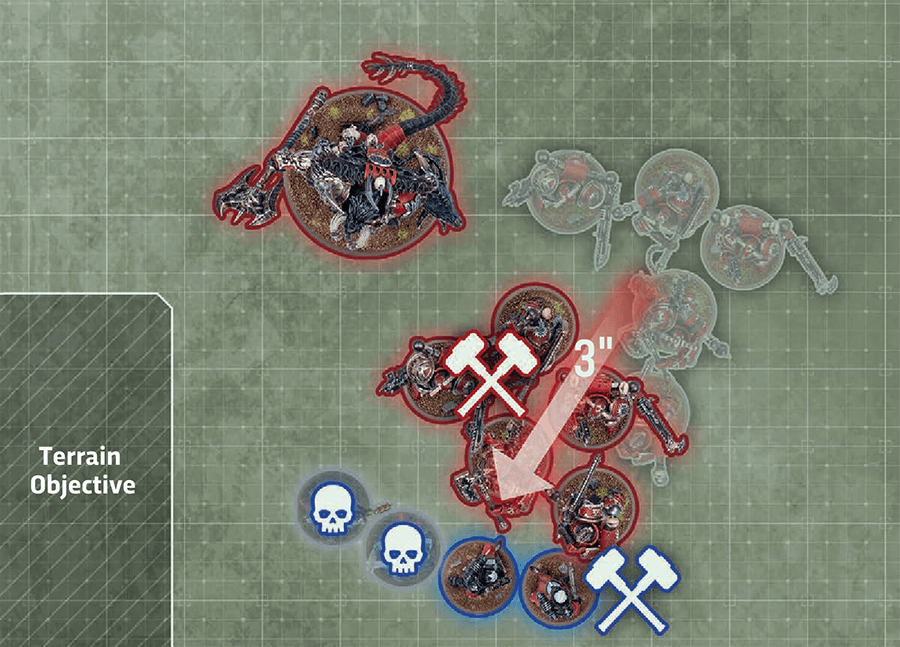
- The BLUE player has no Fights First units, so the RED player selects their next unit.
- The RED player selects another Fights First unit. This unit is unengaged, but was engaged with the TRANSPORT at the start of the Fight step, so can make an overrun fight. It first makes a pile-in move to engage the unit that disembarked, then fights, destroying two enemy models.
- The BLUE player’s unit fights back, but inflicts no damage.
4. Consolidate 12.07
Both players make consolidation moves (see below) with all of their eligible units they choose to move. The ‘Eligible If’ section describes which units are eligible to make such moves. The player whose turn it is resolves all of their moves first, followed by their opponent. Each unit cannot make more than one consolidation move during this step.EFFECT: Your unit moves as described in Moving (03).
BEFORE MOVING: Select consolidation mode:
- Ongoing Consolidation:If your unit is engaged, you must select this mode and select every enemy unit it is engaged with.
- Engaging Consolidation:Otherwise, if your unit is within 3" of one or more enemy units, you must select this mode and select one or more of those enemy units.
- Objective Consolidation:Otherwise, if your unit is within 3" of one or more objectives, you must select this mode and select one of those objectives.
- Ongoing Consolidation:Models in base-contact with one or more enemy models cannot be moved. Each model that is moved must end its move closer to the closest selected enemy unit, and engaged with it if possible.
- Engaging Consolidation:Each model that is moved must end its move closer to the closest selected enemy unit, and engaged with it if possible.
- Objective Consolidation:Each model that is moved must end its move within range of the selected objective if possible, or closer to it if not.
- Ongoing Consolidation:Each model that started this move engaged with an enemy unit must still be engaged with that enemy unit.
- Engaging Consolidation:Your unit must be engaged with all of the selected enemy units. If one or more enemy units engaged with your unit have not been selected to fight this phase, your opponent must select each of those units, one at a time; when each is selected, it becomes eligible to fight and is selected to fight (12.04).
- Objective Consolidation:Your unit must be unengaged and within range of the selected objective.
5. End of Fight Phase 12.09
Rules that are triggered at the end of the Fight phase are resolved now.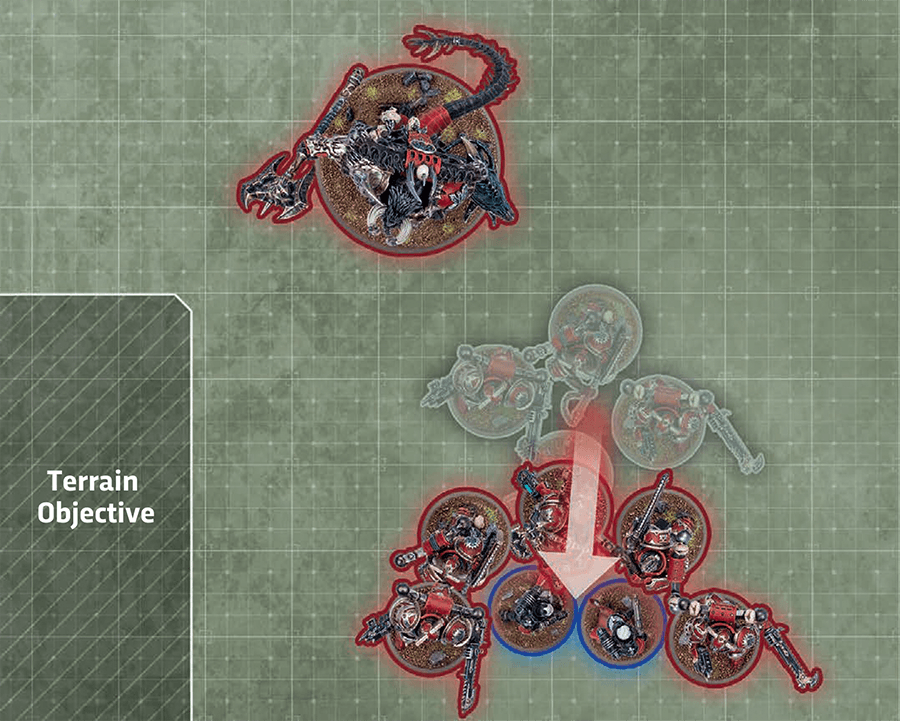
Each model moves up to 3". Models in base-contact with enemy models cannot be moved.
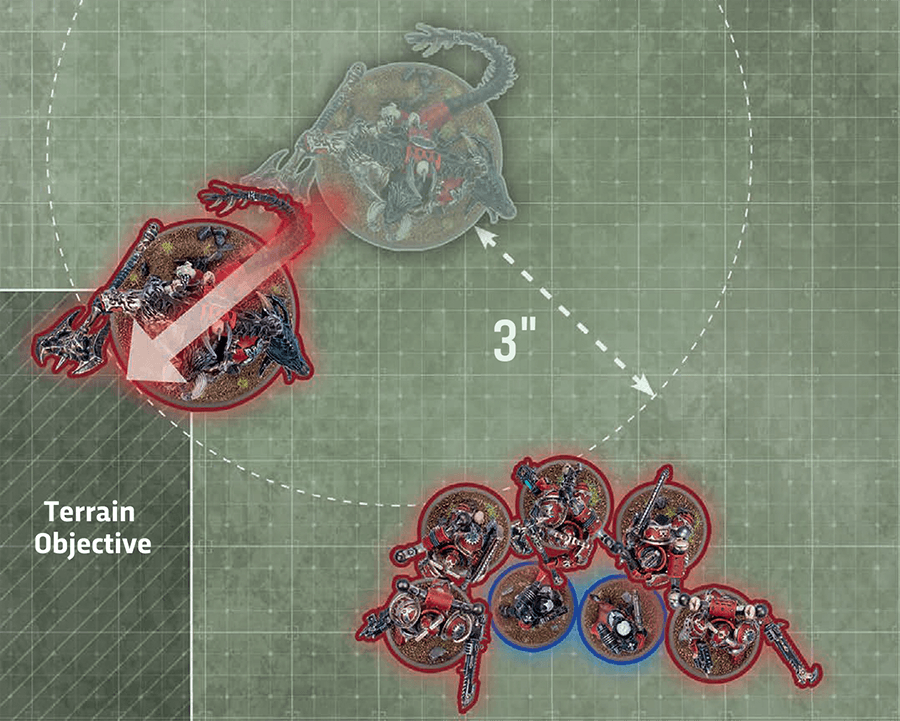
BATTLEFIELDS AND TACTICS
Terrain 13
This section provides rules for using terrain to transform your gaming table into an interactive, thematic battlefield. These rules help to bring your battlefield to life and introduce a vital tactical dimension to your games.
Placing Terrain 13.01
Before the battle, place a selection of terrain features on the battlefield using one or more of the following methods:- Place a well-defined boundary (such as a base or mat) in each location you want to furnish with terrain, then place one or more terrain features wholly within that boundary.
- Place one terrain feature directly on the battlefield.
- Place two or more terrain features directly on the battlefield in such a way that together they define the boundary of an area.
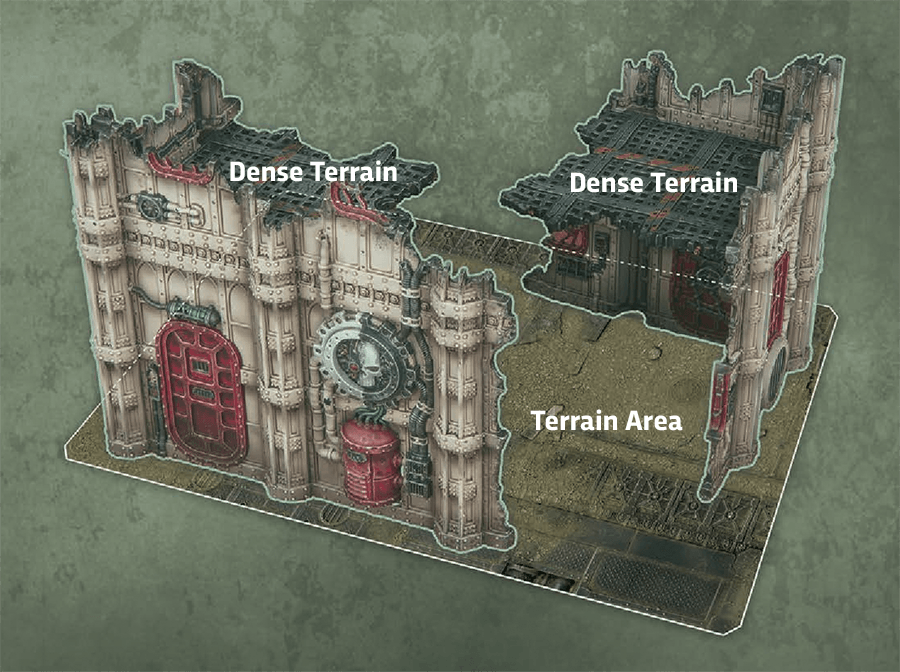
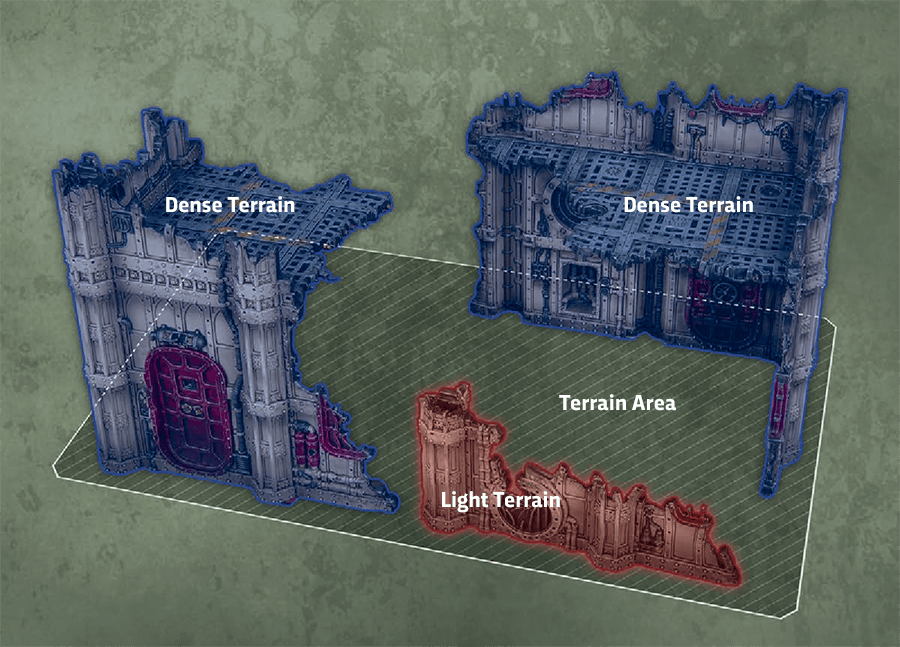
In each case, the area of the battlefield occupied by that boundary or terrain feature is known as a terrain area. A mission’s deployment map may define the location and dimensions of each terrain area. Otherwise, players must agree on this before the battle.
FAQ
| Q: | Are models that are within the boundary of a terrain area, but not on the ground floor of a terrain area (e.g. overhanging parts of FRAME VEHICLES or models on terrain features that are within that terrain area) within that terrain area? |
| A: | Yes |
Terrain Categories 13.02
Each terrain feature belongs to a terrain category, which can affect the movement and visibility of models. Below are some examples of which types of terrain features fall under each category.- Creating Your Own Battlefield 13.02.01
Exposed 13.03
Exposed terrain offers only scant protection to the most desperate troops, and can be traversed without hindrance.Examples: Craters, razorwire, scattered debris.
Light 13.04
Light terrain can provide cover from incoming attacks, but will not slow an enemy’s advance or offer lasting defence.Examples: Barricades, low walls, statuary.
Dense 13.05
Dense terrain is an obstacle to even the largest war machines, and can shelter entire squads from enemy sight.Examples: Buildings, ruins, armoured containers, woods.
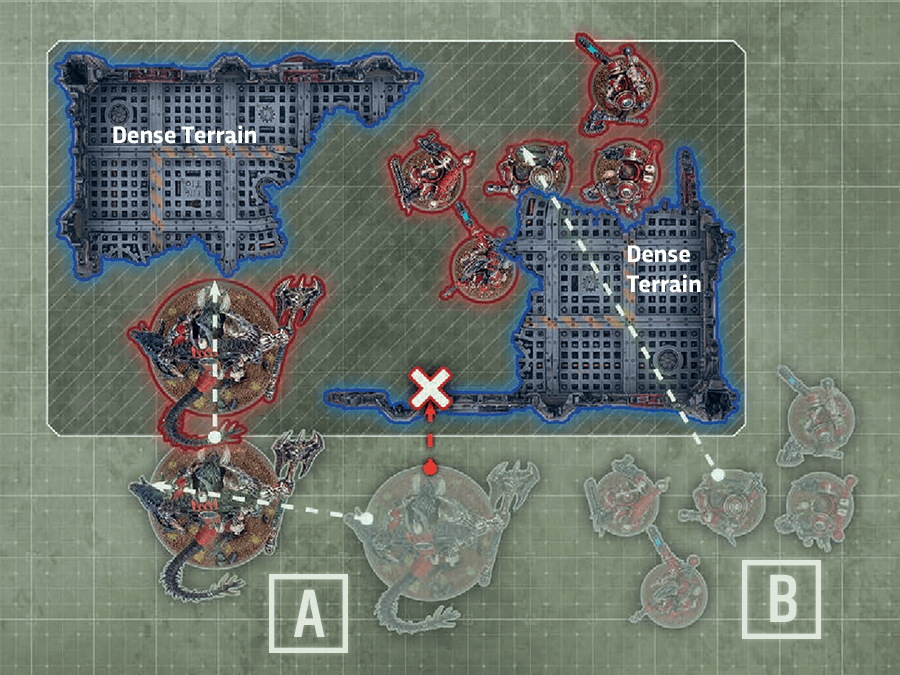
Terrain and Movement 13.06
Models can move through different categories of terrain feature as follows:- Exposed/Light: All models can move horizontally and vertically through exposed and light terrain features.
- Dense:
- INFANTRY/BEASTS/SWARM/MOBILE models can move horizontally through dense terrain features.
- INFANTRY/BEASTS/SWARM models can move vertically through dense terrain features.
- Other models can move horizontally through dense terrain features provided that all sections of that terrain feature that the moving model’s base would move through are 2" or less in height. Otherwise, the moving model must move vertically to ascend or descend such sections. They cannot move through ceilings and floors while doing so, and they cannot end that move on any surface of that terrain feature that is not on ground level (see below).
- Solid Terrain and Movement 13.06.01
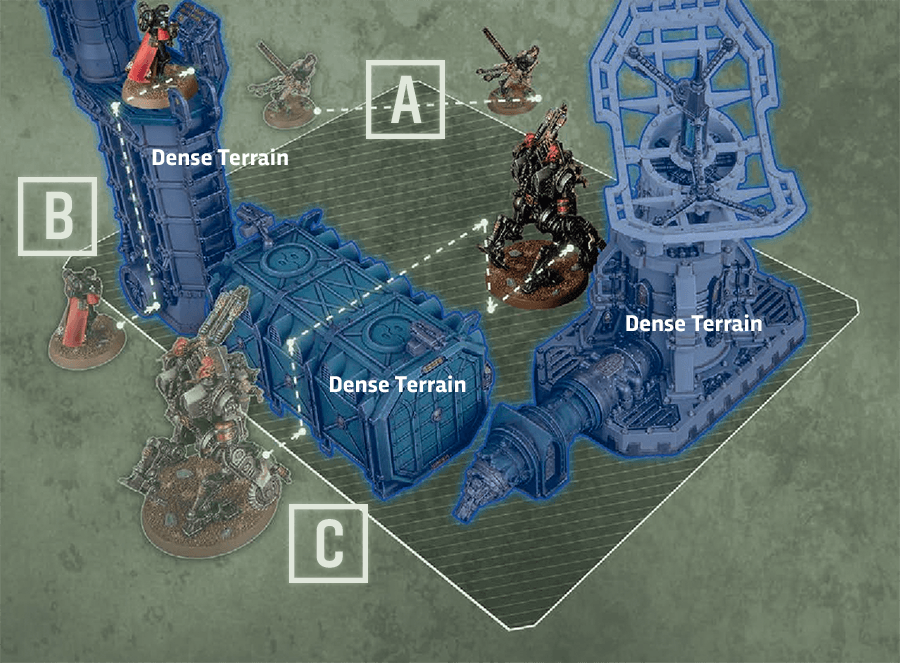
Moving Vertically
Models can move vertically to ascend or descend terrain features. While doing so:- That model must remain within 1/2" horizontally of that terrain feature.
- Add the distance moved vertically up, and the distance moved vertically down, to any other distance that model has moved since its unit began that move.
Setting Up or Ending a Move
Models can be set up or end a move on the ground level of terrain features. Models can also be set up or end a move on any surface of a terrain feature that is not on ground level, if all of the following apply:- That model has one or more of the following keywords: INFANTRY/BEASTS/SWARM/FLY/MONSTER.
- After ending that move, that model is stable and no part of its base overhangs the outer edge of that surface.
Terrain and Visibility 13.07
Terrain can affect visibility, depending on whether the Benefit of Cover, Hidden, Obscuring or Solid rules apply.Benefit of Cover 13.08
Each time a ranged attack targets a unit, if every model in that unit meets one or more of the following conditions, that unit has the benefit of cover against that attack:- That model has the INFANTRY/BEASTS/SWARM keyword and is within a terrain area.
- That model is not fully visible to the attacking model due to one or more intervening terrain features and/or one or more intervening obscuring terrain areas (see below).
Each time a ranged attack targets a unit that has the benefit of cover against it, worsen the BS characteristic of that attack by 1.
FAQ
| Q: | When my unit shoots at another unit, how does it work if some models in the target unit are fully visible to some models in my unit, while others are within a terrain area/not fully visible? |
| A: | For each attacking model in your unit, determine whether the target unit has the benefit of cover, as described in Terrain and Visibility. In this scenario, the target unit will likely have the benefit of cover against some of the attacking models, but not all. This means that, in an example unit where all attacking models are using the same weapon, when you get to the Resolve Attacks step of the Attack Sequence, you will collect dice for attacks made by models against which the target unit has the benefit of cover separately from the dice for attacks made by models against which the target unit does not have the benefit of cover. |
Hidden 13.09
A model is hidden while all of the following apply to it:- That model has the INFANTRY/BEASTS/SWARM keyword and is within a terrain area that contains one or more light/dense terrain features.
- That model’s unit did not make one or more ranged attacks during this turn or during the previous turn.
Errata
Hidden and the First Turn 13.09.01
During the first turn, conditions that require something not to have happened during the previous turn are true. For the Hidden rule, this means that during the first turn a unit has not made ranged attacks during the previous turn.Obscuring 13.10
Terrain areas containing one or more light or dense terrain features are obscuring terrain areas. If every line of sight drawn between two models crosses one or more obscuring terrain areas (excluding obscuring terrain areas that one or both of those models are within), those two models are not visible to each other.Solid 13.11
Dense terrain features have the Solid rule. Line of sight cannot be drawn across any enclosed gap in the surface of such a terrain feature that is 3" or less from ground level.Gone to Ground 13.11.01
Hidden models that are concealed by dense terrain features gain an extra benefit while they have gone to ground.A model has gone to ground while all of the following apply:
- That model is hidden.
- That model is not fully visible to the attacking model due to one or more intervening dense terrain features.
- That model’s unit did not make one or more ranged attacks during this turn or during the previous turn.
While a model has gone to ground, subtract 3" from that model’s detection range.
Designer’s Note: Units that made ranged attacks in the current or previous turn cannot go to ground, regardless of any abilities that allow them to shoot and remain hidden.
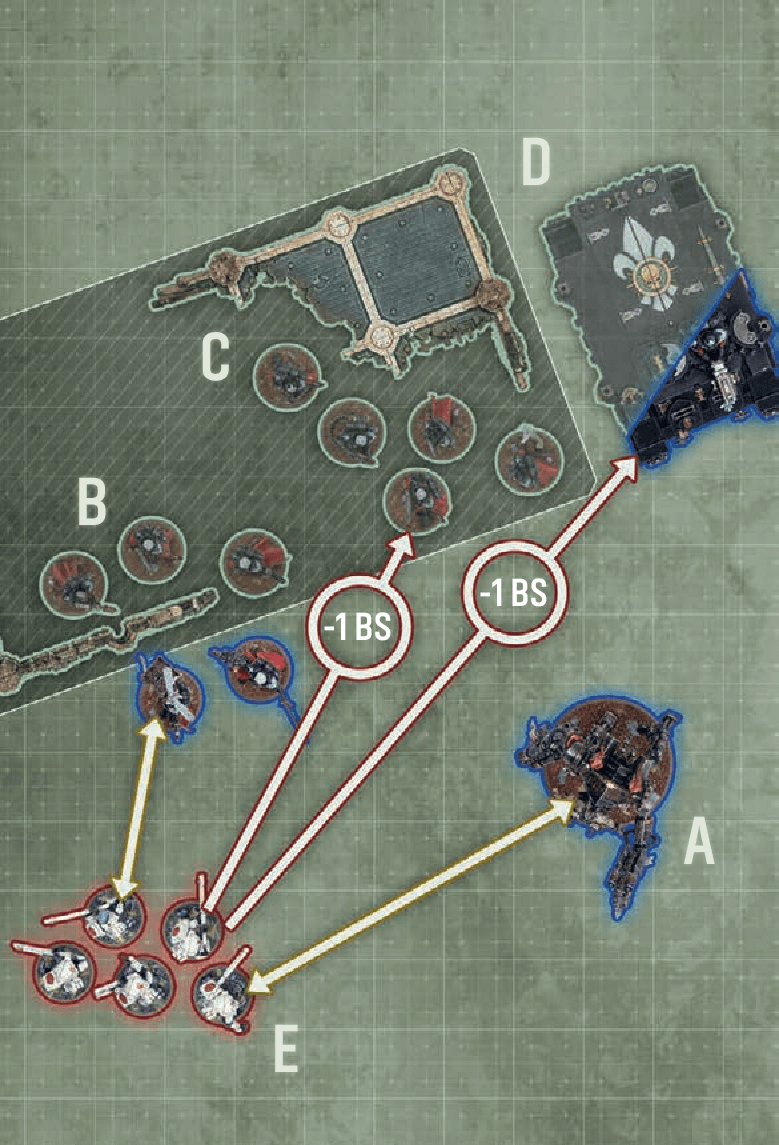
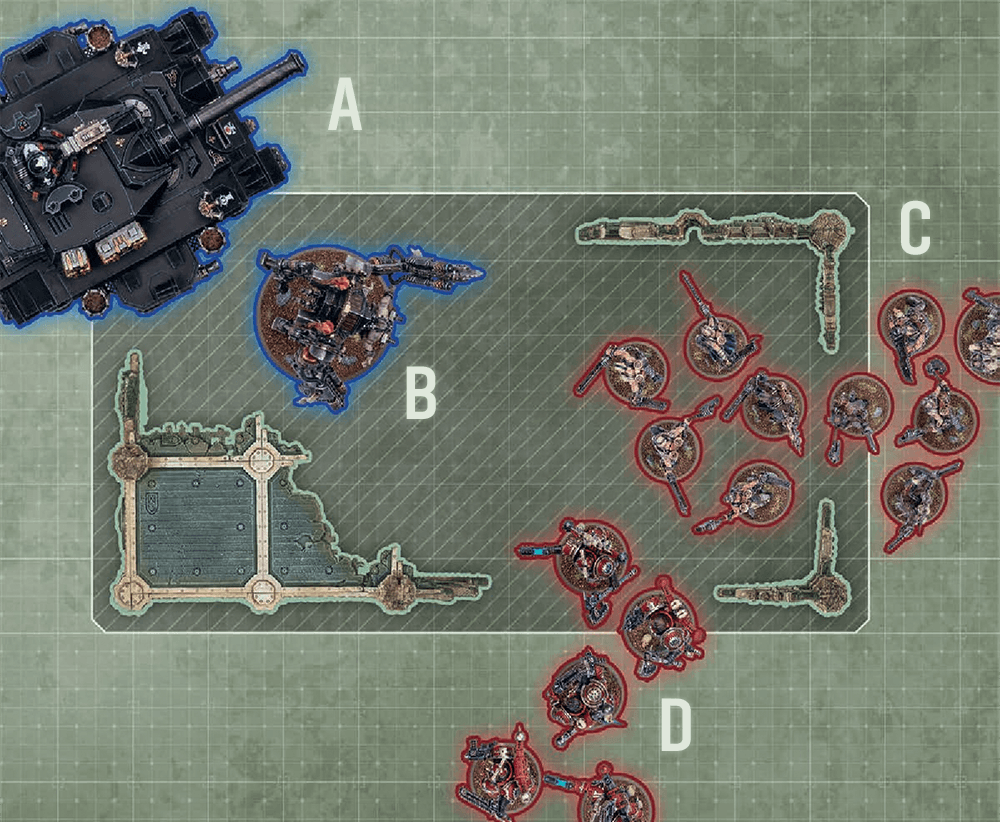
- Unit A is fully visible to every model in Unit E, so does not have the benefit of cover.
- Not all of the models in unit B are within a terrain area, so unit B does not have the benefit of cover.
- All of the models in unit C are within a terrain area, so unit C has the benefit of cover.
- Unit D is not fully visible to unit E due to an intervening obscuring terrain area, so unit D has the benefit of cover.
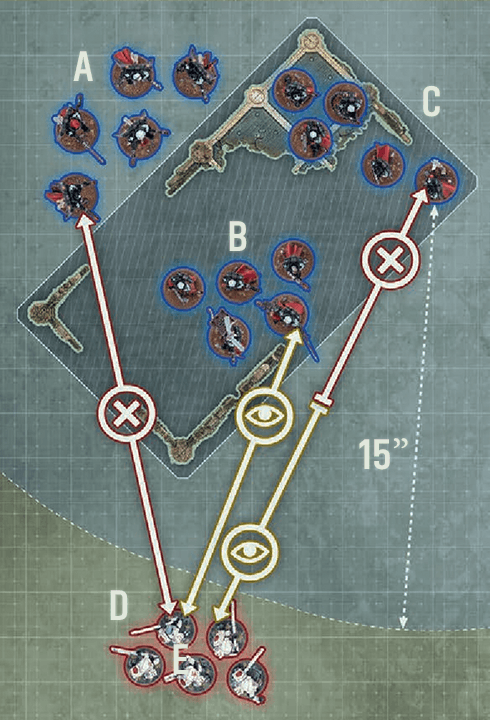
- There is an obscuring terrain area between all models in units A and D, so none of them are visible to each other.
- All models in units B and C are within the terrain area and are INFANTRY, so are hidden. However, unit D’s models are within the 15" detection range of unit B’s models (but not unit C’s), so unit B’s models are visible to unit D’s. Unit D’s models are also visible to the models in units B and C, since they are not within a terrain area.
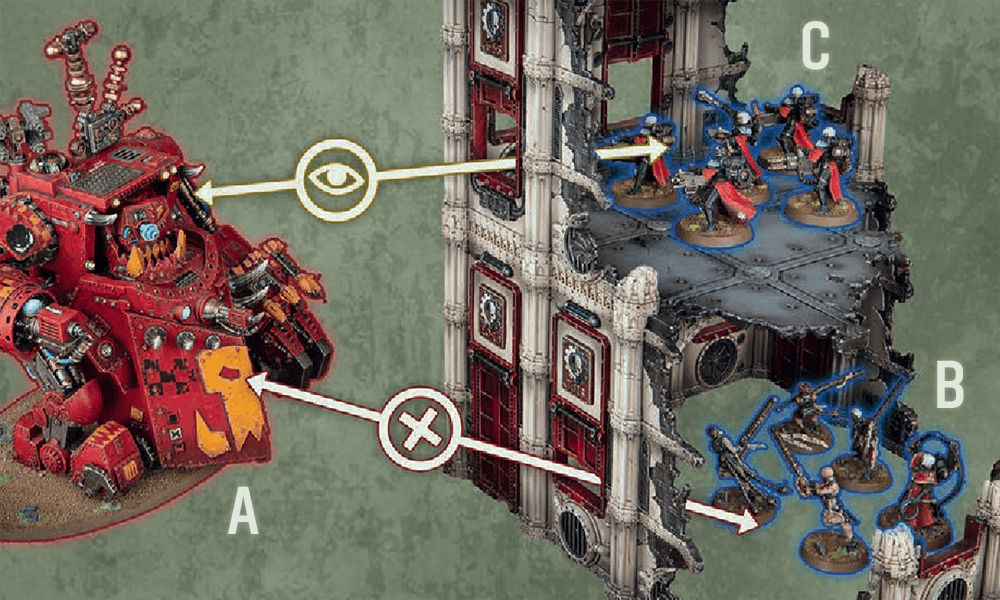
Units A and C are visible to each other, because even though this dense terrain feature has the Solid rule, line of sight can be drawn normally through enclosed gaps that are more than 3" from ground level.
Objectives 14
Objectives represent critical locations that both sides are attempting to secure, and many missions require your forces to take control of them to achieve victory. This section describes how to do so with your models.
FAQ
| Q: | If a rule refers to an ‘objective marker’, does this mean an ‘objective’? |
| A: | Yes (excluding rules in the Core Rules)'. |
Terrain Objectives 14.01
If a mission uses objectives, it will state where they are located on the battlefield. Typically, your mission will have a deployment map showing several points where objectives should be placed. The location of each point should coincide with a terrain area (13.01); that terrain area is the objective, and is called a terrain objective.When measuring distances to and from an objective, measure to and from the closest part of it.
FAQ
| Q: | Are models that are within the boundary of a terrain area, but not on the ground floor of a terrain area (e.g. overhanging parts of FRAME VEHICLES or models on terrain features that are within that terrain area) within that terrain area? |
| A: | Yes |
Objectives Not Within A Terrain Area 14.01.01
If the location point of an objective does not coincide with a terrain area, you must denote the location of that objective with a flat, circular marker, 40mm in diameter, centred on that point – this is called anobjective marker. Models can move through objective markers and they can end a move on top of objective markers.A model is within range of an objective marker while it is within 3" horizontally and 5" vertically of that objective marker. When measuring distances to and from an objective marker, measure to and from the closest part of it.
Level of Control 14.02
At the start of the battle, no objective on the battlefield is controlled by either player. To gain control of an objective, a player will need one or more models with an OC characteristic of 1 or more within range of it. A model is within range of a terrain objective while it is within that terrain area.At the end of each phase and turn, to determine a player’s level of control over an objective, add together the OC characteristics of all the models in that player’s army that are within range of that objective:
- The player who has the highest level of control over that objective controls that objective.
- If both players have the same level of control over that objective, unless that objective is secured (see below), that objective is not controlled by either player.
While one or more units from a player’s army are within range of an objective that player controls, for each of those units that contains one or more models with an OC characteristic of 1 or more, that unit is said to be controlling that objective.
FAQ
| Q: | When determining control over an objective, can the same model’s OC count towards more than one objective that model is within range of? |
| A: | Yes. |
| Q: | Is being within range of a terrain objective the same as being within range of an objective marker? |
| A: | Yes. |
| Q: | Can a unit be controlling more than one objective at once? |
| A: | Yes. |
Controlling an Objective at the End of a Phase 14.02.01
At the end of each phase and turn, the first thing players do (before any other ’at the end of the phase/end of the turn’ rules or abilities) is determine which objectives are controlled by which player.Secured Objectives 14.03
Some rules allow an objective to be secured by a player’s army. When an objective is secured by a player’s army, that objective remains under their control – even once they no longer have any units within range of it – until their opponent’s level of control over that objective is greater than theirs at the end of a phase.FAQ
| Q: | If my unit has taken control of an objective at the end of my movement phase and that unit has as an ability that secures an objective they control, can they secure that objective? |
| A: | Yes |
Stratagems 15
Stratagems can be used by spending Command Points, to create epic moments of tactical brilliance or peerless martial might. They are used when a player deems that a critical point in the battle is reached, where extra combat prowess or fleeting but powerful effects are required to tip the balance in their favour.
FAQ
| Q: | Can I use the Insane Bravery stratagem on a battle-shocked unit? |
| A: | No, as a unit’s controlling player cannot target that unit with stratagems (01.07). |
Using Stratagems 15.01
- How many CP it costs to use.
- WHEN: When it can be used.
- TARGET: Which units it can target.
- EFFECT: What the effects of using that stratagem are.
- RESTRICTIONS: Any additional restrictions that apply.
Each player can use the same stratagem multiple times during the battle, but the following restrictions apply:
- Each player cannot use the same stratagem more than once in the same phase.
- Unless otherwise stated, each player cannot target the same unit with more than one stratagem in the same phase.
Each time you use a stratagem, resolve the following sequence:
- Select targets as described in that stratagem.
- Reduce your CP total by the CP cost listed in that stratagem. If that stratagem contains a section that carries an additional CP cost (e.g. +1CP), you can only use that additional section if you increase the CP cost of that stratagem by the amount shown. If you do not have enough CP remaining, you cannot use that stratagem.
- Resolve the effects of that stratagem.
- Rules Sequencing 01.03.02
- Modifying CP Cost 15.01.01
- Affected By A Stratagem 15.01.02
- Stratagem Definitions 15.01.03
FAQ
| Q: | After using an ability that increases the CP cost of a stratagem, must my opponent continue to use the selected stratagem at the increased cost if they have the necessary CP available? |
| A: | Yes. |
| Q: | After using an ability that increases the CP cost of a stratagem, if my opponent does not have the necessary CP available for the selected stratagem, what happens? |
| A: | No CP are spent and that stratagem's effects are not resolved (but that stratagem still counts as having been used this phase). |
| Q: | If a stratagem contains a section that carries an additional CP cost (such as the Into the Fray option of Heroic Intervention), is that additional cost considered to be a modifier? |
| A: | No, a stratagem that costs 1CP and is making use of an optional +1CP section has an original cost of 2CP. |
Core Stratagems
All players can use core stratagems (see below). Additional stratagems can be found in Codexes and other publications.Stratagems Key

Either player’s turn

Your turn

Opponent’s turn
- Advance roll
- Charge roll
- Damage roll
- Hazard roll
- Hit roll
- Save roll
- Wound roll
- A roll to determine the number of attacks generated with a weapon.
TARGET: That unit or model.
EFFECT: You re-roll that roll. If you are rolling more than one dice together, select one of those dice to re-roll (excluding charge rolls, which you must re-roll in full).
TARGET: That CHARACTER unit.
EFFECT: Select one CHARACTER model in your unit. Until the end of the phase, that model’s melee weapons have the [PRECISION] ability.
TARGET: That unit.
EFFECT: That battle-shock roll is automatically successful.
RESTRICTIONS: You cannot use this stratagem more than once per battle.
TARGET: One friendly unengaged EXPLOSIVES/GRENADES unit that is eligible to shoot and did not make an advance move this turn.
EFFECT: Resolve the following sequence:
- Select one EXPLOSIVES/GRENADES model in your unit.
- Select one unengaged enemy unit within 8" of and visible to that model.
- Roll six D6: for each 4+, that enemy unit suffers 1 mortal wound (06.02).
Errata
TARGET: That MONSTER/VEHICLE unit.
EFFECT: Resolve the following sequence:
- Select one enemy unit engaged with your unit.
- Select one model in your unit engaged with that enemy unit.
- Roll a number of D6 equal to the T characteristic of that model: for each 1, your unit suffers 1 mortal wound; for each 5+, that enemy unit suffers 1 mortal wound (to a maximum of 6 mortal wounds per unit).
Errata
TARGET: One friendly unit that is in strategic reserves (excluding AIRCRAFT).
EFFECT: Your unit makes an ingress move (20.04).
RESTRICTIONS: You cannot use this stratagem during the first battle round.
TARGET: One friendly unengaged unit (excluding TITANIC units).
EFFECT: Your unit shoots using snap shooting.
EFFECT: Your unit shoots as described in Making Attacks (04).
WHILE SHOOTING:
- You can only target one visible enemy unit within 24" of your unit (and only if it is an eligible target).
- Each attack only hits on an unmodified hit roll of 6 (irrespective of the attacking weapon’s BS characteristic or any modifiers). Those hits are not critical hits.
- You cannot re-roll hit rolls.
TARGET: One friendly SMOKE unit.
EFFECT: Until the end of the phase, each time an attack targets either your SMOKE unit, or a unit that is not fully visible to the attacking model because of one or more models in your SMOKE unit, the target has the benefit of cover against that attack (13.08).
TARGET: One friendly unengaged unit within 12" of one or more enemy units. You can only select a VEHICLE unit if it is a CHARACTER/WALKER unit.
EFFECT: Resolve a charge with your unit (11.02). While doing so, before making the charge roll, you must select one of the following modes:
- Leap to Defend: When selecting charge targets, you can only select enemy units that made a charge move this phase and are within the maximum distance.
- Into the Fray:
- When making the charge roll, if the result is greater than 6 (after modifiers), change it to 6.
- When selecting charge targets, you can select any enemy units that are within 6" of your unit and within the maximum distance.
TARGET: One friendly unit that is eligible to fight.
EFFECT: Until the end of the phase, your unit has the Fights First ability and it must be the next unit you select to fight (12.04).
Actions 16
Actions represent vital battlefield tasks your forces must carry out, from searching for missing archeotech to completing a blasphemous ritual.
Performing Actions 16.01
Some rules allow units to perform actions. Each action states:- STARTS: When it is started.
- UNITS: Which friendly units can perform it.
- USE LIMIT: How many times friendly units can start it.
- COMPLETES: When it completes.
- EFFECT: What the effects of completing it are.
- Any additional restrictions that may apply.
FAQ
| Q: | If a unit has a rule that allows it to start an action when it is battle-shocked can it also continue doing that action if it becomes battle-shocked after starting an action? |
| A: | Yes |
| Q: | If a unit becomes battle-shocked after starting an action does it stop performing that action? |
| A: | Yes |
Starting an Action
- It is not on the battlefield.
- It is an AIRCRAFT/FORTIFICATION unit.
- It is battle-shocked.
- It has an OC characteristic of 0 or ‘-’.
- It is engaged (unless it is a TITANIC unit).
- It made an advance or fall-back move this turn.
- It started another action this turn.
- It is not eligible to shoot (excluding TITANIC units).
- It is not eligible to declare a charge.
Completing an Action
If a unit performing an action makes a move (excluding pile-in and consolidation moves) or leaves the battlefield, that unit does not complete that action. Otherwise, when an action is completed, its ‘Effect’ section is triggered.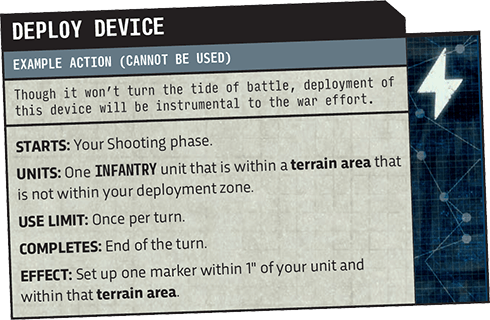
Example action for illustrative purposes only.
ADVANCED RULES
Monsters and Vehicles 17
Due to their imposing bulk and implacable nature, Monsters and Vehicles function differently on the battlefield. This section details the additional rules required to use these units in your games.
Moving Monsters and Vehicles 17.01
Each time you make a normal or advance move with a unit, MONSTER/VEHICLE models in that unit can be moved through friendly and enemy models (excluding other MONSTER/VEHICLE models).FAQ
| Q: | While making a move type other than a normal/advance move, can my MONSTER/VEHICLE unit move through friendly units? |
| A: | Yes. |
Frame 17.02
Some models do not have a base; many of these are MONSTER/VEHICLE models. Such models have the FRAME keyword, as do some other large models. Whenever a rule refers to a model’s position in relation to anything else on the battlefield (e.g. when measuring distances), if that model has the FRAME keyword, unless otherwise stated, measure to and from the closest point on that model (so not necessarily from its base, if it has one).When rotating a FRAME model as part of a move, if that model does not have a base, turn it any amount around its central axis, while keeping it upright.
FAQ
| Q: | Are models that are within the boundary of a terrain area, but not on the ground floor of a terrain area (e.g. overhanging parts of FRAME VEHICLES or models on terrain features that are within that terrain area) within that terrain area? |
| A: | Yes |
Shooting at Engaged Monsters and Vehicles 17.03
In your Shooting phase, enemy MONSTER/VEHICLE units that are engaged can be selected as targets of ranged attacks (excluding attacks made with [BLAST] weapons).Each time a model makes a ranged attack that targets such a unit, subtract 1 from the hit roll (excluding attacks made with [CLOSE-QUARTERS] weapons by models in a unit engaged with the target).
- Shooting While Engaged With Monsters/Vehicles 17.03.01
Errata
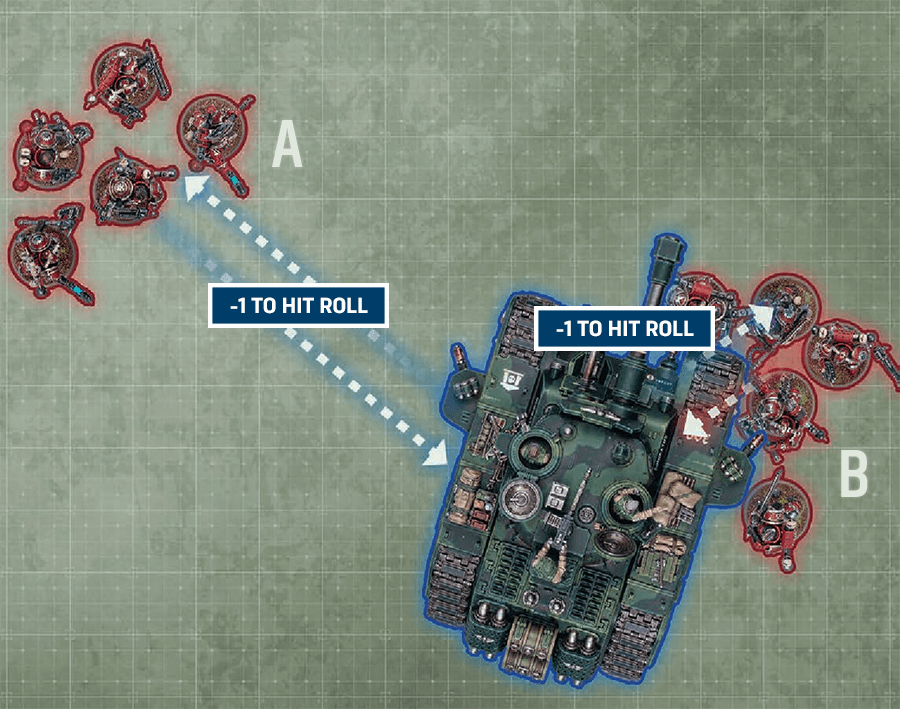
This INFANTRY unit can shoot at the VEHICLE using normal shooting. While resolving those attacks, subtract 1 from hit rolls. As the VEHICLE is engaged, [BLAST] weapons cannot target it, but can target other unengaged units.
This INFANTRY unit is engaged, but can shoot at the VEHICLE using close-quarters shooting. While doing so, it can only make attacks with its [CLOSE-QUARTERS] weapons and can only target the VEHICLE it is engaged with.
Transports 18
TRANSPORT models can carry passengers across the battlefield. This section explains how to use such models in your battles, and how units can embark within and disembark from them.
FAQ / Errata
| Q: | Can a unit that used the rapid disembark mode this turn (e.g. using a Trukk’s Pilin’ Out ability) be targeted with the Heroic Intervention stratagem? |
| A: | No. |
- Wholly within the set-up distance of that TRANSPORT, and as close as possible to that TRANSPORT.
- Or: If the above is not possible while remaining unengaged, set up that model wholly within the set-up distance of that TRANSPORT, as close as possible to that TRANSPORT, and engaged.
Each model that still cannot be set up is destroyed.
Transport Capacity 18.01
TRANSPORT models have a transport capacity listed on their datasheet. This determines the type and maximum number of friendly models that are eligible to embark within them. More than one unit can be embarked within the same TRANSPORT model at the same time, provided it has sufficient transport capacity.Before the battle, in the Declare Battle Formations step, your units can start embarked within any friendly TRANSPORT model that has sufficient transport capacity remaining for the whole unit.
A friendly unit must be embarked within each friendly DEDICATED TRANSPORT model. At the end of this step, each friendly DEDICATED TRANSPORT model without an embarked unit is destroyed, but they do not trigger rules that are triggered when a model is destroyed.
Embarking 18.02
Once the first battle round has started, a friendly unit can embark within a friendly TRANSPORT model after making a normal, advance or fall-back move, if all of the following conditions apply:- Each model in that unit is within 3" of that TRANSPORT.
- That unit was not set up on the battlefield this turn.
- That unit is eligible to embark within that TRANSPORT, as described on that TRANSPORT’s datasheet.
- That TRANSPORT has sufficient remaining transport capacity for each model in that unit.
When a unit embarks, the active player removes that unit from the battlefield and places it to one side – it is now embarked within that TRANSPORT and is not on the battlefield.
- Not on the Battlefield 01.02.04
FAQ
| Q: | Do a unit's abilities continue to function while they are embarked within a TRANSPORT? |
| A: | Yes, within the restrictions specified by the ability itself. Embarked units are Not On The Battlefield (01.02.04), so any ability requiring visibility or measurement to another unit will fail. Example: Azrael is attached to an Intercessor Squad unit and embarked within a TRANSPORT, and that TRANSPORT is making a shooting attack using the Firing Deck ability. While Azrael’s Supreme Grand Master ability is still technically active, it will have no effect, as the requirements of the ability are not met (the ability affects ‘weapons equipped by models’ in Azrael’s unit, and for the purposes of Firing Deck, the TRANSPORT itself is equipped with those weapons instead). |
| Q: | If a rule says a unit can embark into a TRANSPORT in a turn that unit disembarked, does this ignore the core rules restriction on embarking in a turn that unit made a set up move (see 18.02)? |
| A: | Yes |
Able To Embark 18.02.01
A unit is able to embark if it meets all of the conditions in Embarking (18.02). Note that one or more of these conditions may be modified by other rules, in which case a unit must satisfy those modified conditions in addition to any unmodified conditions to be able to embark.Disembarking 18.03
In the active player’s Movement phase, each friendly unit embarked within a TRANSPORT model can disembark from it by making a disembark move (see below).If a TRANSPORT model is destroyed, before removing it from the battlefield, the active player must make an emergency disembark move (see below) with each unit embarked within it.
- Persisting Rules Effects 01.02.02
- Hazard Rolls 06.03
- Rapid Disembark And Limitations 18.04.01
- Rapid/Tactical Disembark: 3"
- Combat Disembark: 6"
- Embarked within a TRANSPORT model that is on the battlefield.
- Did not embark within that TRANSPORT this phase.
- That TRANSPORT has not made an advance or fall-back move this phase.
BEFORE MOVING: Select disembark mode:
- Rapid Disembark:If that TRANSPORT made a normal or ingress move this phase, you must select this mode.
- Tactical Disembark:Otherwise, If that TRANSPORT remained stationary or has not yet been selected to move this phase, and if you can set up your unit as described below, you must select this mode.
- Combat Disembark:Otherwise, you must select this mode. Make a hazard roll for each model in your unit.
- Rapid Disembark:If that TRANSPORT made an ingress move this turn, each model must follow the same rules that TRANSPORT had to follow while resolving that move.
- Combat Disembark:Each model can be set up engaged with one or more enemy units that TRANSPORT is engaged with.
- Rapid Disembark:Until the end of the turn, your unit is not eligible to declare a charge.
- Tactical Disembark:Select your unit to make a normal or advance move.
- Combat Disembark:Your unit is battle-shocked and, until the end of the turn, it is not eligible to declare a charge.
EFFECT: Your unit is set up as described in Set Up (03.02).
BEFORE MOVING: Make a hazard roll for each model in your unit (06.03).
WHILE MOVING: Set up each model in your unit: (1) Wholly within the set-up distance of that TRANSPORT, and as close as possible to that TRANSPORT. OR: (2) If the above is not possible while remaining unengaged, set up that model wholly within the set-up distance of that TRANSPORT, as close as possible to that TRANSPORT, and engaged. Each model that still cannot be set up is destroyed.
AFTER MOVING: Your unit is battle-shocked and, until the end of the turn, it is not eligible to declare a charge.
- Embarked within a TRANSPORT on the battlefield
- Did not embark within that TRANSPORT this phase
- That TRANSPORT has not made an advance/fall-back move this phase
WHILE MOVING: Set up each model wholly within the set-up distance of that TRANSPORT.
- Embarked within a TRANSPORT on the battlefield
- Did not embark within that TRANSPORT this phase
WHILE MOVING: Set up each model wholly within the set-up distance of that TRANSPORT.
AFTER MOVING: Your unit is not eligible to declare a charge until the end of the turn.
FAQ
| Q: | If a unit makes any disembark move in a turn (i.e. Disembark move, Emergency Disembark move etc.) has it disembarked that turn? |
| A: | Yes. |
Attached Units 19
Forming Attached Units 19.01
Some units have the Leader or Support ability listed on their datasheet (see below). Such units are known as leader units and support units respectively. Both of these abilities allow such units to lead other friendly units (known as bodyguard units) to form attached units. An attached unit is a single unit for all rules purposes. Leader and support units can only lead specific bodyguard units, as listed in the datasheet.Mighty heroes fight at the forefront of battle.
Before the battle, in the Muster Armies step, for each leader and support unit in your army, you can select one friendly bodyguard unit that unit can lead. That unit will then lead that bodyguard unit for the battle and form an attached unit with it.Unless otherwise stated, each bodyguard unit can only have one leader unit and one support unit attached to it.
- Attached Units After Their Bodyguard Unit is Destroyed 19.01.01
FAQ
| Q: | The Munitorium Field Manual shows my unit can attach to different units then are on it’s datasheet, which do I use? |
| A: | Use the Munitorium Field Manual. |
Attacking Attached Units 19.02
Each time an attack targets an attached unit, if that unit contains one or more bodyguard models, use the highest T characteristic of the bodyguard models in that unit while resolving that attack, even if a leader/support unit in that attached unit has a different T characteristic. If that unit only contains leader/support models, use the highest T characteristic of those models while resolving that attack instead.Rules that are triggered when a unit is destroyed are only triggered when the last model that started the battle in an attached unit is destroyed.
Keywords in Attached Units 19.03
An attached unit has all of the keywords of all of its component units. As such, an attached unit is affected by any rule that applies to units with any of those keywords. Note that models in an attached unit do not gain the keywords of other models in that unit that they do not already have. Remember that attacks target units, not models.FAQ
| Q: | Units have all the keywords of all their models, and attached units have all the keywords of all of their component units. How are destroyed models taken into account for these purposes? |
| A: | These statements are only true so long as the models possessing those keywords remain part of the unit; destroyed models do not contribute their keywords to their prior unit. Example: The Aspiring Sorcerer model in a unit of Rubric Marines is destroyed; as none of the remaining models in the unit possess the PSYKER keyword, that unit is no longer a PSYKER unit. |
Abilities in Attached Units 19.04
Abilities/rules that affect a single specified model (e.g. from an enhancement or an item of wargear) only ever apply to that model, even while part of an attached unit.Otherwise, abilities/rules that affect a unit (or models in it) apply to every model in an attached unit, until the source of that ability/rule is destroyed, as shown below.
| ||||||||||||||||||
In all of the above cases, if that last model was destroyed as the result of an attack, the ability it was conferring upon the attached unit applies until the attacking unit has resolved all of its attacks.
- Revived 01.02.03
FAQ
| Q: | When does a model’s or unit’s ability in an attached unit apply to all models in that unit? |
| A: | A rule that applies to ’this/that unit’ or ’models in this/that unit’ applies to all models in an attached unit. Rules that just apply to one model in an attached unit (for example, a rule that grants a model Feel No Pain or Lone Operative) only apply to that model, not to all models in the attached unit. |
Strategic Reserves 20
Strategic reserves are units that arrive on the battlefield at different times, either because they were held back during deployment, or because they are using special abilities to reposition themselves.
Placing Units in Strategic Reserves 20.01
Before the battle, in the Declare Battle Formations step, you can select one or more friendly units (excluding FORTIFICATIONS) to place in strategic reserves. Instead of setting up these units on the battlefield during deployment, place them to one side; they are strategic reserves units, and will arrive later in the battle.Unless otherwise stated, the combined points value of all of your strategic reserves units (including those embarked within TRANSPORTS that are themselves placed in strategic reserves) cannot exceed 50% of your points limit for your battle size.
- Reserves 20.01.01
FAQ
| Q: | If I place units in strategic reserves during the battle, can this exceed the 50% of my points limit for the battle restriction as mentioned in Placing Units in Strategic Reserves (20.01)? |
| A: | Yes. That restriction is applicable before the battle, in the Declare Battle Formations step. |
| Q: | Does the limit to the combined points value of my units in strategic reserves only apply until the start of the first battle round? |
| A: | Yes. |
Strategic Reserves at the End of the Battle 20.01.02
At the end of the final turn, units in strategic reserves are destroyed, but they do not trigger rules that apply when a model is destroyed.Repositioned Units 20.02
Some rules allow units to be removed from the battlefield and placed in strategic reserves during the battle. Units that use such rules are known as repositioned units. In addition to any other rules that apply to such units (such as where they can or cannot arrive), all of the following rules apply to them:- If used in the Movement phase, such rules can be used on units that have already moved that phase.
- A repositioned unit that is set up in the same turn in which it made an advance, fall-back or disembark move has still made an advance, fall-back or disembark move that turn.
- When they are removed from the battlefield, any rules that are affecting such units for a specified duration or under specified circumstances continue to affect them while that duration and/or those circumstances apply.
Arriving from Strategic Reserves 20.03
To arrive on the battlefield, each strategic reserves unit must make an ingress move (see below). Unless otherwise stated, they can only do so from the second battle round onwards.EFFECT: Your unit is set up as described in Set Up (03.02).
BEFORE MOVING: Your unit is set up as described in Set Up (03.02).
WHILE MOVING: Set up your unit wholly within the set-up distance of one or more battlefield edges and more than 8" horizontally from all enemy units.
- Before the Third Battle Round: While doing so, no models can be set up within your opponent’s deployment zone.
At the end of the third battle round, unless otherwise stated, all strategic reserves units that have not made one or more ingress moves are destroyed, with the following exceptions:
- Units embarked within TRANSPORTS that have made an ingress move during the battle.
- Repositioned units (see above).
- Not on the Battlefield 01.02.04
- Persisting Rules Effects 01.02.02
- Setting Up Large Models 03.02.02
- Set Up As Reinforcements 20.03.01
Flying and Surging 21
This section supplements the basic rules for moving models, explaining how some units can fly over obstacles or surge closer to the enemy.
Surge Moves 21.01
- The rule allowing this move type has been triggered.
- Your unit is not battle-shocked.
- Your unit is unengaged.
- Your unit has not moved this phase.
BEFORE MOVING: Select the closest enemy unit to be the surge target.
WHILE MOVING:
- Each model must end its move engaged with the surge target if possible.
- Each model that cannot end its move engaged with the surge target must end its move as close as possible to the surge target.
- Your unit cannot be engaged with one or more enemy units that were not the surge target.
- Your unit cannot move again this phase.
- Rules Sequencing 01.03.02
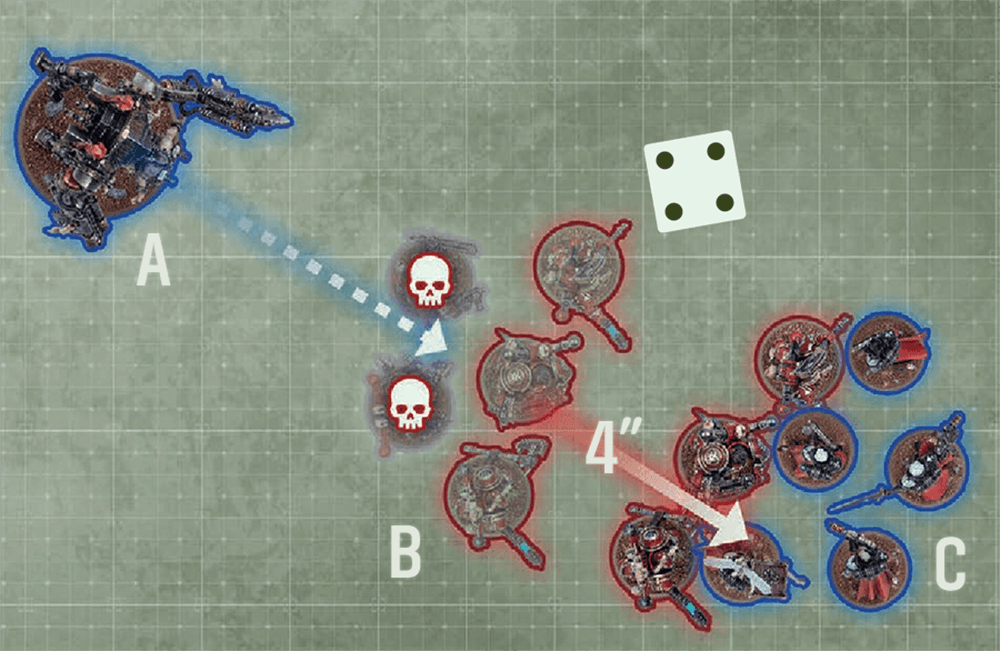
- Unit A shoots, and destroys two models from unit B.
- Unit B has an ability that allows it to make a surge move of D6" after an enemy unit has shot, if one or more of its models were destroyed by those attacks. The active player rolls one D6, resulting in a 4.
- Unit B makes a surge move, each of its surviving models moving up to 4" towards the closest enemy unit (unit C). It ends this move engaged with that unit.
Flying Models 21.03
Each time a FLYING unit is selected to make a normal, advance, fall-back or charge move, before moving any models in that unit, the active player can declare that it will take to the skies. If it does, while resolving that move:
- Subtract 2" from the maximum distance.
- Ignore all vertical distance for the purposes of how far it has moved.
- It can move through all types of model (including enemy models and MONSTER/VEHICLE models).
- It can move horizontally and vertically through all categories of terrain feature.
FAQ
| Q: | When do the effects of a FLYING unit taking to the skies apply? |
| A: | When that unit is selected to make a normal/advance/fall-back/charge move. Note that for an advance/charge move, this means you must declare that a unit will take to the skies before rolling for that advance/charge move. |
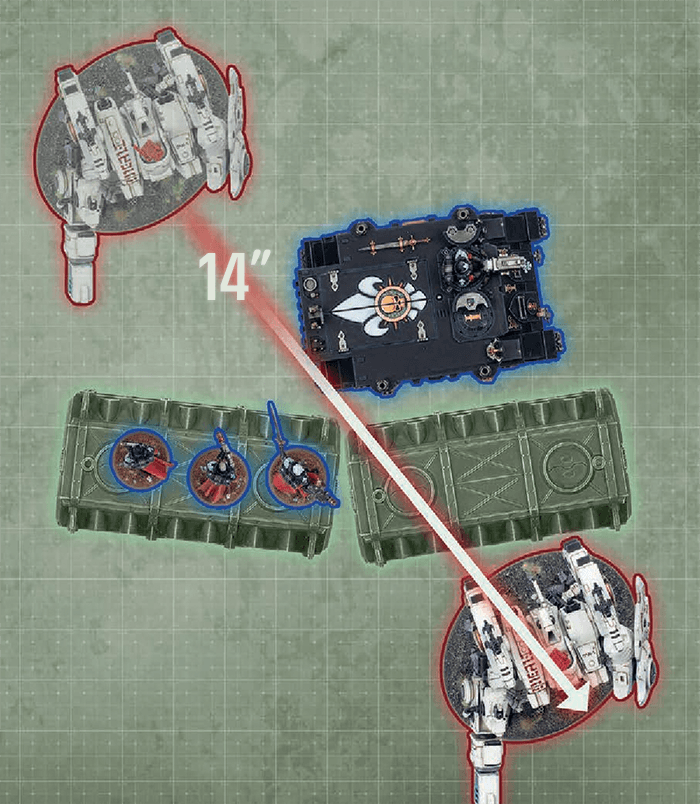
- This Riptide Battlesuit can FLY. It makes an advance move with a maximum distance of 16".
- Before moving the unit, the active player declares that it will take to the skies. That move’s maximum distance is reduced to 14", but while making that move, the Riptide Battlesuit can move through all enemy units (including VEHICLES) and all terrain features, ignoring any vertical distance that would normally be counted to ascend and descend terrain features.
Other Rules and Abilities 22
In addition to the core abilities presented elsewhere, many units have access to other rules and types of abilities that function as described below.
Aura Abilities 22.01
Abilities that affect models or units within a stated range are aura abilities, and are tagged with the word ‘Aura’.While a model with an aura ability is on the battlefield, it is always within range of its own aura ability.
A unit can be affected by more than one aura ability at a time, but if a unit is within range of the same aura ability more than once, that aura ability only applies to that unit once.
Faction Abilities 22.02
Some abilities are common to each unit that belongs to a particular faction – these are faction abilities (also known as army rules), and are listed in the Faction Abilities section of a datasheet.Unless otherwise stated, a unit’s faction abilities only apply if the army faction you selected while mustering your army matches a faction keyword listed on that unit’s datasheet.
Psychic Abilities 22.03
Abilities tagged with the word ‘Psychic’ are psychic abilities. If a psychic ability causes a model to lose one or more wounds, each of those wounds is said to be inflicted by a psychic attack (this can be important for the triggering of other rules).- Psychic Abilities with a Psychic Level (22.03.01)
Wargear Abilities 22.04
Abilities that are gained when a unit (or one of its models) has a particular item of wargear are wargear abilities, and are listed in the Wargear Abilities section of a datasheet.If a unit has an item of wargear that has a wargear ability, that ability applies to that unit. If a model within a unit has an item of wargear that has a wargear ability, that model is the ‘bearer’ of that item of wargear and that ability applies until that model is destroyed.
Plunging Fire 22.05
Each time a model makes a ranged attack that targets a visible unit containing one or more models on ground level, if one or more of the following conditions apply, improve the BS characteristic of that attack by 1:- The attacking model is on a section of a terrain feature that is 3" or more in height.
- The attacking model has the TOWERING keyword and the target unit is within 12".
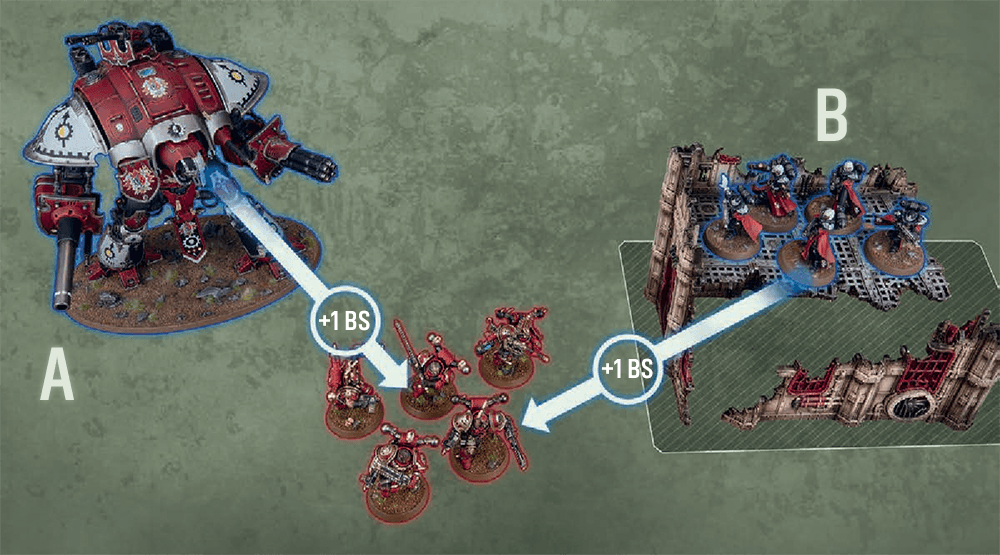
Aircraft 23
AIRCRAFT fulfil a unique but limited role on Warhammer 40,000 battlefields. Hurtling through the skies while they duel one another, strafe ground forces or perform bombing runs, they are constantly on the move.
Deployment 23.01
- In the Declare Battle Formations step, all AIRCRAFT units must be placed in strategic reserves (20.01).
Movement 23.02
- AIRCRAFT units are only eligible to make an ingress move (20.04); they are not eligible to make any other type of move.
- At the end of your opponent’s turn, all AIRCRAFT units in your army that are on the battlefield must be placed in strategic reserves.
- Each time a unit makes any type of move, its models can be moved through AIRCRAFT models.
- Each time a unit makes a pile-in, consolidation or surge move, unless that unit can FLY, while making that move, ignore AIRCRAFT units for the purposes of selecting enemy units and determining the closest enemy unit.
- Being engaged solely with one or more AIRCRAFT units does not prevent a unit from being eligible to make a normal or advance move.
Shooting 23.03
- The Plunging Fire rule (22.05) has no effect on attacks made by, or targeting, AIRCRAFT units.
Charging and Fighting 23.04
- AIRCRAFT units are not eligible to declare a charge, and can only make melee attacks that target FLYING units.
- Only FLYING units can select AIRCRAFT units as a charge target, and only FLYING models can make melee attacks that target AIRCRAFT units.
REFERENCE
Core Abilities 24
This section presents the most common abilities used in Warhammer 40,000. When these appear in other places, they are usually only referenced by name.
FAQ
| Q: | When a unit with Firing Deck is equipped with another unit’s weapons, do abilities that affect those weapons while they are equipped by that other unit affect those weapons while they are equipped by the unit with Firing Deck? |
| A: | No. For example, if a unit of Flash Gitz with the Supa-snazz Dakka upgrade and an attached Big Mek is embarked within a Trukk, when that Trukk uses Firing Deck to equip the Flash Gitz’ Snazzguns, those weapons:
|
| Q: | What does the X" in Lone Operative X" mean? |
| A: | The X is a placeholder for a number of inches that the ability might appear in a rule with, like Lone Operative 15" where the X has been replaced with 15" |
| Q: | I failed hazard rolls from [Hazardous] weapons, do those mortal wounds have to be allocated to the models with the [HAZARDOUS] weapons? |
| A: | No, you allocate the mortal wounds to the unit as per Mortal Wounds(06.02). (This represents Bob the guardsmen picking up his fallen squad mates plasma gun or that the twisting power of James the Chaos Sorcerer pulling his followers into the warp.) |
| Q: | If both players have units with the Scouts ability, do they alternate resolving scout moves? |
| A: | Yes, players alternate resolving any pre-battle rules units from their army may have, starting with the player who will take the first turn. |
| Q: | In what step during the attack sequence do I roll for Feel No Pain? |
| A: | In the Resolve Damage step of the Inflict Damage step (05.04). |
| Q: | If my unit has the Deadly Demise ability and has an ability that allows it to Fight on Death, how do I resolve this? |
| A: | Fight on Death rules are resolved before Deadly Demise abilities, meaning that your unit’s Deadly Demise will resolve after your unit has fought/at the end of the phase and the relevant models have been removed from the battlefield. |
| Q: | If the [ANTI] ability on my unit is ANTI-NON-MONSTER/VEHICLE does it mean the [ANTI] rule triggers when targeting units that do not have the MONSTER or VEHICLE keyword? |
| A: | Yes, ANTI-NON-(any keyword) will trigger on any unit that does not have the specified keyword. |
| Q: | Does vertical movement in a unit that has taken to the skies count towards the distance a model has used for the purposes of [Heavy]? |
| A: | No. |
Abilities 24.01
Many units have core abilities listed on their datasheets, and weapon abilities listed in their weapon profiles.Weapon abilities are presented in square brackets with bold formatting, e.g. [BLAST]. Weapons are often described using a particular ability they have, e.g. [BLAST] weapons are those with the [BLAST] ability.
If a weapon ability is followed by one or more keywords, when making attacks with that weapon, that ability only applies if the target unit has one or more of those keywords.
Example: The [LETHAL HITS: VEHICLE] ability only applies to attacks that target a VEHICLE unit. The [SUSTAINED HITS 1: INFANTRY/BEASTS] ability only applies to attacks that target an INFANTRY/BEASTS unit.
- With The ’X’ Ability 24.01.01
Duplicated Abilities 24.02
Multiple instances of the same core ability or weapon ability are not cumulative, regardless of any numbers or keywords included in them. In such cases, the controlling player must select which instance will apply at any one time. In the case of duplicated weapon abilities, this selection must be made each time that unit makes attacks, in the Select Weapons step.- Multiple instances of core abilities that include a number are duplicated even if that number varies. However, in the case of Scouts, you must select the lowest number not shared by every model in that unit (e.g. if every model in a unit has both Scouts 6" and Scouts 8", you could select Scouts 8" as it is shared by every model, but if a unit contains one model with Scouts 6" and five with Scouts 8", you must select Scouts 6").
- Multiple instances of weapon abilities that include a number (e.g. [SUSTAINED HITS 1]) are duplicated even if that number varies (e.g. the controlling player would have to select between [SUSTAINED HITS 1] and [SUSTAINED HITS 2]).
- Multiple instances of weapon abilities that include a keyword are duplicated even if that keyword varies (e.g. the controlling player would have to select between [ANTI-VEHICLE 4+] and [ANTI-INFANTRY 2+]).
Certain weapons are the bane of particular foes.
This ability always takes the form [ANTI-X Y+]. Each time an attack is made with an [ANTI] weapon, if the target unit has the keyword denoted by X, an unmodified wound roll of Y+ is a critical wound.Folding stocks, shortened barrels or lightweight construction enable some weapons to be easily fired on the move.
Units containing one or more models with an [ASSAULT] weapon can shoot using assault shooting (10.05).High-explosive rounds can fell several warriors in a single blast, but firing them too close to comrades is unwise.
Each time you gather attack dice for a [BLAST] weapon, add one additional attack dice for every five models that were in the target unit in the Select Targets step (rounding down).If this ability takes the form [BLAST X], each time you gather attack dice for such a weapon, add X additional attack dice for every five models that were in the target unit in the Select Targets step (rounding down) instead.
With sufficient might or skill, warriors may sweep blades or talons through their foes in long lethal arcs.
This ability always takes the form [CLEAVE X]. Each time you gather attack dice for a [CLEAVE] weapon, if you only selected one target for all of that weapon’s attacks, add X additional attack dice for every five models that were in the target unit in the Select Targets step (rounding down).Weapons designed for close-quarters fighting can be wielded effectively even in the press of melee combat.
Units containing one or more models with a [CLOSE-QUARTERS] weapon can shoot using close-quarters shooting (10.06).When using another shooting type, for each model in that unit (excluding MONSTER/VEHICLE models), you can only select one of the following to make attacks with:
- One or more of its [CLOSE-QUARTERS] weapons.
- One or more of its other ranged weapons.
From detonating ammo stores to corrosive innards or frenzied death throes, some targets are deadly even in defeat.
This ability always takes the form Deadly Demise X. Each time a model with this ability is destroyed, after the units embarked within it (if any) have made their emergency disembark moves, roll one D6. On a 6, that model suffers a deadly demise; each unit within 6" of that model suffers a number of mortal wounds denoted by X (if this is a random number, roll separately for each unit within 6").There are many ways by which to deploy troops to the field of battle including tunnels, teleportation devices and other esoteric means of transportation.
Each time this unit makes an ingress move (20.04), if every model in this unit has this ability, it can be set up anywhere on the battlefield that is more than 8" horizontally from all enemy units, even if that is within your opponent’s deployment zone.The most potent weapons strike with such power that they make a mockery of armour and can cleave through several foes.
Each time an attack made with a [DEVASTATING WOUNDS] weapon results in a critical wound, the attack sequence for that attack ends and the target unit suffers a number of mortal wounds equal to the D characteristic of that weapon. These are inflicted after resolving any normal damage inflicted by those attacks.Mortal wounds inflicted by [DEVASTATING WOUNDS] weapons can damage a maximum of one model for each critical wound; any remaining mortal wounds inflicted by that attack are lost.
Some warriors ride to battle atop trusty mounts that gore and trample nearby foes. Others wield combat weapons that deliver a frenzy of additional blows.
Each time a unit containing one or more models with an [EXTRA ATTACKS] weapon fights, those models will make attacks with those weapons in addition to any others. In the Select Weapons step (04.01), for each of those models, you must select:- All of that model’s [EXTRA ATTACKS] weapons.
- One of that model’s other melee weapons, if possible.
- Only [EXTRA ATTACKS] weapons 24.11.01
The hardiest warriors refuse to be laid low, even by wounds that should by all rights prove lethal.
This ability always takes the form Feel No Pain X+. Each time a model with this ability would lose a wound, roll one D6: on an X+, that wound is not lost.Those possessed of lightning-fast reactions may strike before the opponent can react.
While every model in a unit has this ability, that unit is a Fights First unit.See the Resolve Fights First Combats step in the Fight phase (12.04).
Some transports have dedicated platforms or firing ports from which embarked passengers can lay down a withering hail of munitions.
This ability always takes the form Firing Deck X. In your Shooting phase, each time this TRANSPORT is selected to shoot, if one or more units are embarked within it, resolve the following sequence:- Select up to X models embarked within this TRANSPORT (excluding models whose units have already been selected to shoot this phase).
- For each selected model, select one of its ranged weapons (excluding [ONE SHOT] weapons).
- Until this TRANSPORT has resolved all of its attacks, it has all of those selected weapons in addition to its other weapons.
- Until the end of the turn, units embarked within this TRANSPORT are not eligible to shoot.
Weapons powered by unstable and dangerous energy sources pose a substantial risk to the wielder and those that stand beside them.
Each time a unit is selected to shoot or selected to fight, after that unit has resolved all of its attacks, make a number of hazard rolls (06.03) for that unit equal to the number of [HAZARDOUS] weapons you selected in the Select Weapons step.Heavy weapons are amongst the biggest guns on the battlefield, but require bracing to fire at full effect.
In your Shooting phase, each time an attack is made with a [HEAVY] weapon, add 1 to the hit roll if all of the following apply to the attacking unit:- That unit is unengaged.
- That unit was not set up on the battlefield this turn.
- No model in that unit has moved more than 3" this turn.
Some airborne vehicles can use vectored thrusters or anti-gravity technology to hover and skim over the battlefield, the better to hunt their prey or deploy embarked troops.
Each time this unit takes to the skies (21.03), do not subtract 2" from the maximum distance.Some weapons are designed to root enemy formations out of entrenched positions.
Each time an attack is made with an [IGNORES COVER] weapon, the target cannot have the benefit of cover against that attack (13.08), including from rules that give a model or unit the benefit of cover (e.g. Stealth).Indirect fire weapons launch munitions over or around intervening obstacles – nowhere is safe from their fury.
Units containing one or more models with an [INDIRECT FIRE] weapon can shoot using indirect shooting (10.07).Many armies employ reconnaissance units who can sit concealed, waiting for the right moment to strike.
During deployment, if every model in a unit has this ability, it can be set up anywhere on the battlefield that is more than 8" horizontally from your opponent’s deployment zone and all enemy units.With the momentum of a warrior at full-tilt, lance weapons are deadly on the charge.
Each time an attack is made with a [LANCE] weapon, if the attacking model’s unit made a charge move this turn, add 1 to the wound roll.Mighty heroes fight at the forefront of battle.
Before the battle, in the Muster Armies step, for each leader and support unit in your army, you can select one friendly bodyguard unit that unit can lead. That unit will then lead that bodyguard unit for the battle and form an attached unit with it.Unless otherwise stated, each bodyguard unit can only have one leader unit and one support unit attached to it.
Many deadly weapons can inflict fatal injuries on any foe, no matter their resilience.
Each time an attack made with a [LETHAL HITS] weapon results in a critical hit, you can choose for that attack to automatically wound the target.Assassins and other covert agents are difficult to pinpoint in the storm of battle.
Unless part of an attached unit, this unit is not visible to enemy models unless they are within 12" of this unit, and it cannot be targeted by [INDIRECT FIRE] weapons unless the attacking model is within 12" of this unit.If this ability takes the form Lone Operative X", unless part of an attached unit, this unit is not visible to enemy models unless they are within X" of this unit, and it cannot be targeted by [INDIRECT FIRE] weapons unless the attacking model is within X" of this unit.
- Attached units and Lone Operative 24.24.01
Melta weapons are powerful heat rays whose fury is magnified at close range.
This ability always takes the form [MELTA X]. Each time a model makes an attack with a [MELTA] weapon, if the target unit was within half range of that weapon in the Select Targets step, until the attacking unit’s attacks have been resolved, add X to that weapon’s D characteristic.Some weapons are so rare, or so complex and slow to reload, that they can only be used once.
Each weapon with this ability can only be selected to make attacks with once per battle.If a destroyed model is returned to a unit, all of its [ONE SHOT] weapons that have already been selected to make attacks with during the battle cannot be selected to make attacks with again.
If a new unit is added to an army, all [ONE SHOT] weapons in that unit can be selected to make attacks with once per battle.
- Multiple [ONE SHOT] Weapons 24.26.01
Pistols can be wielded even at point-blank range.
[PISTOL] and [CLOSE-QUARTERS] are identical for all rules purposes. See [CLOSE-QUARTERS].Precision attacks can pick high-value targets out in a crowd.
While resolving attacks made with one or more [PRECISION] weapons, at the start of the Allocation Order step (05.03), if the target unit contains one or more CHARACTER models visible to one or more of the attacking models, the active player can select one allocation group that contains one of those visible CHARACTER models. If they do, until those attacks are resolved, or until that CHARACTER group is destroyed (whichever happens first), that CHARACTER group is the current allocation group.24.28.01 Precision and Devastating Wounds
Mortal Wounds inflicted by a [PRECISION] attack with the [DEVASTATING WOUNDS] ability are first applied to the CHARACTER group that was selected for those [PRECISION] attacks (if that group is not already destroyed).Some weapons can channel the bearer’s psychic might to empower their blows.
Each time an attack is made with a [PSYCHIC] weapon, you can ignore any or all modifiers to that attack’s BS or WS characteristic and any or all modifiers to the hit roll. Attacks made with [PSYCHIC] weapons are known as psychic attacks (this can be important for the triggering of other rules).Rapid fire weapons are capable of long-ranged precision shots or controlled bursts at nearby targets.
This ability always takes the form [RAPID FIRE X]. Each time you gather attack dice for a [RAPID FIRE] weapon, add X additional attack dice if the target unit was within half range of that weapon in the Select Targets step.Example: If a [RAPID FIRE 1] weapon with an A characteristic of 1 targets a unit that is within half range, you would gather one additional attack dice for that weapon (for a total of two for that weapon).
Scouts form the vanguard of many armies. Unnoticed by the enemy, they range ahead of the main force.
This ability always takes the form Scouts X". In the Resolve Pre-battle Abilities step, if every model in a unit has this ability, you can do one of the following:- If that unit is in strategic reserves, you can set up that unit anywhere that is wholly within your deployment zone.
- If that unit is wholly within your deployment zone, it can make a scout move (see below).
- If that unit is embarked within a DEDICATED TRANSPORT that is wholly within your deployment zone, and if every model embarked within that DEDICATED TRANSPORT has the Scouts ability, that DEDICATED TRANSPORT can make a scout move.
EFFECT: Your unit moves as described in Moving (03).
AFTER MOVING: Your unit must be more than 8" horizontally from all enemy units.
The stealthiest warriors can evade the attentions, and the bullets, of their foes.
If every model in a unit has this ability, each time a ranged attack targets that unit, that unit has the benefit of cover against that attack (13.08).Monstrous creatures and gigantic engines of war loom over the battlefield like gods given form, striding over combatants and smashing through almost any obstacle that bars their passage.
Each time a unit with this ability makes a normal, advance or fall-back move:- Models in that unit can move through models (including MONSTER/VEHICLE models, but excluding TITANIC models) and can move horizontally through sections of terrain features that are 4" or less in height.
- Before moving that unit, you can select for all models in that unit to have the MOBILE keyword until that move ends. If you do, when that move ends, roll one D6: on a 1, that unit is battle-shocked.
Some weapons possess a punishing rate of fire, or can land devastating flurries of blows, tearing the foe apart with relentless ferocity.
This ability always takes the form [SUSTAINED HITS X]. Each time an attack made with a [SUSTAINED HITS] weapon results in a critical hit, that attack results in a number of additional hits on the target as denoted by X.Torrent weapons project clouds of fire, gas or other lethal substances that few foes can hope to evade.
Each time an attack is made with a [TORRENT] weapon, that attack automatically hits the target.[TORRENT]
[TORRENT] weapons cannot have [INDIRECT FIRE] or [PRECISION].Dual weapons are often grafted to the same targeting system for greater lethality.
Each time an attack is made with a [TWIN-LINKED] weapon, you can re-roll the wound roll.Muster Armies 25
The following rules tell you how to create an army list out of models and units from your Warhammer 40,000 collection.
Start Your Army Roster 25.01
The details of your army must be recorded on an army roster. You can either write this down or use the Warhammer 40,000 app. Players should show their finished army roster to their opponent before battle commences.Select Army Faction 25.02
Note on your army roster one faction keyword to be your army faction.Select Battle Size 25.03
With your opponent, select one of the battle sizes below. This will determine the total number of points (also known as the points total) each player can spend to build their army. The points values for units can be found in the Warhammer 40,000 app. You will need to refer to these when building your army. The battle size will also determine the total number of Detachment Points (DP) players will have to unlock detachments with, the number of units with the same datasheet name that they can include in their army, and the number of enhancements that they can include in their army. These are summarised below.
|
* The unit limit for BATTLELINE and DEDICATED TRANSPORT units is double the relevant amount shown above, and every EPIC HERO has a unit limit of 1, regardless of the battle size.
Fill Your Army Roster 25.04
You will now select your detachments, units, WARLORD and enhancements that will be in your army. You will also attach your leader and support units to other units.When doing so:
- You cannot exceed any of the values presented in the Select Battle Size table (25.03). For example, in an Incursion battle, you cannot select detachments with a combined value of more than 2 DP.
- No unit (including attached units) can have more than one enhancement.
- Your army roster must follow all restrictions placed on it by the rules and units being included in it.
FAQ
| Q: | Can an attached unit be given an Upgrade? |
| A: | Yes. |
| Q: | Can a unit have both an Upgrade and an enhancement? |
| A: | No, units are prevented from having two enhancements, and Upgrades are enhancements. |
| Q: | Are Upgrades enhancements? |
| A: | Yes, Upgrades are a type of enhancement (but not all enhancements are Upgrades). |
| Q: | Can an EPIC HERO unit form an attached unit with a unit that has an enhancement? |
| A: | Yes. |
Select Detachments
You can now use your DP to select detachments for your army. You can only select from those available to your army faction. Each one will give you access to different force dispositions, detachment rules, enhancements and/or stratagems to use in the coming battle. You cannot select the same detachment more than once. Record your selected detachments on your army roster.Note that some detachment rules list units and other detachments that your army either must include or cannot include; you must follow all such rules when building your army for the detachments you have selected.
Select Units
Select all the units you want to include in your army. You can only select units with your faction keyword and units available to your army faction. Each time you include a unit in your army, it can take any wargear or options it has access to. Note on your army roster the number of models in the unit, any wargear and upgrades it has, and its points value.Select one CHARACTER unit to be your Warlord’s unit. This must be a unit that has the faction keyword you chose as your army faction. Then select one CHARACTER model in that unit to be your Warlord the supreme leader of your army and make a note of this on your army roster. That model gains the WARLORD keyword. Some units have a rule on their datasheet stating that they must be your WARLORD. If you want to include one or more of these units in your army, you must select one of them to be your WARLORD. Rules that state that a model cannot be your WARLORD take precedence over ones that require it to be your WARLORD.
Attach Leaders and Support Units
For each leader and support unit in your roster, you can attach them to a bodyguard unit that they can join, following the rules for Forming Attached Units (19.01). Each support unit in your roster must be attached to a bodyguard unit.Select Enhancements
Select all of the enhancements you want to include from the detachments you selected and give each one to a different unit in your army. When you do, increase those units points values accordingly. The points values for enhancements can be found on faction pages.Unless otherwise stated:
- Only CHARACTER units can be given enhancements. If such a unit contains more than one model, select one CHARACTER model in that unit to have that enhancement.
- EPIC HEROES models cannot be given enhancements.
- Your army cannot include more than one of the same enhancement.
Upgrades: Some enhancements are tagged with ’Upgrade’. Unlike other enhancements:
- These can be given to non-CHARACTER units.
- You can include up to three of the same Upgrade in your army (the second and third instances of the same Upgrade do not count towards the total number of enhancements in your army, but you must still spend the stated points cost each time).
If you are playing an Incursion battle, you can select a 3DP detachment as your only detachment.
Some rules refer to units being below starting strength, or at – or below – half-strength. The meaning of these terms varies depending on a unit’s starting strength, as shown below.
|
If a persisting effect applies to a unit when you place it in strategic reserves or when it embarks within a TRANSPORT, make a note of that effect and its duration; if that unit is set up on the battlefield again, any persisting effects continue to apply to that unit for their full duration.
If you have a rule that specifies when it is triggered (e.g. ‘In the Shooting phase’) and it does not specify how long it is active for, it is only active for the duration of that specified period (e.g. until the end of that Shooting phase). After that period, that effect is no longer applicable/active.
If a rule or effect is given to a unit and it does not specify how long it is active for, it is only active for the phase in which it was given.
- If a rule revives, resurrects or returns models to a unit, it does so through destroyed models from that unit.
- This cannot expand a unit beyond its starting strength.
- Unless otherwise stated, such models are added with all wargear and enhancements they started the battle with, and with their full W remaining.
- They must be set up in coherency with models in that unit that started that phase on the battlefield.
- They can be set up engaged with one or more enemy units, but only if those enemy units were already engaged with the unit that model is being returned to.
If a leader or support model in an attached unit is destroyed and subsequently revived, they are still part of that attached unit and they must be returned to it if possible.
When a model revives, resurrects, returns or is added to an embarked unit, if that TRANSPORT has sufficient remaining transport capacity for that model, that model is returned to that unit and is embarked. Otherwise, that model is destroyed, but it does not trigger rules that apply when a model is destroyed.
- That unit is not visible to any other units (units are visible to themselves).
- Any other unit is not visible to that unit.
- Players cannot measure distances to or from that unit (units are within range of their own abilities).
This means units not on the battlefield cannot be selected or targeted by any attack or rule that requires a unit to be visible or within a certain distance (other than their own abilities).
Such units can still use their other rules, and are still units in the controlling player’s army and so can be affected by rules that require a player to select a unit from an army, as well as rules that affect all units in an army.
The controlling player must make battle-shock rolls for units that are not on the battlefield in their Command phase if they are battle-shocked, or if they are at or below half-strength.
Different instances of the same datasheet are still considered to be ‘other’ units.
- The same models can only be subdivided in this way once (e.g. those smaller units cannot themselves be split further).
- If a rule is used to split a unit into multiple units before the battle, the starting strength of each individual unit is changed to be equal to the number of models in that unit.
- A unit must be split into two units, each containing as equal a number of models as possible (when splitting a unit in this way, make a note of which models form each of the two new units). If a rule states a specific starting strength of the split units, but this is not possible based on the number of models in the unit being split (e.g. due to attached Leader/Support models), split the unit as stated above.
Errata
- A unit must be split into two units, each containing as equal a number of models as possible (when splitting a unit in this way, make a note of which models form each of the two new units). If a rule states a specific starting strength of the split units, but this is not possible based on the number of models in the unit being split (e.g. due to attached Leader/Support models), split the unit as stated above.
This does not give that rule to every model in the unit, unless that rule specifically states that it gives that rule to the unit, in which case every model in that unit gains that rule, as described in Units and Models (01.02).
- Mark the point on the battlefield beneath the centre of the base of the model to be replaced (or its central axis, for a unit with FRAME).
- Place the other model so that the centre of its base (or its central axis, for a unit with FRAME) is directly over that point.
- Place a well-defined boundary (such as a base or mat) in each location you want to furnish with terrain, then place one or more terrain features wholly within that boundary.
- Place one terrain feature directly on the battlefield.
- Place two or more terrain features directly on the battlefield in such a way that together they define the boundary of an area.
In each case, the area of the battlefield occupied by that boundary or terrain feature is known as a terrain area. A mission’s deployment map may define the location and dimensions of each terrain area. Otherwise, players must agree on this before the battle.
FAQ
| Q: | Are models that are within the boundary of a terrain area, but not on the ground floor of a terrain area (e.g. overhanging parts of FRAME VEHICLES or models on terrain features that are within that terrain area) within that terrain area? |
| A: | Yes |
When rotating a FRAME model as part of a move, if that model does not have a base, turn it any amount around its central axis, while keeping it upright.
FAQ
| Q: | Are models that are within the boundary of a terrain area, but not on the ground floor of a terrain area (e.g. overhanging parts of FRAME VEHICLES or models on terrain features that are within that terrain area) within that terrain area? |
| A: | Yes |
- Any army rules they have.
- Any detachments in their army.
- Any stratagems they use.
- Any enhancements that units or models in their army have.
- Any abilities or rules found on their units’ datasheets.
- Rules that have restrictions (e.g. ‘Once per battle/turn/phase’) only apply to the player whose rule it is.
Some missions may introduce additional rules that take effect in the battle. Where this is the case:
- If the rule is used by a player, it is treated as one of that player’s rules.
- If it is not used by a player, and always takes effect, such a rule is resolved before any of the active player’s rules, in an order of their choosing.
- All of the active player’s rules that must be used, in an order of their choosing.
- All of the active player’s rules that they can optionally use and wish to use, in an order of their choosing.
- All of the opposing player’s rules that must be used, in an order of their choosing.
- All of the opposing player’s rules that they can optionally use and wish to use, in an order of their choosing.
If another rule could be used after a rule has resolved during this sequence but before other rules in that same timing have resolved, those new rules do not trigger until all the remaining rules to be resolved in that same timing have been resolved.
- Within: If a rule says it applies ‘within’ a specified distance, it applies at any distance that is not more than that distance. For example, within 1" means any distance that is not more than 1" away
- Model/Unit Within: A model is within a specified distance if any part of its base is within that distance. A unit is within a specified distance if one or more of its models are within that distance.
- Model/Unit Wholly Within: A model is wholly within a specified distance if every part of its base is within that distance. A unit is wholly within if every model in that unit is wholly within the specified distance. A model with the FRAME keyword is wholly within a specified distance if all parts of that model are within the specified distance.
Example: A model is wholly within a terrain area if no part of its base extends beyond the footprint of that terrain area. A unit is wholly within a specified distance if every model in that unit is wholly within that distance.
If two or more are equally close, the controlling player of the model or unit using that rule selects which is the closest for the purposes of that rule.
- If a rule instructs you to move a model as close as possible to a unit or model you must end that model’s move in base contact with that unit or model if its move is sufficient to do so without breaking any other restrictions (such as coherency), or as close as you can achieve if its move is not sufficient.
- If a model is already as close as possible to a unit or model when it is instructed to make a move as close as possible towards a unit or model, that model cannot be moved, but still counts as having made the move in question.
- If a rule instructs you to move a model as close as possible to an objective you must end that model’s move within range of an objective if its move is sufficient to do so without breaking any other restrictions (such as coherency), or as close as you can achieve if its move is not sufficient.
- If that model is already within range of an objective it can move up to the maximum distance of that move but must end its move still within range of that objective.
When moving a model from your army into base contact with an enemy model during a move, if that enemy model overhangs its base such that it is not physically possible to be in base contact with that model, until the end of the turn, those models are considered to be in base contact with each other while all of the following are true:
- The distance your model could move was sufficient to move it into base contact with the enemy model if there was no overhang.
- The models are as close as possible together.
- Any part of one model is within 1" of any part of the other model.
- That line has no thickness.
- That line must be straight.
- If a rule allows you to re-roll a dice roll that was made by adding several dice together (e.g. 2D6, 3D6, etc.) then you must re-roll all of those dice again.
- You can never re-roll a dice more than once, and re-rolls happen before modifiers (if any) are applied.
- A re-rolled dice is still considered to be a dice roll and, as such, any rules that can be triggered by a dice roll can also be triggered by a re-rolled dice.
- To do so, both players roll one D6, and whoever rolls highest wins the roll-off.
- If there is a tie for the highest roll, roll off again.
If a rule refers to the lowest dice result and a dice roll involves multiple dice, if more than one of those dice have the same value, and that value is the lowest, the active player must select one of those dice to be the lowest dice result.
This may result in a value that is greater than a value that could be rolled on a D6 dice.
When a model is destroyed, first resolve any rules that are triggered when it is destroyed, then it is removed from the battlefield. If any such rules apply, and if the model was destroyed as the result of an attack, unless otherwise stated, those rules are only resolved and that model is only removed after the attacking unit’s attacks have been resolved. Unless otherwise stated, destroyed models and units cannot use abilities or be selected or targeted by rules.
Some rules only trigger if an enemy model or unit was destroyed by you, or by a model or unit from your army. This means that the enemy model or unit was destroyed by an attack made by a model from your army, or by a player rule you have. Enemy models or units that are destroyed by any other means are not destroyed by you, or by a model or unit from your army.
Unless otherwise stated, that rule allows you to ignore modifiers to the unit’s rolls and the unit’s profile and weapon characteristics.
When a rule states you can ignore modifiers to a stated roll or characteristic, you can choose to ignore all of those modifiers, or only some of them. For example, you can still choose to apply positive/beneficial modifiers while ignoring negative/detrimental modifiers.
Random Attacks: If a weapon has a random A characteristic, that characteristic is determined when generating attacks for that weapon at the Resolve Attacks step (04.03). If several weapons with random A characteristics are making identical attacks, generate the attacks for each of those weapons individually, and group them all together.
Random Damage: If a weapon has a random D characteristic, then each time an attack made with it inflicts damage, the controlling player determines that weapon’s characteristic when the opposing player has selected a model in the target unit to allocate that attack to.
When determining a random D characteristic, the dice roll made is called a damage roll.
Where a D characteristic includes an operator (e.g. a ‘+’, as in D6+1), the value after the operator is part of that D characteristic – it is not a modifier.
Other Random Characteristics: For all other characteristics, roll to determine the value on an individual, per-model or per-weapon basis each time that characteristic is required.
- If that unit has one or more models that does not have its full wounds remaining, select one of those models; that model regains one lost wound.
- If all models in that unit have their starting number of wounds, but one or more models from that unit are currently destroyed, revive one of those destroyed models (excluding CHARACTER models), with one wound remaining.
If a rule states that a model heals or regains a number of wounds, only that model can regain wounds up to its starting number of wounds. Any excess regained wounds are lost and do not cause a destroyed model from that unit to revive.
- Create Groups: Divide all models in the target unit into the following groups, as many times as required:
- One group for each CHARACTER model.
- One group for all other models with the same W, Sv and InSv characteristics.
- Allocation Order: Declare the order in which those groups will have attacks allocated to them, applying all of the following:
- If a non-CHARACTER group contains a model that has lost one or more wounds, that group must be first in the allocation order.
- No CHARACTER group can be earlier in the allocation order than a non-CHARACTER group.
- CHARACTER groups containing a model that has lost one or more wounds must be earlier in the allocation order than CHARACTER groups containing no wounded models.
- Make Save Rolls: The opposing player makes one save roll for each attack that wounded the target by rolling one D6.
FAQ
| Q: | When declaring the allocation order of groups in my unit I have more than one non-CHARACTER groups that contain a model with a missing wound, how must I select the order? |
| A: | Those groups can be selected in an order of your choosing but must be in an order that makes them come before any non-CHARACTER groups that do not contain a model with a missing wound. |
| Q: | I have a unit being attacked with weapons that will modify some of their save rolls to be worse then 6 should I make those save rolls? |
| A: | Yes, because other models in your unit may have Sv’s that are better those models you’ve mentioned, this means that enough save rolls could be allocated to the those models that the rest of the results are not greater then the Sv’s of the other models in your unit. |
| Q: | Can I group or allocate a wound to a destroyed model? |
| A: | No. |
Those possessed of lightning-fast reactions may strike before the opponent can react.
While every model in a unit has this ability, that unit is a Fights First unit.See the Resolve Fights First Combats step in the Fight phase (12.04).
EFFECT: Your unit moves as described in Moving (03).
BEFORE MOVING: Select one or more enemy units that are within 12" of your unit and within the maximum distance of your unit; until the end of this move, each of those enemy units is a charge target.
WHILE MOVING:
- Each model must end its move closer to one or more charge targets.
- Each model that can end its move within 1" of one or more charge targets must do so.
- Each model that can end its move engaged with one or more charge targets must do so.
- Your unit must be engaged with all of the charge targets.
- Your unit cannot be engaged with one or more enemy units that are not charge targets.
- Until the end of the turn, each model in your unit has the Fights First ability (24.13).
While a model with an aura ability is on the battlefield, it is always within range of its own aura ability.
A unit can be affected by more than one aura ability at a time, but if a unit is within range of the same aura ability more than once, that aura ability only applies to that unit once.
Unless otherwise stated, a unit’s faction abilities only apply if the army faction you selected while mustering your army matches a faction keyword listed on that unit’s datasheet.
- Psychic Abilities with a Psychic Level (22.03.01)
If a unit has an item of wargear that has a wargear ability, that ability applies to that unit. If a model within a unit has an item of wargear that has a wargear ability, that model is the ‘bearer’ of that item of wargear and that ability applies until that model is destroyed.
For example, an ability reads: ‘This unit’s ranged attacks that target the closest eligible target can:
In order for those attacks to re-roll hit rolls, that target must be both the closest eligible target and within range of an objective your opponent controls.
- A unit has all the keywords of all models in that unit. A model only has its own keywords.
- If a rule specifies that it applies to a unit with a keyword, it applies to a unit which includes one or more models with that keyword.
- If a rule specifies that it applies to a model with a keyword, it only applies to a model with that keyword.
- If a rule specifies that it applies to ‘non-KEYWORD’ models/units, it only applies to models/units that do not have that keyword. For example, if a rule applies to non-VEHICLE units, it only applies to units that do not have the VEHICLE keyword.
- Some units can contain models that have different keywords. While this is the case, such a unit is considered to have all of the keywords of all of its models, and so is affected by any rule that applies to units with any of those keywords. Remember that attacks are made against units, not models.
- If a rule only applies to models with a specific keyword, then it instead only applies to models in such a unit that have the correct keyword.
- A rule with a comma-separated list of keywords, or a series of keywords separated by slashes (‘/’), or two keywords separated by the word ‘or’ (e.g. ‘an IMMORTALS, DEATHMARKS or LYCHGUARD unit’) refers to a model/unit that has any one of those keywords.
- A rule with multiple adjacent keywords (e.g. ‘an AELDARI GUARDIANS unit’) only refers to a model/unit that has all of those keywords.
- Some older rules use keywords without specifying model or unit: for example, MONSTER/VEHICLE or TRANSPORT. These rules refer to units with those keywords.
- Singular and plural instances of the same keyword function in the same way.
Mighty heroes fight at the forefront of battle.
Before the battle, in the Muster Armies step, for each leader and support unit in your army, you can select one friendly bodyguard unit that unit can lead. That unit will then lead that bodyguard unit for the battle and form an attached unit with it.Unless otherwise stated, each bodyguard unit can only have one leader unit and one support unit attached to it.
Other models and units can be either visible or fully visible to the observing model, as shown below. Note that terrain applies additional rules to visibility (13.07).
FAQ
| Q: | When checking line of sight from one model to another, is this drawn between the bases of those models, or between any part of them? |
| A: | Line of sight is drawn from any part of the observing model to any part of the model being observed. |
| Q: | When a model overhangs the edge of the battlefield, how does that affect its visibility? |
| A: | That model’s controlling player can draw line of sight from any part of that model that is not overhanging the edge of the battlefield. Their opponent can draw line of sight to any part of that model. |
Some weapons are so rare, or so complex and slow to reload, that they can only be used once.
Each weapon with this ability can only be selected to make attacks with once per battle.If a destroyed model is returned to a unit, all of its [ONE SHOT] weapons that have already been selected to make attacks with during the battle cannot be selected to make attacks with again.
If a new unit is added to an army, all [ONE SHOT] weapons in that unit can be selected to make attacks with once per battle.
Some transports have dedicated platforms or firing ports from which embarked passengers can lay down a withering hail of munitions.
This ability always takes the form Firing Deck X. In your Shooting phase, each time this TRANSPORT is selected to shoot, if one or more units are embarked within it, resolve the following sequence:- Select up to X models embarked within this TRANSPORT (excluding models whose units have already been selected to shoot this phase).
- For each selected model, select one of its ranged weapons (excluding [ONE SHOT] weapons).
- Until this TRANSPORT has resolved all of its attacks, it has all of those selected weapons in addition to its other weapons.
- Until the end of the turn, units embarked within this TRANSPORT are not eligible to shoot.
- Each model in that unit is within 3" of that TRANSPORT.
- That unit was not set up on the battlefield this turn.
- That unit is eligible to embark within that TRANSPORT, as described on that TRANSPORT’s datasheet.
- That TRANSPORT has sufficient remaining transport capacity for each model in that unit.
When a unit embarks, the active player removes that unit from the battlefield and places it to one side – it is now embarked within that TRANSPORT and is not on the battlefield.
- Not on the Battlefield 01.02.04
FAQ
| Q: | Do a unit's abilities continue to function while they are embarked within a TRANSPORT? |
| A: | Yes, within the restrictions specified by the ability itself. Embarked units are Not On The Battlefield (01.02.04), so any ability requiring visibility or measurement to another unit will fail. Example: Azrael is attached to an Intercessor Squad unit and embarked within a TRANSPORT, and that TRANSPORT is making a shooting attack using the Firing Deck ability. While Azrael’s Supreme Grand Master ability is still technically active, it will have no effect, as the requirements of the ability are not met (the ability affects ‘weapons equipped by models’ in Azrael’s unit, and for the purposes of Firing Deck, the TRANSPORT itself is equipped with those weapons instead). |
Example: If a unit makes a normal move and all models in that unit have an M characteristic of 6" except for one model with an M characteristic of 9", that model’s maximum distance for that move is 9", while the other models’ maximum distance is 6". While that unit is making that move, all other restrictions must be met.
- Within 2" horizontally and 5" vertically of at least one other model in that unit.
- Within 9" horizontally and 5" vertically of every other model in that unit.
REGAINING COHERENCY
In the End of Turn step of each player’s turn, if one or more units on the battlefield are not in coherency, those units’ controlling players must remove models from them, one at a time, until they are in coherency again. Models removed in this way are destroyed, but they do not trigger rules that apply when a model is destroyed.
FAQ
| Q: | Do models destroyed when a unit is out of coherency count for mission objectives? |
| A: | Yes. |
| Q: | When checking coherency for my unit can my unit be in multiple groups? |
| A: | No, it must be in a single contiguous group as per Units and Models (01.02) and What is Coherency in the core rules. |
| Q: | When a move says that a model or unit must move in a way if it is able, can that requirement force the unit to end their move not in coherency? |
| A: | No, when a model or unit is making a move it must follow requirements while ending that move in coherency. |
- Exposed/Light: All models can move horizontally and vertically through exposed and light terrain features.
- Dense:
- INFANTRY/BEASTS/SWARM/MOBILE models can move horizontally through dense terrain features.
- INFANTRY/BEASTS/SWARM models can move vertically through dense terrain features.
- Other models can move horizontally through dense terrain features provided that all sections of that terrain feature that the moving model’s base would move through are 2" or less in height. Otherwise, the moving model must move vertically to ascend or descend such sections. They cannot move through ceilings and floors while doing so, and they cannot end that move on any surface of that terrain feature that is not on ground level (see below).
- Solid Terrain and Movement 13.06.01
- While a friendly model is within engagement range of one or more enemy models, those models – and the units they belong to – are engaged with each other.
- While a unit contains no engaged models, that unit is unengaged.
FAQ
| Q: | Does my model or unit become engaged while moving through a enemy units engagement range during a move? |
| A: | No |
EFFECT: Your unit moves as described in Moving (03).
BEFORE MOVING: Make an advance roll by rolling one D6.
AFTER MOVING:
- Your unit must be unengaged.
- Until the end of the turn, unless otherwise stated, your unit is not eligible to declare a charge or start an action.
EFFECT: Your unit moves as described in Moving (03).
BEFORE MOVING: Select consolidation mode:
- Ongoing Consolidation:If your unit is engaged, you must select this mode and select every enemy unit it is engaged with.
- Engaging Consolidation:Otherwise, if your unit is within 3" of one or more enemy units, you must select this mode and select one or more of those enemy units.
- Objective Consolidation:Otherwise, if your unit is within 3" of one or more objectives, you must select this mode and select one of those objectives.
- Ongoing Consolidation:Models in base-contact with one or more enemy models cannot be moved. Each model that is moved must end its move closer to the closest selected enemy unit, and engaged with it if possible.
- Engaging Consolidation:Each model that is moved must end its move closer to the closest selected enemy unit, and engaged with it if possible.
- Objective Consolidation:Each model that is moved must end its move within range of the selected objective if possible, or closer to it if not.
- Ongoing Consolidation:Each model that started this move engaged with an enemy unit must still be engaged with that enemy unit.
- Engaging Consolidation:Your unit must be engaged with all of the selected enemy units. If one or more enemy units engaged with your unit have not been selected to fight this phase, your opponent must select each of those units, one at a time; when each is selected, it becomes eligible to fight and is selected to fight (12.04).
- Objective Consolidation:Your unit must be unengaged and within range of the selected objective.
Weapons powered by unstable and dangerous energy sources pose a substantial risk to the wielder and those that stand beside them.
Each time a unit is selected to shoot or selected to fight, after that unit has resolved all of its attacks, make a number of hazard rolls (06.03) for that unit equal to the number of [HAZARDOUS] weapons you selected in the Select Weapons step.- Select Model: Select one model in that unit by following the first instruction below that applies:
If a non-CHARACTER model in that unit has lost one or more wounds, you must select that model. Otherwise, if that unit contains one or more non-CHARACTER models, you must select one of those models. Otherwise, if one or more CHARACTER models in that unit have lost one or more wounds, you must select one of those models. Otherwise, you must select one CHARACTER model in that unit. - Resolve Damage: The selected model loses 1 wound. If this reduces that model’s remaining wounds to 0, it is destroyed.
MORTAL WOUNDS AND NORMAL DAMAGE
When resolving attack dice, if those attacks inflict a mixture of both mortal wounds and normal damage, resolve all of the normal damage first, then resolve all of the mortal wounds.
- Normal Damage 06.02.01
FAQ
| Q: | I have a rule that triggers when a mortal wound is allocated to a model, when does this happen? |
| A: | When you select a model in the Select Model step of Mortal Wounds (06.02). |
FAQ
| Q: | I failed hazard rolls from [Hazardous] weapons, do those mortal wounds have to be allocated to the models with the [HAZARDOUS] weapons? |
| A: | No, you allocate the mortal wounds to the unit as per Mortal Wounds (06.02). (This represents Bob the guardsmen picking up his fallen squad mates plasma gun or that the twisting power of James the Chaos Sorcerer pulling his followers into the warp.) |
| Q: | If a rule says my unit must make a hazard roll does every model in the unit make a hazard roll? |
| A: | No, the unit would make 1 single hazard roll. |
EFFECT: Your unit moves as described in Moving (03).
BEFORE MOVING: Select fall-back mode:
- Ordered Retreat: If your unit is not battle-shocked, you can select this mode.
- Desperate Escape: Otherwise, you must select this mode. Make a hazard roll for each model in your unit (06.03).
- Desperate Escape: Each model that is moved can be moved through enemy models.
- Your unit must be unengaged.
- Until the end of the turn, unless otherwise stated, your unit is not eligible to shoot, declare a charge or start an action.
- Desperate Escape: If your unit is not battle-shocked, you must make a battle-shock roll for your unit (01.07).
EFFECT: Your unit moves as described in Moving (03).
AFTER MOVING: Your unit must be unengaged.
EFFECT: Your unit is set up as described in Set Up (03.02).
BEFORE MOVING: Your unit is set up as described in Set Up (03.02).
WHILE MOVING: Set up your unit wholly within the set-up distance of one or more battlefield edges and more than 8" horizontally from all enemy units.
- Before the Third Battle Round: While doing so, no models can be set up within your opponent’s deployment zone.
EFFECT: No models are moved (either in straight lines or rotated). Units that remain stationary do not trigger any rules that are triggered when a unit starts or ends a move.
- Rapid/Tactical Disembark: 3"
- Combat Disembark: 6"
- Embarked within a TRANSPORT model that is on the battlefield.
- Did not embark within that TRANSPORT this phase.
- That TRANSPORT has not made an advance or fall-back move this phase.
BEFORE MOVING: Select disembark mode:
- Rapid Disembark:If that TRANSPORT made a normal or ingress move this phase, you must select this mode.
- Tactical Disembark:Otherwise, If that TRANSPORT remained stationary or has not yet been selected to move this phase, and if you can set up your unit as described below, you must select this mode.
- Combat Disembark:Otherwise, you must select this mode. Make a hazard roll for each model in your unit.
- Rapid Disembark:If that TRANSPORT made an ingress move this turn, each model must follow the same rules that TRANSPORT had to follow while resolving that move.
- Combat Disembark:Each model can be set up engaged with one or more enemy units that TRANSPORT is engaged with.
- Rapid Disembark:Until the end of the turn, your unit is not eligible to declare a charge.
- Tactical Disembark:Select your unit to make a normal or advance move.
- Combat Disembark:Your unit is battle-shocked and, until the end of the turn, it is not eligible to declare a charge.
EFFECT: Your unit is set up as described in Set Up (03.02).
BEFORE MOVING: Make a hazard roll for each model in your unit (06.03).
WHILE MOVING: Set up each model in your unit: (1) Wholly within the set-up distance of that TRANSPORT, and as close as possible to that TRANSPORT. OR: (2) If the above is not possible while remaining unengaged, set up that model wholly within the set-up distance of that TRANSPORT, as close as possible to that TRANSPORT, and engaged. Each model that still cannot be set up is destroyed.
AFTER MOVING: Your unit is battle-shocked and, until the end of the turn, it is not eligible to declare a charge.
EFFECT: Your unit can make one additional pile-in move, then fights as described in Making Attacks (04).
- It is engaged.
- It made a charge move this turn.
- It was selected to make an overrun fight this phase (12.06).
BEFORE MOVING: Select pile-in targets:
- If your unit is engaged, select every enemy unit it is engaged with.
- Otherwise, select one or more enemy units within 5" of your unit.
- Models in base-contact with one or more enemy models cannot be moved.
- Each model that is moved must end its move closer to the closest pile-in target, and engaged with it if possible.
- Your unit must be engaged.
- Each model that started this move engaged with an enemy unit must still be engaged with that enemy unit.
EFFECT: Your unit moves as described in Moving (03).
AFTER MOVING: Your unit must be more than 8" horizontally from all enemy units.
- The rule allowing this move type has been triggered.
- Your unit is not battle-shocked.
- Your unit is unengaged.
- Your unit has not moved this phase.
BEFORE MOVING: Select the closest enemy unit to be the surge target.
WHILE MOVING:
- Each model must end its move engaged with the surge target if possible.
- Each model that cannot end its move engaged with the surge target must end its move as close as possible to the surge target.
- Your unit cannot be engaged with one or more enemy units that were not the surge target.
- Your unit cannot move again this phase.
During Deployment: If a model is so large that its base cannot physically be set up wholly within your deployment zone, it must be set up so that it is touching your battlefield edge. During a turn in which such a large model is set up on the battlefield, that model’s unit cannot do any of the following:
- Make a normal/advance/fall-back/charge move.
- Make any attacks with ranged weapons.
From Strategic Reserves: If a model is so large that its base cannot physically be set up wholly within the distance required of the battlefield edge, it must be set up so that it is touching a battlefield edge. During a turn in which such a large model is set up on the battlefield (excluding AIRCRAFT models), that model’s unit cannot do any of the following:
- normal/advance/fall-back/charge move.
- Make any attacks with ranged weapons.
Disembarking from a Transport: When a unit disembarks from a TRANSPORT, it must be set up wholly within 3" of that model. If a disembarking model is so large that it is not possible to set it up wholly within 3" (typically because it is itself larger than 3" in all directions), set that model up with its base within 1" of that TRANSPORT’s base (or hull), and not engaged with any enemy units.
Many deadly weapons can inflict fatal injuries on any foe, no matter their resilience.
Each time an attack made with a [LETHAL HITS] weapon results in a critical hit, you can choose for that attack to automatically wound the target.EFFECT: Your unit shoots as described in Making Attacks (04).
WHILE SHOOTING:
- You can only target one visible enemy unit within 24" of your unit (and only if it is an eligible target).
- Each attack only hits on an unmodified hit roll of 6 (irrespective of the attacking weapon’s BS characteristic or any modifiers). Those hits are not critical hits.
- You cannot re-roll hit rolls.
|
FAQ
| Q: | My attack has a rule that means it results in a critical hit on a hit roll of 4+. Does this work when snap shooting? |
| A: | Unless otherwise stated, no: when snap shooting, each attack only hits on a roll of 6. |
| Q: | My attack has a rule that means it results in a critical hit on a hit roll of 4+, and I would otherwise need a 5+ to hit. Does a 4+ hit? |
| A: | Yes, except when snap shooting: when snap shooting, each attack only hits on a roll of 6. |
High-explosive rounds can fell several warriors in a single blast, but firing them too close to comrades is unwise.
Each time you gather attack dice for a [BLAST] weapon, add one additional attack dice for every five models that were in the target unit in the Select Targets step (rounding down).If this ability takes the form [BLAST X], each time you gather attack dice for such a weapon, add X additional attack dice for every five models that were in the target unit in the Select Targets step (rounding down) instead.
- Engaged and did not make an advance move this turn.
- Has one or more [CLOSE-QUARTERS] weapons or is a MONSTER/VEHICLE unit.
WHILE SHOOTING: Models in your unit can target enemy units your unit is engaged with.
- MONSTER/VEHICLE Models: Each time a MONSTER/VEHICLE model in your unit makes an attack:
- Unless that attack is made with a [CLOSE-QUARTERS] weapon and targets a unit your unit is engaged with, subtract 1 from the hit roll.
- If that attack is made with a [BLAST] weapon, it still cannot target a unit your unit is engaged with.
- Non-MONSTER/Non-VEHICLE Models: You can only select [CLOSE-QUARTERS] weapons to make attacks with and you can only select enemy units that are engaged with your unit as targets.
Weapons designed for close-quarters fighting can be wielded effectively even in the press of melee combat.
Units containing one or more models with a [CLOSE-QUARTERS] weapon can shoot using close-quarters shooting (10.06).When using another shooting type, for each model in that unit (excluding MONSTER/VEHICLE models), you can only select one of the following to make attacks with:
- One or more of its [CLOSE-QUARTERS] weapons.
- One or more of its other ranged weapons.
Some warriors ride to battle atop trusty mounts that gore and trample nearby foes. Others wield combat weapons that deliver a frenzy of additional blows.
Each time a unit containing one or more models with an [EXTRA ATTACKS] weapon fights, those models will make attacks with those weapons in addition to any others. In the Select Weapons step (04.01), for each of those models, you must select:- All of that model’s [EXTRA ATTACKS] weapons.
- One of that model’s other melee weapons, if possible.
Some of these profiles are known as Hunter profiles. Hunter profiles can only target units with the specified keywords.
Note that if a unit is equipped with more than one such weapon, a different profile can be selected for each model within that unit.
If any modifiers or abilities apply to an attack, those changes apply to the weapon making that attack until that unit’s attack sequence and all effects of those abilities (e.g. [Hazardous]) have been resolved.
Rules that apply to a weapon that modify rolls apply to the attacks made with that weapon.
Rules that are triggered when an attack is ‘allocated’ to a unit are triggered in step 1 of the Inflict Damage step (05.04).
In the Gather Attack Dice step, for each weapon that is splitting its attacks, only gather a number of attack dice for that weapon equal to the number of attacks you declared would be made against that target with that weapon.
When all of a model’s ranged weapons have shot, that model has shot.
When all models in a unit that are making ranged attacks have resolved all of those attacks, that unit has shot.
If a unit was selected to shoot and none of the models in it make any attacks, it has not shot.
When all of a model’s selected melee weapons have fought, that model has fought.
When all models in a unit that are making melee attacks have resolved all of those attacks, that unit has fought.
If a unit was selected to fight and none of the models in it make any attacks, it has not fought.
- That model has the INFANTRY/BEASTS/SWARM keyword and is within a terrain area.
- That model is not fully visible to the attacking model due to one or more intervening terrain features and/or one or more intervening obscuring terrain areas (see below).
Each time a ranged attack targets a unit that has the benefit of cover against it, worsen the BS characteristic of that attack by 1.
FAQ
| Q: | When my unit shoots at another unit, how does it work if some models in the target unit are fully visible to some models in my unit, while others are within a terrain area/not fully visible? |
| A: | For each attacking model in your unit, determine whether the target unit has the benefit of cover, as described in Terrain and Visibility. In this scenario, the target unit will likely have the benefit of cover against some of the attacking models, but not all. This means that, in an example unit where all attacking models are using the same weapon, when you get to the Resolve Attacks step of the Attack Sequence, you will collect dice for attacks made by models against which the target unit has the benefit of cover separately from the dice for attacks made by models against which the target unit does not have the benefit of cover. |
Precision attacks can pick high-value targets out in a crowd.
While resolving attacks made with one or more [PRECISION] weapons, at the start of the Allocation Order step (05.03), if the target unit contains one or more CHARACTER models visible to one or more of the attacking models, the active player can select one allocation group that contains one of those visible CHARACTER models. If they do, until those attacks are resolved, or until that CHARACTER group is destroyed (whichever happens first), that CHARACTER group is the current allocation group.EFFECT: Your unit shoots as described in Making Attacks (04).
WHILE SHOOTING:
- You can only target one visible enemy unit within 24" of your unit (and only if it is an eligible target).
- Each attack only hits on an unmodified hit roll of 6 (irrespective of the attacking weapon’s BS characteristic or any modifiers). Those hits are not critical hits.
- You cannot re-roll hit rolls.
The most potent weapons strike with such power that they make a mockery of armour and can cleave through several foes.
Each time an attack made with a [DEVASTATING WOUNDS] weapon results in a critical wound, the attack sequence for that attack ends and the target unit suffers a number of mortal wounds equal to the D characteristic of that weapon. These are inflicted after resolving any normal damage inflicted by those attacks.Mortal wounds inflicted by [DEVASTATING WOUNDS] weapons can damage a maximum of one model for each critical wound; any remaining mortal wounds inflicted by that attack are lost.
- If the target unit is an attached unit, use the highest T characteristic amongst bodyguard models in that unit that are on the battlefield.
- Use the highest T characteristic amongst models in that unit that are on the battlefield.
| ||||||||||||||||||||||||||||||
- Multiple Toughness Characteristics 05.02.01
Those models will stay on the battlefield until their unit is selected to attack and has attacked, or until the end of the phase (whichever comes first). Any rules triggered by those models being destroyed are resolved, and then those destroyed models are removed.
If a rule instructs a destroyed model to fight immediately after the attacking unit, instead that model is not removed from the battlefield until that model’s unit has fought, or until the end of the phase (whichever comes first). This allows the models in the unit to fight all at once, and stratagems that target that unit will also affect that destroyed model.
The hardiest warriors refuse to be laid low, even by wounds that should by all rights prove lethal.
This ability always takes the form Feel No Pain X+. Each time a model with this ability would lose a wound, roll one D6: on an X+, that wound is not lost.- Select Model: Select one model in the current allocation group (see below); this must be a model that has lost one or more wounds if possible.
- Check Save Roll: For each result, check if that attack inflicts damage or fails by matching the first condition below that applies:
Unmodified INFLICTS DAMAGE Invulnerable Save: The models in the current allocation group have an InSv characteristic, and the result is equal to or greater than that characteristic. FAILS Save and AP: After modifying the result by the attacking weapon’s AP characteristic, it is equal to or greater than the Sv characteristic of models in the current allocation group.
Example: An AP characteristic of -1 would modify a save roll of 3 to a 2. For models with a Sv characteristic of 2+ or better, that attack would fail.FAILS Any other result INFLICTS DAMAGE - Resolve Damage: If that attack inflicts damage, the selected model loses a number of wounds equal to that attack’s D characteristic. If this reduces that model’s remaining wounds to 0 or fewer, it is destroyed.
FAQ
| Q: | Fight On Death (05.04.05) requires models awaiting such an ability to stay on the battlefield until their unit has attacked (or until the end of the phase). How do these models function while this is the case? |
| A: | Models awaiting a Fight On Death ability are still present on the battlefield for all rules purposes. This includes (but is not limited to) the following regarding such models:
|
| Q: | In what step during the attack sequence do I roll for Feel No Pain? |
| A: | In the Resolve Damage step of the Inflict Damage step (05.04). |
When Modifying Characteristics
When modifying characteristics, unless otherwise stated, the following points also apply:- Characteristics of ‘-’, ‘*’ and ‘N/A’ can never be modified.
- Rules that modify a model’s WS and/or BS characteristic modify the WS and/or BS characteristic of every weapon equipped by that model.
- After all modifiers have been applied:
- M cannot be less than 1"".
- T cannot be less than 1.
- Sv cannot be 1+ or better.
- InSv cannot be 1+ or better.
- Ld cannot be 4+ (or better) or 9+ (or worse).
- OC cannot be less than 0 or ‘-’.
- Range characteristics cannot be less than 1".
- A cannot be less than 1.
- WS cannot be 1+ (or better) or 7+ (or worse).
- BS cannot be 1+ (or better) or 7+ (or worse).
- S cannot be less than 1.
- AP cannot be worse than 0.
- D cannot be less than 1.
- Improving WS, BS, Sv and Ld: When improving a WS, BS, Sv or Ld characteristic, subtract the appropriate amount from the number before the plus sign, e.g. improving a WS of 3+ by 1 would result in a WS of 2+.
- Worsening WS, BS, Sv and Ld: When worsening a WS, BS, Sv or Ld characteristic, add the appropriate amount to the number before the plus sign, e.g. worsening a WS of 3+ by 1 would result in a WS of 4+.
- Improving AP: When improving an Armour Penetration characteristic, subtract the appropriate amount from the characteristic, e.g. improving an AP of -1 by 1 would result in an AP of -2; improving an AP of 0 by 1 would result in an AP of -1.
- Reducing or Worsening AP: When reducing or worsening an Armour Penetration characteristic, add the appropriate amount to the characteristic, to a maximum of 0, e.g. reducing/worsening an AP of -1 by 1 would result in an AP of 0; reducing/worsening an AP of 0 by 1 would result in an AP of 0.
- Improving or Worsening Other Characteristics: When instructed to improve/worsen a characteristic that does not include a ‘+’ or ‘-’ symbol, add/subtract the specified amount to/from that characteristic (e.g. to improve a S by 1, add 1 to it).
When a player has to measure the distance to a destroyed unit, they measure to the last model destroyed in that unit.
Weapons powered by unstable and dangerous energy sources pose a substantial risk to the wielder and those that stand beside them.
Each time a unit is selected to shoot or selected to fight, after that unit has resolved all of its attacks, make a number of hazard rolls (06.03) for that unit equal to the number of [HAZARDOUS] weapons you selected in the Select Weapons step.When using these out-of-phase rules, you cannot use any other ‘phase-locked’ rules; that is, any other rule that explicitly states the phase in which that rule applies.
- Start of Battle Round/Turn/Phase: If a rule is triggered at the start of the battle round/turn/phase, it is triggered at the start of every battle round/turn/phase.
- The Turn/the Phase: If a rule is triggered during the turn/phase instead of during your turn/phase or your opponent’s turn/phase, it is triggered in both players’ turn/phase.
- If that roll succeeds, that unit does not become battle-shocked.
- If that roll fails, that unit, and each model in it, is battle-shocked.
While a unit is battle-shocked:
- The Objective Control (OC) characteristic of all of its models is modified to ‘-’ (02.02).
- Its controlling player cannot target that unit with stratagems (15).
- It is not eligible to start an action (16), and any action it has started cannot be completed.
- Battlefield Morale 01.07.01
- Battle-shock Test 01.07.02
FAQ
| Q: | If a unit has a rule that allows it to start an action when it is battle-shocked can it also continue doing that action if it becomes battle-shocked after starting an action? |
| A: | Yes |
| Q: | If a unit becomes battle-shocked after starting an action does it stop performing that action? |
| A: | Yes |
Sometimes a mode will be mandatory if applicable (e.g. consolidation modes, 12.08), but in the case of fall-back moves, ordered retreat is not mandatory, so you could select desperate escape instead.
Many move types state conditions you must meet while/after moving. Those that are labelled with a mode name only apply if you selected that mode; those not labelled with a mode name always apply.
EFFECT: Your unit shoots as described in Making Attacks (04).
AFTER SHOOTING: Until the end of the phase, your unit is not eligible to start an action.
- Unengaged and made an advance move this turn.
- Has one or more [ASSAULT] weapons.
WHILE SHOOTING: You can only select [ASSAULT] weapons to make attacks with.
AFTER SHOOTING: Until the end of the phase, your unit is not eligible to start an action.
- Unengaged and did not make an advance move this turn.
- Has one or more [INDIRECT FIRE] weapons.
WHILE SHOOTING:
- [INDIRECT FIRE] weapons in your unit can target units that are not visible to the attacking model.
- Each time an [INDIRECT FIRE] weapon makes an attack:
- The target has the benefit of cover against that attack (13.08).
- You cannot re-roll hit rolls.
- An unmodified hit roll of 1-5 fails, unless your unit remained stationary this turn and the target is visible to one or more friendly units, in which case an unmodified hit roll of 1-3 fails instead.
TARGET: That MONSTER/VEHICLE unit.
EFFECT: Resolve the following sequence:
- Select one enemy unit engaged with your unit.
- Select one model in your unit engaged with that enemy unit.
- Roll a number of D6 equal to the T characteristic of that model: for each 1, your unit suffers 1 mortal wound; for each 5+, that enemy unit suffers 1 mortal wound (to a maximum of 6 mortal wounds per unit).
Errata
Designer’s Note: Occasionally, all of a unit’s targets will be destroyed before they have had a chance to fight, with no other targets close enough to engage with a pile-in move. In such cases, a player can choose to pass and wait to see if another enemy unit ends a pile-in move close enough to be attacked later in the phase.
If a TRANSPORT model is destroyed, before removing it from the battlefield, the active player must make an emergency disembark move (see below) with each unit embarked within it.
- Persisting Rules Effects 01.02.02
- Hazard Rolls 06.03
- Rapid Disembark And Limitations 18.04.01
- Rapid/Tactical Disembark: 3"
- Combat Disembark: 6"
- Embarked within a TRANSPORT model that is on the battlefield.
- Did not embark within that TRANSPORT this phase.
- That TRANSPORT has not made an advance or fall-back move this phase.
BEFORE MOVING: Select disembark mode:
- Rapid Disembark:If that TRANSPORT made a normal or ingress move this phase, you must select this mode.
- Tactical Disembark:Otherwise, If that TRANSPORT remained stationary or has not yet been selected to move this phase, and if you can set up your unit as described below, you must select this mode.
- Combat Disembark:Otherwise, you must select this mode. Make a hazard roll for each model in your unit.
- Rapid Disembark:If that TRANSPORT made an ingress move this turn, each model must follow the same rules that TRANSPORT had to follow while resolving that move.
- Combat Disembark:Each model can be set up engaged with one or more enemy units that TRANSPORT is engaged with.
- Rapid Disembark:Until the end of the turn, your unit is not eligible to declare a charge.
- Tactical Disembark:Select your unit to make a normal or advance move.
- Combat Disembark:Your unit is battle-shocked and, until the end of the turn, it is not eligible to declare a charge.
EFFECT: Your unit is set up as described in Set Up (03.02).
BEFORE MOVING: Make a hazard roll for each model in your unit (06.03).
WHILE MOVING: Set up each model in your unit: (1) Wholly within the set-up distance of that TRANSPORT, and as close as possible to that TRANSPORT. OR: (2) If the above is not possible while remaining unengaged, set up that model wholly within the set-up distance of that TRANSPORT, as close as possible to that TRANSPORT, and engaged. Each model that still cannot be set up is destroyed.
AFTER MOVING: Your unit is battle-shocked and, until the end of the turn, it is not eligible to declare a charge.
- Embarked within a TRANSPORT on the battlefield
- Did not embark within that TRANSPORT this phase
- That TRANSPORT has not made an advance/fall-back move this phase
WHILE MOVING: Set up each model wholly within the set-up distance of that TRANSPORT.
- Embarked within a TRANSPORT on the battlefield
- Did not embark within that TRANSPORT this phase
WHILE MOVING: Set up each model wholly within the set-up distance of that TRANSPORT.
AFTER MOVING: Your unit is not eligible to declare a charge until the end of the turn.
FAQ
| Q: | If a unit makes any disembark move in a turn (i.e. Disembark move, Emergency Disembark move etc.) has it disembarked that turn? |
| A: | Yes. |
Examples: Buildings, ruins, armoured containers, woods.
Examples: Barricades, low walls, statuary.
Examples: Craters, razorwire, scattered debris.
- The attacking model is on a section of a terrain feature that is 3" or more in height.
- The attacking model has the TOWERING keyword and the target unit is within 12".
- That model has the INFANTRY/BEASTS/SWARM keyword and is within a terrain area that contains one or more light/dense terrain features.
- That model’s unit did not make one or more ranged attacks during this turn or during the previous turn.
Errata
TARGET: That unit.
EFFECT: That battle-shock roll is automatically successful.
RESTRICTIONS: You cannot use this stratagem more than once per battle.
- The CP cost of a stratagem use can never be modified below 0CP.
- If a rule modifies the CP cost of a stratagem when you use it, but does not specify a duration for that modifier, that modifier only applies to that usage of that stratagem.
- Your Opponent’s Stratagems: stratagems that your opponent uses are sometimes referred to as your opponent’s stratagems.
- Your Stratagems: stratagems that you use are sometimes referred to as your stratagems.
- Your Unit (in Stratagems): The term ‘your unit(s)’ in the Effect section of stratagems always relates to the unit(s) selected in the Target section of that stratagem, and never refers to any other units from your army.
TARGET: One friendly unengaged unit within 12" of one or more enemy units. You can only select a VEHICLE unit if it is a CHARACTER/WALKER unit.
EFFECT: Resolve a charge with your unit (11.02). While doing so, before making the charge roll, you must select one of the following modes:
- Leap to Defend: When selecting charge targets, you can only select enemy units that made a charge move this phase and are within the maximum distance.
- Into the Fray:
- When making the charge roll, if the result is greater than 6 (after modifiers), change it to 6.
- When selecting charge targets, you can select any enemy units that are within 6" of your unit and within the maximum distance.
Before the battle, in the Declare Battle Formations step, your units can start embarked within any friendly TRANSPORT model that has sufficient transport capacity remaining for the whole unit.
A friendly unit must be embarked within each friendly DEDICATED TRANSPORT model. At the end of this step, each friendly DEDICATED TRANSPORT model without an embarked unit is destroyed, but they do not trigger rules that are triggered when a model is destroyed.
When the bodyguard unit in an attached unit affected by such a rule is destroyed, all of those leader/support units remain a single unit for all rules purposes.
Certain weapons are the bane of particular foes.
This ability always takes the form [ANTI-X Y+]. Each time an attack is made with an [ANTI] weapon, if the target unit has the keyword denoted by X, an unmodified wound roll of Y+ is a critical wound.Some rules are linked to one or more keywords. For example, a rule might say that it applies to INFANTRY units. This means it only applies to units that have the INFANTRY keyword. Singular and plural instances of the same keyword function in the same way.
- Using Keywords & Mixed Keywords in Units 02.05.01
FAQ
| Q: | Do rules that affect a keyword include multi-word keywords that contain that keyword? For example, would rules that affect COMMISSAR units affect a unit that has the COMMISSAR GRAVES keyword? |
| A: | No. |
Assassins and other covert agents are difficult to pinpoint in the storm of battle.
Unless part of an attached unit, this unit is not visible to enemy models unless they are within 12" of this unit, and it cannot be targeted by [INDIRECT FIRE] weapons unless the attacking model is within 12" of this unit.If this ability takes the form Lone Operative X", unless part of an attached unit, this unit is not visible to enemy models unless they are within X" of this unit, and it cannot be targeted by [INDIRECT FIRE] weapons unless the attacking model is within X" of this unit.
Rapid fire weapons are capable of long-ranged precision shots or controlled bursts at nearby targets.
This ability always takes the form [RAPID FIRE X]. Each time you gather attack dice for a [RAPID FIRE] weapon, add X additional attack dice if the target unit was within half range of that weapon in the Select Targets step.Example: If a [RAPID FIRE 1] weapon with an A characteristic of 1 targets a unit that is within half range, you would gather one additional attack dice for that weapon (for a total of two for that weapon).
Coils of sparking wires, unstable propellant and throbbing power cells are just some of the extras which Flash Gitz rivet onto their snazzguns to kill the enemy in more over-the-top ways.
FLASH GITZ unit only. This unit’s Snazzgun weapons have [Rapid Fire 1].
Scouts form the vanguard of many armies. Unnoticed by the enemy, they range ahead of the main force.
This ability always takes the form Scouts X". In the Resolve Pre-battle Abilities step, if every model in a unit has this ability, you can do one of the following:- If that unit is in strategic reserves, you can set up that unit anywhere that is wholly within your deployment zone.
- If that unit is wholly within your deployment zone, it can make a scout move (see below).
- If that unit is embarked within a DEDICATED TRANSPORT that is wholly within your deployment zone, and if every model embarked within that DEDICATED TRANSPORT has the Scouts ability, that DEDICATED TRANSPORT can make a scout move.
EFFECT: Your unit moves as described in Moving (03).
AFTER MOVING: Your unit must be more than 8" horizontally from all enemy units.
From detonating ammo stores to corrosive innards or frenzied death throes, some targets are deadly even in defeat.
This ability always takes the form Deadly Demise X. Each time a model with this ability is destroyed, after the units embarked within it (if any) have made their emergency disembark moves, roll one D6. On a 6, that model suffers a deadly demise; each unit within 6" of that model suffers a number of mortal wounds denoted by X (if this is a random number, roll separately for each unit within 6").Heavy weapons are amongst the biggest guns on the battlefield, but require bracing to fire at full effect.
In your Shooting phase, each time an attack is made with a [HEAVY] weapon, add 1 to the hit roll if all of the following apply to the attacking unit:- That unit is unengaged.
- That unit was not set up on the battlefield this turn.
- No model in that unit has moved more than 3" this turn.
Some weapons possess a punishing rate of fire, or can land devastating flurries of blows, tearing the foe apart with relentless ferocity.
This ability always takes the form [SUSTAINED HITS X]. Each time an attack made with a [SUSTAINED HITS] weapon results in a critical hit, that attack results in a number of additional hits on the target as denoted by X.Example: If a rule instructs you to select a model from your army with the Deadly Demise ability, you could select a model with the Deadly Demise 1, Deadly Demise D3 or Deadly Demise D6 ability.
The stealthiest warriors can evade the attentions, and the bullets, of their foes.
If every model in a unit has this ability, each time a ranged attack targets that unit, that unit has the benefit of cover against that attack (13.08).If a unit has Lone Operative, but models in that unit have different range values for Lone Operative, the highest value amongst that unit’s models on the battlefield is applied to the whole unit.
If an attached unit below starting strength only contains models with Lone Operative, Lone Operative becomes active again.
Example: A CHARACTER with Lone Operative is attached to a bodyguard unit that has Lone Operative 15". Lone Operative 15" is therefore used for the whole unit.
Torrent weapons project clouds of fire, gas or other lethal substances that few foes can hope to evade.
Each time an attack is made with a [TORRENT] weapon, that attack automatically hits the target.Indirect fire weapons launch munitions over or around intervening obstacles – nowhere is safe from their fury.
Units containing one or more models with an [INDIRECT FIRE] weapon can shoot using indirect shooting (10.07).Mighty heroes fight at the forefront of battle.
Before the battle, in the Muster Armies step, for each leader and support unit in your army, you can select one friendly bodyguard unit that unit can lead. That unit will then lead that bodyguard unit for the battle and form an attached unit with it.Unless otherwise stated, each bodyguard unit can only have one leader unit and one support unit attached to it.
Mighty heroes fight at the forefront of battle.
Before the battle, in the Muster Armies step, for each leader and support unit in your army, you can select one friendly bodyguard unit that unit can lead. That unit will then lead that bodyguard unit for the battle and form an attached unit with it.Unless otherwise stated, each bodyguard unit can only have one leader unit and one support unit attached to it.
Unless otherwise stated:
- Only CHARACTER units can be given enhancements. If such a unit contains more than one model, select one CHARACTER model in that unit to have that enhancement.
- EPIC HEROES models cannot be given enhancements.
- Your army cannot include more than one of the same enhancement.
Upgrades: Some enhancements are tagged with ’Upgrade’. Unlike other enhancements:
- These can be given to non-CHARACTER units.
- You can include up to three of the same Upgrade in your army (the second and third instances of the same Upgrade do not count towards the total number of enhancements in your army, but you must still spend the stated points cost each time).
If you are playing an Incursion battle, you can select a 3DP detachment as your only detachment.