Nemesis Operatives
 01
01 Books
| Book | Kind | Edition | Version | Last update |
 Nemesis Operatives Nemesis Operatives | ||||
| Nemesis Operatives | Expansion | 3 | May 2026 | |
Nemesis Custom Builder
Each NEMESIS operative needs two blank datacards to record its rules. Download and print the blank datacards below, then begin creating your NEMESIS operative by completing the following steps.Blank Nemesis datacards:

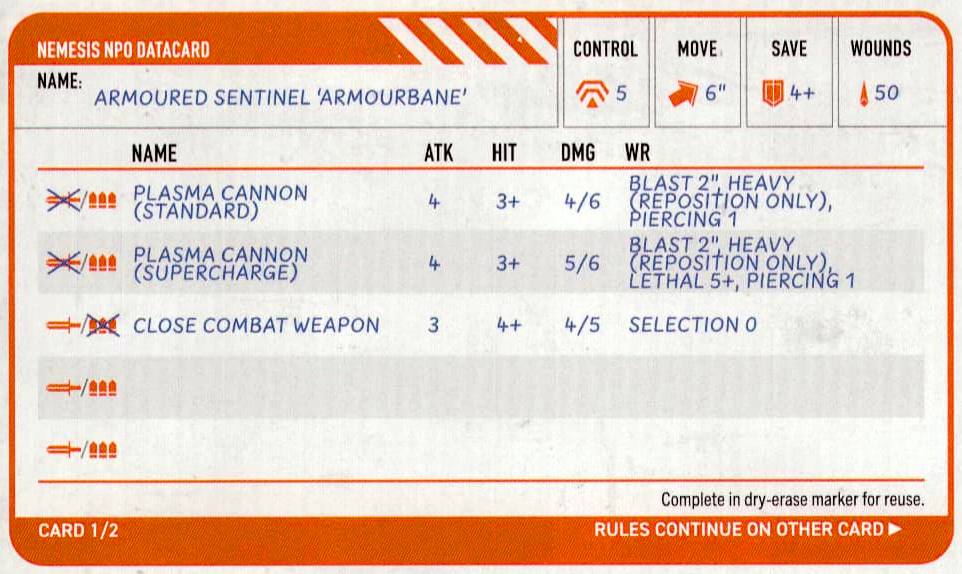
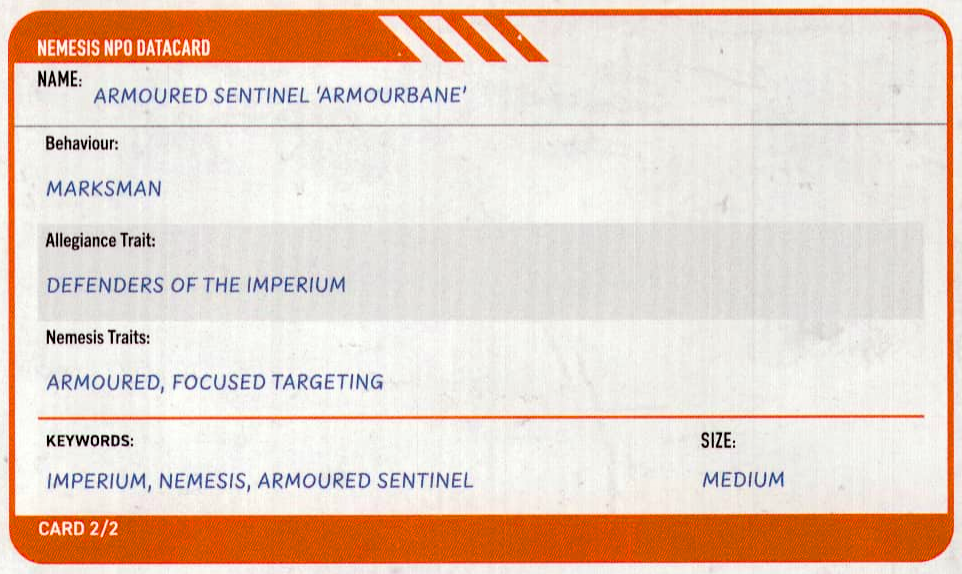
Example datacards: Armoured Sentinel ‘Armourbane’
1. Allegiance
Select one of the following allegiance keywords and add it to the operative’s datacard: AELDARI, CHAOS, IMPERIUM, LEAGUES OF VOTANN, NECRON, ORK, T’AU EMPIRE, TYRANID. Other operatives that don’t share that keyword cannot be used in the same kill team as it. Each NEMESIS operative has an allegiance trait determined by its allegiance keyword (see step 5).2. Size
The bigger the operative’s size, the bigger its base usually is. Unless the killzone map is designed for them, larger bases (in particular 100mm or more) can be awkward as there may be locations where the operative cannot be placed. Therefore, use your discretion when selecting the operative’s size and/or setting up the killzone for your battles. For example, close quarters killzones (e.g. Killzone: Tomb World) aren’t recommended for large NEMESIS operatives.
|
*Control is a new stat for NEMESIS operatives that’s used for the APL stat in all instances except spending action points. For example, use it for determining control of markers, and for rules that compare a dice result to the operative’s APL stat.
NEMESIS operatives can activate twice per turning point, but activation restrictions and action point limits vary depending on if it’s an NPO or player operative. This is detailed in the mission pack you are playing.
3. Behaviour (NPO Only)
BRAWLER
This NPO will move towards the enemy to fight them, but will seek cover on its way. When activated, if it’s a NEMESIS NPO or will perform the Fight or Charge action during that activation, give it an Engage order. Otherwise, give it a Conceal order.- Fight.
- Charge the closest player operative via the shortest possible route.
- Reposition towards the closest player operative, to cover if possible (a subsequent Dash action can fulfil this).
- Dash towards the closest player operative, to cover if possible.
MARKSMAN
This NPO will move to an ideal position to shoot the enemy. When activated, if it’s a NEMESIS NPO or will perform the Shoot action during that activation, give it an Engage order. Otherwise, give it a Conceal order.- Fall Back. If possible, to a location where there’s a valid target that isn’t obscured, if not, to a location that’s appropriate for the NPOs to better win the mission.
- Shoot.
- Reposition. If possible, to a location where there’s a valid target that isn’t obscured, if not, to a location that’s appropriate for the NPOs to better win the mission (a subsequent Dash action can fulfil these).
- Dash. If possible, to a location where there’s a valid target that isn’t obscured, if not, to a location that’s appropriate for the NPOs to better win the mission.
BATTLER
This NPO will move towards the enemy to fight them, but will seek cover on its way, and will shoot if the need arises. When activated, if it’s a NEMESIS NPO or will perform the Fight, Charge or Shoot action during that activation, give it an Engage order. Otherwise, give it a Conceal order.- Fight.
- Charge the closest player operative via the shortest possible route.
- Reposition towards the closest player operative, to cover if possible (a subsequent Dash action can fulfil this).
- Shoot.
- Dash towards the closest player operative, to cover if possible.
GUARDIAN
This NPO will shoot the enemy as a priority, but will fight if the need arises. When activated, if it’s a NEMESIS NPO or will perform the Fight, Charge or Shoot action during that activation, give it an Engage order. Otherwise, give it a Conceal order.- Fight.
- Shoot.
- Charge the closest player operative that’s within 4" of it via the shortest possible route.
- Reposition. If possible, to a location where there’s a valid target that isn’t obscured, if not, to a location that’s appropriate for the NPOs to better win the mission (a subsequent Dash action can fulfil these).
- Dash. If possible, to a location where there’s a valid target that isn’t obscured, if not, to a location that’s appropriate for the NPOs to better win the mission.
4. Weapons
|
|
5. Traits
AELDARI: Arrogant Superiority
CHAOS: Let the Galaxy Burn
IMPERIUM: Defenders of the Imperium
LEAGUES OF VOTANN: Acquisition at All Costs
NECRON: Living Metal
ORK: Waaagh!
T’AU EMPIRE: Supporting Fire
TYRANID: Will of the Hive Mind
Note that these rules are written from the perspective of the NEMESIS operative being friendly. If it’s being created as an enemy operative (e.g. an NPO), the rule should be used from the perspective of the NPOs, as determined by the threat principle.
| |||||||||||||||||||||||||||
| ||||||||||||||||||||||||||||||
6. Name Operative
Finally, choose a name for your operative, which is the name of the miniature it is or represents. You can also designate it a suitable moniker, tag or call sign, to evoke its background or (in)famous deeds.7. Core Rules
NEMESIS operatives are very different to normal operatives, therefore they have some important core rules to reflect this that can be found in this section. Note that when a NEMESIS is a player operative, it doesn’t gain a faction keyword. For example, it cannot be selected for your kill team’s faction rules that specify an operative with that faction keyword.EXTRA DEFENCE
Whenever an operative is shooting this operative, collect and roll one additional defence dice, unless this operative is injured.BULKY
- This operative cannot be placed on Vantage terrain higher than 2" from the killzone floor.
- Whenever this operative would perform the Fight action, the distance requirements of its control range can be changed to 1" horizontally and 4" vertically until the end of that action.
- This operative can move through other operatives (excluding NEMESIS operatives).
- Ignore all changes to this operative’s APL and if it’s a player operative, APL changes don’t affect the 5AP you can spend per turning point.
TOWERING SIZE
- In the Firefight phase, whenever you determine this operative’s order, you cannot select Conceal.
- This operative cannot be in cover or obscured by Light terrain, terrain parts less than 3" tall or terrain that’s not wholly intervening.
- Whenever another operative is performing the Shoot action, being within control range of other operatives doesn’t prevent this operative from being selected as a valid target. In other words, this operative can be shot while within control range of friendly operatives.
- This operative can move through terrain parts less than 2" tall. It cannot move through Accessible terrain (excluding hatchways) unless that terrain is also less than 2" tall.
- Whenever this operative would finish a move in a terrain feature less than 2" tall, temporarily remove that terrain feature from the killzone, then return it when this operative leaves that location; if it’s an equipment terrain feature, remove it from the battle instead.
Nemesis Operative Examples
Armoured Sentinel
- Allegiance: IMPERIUM as it will be fighting alongside a SPECTRE SQUAD kill team.
- Size: Medium, determining many of its starting stats and how many weapons it can have.
- Behaviour: Marksman, meaning it will forgo Fight actions in favour of Fall Back and Shoot actions.
- Weapons: Two weapon selections are permitted by its size. It’s modelled with a plasma cannon for its first selection, then its mechanical feet are chosen as a simple close combat weapon. As the melee weapon is Selection 0, it hasn’t used both of its weapon selection, which grants it an extra nemesis trait selection in the following step.
- Traits: As its allegiance is IMPERIUM, its allegiance trait is Defenders of the Imperium. Its first nemesis trait is Armoured, due to its armoured construction. The Focused Targeting rule is selected as its extra nemesis trait due to its targeting systems, such as the searchlight, and its propensity to lay down fire from an optimal position.
- Name: It’s given a name representative of the miniature and its notoriety among the elite of its regiment.
| ||||||||||||||||||||||||


|
 Plasma cannon (standard)
 Close combat weapon
XV8 Crisis Battlesuit
- Allegiance: T’AU EMPIRE as it will be fighting alongside an XV26 STEALTH BATTLESUIT kill team.
- Size: Small, determining many of its starting stats and how many weapons it can have.
- Behaviour: Marksman, meaning it will forgo Fight actions in favour of Fall Back and Shoot actions.
- Weapons: Two weapon selections are permitted by its size. It’s given a meltagun to represent its fusion blaster, and its fists are chosen as a simple close combat weapon. This melee weapon is Selection 0, so it still has a second weapon option available. As it’s modelled with two fusion blasters, its second weapon selection is the twinned weapon, giving its meltagun the Ceaseless weapon rule.
- Traits: As its allegiance is T’AU EMPIRE, its allegiance trait is Supporting Fire. Its nemesis trait is Shielded, representing advanced countermeasure technologies built into the battlesuit.
- Name: It’s given a name representative of the miniature, identifying the battlesuit’s pilot as a veteran warrior of the Fire caste.
| ||||||||||||||||||||||||
|
Screamer-killer
- Allegiance: TYRANID as it will be fighting alongside a RAVENER kill team.
- Size: Large, determining many of its starting stats and how many weapons it can have.
- Behaviour: Battler, meaning it will Fight and Charge whenever possible, but Shoot otherwise.
- Weapons: Three weapon selections are permitted by its size. It’s given a plasma cannon to represent its bio-plasmic scream, and scything talons are chosen as its melee weapon. Its third weapon selection is the paired weapon, adding 1 to the Atk stat of its scything talons.
- Traits: As its allegiance is TYRANID, its allegiance trait is Will of the Hive Mind. Its nemesis trait is Fury, appropriate due to its preference for violent melee combat.
- Name: It’s given a name representative of the miniature and its nightmarish reputation among those operatives who have encountered it.
| ||||||||||||||||||||||||
|
Redemptor Dreadnought
- Allegiance: IMPERIUM as it will be fighting alongside an ANGELS OF DEATH kill team.
- Size: Large, determining many of its starting stats and how many weapons it can have.
- Behaviour: Guardian, meaning it will Fight when required, but will prioritise the Shoot action whenever possible.
- Weapons: Three weapon selections are permitted by its size. It’s modelled with a heavy onslaught gatling cannon (which counts as two selections) and a power fist.
- Traits: As its allegiance is IMPERIUM, its allegiance trait is Defenders of the Imperium. Its nemesis trait is Implacable, fitting for an elite veteran of warfare.
- Name: It’s given a name representative of the miniature and its history with the chapter.
| ||||||||||||||||||||||||
|
Nemesis Operatives Mission Packs
This section contains four new mission packs that feature nemesis operatives for head-to-head, cooperative and solo games of Warhammer 40,000: Kill Team. This includes rules and missions for two infamous nemesis operatives: the Ambull and the Archivist.Mission Packs
First you must decide on your mission pack, determined by the type of game you want to play:- Joint Ops is for solo/cooperative games with and/or against a NEMESIS operative.
- Nemesis Ops is for head-to-head games where both players use a NEMESIS operative.
- The Ambull and the Archivist mission packs are specifically designed for those NEMESIS operatives. Both mission packs contain a Joint Ops and Adversary Ops mission. Adversary ops is for head-to-head games, but the NEMESIS operatives are a third party that can attack either player.
- With some house rules, you can use NEMESIS operatives in other mission packs (e.g. Approved Ops). NEMESIS operatives may need to be restricted from certain mission rules, so read through the mission first and do whatever feels right.
Each mission pack has a game sequence detailing how to set up and play the battle. The Joint Ops and Nemesis Ops mission packs each have an optional campaign to link your games together - the outcome of each game affects which mission you play next.
Create a Nemesis
When selecting operatives before the battle, you must also decide on the NEMESIS operative(s) to be used. The Nemesis Custom Builder section explains in detail how to create your own NEMESIS operative, in which you customise the operative’s rules as appropriate to fit a miniature of your choice. The Nemesis Operative Examples section gives some examples of pre-created NEMESIS operatives you can use instead of creating your own, or as a guide.Joint Ops Mission Pack
If you wish, one player can be the game master. They’ll manage the NPOs - move them, roll dice for them, etc. - while one or more other players control a kill team. The game master will still control the NPOs as the rules in this mission pack specify, they just take the pressure and decision-making away from the player(s) so they can focus on their own operatives and having fun!
Joint Ops Missions
The Joint Ops Missions section contains four missions. For a one-off game, you can randomly determine a mission, or select the one that interests you most. Alternatively, you can link the games together in a campaign. Begin with mission 01: Erosion of Power, then all subsequent missions are determined by the outcome of the previous one, as shown in the Campaign Progress Chart below. This diagram is just to give you an overview of the possible outcomes, so you don’t need to learn it all now - each mission will explain what to do next.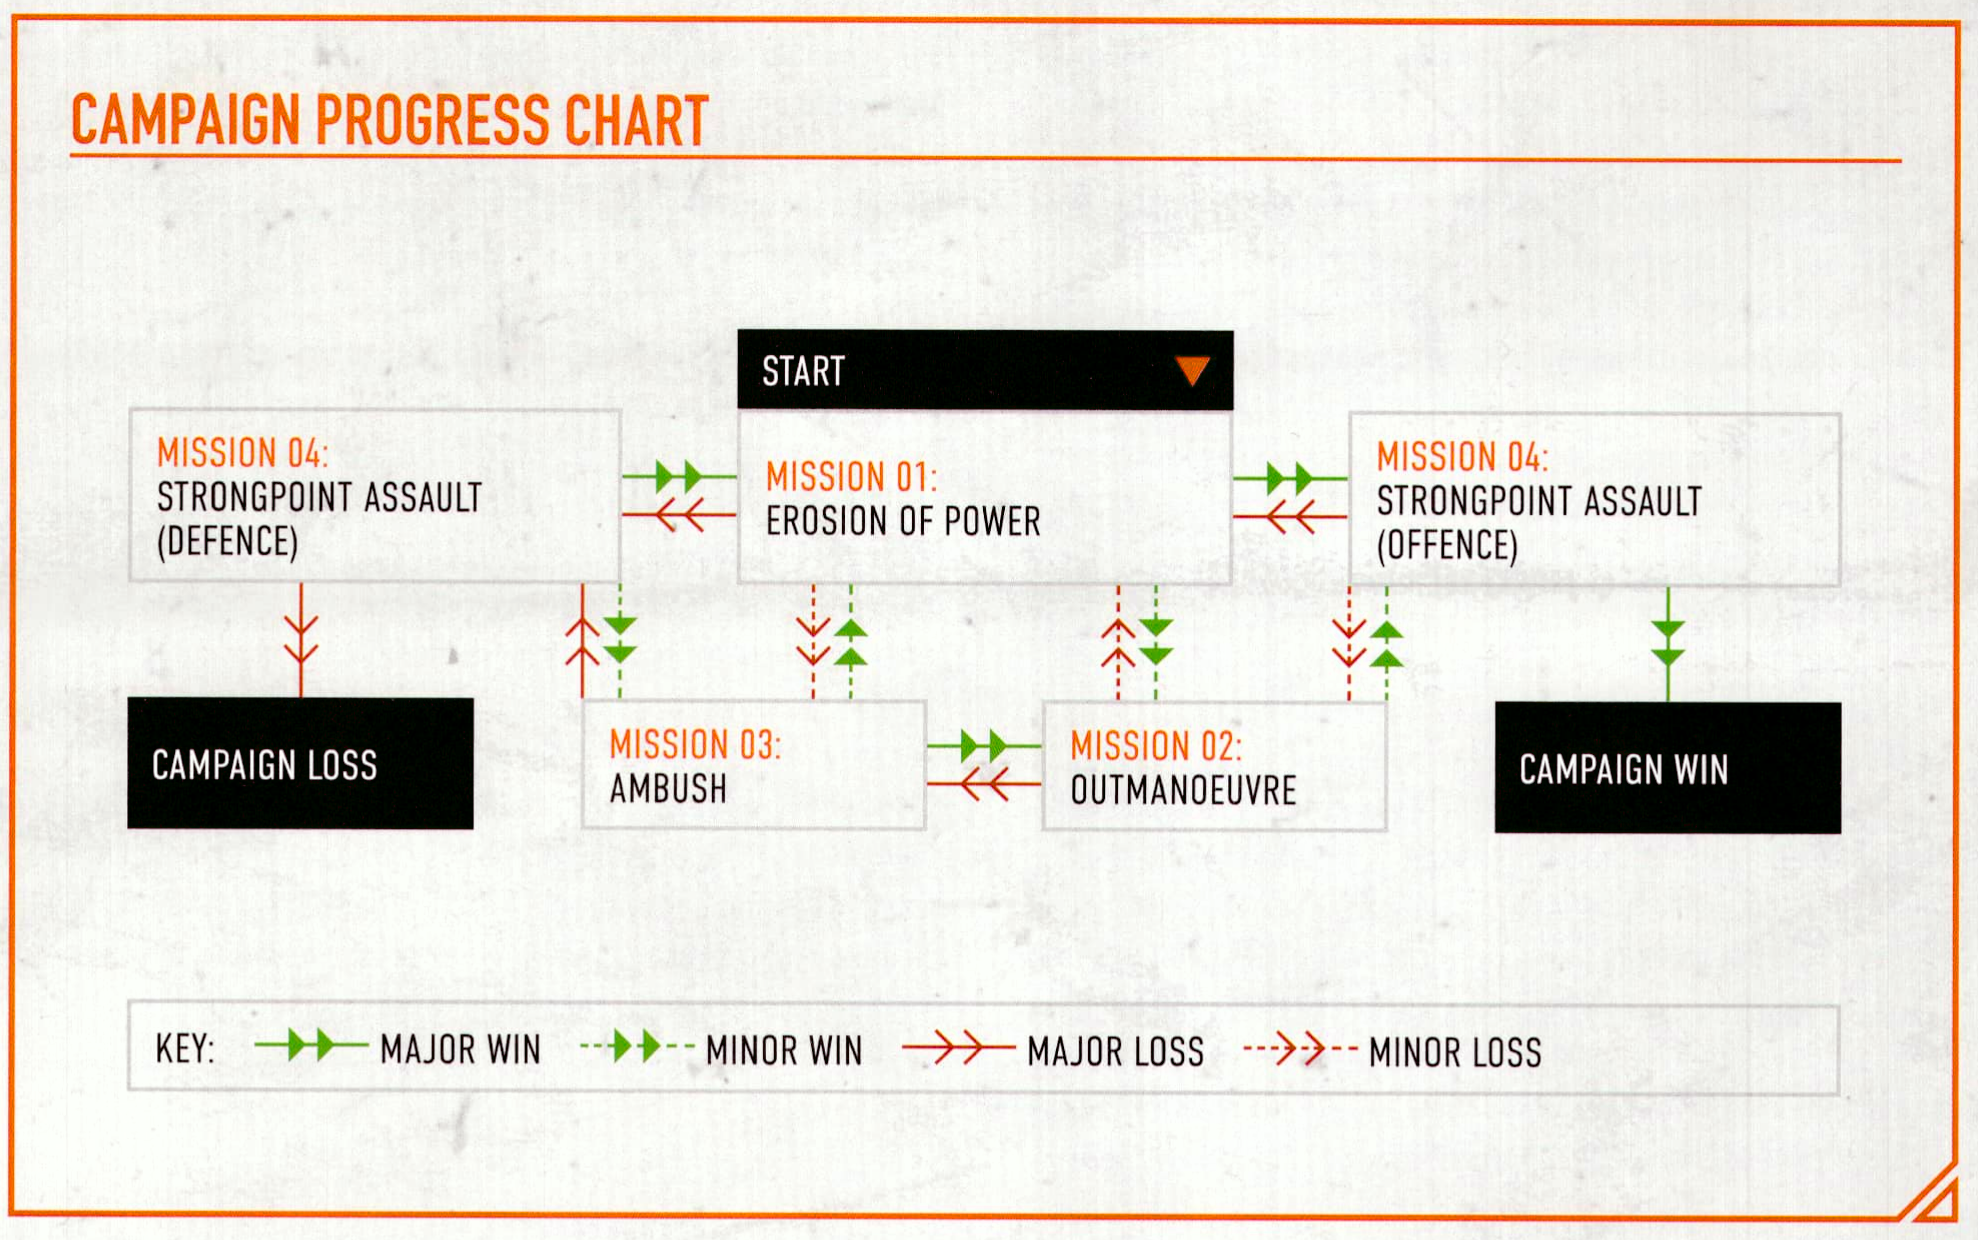
Joint Ops Kill Team Selection
The player(s) select one kill team. If the player(s) are using a NEMESIS operative, create it using the Nemesis Custom Builder, being mindful of its allegiance keyword and size; it must have the same allegiance keyword as your selected kill team (e.g. IMPERIUM, CHAOS, etc.). When selecting operatives, if the player(s) are using a NEMESIS operative, select a reduced number to accompany that operative as shown in the table below. The row you use is determined by the kill team’s normal starting number of operatives (i.e. excluding the NEMESIS operative), and the column you use is your NEMESIS operative’s size. If operatives count as a different number of selections (e.g. BROOD BROTHER MAGUS counting as two, or two PSYCHIC FAMILIAR operatives still counting as one), this also applies to this table.For example, when using a small NEMESIS operative, if the rest of the kill team is usually 10 operatives, 7 other operatives could be taken alongside that NEMESIS operative. These 7 must still fulfil the normal operative requirements for that team (e.g. weapon and operative limits), but the player(s) can select which three aren’t included (e.g. they could leave out a LEADER operative that’s usually required). Once you’ve selected your kill team and its operatives, if you are playing cooperatively, split the operatives between you.
| |||||||||||||||||||||||||||||||||||||||||||||||||
NPOs & Points Stats
Your kill team will fight against procedurally operated non-player operatives (known as NPOs). All NPOs, including a NEMESIS NPO if relevant, must have the same allegiance keyword. If the NPOs are using a NEMESIS operative, create it using the Nemesis Custom Builder, being mindful of its allegiance keyword and size. The other NPOs your kill team will fight against are more standard soldiers. As such, you don’t select a kill team or equipment for them. Instead, use the appropriate datacards for miniatures in your collection, found in the Nemesis Operatives card pack.Each NPO (excluding NEMESIS) has a Points stat on their datacard that’s used to determine how many NPOs are set up at the start of the battle. This amount depends on the NEMESIS NPO in the battle (if any), as specified in the Nemesis NPO Size table of each mission. For example, in mission 1, if the NPOs have a medium NEMESIS NPO, up to 8 points of NPOs must be set up before the battle.
Any unused points are saved in the NPO Reinforcements pool. NPO STRATEGIC GAMBITS and NPO activation cards (see below) will also add points to the NPO Reinforcements pool, then require you to set up NPOs using those points (remove points from the pool for operatives set up).
Strategy Phase
When rolling off to decide who has initiative, roll one dice for the NPOs and one dice for the player(s). If the NPOs win the roll-off, they’ll always choose to have initiative. NPOs don’t gain any CP, but do use STRATEGIC GAMBITS (as specified by the mission). NPOs will always pass after all their required STRATEGIC GAMBITS have been used.NPO Behaviour
Each NPO’s datacard has a behaviour that determines what they do, detailed on behaviour cards and repeated in Behaviour (NPO Only). Each behaviour will specify what order they have when activated. Whenever an NPO would perform an action, perform the first action it can do from its behaviour. If it cannot do any, it’s expended.NPO Activation Cards
This mission pack uses a deck of cards numbered 1-13 to determine NPO activation. Whenever it’s the NPOs’ turn to activate, draw a card from the deck and consult the NPO Activation Cards table on each mission to determine how to resolve it. Once you’ve resolved it, discard that card. If you draw a card but cannot activate the operative the table specifies, skip that NPO activation and alternate back to the player(s).NPOs cannot counteract in this mission pack, but whenever it’s the NPOs’ turn to activate, still draw a card from the deck (even if all NPOs are expended). This is because the activation card may have other rules effects, such as setting up reinforcements.
The NPO activation deck remains secret and cards are only revealed when drawn. However, player(s) can inspect the discard pile at any time to inform them of activation cards that remain in the deck. In the Ready step of each Strategy phase, and whenever you would draw a card from the deck but it’s empty, shuffle all NPO activation cards (including discarded ones) together to recreate the deck.
A deck of NPO activation cards are provided with this publication, but if you don’t have them, you can use those provided in Kill Team: Terror on Devlan, or substitute them with standard playing cards. Simply take all the cards from one suit and treat the following cards as numbers: Ace is 1, Jack is 11, Queen is 12 and King is 13.
Joint Ops Nemesis Activation
NEMESIS NPOs can be activated twice per turning point as a result of the NPO activation cards. Player(s) activate their friendly NEMESIS operative (if any) twice per turning point, but they cannot activate it a second time until all other friendly operatives are expended. Nemesis player operatives cannot move more than 12" per turning point and the player(s) cannot spend more than 5AP for it in total per turning point.Threat Principle
When making decisions for NPOs, use the threat principle: go with the option that’s worst for you. This can determine which ready NPO activates (if there are multiple options from the activation card), how an NPO moves, shoots and fights, how to resolve their dice, etc. There are a few examples below (containing decisions in order of priority) that you can use as a guide, but if one option feels worse for you - in particular to stop you winning the mission - go with that. If you still cannot decide, randomly choose one.Activation Priority
An NPO activation card requires a non-NEMESIS NPO to be activated, but multiple are ready, so the player(s) activate the NPO that:- Can perform the Shoot or Fight action (as determined by its behaviour), and is the most threatening to do so (e.g. is more likely to incapacitate a player operative, is more likely to prevent the player(s) winning, etc.).
- Is not in cover from a player operative.
- Is closer to a player operative.
Setting Up NPOs
NPOs must be set up as specified by the mission, but if there are multiple valid options, the player(s) set up each NPO so that it’s:- More likely to prevent the player(s) winning.
- Better able to perform the Charge, Shoot or Fight action (as determined by the higher priority of the NPO’s behaviour).
- In cover/not a valid target.
- Evenly spaced throughout the specified area and more than 2" from other operatives.
Fight Action
An NPO performs the Fight action and multiple player operatives are within its control range. It fights the player operative that:- It’s more likely to incapacitate.
- Is ready.
Shoot Action
An NPO performs the Shoot action and multiple player operatives are valid targets. It shoots the player operative that:Difficulty
If you want to increase or decrease the difficulty of the missions, here are a few methods:- Change the number of NPOs being set up. Start with one more (or less) points worth of NPOs, and whenever you add points to the NPO Reinforcements pool, add one more (or less).
- If you find a particular type of NPO more (or less) challenging, use a different type instead. For example, if NPOs have the IMPERIUM keyword and INTERCESSOR NPOs are proving difficult, use BATTLE SISTER and CADIAN SHOCK TROOPER NPOs instead.
- When drawing NPO activation cards, draw two and select the result that’s worse for you (or better).
Joint Ops Game Sequence
- Select a kill team as described in Joint Ops Kill Team Selection.
- Determine the mission as described in Joint Ops Missions.
- Set up the killzone and objective markers as specified by the mission map. The mission maps use Killzone: Volkus, but you can use a different killzone and set up terrain features similarly to what’s specified. Drop zones are assigned to the player(s) and NPOs as specified by the mission map.
- Create a NEMESIS operative for each side that’s using one, following the Nemesis Custom Builder. Remember, the allegiance keyword selected must be the same for all operatives on that side (e.g. IMPERIUM, CHAOS, etc.). The player(s) select their operatives for the battle, adhering to the selection requirements in their kill team’s rules. Note that if they’re using a NEMESIS operative, its size limits the number they can select.
- The player(s) select which NPO datacards they’ll be using. Remember, all NPOs must have the same allegiance keyword, matching the NEMESIS operative’s if they’re using one. The player(s) select up to four equipment options (four in total, not four per player). Each option cannot be selected more than once. Don’t select equipment for NPOs.
- The player(s) gain 2CP (two in total, not two per player). NPOs don’t gain any CP.
- The player(s) set up all their equipment that’s set up before the battle (ladders, etc.).
- The mission will specify how many points of NPOs to set up, and where. If any are set up before the battle, set them up now with a Conceal order.
- The player(s) then set up their operatives. Each operative must be set up wholly within their drop zone and must be given a Conceal order.
- If a NEMESIS operative is too large to be set up wholly within its drop zone, set it up with its base touching its killzone edge instead.
- In the first turning point, the player(s) have initiative.
- The battle ends when the mission specifies.
- The mission’s victory condition will specify how to determine whether it’s a win or a loss (major or minor if relevant) for the player(s). This then determines the next mission, as explained in the mission’s campaign progress chart.
Erosion of Power
Mission commanders have demanded a daring strike against the enemy’s supplies, with the intention of choking off their capacity to coordinate reinforcements. The target nexus sites, however - whether of communications, energy or materiel - are sure to be guarded by the foe’s most potent assets.
|
SABOTAGE NEXUS1AP
|
Discard pile (0)
No cards drawn.
Draw without replacement. Use New turning point in the Ready step; an empty deck reshuffles before the next draw. Progress is saved for this tab.
Whenever a player operative performs the Sabotage Nexus mission action, you score 1VP.
The result is determined by the total VP scored during the battle.
|
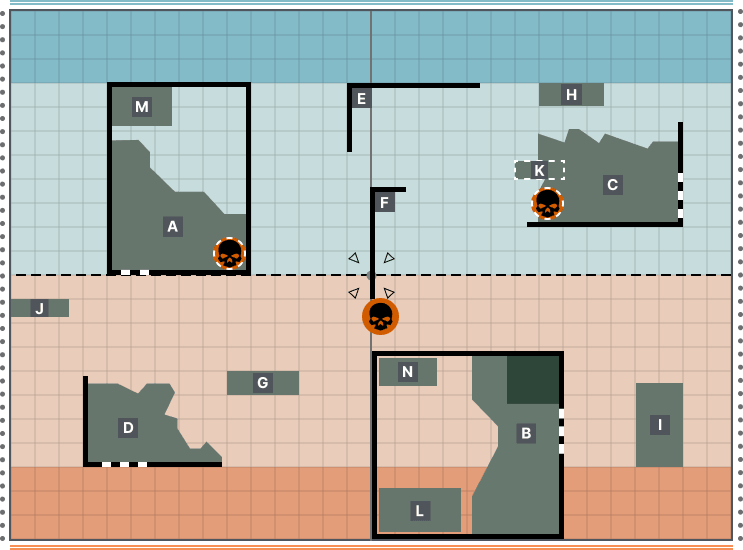
Outmanoeuvre
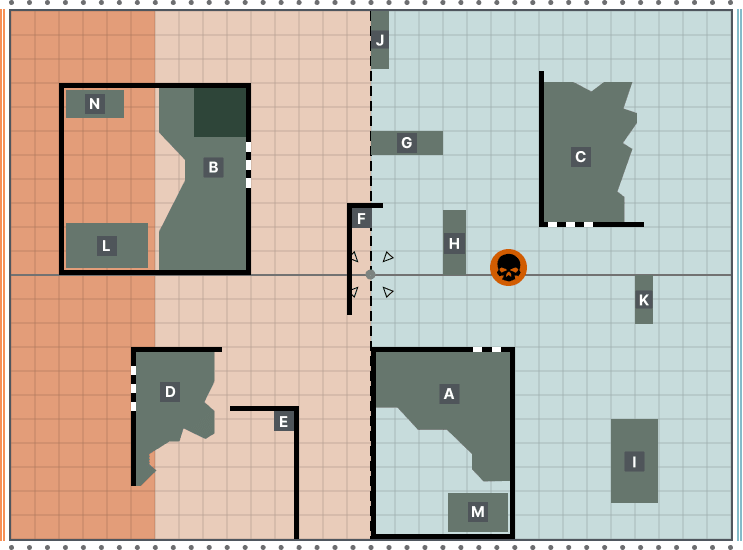
A pocket of the enemy is massing and full-scale encirclement cannot be deployed in time. Your operatives are called upon to strike in a bold, multipronged assault to utterly disrupt the foe’s escape route and seize ground for further offensives.
|
Outflank: As a STRATEGIC GAMBIT in the second turning point, the player(s) select a neutral killzone edge to also be the outflank edge. Remove the objective marker nearest to that killzone edge that’s within player territory from the killzone. Then, whenever an outflanking operative is activated, set that operative up with an order of your choice wholly within player territory with its base touching the outflank edge (it’s no longer outflanking). Then, continue its activation as normal.
|
Discard pile (0)
No cards drawn.
Draw without replacement. Use New turning point in the Ready step; an empty deck reshuffles before the next draw. Progress is saved for this tab.
The result is determined by the number of objective markers contested/controlled by player operatives at the end of the battle.
|
Ambush
In the wake of their primary mission, your operatives’ planned extraction is compromised as vengeful enemy forces converge on their position. A signals array provides the nearest location from which the kill team’s allies can be contacted to coordinate a new exit strategy, but the circling foe know this too.
|
Ambush Advantage: Whenever an NPO is shooting or fighting during the same turning point in which it was set up, its weapons have the Accurate 1 weapon rule.
COORDINATE EXTRACTION1AP
Escape: Once the escape edge has been determined, player operatives can move over that edge while wholly within NPO territory; if any part of their base does, they’re removed from the killzone and have escaped.
|
Discard pile (0)
No cards drawn.
Draw without replacement. Use New turning point in the Ready step; an empty deck reshuffles before the next draw. Progress is saved for this tab.
The result is determined by the number of player operatives that have escaped at the end of the battle.
|
Strongpoint Assault
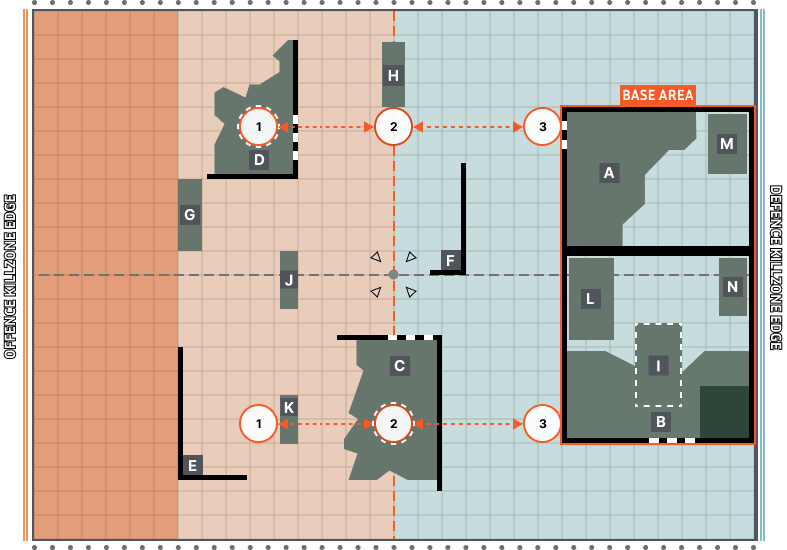
A fortified position is under threat. The aggressors have deployed two powerful weapons that can bring the defences down, but they must be ushered into the ideal position and protected as they are conveyed on these routes. The strongpoint’s defenders, however, will not allow them to do so unopposed.
|
Safeguard Munition Routes: There are two objective markers and they each start at a location marked 1 on the mission map. At the end of each turning point, if the Offence controls an objective marker, they can move that marker to the next location (i.e. from 1 to 2 or 2 to 3). If the Defence controls an objective marker, they can move that objective marker to the previous location (i.e. from 3 to 2 or 2 to 1).
Threat Principle: Whenever an NPO is performing an action in which it moves, contesting an objective marker that NPOs don’t control is a high priority (if possible) for the purposes of the threat principle.
|
Discard pile (0)
No cards drawn.
Draw without replacement. Use New turning point in the Ready step; an empty deck reshuffles before the next draw. Progress is saved for this tab.
|
Nemesis Ops Mission Pack
Nemesis Ops Missions
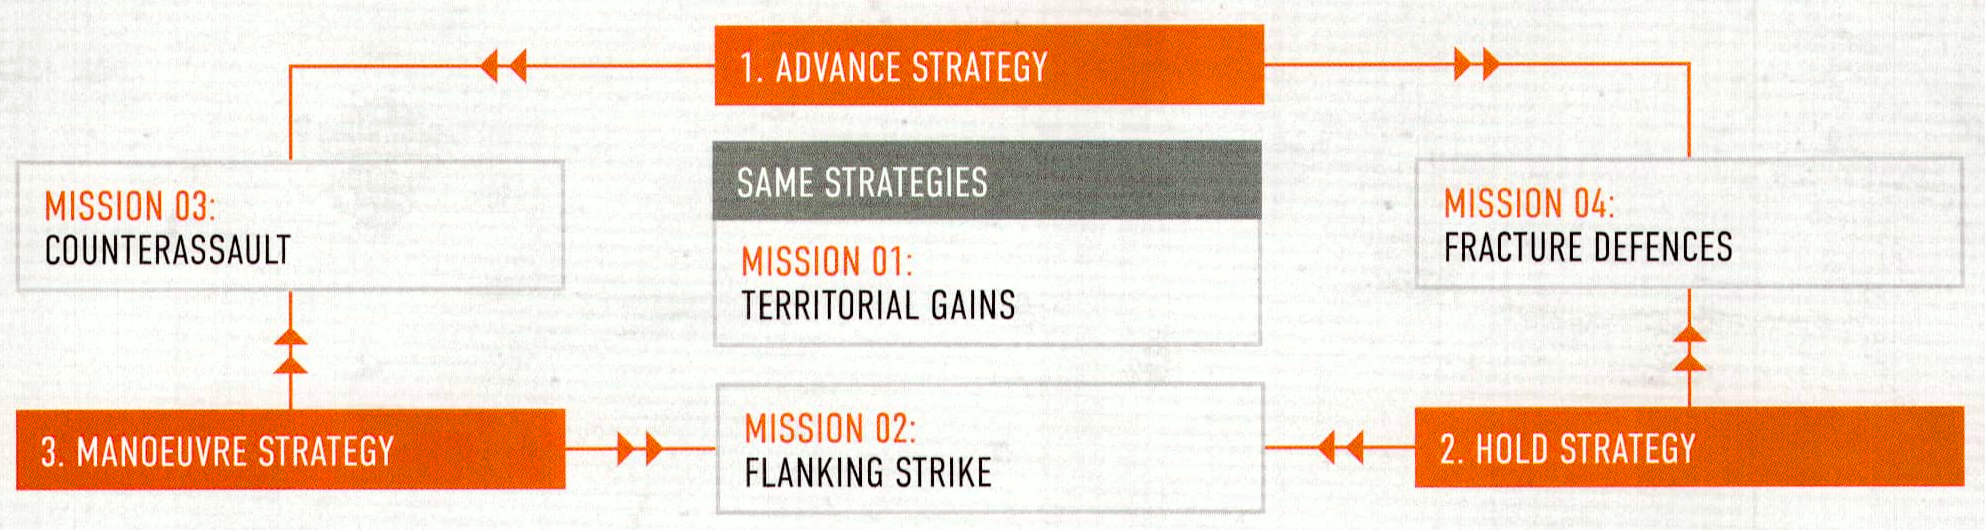
The Nemesis Ops Missions section contains four missions. Before the first game, each player puts a Strategy card face down, or puts a number of dice in their hand that corresponds to their selected strategy’s number. They then reveal their selections simultaneously. The mission is determined by the strategies selected, as shown in the chart below. The missions and their maps use the terms Advancing player, Holding player and Manoeuvring player, relating to the players who chose those strategies.- If the Advance (1) and Hold (2) strategies were selected, play mission 04: Fracture Defences.
- If the Hold (2) and Manoeuvre (3) strategies were selected, play mission 02: Flanking Strike.
- If the Manoeuvre (3) and Advance (1) strategies were selected, play mission 03: Counterassault.
- If the same strategies were selected, play mission 01: Territorial Gains.
You can link the games together in a campaign. If you do, for each subsequent game, repeat the above process for determining the mission. If a player lost the previous game, they must select and reveal their strategy first. The winner of the previous game can then use this information to select their strategy, however, they cannot select a strategy that would repeat the previous mission. The winner of the campaign is the first player to win three games.
Nemesis Ops Kill Team Selection
Each player selects one kill team. Each player must also create a NEMESIS operative using the Nemesis Custom Builder; be mindful of its size, and it must have the same allegiance keyword as your kill team (e.g. IMPERIUM, CHAOS, etc.). When selecting operatives for their kill team, each player must select a reduced number to accompany their NEMESIS operative, as shown in the table below. The row each player uses is determined by their kill team’s normal starting number of operatives (i.e. excluding the NEMESIS operative), and the column they use is their NEMESIS operative’s size. If operatives count as a different number of selections (e.g. BROOD BROTHER MAGUS counting as two, or two PSYCHIC FAMILIAR operatives still counting as one), this also applies to this table.For example, when using a small NEMESIS operative, if the rest of the kill team is usually 10 operatives, 7 other operatives could be taken alongside that NEMESIS operative. These 7 must still fulfil the normal operative requirements for that team (e.g. weapon and operative limits), but the player can select which three aren’t included (e.g. they could leave out a LEADER operative that’s usually required).
| |||||||||||||||||||||||||||||||||||||||||||||||||
Nemesis Ops Activation
Each player must activate their friendly NEMESIS operative twice per turning point, but they cannot activate it a second time until all other friendly operatives are expended. It cannot move more than 12" per turning point and each player cannot spend more than 5AP for it in total per turning point.Nemesis Ops Game Sequence
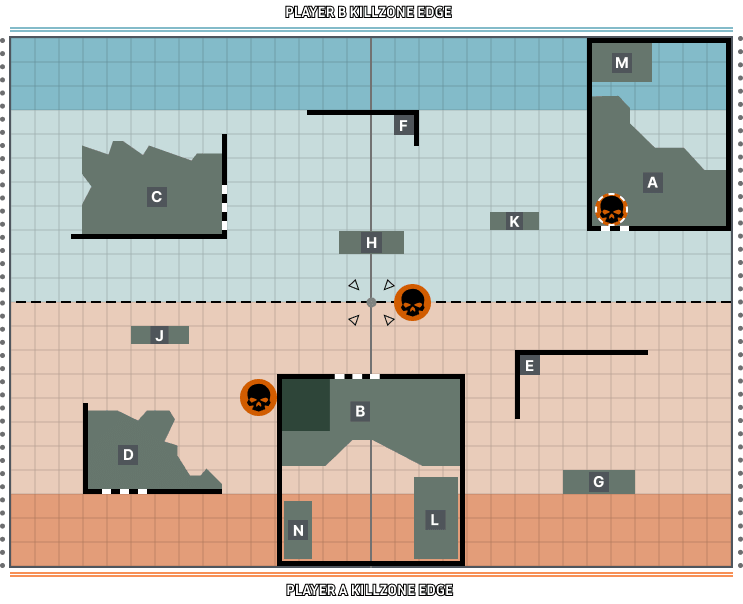
Territorial Gains
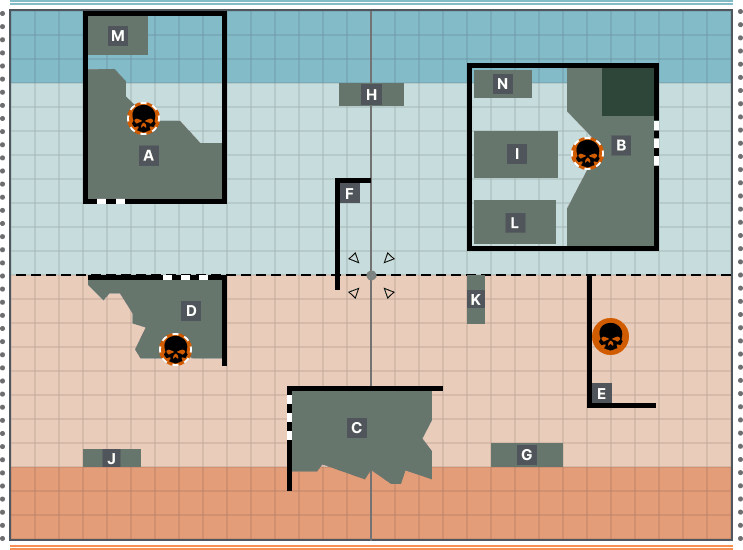
Ahead of advancing forces, operatives have been tasked with securing the route for an anticipated spearhead. These fringes of the foe’s territory are a dangerous frontier, where an elite enemy kill team prowls, but seizing this channel of attack can swing the battle’s momentum in moments.
Objective Markers: Don’t set up objective markers as normal (the mission map set up is an example only). After terrain features have been set up, the player without initiative sets up one objective marker on the centreline, equally between each player’s territory and more than 6" from the killzone edges. Then, starting with the player with initiative, each player sets up one objective marker wholly within their territory and more than 3" from their drop zone, the killzone edges and other objective markers. Each objective marker must be set up on the killzone floor.
SECURE1AP
At the end of the battle, if the enemy NEMESIS operative is incapacitated, you score 2VP; if it’s injured but not incapacitated, you score 1VP.
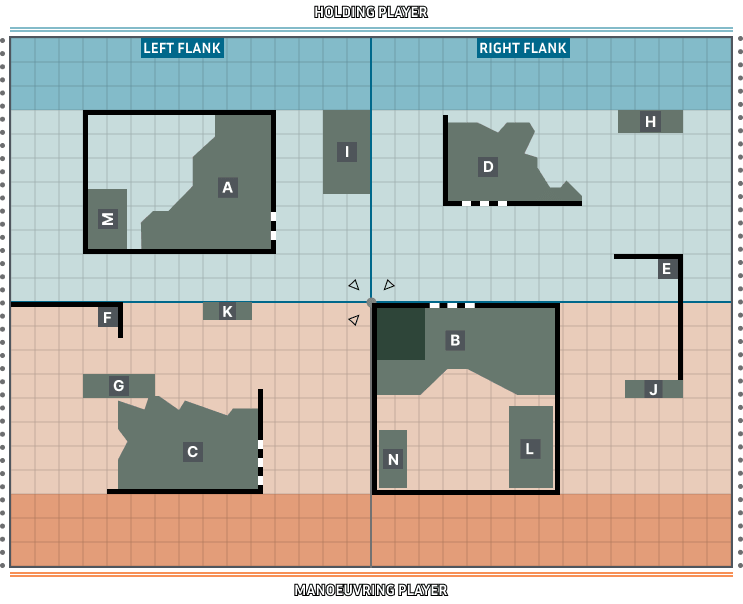
Flanking Strike
Entrenched in defensive positions, one force surveys the enemy operatives advancing from cover to cover. What at first appears to bear the hallmarks of a suicidal strike escalates rapidly, with the attackers’ reinforcements surging from the flanks to bypass the defenders’ firing lines.
If it’s the first turning point, expend it. If it’s the second turning point, set it up with an order of your choice wholly within Manoeuvring player territory with its base touching a neutral killzone edge (it’s no longer outflanking). Then, continue its activation as normal.
- For each flank friendly operatives control, you score 2VP.
- For each flank friendly operatives contest but don’t control, you score 1VP.
At the end of the battle, if the enemy NEMESIS operative is incapacitated, you score 2VP; if it’s injured but not incapacitated, you score 1VP.
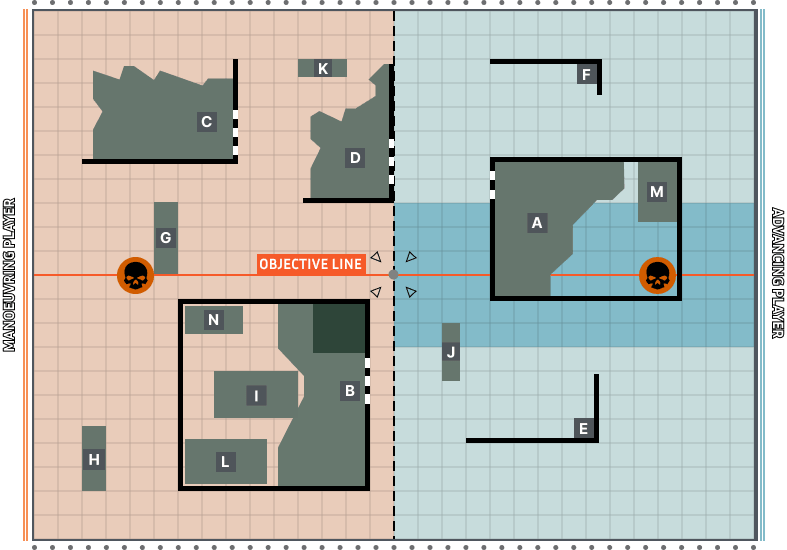
Counterassault
An aggressive push into enemy territory by an elite group of operatives and their looming ally is on the brink of puncturing the foe’s lines, but a counterassault has been prepared to tear the throat from the incursion. As the invaders push forwards, their hunters close in for the kill.
Reserve: When the Manoeuvring player is setting up their operatives before the battle, they cannot set up any in the killzone. They can set up any in reserve instead: place them to one side instead of in the killzone. Whenever an operative set up in reserve is activated, set it up with an order of your choice wholly within Manoeuvring player territory with its base touching a killzone edge, or the Manoeuvring player killzone edge if it’s a NEMESIS operative (it’s no longer in reserve). Then, continue its activation as normal.
SECURE1AP
For each objective marker secured by your kill team, you score 2VP. For each killzone quarter wholly within your opponent’s territory that friendly operatives control, you score 1VP.
At the end of the battle, if the enemy NEMESIS operative is incapacitated, you score 2VP; if it's injured but not incapacitated, you score 1VP.
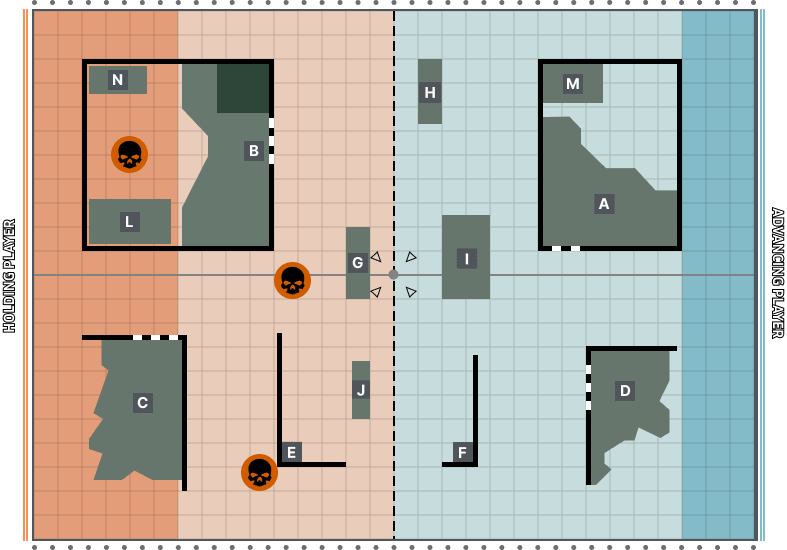
Fracture Defences
An enemy defensive point must be breached to break a stalemate in a grinding war of attrition. A kill team are tasked with escorting a powerful ally capable of ravaging the site, alert at all times to the foe’s own specialists who are rumoured to be hidden throughout this area.
Objective Markers: Don’t set up objective markers as normal (the mission map set up is an example only). After terrain features have been set up, the Holding player sets up three objective markers. One must be wholly within their drop zone, while the other two must be wholly within their territory and more than 2" from their drop zone. Each objective marker must be set up on the killzone floor, more than 2" from the killzone edges and more than 4" from each other.
Set it up with an order of your choice wholly within Advancing player territory with its base touching a killzone edge (it’s no longer in reserve); the operative is treated as performing the Dash action (spend the AP accordingly), then continue its activation as normal. Alternatively, expend it. Operatives in reserve at the end of the battle are incapacitated.
Besieged: In the Initiative step of each Strategy phase, the Advancing player can re-roll their initiative roll. At the end of each turning point after the third, if the Advancing player has friendly operatives within Holding player territory, they can roll one D6: on a 3+, the game continues for another turning point.
DEMOLISH1-3AP
At the end of the battle, if the enemy NEMESIS operative is incapacitated, you score 2VP; if it’s injured but not incapacitated, you score 1VP.
Ambull Mission Pack
The AMBULL and BOREWYRM INFESTATION operatives are NPOs, meaning you use the threat principle and behaviour rules for them as normal. The AMBULL NPO is also a NEMESIS operative; it has the Extra Defence and Bulky core NEMESIS rules, but it doesn’t have Towering Size. The AMBULL and the BOREWYRM INFESTATION NPOs both have the following additional rules:
Burrowing Emergence
In the Set Up Operatives step, the AMBULL and BOREWYRM INFESTATION NPOs are always set up in reserve: place them to one side instead of in the killzone (they cannot be activated while in reserve). They are set up in the killzone as determined by cards drawn from the Intruder deck (see Intruder Deck).Ambull NPO Activation Deck
The AMBULL and BOREWYRM INFESTATION NPOs use a deck of cards to determine their activations, but it only consists of NPO activation cards 1-8. Whenever it’s the Ambull NPO side’s turn to activate, if an AMBULL or BOREWYRM INFESTATION NPO is in the killzone, draw a card from the deck and consult the table below to determine how to resolve it. Once you’ve resolved it, discard that card. The AMBULL NPO can be activated twice per turning point, and BOREWYRM INFESTATION NPOs can be activated multiple times per turning point. If you draw a card but none of it can be resolved, simply skip that NPO activation. For example, if you draw an NPO activation card and you are instructed to activate a BOREWYRM INFESTATION NPO, but there’s only an AMBULL NPO in the killzone, discard that card and then the player(s)/next player activates.The NPO activation deck remains secret and cards are only revealed when drawn. However, players can inspect the discard pile at any time to inform them of activation cards that remain in the deck. In the Ready step of each Strategy phase, and whenever a card would be drawn from the deck but it’s empty, shuffle all NPO activation cards (including discarded ones) together to recreate the deck.
|
Discard pile (0)
No cards drawn.
Draw without replacement. Use New turning point in the Ready step; an empty deck reshuffles before the next draw. Progress is saved for this tab.
Intruder Deck
The remaining NPO activation cards (9-13) are used to create a separate Intruder deck. At the end of each turning point after the first, and whenever an operative finishes performing a mission action (excluding Operate Hatch), draw a card from the Intruder deck (unless it’s empty) and consult the table below to determine how to resolve it, then remove it from the game.
|
Removed cards (0)
No cards drawn.
Cards are removed from the battle when drawn. This deck does not reshuffle; reset only for a new battle. Progress is saved for this tab.
Ambull Game Sequence
- The mission will specify how many NPOs are set up and where. In both missions, the AMBULL and BOREWYRM INFESTATION NPOs are set up in reserve. If playing mission 1, Sentry NPOs are set up before the battle, so set them up now with a Conceal order. The player(s) then set up their operatives. Each operative must be set up wholly within their drop zone and must be given a Conceal order. If playing mission 2, each player alternates setting up one third of their kill team (rounding up), starting with the player with initiative.
Ambull and Borewyrm Infestation
 6"
6" 4
4 35
35NAME | ATK | HIT | DMG | WR | ||||
| Enormous claws | ||||||||
| Enormous claws | 5 | 3+ | 4/5 | Brutal, Ceaseless, Rending | Brutal, Ceaseless, Rending | |||
|
NEMESIS, AMBULL
|
SIZE: SMALL | ⌀50mm |
 1
1NAME | ATK | HIT | DMG | WR | ||||
| Vicious jaws | ||||||||
| Vicious jaws | 3 | 4+ | 3/4 | Rending | Rending | |||
|
BOREWYRM INFESTATION
|
⌀25mm |
The Hidden Enemy
After infiltrating an enemy-held location, your elite operatives now have orders to identify and eliminate key infrastructure assets, then to escape before the foe’s reinforcements can hunt them down. Unbeknownst to both forces, a lurking apex predator has sensed them as potential prey.
Player Order: Whenever you would determine initiative, establish an order instead. Roll one D6 separately for the player(s) and each NPO side. The side with the highest result is first, the side with the second highest result is second, and so on. If two or more sides are tied, keep rolling for them until an order is established between them. Activate in the Firefight phase in side order, starting with the side that’s first.
NPO Reinforcements: As a Sentry NPO STRATEGIC GAMBIT in each turning point after the first, add D3 points to the NPO Reinforcements pool, then set up NPO reinforcements from that pool. Each reinforcement must be set up ready with a Conceal order with its base touching the NPO killzone edge.
Escape: Player operatives can move over the player killzone edge; if any part of their base does, they’re removed from the killzone and have escaped.
Player operatives can perform the following mission action:
ELIMINATE ASSETS1AP
The battle ends when all player operatives have escaped or been incapacitated. VP is then scored as follows:
- For each objective marker that’s been removed from the killzone, the player(s) score 1VP. For each that hasn’t, the NPOs collectively score 1VP.
- For each third of the player(s)’ starting operatives that are incapacitated, the NPOs collectively score 1VP.
At the end of the battle, if the player(s) have scored more VP than the NPOs collectively, the player(s) win. If the NPOs collectively have scored more VP than the player(s), the player(s) lose. If the scores are tied, it’s a draw.
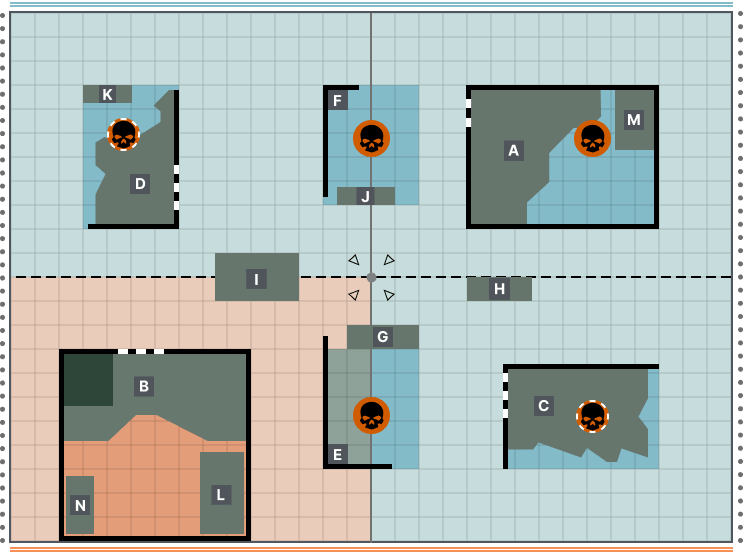
Decaying Generatorium
Within a ruptured generatorium on the brink of catastrophic overload, two kill teams race to salvage vital power cells and deny them from their foes before the installation becomes irradiated. But time is not the only factor; the imminent meltdown has been caused by a feeding intruder, and it is still here.
Modified Threat Principle: Whenever an NPO performs an action, the closest visible player operative it could fight/move towards (as determined by the NPO’s behaviour) is its target (or simply the closest if none are visible). If multiple players’ operatives are equally as close to the NPO, roll-off and the winner decides which operative is its target. The opponent of the player who controls that target will control the NPO for that action, and they must make every effort to charge/fight that target (as determined by the NPO’s behaviour) if the NPO can, and move as specified in the Drawn to Energy rule if it cannot.
Sickening Emissions: Whenever a friendly player operative has an objective marker within its control range, you cannot re-roll their attack or defence dice.
Player operatives can perform the following mission action:
SIPHON POWER1AP
At the end of the fourth turning point, the battle ends and the player with the most VP is the winner. If the players are tied, it’s a draw.
Whenever a friendly operative performs the Siphon Power mission action, you score 1VP (to a maximum of 2VP per turning point).
If a friendly operative incapacitates the AMBULL NPO, you score 2VP.
Whenever a BOREWYRM INFESTATION NPO is incapacitated, place a Borewyrm marker underneath the centre of its base. Player operatives can perform the Pick Up Marker action on Borewyrm markers. At the end of the battle, you score 1VP for each Borewyrm marker friendly operatives are carrying.
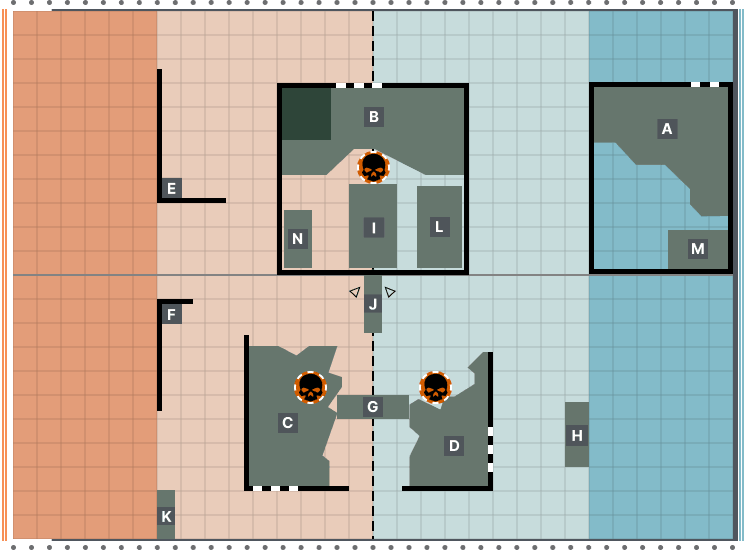
The Archivist Mission Pack
The Archivist NPO Activation Deck
The ARCHIVIST NPO uses a deck of cards to determine NPO activation. Whenever it’s the ARCHIVIST NPO’s turn to activate, draw a card from the deck and consult the NPO Activation Cards table on each mission to determine how to resolve it. Once you’ve resolved it, discard that card. The ARCHIVIST NPO can be activated twice per turning point. If you draw a card but none of it can be resolved, simply skip that NPO activation. For example, if you draw an NPO activation card and you are instructed to activate a non-ARCHIVIST NPO, but there are no ready non-ARCHIVIST NPOs to activate, discard that card and then the player(s)/next player activates. NPOs cannot counteract in this mission pack, but whenever it’s the NPOs’ turn to activate, still draw a card from the deck (even if all NPOs are expended). This is because the activation card may have other rules effects, such as setting up reinforcements.The NPO activation deck remains secret and cards are only revealed when drawn. However, players can inspect the discard pile at any time to inform them of activation cards that remain in the deck. In the Ready step of each Strategy phase, and whenever a card would be drawn from the deck but it’s empty, shuffle all NPO activation cards (including discarded ones) together to recreate the deck.
The Archivist Datacard
NAME | ATK | HIT | DMG | WR | ||||
| Atomic disassembler | ||||||||
| Atomic disassembler | 5 | 4+ | 4/2 | Range 8", Devastating 3, Piercing 2 | Range 8", Devastating 3, Piercing 2 | |||
| Eradicator glove | ||||||||
| Eradicator glove | 4 | 4+ | 5/7 | Brutal, Shock, Stun | Brutal, Shock, Stun | |||
- Fight.
- Shoot the closest player operative.
- Charge the closest operative with less than 10 wounds remaining.
- Reposition towards the closest player operative, to cover if possible (a subsequent Dash action can fulfil this).
- Shoot the closest NPO.
- Dash towards the closest player operative, to cover if possible.
- Ignore the Piercing weapon rule.
- Normal and Critical Dmg of 4 or more inflicts 1 less damage on this operative.
- This NPO can benefit from the effects of the Extra Defence core rule regardless of being injured (this takes precedence over that rule).
|
NEMESIS, ARCHIVIST
|
SIZE: SMALL | ⌀50mm |
The Archivist Game Sequence
- Determine the mission between 1: Betrayal (Joint Ops) or 2: Negotiation (Adversary Ops).
- If playing mission 1, select a kill team for the player(s) as described in Joint Ops Kill Team Selection. If playing mission 2, each player selects their own kill team. If playing mission 2, roll-off - the winner decides who has initiative. Set up the killzone and objective markers (if any) as specified by the mission map. The mission map for mission 1 uses Killzone: Tomb World, and the mission map for mission 2 uses Killzone: Volkus, but you can use a different killzone and set up terrain features similarly to what’s specified. Set up mission markers (if any) as specified by the mission rules. Drop zones are assigned to the player(s) and NPOs as specified by the mission map. If playing mission 2, the player with initiative selects one drop zone, and their opponent has the other.
- If playing mission 1, the player(s) gain 2CP (two in total, not two per player). If playing mission 2, each player gains 2CP. NPOs don’t gain any CP.
- The player(s) then set up their operatives. Each operative must be set up wholly within their drop zone and must be given a Conceal order. If playing mission 2, each player alternates setting up one third of their kill team (rounding up), starting with the player with initiative.
Betrayal
The Archivist has aligned itself with your elite operatives in a joint venture to seize a cache of artefacts from a fortified vault. Yet, while the alien data trader is a knowledgeable and powerful ally against enemy combatants, experienced warriors will be wary of its fluid loyalties where xenotech is involved.
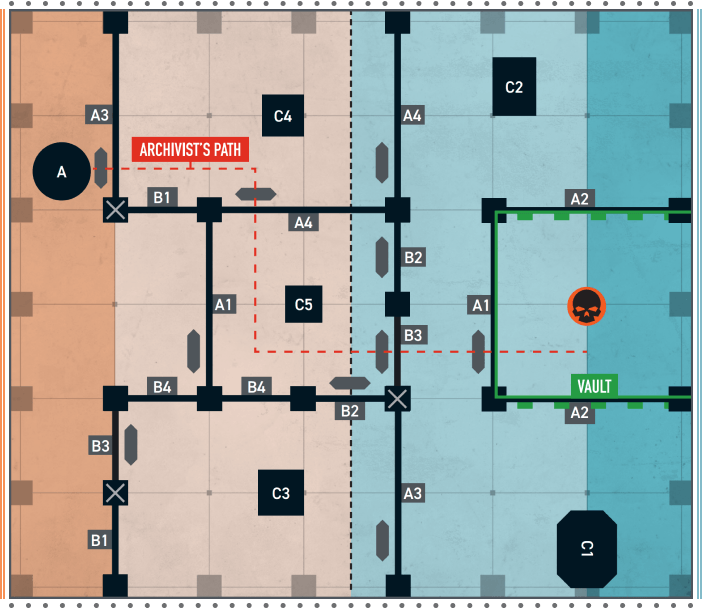
Archivist’s Path: Set up the ARCHIVIST wholly within the player drop zone at the point marked ‘A’ at the start of the Archivist’s Path (see mission map). It starts the battle as a friendly player operative. Whenever the ARCHIVIST player operative is activated, it must move along the Archivist’s Path towards the Vault, but all other decisions are made by the player(s). Once the ARCHIVIST becomes an NPO, it follows its behaviour and moves without following the Archivist’s Path.
Xenotech Vault: Operatives cannot be set up within the Vault while the hatchway to the Vault is closed. Player operatives can perform the Pick Up Marker action on the objective marker within the Vault. While a player operative is carrying that marker, it cannot be removed from the killzone and set up again, and it cannot perform the Dash action.
- 1 if two or more player operatives are closer to the player killzone edge than the ARCHIVIST player operative is.
- 1 if it’s the third or fourth turning point.
- 2 if the objective marker is being carried by a player operative.
On a 7+, or if it’s the fifth turning point, the ARCHIVIST becomes an NPO and follows its behaviour. It’s no longer a player operative for the remainder of the battle. The ARCHIVIST NPO is an enemy operative to all other operatives (and vice versa) meaning other NPOs will try to incapacitate it, and it will try to incapacitate both other NPOs and player operatives.
Threat Principle: Whenever the ARCHIVIST NPO is performing an action in which it moves, moving closer to the objective marker is a high priority (if possible) for the purposes of the threat principle.
|
Discard pile (0)
No cards drawn.
Draw without replacement. Use New turning point in the Ready step; an empty deck reshuffles before the next draw. Progress is saved for this tab.
At the end of the battle, if a player operative is carrying the objective marker and is in player territory, the player(s) win.
At the end of the battle, if the ARCHIVIST NPO is contesting the objective marker, or the objective marker isn’t within player territory, the player(s) lose.
Negotiation
Ever the manipulator, the Archivist has leveraged the resources of a kill team to seize infocores from a derelict vessel. Others are hunting the data-rich cores too, however, and the Archivist masterfully plays both sides, seeking to ensure none have the strength to stop it claiming both hauls.
Infocore Extraction: Player operatives (excluding ARCHIVIST) can perform the Pick Up Marker action on the Infocore mission markers, and operatives with an APL stat of 3 or more (excluding all changes) can carry two Infocore mission markers at a time. At the end of each turning point, each player gains a number of Negotiation points equal to the number of Infocore mission markers enemy operatives control.
Negotiation: Each time the ARCHIVIST NPO would activate as a result of its NPO activation deck, each player must secretly bid any number of their own Negotiation points (that number can be 0) by putting a number of dice in their hand that corresponds to the number of Negotiation points they want to bid. They then reveal their selections simultaneously. If one player has a higher bid, that player spends the Negotiation points they bid, then controls the ARCHIVIST as a friendly player operative for the duration of that activation. If neither player bid a higher number of Negotiation points, the ARCHIVIST remains an NPO, activates as normal and follows its behaviours.
Modified Threat Principle: Whenever the ARCHIVIST NPO performs an action, the closest player operative within its control range is its target. If no operatives are within its control range, the closest visible player operative controlling an Infocore mission marker it could fight/shoot/move towards (as determined by the NPO’s behaviour) is its target (or simply the closest if none are visible). If multiple operatives that meet the conditions to be the target are equally as close to the ARCHIVIST NPO, roll-off and the winner decides which operative is its target. The opponent of the player who controls that target will control the ARCHIVIST NPO for that action, and they must make every effort to fight/shoot/move towards that target (as determined by the NPO’s behaviour) while doing so. If no player operatives control an Infocore mission marker and no player is controlling the ARCHIVIST, skip the activation and discard that NPO activation card.
|
Discard pile (0)
No cards drawn.
Draw without replacement. Use New turning point in the Ready step; an empty deck reshuffles before the next draw. Progress is saved for this tab.
If a friendly operative incapacitates the ARCHIVIST operative, you score 1VP.
At the end of the battle, for each Infocore mission marker friendly operatives control, you score 1VP.
Mission Map Key
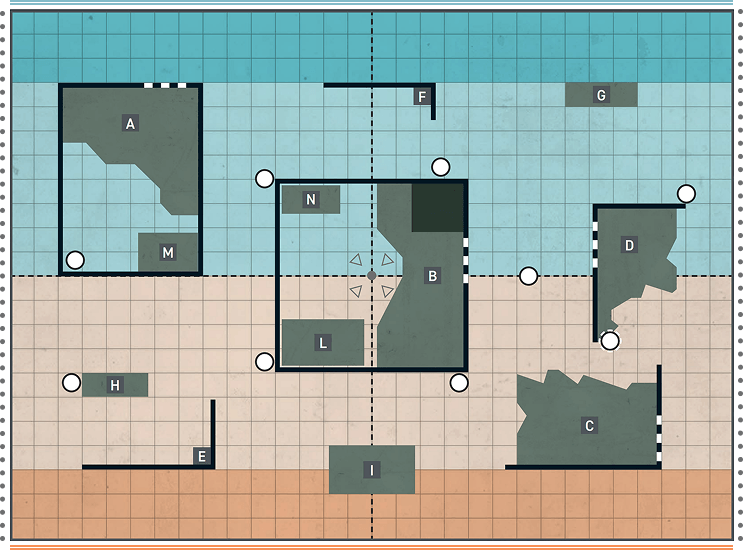
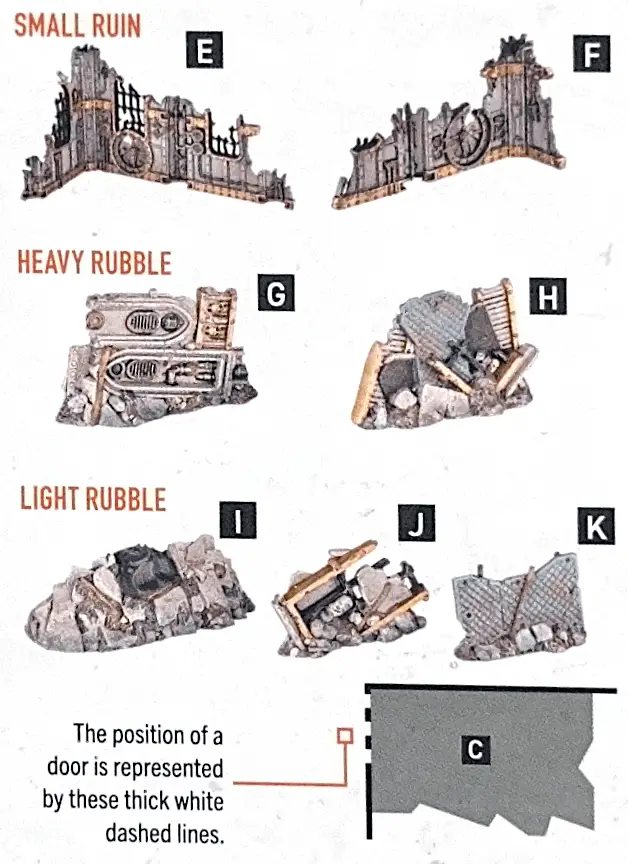
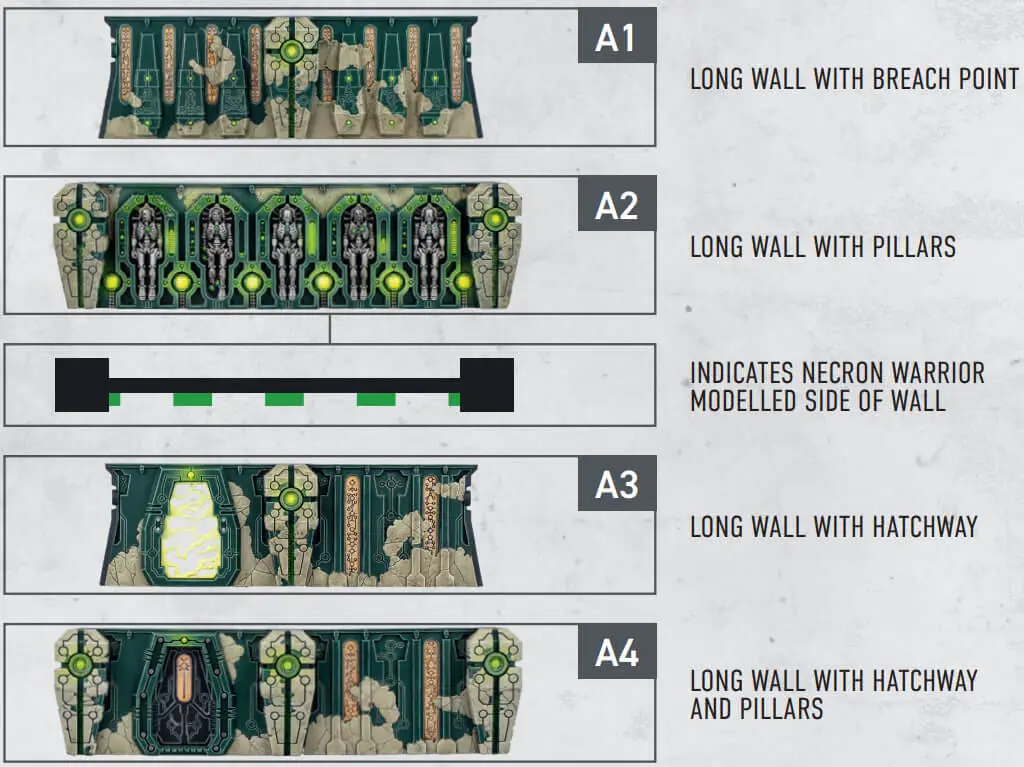
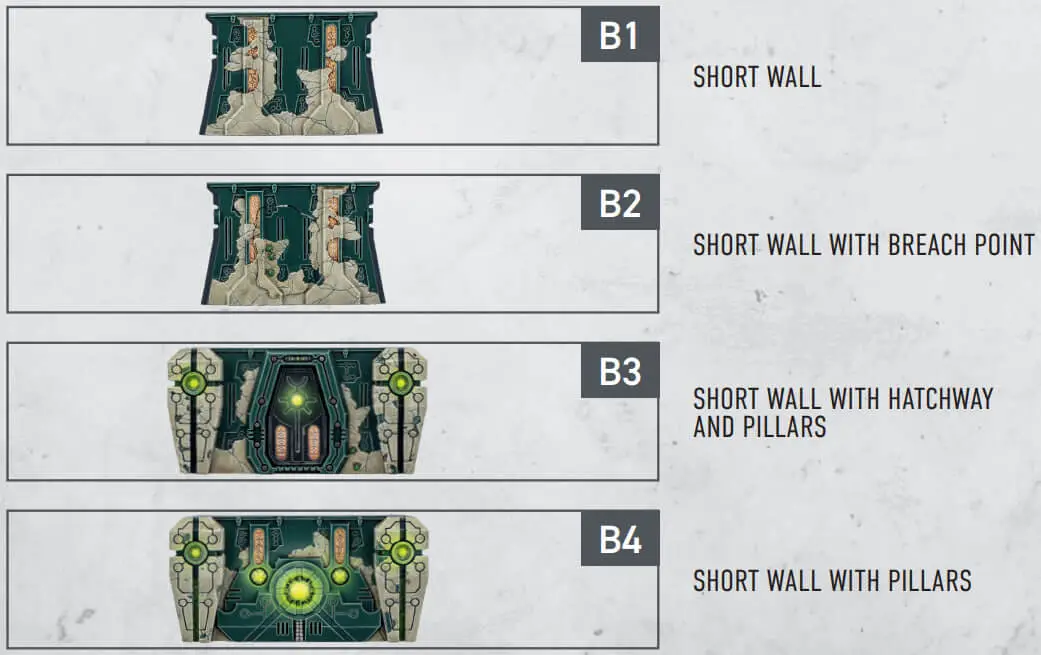
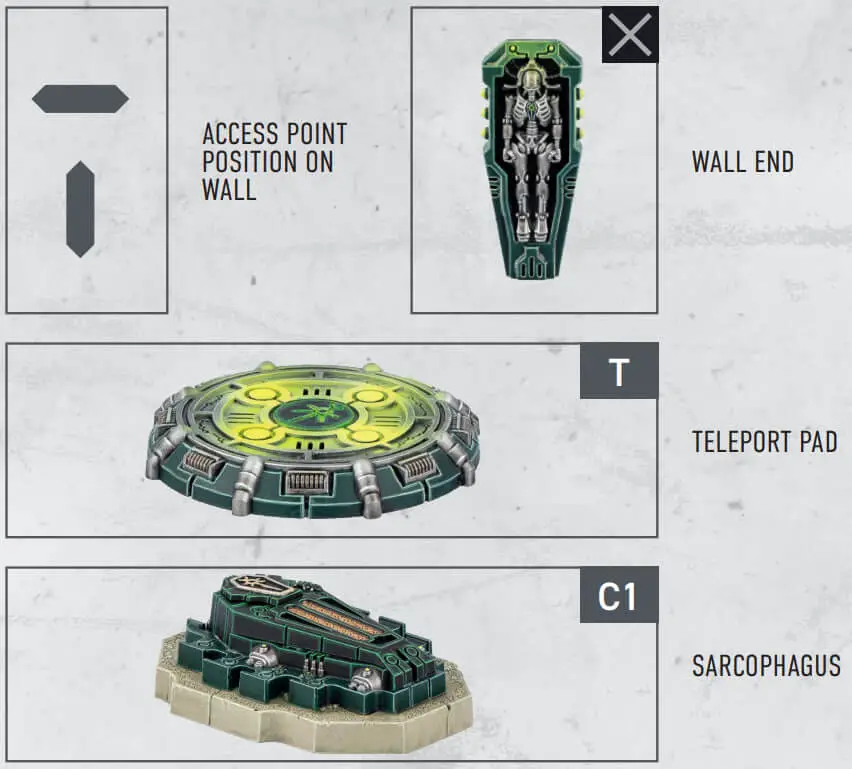
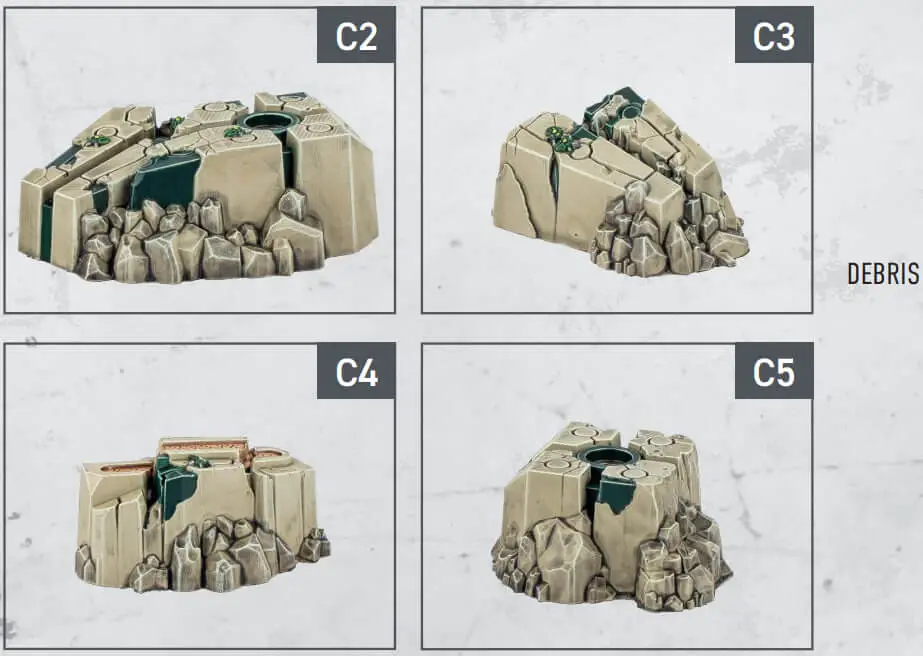
The maps in this publication use the terrain features found in Killzone: Volkus and Killzone: Tomb World. Killzone: Volkus has 2x strongholds, 2x large ruins, 2x small ruins, 2x heavy rubble and 3x light rubble (rules in the Kill Team Core Book). Killzone: Tomb World has a sarcophagus, 4x debris and 2x each other terrain feature shown here (rules on Kill Team: The App). It also has 16x half pillars to complete terrain configuration. Note some maps use less than this.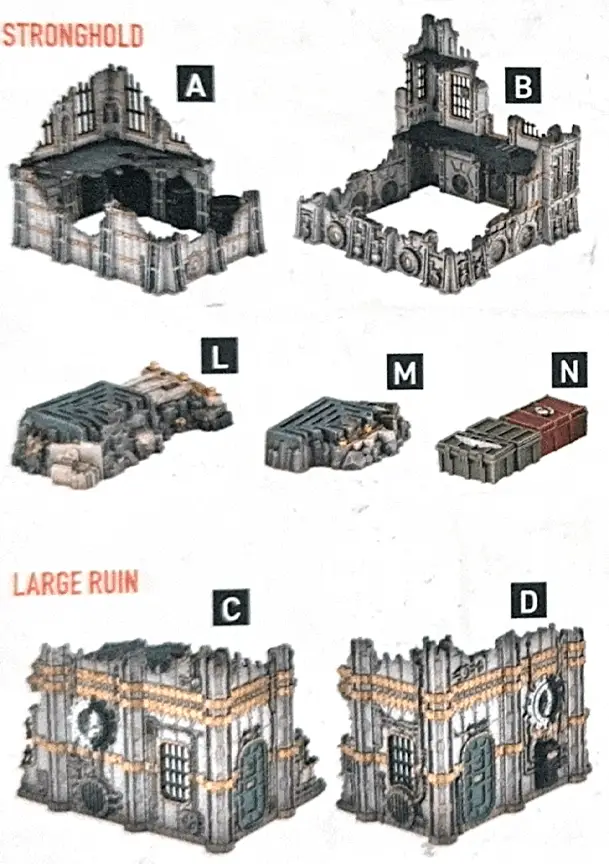
|


Fight1AP
Charge1AP
|

Shoot1AP
|

Reposition1AP
Dash1AP
Fall Back2AP
|
Control range between operatives is mutual, therefore operatives are within each other’s control range if one of them is visible to and within 1" of the other.
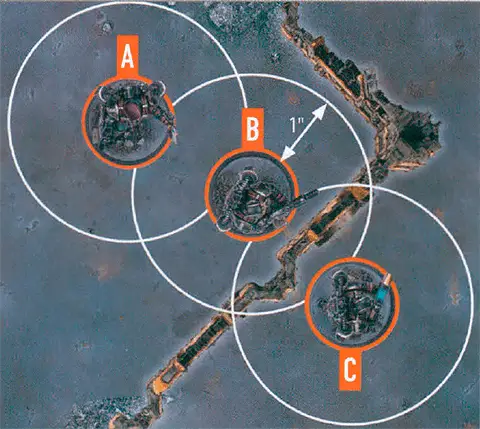
The terrain is within both operative B and C’s control range.
Because of the terrain, operative B is not visible to operative C, and vice versa, therefore they are not within each other’s control range.
OPERATE HATCH1AP
BREACH2AP
While an operative has fewer than its starting wounds remaining, it’s wounded. While it has fewer than half its starting wounds remaining, it’s also injured. Subtract 2" from the Move stat of injured operatives and worsen the Hit stat of their weapons by 1.
‘Incapacitated’ and ‘removed from the killzone’ are separate. Some rules take effect when an operative is incapacitated, but before it’s removed.
- When you’ve finished with your operative’s activation, that operative is expended. While expended, an operative is not ready.
SABOTAGE NEXUS1AP
COORDINATE EXTRACTION1AP
- This operative cannot be placed on Vantage terrain higher than 2" from the killzone floor.
- Whenever this operative would perform the Fight action, the distance requirements of its control range can be changed to 1" horizontally and 4" vertically until the end of that action.
- This operative can move through other operatives (excluding NEMESIS operatives).
- Ignore all changes to this operative’s APL and if it’s a player operative, APL changes don’t affect the 5AP you can spend per turning point.
- In the Firefight phase, whenever you determine this operative’s order, you cannot select Conceal.
- This operative cannot be in cover or obscured by Light terrain, terrain parts less than 3" tall or terrain that’s not wholly intervening.
- Whenever another operative is performing the Shoot action, being within control range of other operatives doesn’t prevent this operative from being selected as a valid target. In other words, this operative can be shot while within control range of friendly operatives.
- This operative can move through terrain parts less than 2" tall. It cannot move through Accessible terrain (excluding hatchways) unless that terrain is also less than 2" tall.
- Whenever this operative would finish a move in a terrain feature less than 2" tall, temporarily remove that terrain feature from the killzone, then return it when this operative leaves that location; if it’s an equipment terrain feature, remove it from the battle instead.